fxguide is here in Stuttgart for the annual FMX conference and on day 1 there has already been a wealth of great presentations, including in-depth looks at Cloud Atlas with Rise FX, The Blue Umbrella from Pixar, Blue Sky Studios on the cinematography of Epic, how ILM uses V-Ray, and panel discussions on the state of the VFX industry. Here’s a look at some of the sessions we saw. Our thanks to fxphd prof Matt Leonard for helping to compile this run-down.
Testing a new photographic approach – Pixar’s The Blue Umbrella
Pixar senior scientist Christophe Hery surprised many FMX attendees by revealing the very ‘live-action’ type approach taken for the studio’s new short The Blue Umbrella – so much so that the production relied on Katana, Nuke, Peregrine Labs’ bokeh, Sapphire plugins, deep compositing and FX in almost every shot. Of course, the entire short is 100% CG, rendered in RenderMan, but Hery noted several people who had seen the short wondered what had been filmed live action.

The Blue Umbrella has a unique look, with the director Saschka Unseld aiming for a more photographic feel, finding inspiration in the work of director Wong Kar Wai who used bold colors, shallow DOF and LOTS of bokeh, as well as inspiration from Saul Leiter, a photographer whose art is focused on a ‘found footage’ aesthetic where the subject of the photograph is seen behind foreground objects, and often through a pane of glass.
Hery took us through the film’s color plan, final color script and how RenderMan was adapted to be more physically based – something that had been an on-going project and one fully implemented for this year’s Monsters University (which Hery also wrote shaders for). Pixar embraced Katana for The Blue Umbrella, writing several macros and add-ons to deal with complex geo and specific needs such as neon lights (LOTS of neon lights). Hery said a total implementation of Katana on a full length feature was not yet an option for the studio, but it was incredibly impressive seeing this combination of live action-looking and familiar Pixar-looking images on the screen.
The director Saschka Unseld will be presenting the entire film and a making of in a session at FMX on Friday.
Le Big Shift in VFX
This presentation was one of two panel discussions which took place today looking at the broader picture of visual effects. For this session we had the pleasure of hearing from Rob Bredow, CTO of Sony Pictures Imageworks, Don Parker from Shotgun, David Morin of Autodesk and Ludwig Von Reiche from NVIDIA. The panel was chaired by Marc Petit who focused the discussion on how the industry has changed over the last few years and where we may be heading in the future.
Bredow kicked off the discussion talking about Imageworks’ open source program covering projects such as OpenColorIO, Alembic (shared jointly with ILM), and OSL (Open Shader Language). He mentioned that back in the early 90’s everyone was writing there own propriety software but as time has gone on software have become more standardised through packages like Photoshop, Maya and Nuke. In the open source market vfx companies have also started to share more information such as Pixar (OpenSubDiv) Disney (Ptex), Dreamworks Animation (OpenVDB), ILM (OpenEXR), and of course Imageworks. These shifts in the sharing of information help venders work closer together and more importantly help pipeline efficiency.

From there the discussion moved to games and the convergence of technology with the film industry both in open source applications and pipelines. Don Parker from Shotgun talked about how their tool can help artists and supervisors not only within a team or larger facility but also across multiple locations around the world. One interesting point made was that Shotgun splits the images and metadata enabling the less sensitive data to be stored in the cloud while the plates can reside with the facilities on physically stored local drives.
The discussion finished up talking about how 20% – 25% of a VFX company’s overall cost can be taken up with infrastructure and that downtime can seriously impact on a studios cash flow. This is because the on-going running overhead still need to be payed for even if not project is running through the facility, and therefore often get loaded onto the next show. Having cloud based rendering services (such as Zync) can really reduce the overheads as you only pay for what you use. This is very different from a more traditional setup where tens of thousands of CPU can sometimes sit idle if a studio isn’t utilizing them 24/7. Finally the panel finished up briefly discussing the benefits of virtual production technology for both pre production, production and post production. One idea that was mentioned was the possibility of creating a virtual environments from HDR still’s which could be stitched together and then projected onto stand-in geometry. From there the Director could ‘visit’ the location, using virtual production technology, test camera angles and mock up shots before visiting the environment or set for real.
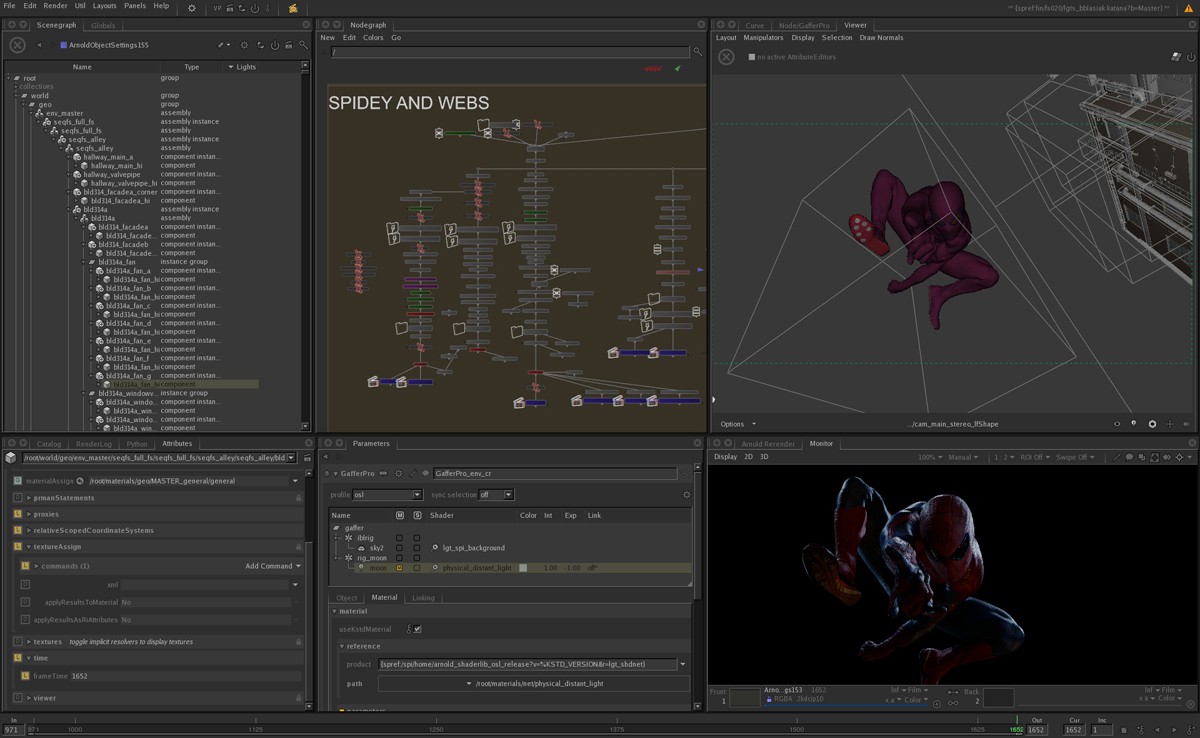
The Evolution of Katana
Steve LaVietes, architect of Sony Picture Imageworks’ lighting and look development tool Katana, started by looking at how models, animations, effects, crowds, hair, etc need an interface which is required to set everything up before the data is send to the final render software. When Imageworks first started looking at the problem there where no off-the-shelf tools available so a custom solution was required. When Ken Ralston joined Imageworks from ILM in 1996 the company was close to requiring a formal pipeline. At this point in the industry 3D and VFX tools still hadn’t been standardized, Maya was three years from release and Nuke wouldn’t be available to the public for another six years.
Imageworks started out developing its first formal lighting tool which they called ‘BIRPS’ (Sony Picture RIB, spelt backwards) which was a script based SPRIB processor. This output RIB file which feed direct;y into Pixar’s RenderMan which was their main render engine at the time. Although BIRPS had main good points, one issue was that scene data needed to be loaded in it’s entirety which could cause problems with very large data sets. At the same time Imageworks also had a proprietary in-house compositing tool called ‘Bonsai’ which the team who maintained it where working on upgrading. By 2002 a new tool was in development, ‘Katana’, however before the 2D revamp got far in development Imageworks decided to upgrade BIRPS and focused the development teams effort on that. Therefore Katana’s 2D compositing toolset was put on hold while the 3D lighting tools became the main focus.
The goals in those early days was to create a unified character, environment and effects lighting pipeline, to be able to deal with much larger data sets, to be able to support multiple renderers, to transition from the legacy data formats, to be able to facilitate custom pipeline development, but most of all to improve the user experience. LaVietes went on to talk about a discussion the key elements they wanted Katana to embrace. These included a node graph, the fact that any node can define or alter the scenegraph hierarchy/attributes, a way in which attributes could describe everything in the scenegraph and finally that the scene hierarchy is processed on demand. Six months later Katana was in production on Spiderman 3, Surfs Up and Beowulf.
Katana continued to evolve at Imageworks over the coming years being used on movies such as Watchman, Alice in Wonderland, Hotel Transylvania and more recently Oz The Great and Powerful. In 2009 Katana was acquired by The Foundry and can be used with both the Arnold and RenderMan renderers. Already companies such as Industrial Light and Magic, Digital Domain, MPC, Pixar and Tippett Studios have implemented Katana into their pipeline to some degree.
Note: If you want to learn more about Katana – rendering pipelines, check out the two Katana courses at fxphd.com this term
The ‘crack rig’ – Rise FX on Cloud Atlas
Florian Gellinger from Rise FX took to the stage to discuss their work on Cloud Atlas, showing a heap of impressive breakdowns. Spanning more than 300 years and covering six intertwined stores Rise focused mainly on a section of the film covering San Francisco in the 1970’s, where Halle Berry’s character is involved in a dramatic bridge crash. Gellinger talked about the extensive previs which was done one the visual effects sequences before shooting began. The bridge that the directors wanted to use was found in Scotland so an entire digital environment was going to be needed to make the bridge appear in San Francisco – it was also easier create the bridge digitally for nighttime scenes. Gellinger and his team started out Lidar scanning the Scottish bridge (with their sister Pointcloud9 company) along with extensive photography of the structure. From this data a CG bridge was modeled in Maya using the the scanned point cloud and projection techniques.
For wide shots of Berry driving towards and over the bridge a background plate was shot on a deserted runway and then composited into the digital environment and bridge scene. To help sell the illusion Rise modeled the car and Halle Berry and rendered a chrome pass as the model which was then used to add both contact lighting and specular information into the live action plate. Close up shots were filmed against a blue-screen at the film studio in Babelsberg, just outside Berlin, and composited into the digital environment using Nuke.
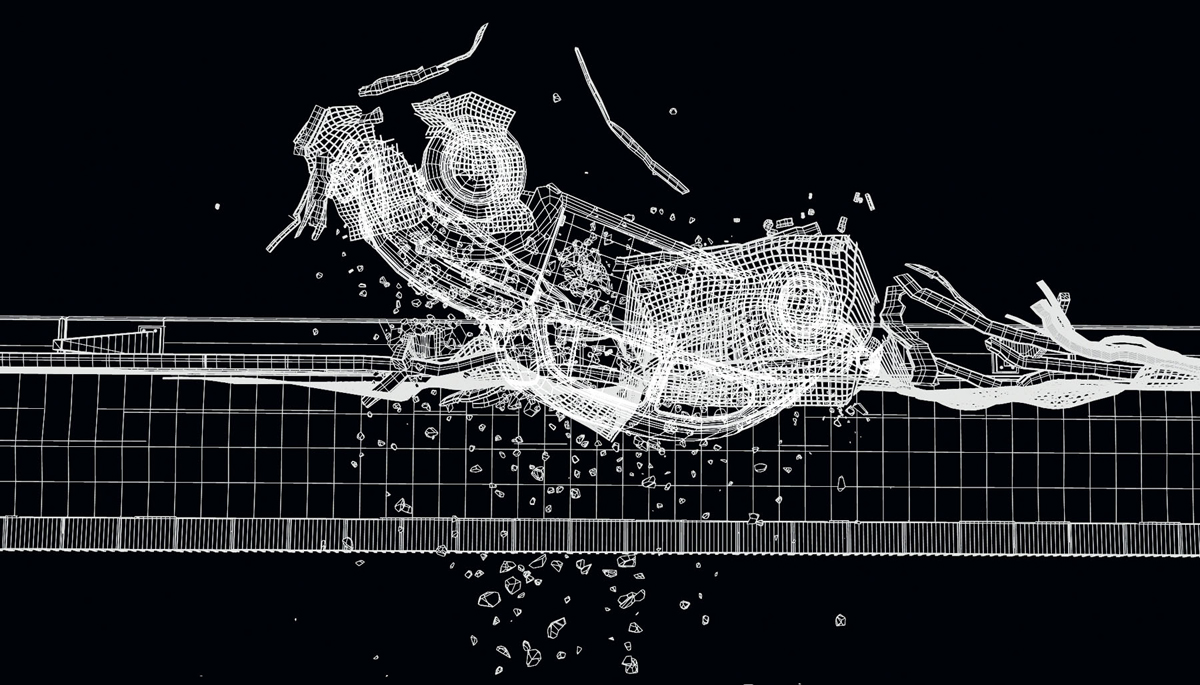
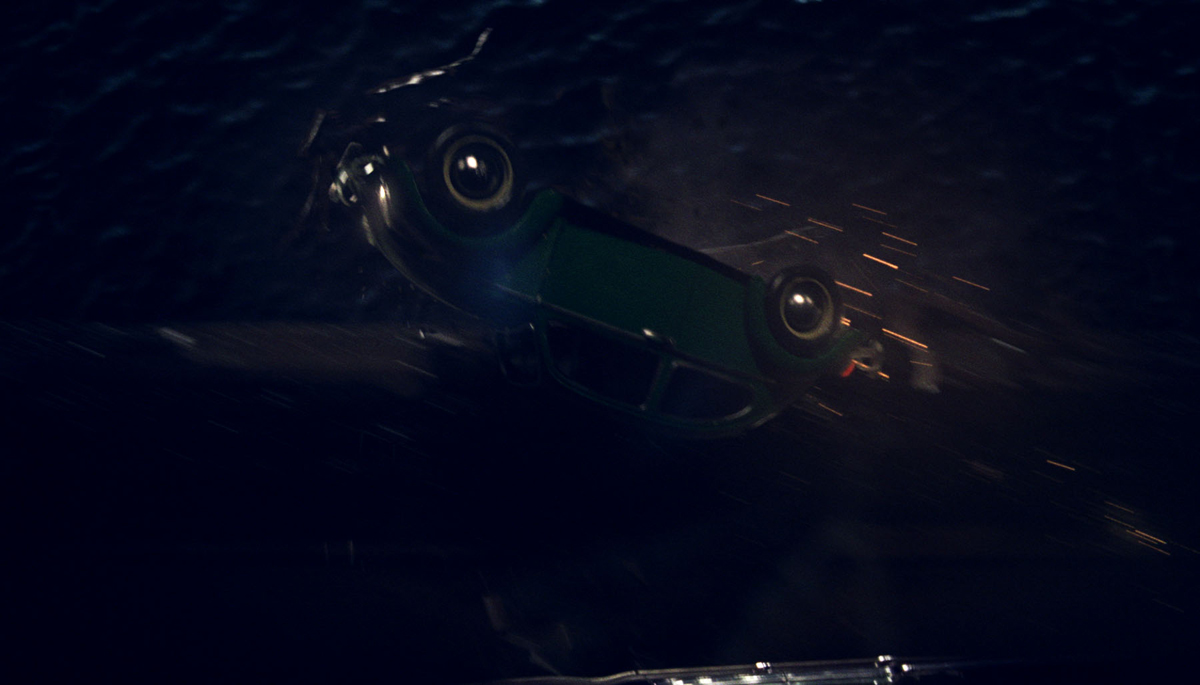
The spectacular crash sense in which Berry’s car is shunted off the bridge into the water and flips upside down was achieved with a special gimbal rig which enabled the practical car to be rotated upside down. However the desired look of weightlessness which as required was not achieved in camera and so Rise painted out the practical garbage and animated new debris both dynamically animated and key framed by hand to create the desired look. Gellinger also mentioned the directors wanted to use a different take of the car crashing into Halle Berry. To achieve this Rise used a model of the bad guys car and matchmoved that into the required take. The live action was then projected onto the CG car and that was composited into the final shot.
Another interesting aspect of the crash which Gellinger talked about was that Rise created a large Houdini fluid container which they pushed the digital car through. This created natural swirls and turbulence fields which could then be used to accurately drive the simulation of bubbles and other fluid effects. As the car sank deeper into the bay the window cracking under pressure creating dust and eventually bubbles. To achieve these effects Rise created what they called a ‘crack rig’ which was then rendered using ray tracing technology and also made to be totally direct-able by the VFX artist and filmmakers. Gellinger stated that although these shots where pretty complex the render time was only about an hour per frame which included both depth of field and true motion blur.
Towards the end of his talk Gellinger mentioned a couple of other shots. Firstly an airplane explosion which was rendered using a fluid effect which also was able to light the surrounding scene, including clouds, flying debris and the plane itself. And also a number of 3D matte painting shots of San Francisco streets.
A whole forest – how ILM is using V-Ray
There were a couple of ‘I can’t believe it’ moments in ILM pipeline lead Jeroen Schulte’s talk on how the powerhouse studio is using The Chaos Groups’ V-Ray for rendering. And we even saw some making of clips for Star Trek: Into Darkness and The Lone Ranger.
ILM first used V-Ray on Transformers: Dark of the Moon, where the opening Cybertron shot required a 900 frame 2K fly-through. This became a 900 million poly build, with randomness achieved with a 3ds Max plugin called Greeble. Render times were kept to 1 to 1 and a half hours per frame. On Avengers, V-Ray usage stepped up for the digital New York buildings, and ILM also used the renderer on the Neo-Seoul bike chase in Cloud Atlas.
For Into Darkness, V-Ray saw heavy use for rendering futuristic buildings to represent London or San Francisco, for example, that would then populate a final shot via the digi-matte team. A fully digital alien forest (the red forest seen in some of the trailers) was also thanks to V-Ray – and this time was made up of billions and billions of polys.
On The Lone Ranger, a major sequence called for Johnny Depp’s character to travel on top of a train through a mountainous and tree-lined valley. Depp was filmed against bluescreen but the entire environment was rendered digitally. Initially ILM used Max and V-Ray to deliver three different levels of forest for near and close shots, but they were so happy with the renders that in the end no proxies were used. Schulte noted shots like these would have previously relied on cards for background trees. Similar techniques were used for the killer shot of Depp walking between trains on a ladder that smashes into a tree – the breakdowns were brilliant.
We can expect to see more use of V-Ray by ILM and its raytracing functionality in the upcoming Pacific Rim.
Rendering color: practical tips for CG artists
Tarek Elaydi, a senior lighting TD with recent credits at Animal Logic on Walking with Dinosaurs and at MPC on Life of Pi, explored the concept of color for CG artists. He noted that now, with more effects and rendering being physically plausible, the tracking of correct color management from concept through to final shots was vital. One interesting note was that, while at MPC, artists were given turntables of Rhythm & Hues’ digital tiger as reference for particular shots – so, the reference was a completely digital image rather than a real one.

Another interesting practical implementation of observing the importance of color came from two different animals Elaydi worked on at MPC for Pi. One was a lizard that is seen running towards camera in the rain, and the other a hornbill. For both, Elaydi found an image of a real counterpart in outdoor lighting conditions and then used Adobe’s kuler tool to check the histogram and color features, and then replicate that in the CG lighting. By knowing the relationship between the colors and the exposure, the more those aspects could be reflected in the final shot. Interestingly, the hornbill is later seen fleeing the boat in the storm but the distinctive orange and yellow colors were preserved even in the stormy setting.
The cinematography in Blue Sky’s Epic
What’s great about FMX is that often there are talks on films not yet released. One of those is Blue Sky Studio’s Epic – about the existence of a whole world of creatures right in our backyards. To help show both the human and small-scale worlds of the film, two distinct cinematographic approaches were employed, as described to us by senior camera and staging technical lead Karyn Monschein.

Monschein noted that the camera work in Epic was designed to reflect what could be achieved if the film had been shot live action (with some departures – it IS an animated film). They also had the services of a live action DOP who brought in a bunch of equipment to Blue Sky. In the human world, the camera team would rely on ‘normal’ lenses, say 40mm to 150mm, to make it feel as if you were there observing the world objectively with these humans. The small character world took a different approach, with Blue Sky initially experimenting with macro photography and even fish eye lenses, but ultimately settling on a very shallow depth of field and lenses ranging from 18mm to 50mm.
For dramatic shots including a ride on a hummingbird, the camera work replicated a cameraperson having to ‘keep up’ with the action. There were also interesting transitional shots going from the human to creature worlds – where focal length, zooms and DOF would alter. Another stylistic difference was that small creatures observing the humans observed them in slow motion, while the small creatures moved super-fast when perceived from the human world.
An interview with Kim Libreri
The interview with Kimi Libreri was a fascinating insight into the inner working of Lucasfilm and especially the work at Industrial Light & Magic. Kim’s role is to be as creative as possible while keeping the standards up across the VFX coming into the studio. The interview started looking back at the big changes within the industry and how all the tools where very proprietary as no real standards had been implemented. Nowadays there is much more commercial software being used across the board and that the hardware infrastructure is no longer SGI (Silicon Graphics) hardware but off the shelf Dell or HP machines. Kim also talked about how the industry as a whole has learnt to design shots better and more efficiently through way of Pre-Viz. IBL (Image Based Lighting) and GI (Global Illumination) technology has not enabled artists to produce photo-real images much quicker and more accurately where in the past an artist would have to use multiple light sources to simulate bounce and fill lighting.

Kim then moved focus to talk about the new Star Wars franchise, a subject that no doubt many in audience where keen to hear about. He said that everything starts with Kathleen Kennedy who is working to put together a great team. Disney is working with a story team who are working closely together in a similar way to how Pixar formulate stories. They are also using the process to look at how ILM will more forward over the coming years in both how they work creativity and technically.
From there Kim went on to talk about how real time computer graphics are going to be a big force in the industry over the next few years. The technology will give near realtime feedback to actors playing CG characters and would enable them to see the virtual set they’ll be performing in. Alongside environments Kim talked about future possibilities in creating live lifelike proxies so the actors would be able to see themselves mush closer to the way they would appear in the final movie.
One way in which directors could be helped in advance, maybe even before pre-production, would be for visual effects companies to showcase new and potentially unrealised technologies which could be used to tell new stories or present new ideas that would tell an existing story in a new or better way. One example given was for a team to visit a possible future location and shot HDR stills of the area. Then build those into a virtual set which the director could then visit through virtual production technology. This way they could reccy a location and plan shots before arriving at the location for principle photography. This system could also allow for experimental Pre-Viz before the script has been finalised.
Kim finished up his talk discussing the cloud and how in his opinion it was going to change everything, free people to work more freely and remotely. Libreri felt that things needed to change in the industry pretty demonically. Over recent years we have seen a fragmenting of skills this artist working on very specific areas of the pipeline, be it rigging, animation, lighting, compositing, etc. He felt that these disciplines and artists doing the work would need to merge into a more combined skillset. Artist should be left to make the creative decisions and computer left to deal with the data. Closing up Kim encouraged people to think about how many creative decisions they could make in a minute and if your getting bogged down with technology you may be using the wrong toolset. Finally he showed some examples of using the Unreal Engine for creating realtime rendering of characters and stressed the importance of getting as many creative ideas out as fast as possible to help with the creative decisions of movie making.
Q: Kim finished up his talk discussing the cloud and how in his opinion it was going to change everything, free people to work more freely and remotely ”
I think we all know where we are heading to…..