In Sucker Punch Productions’ PS4 open world game inFAMOUS Second Son, players control character Delsin Rowe, a Conduit who is able to summon superhuman powers from his environment and other Conduits. In order to realize the necessary particle effects for the game’s signature smoke and neon powers, Sucker Punch relied on a powerful expression-based particle editor and advancements in lighting and real-time curl noise generation. We talk to senior visual effects artist Matt Vainio about the artistry, tools and techniques behind the work.
fxg: There’s a distinctive look to the powers in this game – how did you approach the art direction of them?
Vainio: From the very beginning, one of the pieces of art direction we had was to make the powers feel like another character in the game. They had to have a personality all of their own and feel like something the hero was manipulating. They were not just summoning powers and running wild. The director wanted to make sure the player was in full control of the powers they were manipulating.
fxg: How did that manifest itself into actual concepts?
Vainio: There were a lot of fluid effects and curl noise that we would constrain to a shape like a sphere or a cylinder. So we actually set limits on some of the noise to help constrain it to a shape – and that really helped feel like it was being controlled by the hero.
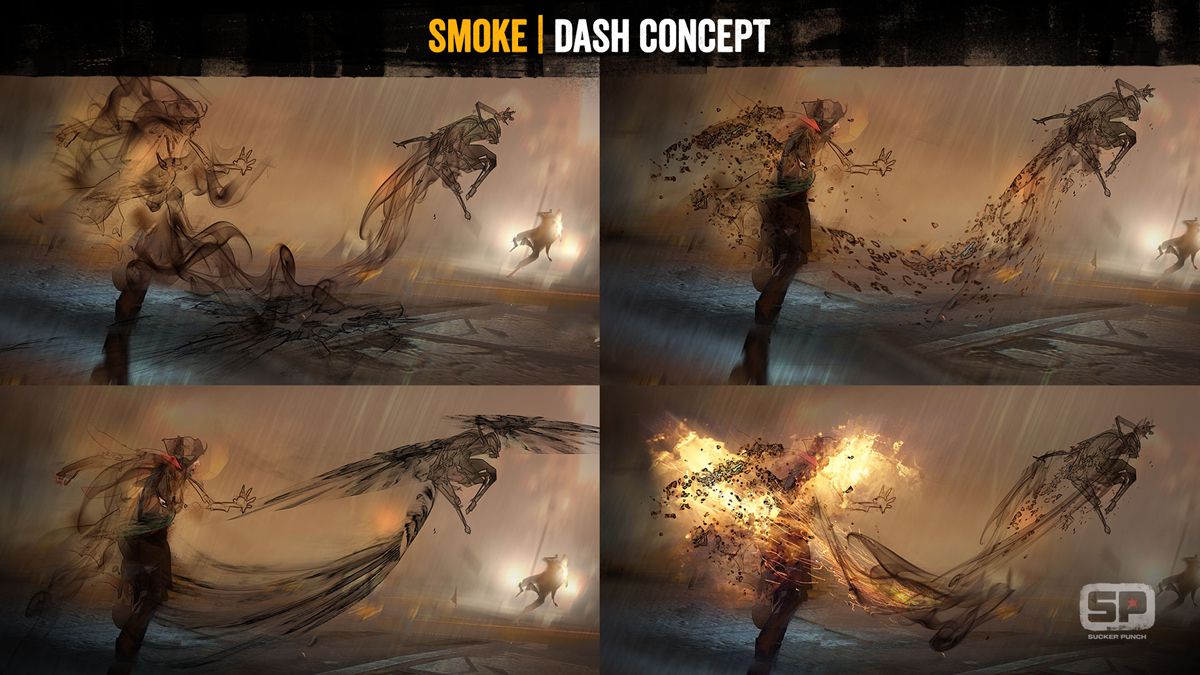
Even for smoke, we didn’t want it to waft away continually all the time. The hero would have links to his smoke via this wispy tendrils. We had to make sure they were part of him. When he dashes, it’s one smooth motion and the smoke isn’t left behind in the world. It’s part of him and carries with him and re-forms into him.
fxg: What was some of the research you looked into in terms of turbulence, fluids and particles?
Vainio: We looked at a lot of movie-grade tools when we were developing our own toolset. So we were using 3ds Max and Krakatoa. We used a bunch of Houdini and Maya Fluids too. A lot of it was trying to get a sense of how other tools worked in creating turbulence, and bringing that back into our own toolset.
Neon: dash example.You can get a lot of real reference for smoke, but you can’t get a lot of real reference in neon – in the form that we needed it. So we had to get some next best representations in terms of fluid and aerosol gas that would stand in for plasma gas. And we researched a lot of stuff written by Ken Perlin who created Perlin Noise. We used a variant of Perlin called Simplex to create a lot of our patterns in real-time. A fair bit of effort went into making it possible to run that in real-time on hardware.
fxg: How did you orchestrate the relationship between the hero and the powers he is conjuring?
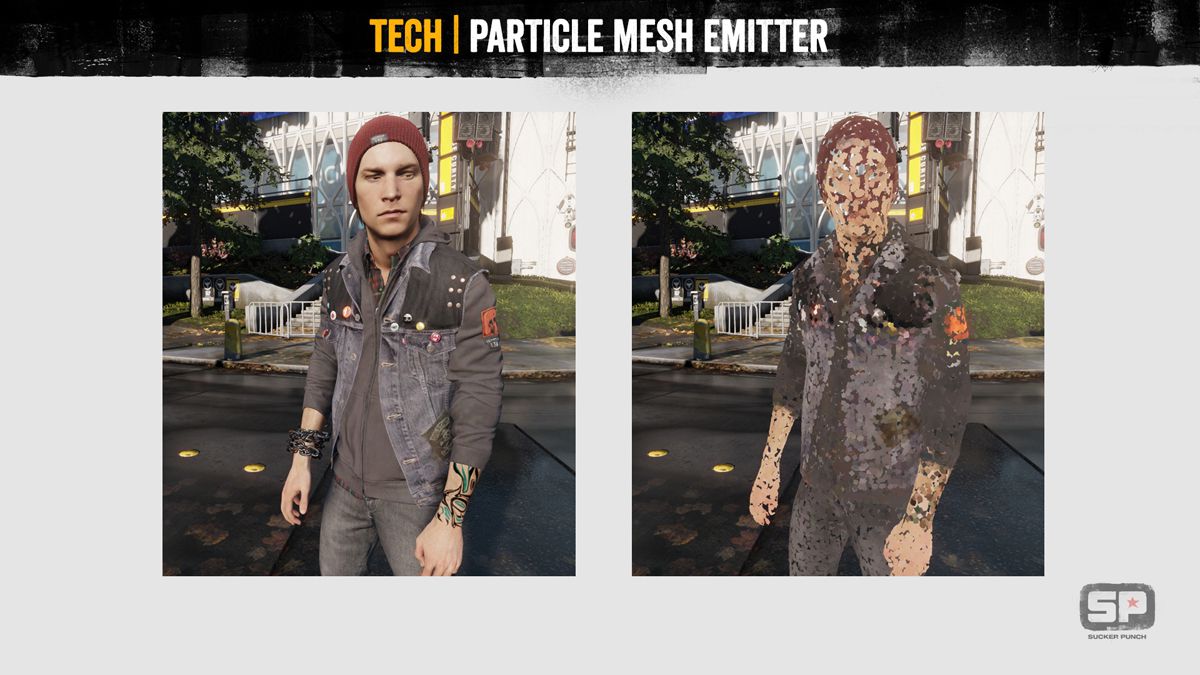
Vainio: Everything is procedural in our game, nothing was really animated. It’s done with expressions and math. The character animates with a bunch of blend animation, so we can’t really be assured of any given animation – it’s actually a weighted percentage of up to five or six anims. So what we really needed to do was access all the joints of the character so we could create a spline out of different joints and use that as reference to emit from or to.
Drawing neon powers.We actually created a low-res version of the hero’s mesh and we were able to use that as a positional locator for corresponding from and going to. It’s called a particle mesh – it’s basically emitting from the surface of the hero and that’s picking up all the different colors of the hero and the normal directions that the triangles respond from.
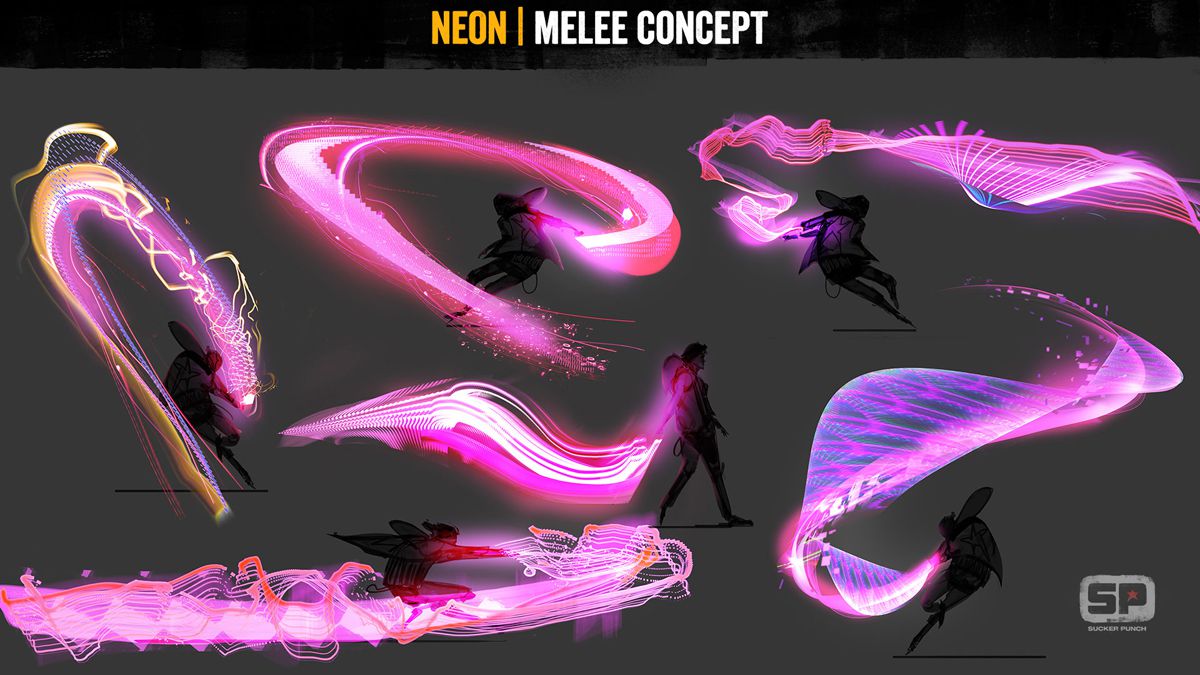
fxg: Aside from the particles, there’s also the ‘ribbon’ look – can you talk about those?
Vainio: Some of the powers had a lot more of wispy look, and that’s what we used ribbons for. It was a different way to triangulate the billboards to have a more continuous look. The UVs stream across that entire set of ribbon as it comes in. We were able to do a lot of interesting things with the faces of that ribbon coming through too. If you can envisage a chopstick in the air, you can rotate or twist that chopstick and actually create that plane.
Smoke: dash ribbons example.fxg: How did you specifically approach the smoke effects?
Vainio: For the powers, all them tended to contain a billowing volumetric kind of smoke, some ribbons and ash and embers. We tended to use those in different portions depending on what the effect is supposed to communicate. Early on we had a lot of design challenges with the smoke feeling like it had weight, impact and force. Smoke, by itself, you don’t really have a lot of sense of those things. So we would add a lot of ash and embers at the head of this stuff.
Smoke: dash example.I came up with the analogy that if someone blows cigarette smoke in your face, it’s kind of annoying, but if somebody puts out a cigarette on your face, that’s going to hurt really bad. So that drove the idea with smoke, that the smoke needed to be the contrail to the embers. So the embers were the lead in the powers, and the smoke was behind.
fxg: What was the particle system engine that you used?
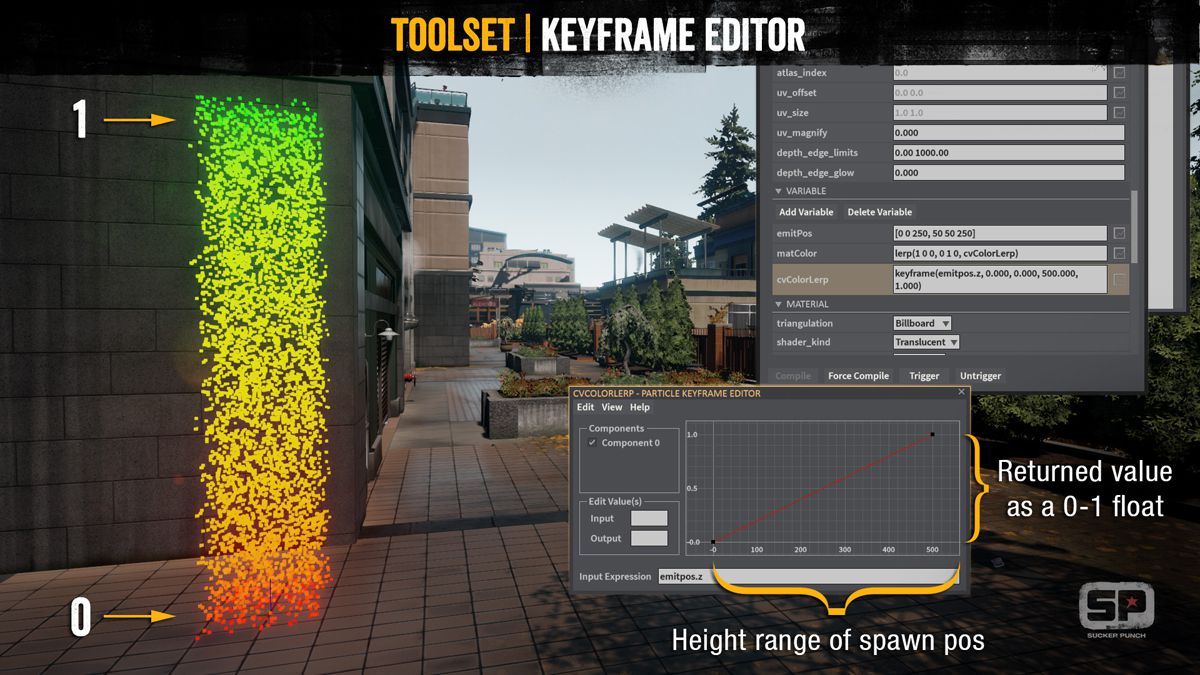
Vainio: It’s a real-time editor in the engine. It’s an expression based system and we compile these expressions into shader language. This shaders are then run on the PS4’s GPU. And this allows us to have a ton of particles. These are known as compute shaders on the GPU.
Particle System Editor in action.Part of the reason we went with an expression system was because at the outset of the project we had a few ‘knowns’. One of those knowns was that we were going to have a lot of different powers and we weren’t really sure what the designers were going to ask us to do. So we tried to build a powerful and flexible system with the goal of knowing we’d have to create a lot of crazy stuff.
Early on we tried to come up with particle editors that were artist friendly, but we found that we were a little bit too constrained by the user interface for this. One of the downsides of one of the node-based editors – what you’re restricted to is what the UI can let you do. You’re restricted in what the engineer has exposed to you. But with an expression based system, everything’s exposed and if you want really complex motion but the math is too complex, we can hand it off to one of our high level graphics engineers who can create part of the sim for us and hand it back. So it proved to be a really powerful tool.
fxg: How did the neon-looking powers differ from say the smoke powers?
Vainio: When we using things like the curl noise, for smoke we would use multiple octaves of curl noise that gave you large and small waveforms that gave you really crunchy noise. But with neon we tended to use more single waveforms so they were very smooth. Also, with the containment I mentioned earlier where we were constraining that shape.
Neon: dash example.fxg: Can you talk about how the neon powers interacted with the world of the game?
Vainio: One of the art direction goals was that everything had a lingering lighting feel. So most of our stuff used a lot more emissive qualities. We’re casting a ton more light with the neon power, so light became a lot more important and central than it did with smoke. So we had to create a bunch of more tools to be able to emit light. We had to emit lights from pretty much any of the particles that were spawned. Not every particle does cast light because it doesn’t really give us the right look. We tended to use a lower amount of bigger lights that gave us an aggregated look. If we used thousands and thousands of tiny lights, not only is it performance expensive but it doesn’t really give you the same look.
Neon: draining example.Technically, what we would do, there’s actually an emissive texture that’s mapped to a mesh that’s on that sign. Our game looks at the emissive texture and looks for texture color values that are above a certain threshold. If they are, it will actually spawn a particle there. So that way it can source the color and the facing of that sign.
When the particles are spawned, we kill all the emission values on the neon signs. We also turn off any reflections and any lights the sign is casting, so there’s an immediate change-over. The particles also spawn their own lights in, and they swirl down to his hands.

fxg: They also cast shadows – how was that achieved?
Vainio: Yes, one of our big goals was to make things feel like they sat in the scene correctly. We didn’t really want things to feel like they were ‘composited’ on. That was a big focus for us, so it was important that all the particles cast shadows – they receive shadows and cast light and they blend through all the techniques. A lot of games out there don’t necessarily blend their particles with the haze and so the black smoke will look like black really far away – we wanted to make sure we didn’t have any of those kinds of things in there.
Particle system editor showing casting of lights.We also used a physically based rendering approach – it’s an energy conserving model so that the reflection off of a shiny surface doesn’t send back more energy than actually went into it. Along with that comes exposure from the camera. So we had to make sure the particles were reflecting the right exposure for all the different times of day.
Pingback: Art directing effects for inFAMOUS: Second Son | Occupy VFX!
Pingback: Art directing effects for inFAMOUS: Second Son | fxguide | ゲーム情報まとめサイト
Pingback: Link: Art Directing the Effects of InFAMOUS: Second Son | Dread Lines