In this week’s podcast, we speak with AE power user Stu Maschwitz of The Orphanage about the recent release of After Effects 7. With the new 32-bit workflow in the software, its potential for use in high end compositing has been expanded greatly. Our online story has highlighted information from the interview and we’ve added new tips in our After Effects tips section about using a 32-bit linear workflow.
The Professional edition of After Effects now supports 32-bit processing in compositions, in addition to 16-bit color support. You can import and export 32-bit OpenEXR, TIFF, and Photoshop files to work with in compositions, as well as import camera RAW files. This greatly opens up the potential of using After Effects for compositing operations for feature films and other high end output. Certainly the product has been used for such work in the past, but with built-in support for higher bit depth imagery it really opens up the potential for the product.

Even if you’re not working on feature films, the addition of 32-bit support is truly welcomed. Color correction — especially when dealing with highlights — is much more flexible and filmic in nature. Highlights bloom out beautifully when color correcting in 32-bit and then outputting in 8-bit for broadcast. Motion graphic design also tends to benefit a great deal from 32-bit support. This is evident when dealing with combining bright graphics and glows in a much more photographic nature…or introducing more contrast range (traditionally losing black and white detail) and then bringing back to normal. The ability to pass imagery through several color correction processes and still be able to regain image information makes things quite flexible.
Our podcast guest this week, Stu Maschwitz, has a great blog which covers using After Effects for film work. Be sure to take a listen to the podcast this week, since there is a ton of information which isn’t included in the online story. The podcast is about 45 minutes long, so we covered a lot of ground from basics to more advanced applications.
The first step for working effectively in After Effects is learning how to use the initial implementation of color management in the release. Consider color managment a “version 1” of the feature, as there are quite a few caveats and limitations. While it is a welcomed addition to the software, it is certainly not a full-up implementation at this point. Our goal is to get you up to speed on the new feature and how to get the most out of it.
Setting up Your Workflow
AE7 now allows you to choose a project color working space so that imagery is display corrected for your monitor. What are the steps in doing this?
1. Calibrate your monitor and save the display profile. Calibration techniques can range from using the built-in calibration tools to 3rd party software and hardware probes.
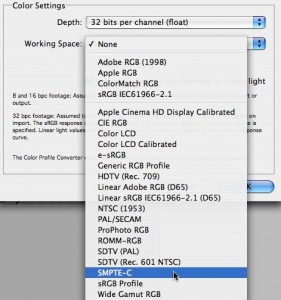
2. Set your project to work in 32-bit float color space and select a project working space which is applicable for your end use. These settings can be found in the project settings dialog box. For NTSC-based projects, consider selecting SMPTE-C.
For film resolution or high-bit depth projects, consider working in a linear color space. There aren’t any linear color space presets which ship with After Effects, but Stu Maschwitz has provided files for url(http://home.earthlink.net/~stumaschwitz/blpx/linearProfiles.zip,download from his prolost blog). Unzip them and install them in /Library/ColorSync/Profiles under OSX and C:Program FilesCommon FilesAdobeColorProfiles under Windows. When you restart the After Effects app, two new linear color space profiles will be available for your use.
3. If you’re also using Adobe Photoshop and Illustrator, you can set the document RGB working space to be the same as you chose in step #2. This ensures that colors in these applications display the same in After Effects.
4. You can use Adobe Bridge to synchronize your settings across the CS2 apps. First, save your color settings setup in Adobe Photoshop. Next, open up Adobe Bridge and select Edit….Creative Suite Color Settings. Select the color settings file you just saved and click Apply. Now when you open a document in any of the CS2 apps, they will be displayed the same on the screen. The color settings dialog boxes in individual apps will notify you if they are syncrhonized or if they have been changed.
5. When you import footage into your project, it is important to convert the footage into the correct color profile for display. Unlike Photoshop or Illustrator, AE7 does not automagically recognize embedded profiles and the user must add a “Color Profile Converter” effect to the footage layer. This color difference might not be noticable when you import footage and are working in SMPTE-C color space, but is very visible if you choose a linear working space.
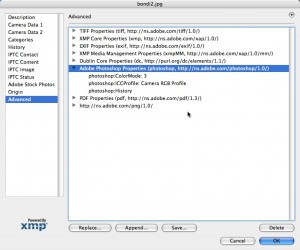
Select your footage layer and choose Effect:Utility:Color Profile Converter from the Effect menu. One drawback to this new implementation is that even in this mode, AE doesn’t recognize an embedded color profile so you must know how the file was saved. In general it is a good idea to standardize your workflow so this might not be a large problem. However, when you receive footage from others it isn’t easy to know which profile was used. The most reliable way to determine the profile is to “Edit Original” in Photoshop and then get File Info… on it. Under Advanced, open the “Adobe Photoshop Properties” item and you’ll see the profile listed.
Using Cineon Imagery in AE7
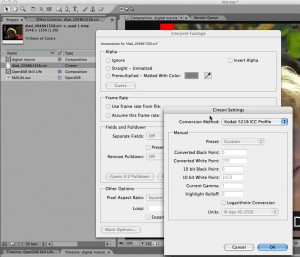
Being an intial release of new color management features, support for film stock and color managment is quite limited in this release of After Effects. The good news is that when importing footage into After Effects, you are able to assign a color profile to a cineon sequence or enter a custom conversion from 10-bit log to 32-bit float.
Only one preset ICC profile is included with After Effects — Kodak 5218. You can access this profile via the Interpret Footage…Main functionality. Click on the More button and you’ll get a popup where you can enter custom values or select the Cineon Kodak 5218 profile. We’ve used the Kodak digital LAD Digital Marcie test image for demonstrating this feature.
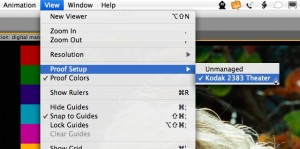
You are also able to use a proofing setup for Kodak 2383 print stock, similar to proofing colors in Adobe Photoshop. The only proof setup provided by Adobe for After Effects is the 2383 stock. ICC profiles are used for this feature, so custom profiles can be created by facilities with staff to do so, but for smaller shops it would be nice if there were more profiles available.
Using 8 bit and 16-bit Effects in a 32-bit Project
Not all effects in the processing pipeline in After Effects are 32-bit native, so you need to watch what effects you use and how you use them. When you place an 8 or 16-bit effect into a 32-bit composition, a yellow triangle warning sign appears in the effects palette, letting you know that some kind of conversion is taking place. To work with an 8-bit filter the software needs to convert the bit depth of the imagery from 32-bit to 8-bit. This can happen either automatically or by using the HDR Compander.
When converting automatically, you would simply drag the 16-bit effect into your composition and the values below 0 and above 1.0 are simply clipped. By using the HDR Compander, you have adjustments for the level of compressing the full range down into 16-bit or 8-bit, which you can then expand back after the fact.
as well as the warning sign for lower-than-32bit effects”]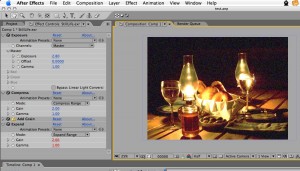
Adobe has included an effects preset for the HDR Compander which links two of these effects via expressions — the first instance compresses the range and the second expands it back.
Obviously, with an 8-bit effect this can have a devastating impact upon your imagery. With a 16-bit effect — and depending upon the color range of your 32-bit imagery — this impact of compressing the range and then re-expanding could be fairly minor. Whenever possible, its a good idea to design your composition to use these effects at the end of the processing tree — preferably the last step before outputting to lower bit depth — so that you limit this as much as possible.
How do you know which effects are 8, 16, or 32-bit in their precision? In the effects palette, you can click the panel menu (the triangle in the upper right) and choose to view only 16-bit or 32-bit filters. Since Adobe didn’t have time in the development process to convert all filters over to 32-bit, they attempted to add ones which made the most sense for high bit-depth imagery. There was a lot of feedback from the beta sites about what was good to include and not include. Over time they plan to move more and more effects to higher bit depths.
 After Effects 32-bit Workflow Tips
We’ve added several tips to the fxguide website about how to get the most from After Effects 32-bit workflow. The tips were authored by Maschwitz on his Prolost blog and he was kind enough to allow us to mirror them here as well. We think you’ll find them interesting.
The Linear Workflow Tips
Linear Color Workflow in AE 7: Part 1 – Setting up Your Project
Linear Color Workflow in AE 7: Part 2 – Working in Linear Float
Linear Color Workflow in AE 7: Part 3 – Setting up an eLin-like Workflow
Linear Color Workflow in AE 7: Part 4 – Rendering
Linear Color Workflow in AE 7: Part 5 – Working with Cineon Imagery
Image from Mini spot are © Brouillard Communications. Courtesy The Orphanage.

