In our continuing ‘Art of …’ series we turn to one of the central issues for compositors – keying. This weeks fxpodcast, which accompanies the article, covers the Primatte keying plugin with Scott Gross of IMAGICA Corporation of America.
BC – (Before Computers)
Keying and matting have a long history. Visual Effects most core technique is compositing – since the dawn of film making itself, we have wanted and needed to extract parts of one scene and place them convincingly in another. In it’s earliest form, it involved photographic processes such as simple multiple exposures onto the same piece of film. Very manual techniques such as hand painting opaque liquid around objects directly onto film (the precursor to digital rotoscoping) were employed but were insanely laborious and nigh-impossible to execute with any realism.
More ingenious photographic and optical minds got to work on how to do this kind of automatically using photochemical processes. The pioneers worked out that film chemistry provided them with some emulsion layers that could be chemically isolated by colour, so if they shot a subject against a specific coloured background they could generate their matte shapes almost automatically. The most successful colour turned out to be blue so that became the most popular background for shots to be matted.
Surprisingly the basic principles of combining images onto photographic film, “optical compositing”, are very similar to digital compositing. Let’s say we want to put object “A” into background “B”.
Optical compositing is a four step process.
1. A cutout shape is made for the “A” object that is to be extracted … basically a black matte with a window in it. This isolates our “A” object.
Negative film is blank until it receives light – but once it does receive it, it builds up until it is fully exposed so you can’t just double expose our “A” object into the “B” background. We need to make an unexposed black hole to burn it into.
2. A direct inverse of the “A” matte is made .. a “holdout matte” which is a window with a black shape in it.
3. This holdout matte is physically sandwiched with the “B” film element and rephotographed onto a new negative giving us a black unexposed hole the exact shape of the “A” object.
4. New film is then rewound, our “A” element is physically sandwiched with it’s “A” matte shape and double-exposed into the hole left from step 3. Voila, the elements are combined.
Even though we don’t need to see this happening in digital compositing, the same principles really are being applied behind the scenes. Just like a negative, a digital file with no information is “black” like unexposed film. Once a pixel has values it has been exposed and they build until it is white. In other words, you still have to make a hole in your “B” background to add the “A” foreground to. Rather than being done photochemically it’s now done mathematically of course.
This of course deals only with the most basic requirements of compositing – nuts and bolts. The real juice is in achieving a realistic composite. If we want our audience to believe that our composite really was all exposed on the same piece of film at the same time we have to to deal with a whole range of other issues such as edge quality, colour fringing, motion artifacts, colour and contrast balancing and grain matching.
For instance if you shoot a red-brown haired subject against a blue background the softer fringe of their hair will pass through magenta colour on the way to the blue. Composite this over a green leafy background and the hair fringe will look wrong.
Likewise, the soft blurred edge of a moving object should reveal back to blend with the detail in the new background plate, not just a blue blurry smudge of the bluescreen background.
Early digital keyers had no tools to deal with these issues and required operators to devise complex workaround techniques to achieve good results.
Digital keying
We have chosen to tell the story of modern digital keyers, but in many respects all keyers today owe an enormous debt to the chemical and optical keyer pioneers from the years before digital keying.
One company that made the move from analogue to digital keying is Ultimatte. Petro Vlahos, a Hollywood special effects pioneer who developed the color-difference blue screen process for the Motion Picture Research Council, founded Ultimatte Corporation, of Chatsworth, California, in 1976. Ultimatte was the original hardware realtime keyer but they also later developed into company offering software plugin keying. Ultimatte was revolutionary. Fast – accurate and the backbone of news and on air keying for many many years.
The original idea of the Ultimatte algorithm was originally derived from the optical processing of film using the blue-screen process. It was very simple because the inventor’s concept was based on simple operations (for equations: see below), which can be achieved using the chemical and optical characteristics of film processing. Although the latest equations seem to be much more complex, they have really just modified the basic equation by adding some offsets, increasing the conditional branches and by multiplying some coefficients.
i) if (R < G) E = B - G ii) if (R > G) E = R – B
Ultimatte was the first company to apply the algorithm to a real-time analog video device. The constraints of the analog architecture and real-time processing in the 70’s limited any improvements of the composite algorithm itself. By using the older, simple algorithm, they had to overcome real-world compositing problems using some tiny tricks. Whenever they invented their tricks, they got patents on them. These tricks are so intricate that a competitor can spend hundreds of hours figuring out how they work, only to find that they are nothing but a trick to make the original algorithm work better in particular case or type of shot.
The numerical manipulation capabilities of today’s silicon now allows the industry to come up with much more sophisticated image processing capabilities than the early realtime analog solutions.
1992 – 1994
Primatte was originally developed by IMAGICA Corp. (Tokyo) in 1992. The basic algorithm utilized in Primatte was originally presented at the 8th NICOGRAPH Conference and the 23rd Imaging Technology Conference and a U.S. patent was granted in 1994. It uses a scheme not unlike the 3D keyer of the Modular Keyer – which uses not only colour but luminance information. The color component has three primary attributes: Hue, Saturation, and Luminance. The mixture of Hue and Saturation is called Chromaticity – Chromaticity sees no difference between light red and dark red since there is no luminance component. A pure chroma keyer is keying on this basis and hence is not very powerful.
As the world of colour is a three dimensional world (r g and b axis of a colour cube), Primatte aimed to build a key cloud effectively that would therefore be better at keying colours that aren’t just perfect green or blue screens. The key shape is actually a 128 faceted polyhedron. To avoid sharp keys, a lot of math is needed to calculate softness. In a real world keying situation, a hair has its own blue component and that of the blue screen behind it, but both are combined in a pixel on the edge of a key. Primatte aims to isolate the target colour and that of the background to produce a soft “cloud” shape in the 3D cube colour space that spans the two colours. This gradated three dimensional soft cloud defines the key at that edge, in that part of the 3D colour space. What this means is that Primatte is better for non perfect blue and green screens and screens with wilder variation in the “key” colour or what you or I might call a “badly lit blue screen”.
1995
In 1995, Ultimatte’s first software product was awarded an Oscar. When Ultimatte first made a plugin version of its world famous keyer it was immediately adopted but for a while the initial GUI made it difficult to learn and limited its wide scale adoption. Ultimatte expanded the logic of keying with the addition of its Advantedge product . This interesting addition provided a chance for the compositor to add a clean plate of the background blue/green screen as an additional input. Ultimatte would then effectively difference matted out the imperfections in the green screen.
Discreet’s Flame original keyers were written by Andre LeBlanc, who was one of the original gang of four who wrote Flame – and who shared in the 1998 Sci-tech Oscar (awarded to Gary Tregaskis for the primary design; and to Dominique Boisvert, Phillippe Panzini along with LeBlanc). These keyers were 2D implementations based on such things as luminance keying or simple chroma keying. Arriving in 1995 just as Andre LeBlanc was leaving discreet to open a nightclub in Montreal was Daniel Pettigrew. While initially assigned to just improve the shrink, blur and erode functions in these base keyers, – Pettigrew would soon have a dramatic and profound impact on Discreet’s keying technology.
1996
Pettigrew’s first real contribution was the RGBCMYL keyer in 1996. This keyer was still only a “2D” keyer space algorithm but it opened the door to approaching the data manipulation from a new perspective. “There are not many papers on keying” he comments reflecting back, so much of his work was done from first principles and from directly talking to artists using the tools. The RGBCMYK keyer was added in inferno 2.0/flame 5.0.
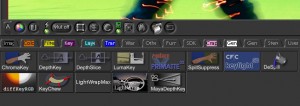 Primatte also first appeared in 1996 and sold only one copy as a stand alone application – at which point the decision was reached to sell Primatte as a plugin to other people’s applications. Scott Gross of Photron USA recalls when he first showed Primatte – Joe Latterii of ILM and Ron Brinkman – then Chief Scientist at SonyImageworks ” just got it immediately – no one else ever understand it so fast – they just got it ” – so perhaps it was no surprise that Ron Brinkman when forming Nothing Real and developing Shake decided to license Primatte from Photron. Apple separately develops Primatte for Shake and so complete is Apple’s embrace of Primatte that the real time Primatte RT code is microcoded into silicon for use in programs such as Motion.
Apple is not alone – Quantel has also embedded the Primatte code in silicon. Primatte is being separately developed under license at many companies. Micah Sharp at Red Giant develops Primatte for use in After Effects and Combustion, and Avid Express. Digital Anarchy develops it in yet another separate development track for Photoshop. Imagineering develops yet another for use in Mokey and Monet. Eyeon develops a version for DF, but interestingly this version is in the OFX format – the new common API standard for plugins – making the Eyeon port valid for a range of systems such as Nuke that support the OFX format. All these ports use V3.0 Primatte. There are also ports being developed by Sony for XPRI and Quantel for iQ, ] but at this stage both of these are the earlier V2.0 of Primatte. This approach of licensing out Primatte development reflects the modest size of Photon. The company owned by IMAGICA, is just 3 people but they still develop directly their most profitable and successful port – the Autodesk/ Discreet Spark version of Primatte. Primatte on Autodesk equipment – unlike Keylight, runs on both Burn and Linux.
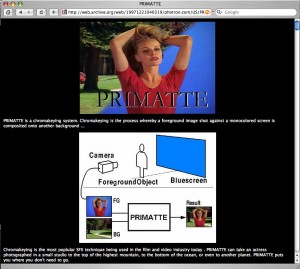
Photron was a much loved company and one widely supported by the broader community. There was no nasty rivalry amongst the keyer developers. “A client once called up to complain that the MAC address of their system was not working with Primatte”, explained Gross. He investigated and discovered that the same MAC address did work with Tinder Tools licensing. At a loss as to why his competitors licensing would work and not his – he ran the Foundry to ask for advice. The Foundry to their credit agreed that there was no logical reason for this and so emailed Photon the source code to their Licensing scheme – so Photon could use this instead.
In 1996, Primatte was producing excellent results using its 128 polyhedron, but still running quite slowly,and some artists felt that they could not control or predict the response they would get when adjusting Primatte.
Primatte and Ultimatte are classified in a same concept of the color processing algorithm group according to Jim Blinn and Alvy R. Smith in their dissertation titled “Blue Screen Matting” Siggraph 1996 conference proceedings. The group was named “Separating Surface Model”.
Although Ultimatte was designed on a series of experiments of analog circuit trial and error, the internal processing seems to be polyhedron processing in a color cube. In this sense, Ultimatte uses about a four or five facets polyhedron, which is nested to define the transition region. On the other hand, Primatte uses 128 faces of nested polyhedron. “That is the most significant difference” says Gross.
“The counterpart is the complexity of the shape control. Because of the flexibility, Primatte polygon sometimes forms non-smooth, bumpy shapes, which introduces too much sensitive matte extraction and causes hard-edge matte.” says Primatte inventor Yaz Mishima of IMAGICA.
1997
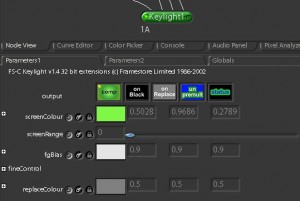
Keylight was developed by CFC but it was extended and marketed globally by the Foundry in London. Keylight was originally written by Wolfgang Lempp, who is now the Chief Technology Officer (CTO) at Filmlight. Keylight was written initially as a Cineon plugin, and has been coded by Bruno Nicoletti at the Foundry since 1997.
Within a year of Apple buying Nothing Real, Keylight became standard in Shake. However, the development is independent of the work done at the Foundry – they are completely two separate development efforts now. The Floating point version developed by the Foundry can be used as a plugin to Shake 3.
Around this time Quantel released the Additive keyer for the Henry. This was a major advance for the Henry community.
1998
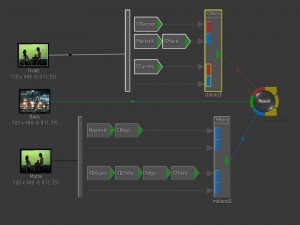
In December 98, two years after Pettigrew set out to write a completely new keyer for discreet, the Modular Keyer (MK) was added in inferno 3. According to Pettigrew, the MK was based on three aims: it needed to be fast to compute – “as machines back then were still pretty slow”, it had to have direct response of the solution, and be extremely precise.
The first of Pettigrew’s new generation of keyers was a 3D keyer which was packaged inside the MK. The keyer showed graphically for the first time the actual 3D histogram and allowed for direct manipulation of the 3 dimensional point cloud solution. The Modular Keyer itself is a baby version of the batch module and allows multilayered keying and masking inside a single layer of the comp. Coupled with the primary key, the program allows for additional patches to be added independently to the solution. The 3D keyer is still a remarkable keyer, but some users were intimidated by the sheer detail of the user interface and the module suffered as it polarized users into those who couldn’t get into it and those who swore by it.
The MK also included the new Colour Warper node which, in addition to colour correcting, had yet another keyer for doing secondary grading. This keyer with its much simpler user interface and very precise knife-like accuracy – especially at low chroma levels – would be released separately as the Diamond Keyer. It was incorporated into a range of discreet products including Combustion 4.

Another small but significant plugin keyer is Zbig. It was developed at Berlin’s Center for New Visual Design (CFB) and is an advanced chroma-key compositing plugin avaliable for use with programs such as Digital Fusion and Illusion. Zbig includes tools such as intelligent spill replacement, shadow adjustment, colour correction and many others that help create convincing and ‘invisible’ composites.
Its original author Zbig Rybczynski is an extremely successful film maker. His work in film and video has earned him 3 MTv Music Video Awards, three American Video Awards, three Monitor Awards for Best Director, the 1986 Billboard Music Video Award for Most Innovative Video, and many others. After working at the CFB between 1994-2001 on compositing and motion control, in 2001 he moved back to Los Angeles and became a member of Ultimatte’s and iMatte’s creative teams.
Zbig is currently continuing his filmmaking career.
2000
In 2000, keying miniDV footage became a real problem. The reduced chroma bandwidth of 4:2:0 or 4:1:1 means that most traditional keyers produce a ‘boiling’ flickering edge when keying miniDV footage. Ben Syverson — having just bought a PowerComputing Mac clone with 640×480, full motion video input, an educational copy of Adobe After Effects, and Metrowerks CodeWarrior — was really fascinated to know why a “difference matte” wouldn’t work for removing a foreground object from any background. In the years to come this would lead to producing a range of dv keyers.
He started with cracking open the Adobe After Effects 3.1 SDK, and hacking around with the “Checkout” code example. “I believe (the code) is still in the current SDK,” explains Syverson. “After a few tortuous nights trying to figure out how to access two images in the same code block, I figured it out, and I wrote DeltaMatte, which was a simple difference keyer. DeltaMatte (and difference matting in general) quickly proved relatively useless for real keying, so I started researching other keyers and what made them tick. I downloaded the demo of Ultimatte and was very impressed”.
After many experiments (including some logic-based keyers), he had produced IndyMatte which was fairly similar to Ultimatte. Syverson wrote a few other tools (a filter designed to help with sky replacements, a color matching tool, etc), and released it to the world as The Matte Pack, under his company, Kaleidafex. He put an ad in the Mighty Joe Young issue of Cinefex, and signed an agent and representative but he never made a single sale.
2001
In late 2001, Syverson started working on dvMatte, a sort of hacked version of IndyMatte that would blur the image before it was keyed. This helped out a lot for DV footage, “so I approached Alex Lindsay (of dvGarage) about including it in The Composite Toolkit, a disk I knew they were working on,” says Syverson. “I told them they could have it for free, but they insisted on paying me for it! In August 2002, a couple days before my birthday, the Composite Toolkit was released, and people started using dvmatte”, he explains proudly.
2003
In 2003, it became apparent to Syverson that simply blurring the key was not sufficient. The resulting matte was too soft and not detailed enough. “I thought about the problem, and I realized that you could approach the matte as a two-pass process; base matte and detail matte. You could constrain the base matte so that it just filled in the interior, and rely on the detail matte for the edges. The best way I could see to add detail was to pull it from the luma channel, which is relatively pristine. I added the resulting mattes together, and voila, dvmatte pro. I think Alex Lindsay of dvGarage.com first reaction was “Holy shit!” We released the day after my birthday, on August 9th, 2003.” After that came dvmatte pro 1.5 for Final Cut Pro, and then After Effects with simplified controls, light wrap, and some color correction tools.
From 1999 until the now famous ‘NAB toxik intervention’ of 2002, Pettigrew worked in the toxik project at the then-named Discreet. “Working on tools was painful as the the tools had no foundation to work on,” says Pettigrew. During this frustrating period he developed his ideas on a new one button fast keyer. Returning to the flame team in July of 2002, Pettigrew started work on his final keyer for discreet – the Master Keyer – shown only months later at the 2003 discreet user group at NAB in Las Vegas. The Master Keyer was released in late 2003 and in 2004 it was shown integrated into the Batch module – just as Pettigrew was leaving the company. Pettigrew left and joined the Apple Pro Applications division and while his work there is confidential, he is working on core research which should be available for all Pro apps in the future.
2004
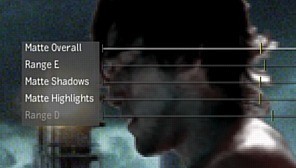
Master Keyer was added in inferno 5.5/flame 8.5 in early 2004. This keyer is a response to the simplicity of keyers such as Primatte and the perception that the 3D keyer in the Modular Keyer was too complex. The Master Keyer introduced a few major advances, first was that unlike the 3D Keyer – patches are intergrated into the primary solution and not band-aids, second that the program will suggest which parameters at any pixel on the screen are most likely to contribute to adjusting the key – and in order of recommendation.. (these include the Range A to E parameters), and finally it performs a very complex andremarkably good foreground colour correction to balance the foreground into the scene.
2005
After going back to the drawing board, the new Toxik is released. A great achievement, Toxik has as one of its central points a floating point/HDR pipeline. All the previous user interface models for keying were designed to key values from 0 to 1 or to work within hue spectrums of video. So the first problem is that the user can pick values that cannot be represented by these models. In addition, explains Toxik product manager Chris Vienneau, “the value in HDR files often times spike dramatically especially when you have images of the sun so pulling keys with soft edges is difficult with mixed light scenes. This is also a problem with the traditional edge filters which can cause banding because the sampling is done by averaging so if you are averaging from 50000 to 0.4 you will not get the gradation you expect”.
Other than that the benefit of having the extra information available within a Cineon file (mid-dynamic range) is especially useful for green-screen footage as there are several f-stops available in a scan. With the Photo Lab tool, points out Vienneau, ” several keyers and some matte combining tools you can pull several different keys with different exposures and combine them together to make a final key. Traditionally this would have been done by rescanning the image or applying different luts on import. This can be problematic if the scanner (a mechanical process) is off on the second or third pass”.
Looking to the future, companies such as the Foundry are developing new technologies, Furnace plugins for apps such as Flame and Shake offer a range of new matte extraction tools based on colour, edges and in some cases movement optical flow tracking.
Another company advancing these techniques is imagineer. The Mokey product uses plane tracking techniques to provide object mattes. Interestingly, its sister product Monet – provides as part of its tracking placement tools, the ability to key off and under reflections on glass, by comparing a range of frames, the program isolates reflections and area lighting/shading allowing keying under shadows and highlights. These techniques are not yet refined but they show promise and are generally moving away from defining matte based on what could be called traditional methods.
The Motion version of Primatte is written for the GPU just like dvmatte. The difference is that dvmatte is usable on DV, HD and HDV footage. The Motion version of Primatte is only usable for uncompressed video or film footage, which renders it useless; no one is doing high-end film compositing in Motion. “I also highly doubt they’re doing the full Primatte process, which involves a complex 3D shape in RGB space. I think the accelerated Primatte is mostly intended as a proof of concept, and perhaps even to attract developers. If that’s the case, it worked for me, because seeing our “competition” running so quickly definitely kicked my ass into gear” says Syverson.
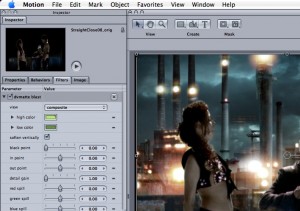
dvMatte Blast is written directly for the GPU using FxPlug and runs hundreds of times faster than the CPU version. “It’s fun and gratifying work to see that kind of an improvement,” says Syverson. “HDV has a slightly different chroma arrangement than DV-NTSC, but otherwise, it’s like ‘big DV’. We treat it exactly the same.”
According to Syverson “The SDK of the FxPlug architecture is wonderful. The Motion team should be commended for exposing this functionality when every other product clings to a CPU-only model. Motion gets written off as a toy, but with a full curve editor, accelerated 16bit and 32bit floating point support, nest-able layers, and a GPU-oriented SDK, it’s far more powerful for raw compositing than Adobe’s current offering.”
Earlier this year, we interviewed Ben Syverson for an fxpodcast covering the new fxPlug architecture in Motion. You can listen to it by going to our story on the fxPlug architecture.
Whats Next ?
Keying is such a vital area of visual effects, research continues to both improve the quality of the key and easy of use of the module.While it is not strictly keying in the greenscreen sense – there are a host of new matte generating tools that extract mattes via a range of different technologies.
Even as we go to press (online) new keyers are being tested and will be launched very shortly, (NDA on the details- but check back and we’ll post updates very soon).
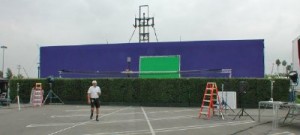
The age old question is should one shoot against blue or green screen. Many factors influence the decision, the most obvious being what colours are represented in the foreground subject. For a while prior to the Vision 2 stocks – the film stock itself was grainier in the blue channel, and hence green screen grew in popularity. One urban myth is that human skin contains a lot more green than blue and so blue screen should be better, in fact this is only true of blond hair – which is often better shot against blue – but human skin while not equally balanced in its green and blue components – easily keys from either blue or green screen.
Ten years ago blue screen was popular due to ILMs widely known preference for Blue screen – but in reality ILM had special custom tools tuned to blue screens – unfortunately just using a screen the same colour as ILM did not result in Star Wars quality composites for those who tried to copy ILM !!
In today’s terms when using a colour difference keyer it is ideal to use as pure a green or blue colour as possible. For other keyers the secret lies in having an even screen – without great colour or luminance variation. Some of the best keys are drawn from red screens (often used in the old days for model work), a very narrow red part of the spectrum could be produced with special red fluro lights – enabling very accurate keys on minitures such as space ships.
The State of the Art
Zmatte
The standalone Zbig Software was available on the market since 1998 as a chroma key/compositing program and as a plug-in for many standard programs, (Fusion, Illusion and others)
A unique feature of Zbig Software is the automatic and dynamic application of background color reflections onto the composed foreground, resulting in an extremely convincing composition.
Ultra Keyer
Fusion keyer
– Five modes of spill suppression to eliminate difficult reflection halos.
– Animated garbage mattes for isolating rigging and set elements.
– Adjustable edge gamma and fringe color correction.
– Matte thresholding for semi-transparent region replacement.
– Matte blur, gamma, and contrast control for post key processing of the matte.
– Advanced color selection includes a more varied range than traditional “select” and “soften” style keyers
Keylight
The keyer is effectively a colour difference keyer, so it works better on primary colour, and according to the Foundry’s Bruno Nicoletti “to work well it needs a high primary saturation” in the keying background. Keylight’s strength comes from the algorithm that allow the spill removal to become an intrinsic part of the process. Recently, it has been upgraded to a full float implementation on Shake, but this is only currently as a plugin. The version shipping with Shake 4 now respects Float and no longer clamps to 16 bit. Even with Keylight’s great foreground colour correct, in a floating pipeline in Shake, it is often only used for key or matte generation and not for the key & comp of the foreground and background. The work of CFC in pioneering their compositing pipeline caused them to get a technical achievement award in 1996. Keylight anecdotally is thought to be best on transparent items such as sheer fabric – glass ware and say soft hair. There is now Linux & Burn support for Keylight. When using the Keylight controls fg bias work best with near neutral colours. Nicoletti has also written a great new 64 bit version of Keylight for Discreet (A M&E) products which also has improvements to the matte processing and colour correction tools.
dvMatte and dvMatte Blast
Plugins for programs such as Final Cut Pro and Motion, these keyers are from dvGarage, which has worked hard to make formats such as Mini-dv be viable for keying work. While these keyers will work great on normal footage, it is their ability to key compressed 4:2:0 and 4:1:1 footage that significantly advanced the art of keying. DvBlast also is one of the first programs to achieve extremely fast HD keying using the GPU power of the G5 Apple real time tool box.
Primatte
Primatte today runs on a wide variety of OS – LINUX, OSX, NT IRIX etc. Primatte is one of the most widely available plugin keyers, from Flame, Smoke to Fusion, Shake, Quantel, AE, Photoshop, Nuke and others. When using Primatte’s controls the fgbias effect the f/g colour & Matte opacity, the key controls are the shadow gain, mid gain and highlight gain.
For a full discussion of Primatte listen to our fxpodcast with Scott Gross of IMAGICA Corporation of America by clicking the links at the top of this page. Scott has been involved with Primatte from the beginning and he explains not only the keyer’s approach but much of its history.
Ultimatte
Ultimatte, Primatte and Keylight all share the same problem in Flame – the lack of being able to use them inside Action. It is useful to think of the Ultimatte process as a mixing process, not a keying process. This makes it possible to matte with shadows, hair, water etc. An Ultimatte uses the intensity and purity of the blue signal as a function to determine how much blending to perform between the foreground and background images. Another useful feature of the Ultimatte is the previously mentioned blue spill removal. Other circuits deal with glare, uneven or dirty blue backings, etc. Modern units from the Model V on up can independently adjust the color of the background and foreground plates. An Ultimatte used to have many knobs on its front panel, but the new digital units use a display screen and multifunction controls. The Current Model is the “9” and there are also models for High Definition work.
Flame RGB/RGBCYMK “old school keyers”
There is a set of keyers in Flame in what used to be the Old keyer – which ironically is where the Master Keyer was added to. These keyers are simple and often not very useful. They are linear in the sense that they have no 3D aspects – such as Lum key or a simple green or blue screen keyer. To get good keys with the RGBCYMK keyer it was often required to have multiple layers in action each contributing a bit and being individually masked.
Difference Keyer
For many years Flame had a desktop difference keyer which was not particularly popular, with the addition of the Modular keyer it became accessible from inside Action – but the use of it breaks the GUI paradigm, since you to use it you import images directly into the modular keyer which is inside action – from the desktop -skipping the whole main action menu and layers system. This step is so odd many flame artists don’t even know they can do it.
Modular Keyer / 3D keyer
This was the first keyer to visualize the 3D colour space and explicitly show the keying cloud and patches. As such it is both a very powerful keyer and a more complex UI than any other keyer. This complexity was increased by providing the 3D keyer inside a ‘babybatch’ user interface of the modular keyer. The Modular keyer itself allows for multiple keys – layers, masked off foreground colour corrections and rotos – all in one packaged up action layer. The Modular Keyer is about the most powerful keyer due to its direct access to just about every aspect and some cool tools in the 3D keyer that does interactive variation analysis (labeled noise) – and the on screen ability to quickly interactively adjust the marginal areas of a key. Unlike the Master Keyer it is not a single button click solution. Its reputation is handling keys that are not actually green or blue screens, such as keying skies off HDCAM or keying people off grass, etc.
The MK is not included in Smoke or Flint.. an extremely odd shortsighted marketing decision from Autodesk M&E.
Diamond Keyer/Colour Warper – Combustion, Toxik, FFI
The Colour Warper includes a keyer to allow for secondary colour grading. As it is vital to isolating a particular shade of say yellow during a colour correction – the Colour Warper has a keyer. This keyer has been repackaged as the Diamond keyer in Combustion 4. The reason it is called the Diamond Keyer is the sharp diamond shape of the defining key in the UI. Its name is not a PR or marketing expression it is a reflection of this UI, and the UI is a very accurate representation of the underlying algorithm. It could just as easily been called the knife keyer – as the sharp peak of the key defining shape allows for very precise keying especially in low chroma areas. By comparison the 3D Keyer is a puffy cloud and not razor sharp near the grey scale center line of the 3D cube.
Master Keyer
Relatively recently the Master Keyer was added to FFIS. This keyer is a response to the simplicity of keyers such as Primatte and the perception that the 3D keyer in the Modular Keyer was too complex. as a result the Master Keyer – while brilliant – has been dumbed down enormously. The clearest indication of this is the fact that the primary heads on adjustments are called Range A, Range B, etc to RangeE. No where in the primary manual were these controls explained or examples of their use given- heck they are not even mentioned.
It also has some great edge controls for adjusting the luminance of the edge or the blending of the edge – if the luminance of the green screen miss-matched the comp. The Master Keyer uses a 3D colour cube solution just like the 3D keyer – but you’d never know that from the UI! The Range controls are adjusting the key in various axis around the key point in 3 dimensions – on various planar slices through the 3D cube. There are 3D Quicktimes of the exact operation of each on fxguide.com. It is perhaps not overstating it to say that the Master Keyer is the keyer almost everyone goes to first. If it works, they stay there and only on extremely hard keys do most people move on to the Modular Keyer.
All rights reserved. Unlawful to be reproduced or duplicated in any form without permission of fxguide, LLC. copyright 2005

Pingback: DEMO: Green Screen Compositing with Blender | CIS 3810
Pingback: DEMO: Green Screen Compositing with Blender | Social Media Technologies in Organizations
Pingback: Efeitos Especiais em Filmes | Coruja Informa
Pingback: Tutorials and Magazines | 3d art and animation
Pingback: Compositing | 3d art and animation
Pingback: How To Make Minitures In Film | Oziracal4