We take a look at two of the winners from this year’s SIGGRAPH Computer Animation Festival – Moonbot Studio’s The Fantastic Flying Books of Mr. Morris Lessmore and Paths of Hate, directed by Damian Nenow of Platige Image.
The Fantastic Flying Books of Mr Morris Lessmore
The Fantastic Flying Books of Mr. Morris Lessmore tells the story of a magical library discovered by the lead character after a violent storm washes his house away. Directed by William Joyce and Brandon Oldenburg, the short film was created using practical effects, 2D animation and CG techniques at Moonbot Studios in Shreveport, Louisiana, and has also been developed into an iPad App. The film received the Best in Show Award at SIGGRAPH.
– Watch the trailer for ‘The Fantastic Flying Books of Mr Morris Lessmore’.
According to co-director Brandon Oldenburg, Morris Lessmore was a personal story for many at Moonbot, although the original concept came from fellow director William Joyce’s mind. “It goes back to his relationship with his publisher, Bill Morris, at HarperCollins,” says Oldenburg. “William was a close friend of Bill, and then many years later Bill was on his death bed and William visited him, and on the flight there he started to sketch out a small parable about Bill’s life on his notepad. And he read it out to Bill in his house.”
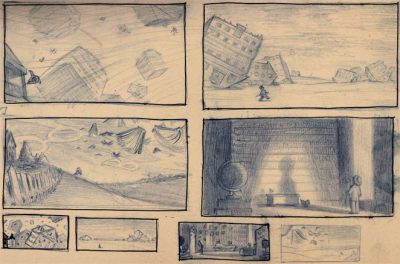
Although the notepad sat on the shelf for a number of years, the ideas contained in it resurfaced after Hurricane Katrina had hit New Orleans. “Katrina affected all our lives in different ways,” notes Oldenburg. “One of our observations was that whenever a storm occurs in a person’s life, it can erase everything. What do you do to move forward? How do you start over again? Specifically, there were books that had been washed up in the streets from people’s homes, and it felt like the perfect analogy for what had occurred in people’s lives. It wasn’t just Katrina – it could be a tsunami or tornado or whatever.”
From those observations came the story of how Morris lost his book and how he would start over. To tell that story, Moonbot decided to use both traditional and more modern animation techniques, partly for aesthetic and partly timing reasons. At the start of production, the studio did not have the necessary computers or software to achieve everything digitally, so they chose miniatures to create the backgrounds and settings for much of the film.
“Normally, miniatures are used for stop motion,” observes Oldenburg, “but we are artists first and we like getting our hands dirty. We just wanted to have fun at every step of the process. At the same time, we didn’t have a very large crew to start modeling and building all this stuff in the computer. So we thought, ‘Why don’t we just go ahead as we’re slowly ramping up and building the team, why don’t we just go ahead and build the sets?’ Also, the one thing a computer does well is perfection, but we really wanted to make sure everything looked realistic and lived-in and textured.”
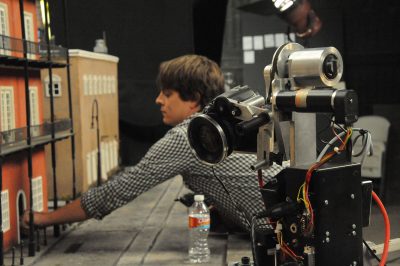
A local construction team and small live action crew built and shot the miniatures, which were rendered at 1/6th scale for wider shots and 1/12th scale for closer views, such as the interior of the library. “Those proportions were chosen because some of the props were actually easier to find, to start off with, through doll making companies,” says Oldenburg. “
We were able to locate a miniature piano at 1/12th scale, out of Japan, for example. To have built that would have taken a lot of time and effort. It’s actually a piano you can plug into the wall and it plays, but we changed the legs to make it look like it was standing on books and we changed the sound panel door into a book flap. After seeing Coraline, we realized they used the same piano we had found too!”
The miniature sets were shot on Canon 7Ds. Initially, the team began with only one camera but soon realized they could establish a number of units shooting simultaneously. “We only had a week to shoot the miniatures,” recalls Oldeburg. “So when we had another set-up to shoot, we just ran out to Best Buy and would buy another camera.” A friend of the directors also utilized a micro servo motion control rig for moving shots that was small enough to shoot the intimate sets using the Canon cameras. On set, artists would play a sculpt of Morris into the scenes for a lighting test, and then shoot an empty plate, since the character would be completed in CG. Chrome and diffuse balls were also used for HDR set-ups and survey data taken of the sets for later CG work.
However, before CG animation began, Moonbot worked on the 2D animated elements, including Humpty Dumpty’s flip book. Again this was partly because the studio was still ramping up its CG assets. “When we hired our animators,” says Oldenburg, “we needed them to be working immediately, so we had them tackle the Humpty Dumpty scenes first. All they needed was a pencil and paper. We did traditional 2D animation for all of the Humpty performances. Once we liked the pencils, we went into Photoshop to clean them up, then texture-mapped them onto CG books, and found the marriage of how many pages to turn and how fast to flip them.”
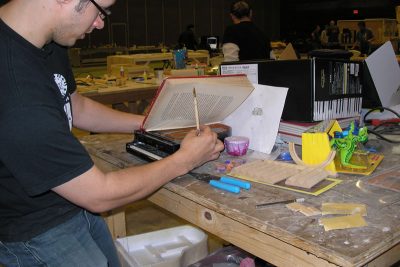
“Humpty Dumpty was two characters in one,” adds Oldenburg. “It’s like being on a horse – the horse is doing a performance and so are you. The best performance is when you’re in marriage with each other, so we had to talk about how the book was going to move and how was Humpty going to move on the pages so that they worked together.”
When the CG animation process did begin, animators would sometimes directly go in and draw over the miniature or digital backgrounds. The directors would sign off on the poses, before CG blocking and then animation occurred. Particular sequences called for close interaction between the miniatures and the CG characters. “For the house spinning effect in the hurricane,” explains Oldenburg, “we built the house that he’s running on as a miniature, and we took photos of it and thought for a while we’d shoot it on set spinning. But then we thought that was going to be too difficult to match a performance. So we used the miniature as a texture mapping device for a CG object.”
The spinning house, interestingly, became one of several interactive elements for Moonbot’s Morris Lessmore iPad App, a re-telling of the story to suit the device that has proved extremely popular. Says Oldenburg: “We realized after finishing the film that we had a lot of rich ‘assets’ – models, backgrounds, music by John Hunter and of course our talented artists. We could alter and adjust things in our story in an interactive book. The iPad was this magical window into all these various mediums that we’d seen from DVDs to the Internet – all at the same time.”
_______________________________________
Paths of Hate
Paths of Hate, a ten minute short directed by Damian Nenow of Platige Image, won the Computer Animation Festival Jury Award. The film is a stylized depiction of two dogfighting airplanes, created almost entirely in 3ds Max. We caught up with Nenow after one of his presentations on the film at the Autodesk exhibition booth.
– Watch the Paths of Hate trailer.
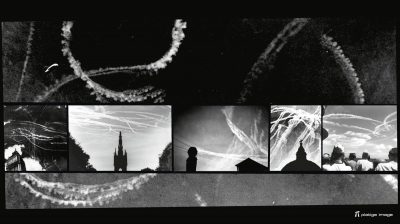
fxg: During your presentation you showed some photos from the Battle of Britain which had the paths of the dogfighting planes lingering in the sky. You said that that was your inspiration for the film.
Nenow: Yes, it might be considered the most direct reference as inspiration. I named the film because of the paths. So many of those pilots died in battles like that. I felt like those paths were the last remains of the fighters who had been in that battle.
fxg: The film is very stylized – what concept work or design did you do and how did you decide to use 3ds Max?
Nenow: It was started as a student project a few years ago, but because I was working on it mostly by myself I didn’t do much concept art, just a few drawings of the characters and a storyboard. I also did a trailer early on. 3ds Max is a tool I had been using for the last 10 years and I couldn’t imagine using another tool for this.
fxg: I understand you used a pretty traditional modeling and animation approach, but that there were two very important layers for the look of the planes and environments.
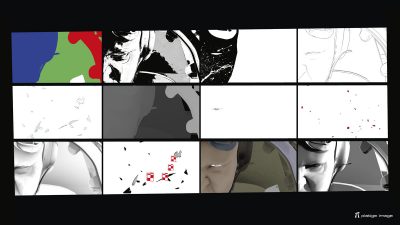
Nenow: Because the film is stylized and looks like a comic book illustration, I had to have an outlines and drawings layer. There were between 15 and 40 normal layers, but the two most important were the outlines layer and the drawings. The outlines were generated automatically by a shader in Max – rendered using V-Ray Toon – and the drawings layer were literally hand-drawn textures. I also relied on a lot of projections for the textures and details on the planes and other surfaces. Projections are just a way to put your texture on a surface on an object. Usually you would use UVW mapping, but for some of the shots that contain a lot of movement, like the faces, I had to use the projections.
fxg: How did you go about modeling the planes? What reference did you use?
Nenow: We actually had those planes in museums in Poland. We took about 300 photographs of them, and many of the cockpits. There were also thousands of blueprints available too which are very precise, down to the single screws. The end models were simple as there was no need to have everything on top or on side. All of that detail came from textures, but we did model damage and bits of engines being exposed as the battle goes on.
fxg: What was your approach to the animation and camera work – it seemed to have a very hand-held feel?
Nenow: It was all key-framed by hand. One of my goals was for the camera to be animated like a real one in a natural way with all its imperfections and unexpected movements – as if it was being held by a human operator sitting in some invisible plane filming the two heroes.
fxg: Your approach to the clouds was also fairly simple, wasn’t, but produced some very textured results.
Nenow: Well, I wanted to have the clouds in there as geometry and animate the planes around the clouds. I also wanted the clouds to be photorealistic in terms of how they received lighting, but also be textured – it had to have a proper translucency effect.
Most people would do clouds now as volumetric renders, but I didn’t want to use a volumetric solution because it’s hard to control them and know the final shape. So I created them first as low-poly geometry based clouds. Then, using the Vertex Color Tool in Max, which is an almost forgotten tool, I could use the vertex color data to illuminate the clouds in the way I wanted.
The way it worked was I created these low poly elements, then covered them with thousands of sprites. They had alpha channel textures on them. You can then add photorealistic textures, like photographs of fragments of actual clouds, or you can add hand-drawn ones, which is what I did. So that’s why they look pictorial. I was able to get very fast render times – between 10 to 30 seconds just using a simple scanline renderer.
Finally, the Best Student Project Prize at the Computer Animation Festival went to Flamingo Pride, directed by Tomer Eshed from The Konrad Wolf Potsdam-Babelsberg Film and Television University.

Pingback: Behind the scenes with the Siggraph CAF winners » CGNCollect