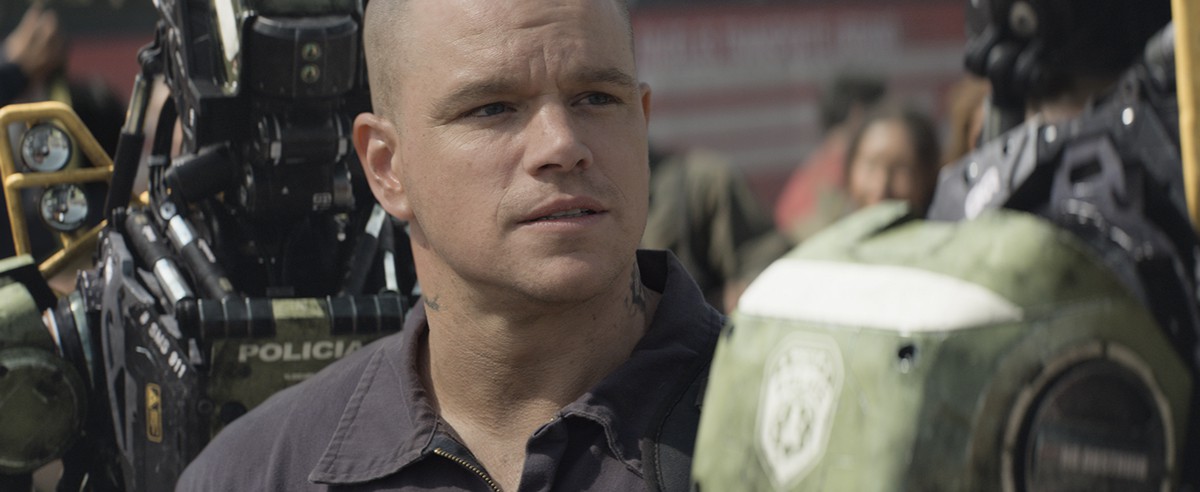
Even before the release of his first feature film, District 9, Neill Blomkamp had impressed audiences with his dystopian visions in short films and various other projects he had tackled with a background in CG work. Now with Elysium, Blomkamp had the opportunity to explore both a gritty future world – set in 2154 – and a pristine space habitat where the wealthy now reside. The director reunited with his close collaborators Image Engine, and particularly visual effects supervisor Peter Muyzers and visual effects producer Shawn Walsh, to tell the story of an ex-con Max (Matt Damon) seeking to get to Elysium despite the efforts of Elysian goverment minister Jessica Delacourt (Jodie Foster) and mercenary agent Kruger (Sharlto Copley).
fxguide goes deep into many of the design, practical, miniature and digital effects efforts required to bring Blomkamp’s Elysium to the screen. We talk to Image Engine, Weta Workshop, Whiskytree, Method Studios, ILM, The Embassy, MPC, Kerner Optical, MastersFX and concept designer TyReuben Ellingson.
Above: Watch an exclusive breakdown of Image Engine’s visual effects for Elysium, thanks to our media partners at WIRED.
Making Elysium
“Ever since District 9,” says Peter Muyzers, “we were talking with Neill about this concept of Elysium and what it meant. Neill is very open with his key members of his team, and he involved a lot of people early on. And even though we’re doing a sci-fi film, say for the spaceship, we went and looked at reference. He spoke to Syd Mead who is a great concept designer and has great legacy, and Syd Mead was the inspiration behind a lot of this.”
We spoke to Syd Mead in 2007 at Siggraph for fxguidetv.

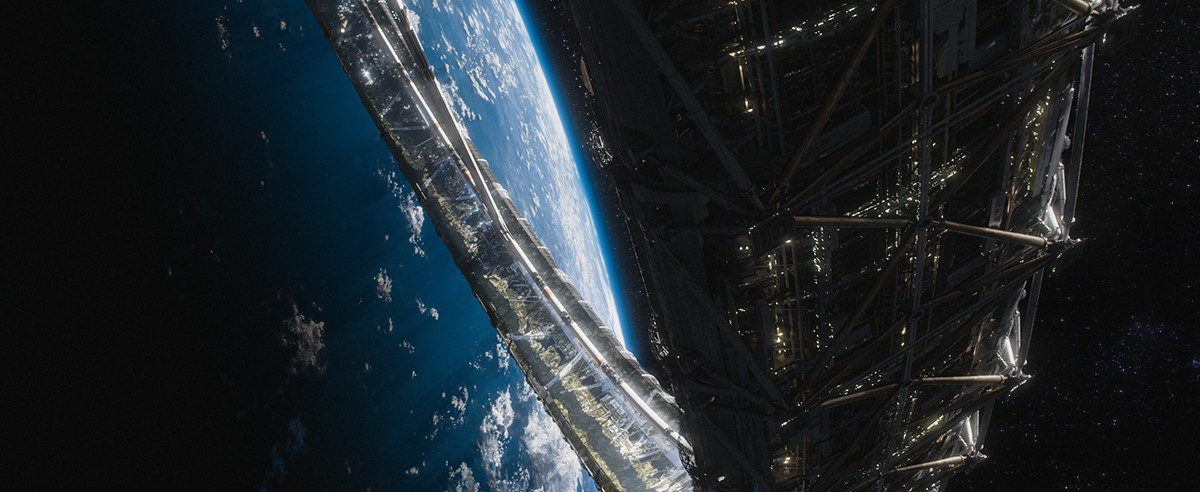
Central to Elysium’s visual effects was the actual torus ring, seen as a massive structure above Earth and from surface level views. “Neill went to NASA,” adds Muyzers, “and spoke to JPL and posed the question, can this happen? Can it be real? How close could we approximate some form of reality into the future, and it was quite inspiring to hear from NASA that they had thought of a concept just like this in the 1970s – the Stanford Torus was also designed in the 1970s – things Syd Mead drew at the time.”
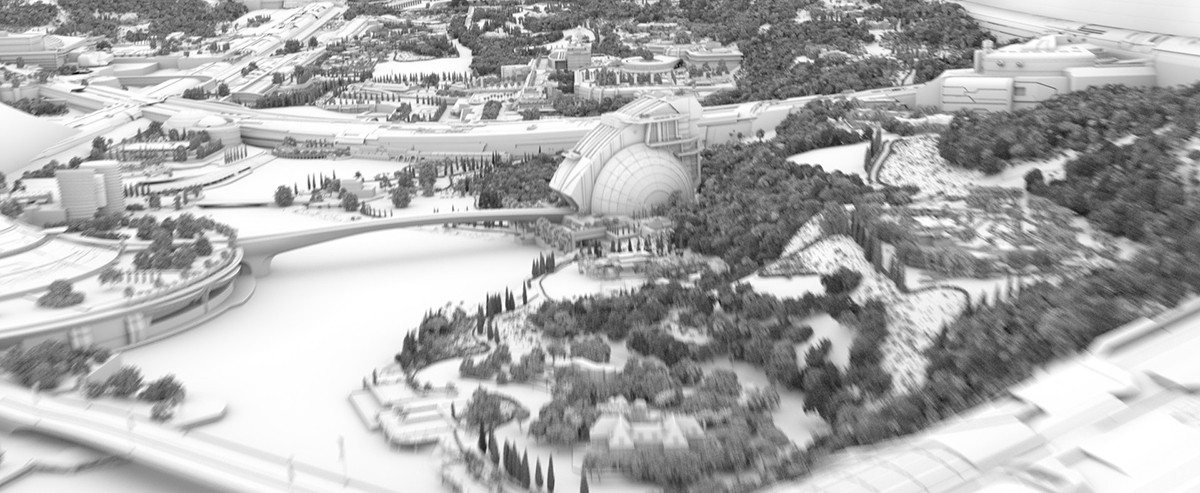
The assets required, like the Elysium torus and many other ships, droids and CG creations, meant that the visual effects teams would be exploring new heights in areas of modeling and rendering. The more complex scenes of the Elysium ring environment, for example, contained more than 3 trillion polygons. The ring was 2km wide, 40km in diameter and had a 125.6km circumference with a surface length of 126,056.22m. “Neill wanted a lot of detail but the detail had to make sense,” says Muyzers. “Don’t just throw stuff in there to make this stuff up – look at bridge construction, oil drilling platforms. We were always using real world reference. He would say, ‘No, it’s too sci-fi!'”
Watch a clip from Elysium
Elysium was shot on RED EPIC cameras by DOP Trent Opaloch using anamorphic lenses (resulting in a resolution of about 3.3K that was then mastered at 4K for release). Filming took place on location in Mexico City and in Vancouver. Interestingly, Muyzers says they used an ACES color pipeline for the production. “Neill could sit in the theater at Image Engine and be confident they would look the same in the theater with an audience. And the same at the DI house – it was a unified color workflow.”
Image Engine’s Shawn Walsh ultimately co-ordinated the effort of several VFX shops – with Image Engine acting as a central hub – for a total of 822 effects shots in the final cut. Walsh knew that working with Blomkamp would be an experience above that of District 9, too. “Our first asset reviews was for the droids,” he recalls. “Neill said, ‘These droids are fantastic and amazing but now we need to make them truly exceptional.'”
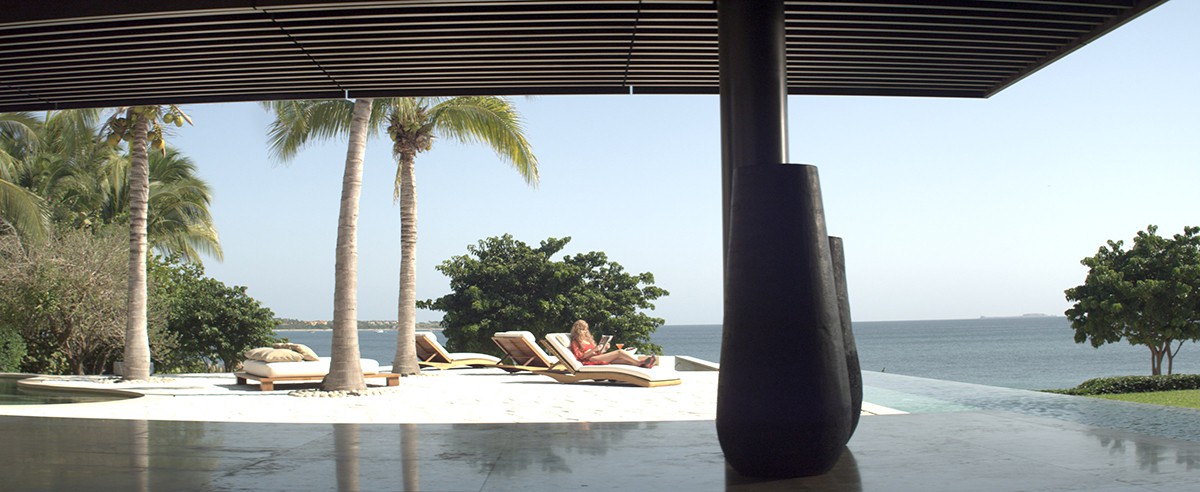
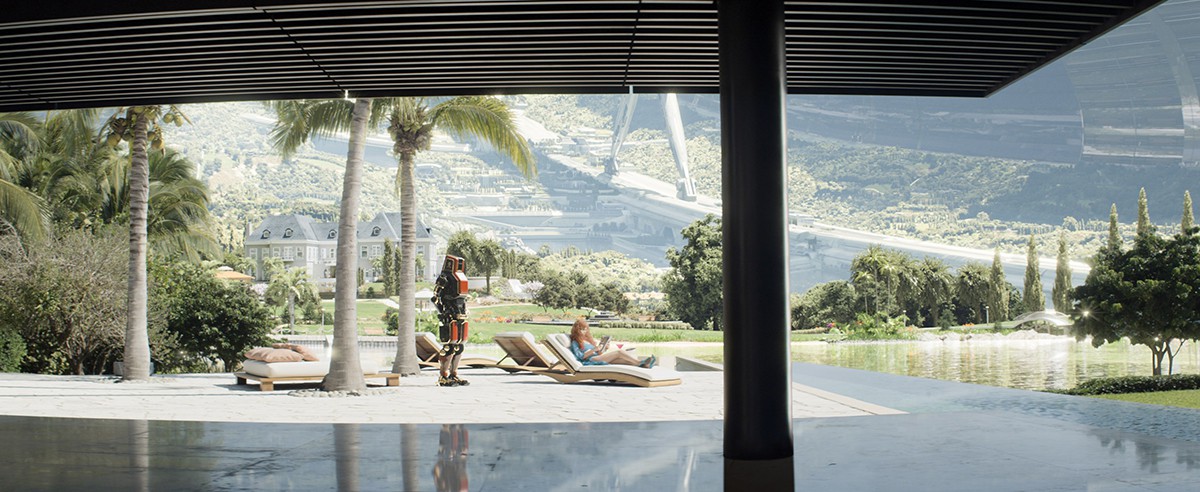
On the surface
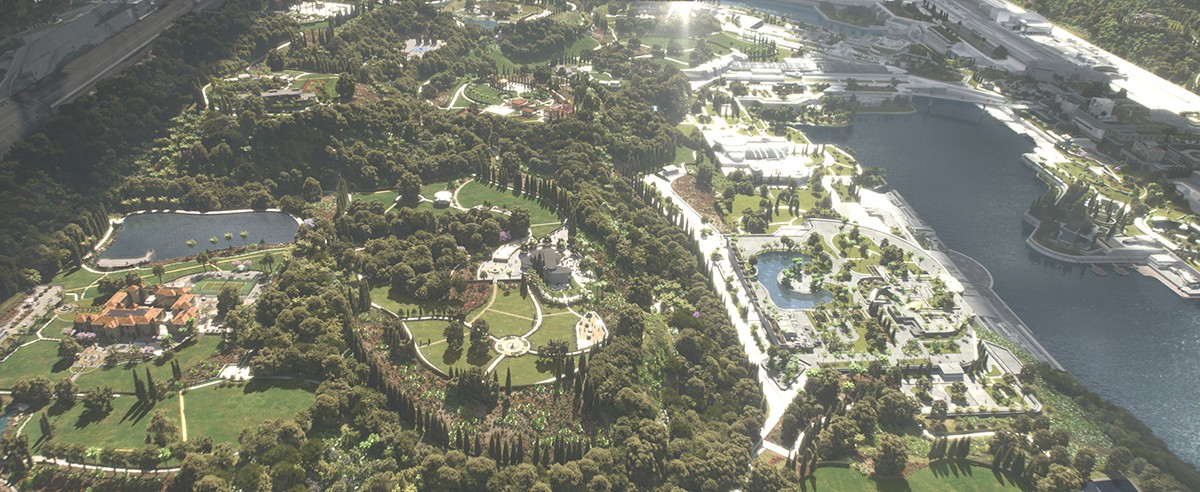
The effect: The richly detailed, luxurious and pristine living environment of Elysium referenced modern-day Malibu, and was brought to life by Whiskytree.
The hard surface assets for the framework of the ring of Elysium were created by Image Engine, with Whiskytree adopting an improved Arnold rendering pipeline to realize the surface-level high-tech municipal structures, governance buildings, trees and residential areas of the torus.
“Peter Muyzers had shot a lot of reference plates of Malibu,” explains Whiskytree creative director Jonathan Harb. “In the early days we looked at that footage and for a while we considered using those plates, but eventually realized that would be more work than it was worth.”
Knowing they would therefore be crafting everything in CG down to each individual leaf, Whiskytree turned to an earlier internal Softimage/Arnold test that had aimed to improve their own layout tools. “We wanted to see how far we could push environment creation without doing any matte painting,” says CG supervisor Votch Levi. “We were able to create an entire environment with an enormous environment count and asset count without too much trouble. It was actually surprising how far we could push complexity inside Arnold – what it was willing to take.”
“Even in this test, we were creating scenes that were rendering in the billions of triangles – 1.6 billion – but for Elysium we would have to go even further than that,” adds Levi. “So luckily we worked very closely with the guys at Solid Angle and we wrote a little tool in-house which helped memory management and I/O and they took that tool and incorporated it into the core of Arnold and it have us an order of magnitude more complexity we could throw at it.”

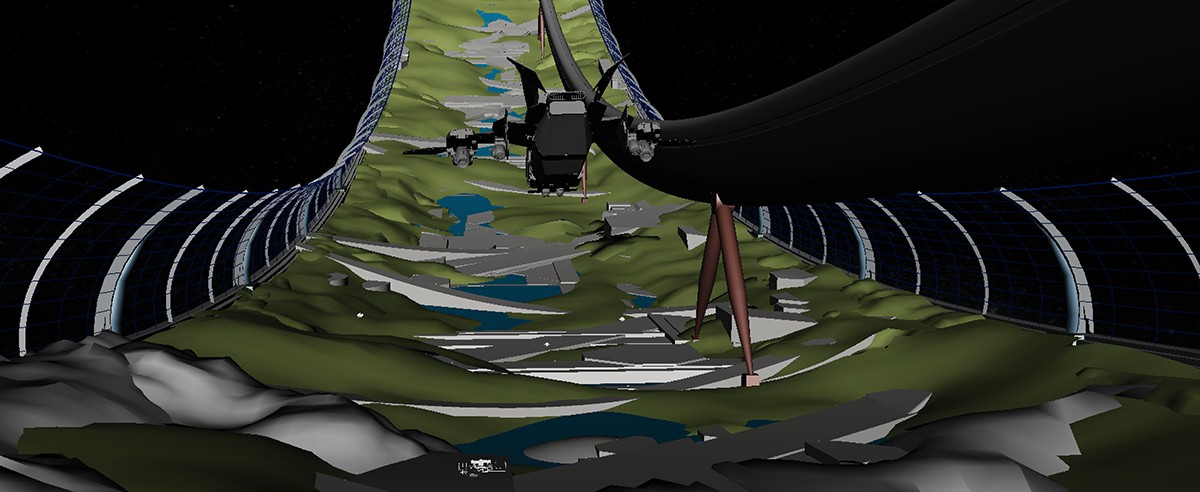
Whiskytree then capitalized on that internal project to do a further test for Elysium. “When Pete and Shawn first came to us,” recalls Harb, “they said we need to make this big crazy torus with all those surfaces. One of our guys on a Friday evening just knocked up a big torus, carpet bombed it with probably tens of thousands of trees, and set off a render. It was about three or four hours of work, rendered over the weekend. We came back on Monday and we were already able to show them a camera flying over this incredibly complex surface.”
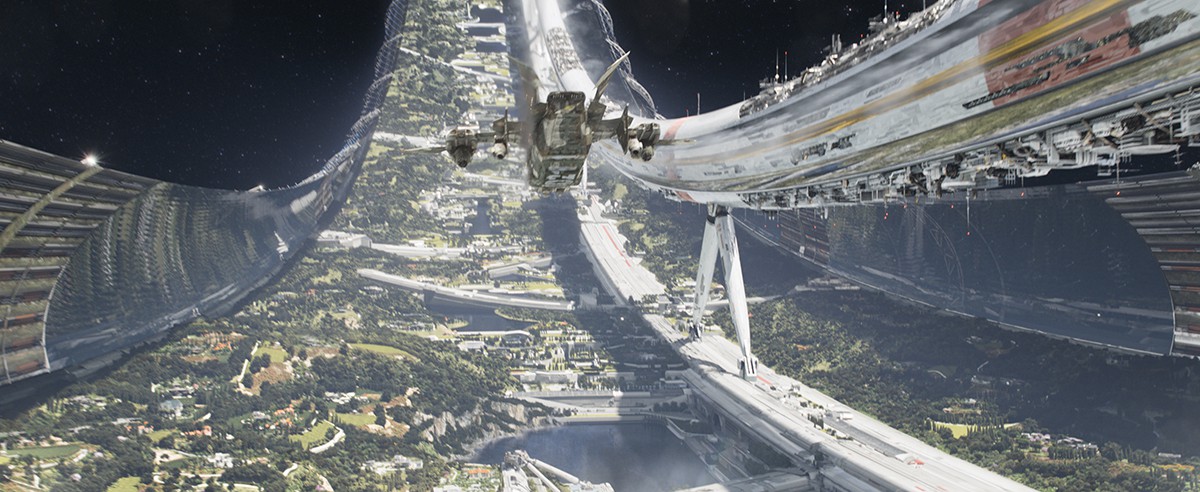
The Arnold development allowed Whiskytree to move from 1.6 billion triangle scenes to 3 trillion triangle scenes. It also meant the studio’s previous approach of breaking a shot up into sections – matte painting, geo, projections, et cetera – became almost unnecessary. “We could think about the shot construction in a different way,” says Levi, “and we would divide it up based on our resources. We gave everyone creative freedom to do whatever they wanted.”

“Even for the far views of Elysium,” adds Levi, “we created a matte painting that was projected onto the surface. But we didn’t start with a straight-up painting. We took a panorama camera and used an approved stretch of the landscape and rendered out a 180 degree view and we’d then take that and use that as a basis of the matte painting.”
Asset creation was a major part of the effort for the Elysium surface shots, including trees. “The weight of the trees ranges from a half a million triangles to about 20 million triangles,” states Levi. “They’re all hi-res. We don’t do level of detail at all anymore and we don’t use sprites or use cards for them. Elysium is a tropical environment like Malibu so we had to create a whole bunch more trees and plants, shrubs and flowers and even different grass textures. And then we were also building mansions, pools, BBQs, courtyards and retaining walls. It was all very hand-placed and manicured which matched the nature of Elysium itself.”
For the final shots, Whiskytree became what Harb describes as almost an ‘extension’ of Image Engine, in that assets would be shared between the two facilities with final comps done by the lead studio. “The level of complexity of sharing final comps was really overwhelming,” notes Harb. “For example, parts of the air beam were rendered at Image Engine. If we ever came from the exterior of the ring to the interior, the exterior would be rendered at Image Engine and the interior would be rendered at Whiskytree – then all seamlessly integrated in the final comp.”
Droids on patrol
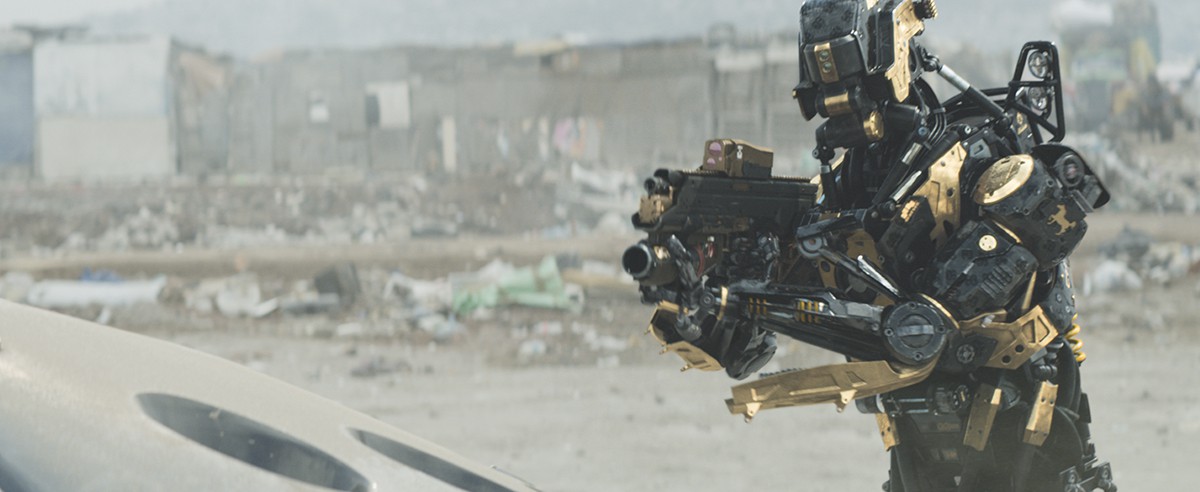
The effect: Droids now carry out many enforcement tasks as well as medical and servant services on Earth and Elysium. Greysuited performers were replaced by Image Engine CGI creations for many of the droids.
“The performance of the droids was quite subdued as Neill wanted them to operate with SWAT team efficiency and be ‘all business’ rather than having any emotions or more complex behavior,” says Image Engine associate visual effects supervisor Andrew Chapman. “He directed the greysuit stunt guys on set to get the performance he was after, so we were able to match that as our first pass and mostly just finessed after that for minor framing and performance tweaks and to add all the secondary animation of for the gadgets.”
“We took a second pass at the droid designs to cover them with all these little whirring gadgets that flick in and out of various cavities: sensors, weapons and so forth,” says Chapman. “So when on patrol they might have their sensors out and then snap back in when they go into battle mode. It gave an extra dimension of life to the droids, and a visible portrayal of some of their inner processes, without going so far as to give any sense of emotion.”

With this on-set performance, Image Engine was also able to acquire HDRIs and other data it needed – thanks also, according to Chapman, to the director’s background in VFX. “Unlike other productions where VFX is merely tolerated,” says Chapman, “he knows there’s a direct link between us getting good reference data from set and that generating a well integrated result in the final shots.”
Multiple witness cameras were also run during the performances to give animators a second or third view of the action. The animation was all key-framed in Maya, via 686 rigging controls. “We had lots of details in the droids that are familiar from vehicles and technology in our current world, so even if the audience doesn’t immediately recognize it there’s a subliminal layer of detail in there that suggests these things are real,” comments Chapman. “For example the large external springs in the droids’ lower back echo the bright yellow suspension springs you see on motorbikes, and we textured them in exactly the same way.”

“Other examples are the hydraulic pistons, connective hoses and LED lights,” adds Chapman. “These small elements should be familiar to anyone who has looked under the hood of a car or around any machinery. So even though the assembly of all these pieces is a somewhat fantastical creation, that familiarity leads you to think of them as something that we could actually manufacture in the very near future.”
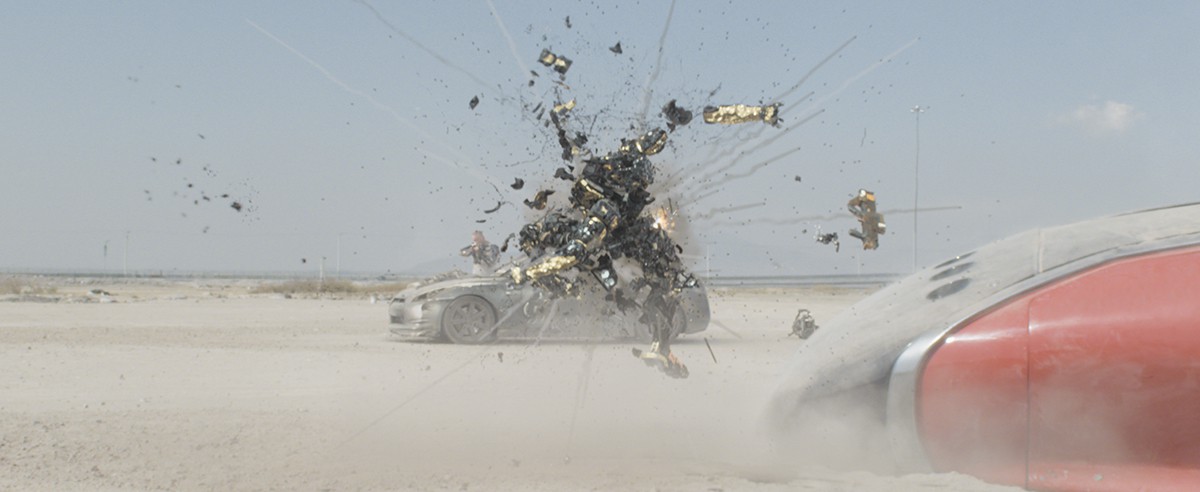
In one spectacular scene, Max faces off against a droid during the heist of Carlyle’s ship and destroys the bot with a devastating weapon. “The exploding droid was one of our favorite sequences to work on!,” exclaims Chapman. “We had a small team dedicated to it, headed up by Senior FX artist Greg Massie.”
Watch part of the heist sequence.
“We started with a greysuit performer being yanked backward on a wire pull to get the performance for the initial explosion,” explains Chapman. “SFX also set off a series of pyro gags including charges hung in the air, timed to go off in quick succession toward the droid, and charges in the sandy ground to get us the elements of the pieces impacting the ground under the explosion. We then mixed in a variety of FX and filmed elements along with the CG droid pieces, wires, sparks and hydraulic fluid to get the end result. Although in the end they were only one of a mix of many different elements in there, the end result wouldn’t have looked as good if we didn’t have those SFX layers as a basis of reality in the shot.”
Not the Los Angeles you know (…yet)
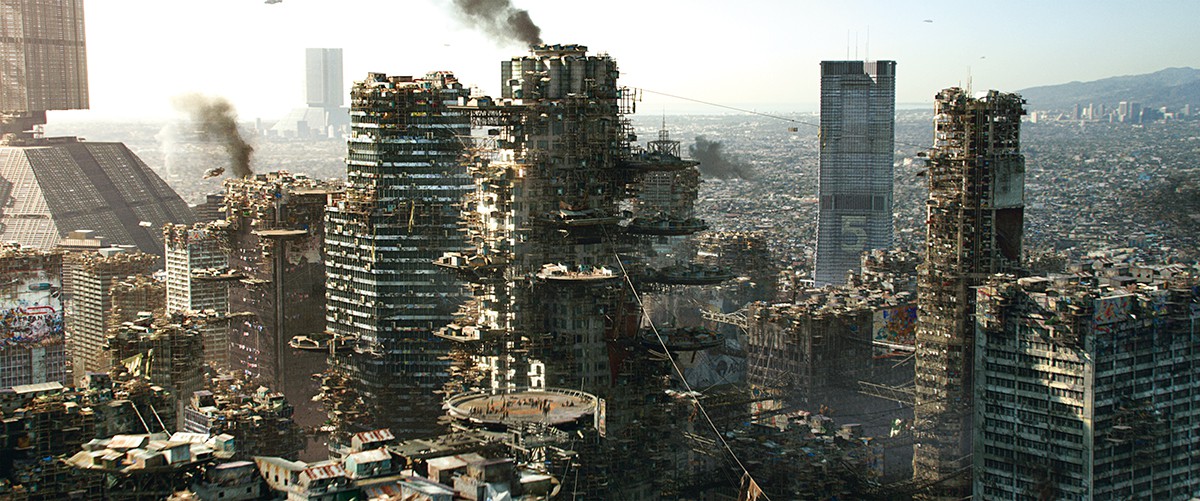
The effect: To establish the immense overpopulation and dilapidation on Earth in the year 2154, the camera flies over downtown Los Angeles, a slum now overrun with city dwellers and shanty towns right up into the tops of skyscrapers. The shot was handled by Industrial Light & Magic.
Peter Muyzers filmed a helicopter plate of downtown LA on a RED EPIC to give the shot an initial grounding. “We knew that we then had to create a number of building assets,” says ILM experienced visual effects supervisor Grady Cofer. “Some we were going to dilapidate and replace with older decayed versions and in other cases we modeled and designed some futuristic buildings out of our own imaginations. Peter had done his homework and found out from city planning in LA where it was likely that future buildings would be built in downtown LA.”
To demonstrate the abundance of people now living amongst the skyscrapers, ILM designed bridges, landing pads and cantilevered platforms – “all of the things that Neill conceived might have been civil-engineered at one point to alleviate the over-population,” says Cofer. “But then we also had favela shacks, tarps, ladders, clotheslines, pipes and air conditioners. To Neill it was important that it wasn’t just visual chaos and that we apply some sort of logic to the distribution of these things.”
The shot was assembled in 3ds Max by digimatte supervisor and environment artist Richard Bluff, who dressed buildings specifically into the scene, lit them and look-dev’d the result. “I worked a little on the modeling of the new buildings to give them the scale and the grounding in reality terms, making sure the windows were the right size and the air-conditioning units were correct,” says Bluff. “At the same time, for the buildings we were keeping from the original plate, I wanted to do some paint work over the top of that in a projection manner to rough it up, dirty them, put graffiti on them.”
That approach meant that ILM could show the client a range of different aspects of the shot as it progressed. “It also felt like it was important to start to get some of the small details into the shot fairly quickly,” notes Bluff. “So I would put graffiti on the buildings – it gives you a sense of scale and instantly a sense of reality. Then I’d add the models for the shanty towns as wooden structures. I made ten different models and then would randomly apply them to all the tops of the buildings and slightly rotate them and apply different textures.”
“I wanted to retain a lot of the glass and the reflection from the original plate,” adds Cofer, “so I projected a sequence of images and masked out the areas where I wanted to retain the glass to give the idea that not everything’s destroyed but there is still some underlying building there. You really read the movement in the glass in a fly-over shot.”
Additional details included tarps, complete with cloth sims, as well as smoke and fire elements plus pockets of atmosphere. Animator Delio Tramontozzi directed a mocap session for hundreds of digital doubles acting out marketplace shopping, hanging clothes, talking and even sleeping.
For rendering, ILM relied on V-Ray to help maintain realistic bounce light. “I used the V-Ray sun,” says Bluff, “and started cranking up the dials to really introduce the particular atmosphere that is present between the sun and the source of the building that really made the sunlight feel really soft. I was artificially overriding the GI contribution from certain buildings and lessening it from others to make pockets of darkness, and then making other buildings feel like they were coming out of the gloom and were a lot lighter.”
This shot is a great example of why just accounting for an facilities contribution on a film by ‘shot count’ alone can greatly underestimate or misrepresent a companies contribution. Shot counts mark say a rig removal shot and an entire fly over of a 2154 futuristic city in ruins – as just one shot.
The final impressive shot even made use of a direct intervention from Blomkamp himself. “We were working on the shot and there was something kind of missing for him,” recalls Cofer. “He wanted a futuristic Tyrell-like building in the background, but he wanted to pull it forward and make it more prominent. We got a delivery from Image Engine and Neill had modeled and look-dev’d it himself and gave it to us to put in the shot – his work can be seen if you watch the shot closely!”
Suiting up
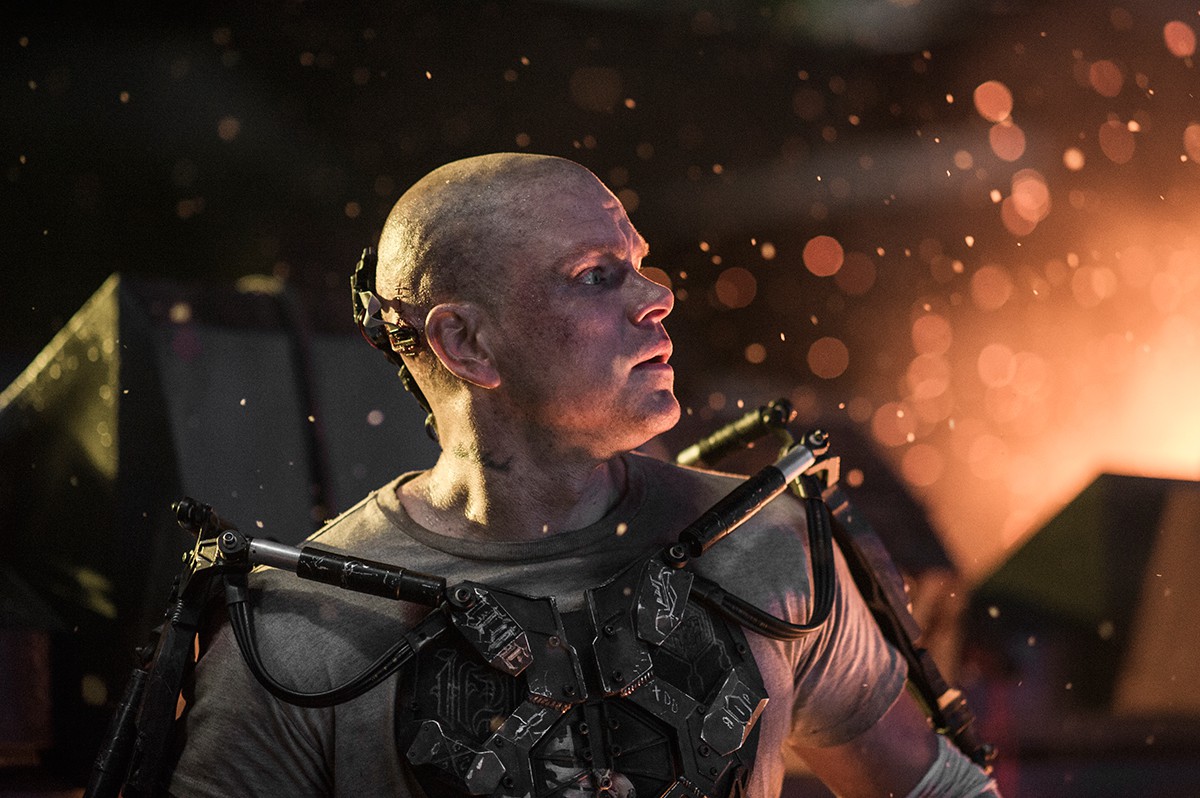
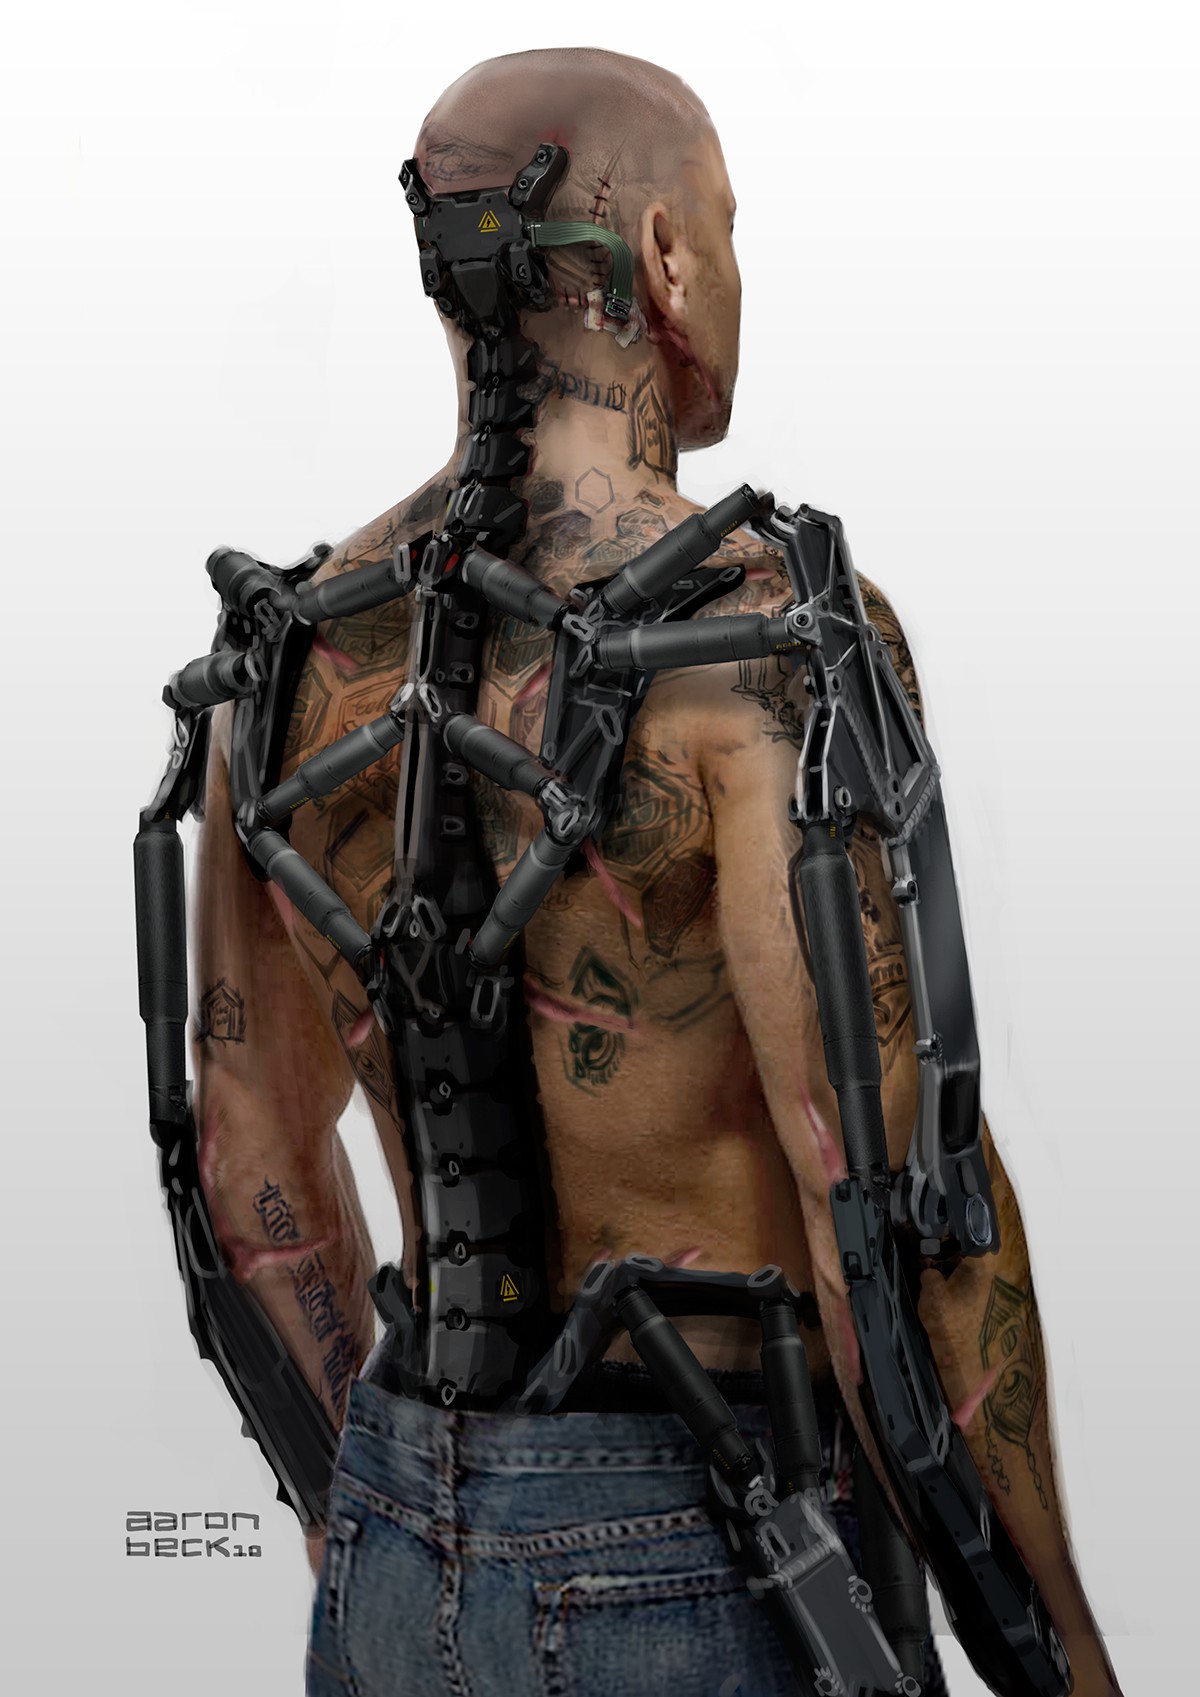
The effect: Hampered by a lethal exposure to radiation, and determined to reach Elysium, Max turns to some old friends to equip him with an exo-suit grafted to his body. Dubbed the ‘HULC’ suit, Weta Workshop crafted the practical effect.
“There is amazing technology happening specifically in the American military around power assisted lifting suits,” says Weta Workshop co-director Richard Taylor, whose team scaled down the existing technology to make for a much more nimble, dynamic and aggressive suit based on the real movements between shoulder and collar bone joints – but as an outer-skeleton.
The HULC suit was made out of urethane and connected to several pistons, with a lyrca under-suit designed to hide the sections where it is was meant to be connected to Max’s bones. “We settled on urethane, a product that we call CC60,” says workshop supervisor Rob Gillies. “It’s basically a 60 SHORE hardness urethane and that’s what we used predominantly for all the linkages that run to the pistons themselves. The pistons were made out of a plastic, with essentially a dummy piston setup going on with elastic cords – it was as basic as that. We tried to design the suit so that it had full mobility, full movement, nothing was restricting and could perform full stunt action as well.”
The HULC suit is featured in this clip.
“The actual geometry of the HULC suit was technically very challenging to allow a full range of motion on the human body,” adds Gillies. “The body is an amazing thing with a skeleton surrounded by muscles and tendons, but once you extract that to the outside of the body it becomes a whole different affair. So all the pistons, the linkages, all need to work together in synergy – essentially so that no matter what action the actor is performing he’s getting the full range of motion.”
 Weta Workshop produced six HULC suits – two hero, two stunt and two extremely soft suits for high falls and action. They received a body scan of Matt Damon so the suit could be molded to his proper dimensions. It took around 20 minutes each day to get Damon into the suit.
Richard Taylor suggests that such a suit may be a physical reality within five years, with examples already abundant around the world. As far Elysium is concerned, too, Taylor says the Workshop was ecstatic that the suit features so prominently in the film (and the film’s poster). “It’s interesting because we’re in a transitional period where a lot of physical effects are being realized digitally,” he says. “It’s so neat working with a director that wants to use an abundance of physical props. Having an opportunity to do bits of technology and robotic tech that’s actually beyond the lead actors is really thrilling on the workshop floor.”
Weta Workshop also produced Kruger’s exo-suit, as well as armor, several weapons, brain implants, prosthetics, tattoos, wounds and citizen barcodes for the film.
You can also check out Mike Seymour’s chat with Weta Workshop’s Richard Taylor and Rob Gillies on our fxpodcast.
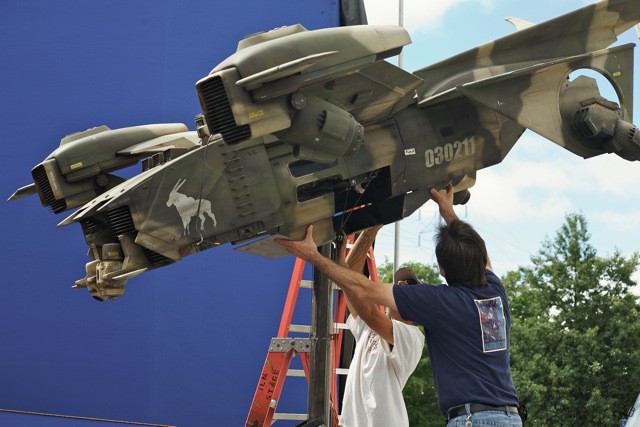
Designing the Raven
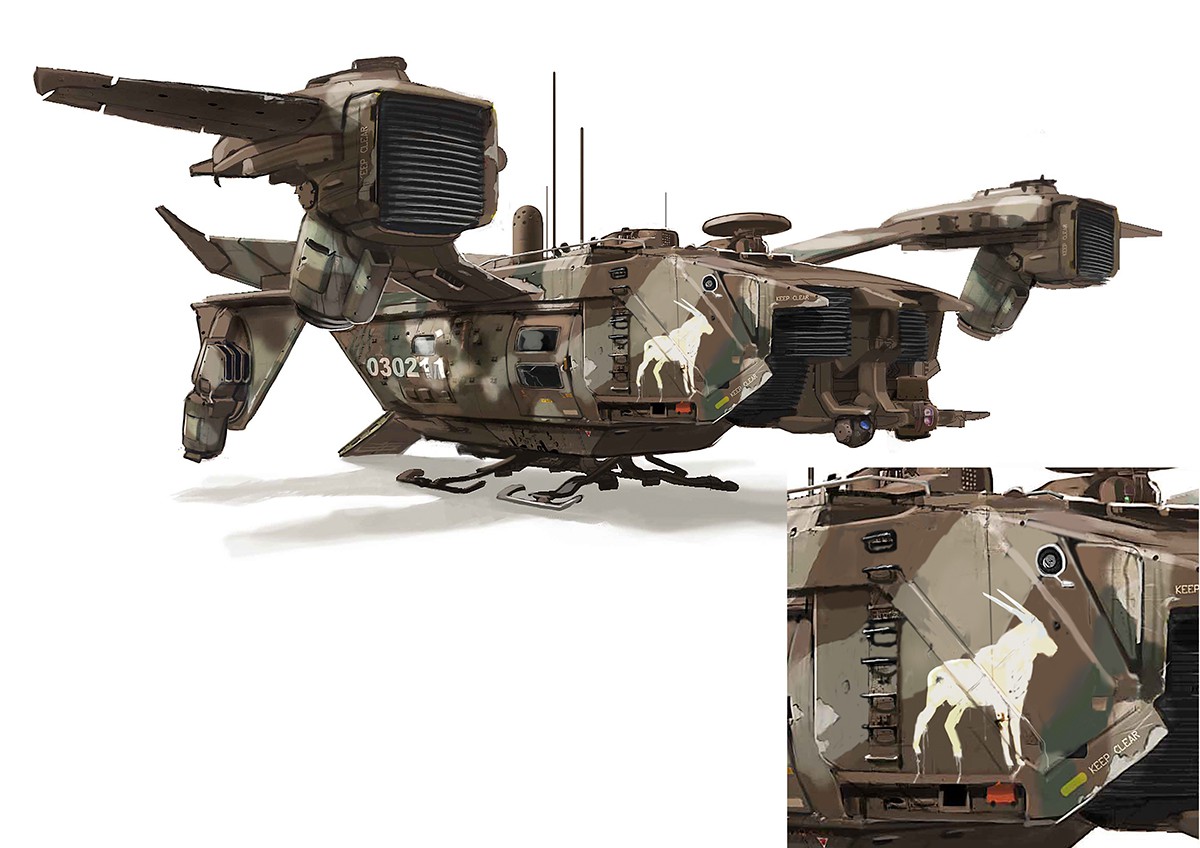
The effect: Kruger’s ship, the Raven, is a bird-of-prey like aircraft with VTOL (Vertical Takeoff And Landing) functionality. Concept designer TyRuben Ellingson helped flesh out the Raven’s details.
“When Neill approached me for assistance with the Raven design,” says Ellingson, “the primary issue on the table, from a concept design development perspective, was that the interior of the vehicle was already approved and under construction. Beyond this inner set piece, what Neill expressed to me in the very beginning was that the Raven was a VTOL craft, and that it needed to be ‘tough’ looking, brutal, while at the same time, look like it ‘could really move.’ Additionally, the name ‘Raven’ was helpful – a strong, compact, sure-footed bird, that, in my minds eye, is also very bright and nimble.”
Ellingson’s initial concepts for the Raven followed the stocky block-like nature of the inner live action set. “It seemed unreasonable to have the outer shape of the Raven be too much longer than this inner compartment,” he says. “I mean, Elysium is set in the future, and the Raven basically ‘self flies,’ the flight deck is not in the front of the ship, there is no front windshield, so one would not expect to see a great deal of volume sitting out in front of the passenger compartment. These things as they are, it still needed to be suitably aerodynamic, so there was an interesting balance of shapes that needed to be found.”
The bird influence is most clearly evident as seen from the front of the vehicle, echoing an open beak, forward swept wings and a tapered tail. “The ‘open bird beak’ front end of the vehicle helped keep the vertical massing, which is in point of fact, quite stumpy, feeling more sleek and aerodynamic,” says Ellingson. “Sweeping the front wings forward had a similar effect, I tried very hard to give the ship a balance that felt authentic to the way Neill described it would move.”
“In my mind,” adds Ellingson, “perhaps one of the most interesting aspects of the design is the way the rear thrust engines are set into the design. As VTOL engines are required to rotate and/or turn the direction of their thrust in a variety of directions (known as ‘thrust vectoring’), I proposed the rear engines be placed into large vertical rings around which the engine could then turn. This idea not only provided an interesting way for the thrust vectoring to operate, it also created a dynamic graphic component.”
Ellingson worked remotely on the project, and was firstly given measured drawings of the approved set construction documents for the Raven interior. He then made simple blocking models in SketchUp. “Once these were complete, I printed out several side plan views on plan paper, and then set to drawing over this outline with ball point pen,” he notes. “This is a technique I employ often as I find it to be direct and simple, in addition to taking advantage of the tactile free-flowing aspects of drawing in one scale – skills that predate my digital tool set and workflow by a number of decades.”
“This sketching exercise led to the development of quality shapes and a nice silhouette,” adds Ellingson, “which I then scanned back into the computer, cleaned up and added a little gray tone in Photoshop, and then sent along to Neill. After a review with him, I moved on to modeling the design in 3D, working quickly to get the shapes and massing in a manner that looked interesting in all directions. Once that was accomplished, I rendered out several views and kicked them back to Neill.”
(NB: you can hear TyRuben Ellingson as he is one of the contributors to fxguide’s vfxshow podcast)
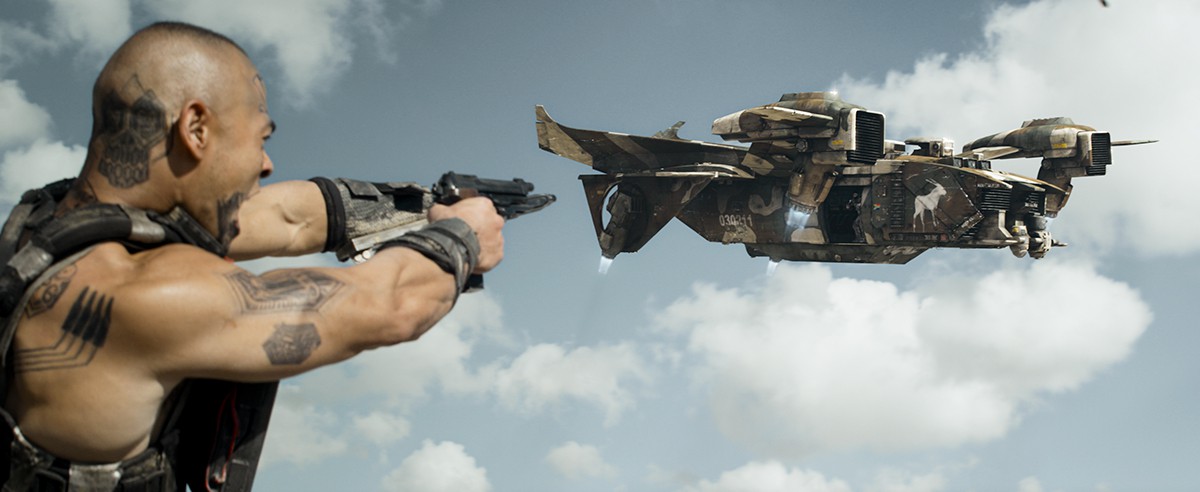
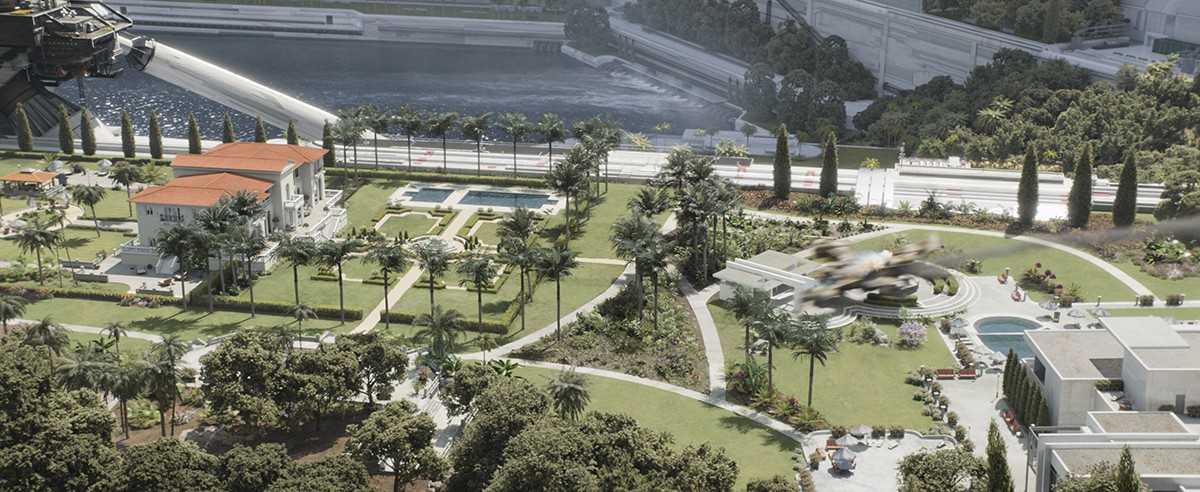
The Raven takes flight
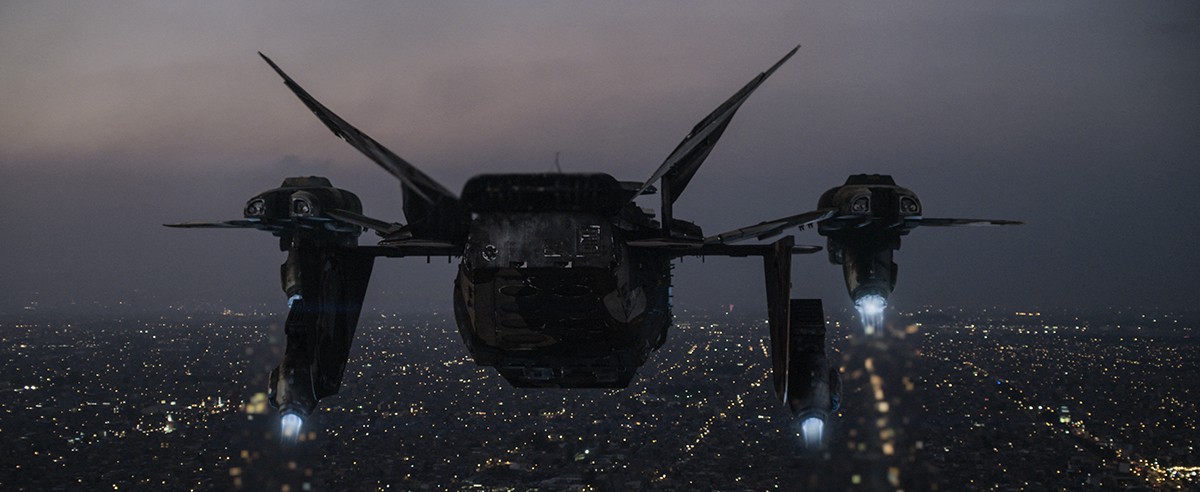
The effect: Crawling across the LA skyline, Kruger’s Raven makes for a dynamic presence. Image Engine created flying and landing shots of the ship.
“We had a lot of great reference from the helicopters used during the shoot,” notes Andrew Chapman. “Similar to the droid greysuits, Neill and Peter were adamant that there be real helicopters in frame wherever possible. This gave the camera crews something to frame up on, Neill something to edit with, and was perfect performance reference for our animators.”
Although the helicopters provided a good basis for motion, they were a lot smaller than the Raven so Image Engine brought more weight to help sell its scale. “That was mostly a case of slowing down and smoothing out the rotations,” explains Chapman. “There’s a great shot of the Raven coming in to the Carlyle crash site, it clears a little rise by only a foot or two and makes a really nice transition into a turn, I’m really happy with the motion on that shot, the Raven is still nimble while looking like it has the weight of a tank. As for all the moving parts, we had some good reference in clips of military vehicles, swivelling VTOL jets, flaps, airbrakes and so forth.”
“I’m also a pilot myself,” adds Chapman, “so I had great fun running a ground school in dailies for the animators on the physics and aerodynamics of flying vehicles, and berating them when they did things like move the ailerons in the wrong direction to turn!”

Modeling of the Raven took place in Maya with texturing in MARI and rendering out to 3Delight. A miniature Raven had been built by Kerner Optical for a crash sequence on Elysium (see below). Interior shots made use of a full-sized set piece complete with a hydraulic rear door. “It was also used on a rotating rig for shots during the crash sequence,” says Chapman, “where the stunt guys were thrown around like they were inside a tumble dryer. The interior was fully detailed but the exterior, wings and engines were all CG. Having that set piece in the frame was great lighting reference and helped us with tracking.”
For dust interaction, real helicopter plates were referenced. In fact, the work done on the Raven and other aircraft in Elysium informed Image Engine’s work on the stealth choppers in Zero Dark Thirty. “We had started this process of using real helicopters for Elysium and shooting them on set for framing and timing reasons and interactivity of dust,” says Shawn Walsh. At the point we were awarded the work on Zero Dark Thirty, we were able to break off a team that had some of that embedded knowledge. Zero Dark Thirty came into the studio, was worked on and was wrapped and in the theater much in advance of Elysium. So you could look at the film and say oh they figured out how to do the ships like the Raven from ZDT, but it was actually the other way around.”

“The clouds of dirt and debris in they kicked up was both a blessing and a curse for us in VFX but resulted in an undeniably better end result,” notes Chapman. “Having all that dust in the plates makes it very difficult for us to embed the CG vehicles within it, but with some clever compositing and layering in, well matched FX elements over the top helped integrate everything and added some great natural detail and interaction with everything on set.”
“And we were really lucky to have one of the world’s best helicopter pilots on the show, Fred North,” says Chapman. “It’s insane what he can do with a helicopter, dropping in just above the deck and pivoting around on a dime, it was incredible to watch, the crew was in awe whenever he flew. It’s also funny to see the camera operators’ reactions when he comes tearing in and slams it down just in front of them, you can feel the tension in the camera and that brings an extra layer of reality to the shots that you wouldn’t have if they were shooting against an empty sky.”
Chapman, in particular, felt that the Raven held up both in flying shots and in scenes close to camera. “There’s a shot where Kruger is boarding the Raven through the side door with the camera following right behind. We were nervous at the time about how that would work out but in the end that’s one of the shots I’m most proud of. You’d never guess that is a fully CG vehicle there, right behind the actors and just a few feet from the camera.”
Carlyle down
Catch a glimpse of Carlyle’s shuttle in this trailer.
The effect: A shuttle carrying Armadyne CEO John Carlyle is brought down in a heist sequence as it flies over Los Angeles. MPC delivered the shots.
MPC modeled the shuttle, a shiny craft with a car-paint like finish, as an in-house asset. “The big challenge we had on this show was that the vast majority of the vehicles in the film are gritty and dirty and fit into the dusty world,” says MPC visual effects supervisor Erik Nordby, who worked with MPC visual effects supervisor Liz Roberts overseeing his studio’s contribution. “The unique challenge we had was, well first of all it was red which is always fun on film. Second to that, it was based on a Bugatti. In fact, Neill had sign-off from Bugatti – they played a role in the design of the shuttle early on and it’s supposed to be this sports car finish as if Bugatti had designed this shuttle. It’s a very shiny surface in a gritty world – and that balance was a challenge.”
For the take-off shot, production had filmed with a stand-in prop. MPC used its model and based extra views of the air brakes and engines on Bugattis – “when you lift the hood of a Bugatti it doesn’t look like a regular engine, it’s extremely clean,” notes Nordby. CG supervision was handled by Pete Dionne and MPC’s compositing supervisor was Hamish Schumacher.
The shuttle passes over the slums of LA. MPC relied on mostly hand-held helicopter plates filmed in Mexico. “The best thing about how Neill shoots is that he shoots very viscerally and most of what we had was air to air,” says Nordby. “There was a second helicopter in the plate, and the camera-housed helicopter would be following and tracking with it. The two pilots flew over Mexico City weaving and dodging which gave us incredibly accurate shots with a lively and genuine camera feel. And then close to the ground we had a little bit of pick up of dust as the helicopter kicks up atmosphere.”
The shuttle is mortally wounded and crash lands in a long stretch of clear dirt – seen from an aerial view – a shot achieved with a combination of CG sim’d pieces and practical elements. “We had in-house some elements that we had shot ourselves which were shot at 120 fps of a block in a similar shape to the shuttle pulling through sand dunes,” explains Nordby. “It was probably 1/16th scale, and using that from all the angles, we could re-build the impact. The forward edge of that interaction was all effects that would then blend into the real elements.”
“In fact,” adds Nordby, “we started almost 100 per cent in effects trying to sim our way out of it. The thing that wasn’t working was scale – there’s not a lot in the shot that sells scale. The shuttle itself is so shiny and a simple shape, and it’s really just a flat plane of dust – so what was really killing us was that it felt quite miniature. It wasn’t until we started to block in actual elements and within those elements and have fire that that began to nail the scale.
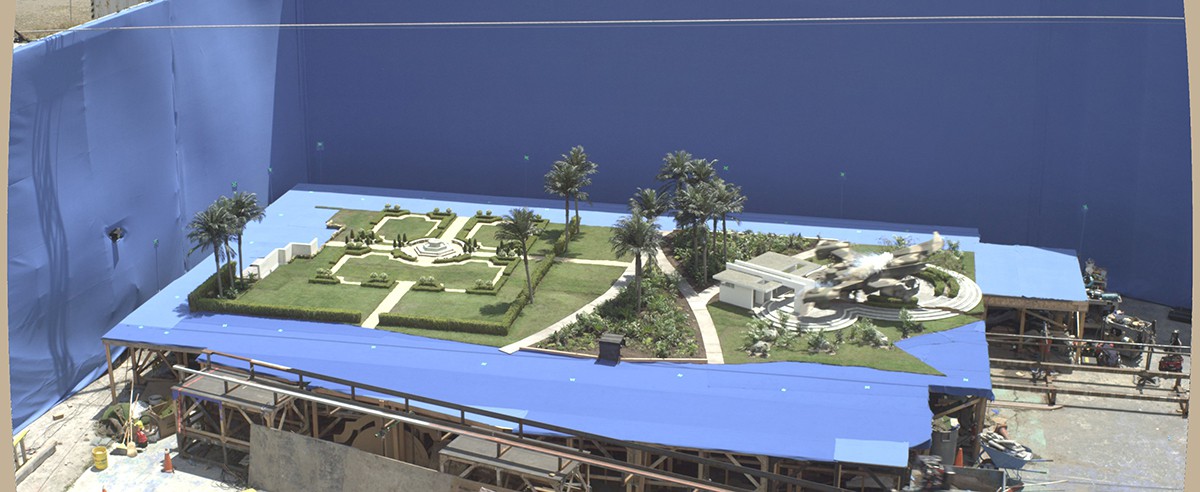
Crash of the Raven
The effect: Kruger takes Max to Elysium in the Raven, but near the surface Max lets off a grenade and causes the aircraft to crash. Kerner Optical (now 32TEN Studios) built a model Raven and Elysium landscape surface to stage the crash at sixth scale.
“Previs had done the beats and the cadence of the crash,” explains Kerner Optical practical effects supervisor Geoff Heron, “but the reason they shot the miniature before live action was so we weren’t going to be locked into however they dressed the set with the Raven for the first unit work. So we could just do the crash and get a nice organic movement and they would match their set dressing to what we ended up with, on live action.”
For the practical Raven model, Kerner Optical built an underlying steel frame based measurements from a computer model mocked up in Rhino. Model and miniature supervisor Fon Davis then oversaw the fabrication of the model detail, starting with forms made out of urethane foam, some CNC’d and some hand-carved. “All the big, bulky body parts were made of urethane foam, sprayed with a sprayable polyester,” says Davis. “It’s like auto body filler where we can carve score lines into it and give it some of the finer texture and detail after we’ve sanded it. Then we put all the greebles on it – as much detail as we can get into the mold we will because every time you cast you get that amount of detail for free.”

Artists then made hard molds by putting fiberglass on top of the urethane forms to end up with a fibreglass shell that mounted to the internal structure. “Then we’d add assorted details from scratch that could break off,” explains Davis, “and also do some plastic fabrication with acrylic and other ways. We would laser cut some parts and do some kit bashing from model kits with the right sized greebles.”
The front of the model Raven was water jet cut metal for the grills constructed out of solid MDF. “We wanted this ploughing into the ground and not breaking,” says Davis. “Neill was very specific about the action he wanted from this model. It was supposed to go through a building – lose the rear stabilizer, one wing at a specific point in time, roll on that side that was missing the stabilizer and the wing up to a set position within one inch. Geoff Heron had rigged part of the framework to have timer releases to cut the wings off at certain points.”
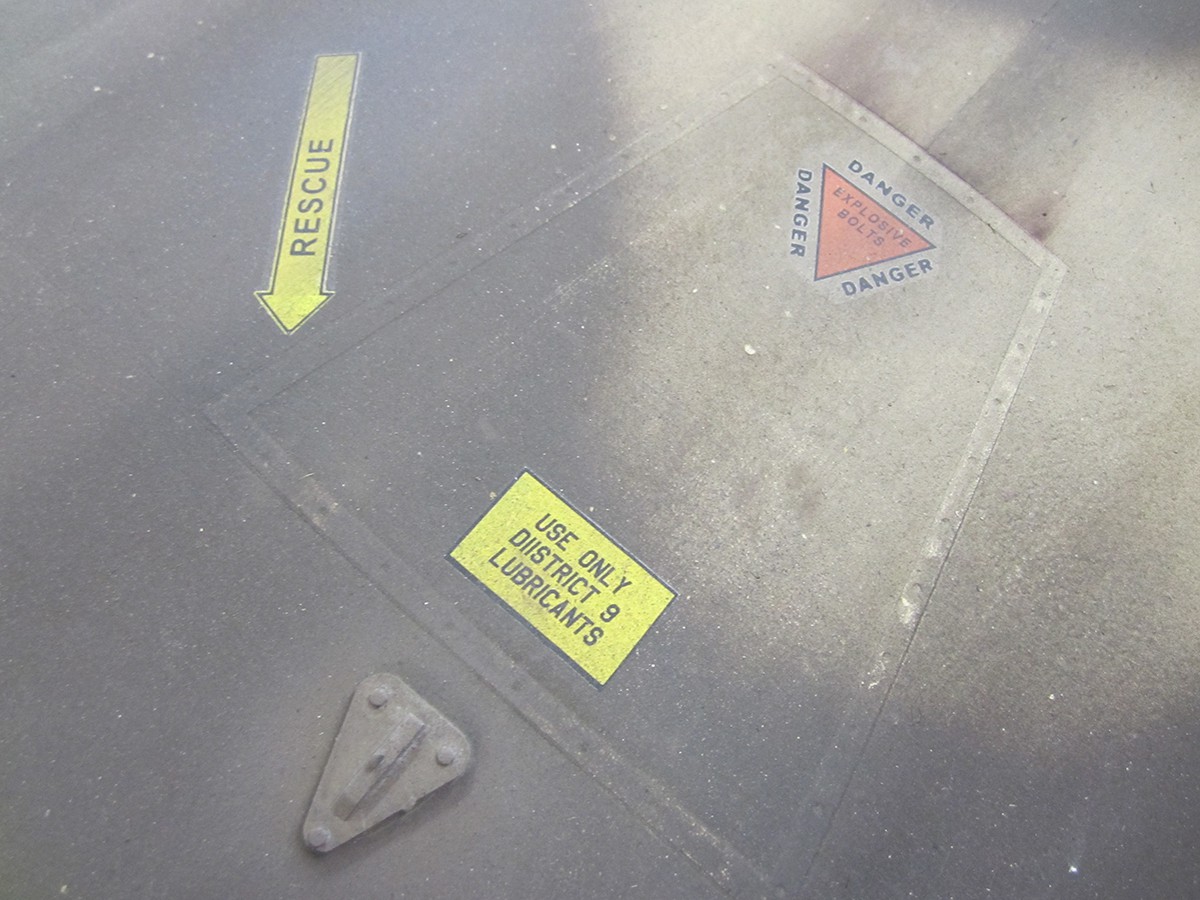 The rest of the aircraft was built with lighter weight but strong materials that would not break off, including Hexcel for the ends of the wings. The camouflage paint was sprayed on with auto touch-up guns, and the Raven was also decorated with several decals and stickers, some applied with vinyl cuttings and some airbrushed. Artists enjoyed incorporating their initials and birthdates into serial numbers and some easter egg notices such as ‘Use District 9 lubricants only’.
The landscape into which the Raven crashes ended up being 70 to 80 feet long, and was dressed on a giant outdoor table to be filmed against bluescreen. “In that setup, the Raven was on a hydraulic rig and it had the ability to ascend and crash into the ground and pitch and roll and yawl,” says Heron. “Then we had a cable-cam that was kind of a chase cam that you see. It was time of day critical because they wanted to shoot right when the bluescreens went into shade and the set was still in sunlight.”
“The whole set was built on a platform that was maybe five feet high,” says Davis. “Underneath, Geoff Heron had built a welded steel track that was very rollercoaster-looking. The Raven rode on this cart that was underneath that platform. There was a channel down the middle of the platform that had sheets of ABS underneath so we could dress the dirt on top and it wouldn’t fall through. But as the ship is going through it ripped through that ABS which allowed the dirt not to pile up in front of the ship.”
“We created a three foot wide trough down the middle where the ship actually hits the ground,” adds Davis. “That was filled with dirt and grass. We had living grass that we had to keep alive and it was a breed of grass for putting greens that has really fine blades and works with one-sixth scale we were working with. We’d also buy baby versions of the real plants. The palm trees were all fake because we couldn’t find any living sixth scale palm trees!”
One of the structures the Raven crashes through is a pool house. “All the windows were real glass because it’s hard to get other things to break like real glass in miniature,” notes Davis. “It had furniture inside and the whole deal. The top of the building and the walls were actually made out of concrete, but we combined that with vermiculite so that they would crush and crumble when hit.”
The action was captured with several RED EPICs running at 72 fps, and one at 96 fps. The team had one take. “The model and camera rig going about 40 feet per second,” says Heron, “which means the whole thing was over in a blink of an eye.”
Future displays
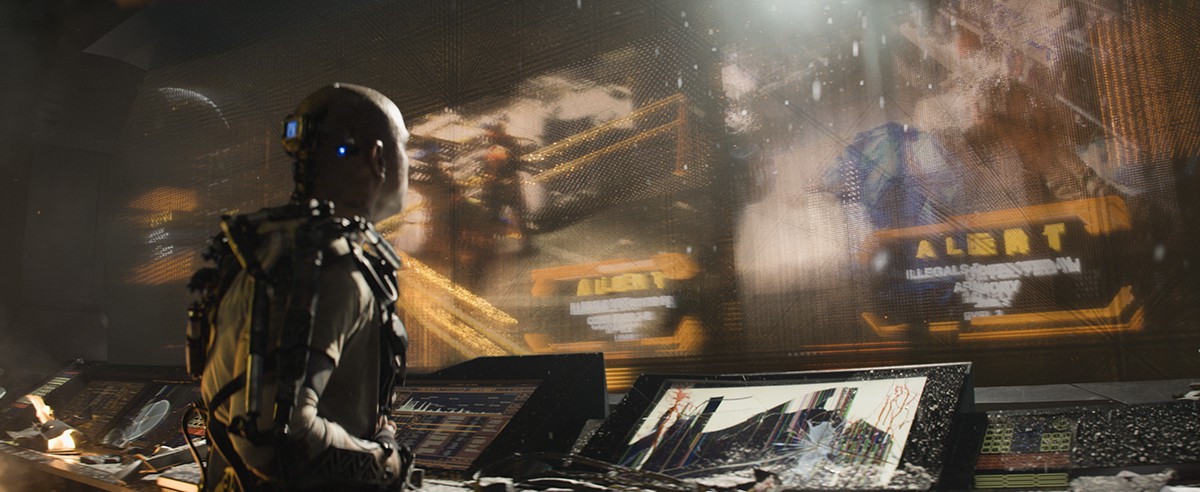
The effect: The futuristic Elysium control room features ‘old-school’ amber displays which were crafted by Method Studios.
“Blomkamp wanted us to imagine what the future of digital displays would have been like if we’d been doing this movie in 1985 and trying to speculate the future from there,” explains Method Studios visual effects supervisor Mark Breakspear. “Back then the display technology was in its infancy and we wanted to capture an exaggeration of that possible future concept.”
Method reference display tech from the 1980s which included data rich and ‘utilitarian’ outputs with “no thought for design and certainly only a rudimentary understanding of information layout,” notes Breakspear. “We wrote out all the aspects that would probably change such as resolution and the way actual data could be physically displayed, and the things that historically have remained fairly constant such as language design and visual grammar. From there we researched modern day 3D data displays, settling with Blomkamp on the 3D point displays that typically show interesting 3D shapes.”

“They were limited by the number of individual LEDs that could be created in a 3D volume, but it got us thinking about how that technology could be pushed by a mind form the 1980s,” adds Breakspear, “and that’s what eventually became our future display tech. We dramatically increased the 3D resolution, and reduced the LED size to almost invisible proportions. We allowed the display to have multiple resolutions at the same time, to cope with resolving detailed information such as text, or more graphic information such as a ship’s trajectory relative to the Earth or Elysium. At the heart of this design was a pretty sophisticated Houdini setup that interpreted our 3D scenes into our displayed environment.”
The plates were shot in a theatre-like room with a large blue screen that represented the back face of the display. “Essentially our display would sit in front of and behind the surface of the blue-screen and would be visible in 3D to anyone within the control room,” explains Breakspear. “In fact, the design allowed different groups of workers to display data on the display in regions closer to them so that as a whole, the viewer could see the hero action for the shot, and on later review more information that would be sub-relevant. It was great to build a display that had that level of detail in terms of narrative.”

On-set monitor displays from filming were also referenced and utilized in part in Method’s final designs for consistency. “Our process to actually create the displays involved creating a fairly great looking 3D version of the display that would probably have worked on its own for any other movie,” says Breakspear. “The design for all the displays was created within the same volume as our virtual 3D LED display and once approved, was used to generate the final display for the shot. Essentially, the highly dense ‘normal’ render was placed inside the 3D LED volume and used to generate either an on or off LED, and also the RGB value of that pixel depending on the material of the 3D geo.”
“The material assigned to text, ships, planets and trajectory lines always resulted in a yellow/orange LED value with a fairly low resolution coefficient,” says Breakspear, “whereas images fed in that were from plate material such as a camera feed would generate an equivalent RGB value on the closest LED. In these areas we also allowed an increase in the resolution coefficient so that the image could still be understood.”
Final compositing took place in Nuke. Only minimal degradation was required as most of that occured in the Houdini/Mantra render. “At one point in the movie the display is partially destroyed and the images needed to appear badly damaged but still have areas that could be read,” states Breakspear. “Houdini was used to segment the finished 3D render in to a sort of strobing puzzle effect. The end result is pretty cool, as you can see through pieces of display that are working to sections that are broken, something that would have been much harder to realize in a 2D only solution.”
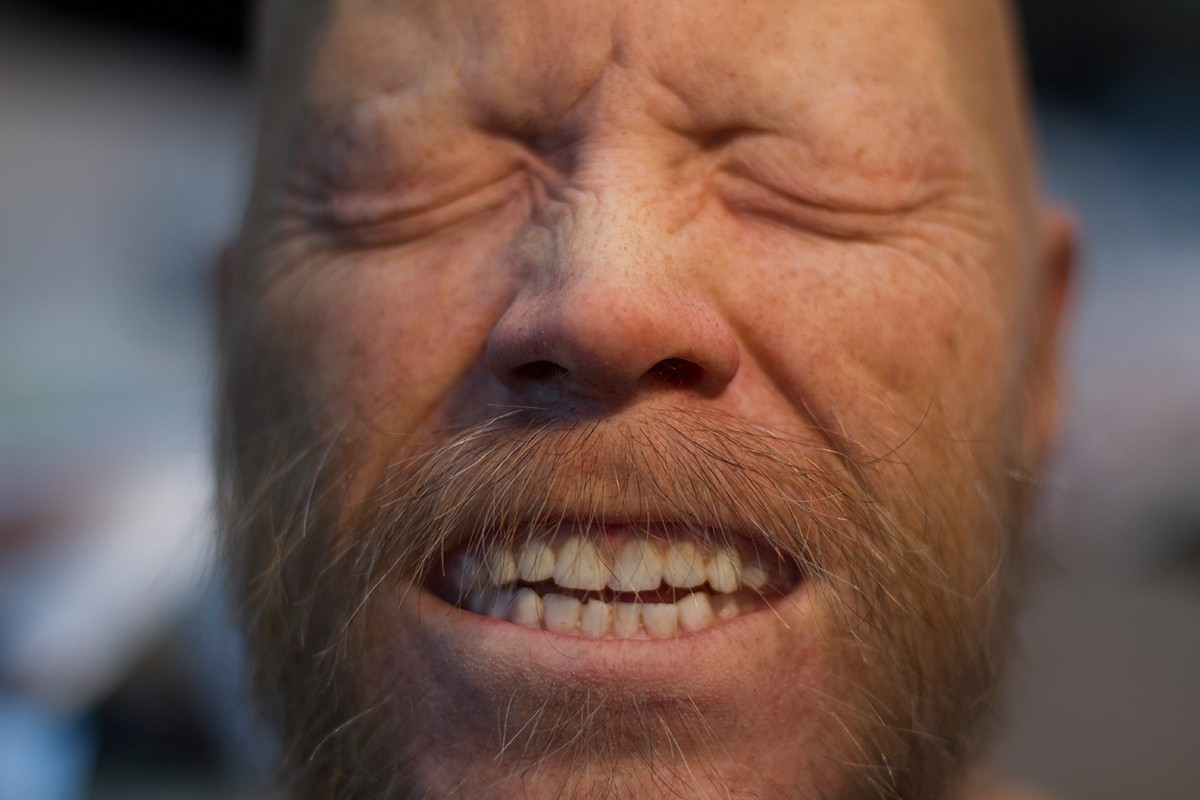
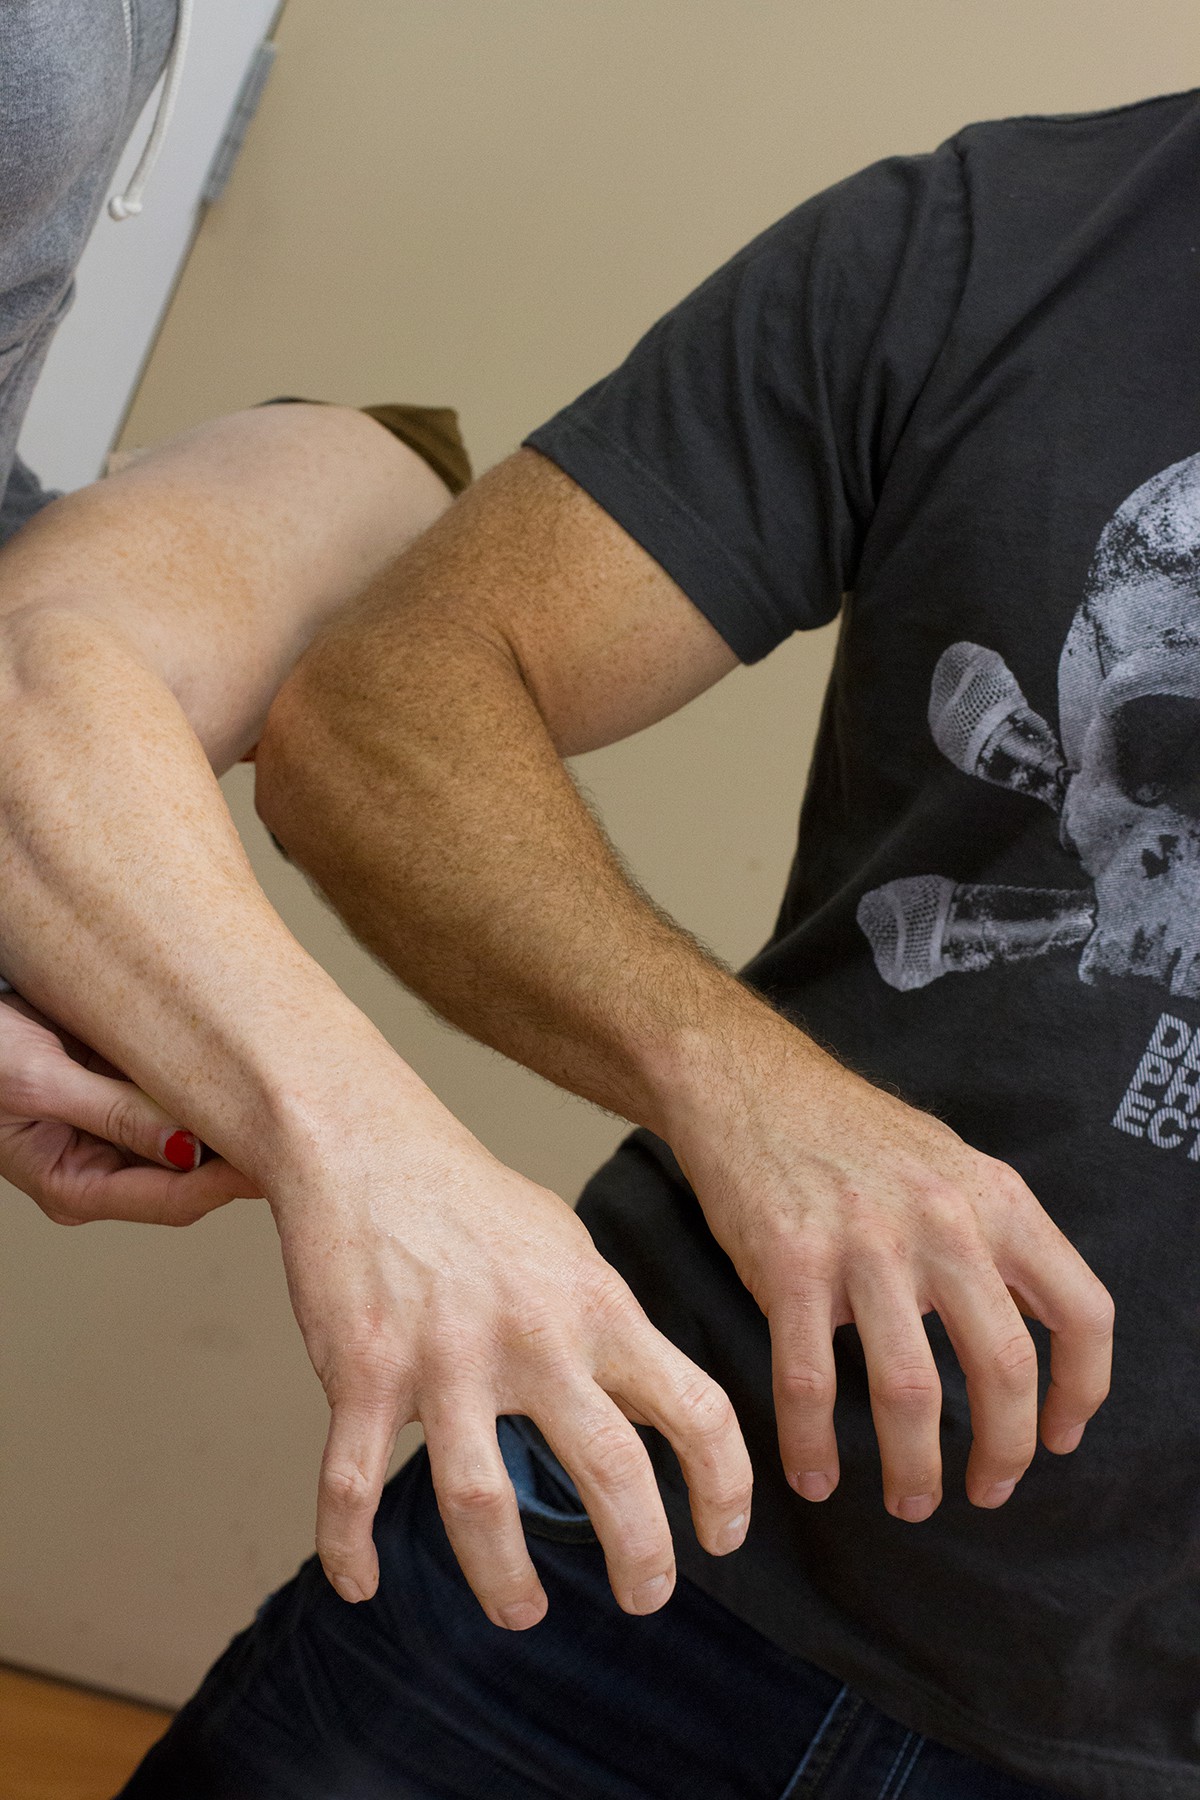
Making Crowe

The effect: Kruger henchman Crowe (Josh Blacker) meets a grisly death at the hands of Max while on Elysium. To help shoot the scene, MastersFX made a highly-detailed and articulated dummy of the actor.
“The actor’s head was cast using the tried and tested method of life casting using PGC (prosthetic grade cream) or Alginate as it is otherwise known,” explains MastersFX art director Werner Pretorius. “We got lucky with Josh as he had a completely clean shaven head, so we were able to take a life cast of his entire head without it necessitating a bald cap, thus capturing every skin pore around his entire head with no distortion.”
The first step in creating the dummy was to treat Blacker’s exposed skin with a skin-safe release agent, especially the exposed hair. “You mix up your material and apply it all over the area to be life cast,” says Pretorius. “In this case it was the entire head. We were very careful to get all the detail, and of course always keep a close eye on keeping material away from the actor’s nostrils as it is the only way to breathe during the process.”
After that material has set, artists covered the actor’s head in a plaster bandage to provide a rigid shell for the Alginate to hold its shape. “Then the life cast is gently removed,” adds Pretorius, “the two halves of the cast are reassembled and we are left with a perfect negative impression of the actor’s face.”
This is now a negative mold into which molten clay is poured. MasterFX’s preferred clay for impressions is Chavant red medium. “We leave the clay to cool overnight and peel off the plaster bandage and Alginate very gently,” says Pretorius, “being extra careful not to damage any of the detail that was picked up during the life casting process. When all of this material is finally removed, you are left with a perfect impression of the actor in clay form. This form can then be tweaked or fixed as needed, meticulously adding all the skin detail back into it pore by pore if necessary.”
The final mold was then made using a low odor Silvertip epoxy. Explains Pretorius: “Using a clay wall we first laid up the front half of the mold and then removed the clay wall, released the exposed epoxy with a wax based release and proceeded to lay up the back half. Each half has about five layers of epoxy matting to give us a strong lightweight mold.”
“Once the epoxy was set,” adds Pretorius, “we opened it and cleaned the clay out of the mold making sure we were very gentle as to not damage the molded detail, laid some more clay into it to represent our skin thickness and ran a core in the two halves using epoxy as well.

For the Crowe dummy skin, MastersFX used a platinum silicone called ‘Dragonskin. “It was strong enough to take the abuse we knew the dummy would be put through on set,” says Pretorius. “This particular dummy was required to perform various action sequences, including being launched into a wall at high speed, being able to be reset quickly and launched again. We had a backup which was never even used as the original one held up perfectly take after take.”
The Dragonskin was tinted to match the actor’s base skin tone and the teeth and tongue were also intrinsically colored so that MastersFX could use soft silicone teeth to prevent breakage. “After we achieved the desired skin thickness and tone we placed the metal armature we fabricated for it into the mold and backed it all up with an expanding urethane foam,” says Pretorius.
 “The foam served two functions, it held our armature in place and also gave the silicone skin something soft to cushion against when it was launched. It was soft and could deform against solid objects and then spring right back into shape before you could register that it has happened, thus helping with overall strength.”
Finally, the dummy head was then attached to an articulated dummy body manufactured using the same techniques. “The dummy body was also able to take different weight sets in different sections in order for us to alter the weight for being catapulted or picked up and slammed down,” notes Pretorius. “It also had various pick points built into the armature for cable rigs.”
The dummy was then detail painted using silicone paint to add deep tones, freckles and skin blemishes to match the actor. “As a final step,” says Pretorius, “all the hair on the face, head and arms was hand punched one at a time, cut and styled. The dummy was dressed in the required wardrobe and welcomed on set.”
Choose your weapons
See some of the weapon effects in this trailer.
The effect: Some of the more elaborate weapons for Elysium were realized by The Embassy.
In one scene, Max fights Kruger and fires off a futuristic flechette gun, expelling bullets that split mid-air into multiple projectiles with accompanying effects, sparks and bullet fragments. The Embassy, under visual effects supervisor Steven Pepper, created these in Houdini and rendered them in Mantra. Kruger protects himself with an electric plasma energy-like shield.
Other weapons and bullets included electrically charged pieces of lead and tasers. In particular, The Embassy adopted earlier work for Battleship in developing efficient tools in Houdini for photorealistic sparks with proper lens abberations and randomness to them. They also adapted their pipeline for bullet hits. “Usually bullet hits on suits might take 2 to 3 days in comp to do, but we have a system now in Houdini where we can bang the stuff out really quickly and save lots of comp time,” says visual effects producer Winston Helgason. “We’d run spray bullets in real-time and you get a super-realistic analogue looking bullet hit.”
The Embassy also worked on bullet hits and sparks on a show car – actually Neill Blomkamp’s old Nissan GT-R which had been sold to production and re-purposed, as well as a later scene of Kruger’s henchmen being torn apart by blasts.
Special thanks to Sony Pictures and to Hannah Hughes at Image Engine. Images copyright © 2013 CTMG.
Pingback: Post Production on Elysium | Jonny Elwyn - Film Editor
Pingback: Elysium - The Name's Ponyboy
Pingback: Elysium Where Are We When The Wild Things Are | Violetcora