At GDC this year Epic Games showed their Open World demo and real time A Boy and his Kite. In a landmark move the team at Epic aimed for something akin to a Pixar short film – a bold statement about just how powerful their Unreal Engine has become and how it is able to be used outside traditional game environments.
Tim Sweeney, founder and CEO of Epic Games, describes game engine companies such as his as being two steps removed from actual gamers. In a sense he suggested that, “we make paint brushes.” Epic Games is on a roll, hiring some of the industry’s brightest talent, and since adjusting its price a year ago it has grown 25 fold in the last year alone.
Outside the traditional game engine market, Epic has also found adoption of its Unreal Engine amongst filmmakers and visualization artists. This spread beyond traditional gaming to architectural walkthroughs, narrative story telling and other forms of communication seems to be at a tipping point. The engines are now so powerful – featuring physically based lighting, ray tracing, SSS and complex environment work – that their use seems to only be further widening.
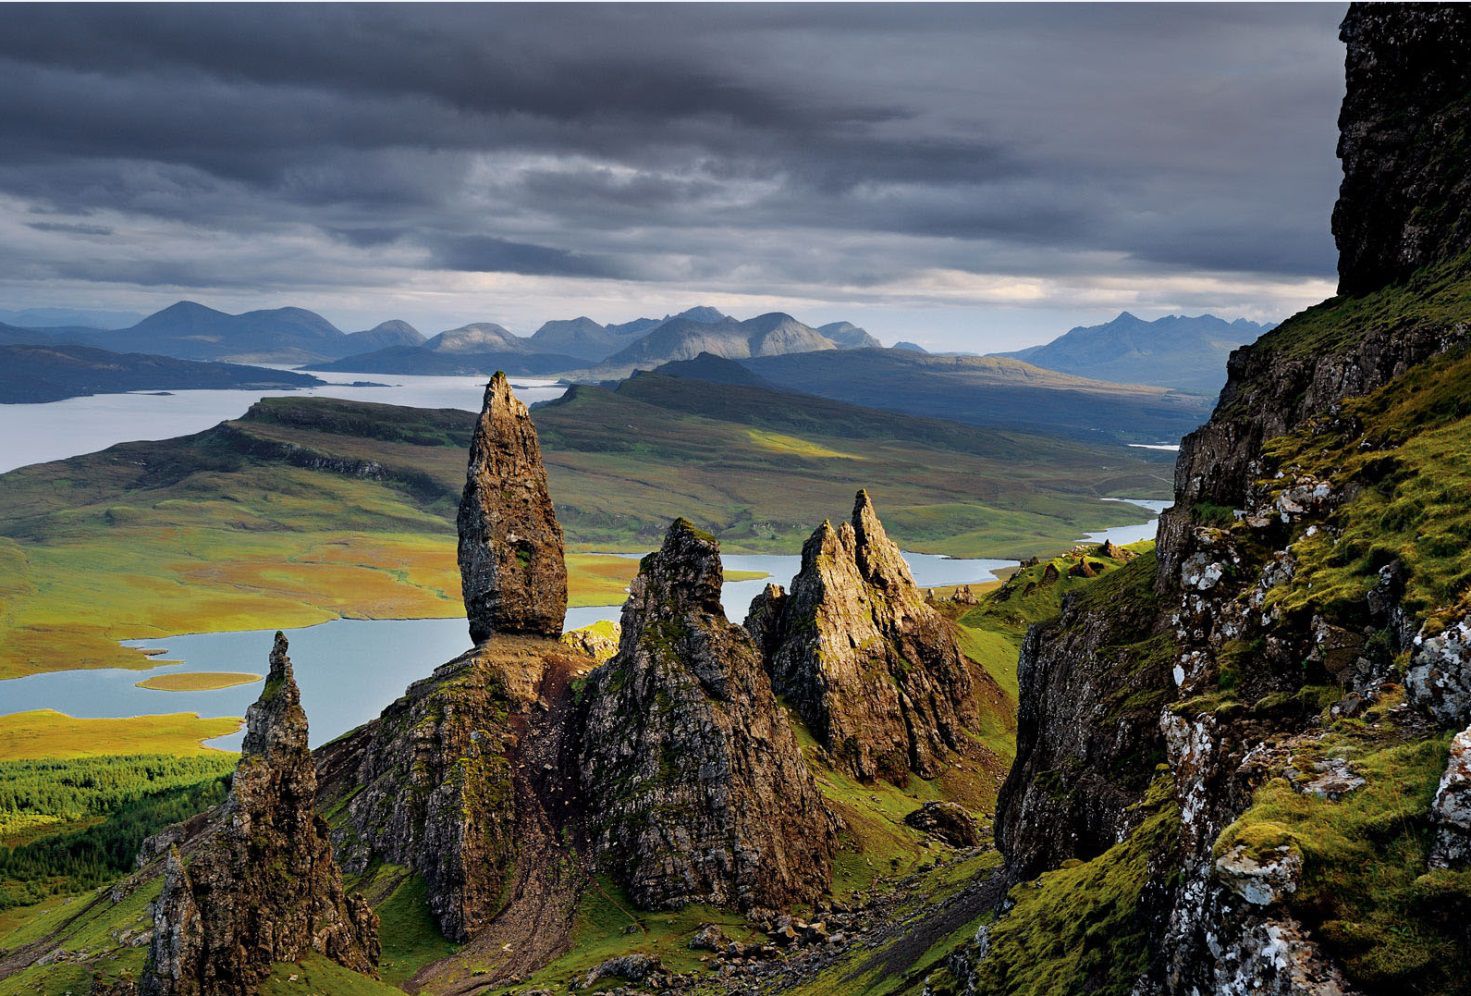
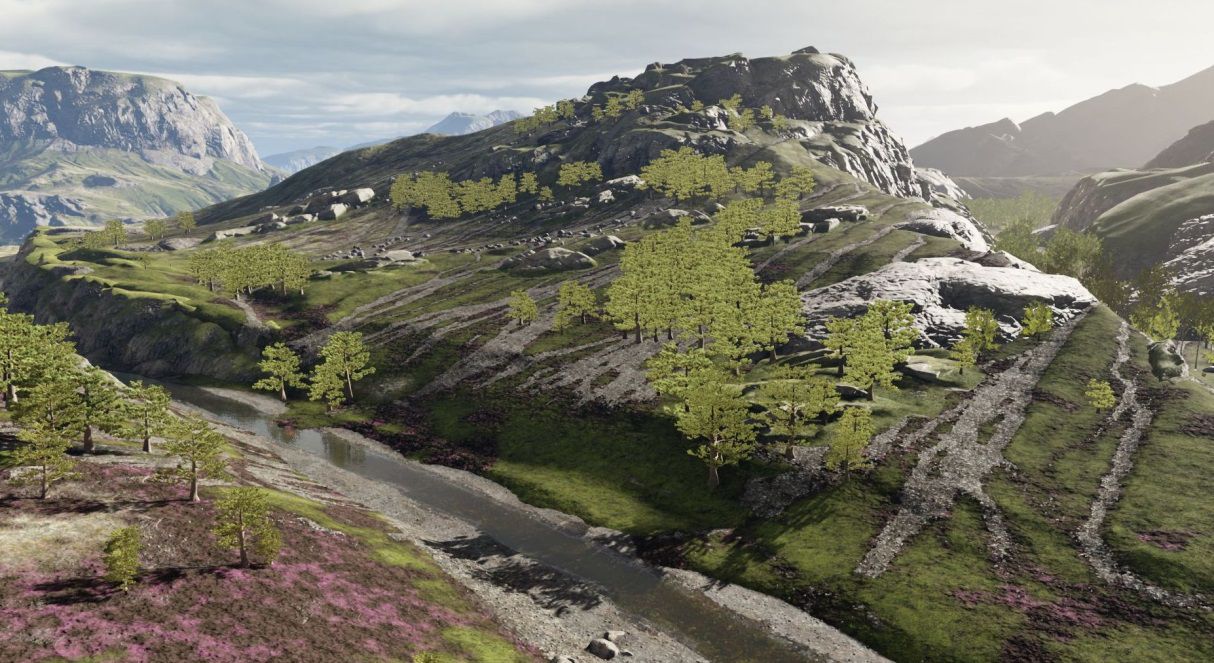
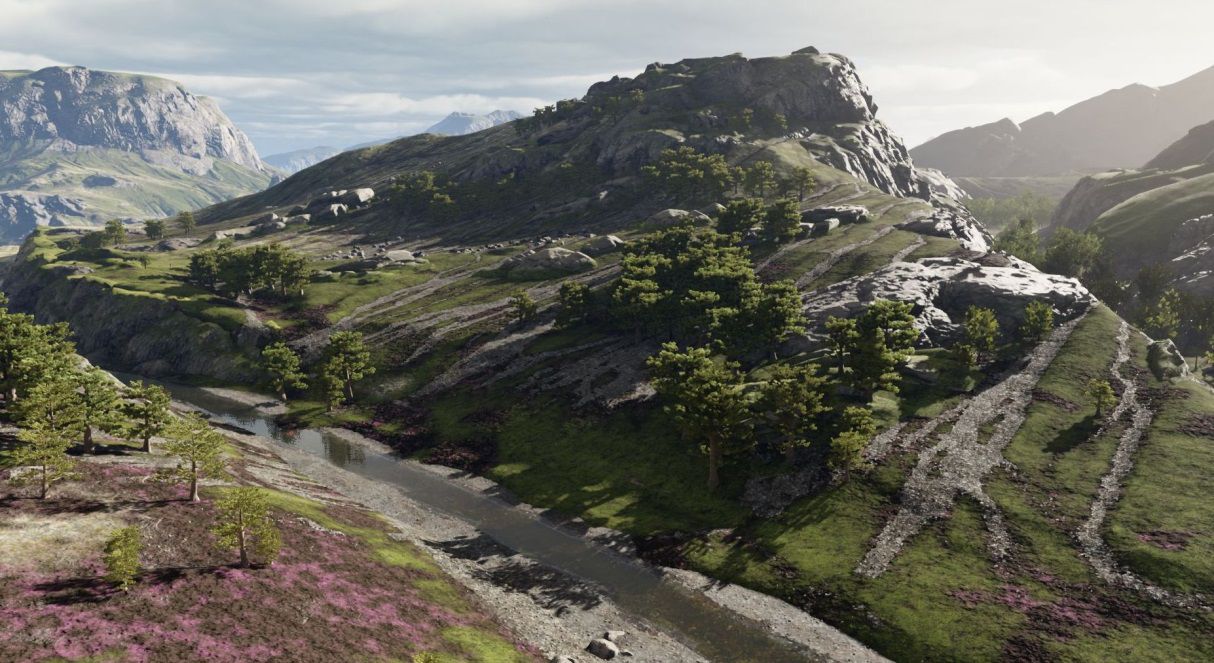
To embrace this new use of their products, the Epic team put together both an open world and ‘Pixar’ style narrative piece that is very cinematic and natural. Gone are the robots and first person shooting environments and in its place is a beautiful Scottish landscape. Even more remarkable is that the piece was made from inception to GDC (where it was first shown) in just 9 weeks.

The short film, ‘A Boy And His Kite’, was directed by Gavin Moran who started his career in traditional classical 2D animation, before moving into computer graphics at Disney, DreamWorks and Sony Pictures Imageworks. Since joining Epic about 5 years ago he has worked on all the recent demos such as Samaritan Demo (2011, Unreal Engine 3), Elemental (2012, Unreal 4) and Infiltrator (2013, Unreal 4). While these earlier demos were impressive in their own right, they were urban, or dark in a way that ‘A Boy And His Kite’ is not. The departure of this demo was very deliberate for the team, and very unlike the nearly always gothic demos that had proceeded it from Epic.
Daniel Vogel, director of engineering at Epic Games, declared at the outset that the environment for ‘Boy’ needed to be at least 100 square miles of terrain. The final open world is indeed that large with fully featured highlands populated with birds, deer and, in the narrative version, a boy and his kite. When the piece was launched at GDC the attendees could fly through or walk around the world at the Unreal booth, and then as a demo version download. Viewers can move around in either drone or walk mode. The narrative film shows the same assets used to produce a cut piece or short film.
https://www.youtube.com/watch?v=O8yGhhtjBwk
“When Kim Libreri (the project’s Executive Producer & VFX supervisor) approached us,” says Vogel, “he wanted something that would show off this huge environment as well as possible. So we wanted to do a story, and the kite piece resonated with a lot of people.” Libreri joked that it may not have hurt that Tim Sweeney’s desk at their main offices happens to actually be surrounded by kites. The colorful sail cloth kites double as window blinds in his Epic Games office.
The approach Epic took to the project was to adopt the production process that would normally be used for a more narrative effects pipeline. For example, Libreri, decided to adopted a strict dailies approach, which proved to be interesting and challenging. One aspect of games that is nothing like traditional effects is that the artists share the same fundamental asset, unlike a database controlled sense of checking it in and out of a scene with version numbers. Literally, if one artist thinks this mountain would look cooler if taller, then it changes the mountain for everyone and there is no fine grained version control – is there is in film – to control and go back to an earlier mountain.
Asset creation
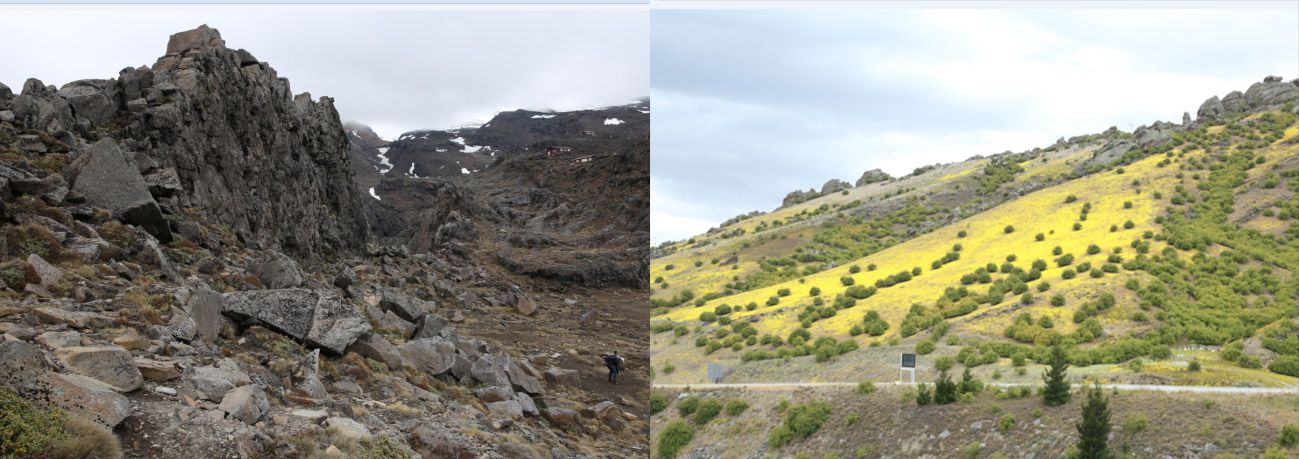
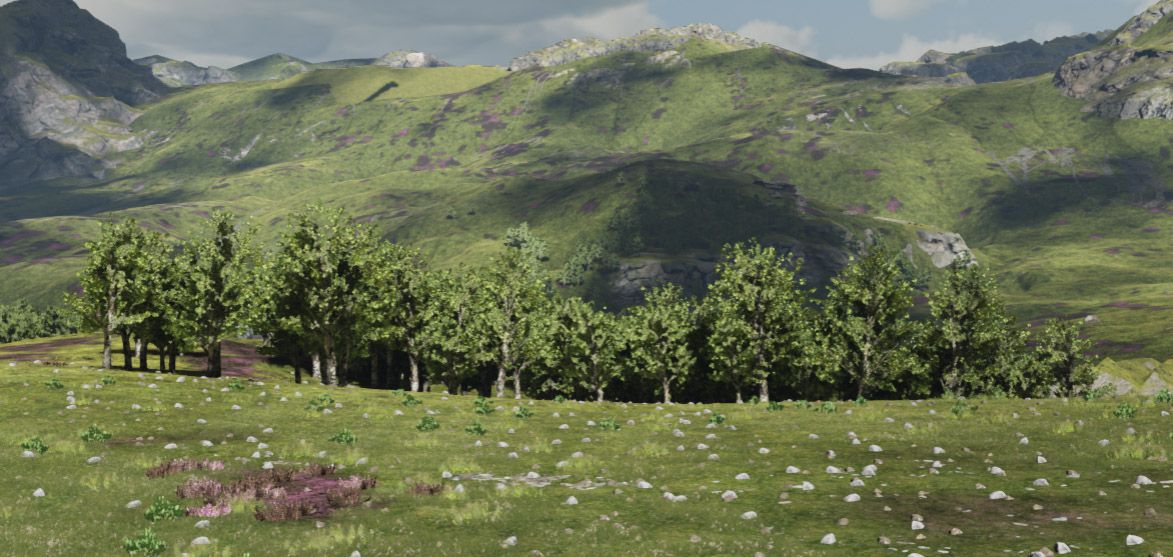
For the asset creation stage the plan had been to fly to Scotland and theme the world as the Isle of Skye, but when the team spoke to their UK Epic counterparts it was pointed out that around the beginning of the year Scotland is very bleak, very cold and very brown – not at all like the world the director had imagined. Sure enough, thanks to Google Earth, they discovered that the Isle of Skye would be perfect – if it had not been the middle of winter. “We have an Epic office in Sunderland (formerly Pitbull Studios) in the UK not far from Scotland, and they said ‘Hey, you Americans – it freezing here, it is brown and muddy and there are no leaves on the trees!” according to Libreri.
Luckily, while this project was going on, the Epic team was also making the Smaug VR experience with Weta Digital which brought New Zealand to their attention as a possible shooting location. Unlike Scotland’s five hours of daylight, New Zealand was in summer and had 12 hours of light – and a lot less rain! So the primary shoot was accomplished by a two man team in New Zealand with additional shoots done by two more out of Epic’s Northern UK office on the occasional day of nice weather. Thus the kite story takes place in a land the team nicknamed ‘Scozeland’. François Antoine, who took on the role of asset supervisor on the project, spearheaded not only the location scouting and trip logistic but also the entire asset pipeline.
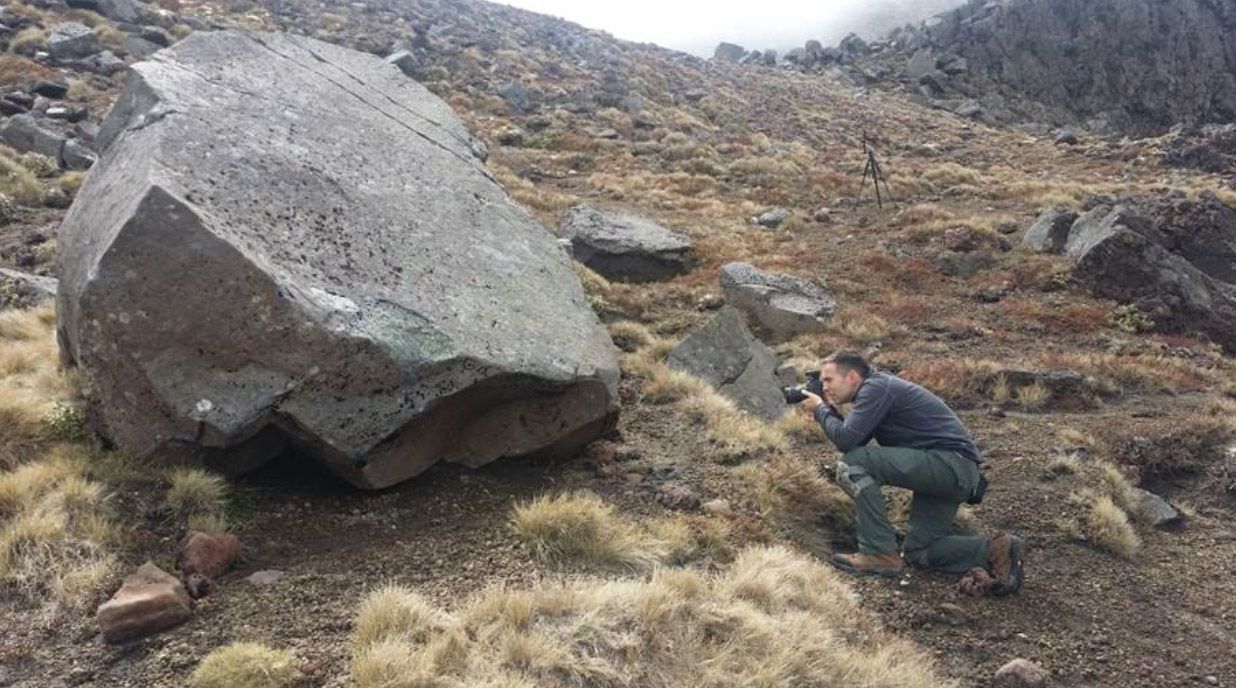
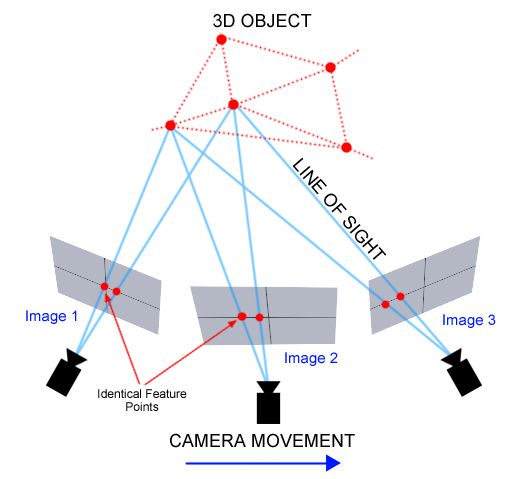
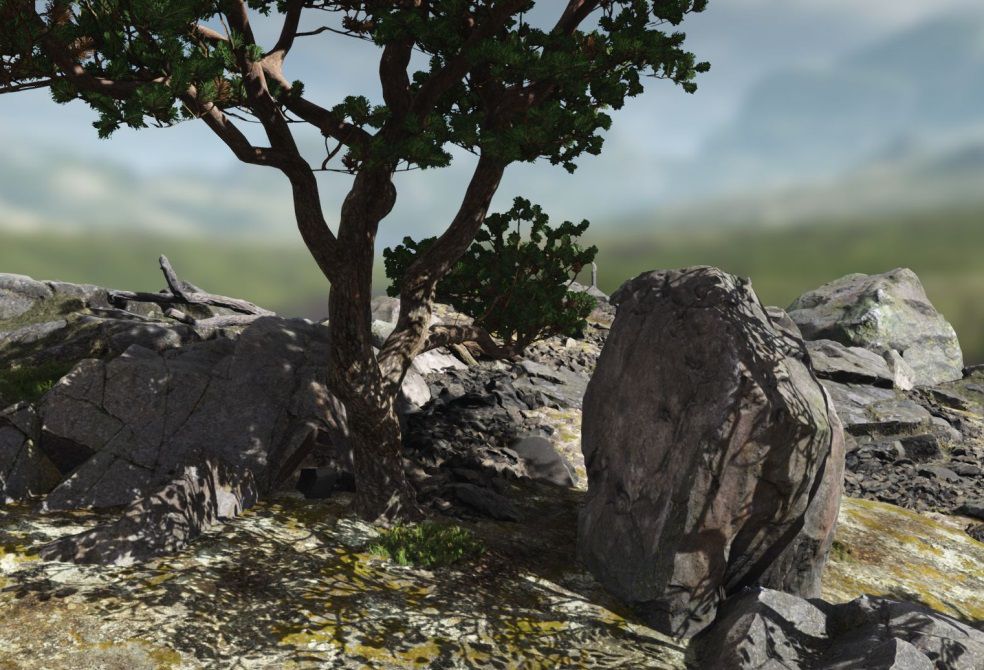
The asset creation and assemble stage was unusual as it started with very much real world terrain and foliage, based on a large amount of photogrammetry. This approach would serve two masters, first it would provide wonderful reference and secondly it would help test and extend the photo based Epic pipeline in ways the team hoped would lead to product improvements.
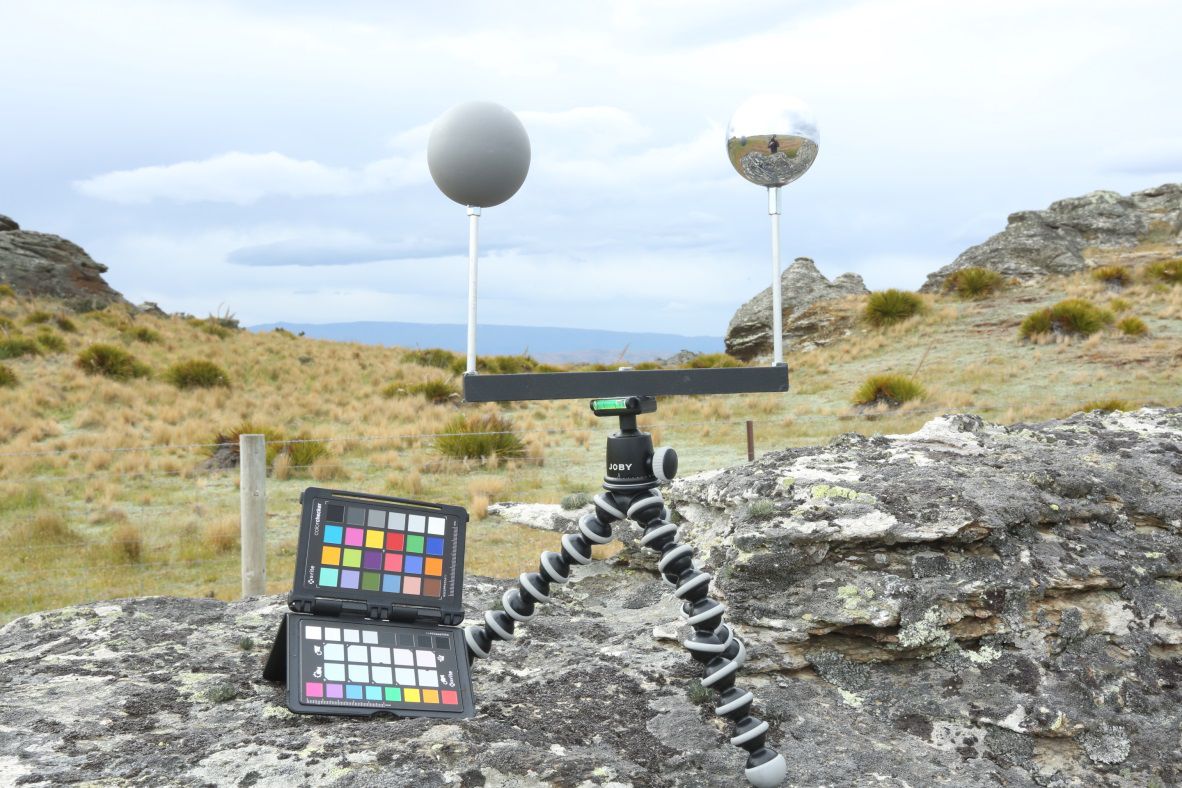
The capturing was split between reference and photogrammetry capture. The later was photographed with a circular polarizer, with as much depth of field as possible and shot with a colorchecker as well as 18% gray and chrome balls. Whenever possible asset captures were done in overcast weather to narrow the range between light and dark areas and minimize specular highlights. The reference photography was also shot with a color checker but this time assets were shot over a blue screen.The blue screen helped with isolation for extraction and the color reference allowed a normalized color space and would allow for adjustments to even out and match all the elements taken over the week of scouting. For all the shoots a full 360 nodal HDR light probe was photographed for later use. The NZ capture gear was primarily three Canon 5D Mk III cameras with Sigma 8mm lenses, 24-70mm L lenses and a RoundShot VR Drive motorized pano head.
This lead to a lot of photos and a lot of great assets. In fact, in New Zealand alone, the two-man team captured some 28,517 photos and 248 assets – all totaling over a terabyte of data. The team captured so much data that only about 50 of these assets were processed and used in the Kite story environment. The team aims to continue on and process the rest of the assets for future use. The photogrammetric reconstruction was done by 10 artists spread over 3 Epic Games offices around the world – USA, UK and Poland.
As a Canon RAW file is effectively compressed, once you convert RAW to say TIFF – it is vastly larger, so the data grew from 7GB to 50GB of data per asset. Working on this around the world and transferring such heavy amounts of data actually required the team to write a tool they call the ‘GDC Photo Ripper’ – which is a very fast multi-threaded networked file copy system as well as a bespoke CR2 to 16bit TIFF linear converter which bakes in sRGB tone mapping (gamma) to generate artist friendly images (raw linear space images can often be in a value range that makes them unintuitive to work with).
The team used Agisoft for the photoscan reconstruction. The high poly object had between 10 and 20 million polygons with a 16K texture (5700 pixels wide). But of course, the asset would have some baked in lighting (ambient occlusion and natural shadows). To remove the lighting information from the assets, Antoine created a semi-automated process which re-generated the lighting condition at the time of each asset’s shoot using the capture HDR and use that information to create a ‘delighting’ pass. The result effectively being a diffuse albedo texture.
Once this is done the assets no longer have any baked-in lighting in their textures so they can be properly re-lit in the game engine correctly for any time of day.
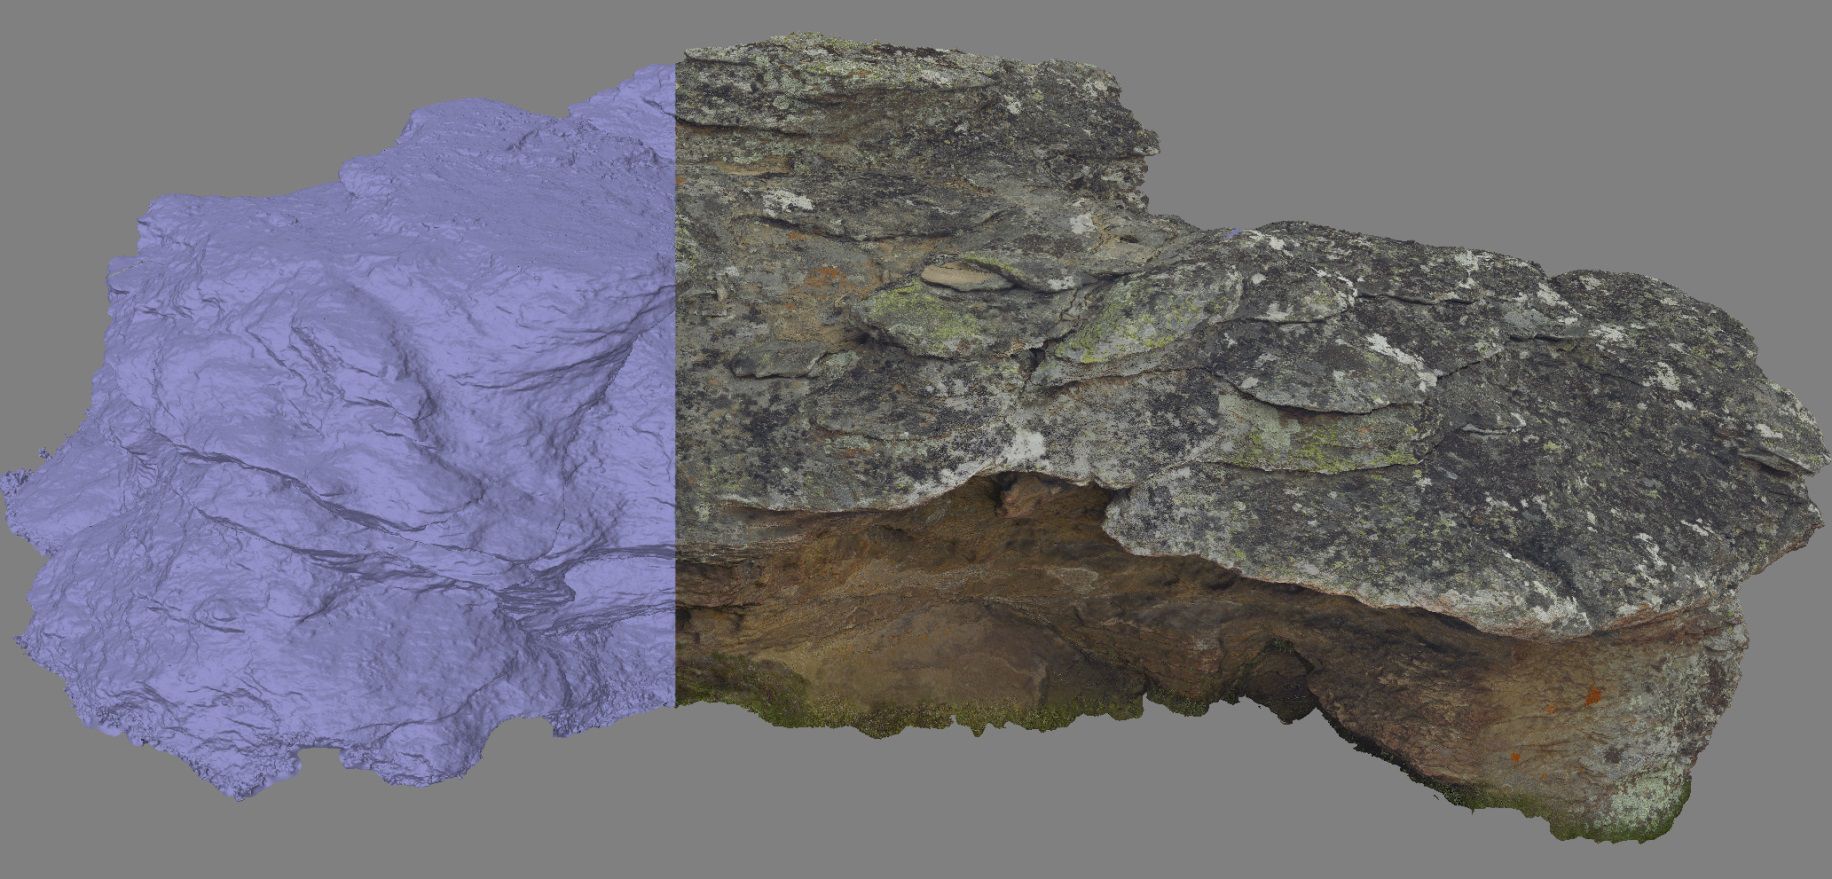
The team then created a roughness map and specular map which are needed for the Unreal Engine 4 physically based lighting renderer. Once complete the team had a high poly asset but this was vastly too complex to be used as a game asset. To make a low-polygon version there were three levels of detail (LOD) produced, with texture cleanup and capping of the model. In the future the team aims to automate and effectively hide this step so the artist would just load the high poly asset and use it – with the game engine managing any LOD work needed. But for now this still involves manual work.

As Unreal 4 has a flow based nodal blueprints script engine, the team built a turntable system that allows any asset to be viewed in any format and in any lighting environment – showing all the possible ‘passes/views’ (normal, shadow etc). All in all the 11 person asset team “worked like crazy over a month and a half.”
Lighting
The lighting is fully dynamic allowing artists to see changes in real time as they made changes and players to change the time of day at runtime. There were three main components to be solved:
1. lit directly by the sun
2. lit by the sky (shadow areas are still lit by the skydome even if directly shadowed to the sun)
3. bounce light from the sun (ie. global illumination)
Cascaded shadow maps (CSM) normally used to compute sun shadows in games, are only accurate for objects near the camera and are very expensive in scenes with high poly counts and long view distances. Ray traced distance field shadows (RTDFS), a new feature developed for Unreal Engine 4, provide detailed shadows in the distance at roughly one-third the cost of CSM.
The distance field is a system of storing distance to the nearest surface at every point – this is stored at every mesh point – so ray intersections skip through empty space based on distance to surface. If the ray intersects, the light is shadowed. This lighting approach was introduced in Unreal v4.5 and has proven to be enormously beneficial on static meshes and foliage. This approach also works for cone intersections for area shadows.
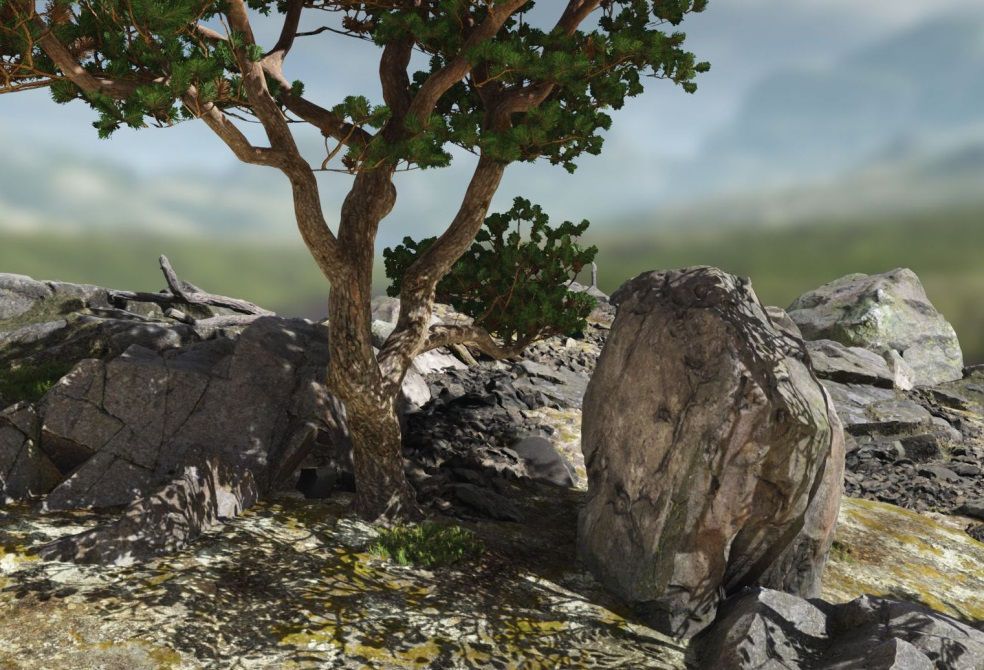
For the sky lighting, the same distance field approach is used for ambient occlusion (DFAO) complements the more traditional screen space ambient occlusion (SSAO). This distance field cone tracing approach produces very effective AO for objects such as rock or large scale terrain.
In terms of shading, the leaves and the kite use a new two-sided shading model that is energy conserving and simulates the transmission of light through thin surfaces. The results are more accurate than trying to reuse the existing subsurface scattering model.
The SSS is now using diffusion profiles which are not skin specific. Martin Mittring, senior graphics architect, is working on forward scattering but it is unclear when this will be released. But for now the boy’s ears are not forward scattering (transmissive SSS in the same way the leaves show light transmission, since the forward scattering is actually different from the back sided double shading used for the foliage). The team did eventually code a solution, but it was not able to be deployed in time for GDC.
The SSS algorithm used today by Epic is based on a variation of texture space diffusion SSS, which dates back to developer JP Lewis (now Weta) and the UCAP days of the Matrix team that Kim Libreri was so centrally a part of!
Camera tech
The new motion blur system in Unreal Engine, which will be released in the next v4.8, is full resolution and has smooth edges, and while not yet released (as this was a very late edition to the project), the team hope to release it soon. The depth of field now allows near and far objects to be out of focus, with a newer circular bokeh. The new camera uses aperture, focal length and focal distance. This new DOF racks focus in a much more lens accurate way and is a dramatic improvement. Neither the DOF or the new motion blur have post process style edging or artifacts as they are less of a trick and more of a physical model implementation.
 Interestingly, one of the cinematic difficulties that director Gavin Moran had to deal with in this realtime render was ironically one of the simplest things to do in film, namely a dissolve. “We couldn’t do a dissolve,” he says. “You’d have to render both shots to dissolve between them, and we were all ready pushing the hardware pretty hard. It is really hard cinematically to show a journey and the passing of time without using a dissolve. We had challenges like that I just didn’t think about beforehand.” The only cinematic approach they had was to fade to black and then back up, to show the passing of time.
Landscape
The landscape is broken up to streaming levels – and it uses a continuous LOD system to avoid high polygon mesh work being everywhere, which is not a new approach. There are weight maps used across the landscape to define and direct terrain coverage, with height maps used to create believable boundaries between terrain types.
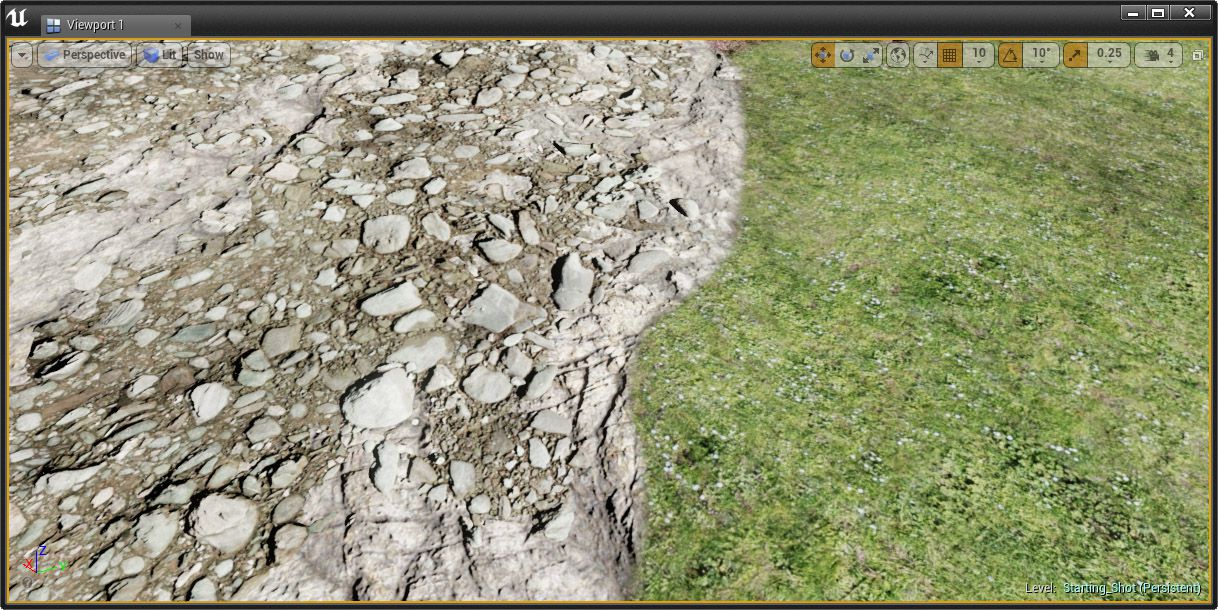
The foliage was a mixture of procedural placement and manual placement. The foliage used Hierarchical Instanced Static Meshes, this allows for wide use of geometric instancing.
Interestingly even at the lowest LOD on the trees – which is effectively using billboards or cardboard cutouts rather than dense meshes – the material on those billboards was specially modified to not shade as one large element, so the billboard has a map or mask of depth information which in turn shades the billboard in an uneven and much more realistic way.

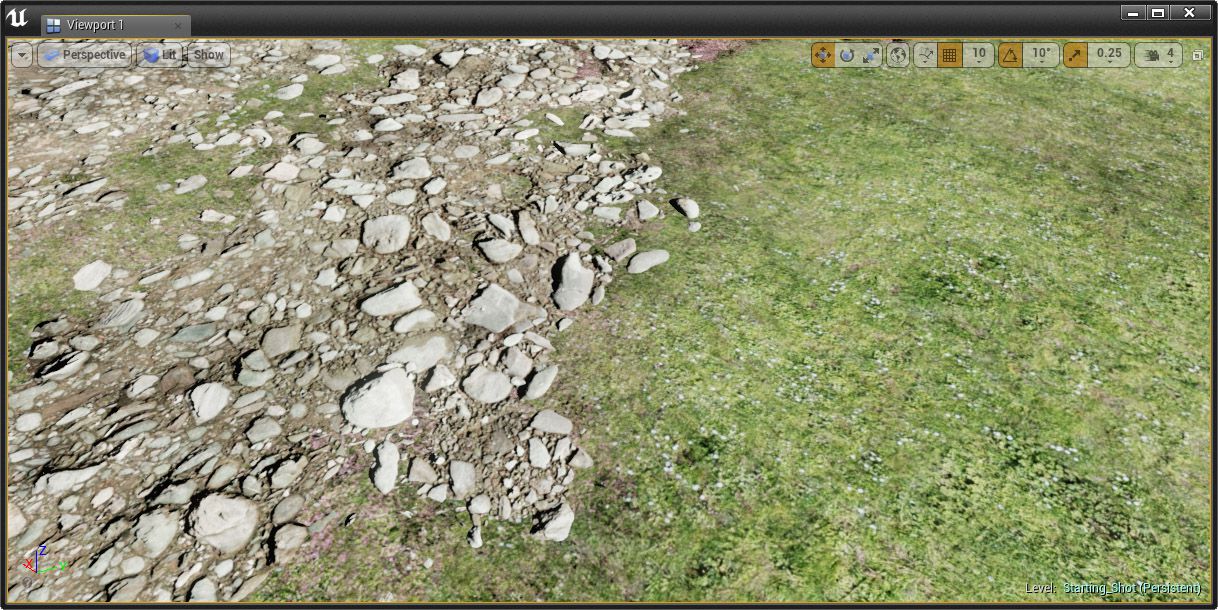
The engine uses simulation for the procedural clustering and thinning of trees and foliage but also rocks and rocky outcrops. The simulation or ‘eco-system’ takes in ‘species’ of greens and then they grow and seed other plants, which then references things like relative strength, altitude, slope, relative size etc. As with any real eco-system, some plants only grow in wooded areas or shaded spaces and thus one species influences and affects others. This was so effective it was used in almost all the 100 square miles of the game environment, but for time the team decided to compute the world in tiles or volumes to allow the designers to try things in just certain areas. And if the simulation was not quite right for the designer they could always go in and manually adjust it for the golden path areas that were expected to be seen for longer in the narrative version.
The final system placed over 190,000 rocks, 255,000 trees, over a million bushes and six million flowers into the environment along with nearly eight million grass elements, that is, ‘featured’ grass elements on top of the base grass system. The base grass system did not use the weight maps, they used the Unreal material graph to define the grass density.
Into this lush environment the team added wildlife. The environment has A.I. deer, birds (crows) and other creatures. The deer were produced using a standard game creature pipeline. The deer or deer agents were programmed with crowd simulation to move away from the camera (run 180 degrees from the viewer), but avoiding cliffs, obstacles trees etc, and of course each other.
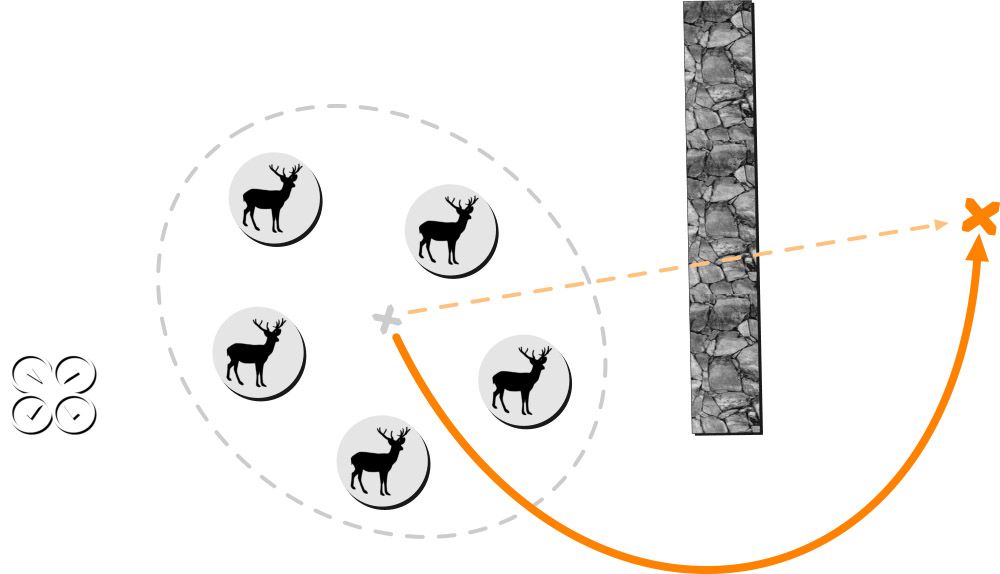
 The agents required navigation data, and with new navigation data, the agents can move from doing detailed collision detection to just ‘skating’ on the masked out regions of the Nav data map, which is much cheaper and thus works better for herds further from camera.
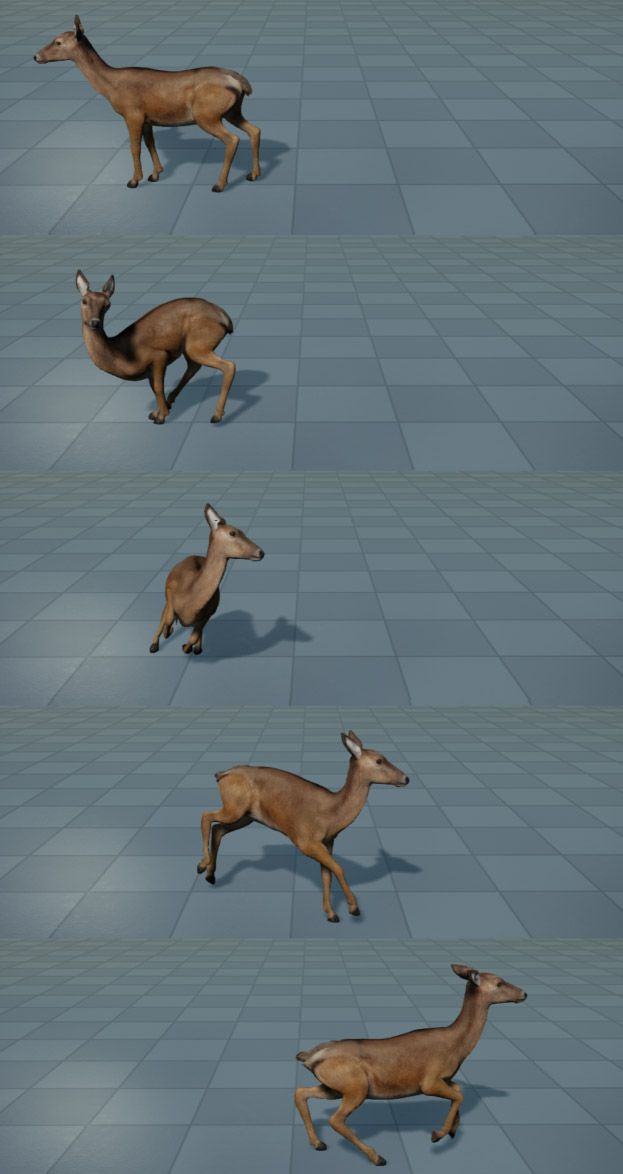
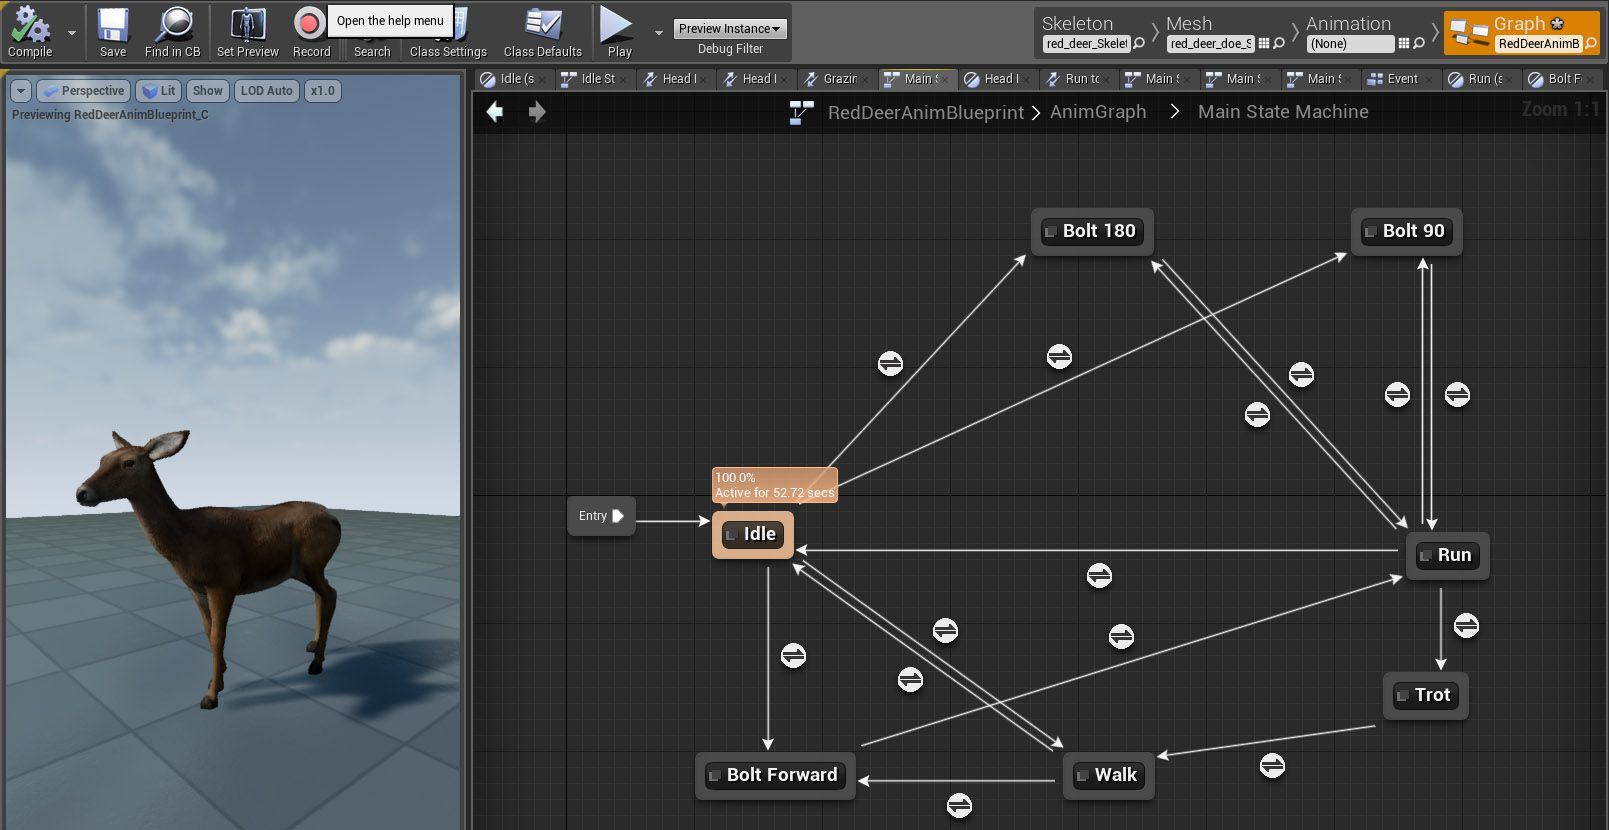
The agent A.I. system drives the motivation, but once the A.I. has given the deer a motivation or direction, it is the animation sub-system that actually does the blended root motion, meaning the state machine in the animation system for the type (and speed) of the motion – accessing the character animation files. All the animation was multi-threaded, and while the team initially spec’d the environment to have a lot more deer (300+), and in fact it could handle in real time more AI deer, for creative reasons the team populated the environment with less deer than they could have, simply because it looked better.
The nature of a quadruped turning is different than a bipedal creature, the turn is more complex and it takes time for the dear to accelerate.
In this context the team needed to build up the deer more than initially thought, but the end results are extremely effective.
Not only were the deer added to the environment but birds were also added. The independent bird agents fly, glide and move through the open world, as you can see in the video below, (real time screen captured footage).
The open world also had complete lighting control to dynamically adjust the lighting for time of day, which makes for an incredible demo piece. The assets, in the open world demo can be used royalty free for all linear content and storytelling a customer might wish to explore.
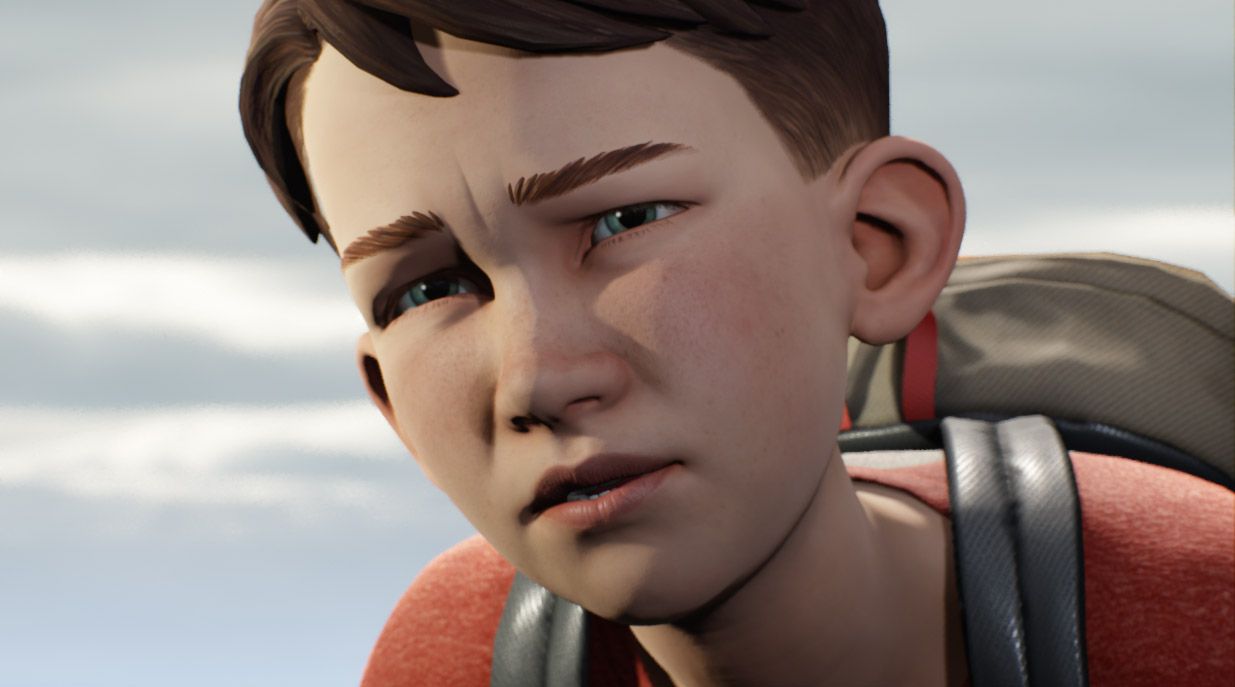
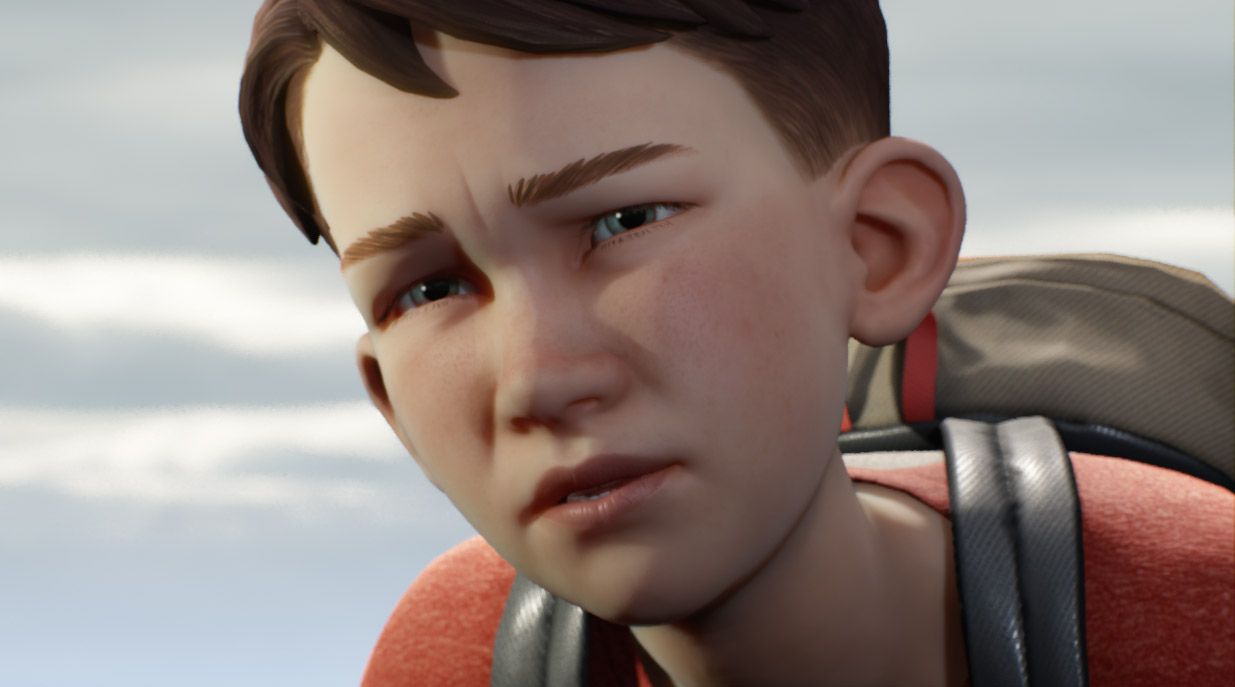
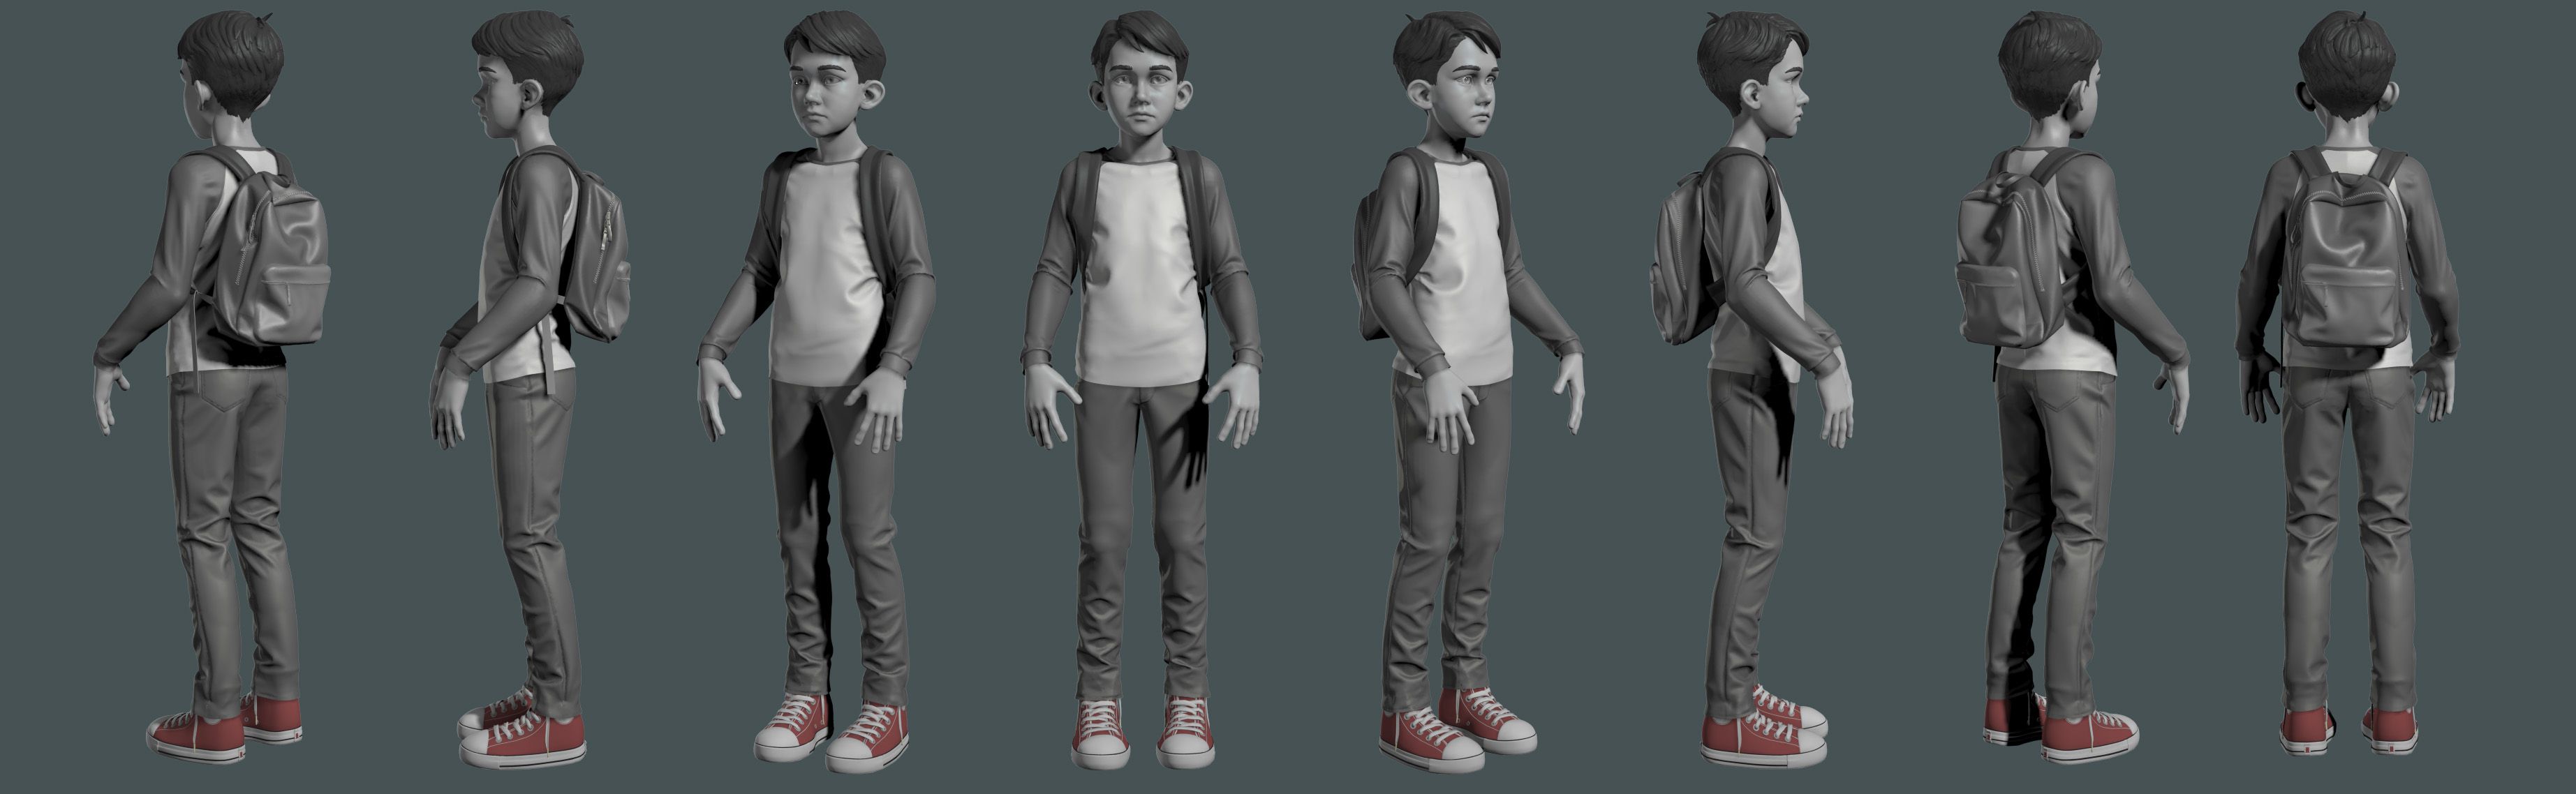
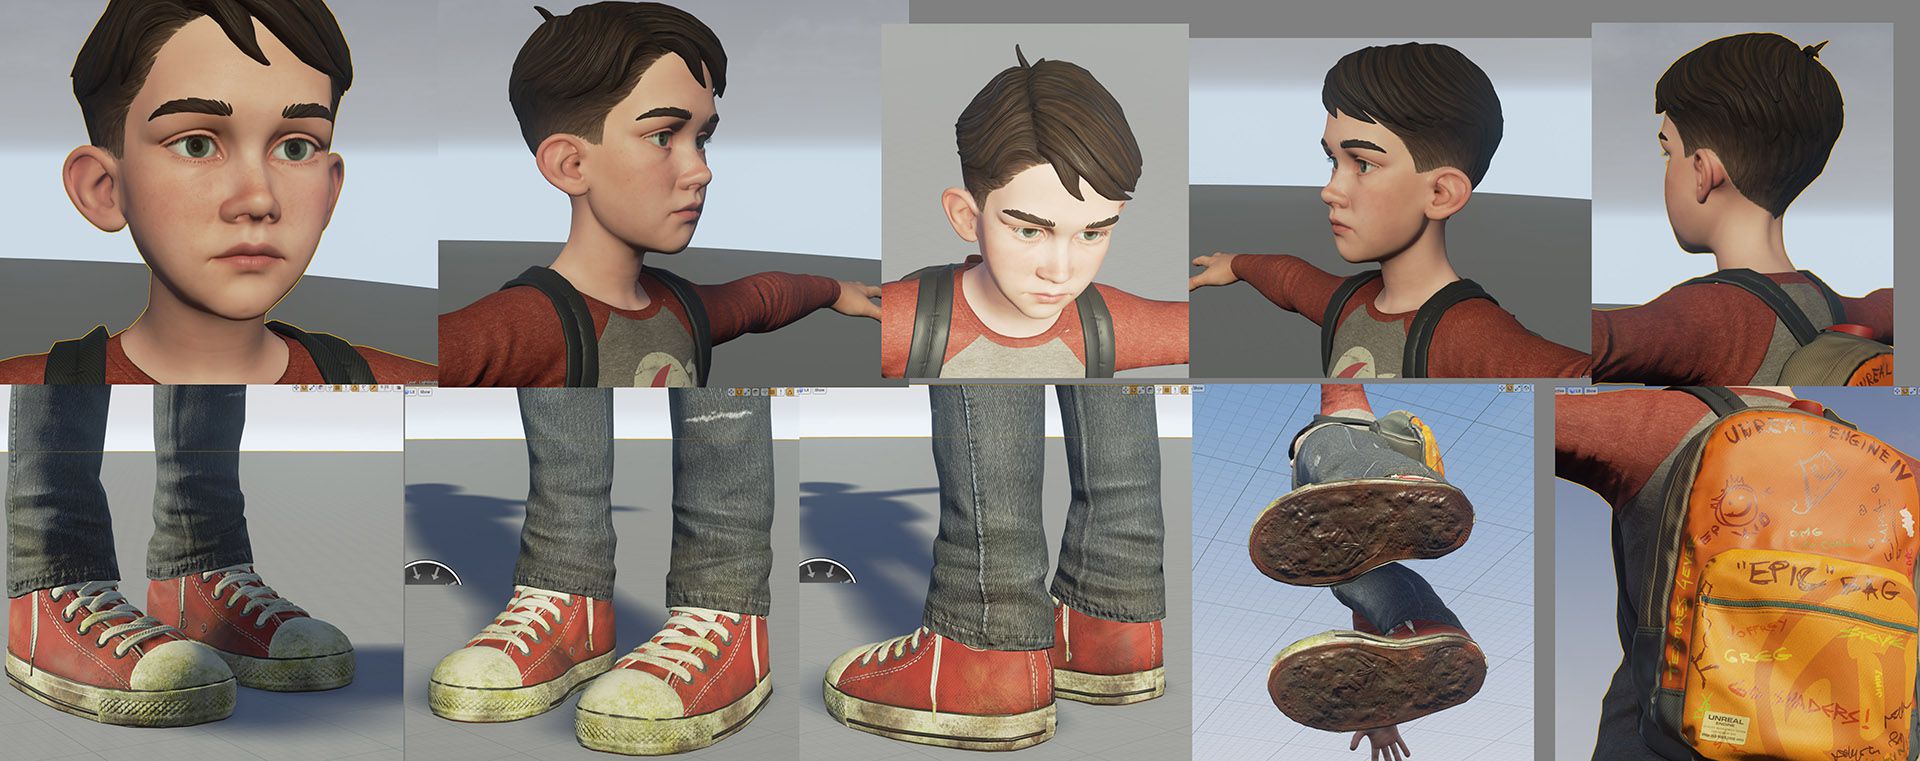
For the cinematic version, the audience watches the boy and his kite. Chris Evans was the senior character technical director on the project. Evans knew from the storyboards and early animatics that the boy would be seen in the wide vista shots but also in extreme closeups, so the face was worked on very early in the brief five week production cycle. The team worked on this project with design and rigging partners 3Lateral to develop and rig the boy. The brief was to make the character cinematic and have what Evans describes as “cinematic fidelity,” but in real time. 3Lateral’s Vladimir Mastilovic headed up their team, and Epic were incredibly impressed with their work. The final look dev was done at Epic and then animated by the team.
The facial rig was a feature film FACS based facial rig, with some 550 blendshapes blending across eight different facial meshes. Evans defines high fidelity characters as being able to accurately provide animators exactly the performance that they need to tell stories. “We want to empower a new wave of story tellers to use real time technology and embrace it,” he says.
Kim Libreri commented, “3Lateral were awesome and we’d use them again – and we’d love any of our customers to use them – they were great.”
The making of a boy
The creation of the boy went through a variety of phases:
Phase 1: Rough sketching, focus on the head
After receiving initial art direction from the team at Epic, 3Lateral begin by focusing on the boy’s face, since it needed to project all the emotional qualities set out in the concept stage.
 Above: A study of the head and hair
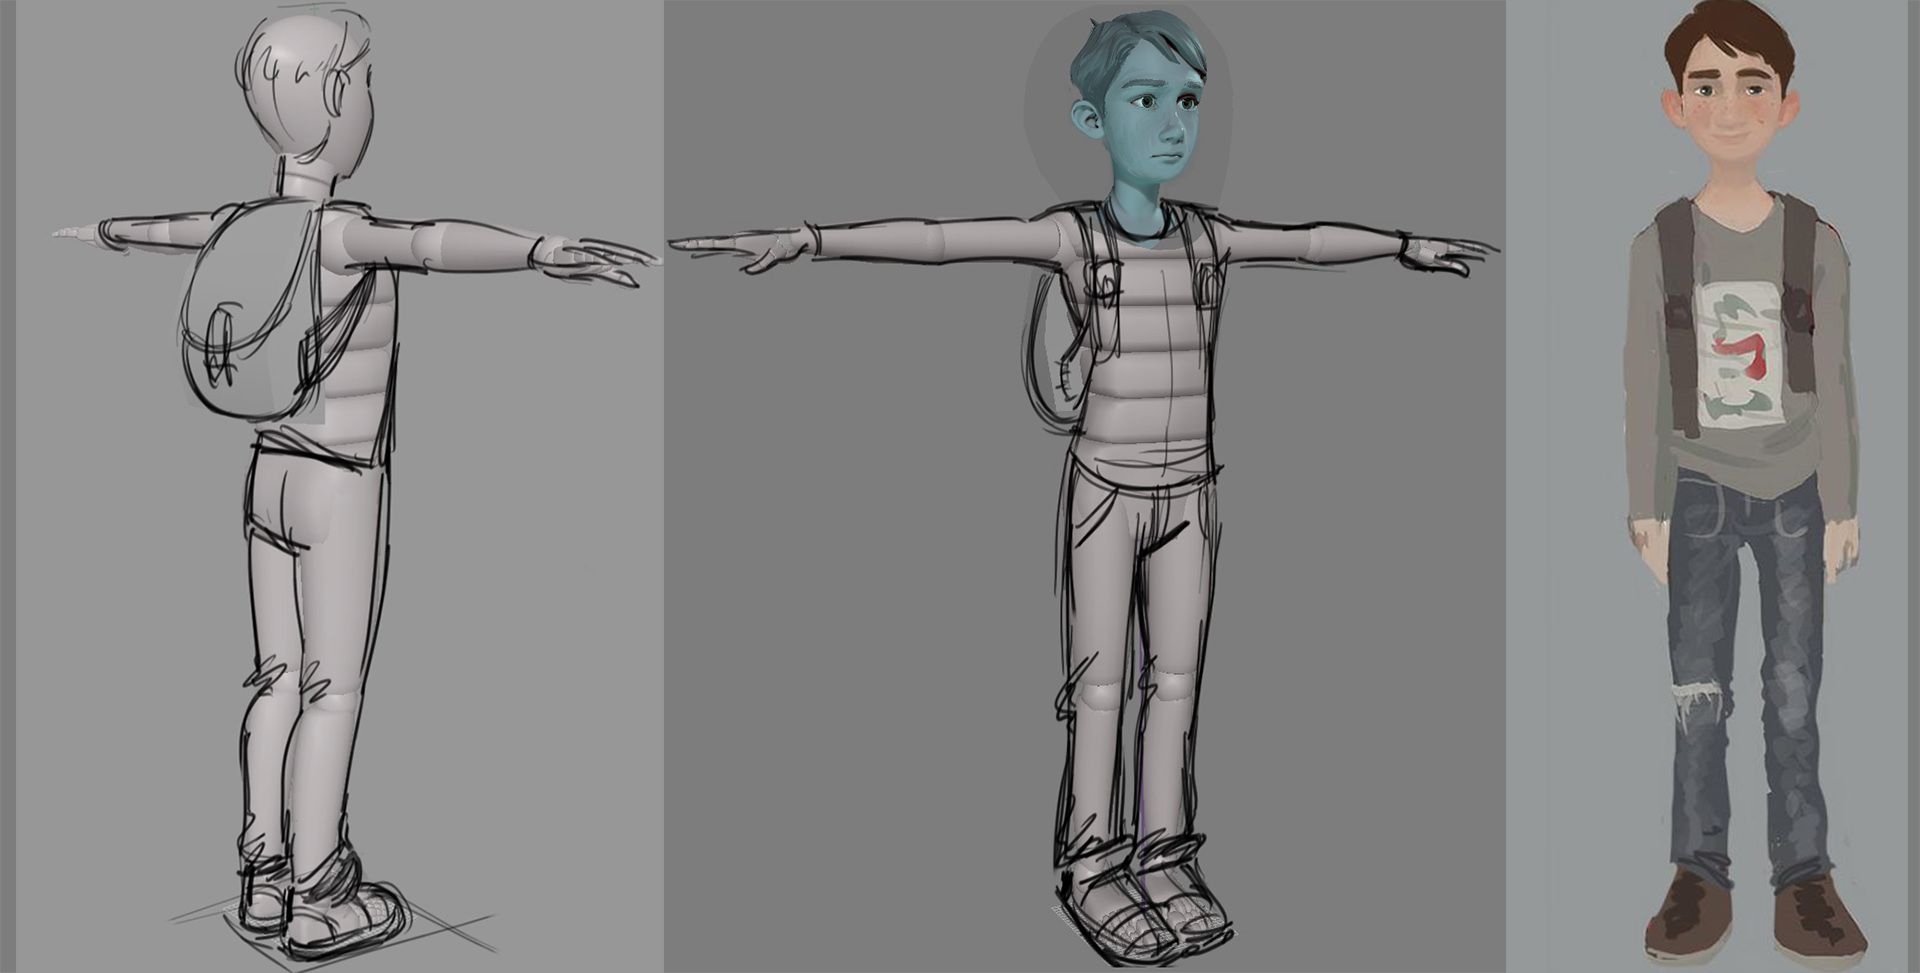
Phase 2: Refining sketches and modeling the head
After initial sketches were done, the team had a very good idea of where Epic wanted to go creatively.
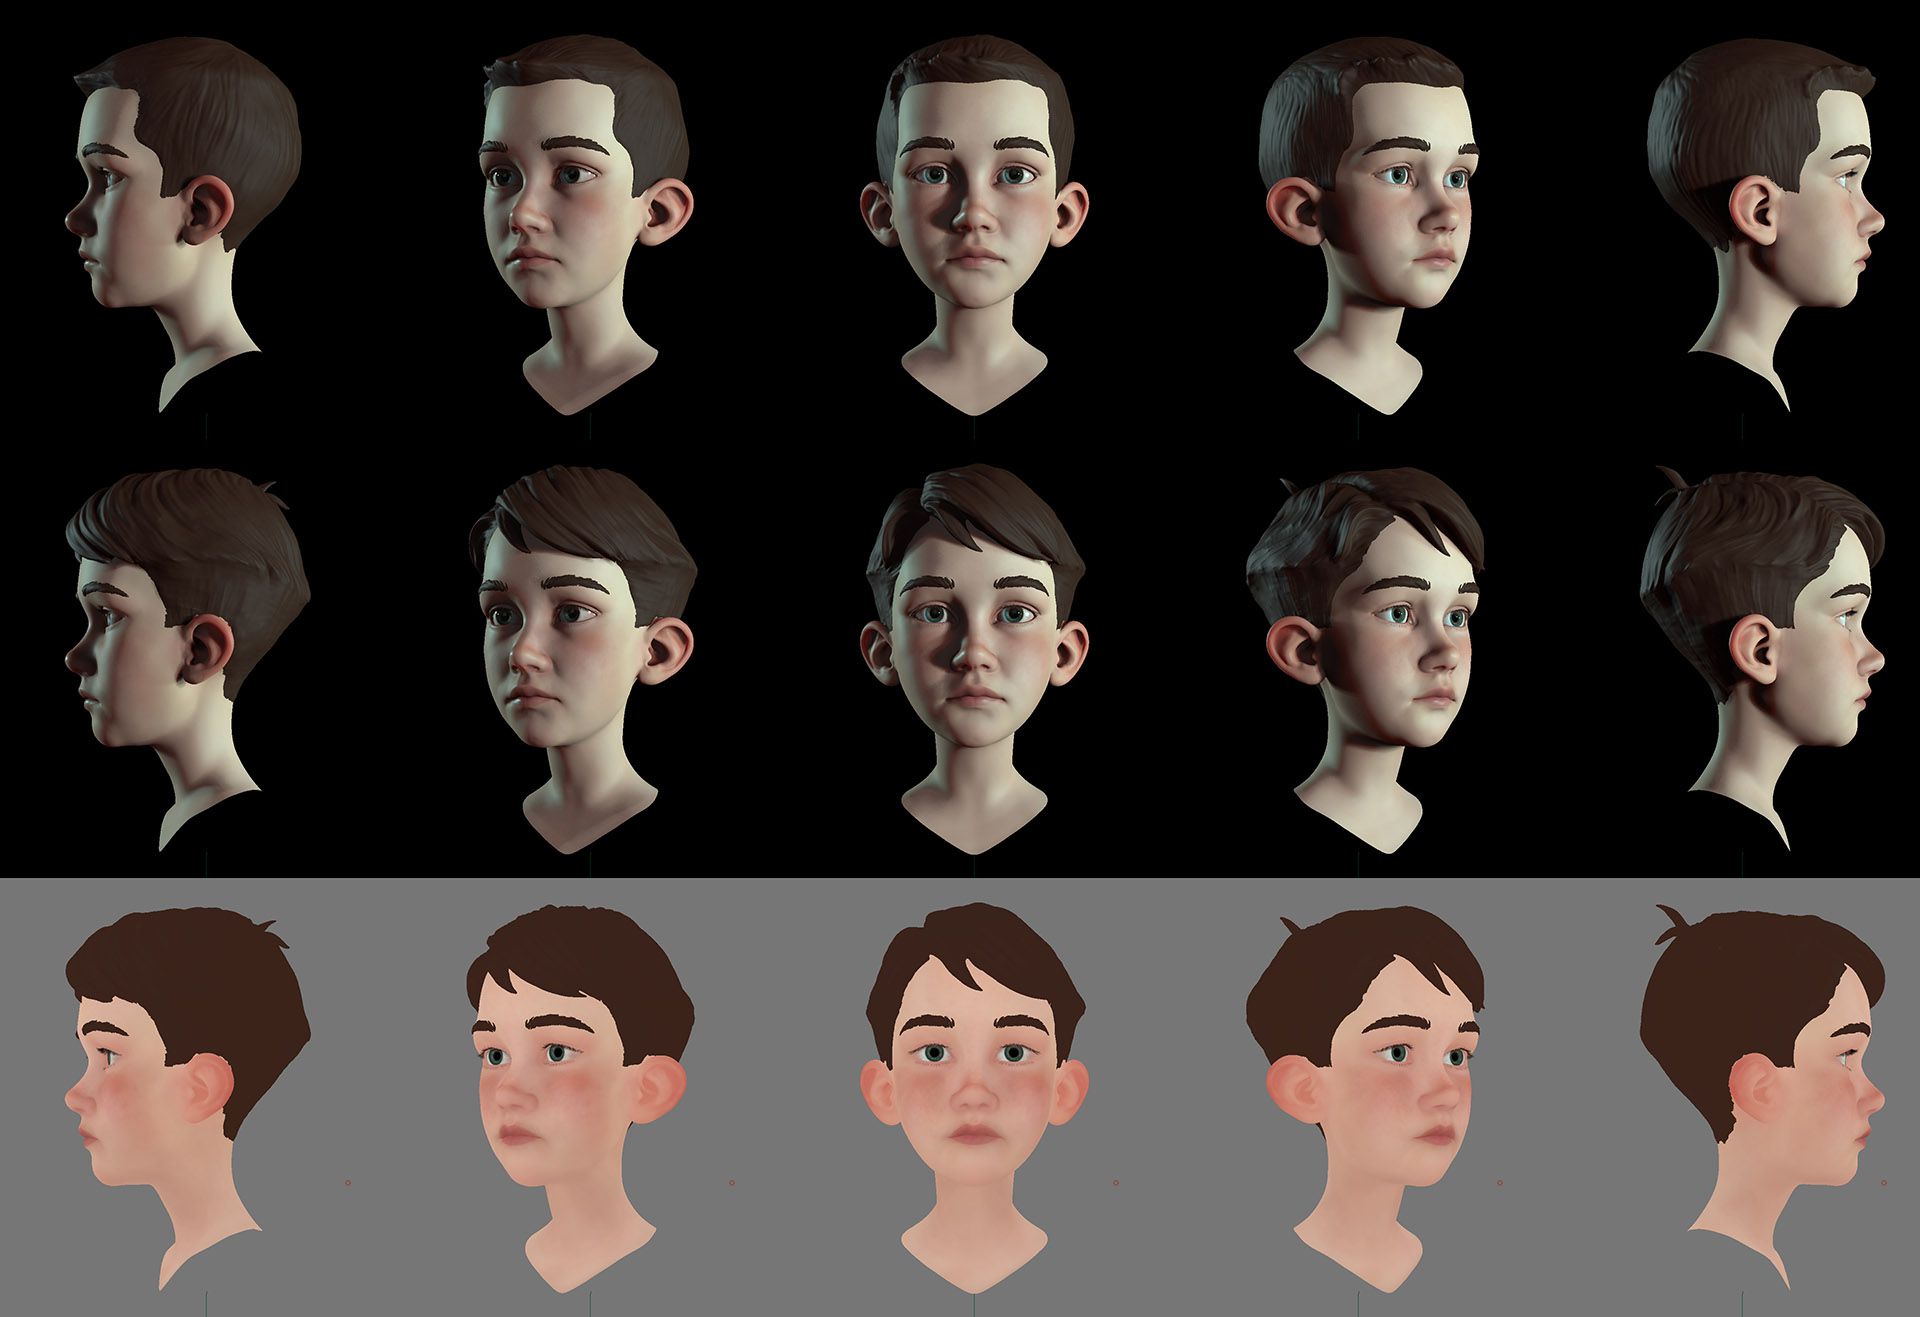
3Lateral then quickly did a number of clothing variations as well as a full sculpt and color pass for the head. Elements like the hair were discussed at length to get the right feel.
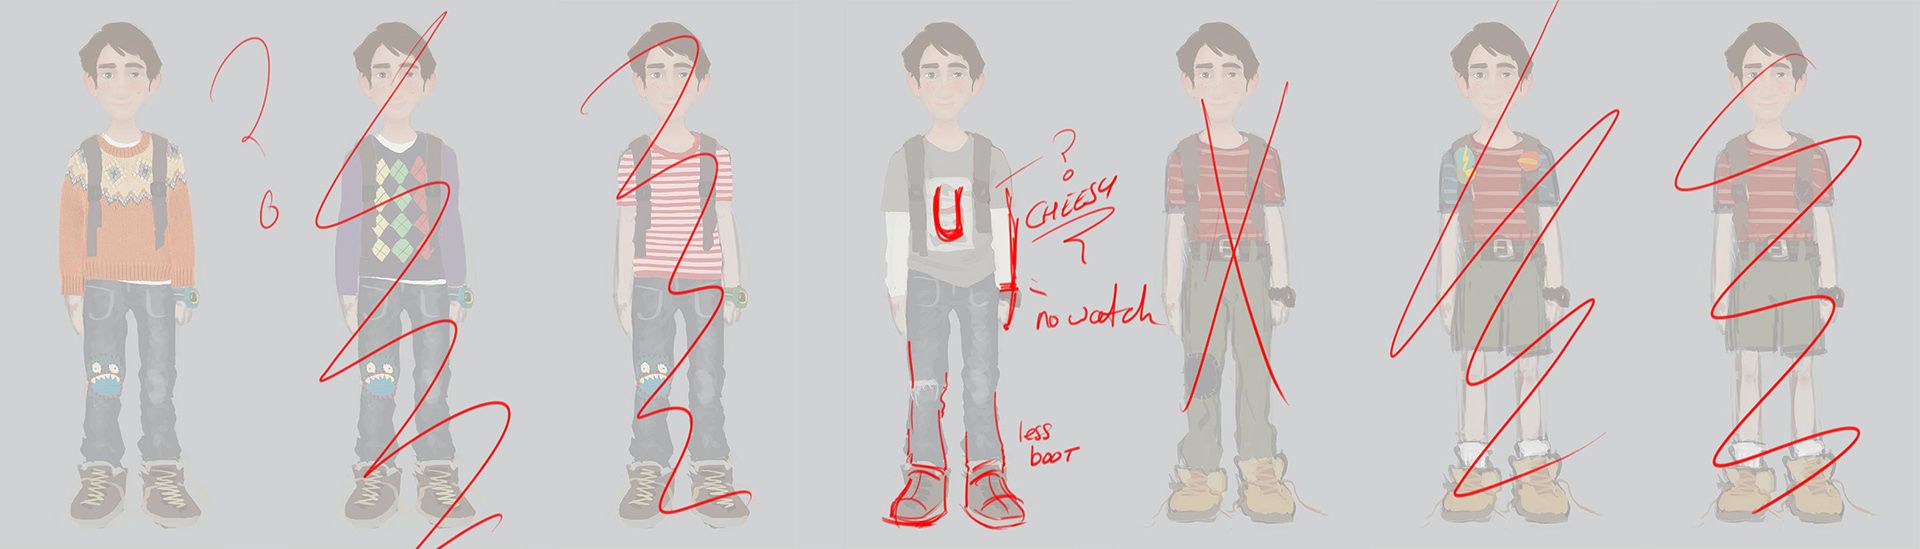
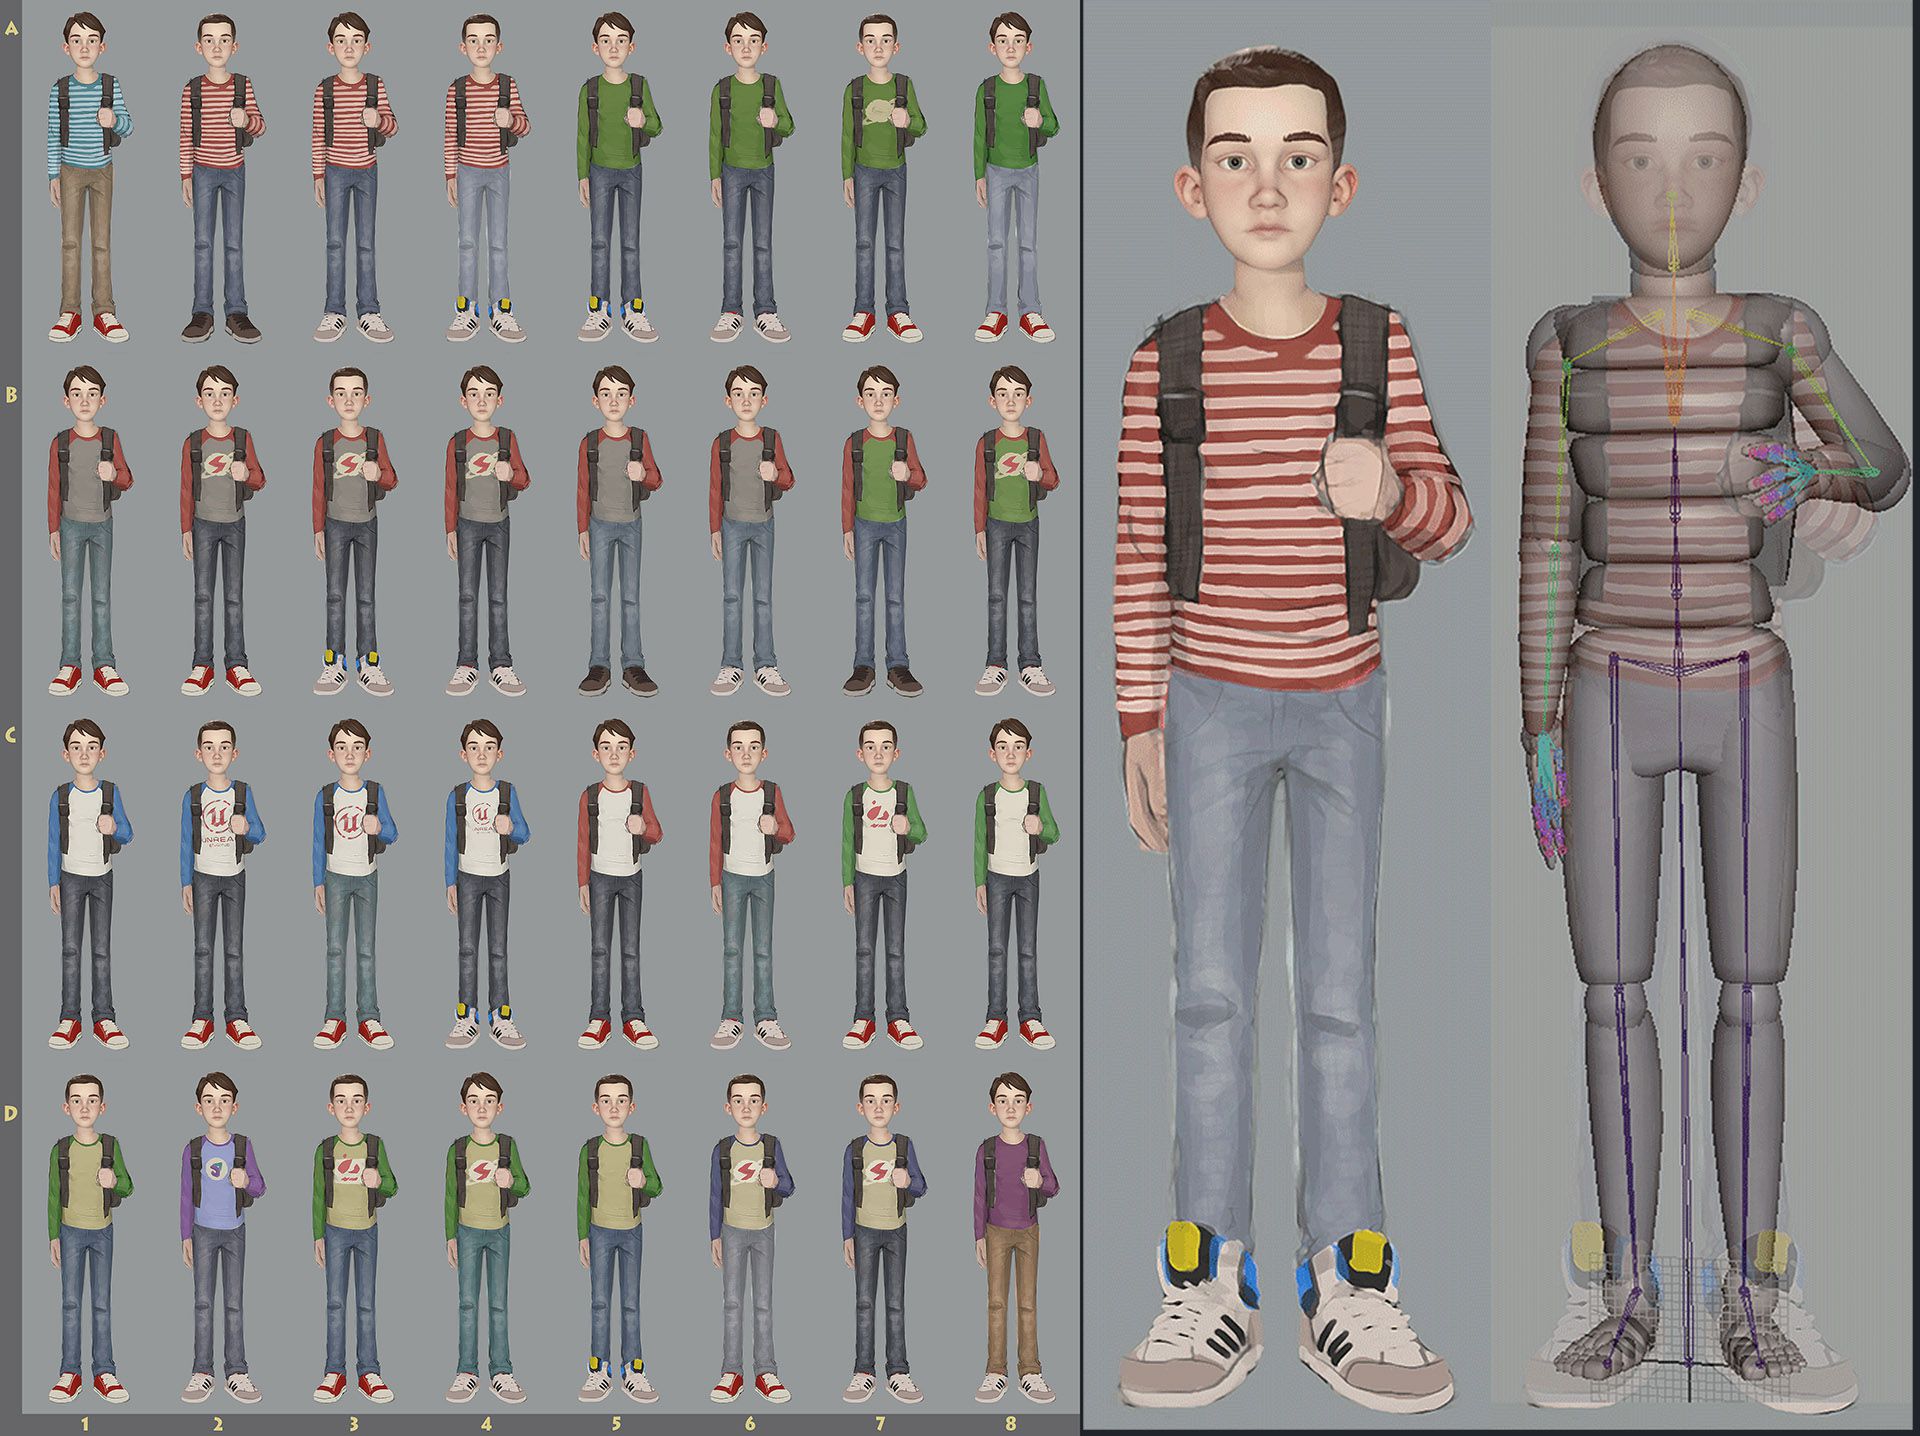
Phase 3: Body and cloth modeling
Having established the face, Mastilovic’s team then started focusing on the secondary features such as cloth wrinkles and hair movement during animation.
Phase 4: Facial rigging
The Epic team knew that the facial expressions were just as important as the design of the character and rigging is an area that 3Laterial excel at solving. “We encourage developers to use blendshapes as much as possible. Nice results can be obtained by joint deformations but blendshapes are hard to completely replace, even if you use hundreds of joints,” comments 3Lateral.
The kid face rig interaction video from 3Lateral.
Phase 5: Preparing the Unreal Engine asset
After completing the authoring of the boy character in Maya, it was imported into Unreal Engine 4.
“This was a great project and I didn’t worry much really. All of the team members knew what they were doing and it was a joy to crunch this one so quickly and at that quality. Always feels good when you encounter a team with which you just click and make it happen” explained 3Lateal founder Vladimir Mastilovic.
The final lookdev was done by the team at Unreal, from the assets and great work done at 3Lateral.

The overall pipeline was so much more like that of a film than a traditional game – of course this was Kim Libreri’s intention all along, for two key reasons:
- to show the community the diversity of styles and flexibility that Unreal can deliver beyond what many think of as the type of imagery game engines are used commonly for,
- to learn from the actual production how Epic can better service a workflow model based on more filmic pipeline procedures and thus improve the tools Epic can offer game developers.
The features shown above were not all part of the current 4.7 release – a lot of the GI and foliage updates will be in version 4.8. Libreri is firm in his vision that this demo shows that “over the next few years not only will Unreal be a great game engine but it will develop into a viable content delivery platform for real time cinematic content.”