Sébastien Lagarde of Dontnod Entertainment explores the world of complex game environments especially for accurate wet simulations with a case study on the incredible new game Remember Me. This is part 1 of a 3 part series where we explore game environments. Part 2 focuses on the rain, and part 3 on the materials used in Remember Me.
Introduction
Sébastien Lagarde has just finished as part of the team on Remember Me from Dontnod Entertainment and published by Capcom (releasing June 2013 for PlayStation 3, Xbox 360 and Microsoft Windows). The game introduces “the mechanic of memory remixing” – one can enter and rearrange a target’s memories to manipulate them. Players accomplish this by replaying a memory and modifying details to change the target’s recollection of the outcome. As part of that game’s R&D, Lagarde studied and developed algorithms for rain and wet environments.
Watch a trailer for Remember Me.
Remember Me takes place in Neo-Paris in 2084. Social media has evolved to the point that everyone is equipped with a memory-capturing implant called a SenSen (Sensation engine). People record what they see, hear, smell, feel, and taste and share their experiences with others. This has given birth to a memory trading economy where you can share or even sell those memories.
As cool as all this sounds there is a potentially more sinister side to this world as one company, Memorize, controls all the memory data (imagine having a smart phone and social media directly tapped into your brain!). Not everyone in Neo-Paris agrees with one company having so much power and set out to bring Memorize down, this group call themselves the Erorrists. In the game, you get to play the most powerful Errorist of all, Nilin.
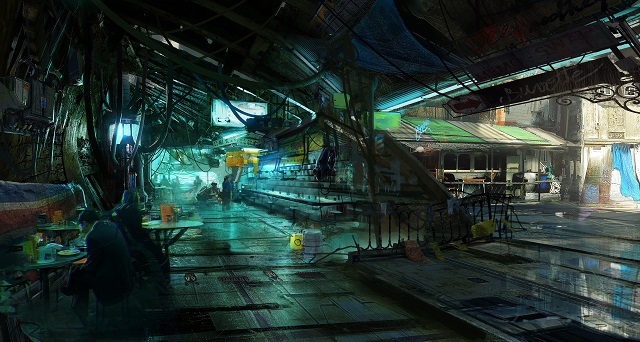
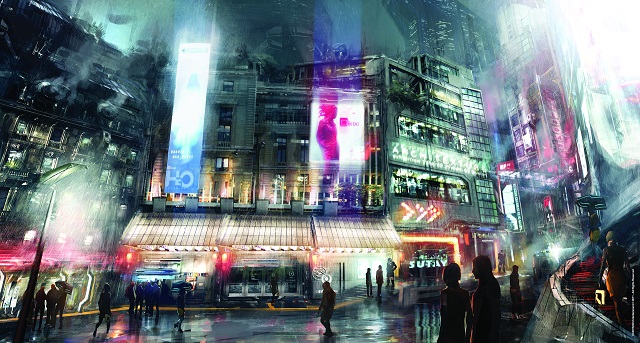
Concept art of the game
The game’s story takes place over one day in the same city – Neo-Paris (a sci-fi vision of Paris in 2084). During this day the player will be able to progress through the tree section of Neo-Paris. Deep-Paris consists of slums and abandoned areas.

Mid-Paris is the closest to the city of Paris itself. While keeping the architecture of Paris in mind, the creative artists add futuristic touches to the mix.
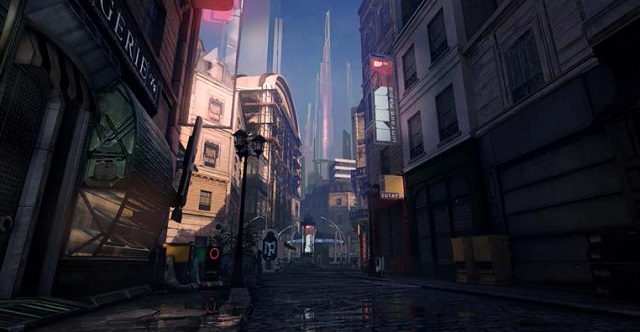
High-Paris is the area where things are much more organized and luxurious. A utopia filled with high-reaching towers where people freely share memories.
The goal, art-wise, was to create a believable future. It was important to the team to include historical landmarks like the Eiffel Tower and the Bastille Pillar as well as to have the city reflect Paris’ overall architecture to be as authentic a design as possible.
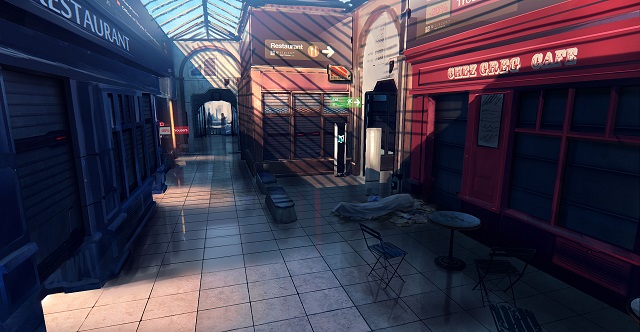
The kind of game could be affiliated with current science fiction called Cyberpunk. This kind usually calls a very dark atmosphere, desaturated and oppressive, in a twilight urban context. Stormy sky, rain, sizzling neon, fog…
With the same commitment to offer a varied experience, the team proposed in the game sections that fold completely to this archetype but they did not want to stop there. They tried to give the player maximum facets of the city. Some episodes of the game are much brighter as the section occurring in the early morning, with a light salmon comes banging on Haussmann facades of Mid-Paris. The sky is blue and clear, the shadows are slightly bluish.
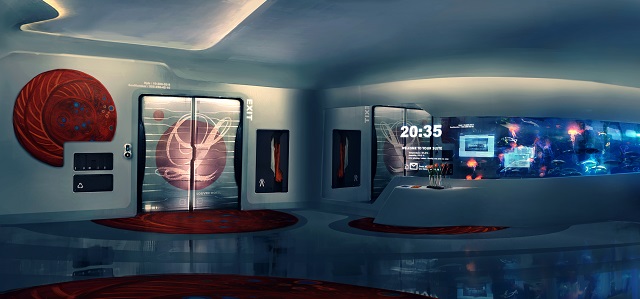
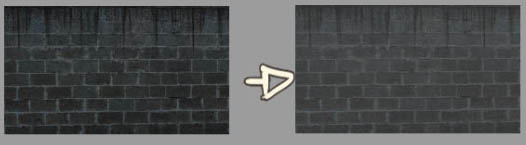
The art direction aimed for a stylized realism look to go with the believable environment. The game also has a rainy look as there is section under rain and other after rain. To go for more photorealism, the technical art team chose to adopt a new lighting system based on physically based rendering (PBR). Moreover, they were aware that the game will require a reflection system to handle rainy mood and the high reflective surface of the clean environment of the High Paris.
These two features will be described next.
Physically based rendering (PBR)
The “Physically-Based Shading Models in Film and Game Production” course at Siggraph 2010 was very inspirational for the Remember Me team. With physically based lighting models it is easier to achieve photorealism with fewer more intuitive parameters. It also allows getting consistent looks under different lighting conditions. This appeals technically but it can also be much better for the artists to work within.
The Remember Me’s art direction was oriented to stylized realism with levels’ static time spread on a whole day. Assets in one level were able to be reused for another level – to reduce production time. Physically based rendering fitted well with these choices.
The surface’s response to light is quantified by a function called the Bidirectional Reflectance Distribution Function (BRDF). The basis for most physically-based specular BRDF terms is microfacet theory. To coarsely simplify, the main differences between traditional lighting model and physically based BRDF are:
- Fresnel everywhere
- Energy conservation (the outgoing energy cannot be greater than the incoming energy)
One consequence of the energy conservation is that the brightness of the specular highlight is automatically linked to its size.
Physically-based BRDFs require a gamma correct pipeline with HDR linear space lighting. For best results it also requires physical light units and area lights. The usual ‘punctual’ lights are unrealistic and tend to generate specular aliasing.
Remember Me lighting model: the theory
Remember Me is based on a modified version of the Unreal Engine 3 which is a forward multipass renderer. The physically based BRDF used for the game is the one described by Naty Hoffman in his Siggraph 2010 talk Crafting Physically Motivated Shading Models for Game Development. It is called Blinn microfacet.
The lighting of Remember Me follows the rendering equation:
![]()
The formula is simple but is not suited for real time use in a game.
Instead, the lighting computation was divided in two parts.
- Efficient direct lighting which uses simple analytic punctual lights and
- More costly indirect lighting which uses image based lighting (IBL).
The direct lighting formulation follows usual game graphic’s formula but with the Blinn microfacet physically based specular BRDF.
![]()
The indirect lighting formula is more complex.
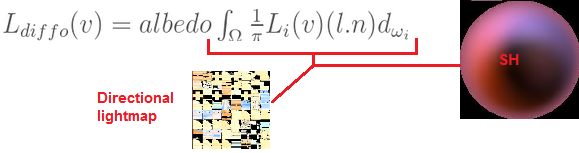
As this is for a game, Remember Me has a static lighting system, allowing the team to store lighting pre-integration information for use at runtime. The graphic engine computes diffuse and specular separately.
The diffuse indirect lighting uses directional lightmap for static objects and spherical harmonics (SH) for dynamic objects.
On the other hand, the specular indirect lighting is more difficult to pre-integrate.

Instead, it has been approximated by considering two parts.
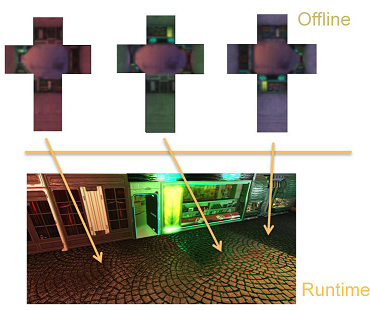
- The lighting is pre-integrated offline with the normal distribution function (NDF) of the BRDF and the cosine from Lambert’s law for different Specular Power values.
- The result is stored in a prefiltered mipmap radiance environment map (PMREM) which is a cubemap texture where each mipmap store the result of the pre-integration for a lower roughness
The team released the tools it developed to generate the cubemaps. It is named ModifiedCubemapgen and it is based on the AMD Cubemapgen source code.
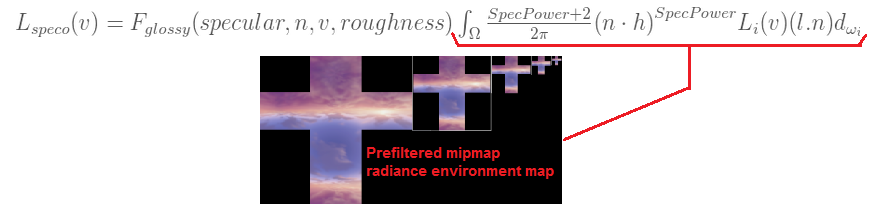
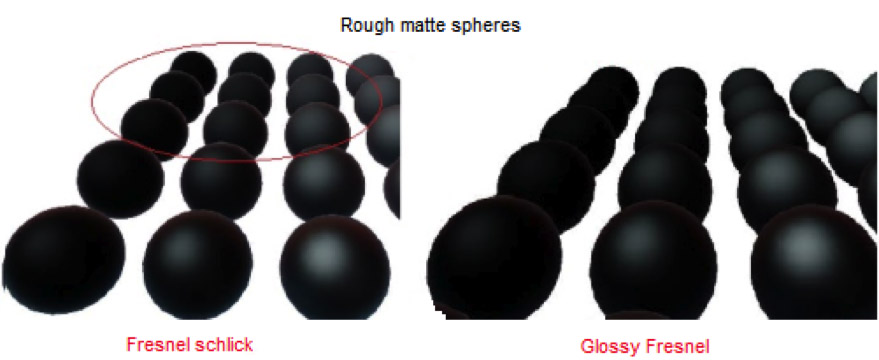
For the left of the integral, the Fresnel term is replaced by a new simple “glossy” Fresnel term applies at runtime. Observation shows that rough surfaces at grazing angle tend to reflect less light due to micro shadowing and masking. The glossy Fresnel coarsely approximates this. It has been designed to be very cheap to render, and although it is not mathematically correct it still provides a pleasant visual result.
In Remember Me the same physically-based BRDF is used for almost all material allowing for a reduction of the number of draw calls (For example, metal and non-metal objects use the same shader and can be grouped together). There are only two extra BRDFs: skin and hair.
To get better results from physically-based BRDF all the lights in Remember Me are faked area lights. They are based on a hack invented by Tri-Ace Research “Real-time Physically Based Rendering – Implementation” CEDEC 2011 consisting in modifying the roughness of the surface with distance from light.

Workflow and authoring of PBR textures (artist guidelines)
When dealing with PBR it is important to understand how the light interacts. Lighting and surfaces properties are decoupled. Identifying what properties belong to the surfaces and understanding the impact of each of those properties is the key to the object appearance looking realistic.
The surfaces properties are part of the BRDF parameters. The BRDF parameters can be constant or vary spatially (in which case the parameter will be a texture).
There are four textures defined in Remember Me’s BRDF:
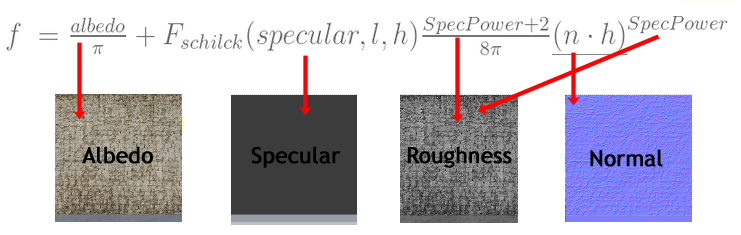
Even if the texture’s names are similar to that of a traditional lighting model – the content is different.
The team was aware that switching to PBR will provide results only as good as the quality of the inputs. Keeping old texture authoring habits with this new lighting model will get worse results than when they were used with the traditional lighting model. The team decided to put a lot of effort into the texture creation workflow. To help artists (including outsourced artists) they created a set of guidelines and references on how to make good textures. The big advantage of PBR is that it references directly from the real world.
The following describes those guidelines and references by each of the four textures types.
1. Albedo texture guideline
 Albedo is the characteristic color of an object. More precisely, it is the bi-hemispherical reflectance of a surface. It is view independent and is more commonly named diffuse.
Traditionally, artists used to ‘store’ lighting information in diffuse textures like ambient occlusion, shadow and reflection. As previously explained the lighting is now decoupled and must be removed from the albedo texture. The lighting in the game will all come from the graphics engine.
It is not intuitive for an artist to get what should be the albedo of an object. Albedo could be a “texture” (pattern) like wood, leather or a constant. With PBR, albedo is no more a simple color value but has a physical meaning. It results that artists tend to author albedo too dark.
Remember Me’s artists have a chart of value to use as reference.
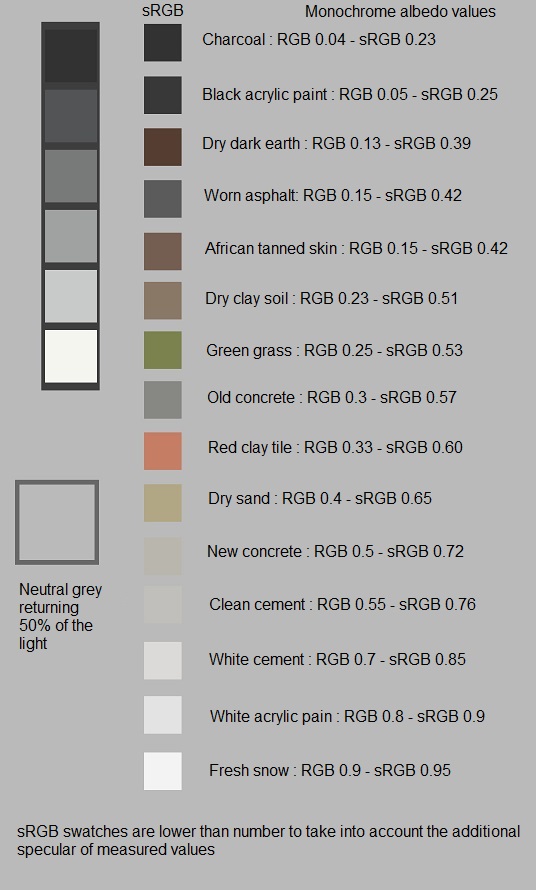
The main guidelines of this chart are:
- Albedo value is between 32-243 in sRGB
- One of the darkest substances on earth is charcoal, the brightest is fresh snow
- Pure metallic objects have an albedo of 0
However this chart is not enough for artists who deal with a large amount of different materials.
Moreover most of the albedo references available are monochrome.
The advantage of using physical albedo is that it can be approximate from photography, increasing the number of references available.
The albedo acquisition process is inspired by the work of Henry Labounta in his GDC 2011 talk “Art Direction Tools for Photo Real Games”.
In summary these points were to:
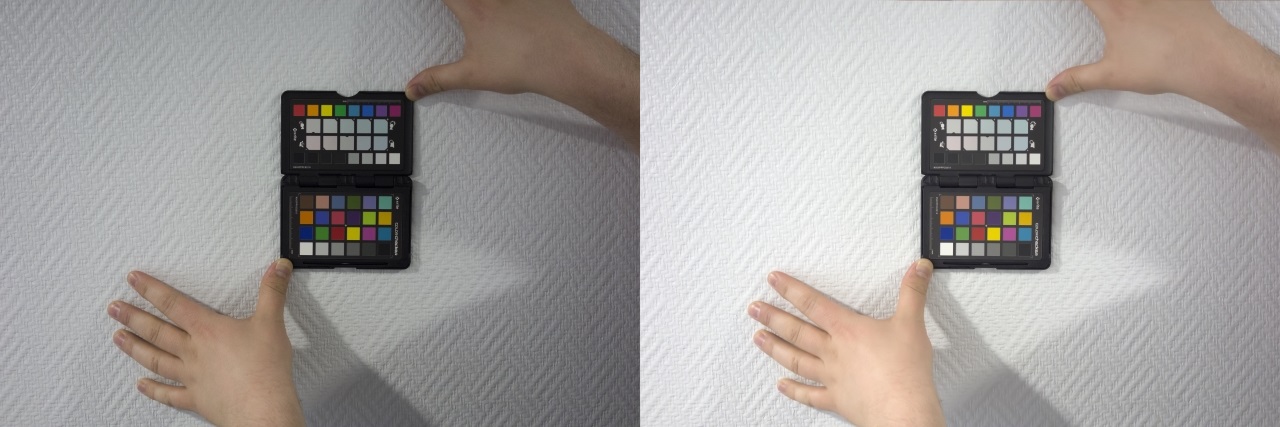
- Wait for an overcast day to reduce directional lighting information
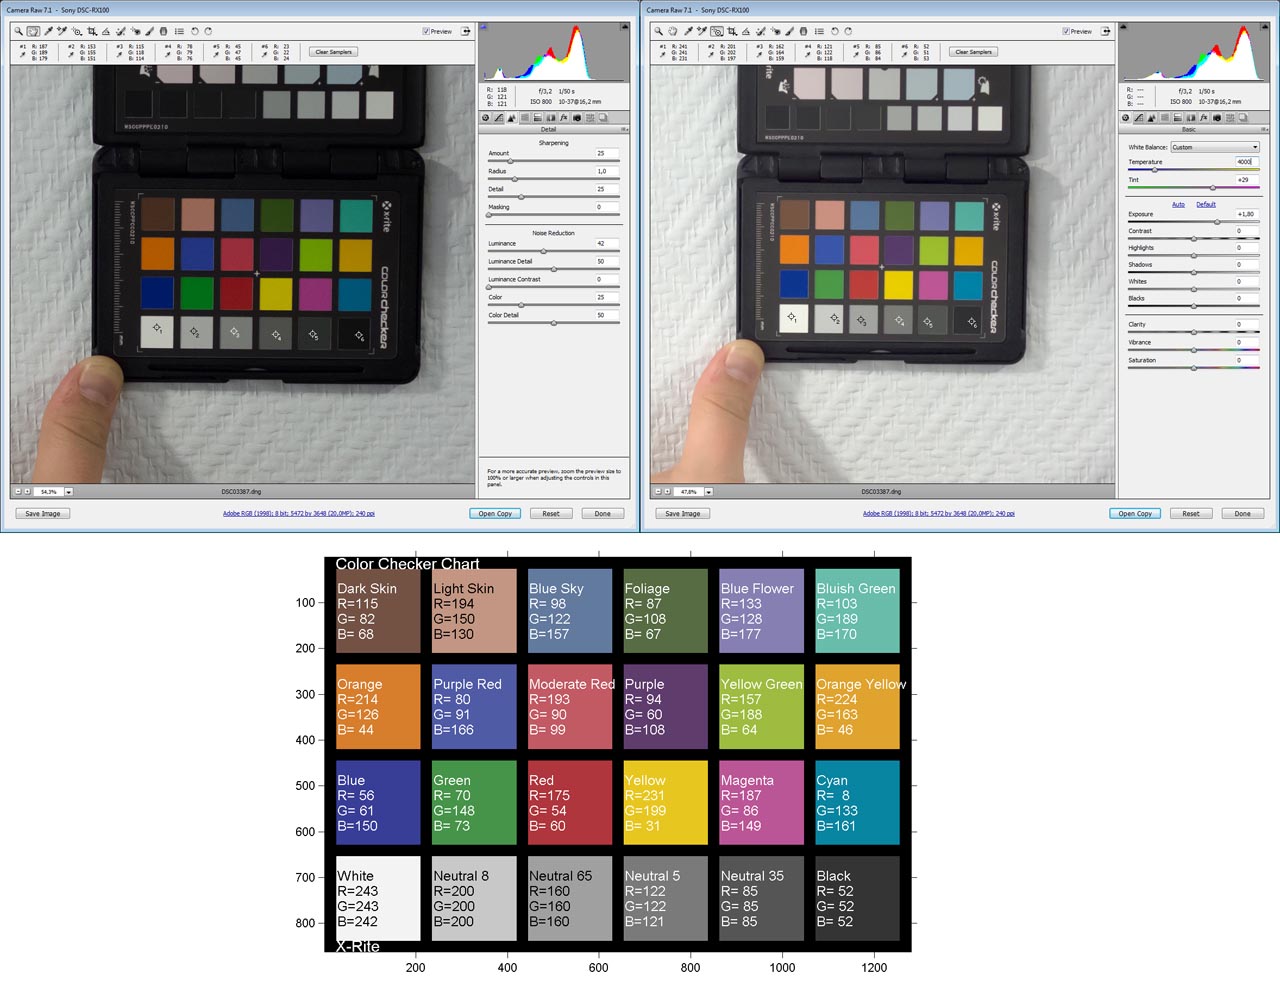
- Shoot RAW photography (meaning don’t use gamma space mode but rather a linear mode) and if possible also containing a Macbeth chart for reference
- Import and calibrate the photo using exposure and black level adjustment with the help of the Macbeth chart
- An sRGB picture can be used as reference by the game artists
The calibration steps require some explanation. When importing the raw photo into Photoshop, 6 color samplers are setup on the 6 white to black color patches of the checker. It was important to ensure the color mode is set to sRGB. Then using the exposure, blacks and other tools available in Photoshop’s tool – an artist would try to best match the 6 values to the sRGB color checker’s references.
For Remember Me the team does not use calibrated textures as based for texture. The textures are instead authored based on albedo reference values provide by the concept art team
In practice, artists often do common mistakes that can be categorized as:
A. Too much miscellaneous Albedo

B. Albedo too dark
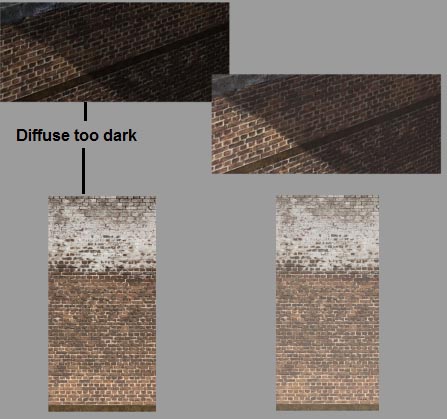
C. Too much contrast
D. Finally, there can be too much occlusion. Macro occlusion is not going to work, however micro-occlusion which can’t be handled by the engine can be baked. The micro occlusion should not be dark but rather just a tint of the albedo as it is supposed to emulate a bounce of light.
2. Specular texture guideline
The specular texture is difficult to understand for artists as it is based on physics concepts. However the authoring is simple, since there is no artistic interpretation involved for it. The specular texture controls the specular reflectance of a surface. It is used as input to the Fresnel equation which computes how much light is reflected.
The specular reflectance of a surface depends on its index of refraction (IOR). Regarding specular reflectance, surfaces commonly used in game can be classified in three main groups:
- metal (conductor)
- non-metal (insulator like water, glass, skin, wood, hair, leather, plastic, stone, concrete)
- gemstones (semiconductor)
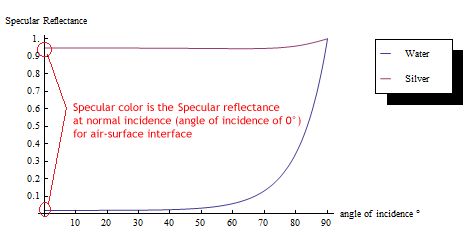
Gemstones are uncommon and will not be relevant to Remember Me. Metals are high reflectors for all incident and viewing directions. Their specular reflectance is colored because their IOR tend to vary significantly with light’s wavelength. At the opposite end is non-metals which are poor reflectors when looking straight down but at grazing angles, they do reflect most of the light. Their specular reflectance is monochromatic because their IOR don’t vary much with light’s wavelength and can be approximated by a constant.
To avoid artists having to deal with IOR – which are difficult to understand (especially for metals which have a complex index of refraction varying with light’s wavelength), the team used the specular reflectance at normal incidence F0 (angle of incidence of 0°, meaning straight down view + light) as input of our Fresnel Schlick’s approximation.
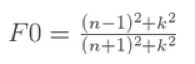 F0 could be represented as a color. Thus F0 is the content of the specular texture (it can be call specular color) and can be retrieving from IOR with the following equation:
Obviously artists don’t need to manipulate such maths. The gathering of real world IOR is tedious (particularly for metal) but it needs to be done only once. Remember Me’s artists used this chart with a variety of reference values as a color picker for their textures authoring:
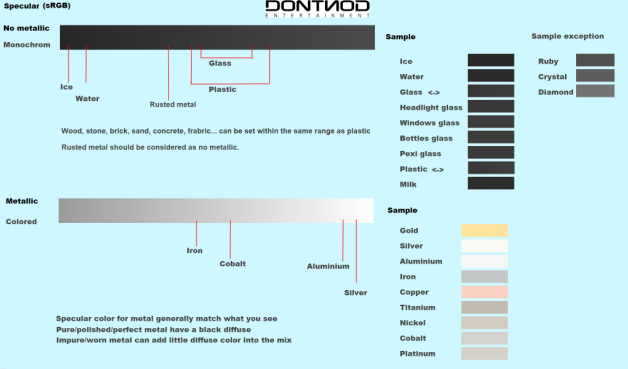
The main guidelines of the chart (in linear RGB here) are:
- No value is under 0.02
- Non-metals value are un-intuitively low: 0.02-0.08
- Gemstones are 0.05-0.17
- Metals have high specular reflectance: 0.5-1.0
When a non-metal IOR is not known, a default value of 0.04 (around plastic)was used. It can be observe that F0 of metal matches the characteristic color of the metal under white light. This allows artists to easily set F0 for unreferenced metal based on what they think the color is. Moreover a metal has no subsurface interaction and thus should have a black albedo.
In practice, the artists experienced that for any non-metal, F0 could be let to 0.04 without any visual change. This is due to the limit of the game’s graphics engine. A common mistake was not setting a black albedo for metal (it just doesn’t seem obvious to artists that it should be black). Most of the time the specular texture is a small texture with flat colors.
The implicit statement in the definition of F0 used here is that it corresponds to specular reflectance of a material in contact with air (which is almost always the case, but not always). This F0 is not valid if the surface is underwater for example. And there are a lot of wet surfaces in Remember Me. (In this case, the value of 1 which is the IOR of air in the F0 equation – should be replaced to 1.33 – the IOR of the water). Another name for this specular texture is “substance” texture but it really should be “Fresnel reflectance at normal incidence for air-surface interface” (which is a bit more of a mouthful!)
An interesting aspect is that the specular texture can be used in shaders to classify all the types of material.
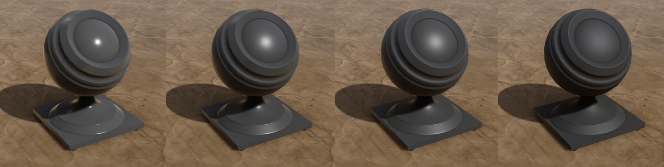
3. Roughness texture guideline
Roughness texture is one of the two most important textures that artists will author – the other is the normal map. When a surface is perfectly smooth, it’s reflection is sharp (mirror-like). When the surface is rough, reflected light rays are deviating from the ideal mirror direction and the reflections start to appear blurry. The distribution of the deviated rays which are important for the reflection can be represented by a cone around the ideal mirror direction. The roughness texture controls the aperture of the cone and thus the blurriness of the reflection. The rougher the surface, the larger the cone.
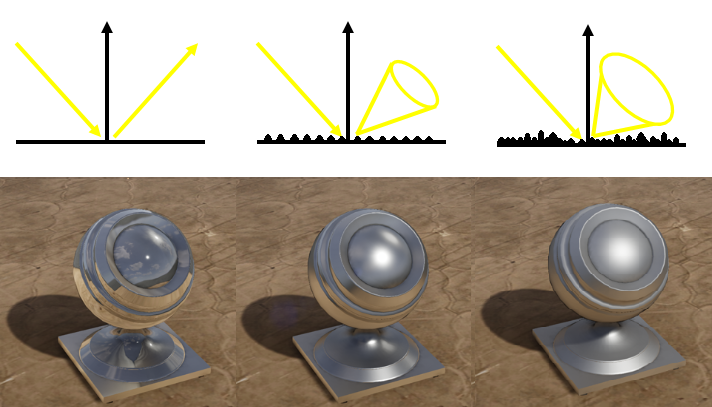
However, the roughness texture content is dependent on the particular graphics engine convention and on the normal distribution function used in the BRDF (which make it difficult to reuse for other graphics engines). For example, it rarely stores the cone aperture angle.
The roughness texture content as numerical values is often difficult for an artist to interpret. In Remember Me these values have been chosen to provide perceptually linear reflection blurring. The roughness values are interpreted by the graphic engine like if it was the cone aperture angle. For indirect lighting it is used to select the mipmap in the cubemap. For direct lighting it is converted to specular power.
The roughness texture convention for Remember Me is:
- 0 – black – means rough
- 255 – white – means smooth
Roughness value are converted to specular power with the following formula:
2^(10 * (Roughness / 255) + 1)
Thus for direct lighting the roughness range value of [0..255] are mapped exponentially to specular power [2..2048].
Remember Me’s artists used a chart with the full range of roughness values, the result shown from the graphic engine and with some real world examples.
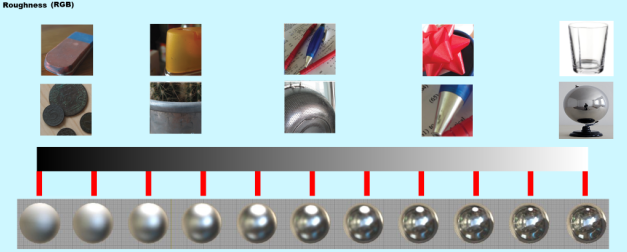
The roughness texture was helped with a fast path visualization tool – showing that texture within the game engine. A test scene was set up with different cubemaps to be able to easily test the game asset under different lighting conditions.
This texture can also be called the “shininess”, “glossiness” or “smoothness”.
4. Normal texture guideline
Actually the Normal is the same as with traditional lighting model, so the artists were very comfortable with controlling it and of course did not need a guideline.
The roughness texture is related to the normal texture in many ways. Both represent geometric features of a surface but at different scale. The normal variance of the normal map will have an influence on the roughness texture (a bumpy surface represented by perturbed normal should be rough for example). Additional surface imperfections like scratches, speckles, pores etc are added in the roughness texture. In Remember Me the roughness texture is in the alpha channel of the normal map texture to force artists to author these textures together and at the same resolution.
Workflow
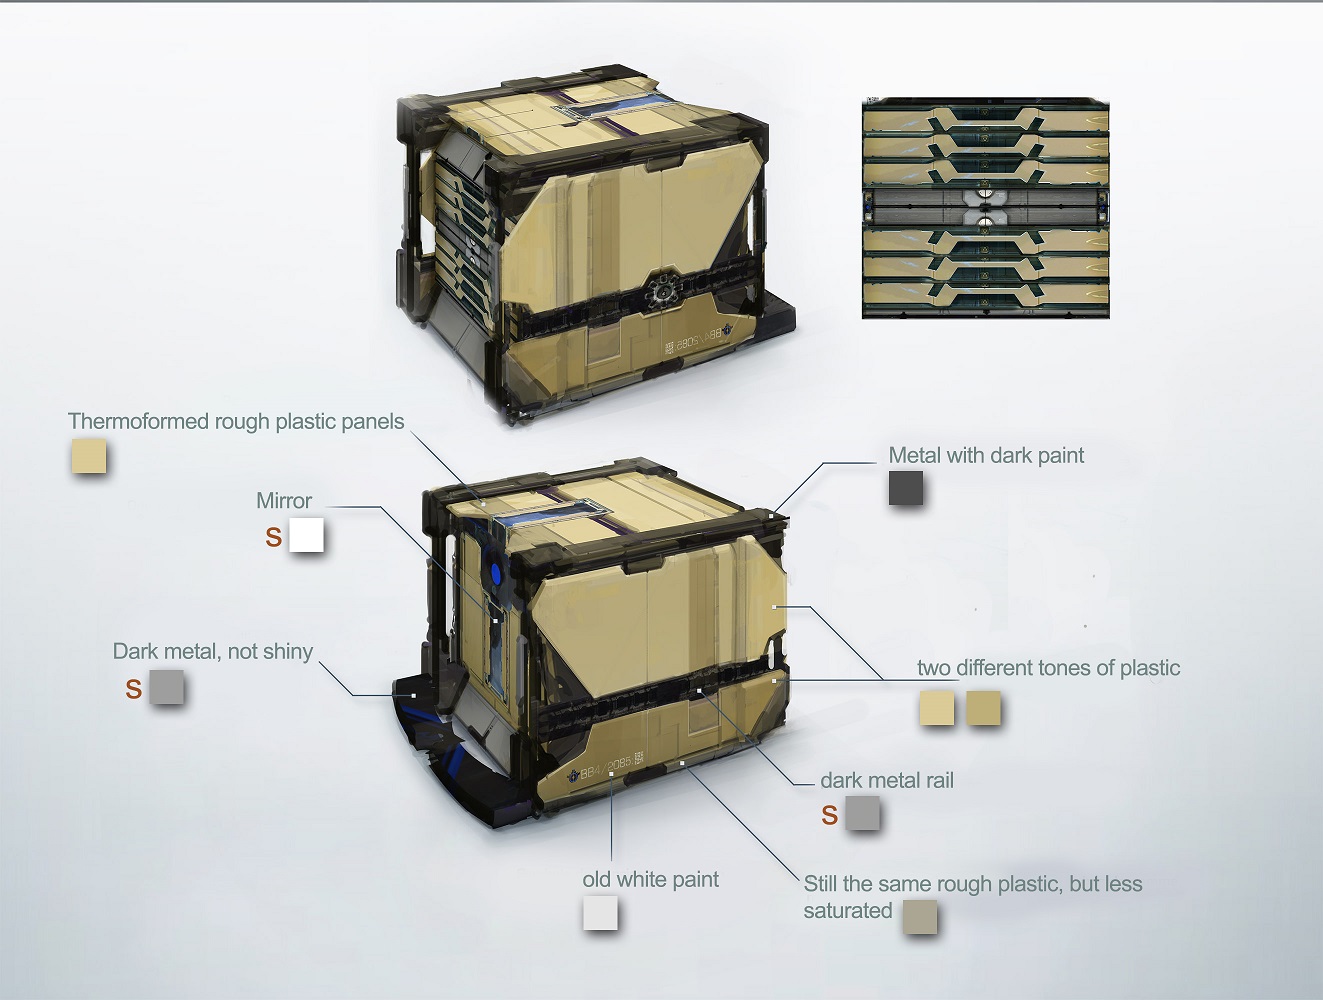
Once the guidelines were written the team has set up a workflow to define PBR reference textures. For Remember Me the concept art team was in charge of providing concept and material references for every asset of the game. Thus each concept is annotated with a substance name (gold, stone…) and common normal terms to describe materials: transparent, bright, dark, pale, rusty, silky, metallic, shiny, blurry, matte etc… This matched very well with the real world references content of PBR.
Concept artists were also in charge of doing the reference albedo capture from photography as well as additional material descriptions. These textures were never used directly in the game. But this process helped standardize the PBR textures for outsourced artists. In practice, however, the albedo photography was fairly time-consuming and not all the concepts come with such detailed reference textures.
Validating tools for PBR textures
With PBR it is really important that artists follow the same rules and produce textures of uniform quality. In Remember Me a set of tools are provided for the artists to validate their textures. The guidelines are not to enforce a code and thus kill artist creativity. For example, an artist used some out of range specular values to create iridescence, the validation is more of a check than a limit that cant be violated.
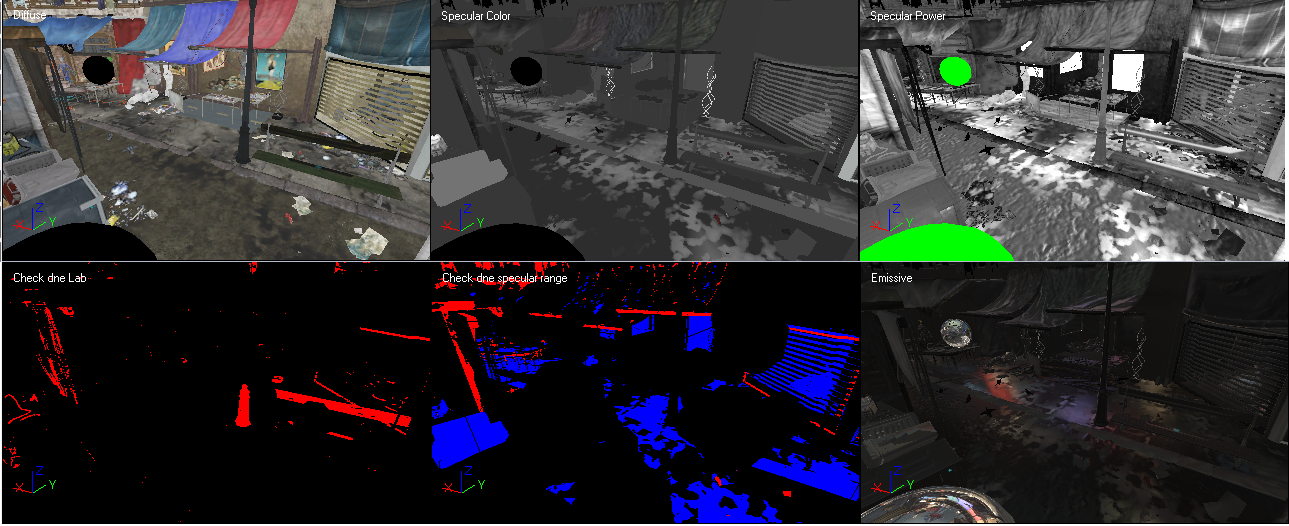
The validating tools are a set of debug view modes. They are purely visual to allow quickly identifying problematic textures. Some modes have a color code to identify the origin of a potential problem. Available debug view modes are:
- Albedo/Specular/Normal/Roughness/Lighting only
- Albedo range validation. The color is converted to CIE Lab and the luminance is used to check the albedo range (Too dark or too bright are identified by different color)
- Specular range validation. The specular value should lie in metal or non-metal range.
- Reflection only to check the reflection system and the roughness blurring.
For Remember Me the artists did not offer any resistance in switching to PBR but many did take some time to figure out how to get right the PBR textures the way they wanted. The validating tools came online late in the production, resulting in several mistakes which could have been avoided. For example, the specular ranges were also not always respected, and the roughness textures were sometimes badly authored resulting in poor visuals. At the end of the production, the lighting artists were required to play with some of the lighting to compensate for the few bad textures that got through before the Debug tool was available.
However the PBR textures creation process has overall been a success and the artists are happy with their results.
Reflection system
Remember Me takes place in a sci-fi vision of Paris with a rather rainy mood. A reflection (which is another name for indirect lighting) is present on almost every surface. Accurate reflections are very expensive on the current generation consoles especially if it is dynamic and based on the current point of view of the camera. The Remember Me reflection systems aim to be fast (as PBR already adds cost to the shader) and is required to respect the constraints of the UE3 forward renderer. This means that there is no access to a normal buffer – limiting the use of common screen space reflection techniques.
In theory, reflection should be computed by throwing towards a lit pixel position – a bunch of rays in a cone defined by the surface roughness and the mirror direction. The lighting is then gathered from each ray/scene geometry intersection and averaged with the BRDF.
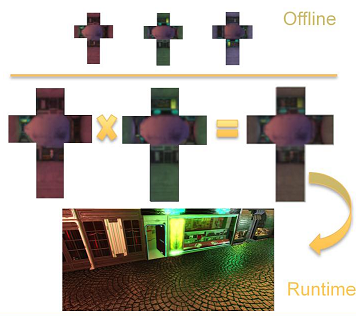
To approximate this process the reflection systems heavily rely on the static lighting of Remember Me. It is based on pre-convolved radiance caching. The cache items are the cubemaps already presented above. Cubemaps are computed in a small subset of locations in the scene. The indirect lighting then interpolates for a given location and combines the result with the glossy Fresnel.
Cubemaps are not free in terms of storage cost and so can’t be densely populated throughout scene. To reduce the number of cubemaps required, the content of cubemap is warped to the working location, thus improving the interpolation quality.
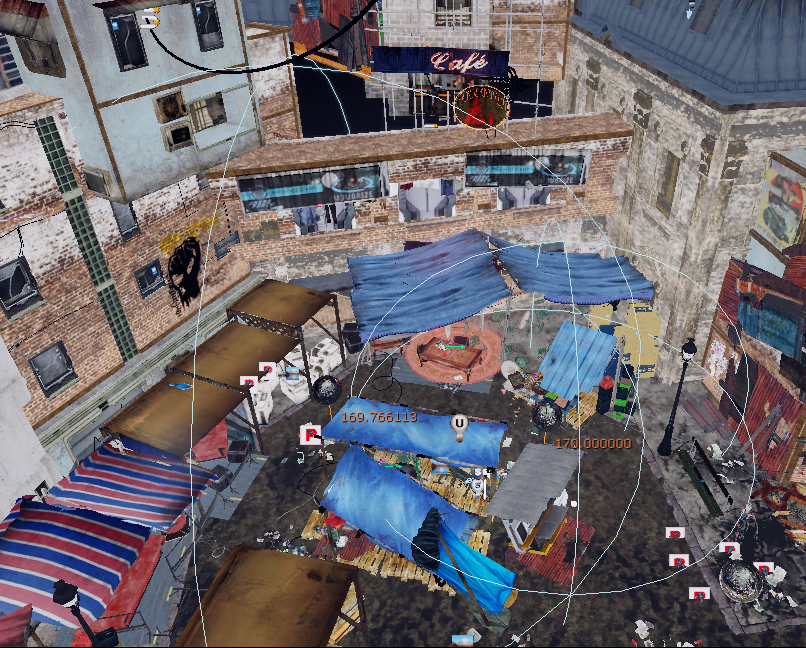
Remember Me levels are a mix of interior and exterior. Usually large open exteriors like a market require less cubemaps than say a small interior corridor. Automatic placement is difficult, thus to get the best usage of the cubemaps, they are hand placed by the lighting artists in the environment.

Levels contain between 100 to 200 cubemaps of configurable size (from 64x64x6 to 256x256x6, most are 128x128x6). This large amount of cubemaps was possible because the cubemaps are streamed when a player enters into an area and they are aggressively compressed into the DXT1 format. During a game play walkthrough the number of simultaneous cubemaps loaded can be around 40. This requires a memory size of about 2.5Meg.
Unfortunately gathering and interpolating multiple warped cubemap inside a shader is too expensive for the current generation consoles. Remember Me can’t afford more than one cubemap per object’s shader and using the nearest cubemap can introduce unacceptable lighting seams.
Thus the reflection system of Remember Me uses a pre-mixed cubemap which is then sent to the objects’ shader. This new cubemap is processed with the GPU for the location of the current point of interest (POI). The POI depends on the context; it can be the camera, the player or any characters in the scene. It could be also a dummy location animated by a track for in game cinematics.

Pre-mixing avoids most lighting seams but it has obvious caveats: only one location can be considered, meaning the reflection accuracy will decrease with the distance from the POI.
Artists could minimize the problem on a case by case basis by:
- Reducing the indirect lighting contribution with the distance. This feature was merging with the shader LOD system.
- Overriding the cubemap with a fixed cubemap. This feature also allows getting more specular reflection by increasing the resolution of the dedicated cubemap. Independent warping is done in case of fixed cubemap.
- Using ambient lighting information at objects position and mix it with the cubemap based on POI distance. Ambient lighting information can be lightmaps or SH.
Moreover as the cubemaps mix is done before the scene rendering, there is no objects’ position available for warping. The reflection systems have a dedicated solution to work around this limitation. It is dedicated to planar reflections like from the ground, which is an important visual cue of the scene. For everything else, a pre-mixed cubemap with no warping is used as coarse reflection approximation (except in the case of fixed cubemaps).
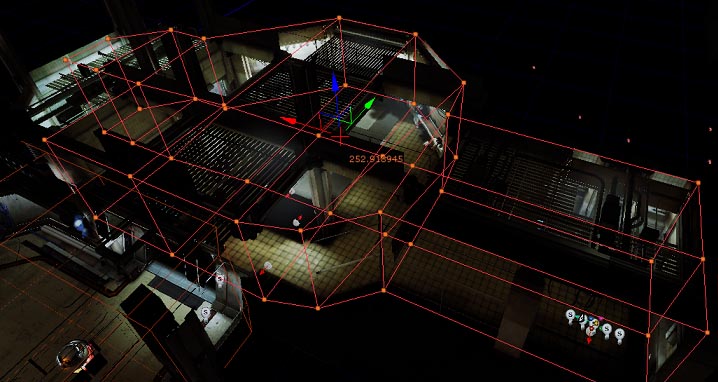
Cubemap weights calculation for the mix
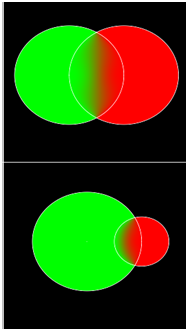
To gather nearest cubemap efficiently and to attribute appropriate weights to the cubemap for the mix, each cubemap has an associated influence volume.
It can be a sphere or an oriented bounding box (OBB). The influence volumes require overlapping to allow smooth transitions between cubemaps.
Artists can also use smaller influence volume size to indicate that a particular area is more important and should contribute more.
When the POI is inside an influence volume, the cubemap associated is taken into account for the pre-mixed cubemap. The weights to attribute to each cubemap are based on the bound’s distance of the influence volume (like an inverse distance field) and its size.
Cubemap warping
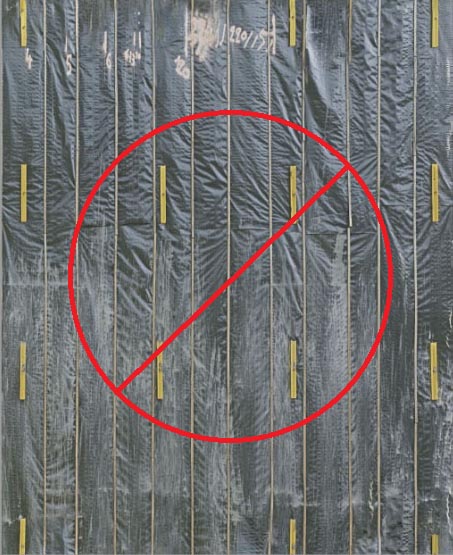
Standard cubemaps provide accurate information only for a single point in space. Applying a cubemap onto a planar geometry such as a planar surface creates visual issues in part due to lack of parallax (reflected objects are not at the right position). The problem is that objects use the cubemap texture which is projected onto a cube at an infinite distance. This infinite cube doesn’t match the surrounding environment of the ground.
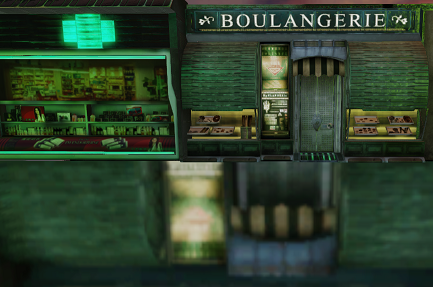
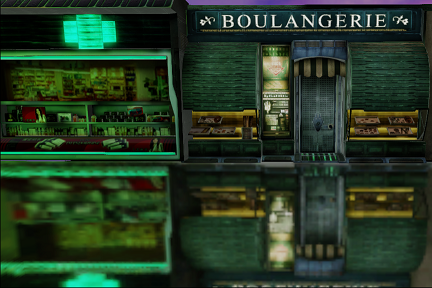
Above, the right image has the wrong planar reflection,the one on the right is correct.
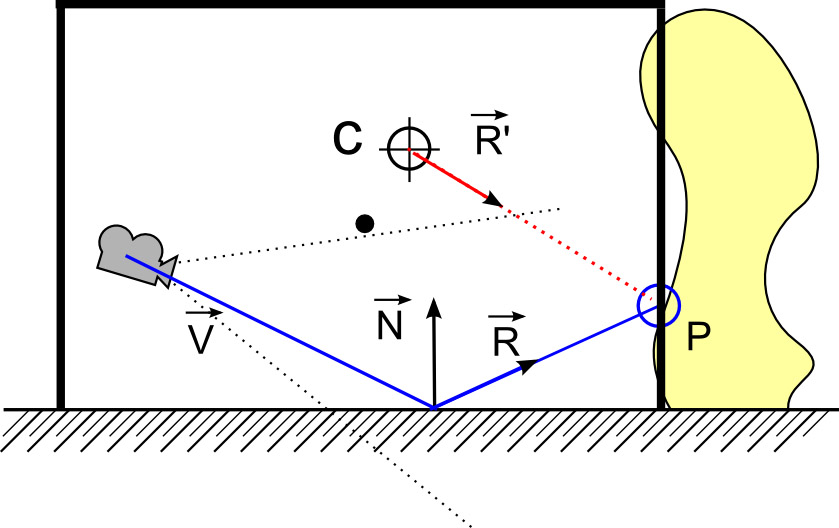
The solution to solve this is pretty similar to collision detection. To warp the cubemap for the current pixel location, the intersection between the mirror direction and the scene needs to be computed. It is then used to correct the lighting information to fetch from the cubemap.
The process is as follow:
- Get mirror direction (R) from view vector (V) and object’s normal (N)
- Intersect (P) the mirror direction with the scene geometry proxy (a box on the figure)
- Retrieve the lighting information at this point based on position of the cubemap (C) and the surface’s roughness (with R’)
The intersection test needs to be pretty fast and thus requires very coarse scene geometry proxy. A single volume attached to a cubemap is used to represent the surrounding environment. For the case of a fixed cubemap the test needs to be performing inside the object’s shader. Thus simple sphere and OBB are used. For planar surfaces the dedicated solution allows more accurate convex and concave volume. All these volumes are calling parallax volumes in Remember Me and they are built and hand placed by lighting artists inside the editor.
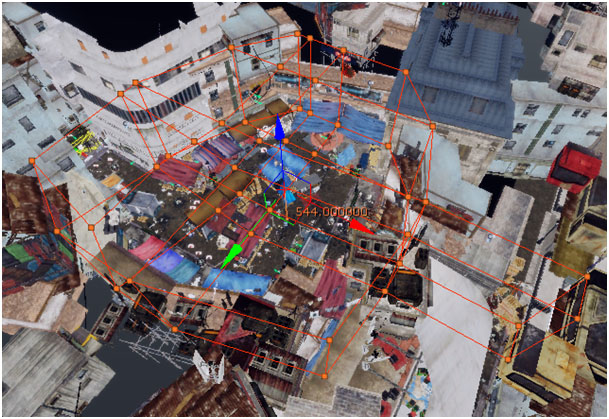
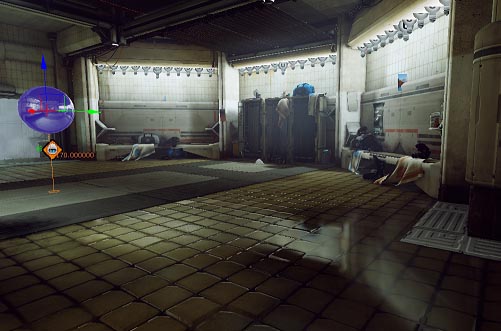
Planar reflection
The dedicated planar reflection solution requires artists to associate a reflection plane (red grid) and a parallax volume (white) to a cubemap.
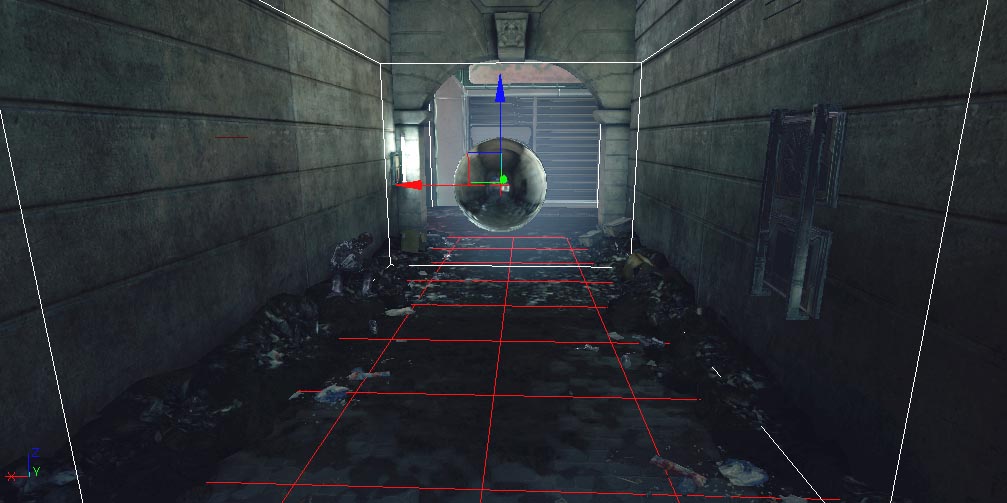

Standard cases require a volume intersection test to be done inside the shader. For planar reflection the GPU rasterizer is use.
Rasterizing the parallax volume from the point of view of the reflected camera through the reflection plane (V’) provide the intersection result (P). The reflection plane here acts as virtual positions for the planar surface.
Any kind of volume can be handled with this process but hidden features due to concavity may produce artifacts. It’s also important to note the result is correct only for normal perpendicular to the reflection plane corresponding to perfectly smooth surface. The rougher is the surface (a more bumpy normal) the less accurate is the result but the more tolerant is the eye.
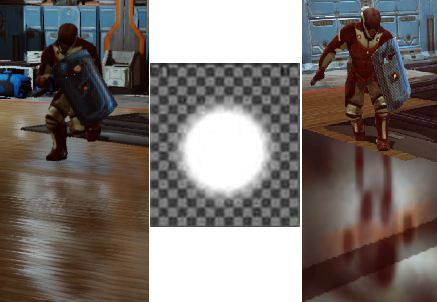
In several cases lighting artists wanted to enhance the planar reflection. Typical cases are brightness boosts of a particular element, elements scale to be visible in the reflection, elements stretch to simulate Blinn highlight, hiding artifact of concave parallax volume or even elements animation. This is allowed in the reflection system through image proxies. Image proxies are simple quads containing either a capture of an element in the world or an image provided by the artists. They are similar to billboard or light cards and can be oriented along axis or facing camera.
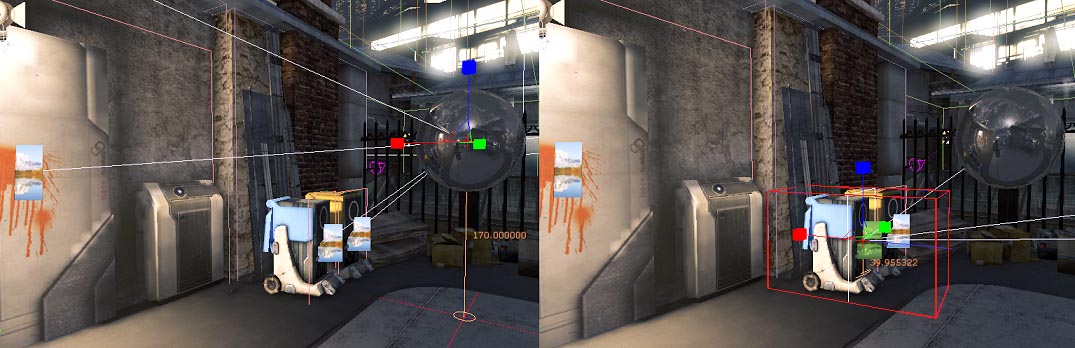
Results from above are shown below here…note the ground plane.
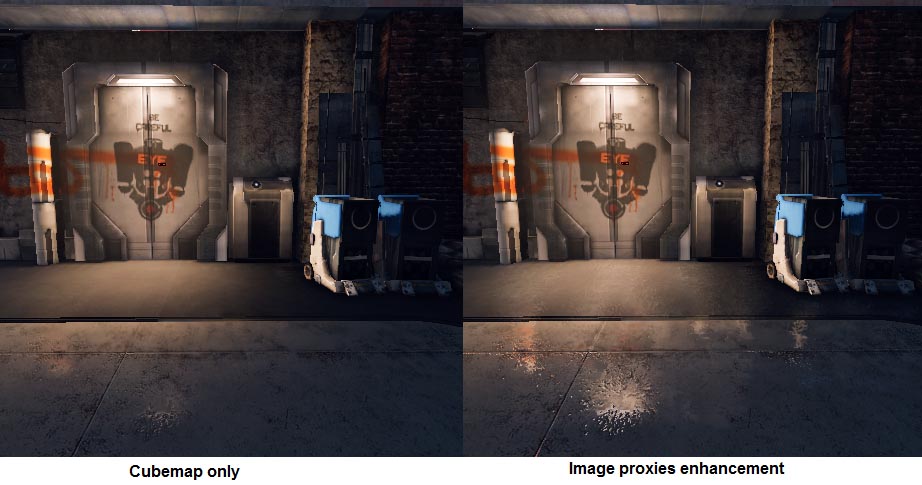
Image proxies can have a shader allowing them to do animation (like fire) and can be linked to dynamic elements like actors or even the actor’s bones. As actors are often an element of the scene one wants to enhance, they are rendered on top of a cubemap from the point of view of the reflected camera.
For performance reasons, the planar reflection solution doesn’t use a cubemap layout but a simple 2D texture. The reflection systems only render the highest mip of this 2D texture and the others mipmap are generated with the GPU. This means that the planar reflection solution doesn’t use an accurate pre-integrated radiance texture unlike cubemap. The 2D texture is 256×256 resolutions to efficiently compute the mipmap.
To sum up, the reflection system has two components, one pre-mixed 2D texture dedicated to one planar surface (usually the ground) and one pre-mixed cubemap use on everything else with some tweaks when required.
The overall systems take between 0.4ms to 0.7ms on PS3 for the both cubemap mixing step.
In Part 2 of our game environments series, learn about the creation of rain inside Remember Me, and soon after Part 3 we look at Surfaces.
I was just looking at this today on the ign reviews ,they didnt have nice things to say about the gameplay , but we all agree its a great looking game,that it is. Thank you for posting this in detail view about how they did it , its really inspiring.
Just to not stay on a negative review (I am a little bias), the game is polarized (take a look at review from 40% to 90% here : http://kotaku.com/remember-me-beautiful-or-pretentious-these-six-critic-510999206). Still all reviews agree on the beautiful art direction :).
Game play can be subjective, I love that this game pushes boundaries – and is not just a rehash of what has gone before. I think that is true of Game play and the amazing work of the technical team. We are very proud to be able to show some insight into the work that went into the game. We are also very pleased to be able to explain the level of dedication the team had for producing such high quality work.
Awesome article, thank you Sébastien!
That’s interesting to see that really beautiful games are still using forward rendering. I thought all the games were now using deferred shading/lighting or maybe tiled forward. Did the multiple passes cause you performance problems during the development?
Thank you,
The multiple passes avoid us to have too much light, so in practice we have only one dynamic light by object and when performance allow it we go up to three. This could seems very few compare to deferred shading with hundred of light but most of these lights are use to simulate bounce of light which are baked into lightmap/sh in our case. Our game have mainly static lighting.
Great job! Beautifull article 🙂 Thanks
[…] Sébastien Lagarde has written some very informative blog posts on the topic, well worth reading: Adopting a physically based shading model, Feeding a physically based shading model as well as the DONTNOD specular and glossiness chart. Also environment mapping (aka image based lighting) is crucial for realistic looking materials, especially metals, and this post explains how to prepare them with AMD Cubemapgen. A good writeup of the topics described in the blog posts can be found in this fxguide feature article on Remember Me. […]
[…] http://www.fxguide.com/featured/game-environments-parta-remember-me-rendering/ […]
[…] https://www.fxguide.com/featured/game-environments-parta-remember-me-rendering/ […]
[…] Game environments – Part A: renderingRemember Me […]
[…] not going to post a tutorial about authoring materials for a physically based renderer, because a lot of great tutorials exist for this already. I have, however, noticed that there is a distinct lack of decent reference for material […]
[…] remember me (2) they also approximate by considering two […]
[…] are setting in those shaders. This is why there are “best practices” guides (like this one from Dontnod Entertainment). Then we can be certain our shaders will work with any lighting. But when we get crazy and want to […]
[…] Blinn-Phong, like in my first formula by Hoffman, used, or the one from Brian Karis. According to http://www.fxguide.com/featured/game-environments-parta-remember-me-rendering/s formula it could be the one from Hoffman, but then i’m not sure. So to summarize […]
[…] repost Source: http://www.fxguide.com/featured/game-environments-parta-remember-me-rendering/ […]
[…] Real world pictures courtesy of Andrea Weidlich from “Exploring the … | Read Sources […]
[…] http://www.fxguide.com/featured/game-environments-parta-remember-me-rendering/ […]
[…] Rendering Remember Me […]
[…] when I write these little thought splurges I like to do research, so I came across this: click me – The website goes in-depth at the complexity of game lighting, the formulas, and moreover […]
[…] https://www.fxguide.com/featured/game-environments-parta-remember-me-rendering/ […]
[…] John Hable’s更绝妙的博客:任何都有菲涅尔 Sebastien Lagarde的总结:渲染勿忘 现在想来Sebastien Lagarde所有的博客都很好 SIGGRAPH 2010的PBR课程 […]
[…] Game environments – Part A: rendering Remember Me | … – EXCLUSIVE. The first of our three-part series on game environments, looking at Dontnod and Capcom’s newest release Remember Me. This part focuses on rendering the game. […]
[…] Most objects have a combination of both diffuse and specular reflections. Glossy reflections are a mix between the two where the highlights of light sources can clearly be seen but the reflection is blurry and undefined. Glossy reflections are semi-specular or semi-diffuse reflections. Realtime rendering of glossy, shiny smooth and rough surfaces – visual examples. Source: http://www.fxguide.com/featured/game-environments-parta-remember-me-rendering/ […]
[…] Sébastien Lagarde’s summary of Rendering Remember Me […]