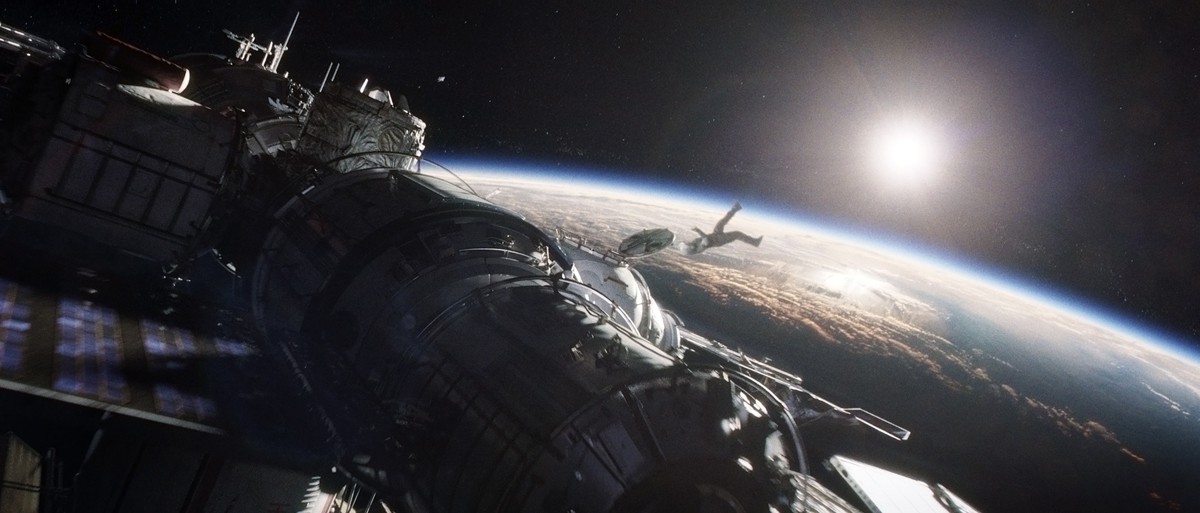
One of the most impressive films of the year is Alfonso Cuarón’s Gravity, with digital production (the word post does not apply here), computer imagery and visual effects primarily provided by Framestore and lead by visual effects supervisor Tim Webber. Framestore has produced truly remarkable footage and done more than just enhance the story – their work is central to the story, the emotional isolation and drama of the film. fxguide’s Mike Seymour spoke at length with Webber about Gravity and we also highlight some of the other history, elements and computer-controlled rigs in our in-depth coverage of one of the year’s most important visual effects films.
In addition to Framestore’s efforts on the film, Prime Focus partnered to help with the stereo conversion, although much of the digital footage was rendered in stereo. Rising Sun Pictures provided 17 shots, but given Cuarón’s trademark long continuous shots, those 17 shots accounted for over two and a half minutes of screentime (see more details below). Additional VFX work was carried out by Nhance, with scanning and LIDAR contributions from 4DMax, additional scanning by XYZ RGB, facial scanning by Light stage and facial mocap by Mova.
The previs which was key to the film’s success was primarily done by Framestore but in partnership with The Third Floor. It was actually this collaboration that leads to the creation of The Third Floor London. This new company is actually a joint venture between Framestore and The Third Floor LA. The Third Floor London saw the two companies sharing staff, tools, skills and philosophies and an initial headquarters at Framestore’s Wells Street office.
Watch a clip from Gravity.
Imagining Gravity
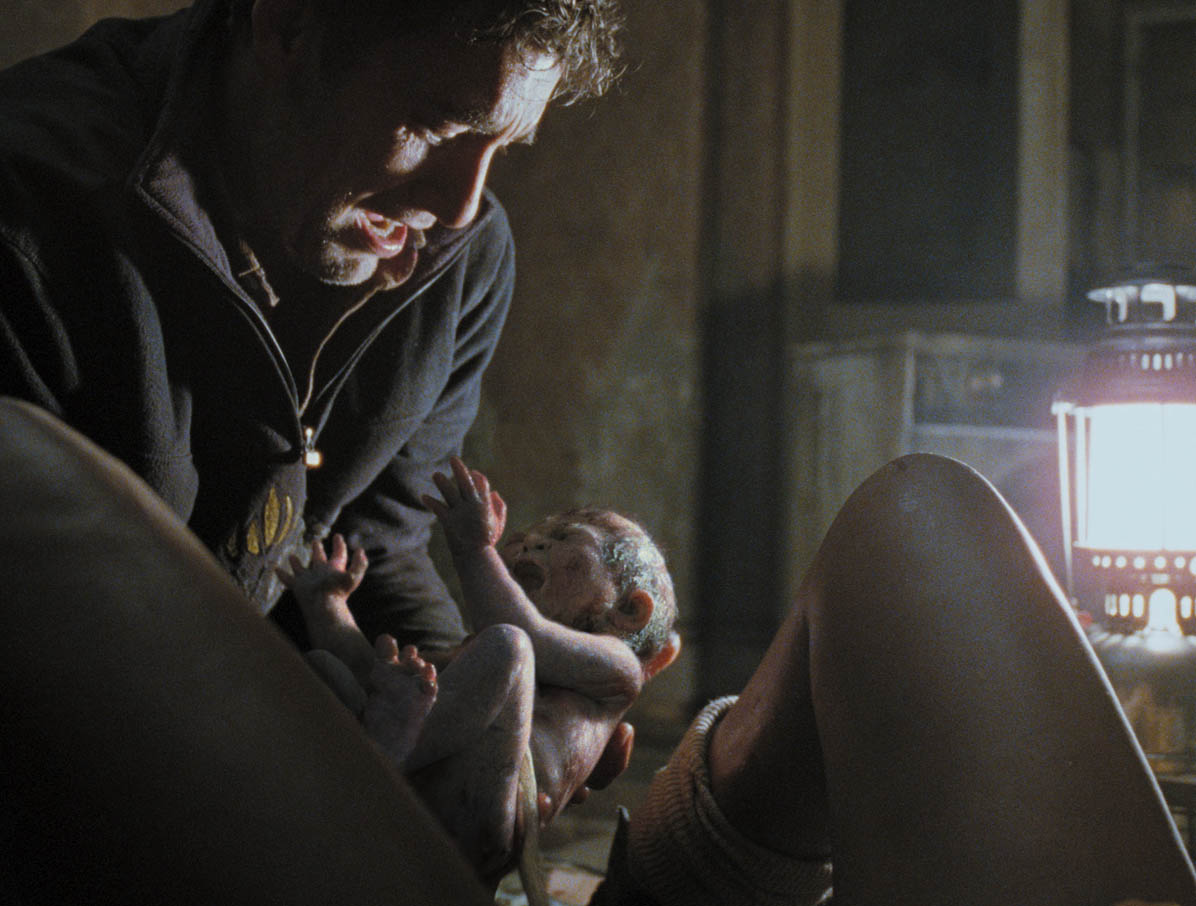 fxguide first sat down with Tim Webber at the end of 2006, to discuss his VFX supervision for the birth sequence in the 2007 film Children of Men, also directed by Alfonso Cuarón. The team then had to produce a photoreal digital child being born, again in one long continuous shot, in a small room. At the time fxguide stated that “All the work is impressive and the digital baby is perhaps the finest work of its type done so far.” The work in that film was remarkable but at least the environment was real. With Gravity, not only was the screen time much longer, it also required vast digital sets and the added complication of zero gravity.
Read the original Children of Men story here. Listen to the original Children of Men podcast here.
Films have tackled zero-G before, most notably on Apollo 13. However, Ron Howard’s solution would not work for Alfonso Cuarón’s shooting style. “Apollo 13 is one of the few films that has done it very well, I think,” says Webber. “They used the vomit comet where you can just about get away with a five second shot for, maybe a little bit longer. Then you’d cut to a close-up and they’d just be standing on a apple box wobbling around and it would work for a close-up for 10 seconds and then they’d do something else for another bit.”
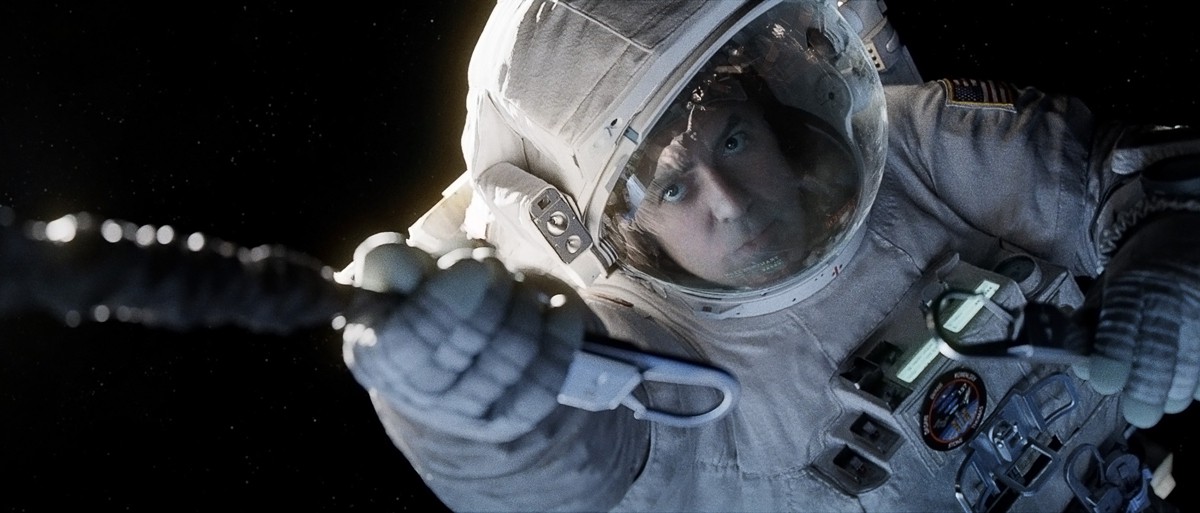
The Gravity team tested a number of systems (see below), with the final solution to have a small number of sets and then a LED ‘light box’ set used for the complex zero gravity work. Here, the actors, primarily Sandra Bullock and George Clooney, were filmed acting inside the box that had projected from it the correct environment the actor was meant to be in. Thus, if the actor was meant to have the earth providing bounce light from their left, on the screen on that side of their body was a giant earth image, digitally controlled and correctly aligned.

To have the actor ‘fall’ towards the camera, the actor would not necessarily move but instead, the camera would fly towards the actor, with the aid of the IRIS robotic camera rig from Bot&Dolly. This combination of flying the camera and lighting Clooney and Bullock by the lightbox would then allow an accurate performance to filmed of each of the two lead actors. But for a shot where they were in their suits, only their faces would be real, the rest of their bodies, suits, hands/limbs, environments, etc were all digital and fully 3D animated.
Making the film before making the film
Clearly, shooting in this way was going to mean that Gravity would be unlike any other film before it. “That was something we were aware of as we were working on it,” recalls Webber. “It was clear because whenever a new person came to join in any department, not just in visual effects, it would kind of take two weeks before they could understand the process and the way the film worked. It was so different to any previous method of making a film, really. It took that long for people just to understand what we were talking about.”

For most of the sequences, the team needed to completely previs everything before they started or else they would not know where the light needed to come from or have images they could use. “We spent quite a lot of time on the previs and then Chivo (DOP Emmanuel Lubezki) became involved and we did a pre-light,” explains Webber. “It became the blurring of the line between visual effects and cinematography. There was a great cross-over and there was no firm line. He got much more involved in visual effects than cinematographers ever get. And I got much more involved in the cinematography than visual effects supervisors ever get. Because in a movie like this there is no clarity between those two.”
‘Chivo’ was involved from fairly early on, he went to the UK and did previs and pre-lighting with the Framestore team for weeks. “We were very lucky that Chivo was the cinematographer,” states Webber, “not just because he is a brilliant cinematographer, but because he was also very willing and able to get his head around working through a different methodology to one he normally works in. We went to a lot of trouble to make it as lighting like in the real world as possible.”
See a clip from Gravity.
If creating zero-G shots was not challenging enough, Webber had to make these possible alongside extremely long takes. The first shot of the film, for instance, is 17 minutes, with no cuts. “The very long shots of zero-G, that is the critical point to what made it a challenge,” says Webber. “It wasn’t just having to simulate zero-G which is tricky, but having to do it in the very long shots. Doing long shots is a challenge, doing zero-G is a challenge, but when you add them together, well they don’t add together, they multiply by each other, and make it incredibly complicated.”
Adding further to this challenge was also keeping those long shots interesting. The team could afford no dead time, where the audience had to wait for someone to float up to screen for their close-up. In one continuous shot the blocking is more like a ballet but one where the choreography has to not be dull even for a few seconds. “You’re telling the story with the camera the whole time so it’s changing from a big wide beauty shot of the environment to a two-shot intense dialogue shot to a single to an action shot to another wide shot,” explains Webber. “Everything within the one shot. So you have to come up with a solution that can create a single shot that works across all the different types.”
On the whole the team stayed mostly to prime lenses for the show. A large percentage of the movie is just on two or three lenses. “That is just the style of how Alfonso lights and it was the types of lenses that worked with the shots – the long shots and the types of shots we were doing in this movie,” says Webber. “There are times when we slowly creep from one lens to another, very occasionally, essentially it still feels pretty much like it’s on a prime lens but there’s a little bit of gradual creep and changes.”
Once the creative previs was agreed to, and then pre-lighting also carried out, the team did an entire second technical previs to work out how to film the shots, translating the desired moves into the real world constraints of the motion control arm and the light box imagery. Explains Webber: “We would do the previs, and then we would do the pre-light and then we would take the information from those two and do what we would call the techvis, which would be extracting it and changing the shot from what you see on the screen to what you would see in the studio, which would often look totally different. Generally the camera would be moving instead of the person, or instead of a mixture of both.”
A minimalist set with maximum effects
On set was very different to a normal set. “Walking onto the set, particularly the light box, was a very strange contraption,” says Webber. On days when the team were filming just Sandra Bullock for her space floating sequences, the entire sound stage was a light box – with a run of rails and a robotic arm on Bot&Dolly’s IRIS rig holding an ARRI Alexa. There was no need for extra grip or gaffer trucks, stand by props or complex wardrobe. Just the actress, a light box, the creatives and a row of extremely talented technicians with their laptops.
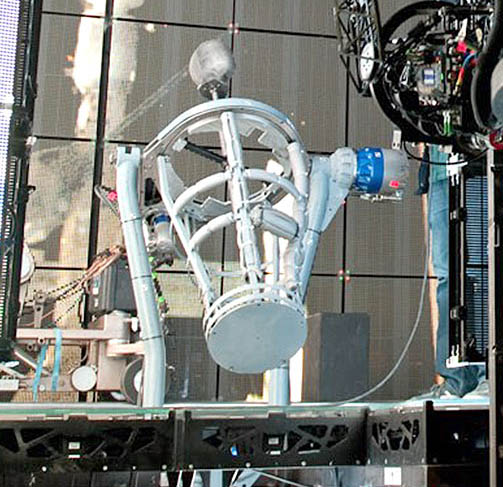
There was a bit of moving the actor as well as the camera. To the right here one can see a basket that the actor could stand it to be manipulated so the computer could rotate and align them. “We generally avoided tipping the actor more than 45 degrees in any direction,” adds Webber, “because as soon as you do you start to see the strain on them. So we wanted to keep them looking as if there was no strain on their face, because that’s what you get in zero gravity. If you tip them upside down and all the blood rushes to their head and the muscles strain the neck, so we were minimizing how much they were being moved around and trying to achieve all the movement by moving the camera and the lights and everything around them”.
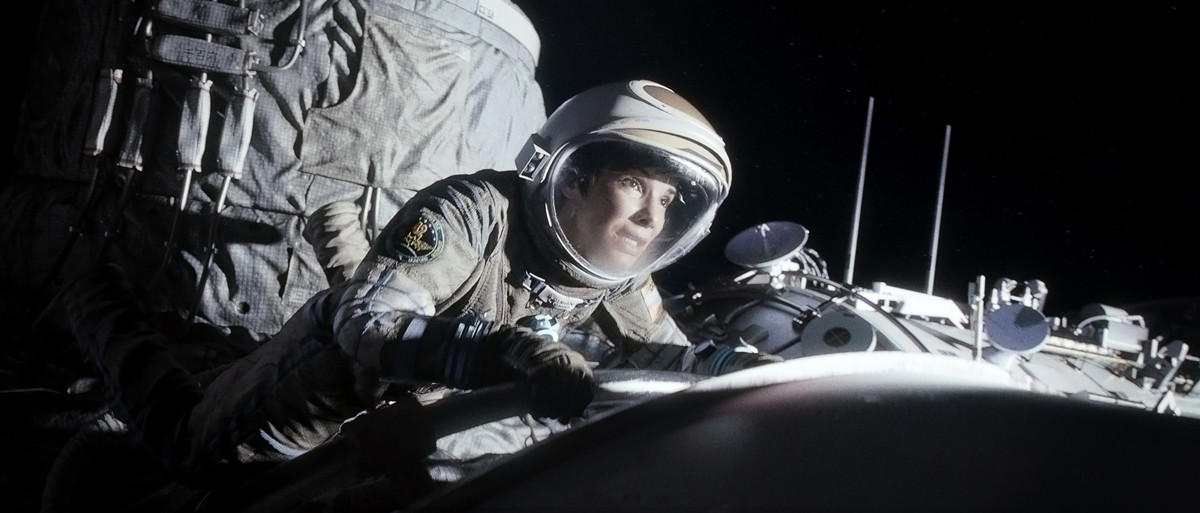
Some of the most challenging shots are when Sandra Bullock’s character removes her external space suit inside the ISS, and then floats through various compartments. Those interior shots were more challenging, according to Webber, because more of the shot is the real actor than in the exterior space sequences. “It’s easier to shoot just a face that’s got the right lighting and right movement than the whole body that has the right movement and lighting on it,” says Webber.
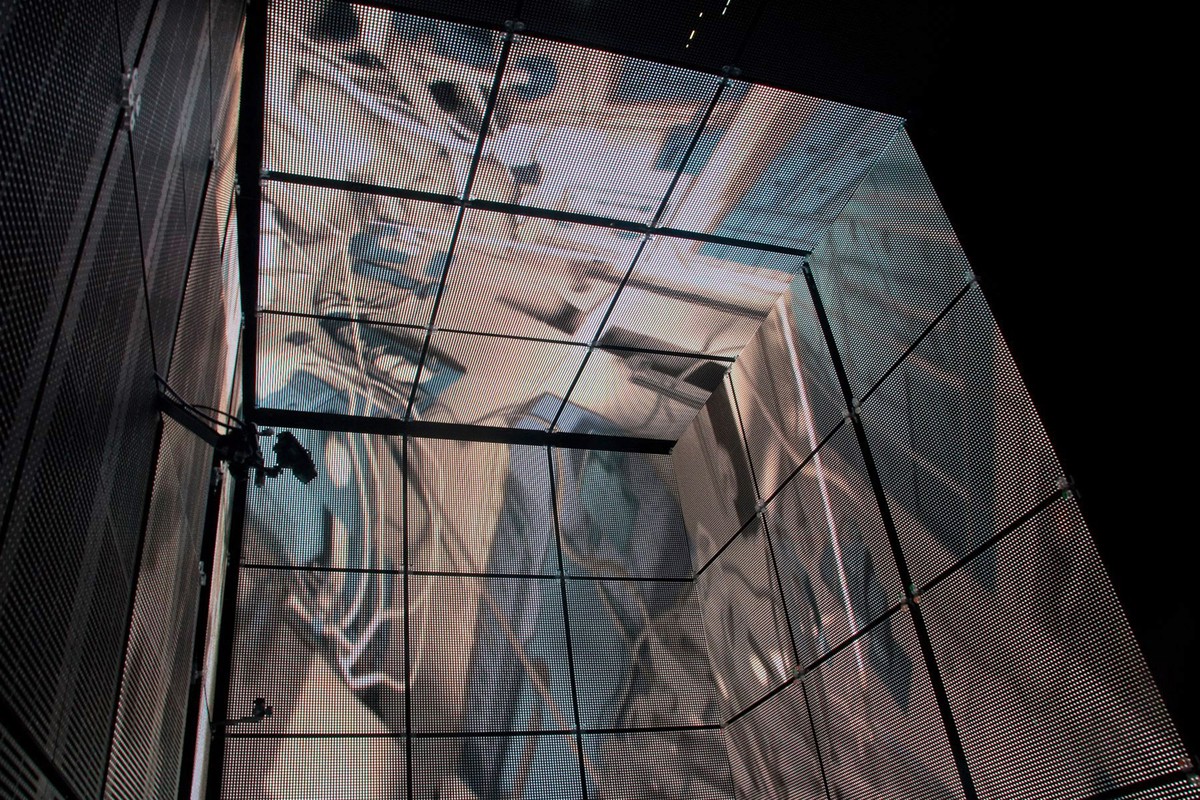
The light box consisted of a large array of LEDs – essentially like an inward facing screens of giant television screens. It was based on the technology commonly used to put massive images on screens behind rock bands or at sports grounds. “Each pixel is made out of an LED that we could control,” explains Webber. “There were essentially 1,800,000 individual lights that we could individually control, so that rather than moving a physical light we could just fade each individual light up and down or put different colors on different lights. So that would be how we move different lights around, not by moving anything physically but moving the image on the screens essentially.”
One side benefit of this approach was that the actors could personally see what was meant to be their environment, rather than having to imagine it as one might on a blue screen. The actors could ‘see’ their virtual world in real time. “It didn’t just give us the correct lighting on them, but it also gave the actor a sense of what was going on around them,” notes Webber. “If Sandra is flying down the ISS, she could actually see the ISS moving around her and it would help to give her a sense of what was happening around her.” It meant that the director could ask her to look at a prop or reach for a particular handle – even if it was not going to be officially added to the shot for months. Adds Webber: “They could actually see the handle they were grabbing and quite often we would put a little dot on it to make it easier to see.”
The LEDs were coarse and not perfectly blended, but Webber found that a lot of the time “it didn’t really matter because the light just blended and it was fine. But there were certain points where we had to put diffusion on. Those LED panels have strange behavior – they have strange spectrums of light, they change color quite dramatically depending on what angle, and it’s different on the vertical angle change to the horizontal angle change, so we had to compensate for all of that.”
While the system required massive previs there was some flexibility on set. “You need to be able to respond to what they want out of a shot,” says Webber. “If they wanted to change the speed and timing at one point we would need to be able to do that. So as well as pre-programming it dramatically, we had to build in flexibility. There were certain points where there was no flexibility and the Framestore team would have to say to George and Sandra, particularly in some of the interior bits, we’d say, ‘Right at the end of this bit we need you to put your hand exactly there and it needs to be at exactly this point,’ and she was brilliant not only at accepting she had to do that whilst giving a performance but incredibly brilliant at putting her hand and hitting marks with her hands in 3D space at the right times and being able to do it every time.”
Below is a diagram of the side and top view of the camera arm that would move towards the actors to simulate them flying at the camera on screen. See more below.

There were other different techniques used to create zero-G, however. Sandra Bullock would be hanging on a rig – dubbed the 12 wire rig – for some shots and be puppeteered. “She was attached by four different points and each point had three different wires going to it,” explains Webber. “So it was essentially a case of triangulating that point of her attachment, meaning we could control the position of that point in 3D space exactly without any swinging or swaying. We could literally puppeteer her and we had a crew of puppeteers that had worked on War Horse. They were literally manipulating Sandra. They had a metal block that represented her and if they lifted it or twisted it or tipped it up or down, she would twist or move up or down. We also had the ability to move that whole rig in X and Y up and down the stage and in height as well. That would pre-programmed, computer-controlled, or puppeteer. All of this could be a pre-programmed move or puppeteered live at the time.”
The team would have to co-ordinate either the two puppeteers controlling the different parts of the rig, or the one puppeteer in the computer with movements in the camera, with movements in the lights, with Sandra’s actions – so that, even though there was no ISS there, it looked as though she was pushing off against the handle of the ISS and starting to move down the corridors. “So all of those actions together worked in such a way that it looked as though something else was happening, that you couldn’t necessarily see on the set,” says Webber. “So trying to assess as we were shooting that it was going to work once we put in a set, was one of the hardest bits. Every take, Alfonso, Chivo and I would be sitting there watching it, and we’d all have to go, yep, that works from my side of view, that works for me, that works for me. It was a complicated thing to assess whether a take had worked.”

Bullock was also shot on occasion in a bicycle seat rig, named because she was essentially sitting on a bicycle seat. Here, though, one of her legs was heavily strapped in for safety so Framestore would be required to replace her leg in CG (with full body replacements and some full body and full-CG face shots forming part of the movie).
One issue with the light box approach is that there is no way to use green screen and so the actors had to be roto’d out of each light box shot. Speaking of Bullock, Webber says “she’s basically rotoscoped out of the environment and we had to do certain things with whatever was behind her to make it work cleanly, but essentially she was rotoscoped out. There was no way we could use greenscreen because you would get the green backing. Because of the camera moves and everything moving around her and everywhere, you would get green spill all over her, and you just wouldn’t get the lighting you need at all.”
Animation, effects and rendering
Framestore moved to a physically based lighting and shading model for Gravity. “We wanted it to feel as real as possible,” states Webber, “and so using a physically based renderer was very important to me, and one of most important and one of my best decisions. It was very risky at the time we made it, but I really think it made a big difference.” The project was rendered in Arnold, which was a break from the previous RenderMan pipeline that Framestore had deployed.
See a clip from Gravity.
While the lighting needed to be accurate, at some point the needs of the cinema storytelling also played a role. The film is faithful but not dogmatic to reality. For example there are some scenes with perhaps more fill that might really occur, in the same way the orbits of the various space stations and satellites may have been compressed slightly in terms of orbiting heights.
But at the core of the lighting was the physical correctness and accurate shaders that the Framestore team and Solid Angle’s Arnold brought to the project. “The main reason to use it was to make it beautiful and realistic,” says Webber, “but I think it helped for Chivo that the light was behaving in a way that he was used to, and we re-designed our lighting rigs in the computer to be very similar to traditional lighting rigs with bounces and blockers and things like that. The slight difference being we could make a white bounce card that was a kilometer by a kilometer if we wanted to bounce a light onto the ISS. In space you might have to do that and you’re not constrained by the real world physicality of it.”
Deciding to use Arnold for the rendering was a challenge. “It was the first time we’d used it,” notes Webber. “It was quite scary to begin with, but the team that developed all our in-house tools to work with Arnold, instead of PRMan, did a great job and actually it went a lot smoother than it could have done.”
Luckily for Framestore, Arnold has exceptional memory management that allowed some of the very complex scenes to still render. “I think that’s something Arnold is very good at – the memory and being able to render scenes with an awful lot of geometry in them whilst doing raytracing on them,” says Webber. “The render times were massive, and working out ways – apart from the simple technology, just making sure you were only rendering the right sort of thing at the right stage. What quality could suffer while you were doing test renderings but wouldn’t change the effect on the whole movie? An awful lot of careful management in those terms made a difference.” The project also used a large amount of instancing, which adds visual complexity but does not weigh down memory limits.
One thing the Framestore team also added was quite a lot of lens effects, like bleeding through a lens or flaring or chromatic aberration – elements that were beyond what one would normally have in real filming. Webber explains that this was “partly because it helped that feeling, it helped sit everything together, particularly because if you were really filming in space you wouldn’t be able to film with the best cameras, swap lenses and do all that sort of thing. It kind of suited the fact that there were qualities of the images that fitted in with that concept of filming in space – that there was a little bit of bleed off really bright lights. The strength of the sun off white suits – the contrast between that and the shadow side. If you don’t have the earth bounce filling in your shadow side then the contrast is massive, much higher contrast than anything you’d get on earth because of the brightness of the sun and the blackness of space on the other side. So there were often quite high contrast images.”
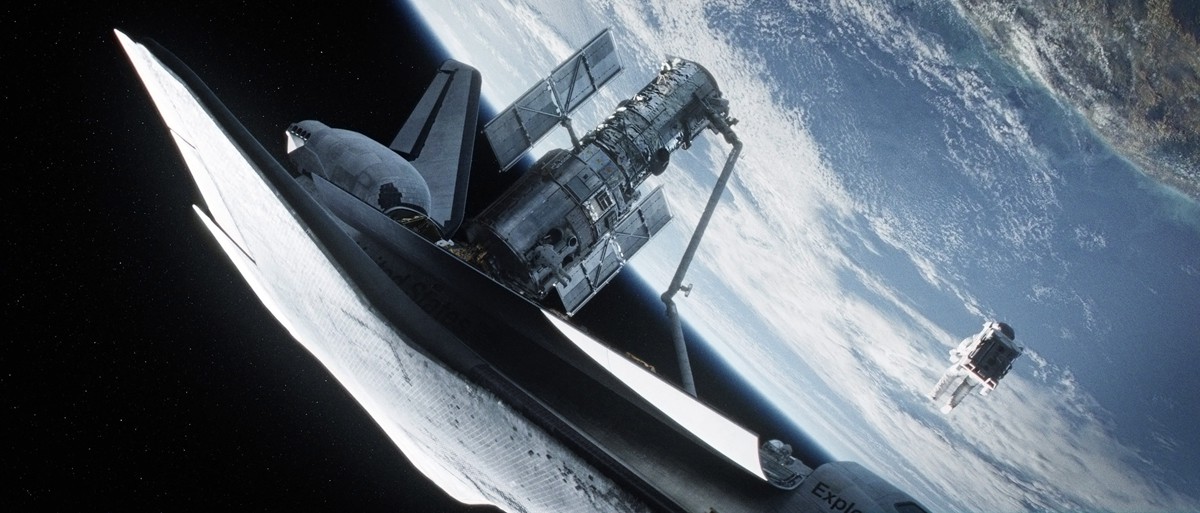
Framestore had pretty much finished production at the end of 2012, although there were sound mixes and a relatively major change made to the opening sequence when the director requested that the space shuttle be shown upside down. That took an additional two months of work, which also included extra modeling for parts of the Hubble telescope. Webber suggests all this “sounds like a simple change”, but changing any part of this movie was always going to be complicated with its continuous shots. “You can normally speed up a shot or what not in editing, but you want to turn one bit of a shot upside down? In a continuous take movie, nothing is that simple.”
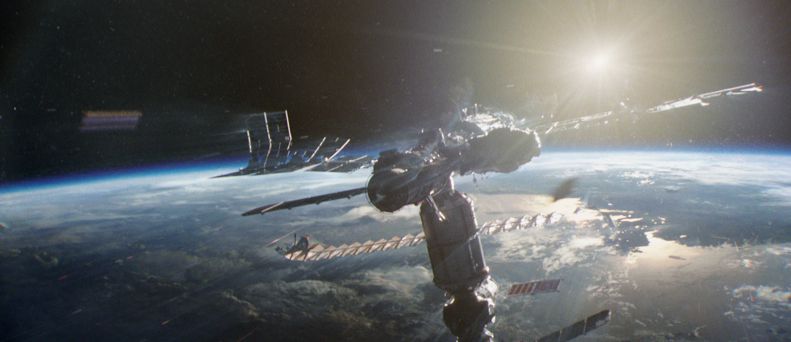
The various craft, space stations, and satellites were modeled extremely accurately by Framestore with a vast amount of detail. With the exception of some of the internal capsules, the whole film’s space sets and environments are digitally rendered.
Destruction tools for debris and fracturing was largely code written and working in Maya. “When we did our first tests of it with brightly colored simple wireframes you could tell it was going to look good – the way it behaved felt very real,” notes Webber. Debris usually has to decelerate and fall, and Framestore had neither in their zero-gravity set, so making shots look realistic could prove hard.
“It’s quite tricky to sell certain parts of the movie where the way things actually work in space feels wrong,” adds Webber. “All the stuff you normally put on when you’re doing your simulation or to help you with a visual effects shot – even atmospherics, making it more wishy-washy as it goes into the distance – you can’t use. When there’s an explosion in space, no-one really knows what that looks like.”
Framestore and the filmmakers did speak to astronauts about various aspects of the film and its realism. And since the film has been released astronauts such as Buzz Aldrin have praised the film. But while the team tried to be as realistic as possible – some concessions had to be taken. “You have to break away at times,” admits Webber. “There are certain things like the undocking procedure which takes 50 minutes – obviously you can’t make that happen when you’re in an exciting moment in the movie. So there were certain things you had to break away from reality with. In terms of the action, the way things move – we would try first of all to make it absolutely true to life, and where we had to break away from the real world, we’d do it so there was a logic to how it made sense.”
Rising Sun re-enters the atmosphere
For shots of Sandra Bullock’s character finally making it to the Tiangong Space Station and then re-entering earth’s atmosphere in the Shenzhou Capsule, Webber turned to Adelaide studio Rising Sun Pictures to realize the imagery. The studio’s work included fully-CG and stereo views of the space station and capsule, plus earth views, flame and plasma effects, clouds and the parachute. Assets created by Framestore were shared with RSP which incorporated them into their Side Effects Houdini / Mantra pipeline to allow for animation and destruction effects.
In bringing to life the earthly views for its sequence, but also for other shots in the film, Rising Sun played a key role in facilitating lower altitude shots. “Tim Webber had this idea that he wanted to know what things looked like from up there and thought it would be a good idea to acquire a bunch of reference material from up or as close as possible to actual altitudes,” recounts RSP visual effects supervisor Tony Clark. “At the time there had been quite a bit of publicity on people doing balloon experiments where they were putting up these balloons and taking photographs, attaching radios and things to them.”
Clark discovered a group of balloon hobbyists called Team Horus who operated from Adelaide. “They were launching these balloons and had radio payloads on them,” says Clark, “and they developed this quite sophisticated tracking software that could tell you if you launched at this point on this day that the flight profile would be a certain way and it would land here.”
“The production commissioned them through us to do a couple of launches on our behalf,” adds Clark. “We supplied some camera payloads on there that we would send up and see what happened. It was one of those things where we didn’t know if we were going to get anything from it, nothing at all or if we’d ever see the cameras again!”
Ultimately, just one balloon footage launch occurred in the Australian outback, with the payload – a high resolution digital camera – sent up to 36 kilometers to capture photographic plates. “If you’re on a gondola hanging beneath a balloon,” explains Clark, “the payload’s just spinning and bumping around. The Team Horus guys had designed some camera controls so that they would shoot bursts. The whole thing was radio and GPS tracked and transmitting its location to ground crews. They had chase cars for retrieving the balloon.”
The results were ‘very useful’ photographs and texture pieces that RSP could utilize in its shots and supplement with matte painting. This was ultimately a feature of the studio’s work for Gravity – taking real reference and also very clean computer graphics renders, and ensuring they were realized as photoreal and authentic shots. “Real photography is never clean relating to the optical performance of the camera, the chip, the camera operator,” notes Clarke. “So we have to find realistic ways of adding in slight deformations on lenses, little bits of dirt and what-not on lenses. We’ve had a lot of tech in-house for creating believable distortions and out-of-focus type effects.”
Camera shake, too, was something RSP invested time in properly replicating. “Instead of rendering a shot clean and shaking it in the comp,” says Clarke, “we’ve rendered the images as clean for layout, and then put them into comp where it’s very interactive to design the camera shake, then taken the camera out of composting, sent it back to 3D and rendered it with a camera shake embedded, which allows us to do sub-frame motion blur.”
A stereo hit
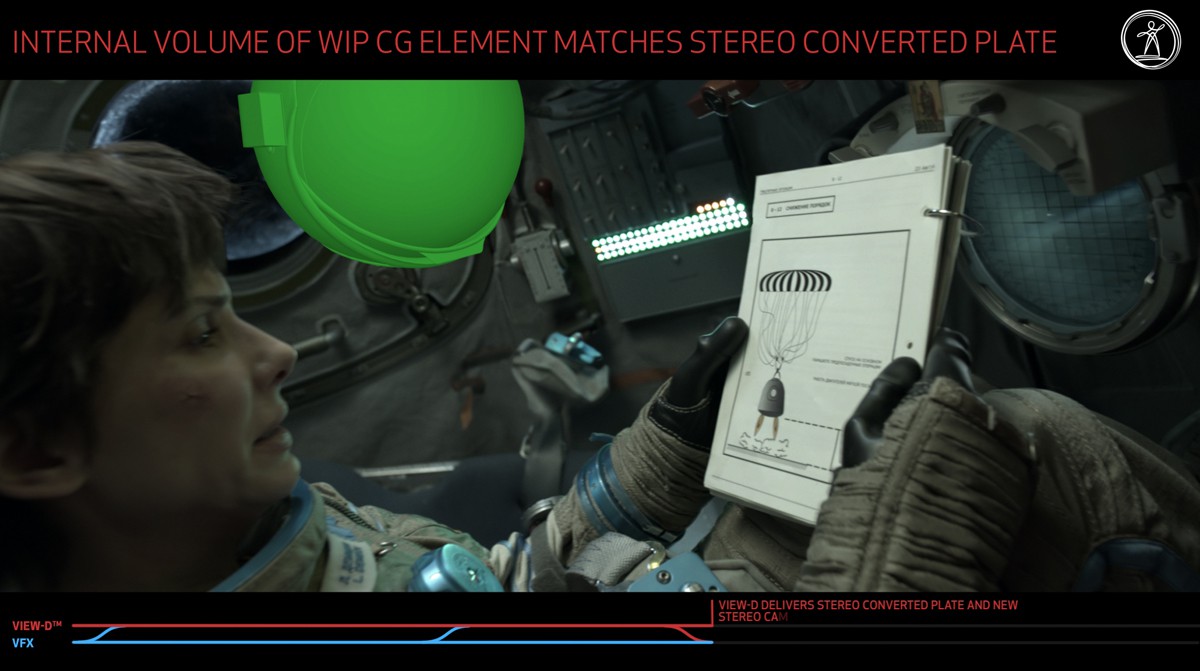
Gravity has also proven a hit in the 3D stereo community and caused a lot of reviewers to suggest that the film is best seen in stereo. Few films since Avatar have been so widely praised for their stereo version of the film. While the actors and any live action in the film was shot on a single lens ARRI Alexa camera in mono, all the 3D was all rendered in stereo by Framestore, with Prime Focus acting as a 3D conversion partner for approximately 30% of the film. Chris Parks served as stereoscopic supervisor.
Webber has his own theories as to why the film works so well in stereo. “I think there’s a number of reasons why it works in stereo. We all knew it was suited for stereo. I think the long takes is the single biggest one for me. It really helps that you’re not crossing, you get a chance to enjoy the environment. You feel like you’re a physical presence moving around and the stereo go hand in hand. They work really well together. The generally shooting on wide lenses helps the stereo. The fact that you’re shooting in space doing all this weird rolling and moving helps stereo.”
Prime Focus converted 85 shots or 27 minutes of live action footage, including one mammoth 15,531 frame conversion. Prime Focus senior stereographer Richard Baker led the studio’s work, with production management by Matthew Bristowe.
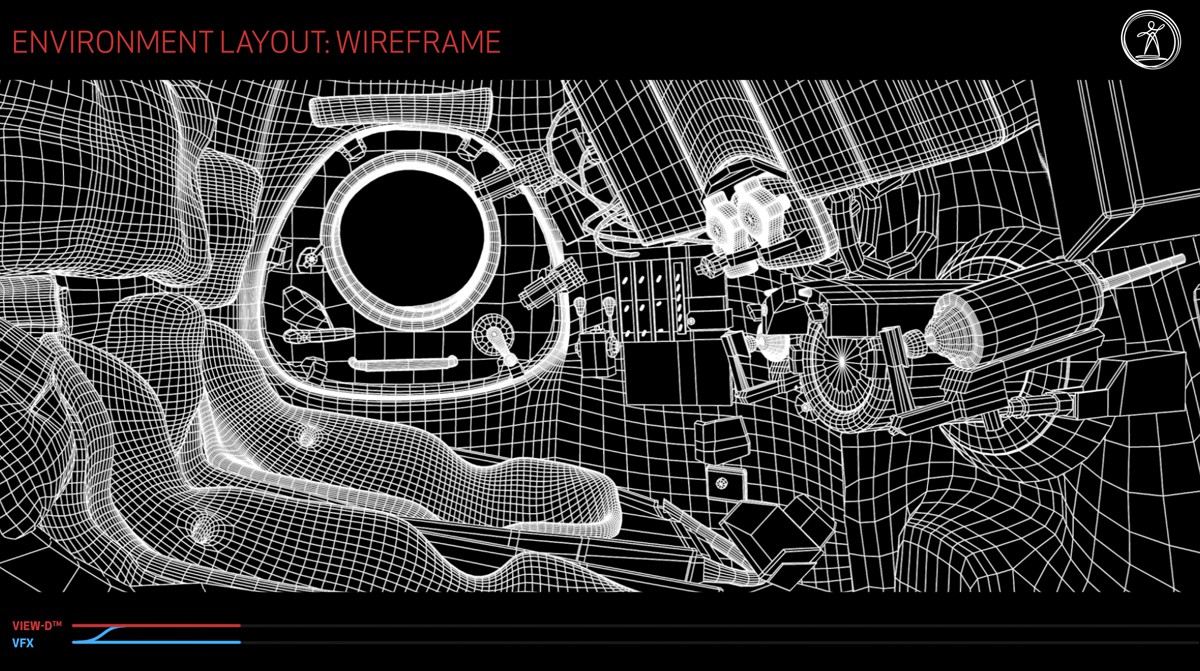
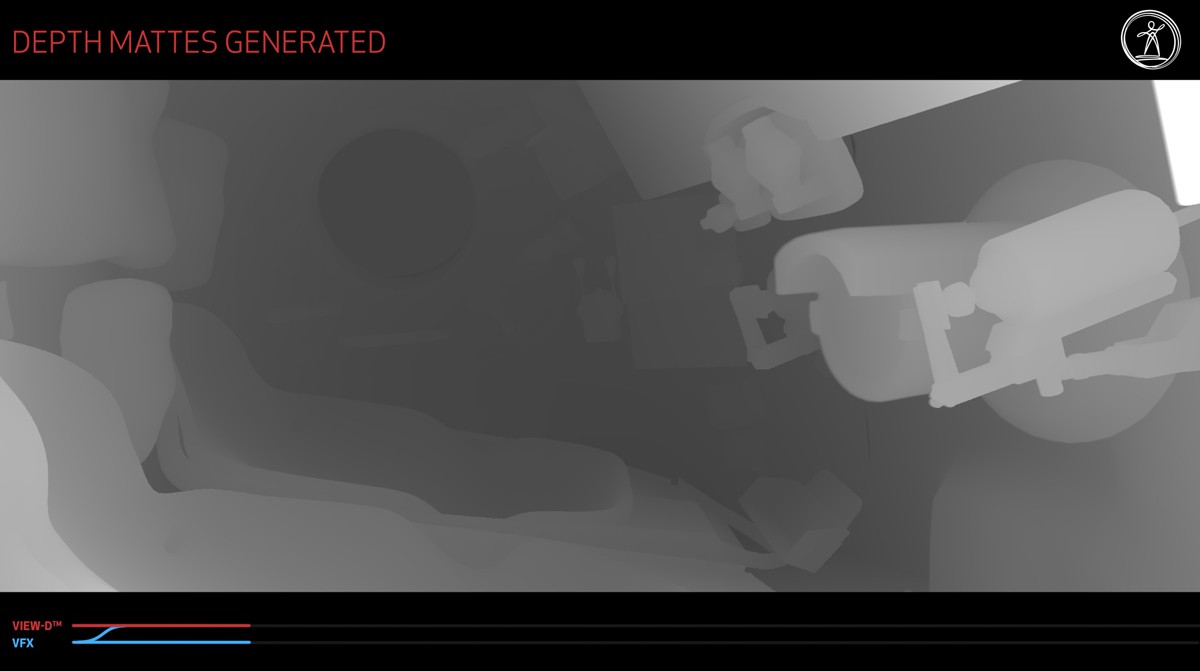
Much of Prime’s conversion work takes place in the space capsules, where live action and some CG elements from Framestore made up the shots. That meant that a major challenge for Prime Focus was interacting back and forth with Framestore to produce the stereo conversions for those shots. “We were being sent 2D tracks of the plates and geo from Framestore,” says Baker, “and we’d convert that. Then we developed some really accurate stereo camera development tools. We could then pass these stereo cameras back to Framestore and they could use these in their Maya scenes.”
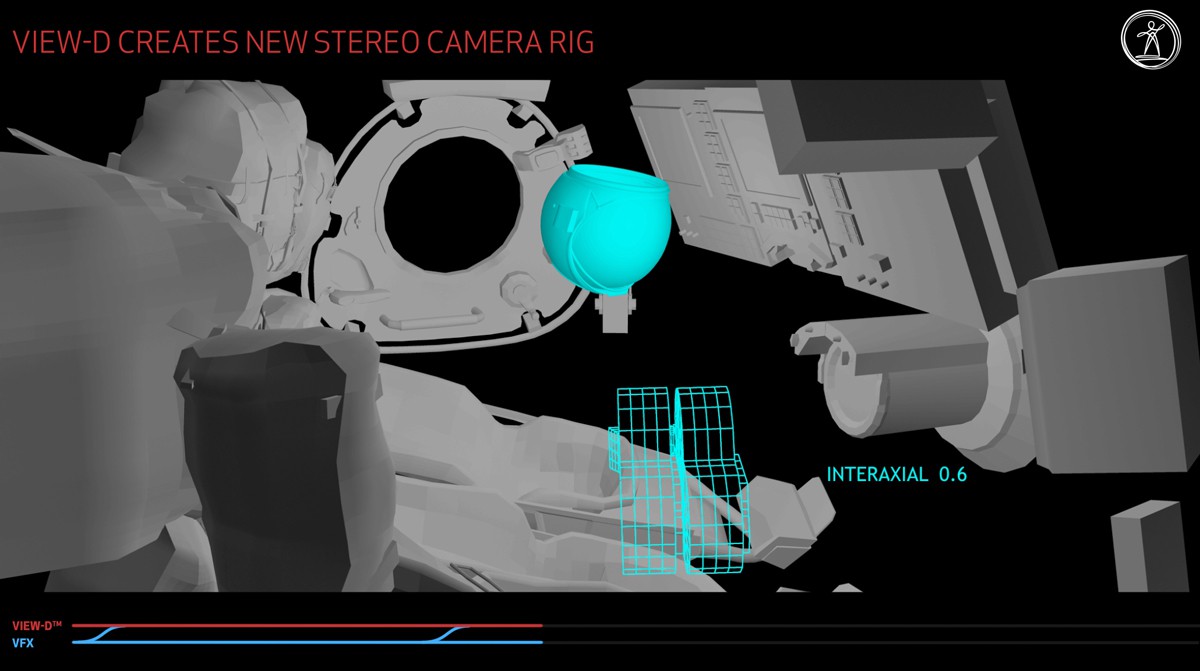
“Framestore had their own proprietary stereo camera format,” explains Prime Focus’ Rajat Roy. “The original footage was shot at 3K, and all the repositioning and scaling wasn’t applied when they tracked their cameras. So we had to take their live asset, like a camera, apply a non-final repo and scale to it, do our conversion according to the new reposition and scale of the image, apply any changes as they arrived, make sure it was version tracked, then hand back to them stereo cameras that matched our conversion – so that they could stereo render and re-apply their comp to our conversion background.”
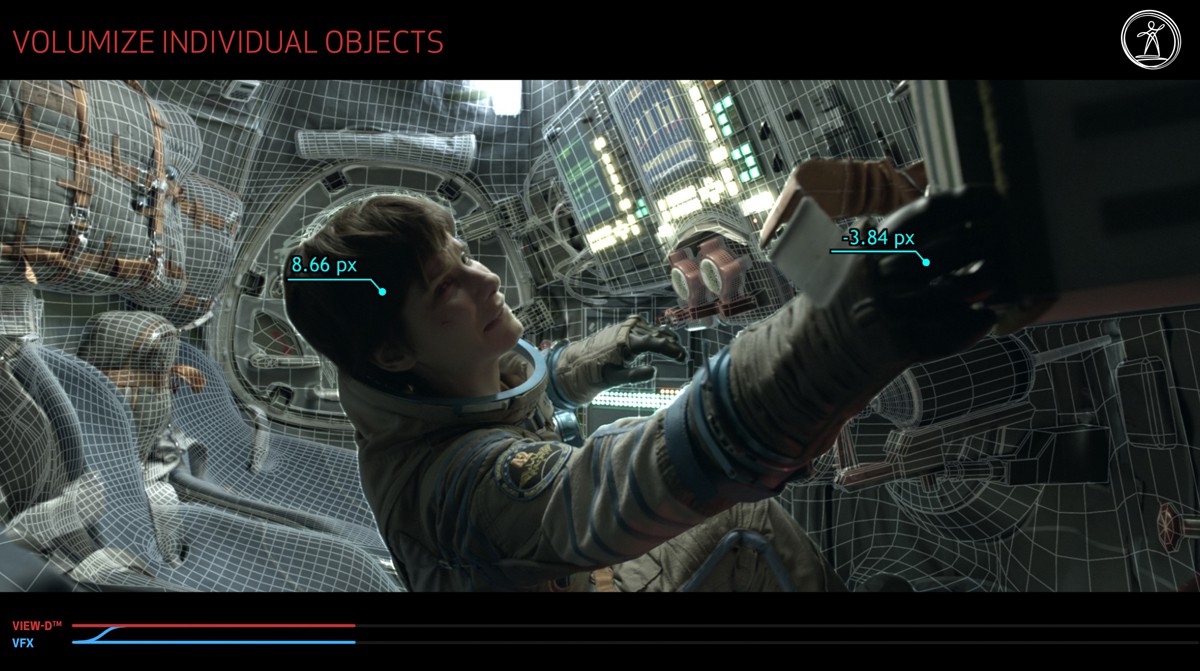
To help with having the most consistent and accurate elements for conversion, Prime Focus was able to leverage cyberscans of say Sandra Bullock’s head for positioning that could be put their View-D pipeline. Traditional roto and spline work was carried out with a multitude of tools including in Fusion and NUKE.
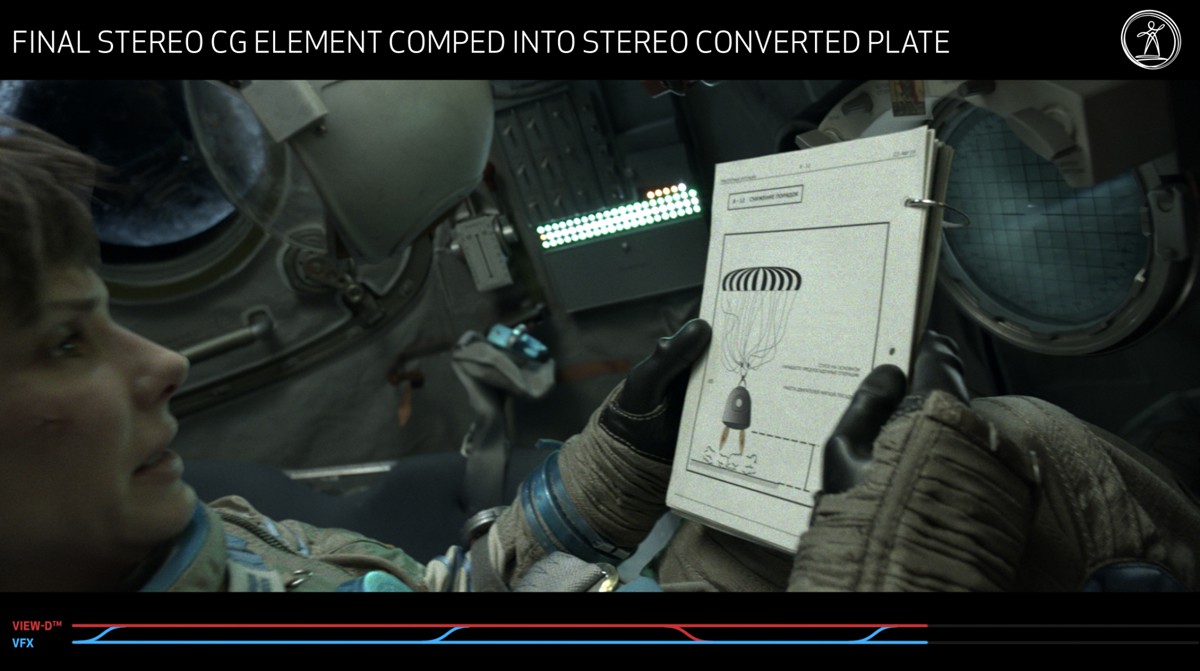
The result was a consistent feel to the stereo in the film, in particular, the stereo CG renders by Framestore, and a clear enhancement to the sense of weightlessness and vastness of space. “I really thought that that enhancement worked so well,” notes Roy. “For example when Sandra was sitting on a chair, they exaggerated the difference between her and the chair to make it look more like she was more in a floaty environment.”
“There was actually a lot of subtlety to it inside the capsule,” adds Bristowe. “But also there were a lot of technical challenges that needed to be resolved before we even got into the creative side.”
Team effort
Clearly, the director really trusted Tim Webber and the team at Framestore. Webber himself was the main visual effects supervisor but was also heavily involved in almost every detail of the film.
But filmmaking is a collaborative process and Webber is the first to point this out. “As with all visual effects shows, what it really comes down to is a talented crew. A huge amount comes down to craft, more than technology. Some of the detail the animators put into it, or the subtlety of the shaders, or the time spent by the compositors putting breath on the visors, which is just a manual job, and listening to the breathing and looking at the head movement, putting every single little breath on by hand. A lot of all of that goes in to making a difference.”
More on Gravity’s light box
The lightbox, resembling a hollow cube, stood more than 20 feet tall and 10 feet wide. The interior walls were constructed of 196 panels, each measuring approximately 2 feet by 2 feet and each holding 4,096 tiny LED lights.
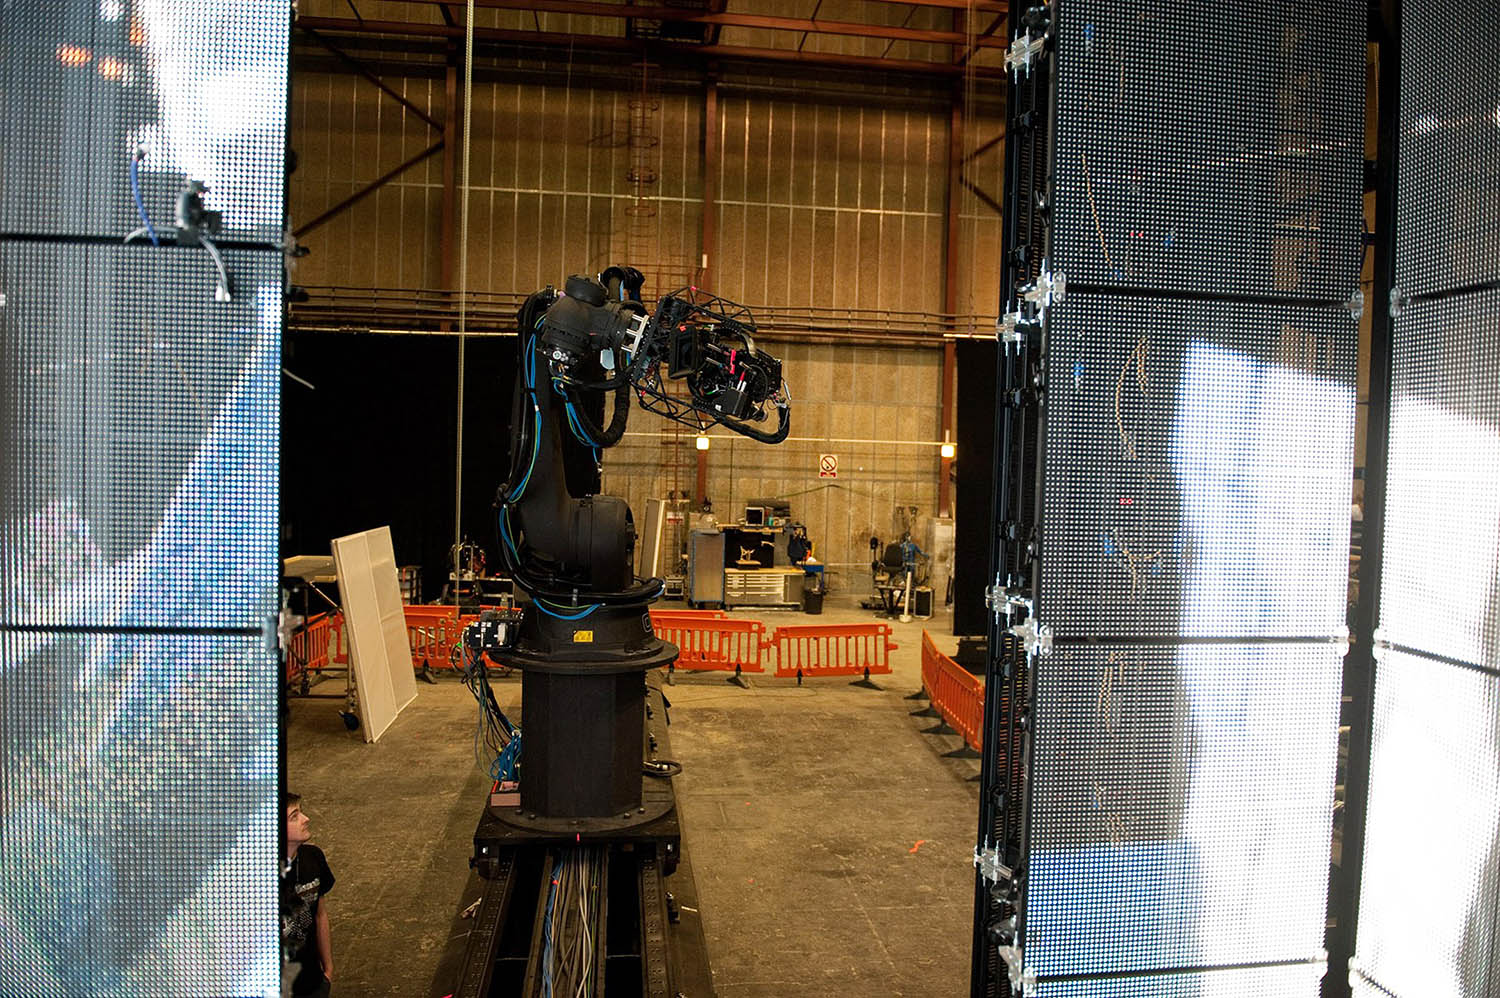
The lights could not only project light, but also varying colors, and the lights could also be programmed to move at any speed. As its name suggests, the purpose of the light box was to cast the appropriate illumination on the actors inside, no matter where they were or how fast they were moving in relation to the light source.
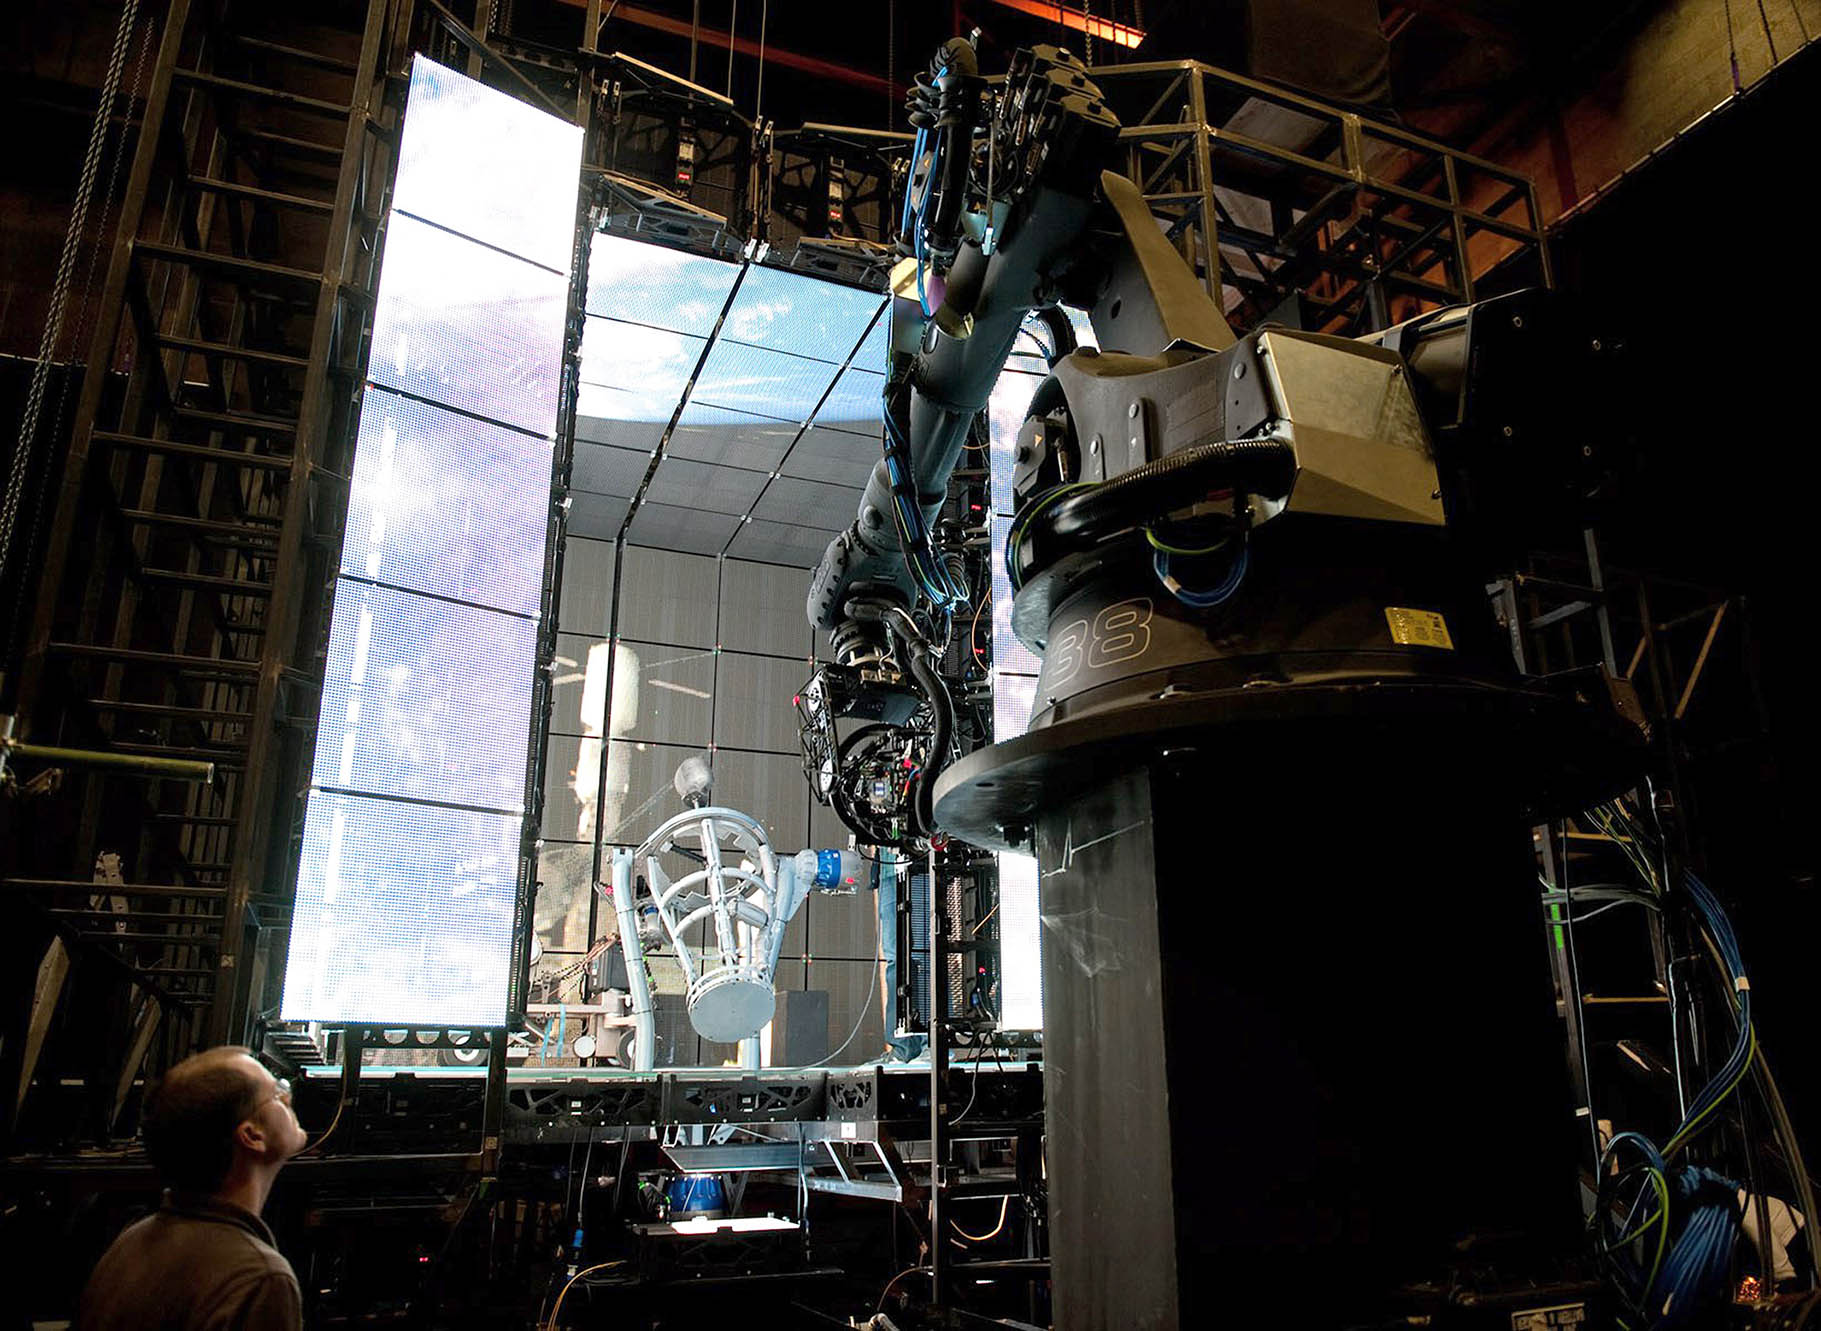
The light box walls could also be moved and were at times placed on robotic arms.
Tests in 2010 – 2011
Early in the production Chris Watts was hired to investigate the possible ways this film might be solved technically. He joined Alfonso Cuarón as visual effects co-ordinator. He organized a series of tests for the director to see what approaches might be used to re-light and animate lighting over an actor. The team tested a number of approaches in pre-production, including this one below using the Lightstage technology from USC ICT.
This is the Comprehensive Facial Performance Capture Video from Eurographics 2011. It is authored by
Paul Debevec, Graham Fyffe, Wan-Chun Ma from USC ICT plus Tim Hawkins of Lightstage LLC and Chris Watts, who was a VFX consultant at the time on Gravity. The actress seen here is Margarita Levieva.
The test done here was to see if a relighting option could be used via the Light stage system developed at USC ICT which involved multiple high-speed cameras, time-multiplexed lighting, and stereo 3D reconstruction. This was not primarily used in the end, due to a number of factors such as the need for (fairly rare at the time) particular Phantom cameras.
Some shots in Gravity did use the Light stage data, from a later session. Once both George Clooney and Sandra Bullock became the final cast, each actor sat for static facial scans that were used as both reference and for those shots where fully CG faces were needed.
The lightbox solution that was used in London worked from less of a principle of re-lighting (as in the Eurographics 2011 approach) and more from the position of creating light environments that were solved from pre-production previs.
“We used Light stage to get some scans of George and Sandra,” explains Framestore’s Tim Webber. “For a few shots they are CG faces, but pretty few. Less than we had originally intended, because the other techniques we developed worked so well, and it’s actually easier to use a real face if you can, and we found ways to get it to work. Doing a CG face that is 100 percent believable and you completely buy into and doesn’t fall into the Uncanny Valley is still no easy achievement. And to do it for a whole movie would be a real challenge”. It was decided that this wasn’t the flavor for this movie.
Interestingly, the same USC ICT research team headed by Paul Debevec had suggested in 2002 such an approach of an all-around “lighting reproduction system” that “didn’t have to be a sphere but could also take other forms including the “walls, ceiling, and floor of a room” might be viable, having done something similar inside the Light stage 3. They only had the actor on a simpler rotating gantry, and the team never implemented a full robotic camera (although this was suggested) – but this did allow “the world spinning around the actor” in the Light stage 3 by having the lights of the light stage programmed to rotate around the actor.
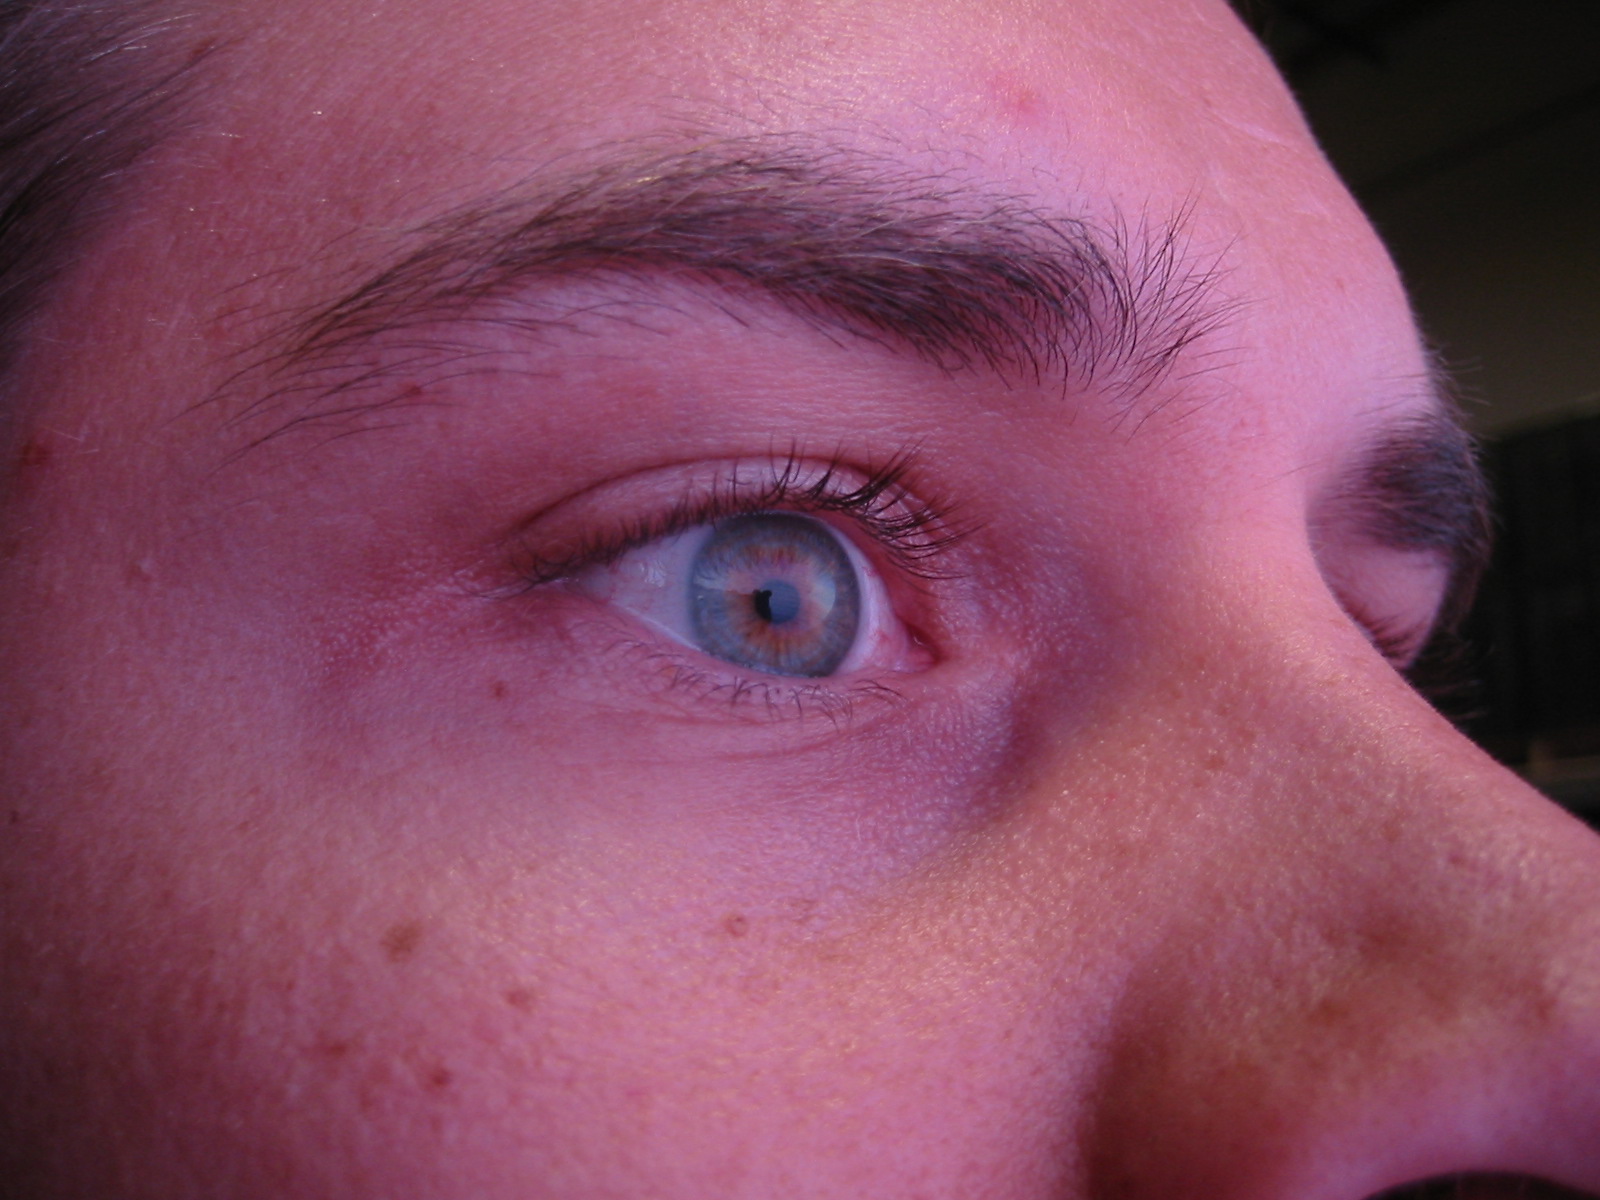
They even explored the LED wall/cube concept briefly in partnership with Digital Domain in 2004 using Barco panels, but the project did not move forward.
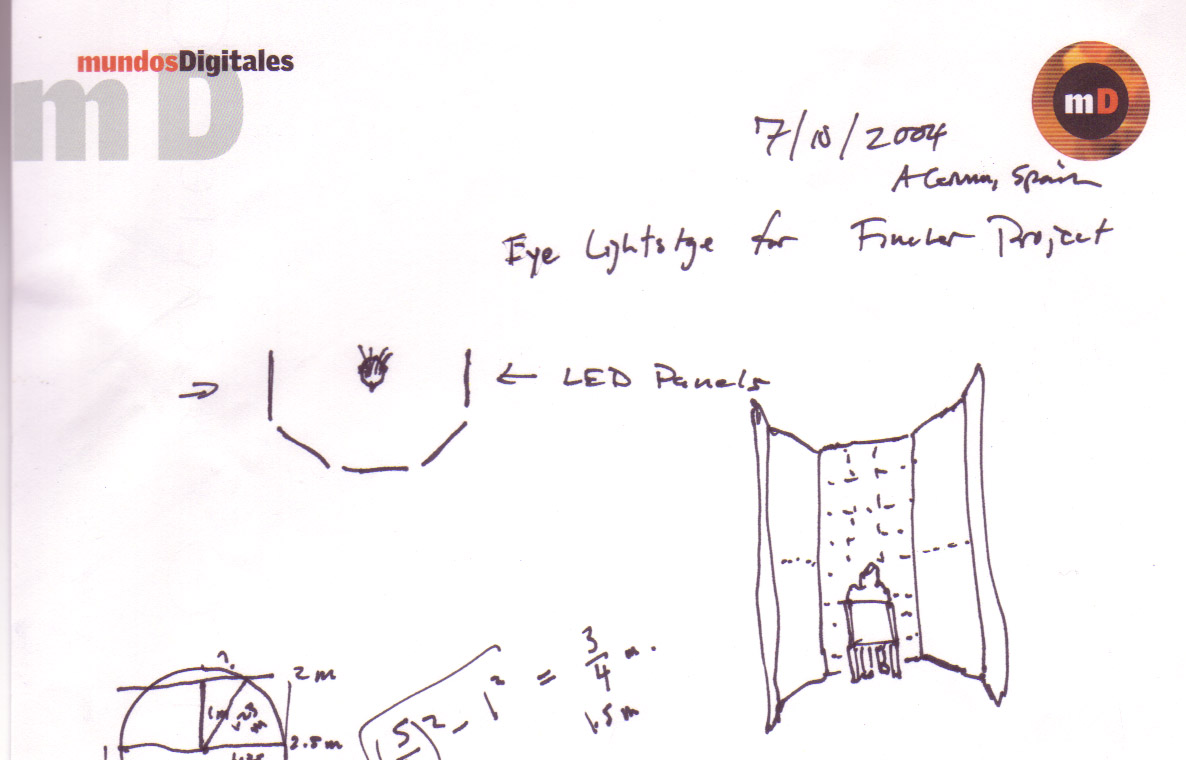
The diagram above it the initial idea for LED – DD project for David Fincher. “… it was for an early version of Benjamin Button” explains Paul Debevec. “DD had brought David Fincher by our lab and he was very interested if a light stage could provide matched controllable lighting on eyes. In this idea, Button’s eyes could be a live actor and the face and head could be digital. I knew we would need higher resolution for that, and designed this setup to surround the actor with LED panels. BARCO then set up one wall of it for the test we did in September 2004, and we showed that the eye reflections were fine. DD ended up going all-CG for the Button character, but we got to help out with that process, too”

Chris Watts and Paul Debevec apparently discussed an approach similar to the Light box before the 2010 test, but since it would have required a bigger color light stage than was available and there was yet to be a commitment to build a new one, the team focused on the Lightstage test mentioned above.
Chris Watts also brought on board the team that would become Bot&Dolly – responsible for the robotic camera rig IRIS used on set. The final rig is driven by Autodesk Maya for shot design and the system was custom built primarily for Gravity. Today the system can be adjusted and scaled with payloads ranging from 6kg to 500Kg.
The main IRIS motion control system has 7 axis of freedom and can be fitted with a camera head with an additional 3 axis of freedom. The rig can be fitted to a track running some 10.8 m long. The Bot&Dolly can move at 4 m/sec and stop with 0.08mm accuracy. Impressive, given the whole system is 6000kg.
Below is an extract from the Bot&Dolly 2012 show reel, which shows work the team were doing around the time of testing and development for Gravity. This is not a shot from the film, but it shows the camera and lights moving while the actress is stationary, giving the illusion of her rolling in space.
The company is based in San Fransisco. While Chris Watts moved onto other projects happily and stayed in the USA, the Bot&Dolly team moved to the UK to shoot. Today their system is available for rental and use by other companies.
All images unless otherwise noted copyright 2013 Warner Bros Pictures. All rights reserved.
Hello, This movie is awesome and oscar winning
Visual Effects. Tim Webber really one of the best supervisor. Hello mike whats u r think about oscar winning VFX.
Thanks Mike and fxguide team.
I think there is little doubt it will be nominated at this stage, but not all the films for 2013/2014 award season are out yet…
great article. couple thoughts… (:
i don’t think we’re far away from a viable mixture of capturing (in whatever method) textured-geometry that can be relit, realistically – and i think we can and will be able to avoid the uncanny valley with excellent animators (and not just reference, but ‘animated textures’ from the camera that can be used). and i’m not at all saying that’s the best or only way or should be done for an entire film, but it can be very helpful for certain types of shots and obviously digi-doubles are pretty common these days (with wildly varying results – again… animation)
and of course, getting a depth channel should save some roto-ing… i.e. open up a lot of possibilities for going beyond greenscreen and focusing on what works best for the performance – of everybody, like including camera and direction – it just helps when everybody is seeing something as close to the final image as possible instead of everyone having a slightly different imagining of it. storyboards and concept art just don’t give you that visceral experience of capturing/reacting to a real shot (especially in collaboration) and the technology we have today has enabled us to take that artwork and integrate it while shooting in real-time. this is the kind of creative inter-disciplinary work that i’m preparing for as the future of filmmaking. can’t wait (:
obviously there has been technical pre-planning for awhile… it’s the artistic involvement that interests me most. is this the most involved we’ve seen vfx (or post) within the early and creative stages of a film?
I dont know if this is the most involved (vfx in production) but it is certainly right up there in terms of modern film making practices and pipelines. I cant speak highly enough of Framestore’s work here and their approach to the project while maintaining the Director’s style and vision. Plus this was not a $250m budget film… Yes it was not a long film by todays standards, but wouldnt we all prefer a shorter better film than one that goes 3 hours and is less engaging – I know I would.
Pingback: Behind the Scenes: Visual Effects and the Making of Gravity
Pingback: Bastidores de “Gravity”
Pingback: Gravity : l’aventure intérieure | Sheet
Pingback: The Making of Gravity | Jonny Elwyn - Film Editor
Pingback: Gravity, de Alfonso Cuarón | Lorhkan et les mauvais genres
Pingback: VFX Show and Tell Video For Gravity | We Geek Girls
Pingback: Sheet-Mag – Gravity : l’aventure intérieure
Pingback: Lab Notes - October 18, 2013 | The Capture LabThe Capture Lab
Pingback: Gravity, what a movie ! | Ludo&co
Pingback: Sheet Mag – Gravity : l’aventure intérieure
Pingback: “Gravidade”, o grande vencedor do VES Awards deste ano | Computação Gráfica e Cinema
Pingback: The VFX War: Part 3 — The Slight Heard Round The World - AGRAPHA Productions
Pingback: The Gravitas of Gravity | digital didascalia
Pingback: The Revolution will be digitised - Extraordinary Places
Pingback: « Il n’y a rien pour porter le son » : défamiliarisation et réalisme signalé dans "Gravity" - Stuart BENDER
Pingback: 14.10.2013 / bei anruf film | superufo!
Pingback: Production Log 19 - JEL Production JEL Production
Pingback: Film Score and More (With Haim Mazar and Matt Allard) GCS013
Pingback: Opinion sobre la película GRAVITY 5/5 | MuyEnterado
Pingback: KEY LIGHT - Luce e Cinema - Shot Academy
Pingback: ‘GRAVITY’, ovvero la luce dello spazio (interiore) | Luce e Design
Pingback: KEY LIGHT – Luce e Cinema | Shot
Pingback: KEY LIGHT: LUCE E CINEMA | Shot
Pingback: Gravity : l’aventure intérieure | Assassin Scribe
Pingback: Gravity. Hoe neem je een film op in de ruimte? - DailyM
Pingback: Gravity: A Groundbreaking Sci-Fi Film Showcasing The Dangers Of Space
Pingback: Capítulo V – Gravedad – Fotografía y Efectos Visuales
Pingback: Capítulo V – Gravedad – Dirección de Fotografía y Efectos Visuales
Pingback: Recreating ‘Gravity’: How Innovation Paved the Way to Oscar | Cinematic Truths
Pingback: Making of do filme Gravidade – Allan Brito