Len Wiseman’s remake of Total Recall contains a whopping 1600+ visual effects shots, but, as with much of the best effects work of late, had its beginnings in practical sets, rigs and photography. “Len’s attitude was always to shoot something, say the hover cars on a rig,” notes overall visual effects supervisor Peter Chiang, whose VFX studio Double Negative was the lead vendor. “This lent something to the composition that could only help with the set extensions. I think in a completely CG film you’d actually end up with something quite different – trying to get it physically meant those restrictions you go through to get a shot makes the shot better.”
With so many ‘big’ sequences, we can’t cover all the VFX in the film, so here’s a look at just some of the major visual effects and virtual production work – including the dramatic hover car chase, the ‘in-one-shot’ gun fight, the robotic Synths, hologram effects and the elaborate earth elevator destruction.
Listen to Mike Seymour’s in-depth fxpodcast with Dneg’s Head of Lighting & Rendering Philippe Leprince about the studio’s adoption of a new physically plausible lighting setup for Total Recall.
Previs
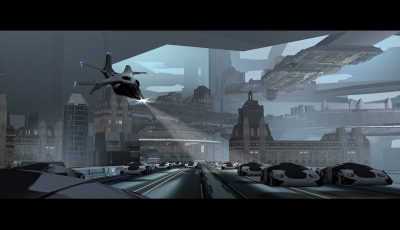
Exemplifying the ever-increasing role of virtual prototyping in filmmaking, The Third Floor not only provided previs for large sections of Total Recall, but was also involved early on in pitching the movie to Sony using ‘pitchvis.’ After the first sequence was completed, the team continued to work to and fro with director Len Wiseman and production designer Patrick Tatopoulos, and, later, set designer William Cheng to flesh out the film’s futuristic world.
“Originally,” says Third Floor previs supervisor Todd Constantine, “the pitchvis was just going to be a test sequence to walk Len Wiseman through what a new Total Recall could look like. But it went over so well that they actually re-wrote the script and incorporated that scene into the final movie. We spent some weeks building the environments and the hover cars designs and making CG stand-ins for the actors. We then would smash little toy cars into stuff with Len at our desks until we worked out the choreography he wanted to see.”
“Previs co-supervisor Josh Wassung, who is also a Third Floor founder, and I then blocked out shots based on our knowledge of the beats Len wanted,” adds Constantine. “Within a few weeks, we had a three-and-a-half minute pitchvis of the hover car chase sequence with a fully imagined environment, choreographed action, lighting, fx, some compositing, sound fx, dialogue lines and a heart pounding score to really put you in the world that Len wanted to create. The pitch to Sony using the pitchvis went over so well that the movie was green-lit quickly and parts of the pitchvis were used to help re-write the script to incorporate those scenes into the final movie.”
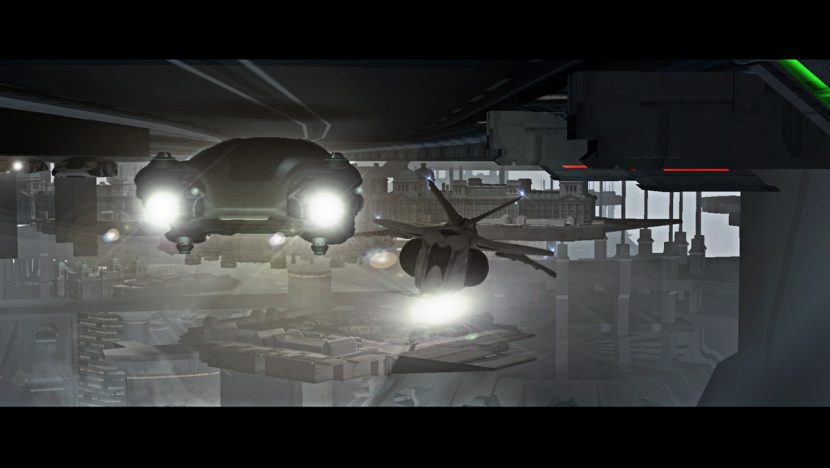
In addition, The Third Floor realized previs for The Fall (previously China Falls) sequences – a giant transport that moves between the center of the Earth between two very different locations – the UFB and The Colony. “Our asset builder, Felix Jorge, sat with Patrick and built a version in Maya,” says Contantine. “We would then trade that design, back and forth from the previs team to the art department as the final version was refined. We’d run into all kinds of challenges from height to shape to function as we tried to figure out how people and vehicles would react in the environment. After a version was decided on, the set designers started putting in the finer details. We’d get their 3D models and integrate them into our previs version and see how they worked around the story beats. We’d find areas that we’d have to address where maybe the eyeline was being obstructed, or a ladder had to be added, etc. We’d give it back to them with some alterations and they would make it work as a build-able set.”
Running as somewhat of a chase movie, Total Recall also called for previs from Third Floor for car chases, foot pursuits, fire fights and an elaborate horizontal and vertical elevator scene. One example of previs helping the director work out his vision is when Quaid (Colin Farrell) takes on the armed soldiers at Rekall all while the camera flies around the room. “Our team set up a motion capture session where Len directed some professional stunt people to perform the action,” explains Constantine. “Once we cleaned up the mo-cap and stitched the performances together, I had the privilege of taking a stab at getting the camera move Len wanted in 3D. During prep for shooting that sequence, we revisited that camera move with Paul Cameron, the DP, with the goal of figuring out how many cameras would be needed, at what speeds and how much distance was necessary on the physical set to get it as ‘one’ shot.”
-Watch a breakdown of the hover car chase, thanks to our media partners at The Daily.
The hover car chase
Perhaps the film’s most spectacular visual effects work is the hover car chase, in which Quaid and Melina (Jessica Biel) attempt to flee Lori (Kate Beckinsale) and robotic ‘Synths’. They take to the magnetic car system in the UFB and fly through the multi-layered city. Although taking cues from The Third Floor’s previs, the sequence was not realized entirely digitally, as many of the car-to-car shots were actually filmed with specially-built hover car rigs at locations in Toronto. “The way that Len Wiseman wanted to do it was that he wanted to shoot as much practical stuff as possible,” says client visual effects supervisor Adrian de Wet. “I love that – I’m a great fan of getting as much in camera as you can possibly get. It helps us, it helps the CG, it helps always. You use that as your starting point for reality and you base all your CG on the practically shot reality.”
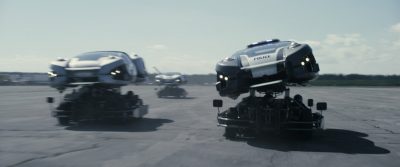
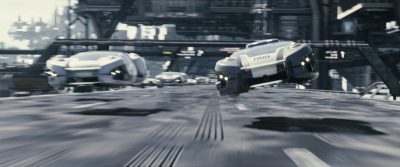
Practical cars
“The rigs consisted of a go-kart on the bottom,” says de Wet, “a four-wheeled go-kart that had two operators, one would be the guy who sat up the front, who was actually driving the go-kart. There was another driver who was operating a gimbal above their heads. On top of the gimbal was a full-sized hover car. So we had to remove the go-kart that was underneath to make it look like the car was hovering, and replace the entire background.”
The actors and stunt doubles in the hover car mock-ups could then “react to the velocities and inertia you get when you’re in a car traveling 40 miles an hour smashing into each other,” says de Wet. “You get all that stuff for free.”
One set of car plates was filmed underneath the Gardiner Expressway in Toronto, which provided appropriate lighting for passing-by UFB city structures. Another group of plates was captured on an expansive unused airbase at Borden. “We let rip with the cars, both 1st unit and 2nd unit,” says de Wet. “We shot the full sun-lit stuff out there. We drove the cars around at 40-50 miles an hour, allowing them to smash into each other. We wrote off a few cars, smashed a few cameras – all that kind of stuff.”
A huge effort was then required to matchmove the car plates, remove the rigs and to establish roads and a world for the hover car chase to exist in. Concepts for the UFB were established by Patrick Tatopoulos’ team, from which Dneg quickly began an asset build. “Len and Patrick gave us a great library from which to choose,” says Peter Chiang. “Once you take in the assets, there’s a whole development process that goes on. We just started building the assets and had them all run in parallel, including The Third Floor’s previs work. And we set the look that way.”
CG versions of the hover cars were created via reference photography of the practical versions (luckily the cars were all similar shapes and sizes). Distant traffic was achieved through a particle system developed in Houdini. But the most intense work was the incredible buildings – ‘platforms’ – and roads network required for the UFB that had to be mapped to the live action plates.
Environments
A major piece of the environments puzzle was solved by Double Negative’s reliance on CityEngine, an architectural tool that allows you to create individual building components and then define rules for how those pieces fit together, say for a neo-classical building (one of the director’s established styles for the UFB). “Graham Jack, Dneg’s visual effects supervisor, realized early on we would struggle to make a city this size without adopting a procedural building tool,” notes CG supervisor Vanessa Boyce, who shared overall CG supervision duties with Jordan Kirk. “We based the CityEngine buildings on five or six real buildings in London and built them as they were. I think the National Gallery in Trafalgar Square was one of them. Then we broke them down into procedural building blocks and were able to have weathering shaders and photographic textures to break them up.”
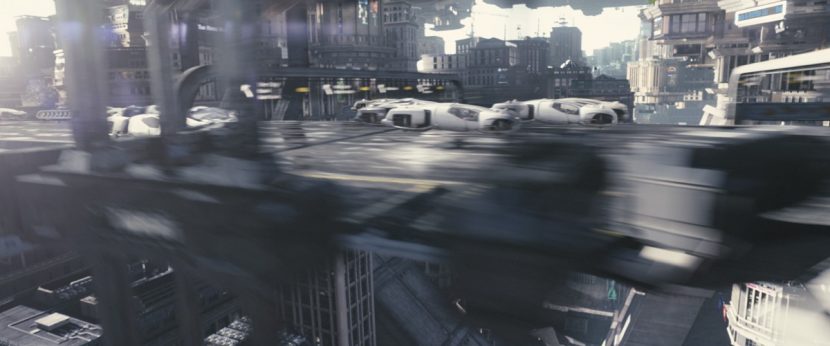
Dneg incorporated the tool into DNasset, its pre-generated RIB system for environments. “It did mean all buildings had to be created in CityEngine,” says Boyce, “but we had a small team who were trained up in how to do it. There was a button to bring it back into Maya.” In addition, the studio had only just moved over to a full physically plausible lighting model with raytracing through RenderMan, which provided much greater looking first renders.
Hear more about the new lighting and rendering pipeline in this fxpodcast with Dneg’s Head of Lighting & Rendering Philippe Leprince.
According to Boyce, the workflow was as follows:
“1. As we developed the shots, we worked at a lower render resolution with lower render quality settings. We knew that eventually we’d have to upgrade to high quality but with 200+ shots, we also knew that we’d have to be smart about what we did and didn’t render.
2. The far distant city would need to be a matte painting but with the multiple angles we had throughout the city, we realized that we had to be flexible with this layer. So we designed some new building platforms (using CityEngine) which were much bigger and more epic to work better visually in the background, rendered these at a few different angles, then matte painted on top of these. These were then placed on cards and roughly placed in by lighting TD’s in their shots as they worked on the overall composition of the shots. These were then exported to Nuke to allow the compositors to reposition if required.
3. The rest of the city would need to be rendered CG. Looking at the initial lighting passes, we realized that for many shots, beyond a certain distance, parallax and rolling reflections became barely noticeable. We realized that we didn’t need to waste time rendering every frame but instead render one high quality overscan frame (calculated efficiently) and reproject it in Nuke. This slashed render times and had the added benefit of eliminating render noise. It also gave our matte painters a frame to paint on to add detail into the buildings.”
Compositing
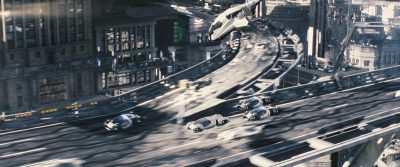
In compositing the hover car chase, 2D artists worked to preserve the original photography and keep necessary reflections, but then also added in elements to sell the integration for the hover car chase. “The other heavy comp work was dressing the environments for weathering,” says 2D supervisor Victor Wade, “which meant dirtying up buildings, signs and vehicles.”
The sequence, and many others in the film, feature lens flares heavily. Interestingly, the film was shot anamorphically with Panavision lenses on the RED EPIC. This meant a 2:1 squeeze on the image, so Dneg took a center crop and treated it as an anamorphic frame. For the characteristic flares, DOP Paul Cameron would oftentimes shine a torch directly into the lens on set. “It was funny, a lot of the camera guys kept hiding his torch or taking the batteries out to stop him shining it at the lens,” jokes de Wet.
Dneg came up with a library of lens flare elements to augment ones shot for real. “It was hard to create a procedural lens flare in CG that felt convincing,” says Wade. “It seems like a simple thing to slap over a lens flare, but because it affects the composition of the frame for that entire shot, it’s actually something that needs a fair bit of judgement and consultation with the director and DP about timing and color – it basically becomes an element in the shot that needs some pretty careful thought.”
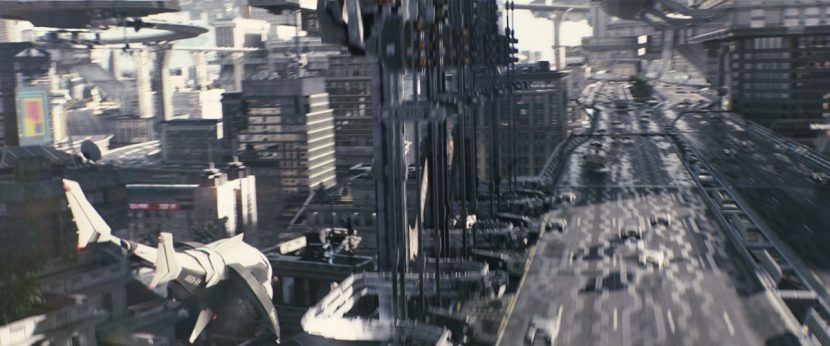
Another important compositing tool for the hover sequence and others in the film was Dneg’s camera shake node in Nuke, which is based on real camera moves. “It’s actually pretty simple,” says Graham Jack. “It’s a library of tracked motion curves from different camera mounts. You take a camera move that’s hard mounted onto a vehicle, and you’re removing the main move – the low-frequency bit – to get the extra high-frequency vibration to come through. So when we have a super-smooth CG camera move, we can add that camera data back over the top to get the right high frequency vibration.”
“We wanted to use something as authentic as possible and as close to how the camera would feel if it was actually shot the way the scene ended up,” adds Wade. “It gives you a pretty good result quite quickly. It’s not a super shaky cam movie, but there are action scenes where it does come into its own.”
Dneg’s city-building, CG, rendering and compositing approaches were also adopted for other UFB environments, The Falls destruction later in the film and for the other major area in the film, The Colony. This location relied heavily, though, on built sets and digital extensions to reflect its polluted and overcast existence, made up of a waterfront, red light district and habitat areas which Dneg fleshed out with modular buildings, digital rain and atmosphere.
Other facilities including Prime Focus, The Senate VFX, MPC and Buf contributed to environments throughout the film as well. Baseblack, under visual effects supervisor Rudi Holtzapfel, completed several shots, including views of the city behind a subway train coming through a station, which was filmed in Toronto. They also extended a churchyard set for the villain’s lair sequence, and animated a Dneg ‘harrier’ model for a getaway scene.
‘Happy Trails’ – the one shot
In an early trailer for Total Recall, the audience was given a taste of just one of the dynamic shots envisioned by Wiseman and Cameron. While visiting Rekall to receive memory implants, Quaid’s procedure is dramatically interrupted by a SWAT team, but instead of capitulating he instinctively reacts and guns them down – all in one shot. The camera racks to and fro in the room, passing seemingly invisibly past solid columns. “We didn’t really know how to do that,” admits Adrian de Wet. “I was thinking we could get four or five bits of dolly track, put it around the action, and then you’d have to push the dolly down the track while filming, but how would you get to the next track? You’d have to freeze the action, you’d have to start it from the next camera, maybe have three camera crews and each running each piece?”
Watch the final ‘one’ shot.Instead, second unit director Spiro Razatos suggested the filmmakers rely on a Super Slide rig from Doggicam, something he had used for the film Fast Five. As noted above, The Third Floor contributed previs for the sequence to establish the number of cameras required. “What happens is,” explains de Wet, “you get five of these sliders and run the camera down them. They’re pieces of truss with a pan and tilt head on them, and you can shove that pan and tilt head at 15 feet per second down the truss.”
“Then once the camera’s got to the end of one piece of truss, you can line it up so that you have another piece of truss over the top of that, with an underslung camera in almost exactly the same place as the previous overslung camera. Then you line up the lenses so that they’re pointing in exactly the same way, but one is almost higher than the other one. So they’re close enough so when you run the first camera down it gets to the end position and the other takes off and the acceleration is really fast – it gets up to speed in about two feet. You have to back up your second camera so there’s a two foot overshot on the right hand side so it gets up to speed by the time the camera is in position.”
See the Super Slide shoot.The sequence with Colin Farrell dispatching the officers was then filmed with multiple EPICs on the Super Slides in one go, although the scene of course still required a significant digital clean-up after the fact. “All the cameras see all the other cameras,” says de Wet, “so it was a big clean up job to get rid of that. We did three or four days of second unit to get clean passes with cameras on a dolly as accurately as possible re-create the move to get the cleans.”
The Synths
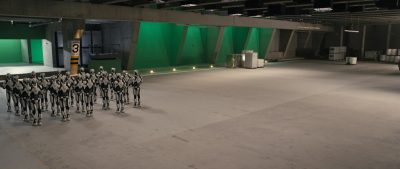
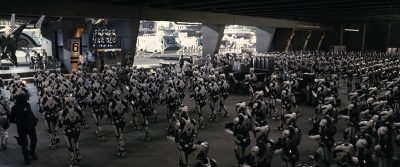
Robotic forces known as the Synths became a significant visual effects effort for the film. “The Synths are supposed to be robots,” says de Wet. “How do you shoot for that? One way would be to shoot nothing for them, do it all-CG. But we decided not to do that, because Len is the kind of person who wanted to do it as practically as possible. So guys in suits got us to a certain place and let us interact and have something for the editor.”
“The problem with guys in suits is that they look like guys in suits unless you change them,” adds de Wet. “The idea then was that we would remove areas of them, such as areas of the torso, cut out each area of the shoulder and the knees and the ankles and you would see through to the background. We filled it with technical mechanics and cables and pistons, to show they’re a futuristic tech, but you leave gaps to see through to the background which sells to the audience that they were not guys in suits.”
Dneg’s aim was to retain as much of the original on-set Synth performances (which took place in suits created by Legacy Effects) as possible. “We would do body tracks and keep bits and pieces of the guys in suits, and then add mechanical pieces here and there so it was more like a robot,” says Graham Jack. “It was sometimes easier to do a complete replacement but we would remain true to the object tracking of the guy in the suits so we’d get realistic human motion and all the detail that comes with that.”
Animation supervisor David Lowry oversaw body tracking and the general animation effort, which also included CG replications of the Synths for many shots. Dneg’s 2D supervisor Victor Wade notes that locking down a body track for a person in a suit made of plastic and lycra, and adapting it to individual body shapes in so many shots was initially daunting. “But because it was a repeatable VFX task, it didn’t turn out to be so tricky,” he says. “We body tracked and roto’d all the practical panels we wanted to keep and in some cases we replaced them entirely with CG, since seeing through multiple Synths would make background replacement extremely complicated.”
“Then it was a pretty intensive prep task to restore the backgrounds through the Synths as they are a lot more slimline than the practical suits,” says Wade. “The compers or TDs would render out a slap comp and from there we could assess whether the track was good or slipping, or do more work in comp with stablization or warping. We could even replace the body track in places with just still pieces – like a 2D animated approach.”
Synths case study: Prime Focus
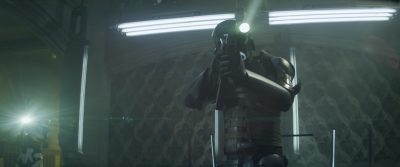
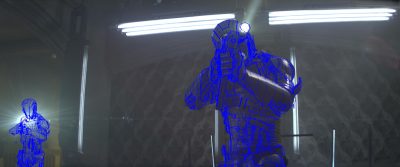
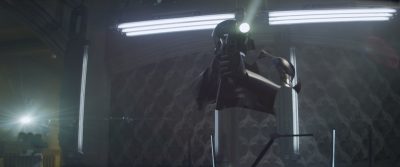
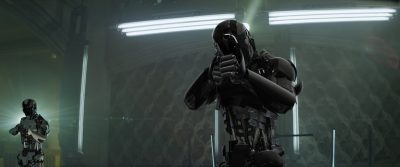
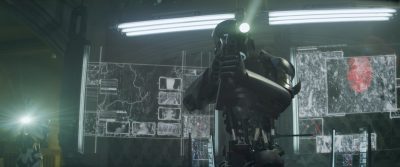
A number of other vendors handled Synth duties. Among them was Prime Focus, which took Dneg models, Lidar scans, textures and on-set reference photos to develop its own Synth pipeline. “We created our own shaders for rendering in Guerilla, which is a hybrid Reyes / Raytrace renderer we have used in several productions now,” explains Prime Focus visual effects supervisor Alex Pejic, responsible for overseeing 224 Synth-related shots.
To body track the on-set Synth performances, Prime Focus used its rig calibration controls to adjust for the varying physiques of the stuntmen. “Another challenge for tracking shots with CG-guts added inside live-action armor was the fact that the live actor body armor is sliding and vibrating over muscle and fat rather than bolted to a metal skeleton,” says Pejic.
One of Prime Focus’ main Synths sequences was the Matthias Lair scene where they take hold of Quaid. To integrate their augmented robots into the shots, artists started with an HDRI, but eventually used the tracked set to create ‘brute force reflections’. “After a few tests,” says Pejic, “we noticed that the numbers of bounces required to light the interiors would give us huge render times. To minimize this, we decided to bake the interior shading solution into a point cloud and then raytrace the set. In term of shading, it was a combination of microfacet distribution and Schlick’s approximation for Fresnel. For the diffusion contribution of the moving Synth we used brute force raytracing, and for the rest of the Synths we pre-baked the environment on each Synth, then convoluted it and raytraced it.”
For a bay shot showing long rows of Synths, the number of identical and overlapping limbs made it,” according to Pejic, “really tough to figure out which limb belonged to which Synth!” So Prime Focus made special optimized ‘sitting Synth’ assets for the bay. “For the lighting setup,” says Pejic, “we textured a Synth bay set model provided by Dneg, and animated digi-doubles to cast the actors’ shadows and reflections. On the lighting side, we tried various, more traditional approaches, including image-based lighting. It soon became apparent though that this was only going to get us so far. We needed far more detail in the reflections than the HDRI’s could give us, and we also needed the flexibility to change the lighting set-ups between shots.”
Prime Focus ultimately decided to ray-trace all the reflections and only use the HDRI’s for ambient contribution. “In order to achieve this, we created a basic model of the set from a supplied Lidar scan by Dneg,” says Pejic. “We then projected HDR textures taken on-set onto the model. Next we separated out the various light emitting geometry so that we could tweak their position and contributions on a shot-by-shot basis. Finally we set-up additional interactive lighting passes, muzzle flashes and gun torches as additive effects that the compositors could dial-in as and when required.”
Synths case study: Buf
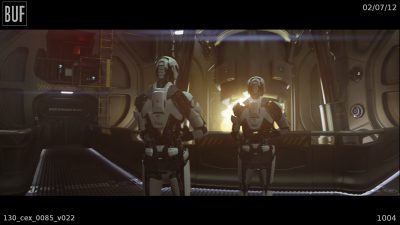
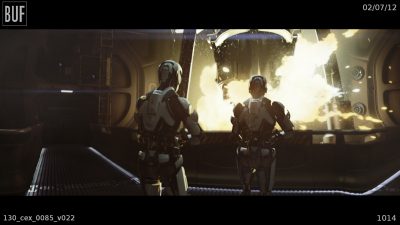
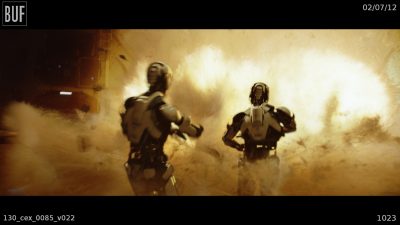
Buf was also called on to handle some Synths shots for the Engine Room destruction sequence, in which all of its robots were fully CG. The studio matched shots by Dneg, integrating explosions into CG sets and composited Kate Beckinsale’s character into some of the final shots.
“For the CG Synths,” explains Buf visual effects supervisor Olivier Cauwet, “we were provided with Dneg’s models and textures. But as it turned out, the database containing the shaders for the Synths was unique to Dneg, so we had to build the shaders using the ‘lookdev turntable’ quicktime we were provided and from reference sent to us. Dneg provided ‘json’ files to us, listing the hierarchy of maps connected to the shaders themselves connected to the objects. We were able to find connections between objects and maps and have an identical render as the rest of the shots in the film. We only use our own in-house software, but we had no trouble integrating with Dneg’s databases. For lighting and the integration of the Synths, we projected the scan of the set on the 3D model and we were making HDRI maps.”
The Synths are enveloped in hallway explosions composited in by Buf. “For destruction shots in the hallway, we had to compose several explosions plates to make it more violent,” says Cauwet. “Once the background was done, we animated and comped the CG Synths that were destroyed by the explosions. The main concern in comping such shots is the lighting effect that changes at each frame because of the explosions. For this, we projected the scans of the explosion on the 3D model of the set, and we recovered the reflections and the lighting effect in a coherent perspective. Finally we comped Kate Beckinsale who was filmed on a green background. We added CG debris, pieces of smashed CG Synths, CG embers and blast effects to improve the integration and make the shots more dangerous.”
Hologram effects
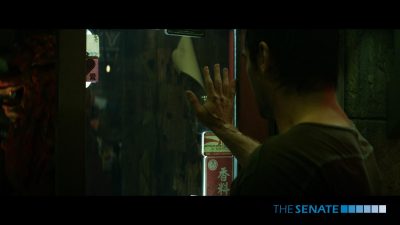
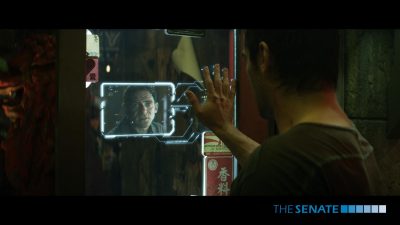
The futuristic world of Total Recall is populated by a multitude of holograms and displays. One device Quaid discovers is actually underneath his skin, and allows him to literally receive phone calls. “They had this pretty cool prosthetic they used on set,” explains The Senate visual effects supervisor Richard Higham, who oversaw this work. “It had this little dial on it as well as several numbers and figures. The idea is it’s supposed to be under his skin and inside his hand. So whenever it wasn’t ringing or activating, you shouldn’t be able to see it – so we had to paint it out, as well the connecting power cable that came up his thumb and up his arm.”
Once Quaid lifts it up to his head to listen, the device flashes and glows. When he places his hand against glass, this activates a display and the caller’s image comes to life. The Senate received an animated graphics sequence from production and a greenscreen element of the caller. “We had to make it look like it was on the glass, so we broke up the animation a bit,” adds Higham. “We also duplicated it and doubled it backwards to give it a sense of depth on the glass. We added the video noise and scanlines by creating animated line sequences.”
The Senate used Nuke for compositing and a combination of Mocha and 3DEqualizer for tracking. The director also requested a ‘quirky’ physical phone connection, so The Senate added spindles that come away from Quaid’s hand and begin forming the border.
Additional hologram work came in the form of a sequence showing Quaid talking to himself, well, a display of himself, at a piano. To create the shots, production filmed live action photography of Farrell sitting at a piano to serve as the background plate. “Then they shot Colin separately against greenscreen using a multiple camera array, which consisted a front-facing camera – a RED EPIC,” says Higham. “They then moved 10 degrees to the left with a Canon HD camera, and kept moving around until they had 18 of these cameras going all the way around.”
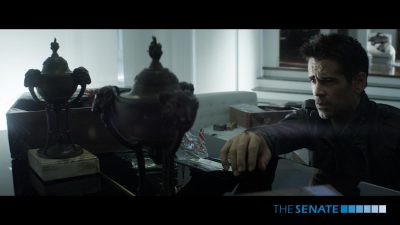
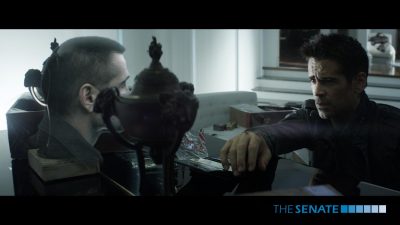
Those greenscreen takes were all lock-offs but it meant The Senate could choose which angle would be appropriate for the main live action. “In some cases,” says Higham, “we were on the move so we had to start either morphing between these two cameras or project back onto geometry. We received a 3D head of Colin Farrell to rig, and then we tracked every single head once we worked out which heads would work in which camera. That 3D track meant we could then start projecting scanlines going over him, which actually follow the contours of his face – we projected those on using a sphere technique.”
“We tracked the main live action and the head from the greenscreen plate using PFTrack,” continues Higham. “We painted areas of deformation onto the geometry and that means when he opens his mouth, the track is intelligent enough to deform the geometry to match it – but unless you have an absolute perfection of position in 3D space with all of these cameras in this array, you’ve got a certain amount of area of inaccuracy. So you can’t just throw the projection on top – instead you actually take the main camera and you project onto a card the actual greenscreen element, but you also project the same scanlines in 3D.”
In a different take to the classic ‘Two Weeks’ head sequence in the original Total Recall, Quaid attempts to disguise himself using an anti-cognition collar to project a realistic holographic head onto his own. MPC was responsible for these effects in the new film.
Watch the hologram effects by MPC.Taking The Fall
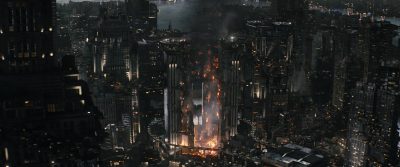
The film’s climax takes place on The Fall, a gravity elevator that travels through the Earth’s core between the UFB and The Colony. Ultimately, The Fall is destroyed by Quaid in a large explosion. Fight scenes on top of the structure were filmed on partial sets, but the establishing shots of The Fall and its demise were left for Double Negative to create based on art department designs and SketchUp models.
One of the biggest challenges was selling the massive scale of the elevator and its piece by piece crumbling destruction. “Even if you put all the right variables into Houdini, say,” says Adrian de Wet, “and then you say, ‘Go’, falling debris always looks fast. I think what it doesn’t account for is loads of real-world nuances that you wouldn’t know about. So I get people to push the scale, make it look too big if you can, and make it a little bit artificially slow.”
Lighting The Fall realistically also became key. “You really have to make sure to now have massive broad lights that just light up things very evenly,” notes de Wet. “It really helps to pepper the scene with tiny lights and tiny light cones – we called that ‘local lighting’. I would say to the team, “Replace that one big light with ten small lights that are lighting in a very uneven broken way.”
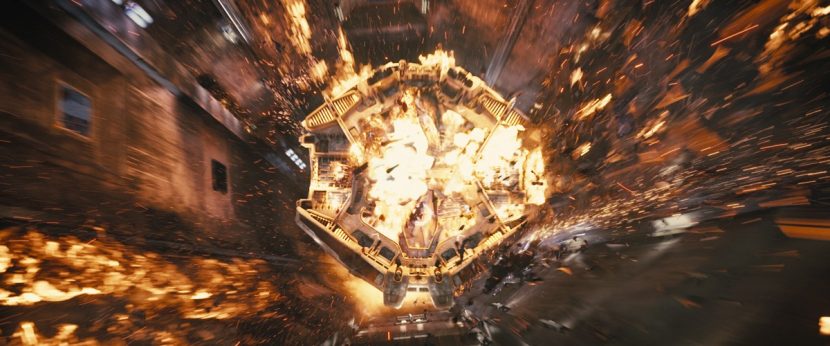
The destruction itself was a mix of practical effects elements and rigid body dynamics and fluid sims and fluid completed by Dneg using Houdini and the studio’s proprietary tools such as DNB, Squirt, Dynamite and dnShatter. That approach also allowed a level of art direction to the sims. “With the tools that we have at Dneg,” says de Wet, “we can get a sim up to a certain level, we can put a little bit more detail in there in the render and light it however we want, and adjust the temperature and density settings. We might split an explosion into lots of different sims and have sims exploding into others, so we can just change parts of it if we have to.”
MPC also contributed to shots involving The Fall, creating some CG views of it ‘falling’ through the tunnel, and shots depicting the zero G environment when the machine passes through the center of the Earth. For scenes on the rooftop of The Fall at the climax of the film, MPC delivered roof extensions and shots of the clamps as they explode. The aftermath of The Fall explosion also called for MPC visual effects shots of set extensions, CG rescue vehicles and greenscreen crowd elements.
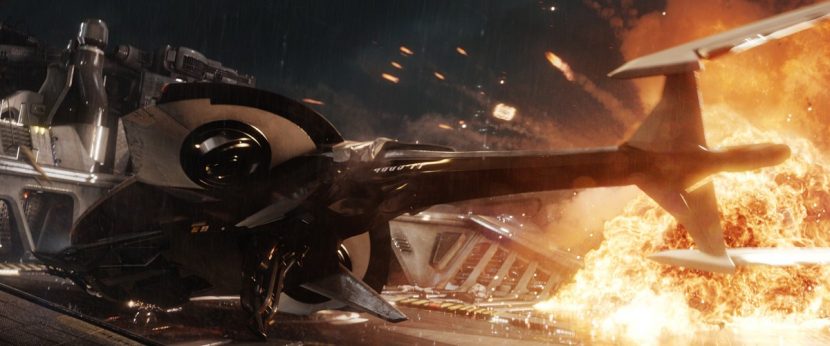
In final newsreel footage showing Colony citizens in celebration, MPC built ground-level Colony views based on reference newsreel footage provided by Len Wiseman. The crowds were a two-and-a-half-D solution from compositing supervisor Marian Mavrovic, where 23 people were filmed in various costumes carrying out different actions. They were then placed as single elements on cars and laid out with MPC’s proprietary crowd software Alice.
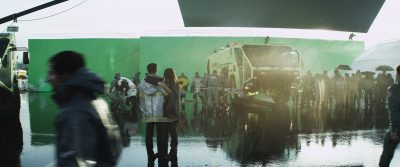
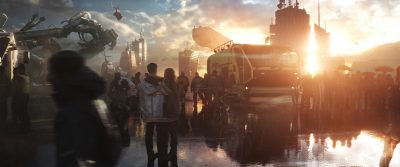
As noted, Double Negative was the film’s lead VFX vendor. Additional work on Total Recall was carried out by Prime Focus, The Senate VFX, MPC, BUF, Baseblack and LipSync Post. Angus Bickerton also contributed additional visual effects supervision.
All images and clips copyright © 2012 Columbia Pictures Industries.

Great article !
Here is a video showing some VFX Breakdown of the film : http://youtu.be/1pXC3FTyafs🙂
[…] oder ganze Städte dreidimensional zu modellieren. Zum Beispiel wurden Teile des 3D-Environments von Len Wiseman’s Remake von Total Recall und Pixar’s Cars 2 mit CityEngine modelliert. Das international tätige […]
[…] oder ganze Städte dreidimensional zu modellieren. Zum Beispiel wurden Teile des 3D-Environments von Len Wiseman’s Remake von Total Recall und Pixar’s Cars 2 mit CityEngine modelliert. Das international tätige […]
[…] oder ganze Städte dreidimensional zu modellieren. Zum Beispiel wurden Teile des 3D-Environments von Len Wiseman’s Remake von Total Recall und Pixar’s Cars 2 mit CityEngine modelliert. Das international tätige Architekturbüro […]