It may be called Pixels, but the first thing the visual effects team needed to do when creating a series of arcade game characters that attack Earth was…ignore the pixels. The characters, Pac-Man and Donkey Kong among them, had to inhabit the screen and be more than just 2D cut-outs. So instead they became voxels, able to exist in three-dimensional space. But that approach raised several questions. How do you make and animate a voxelized character? How do they emit light? And how do you, as Earth fights back, destroy them?
These were the issues faced by overall visual effects supervisor Matthew Butler and a host of VFX studios, lead by Digital Domain and Imageworks. fxguide finds out how they overcame the voxel challenges.
Make the voxels
Based on Patrick Jean’s 2010 short film of the same name, Chris Columbus’ Pixels drew inspiration from 1980s arcade game characters. That’s where the filmmakers, and effects artists, immediately went for reference. “In the games there’s actually not a lot of detail, just a few pixels,” notes Imageworks visual effects supervisor Daniel Kramer, “so what gave us more inspiration was the artwork that’s on the game cabinets themselves. I feel that was the intention the game creators wanted their technology to be, but the technology couldn’t live up to creating that. That gave us extra cues. We still wanted ours to be 8-bit and low res. At the same time, if we needed more detail we’d look at the game art.”
“The filmmakers liked the idea,” adds Kramer, “of rather than building the characters out of static voxels and animating them like a traditional character, they liked the idea that some of the voxels would appear and disappear. It was like a sprite sheet for each pose – you may not have the exact same configuration of voxels. That’s more analogous to translating a 2D sprite sheet to 3D.”
Both Imageworks and Digital Domain would therefore model their respective characters as smooth digital forms with simple rigs and then pass them through a voxelization process in Houdini. Imageworks, for example, adopted a world space technique where, explains Kramer, “You basically have a static invisible field of voxels and as the character moves through the space the voxels are revealed where the two intersect. That idea felt more analogous to a CRT that’s got a fixed number of pixels in space, and as the sprite moves underneath it those pixels are firing, lit up and colored by the sprite below.”
Kramer says that approach worked well, but it quickly became difficult to control the characters’ movements – even just small deformations proved distracting. “Once you start rotating that character in a static voxel field, you would have voxels where the flat side is perpendicular to where the character is moving and he turns 45 degrees and now you have corners of voxels running down the center of his face rather than flat sides. So unless you had a really high number of small voxels, it didn’t always resolve to looking like the character, it took us off-model. We’d also tried literally binding the cubes to the characters but that would cause them to deform or crash through each other and it also didn’t look as digital, it looked for traditional.”
So Imageworks parented different voxel spaces to the character’s limbs. “We might have one voxel space that is parented to his head, one to his upper arm, lower arm etc,” says Kramer. “We’d break it up based on the rig, following the skeleton. Then what would happen is, if the character turned his head, that voxel field would track to his head and there would be no re-voxelization. The cubes themselves would rotate with the head properly. But then any deformation within that head, any squash and stretch or other adjustments would cause re-voxelization within that domain. That gave us enough control to keep it on-model, and also reduced the amount of flickering caused by the voxels turning on and off.”
Still, having that finer control resulted in an initially inefficient translation process. “What we decided to do instead,” describes Kramer, “was just pass point data through the pipeline. We would get the character into Houdini. We would take that same recipe of how we were going to attach the voxels to him, set up all the different spaces, but instead of actually instancing all the voxel geometry we would just create a point per voxel and pack it with attributes to define the voxel. Attributes included the color and size of the voxel and UV spaces for noise and texturing, whatever the shading team needed for that particular voxel. We would send that array of point data to Katana and then at render time we would instance voxels to the points, using those attributes to drive the shading. It ended up being quite efficient.”
Move the voxels
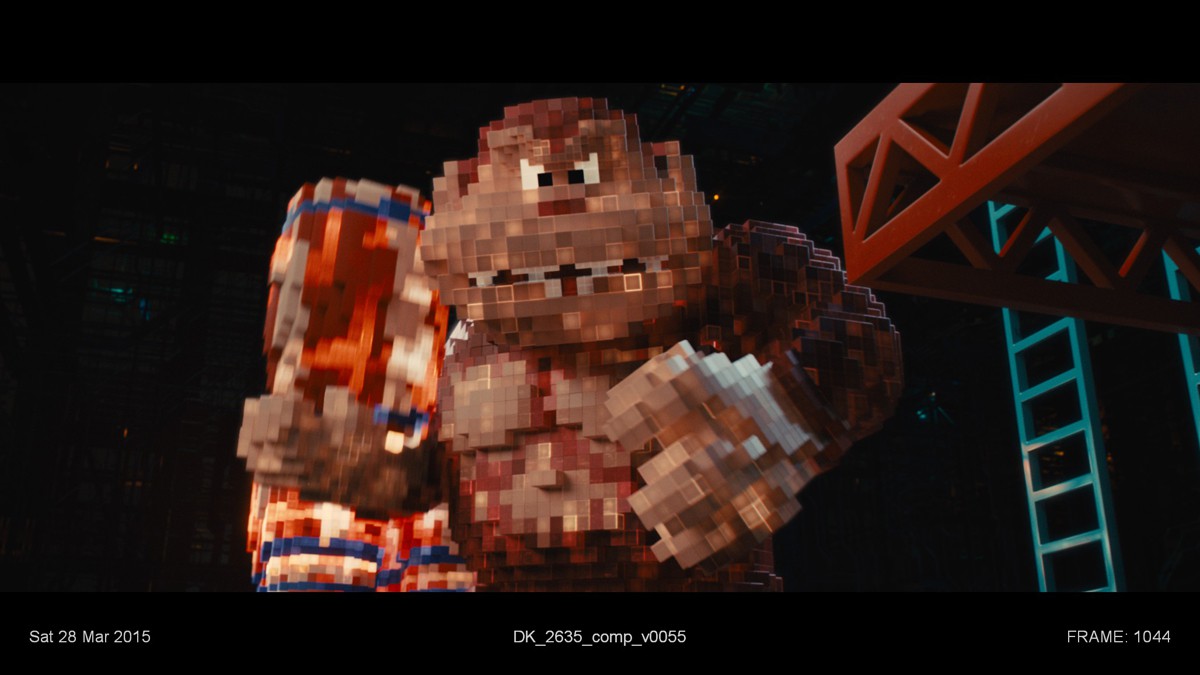
Turning the characters into voxels was only part of the challenge for the visual effects studios. Animating them would prove deceptively simple. Donkey Kong, a Digital Domain creation, required close attention to his face since there were only limited voxels and distances between his eyes and nose. “The animators were kind of flying blind,” says Digital Domain visual effects supervisor Marten Larsson, “because they couldn’t see facial expressions. So we actually started using Houdini Engine so that the animator in Maya could flip on the voxel process for the face, for example, to check facial expressions or if the feet penetrated the ground.”
“The other thing we ran into,” notes Larsson, “was that it was pretty easy to match the iconic look of Donkey Kong when you put him in these poses that people remember. In the arcade game he goes from pose to pose in one frame, but once you start adding the in-between motion in the film you end up with poses that don’t resemble the game as much, especially shot at a different angle.”

What DD came up with, then, was a method to appropriately voxelize Donkey Kong’s head. “We took the head joint and moved his head in effect to the origin and had pretty much the nodes and outputs fairly locked,” explains Larsson. “Then we would re-voxelize that bespoke for the facial features. If he twisted his head 90 degrees, nothing would really re-voxelize. His arms had a separate setup where we moved it to the origins, but we could still move the pivot. If he had his arms overhead and the elbow was the closest thing to camera, we could put the pivot at the elbow. The other thing we did was have a threshold on the geometry itself. So as he moves his arm, the actual points on the mesh would snap between different positions.”
Some of the characters in Pixels required more human-like animation, including a voxelized version of 1980s TV star Max Headroom. Digital Domain crafted Headroom, known his stuttering and distorted appearance, using facial capture of the same actor who played him in the show, Matt Frewer. “We captured him in our MOVA facial capture booth and used our Direct Drive to run the facial animation of a model of him,” says Larsson. “It was a little bit weird conceptually how we were solving the final shots. To get that iconic look you needed that particular background that had been in the show. As we had him flying out of the ship, we had a bunch cubes flying out creating that weird background.”
“We basically made the model a little bit younger looking and matched it closer to what it looked like back then,” adds Larsson. “The MOVA and Direct Drive setup captured Max as him but the issue was that Max Headroom had a fair amount of prosthetics on that restricted his motion a little bit more, so we actually went in and post-process the data to fight how well it captured the real Matt, to get a little bit of that stiffer behavior back.”
Light the voxels
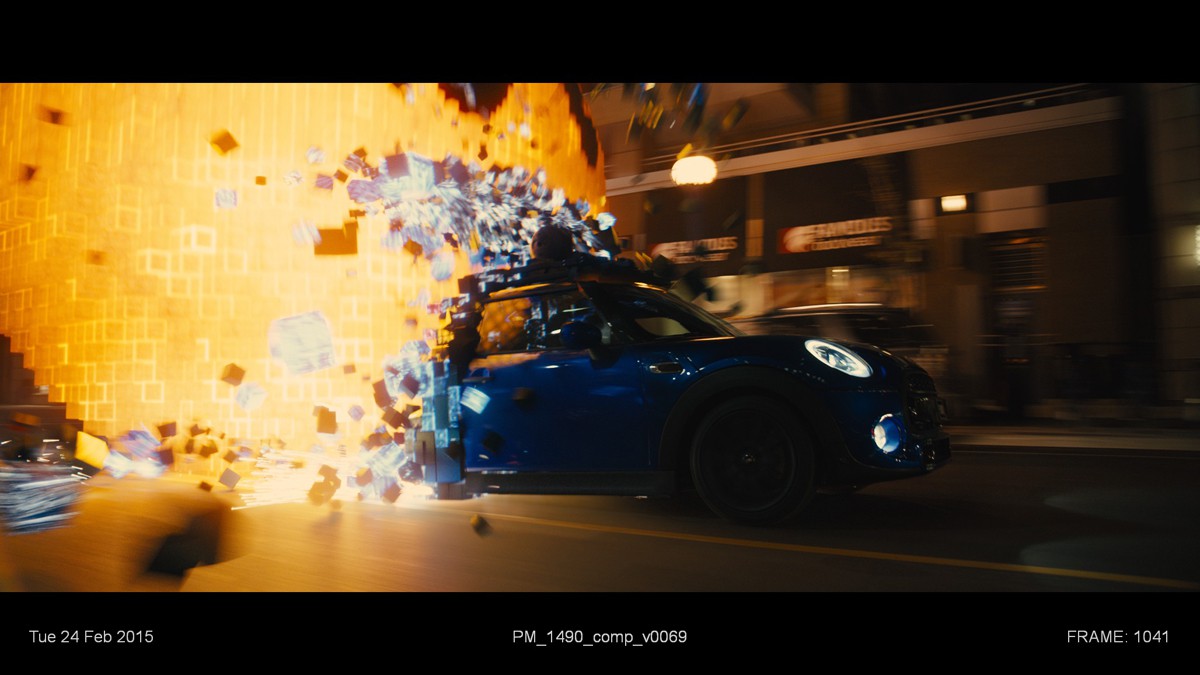
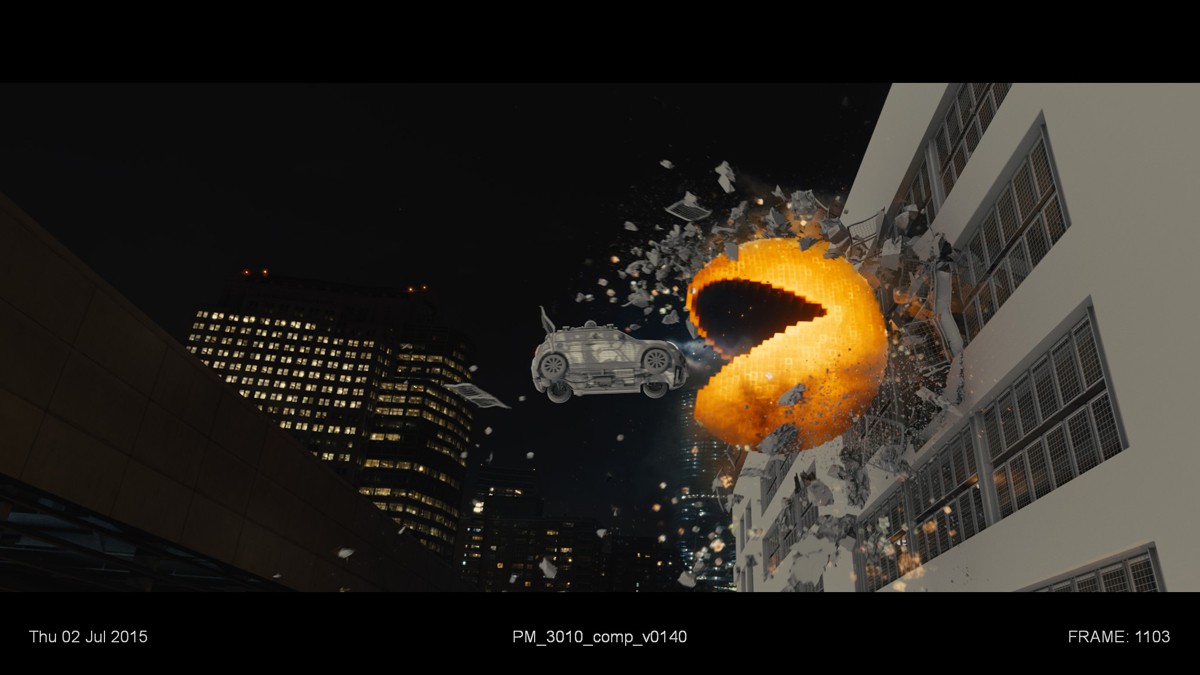
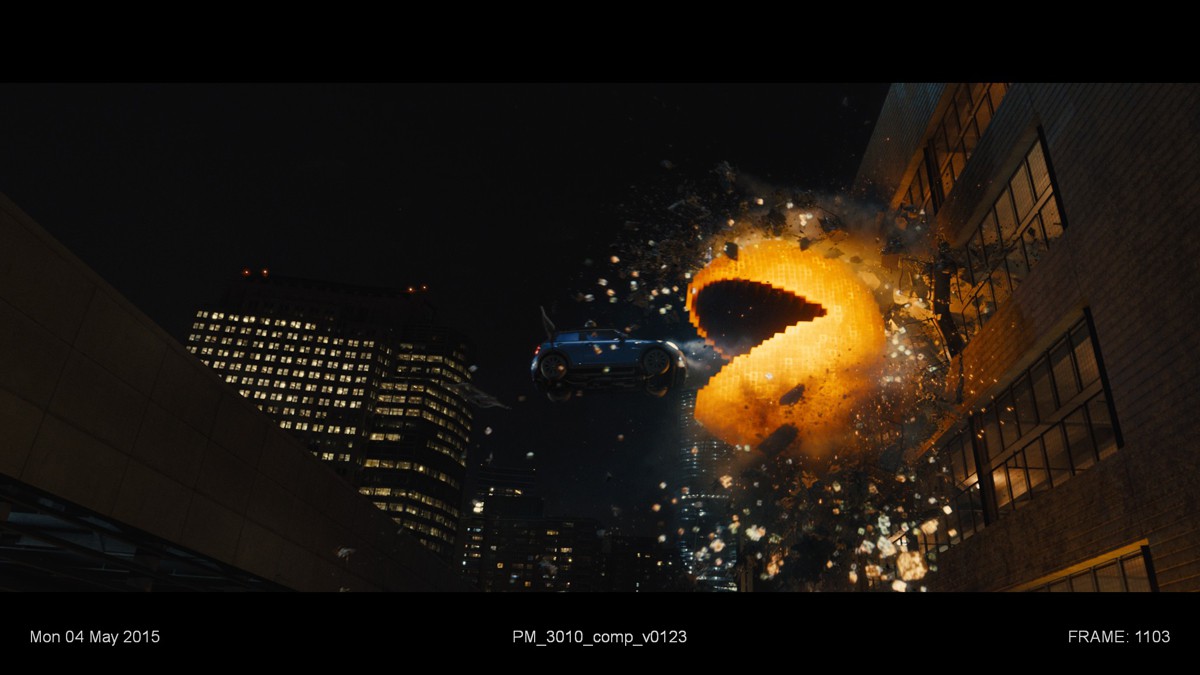
The next step in retaining the authenticity of the arcade characters was their light emission – for this the filmmakers requested a CRT video game feel in which the characters have a kind of ‘light energy’. Pac-Man was perhaps one of the most iconic but also difficult characters to light, not least of which because of the challenge in solving the fact that he was effectively just a yellow sphere. The character’s lighting setup began with the live action shoot in the streets of Toronto. “He’s being chased by these Minis that are called Ghosts,” outlines Digital Domain’s Larsson. “They had practical Minis that were driven through the streets of Toronto. Then we had an additional Mini that was rigged with yellow light panels around and generators on top. There was also a paint pole on the top with an LED that was set to the height of Pac-Man. That was used to throw interactive light around and also help framing.” Reference photography, HDRIs and LIDAR of the locations were also captured to aid in re-producing car reflections and elements that Pac-Man would eat.
Digital Domain’s first attempts at placing a voxelized Pac-Man in the scene resulted in the spherical character looking somewhat flat. “He’s also basically a glowy sphere emitting light in the middle of a night scene,” notes Larsson. “Our first renders were almost completely flat because he didn’t have any shape at all. It’s all communicated by his internal lighting, and almost none of the actual set or scene lighting is visible on him. We ended up blending in almost a Fresnel-like fall-off so he’s brighter in the middle and then falls off at the edges in brightness and color temperature.”
Artists would also add in undulating patterns to the voxels and light up the edges to make Pac-Man appear as if he was made up of active light energy. DD published Alembics of of Maya which then went through the voxelization process in Houdini. From here, V-Ray proxies were produced, loaded into Maya for lighting and sent to V-Ray for rendering.
Imageworks had a similar challenge with lighting its characters, but in general had another layer of complexity since many of them would appear during the day and not at night. “If we had too much light energy going on, if our characters were completely internally illuminated, then they lacked any key to fill,” says Kramer. “We’d be putting them into a bright sunny scene and everything in the scene photographically had really dark shadows and strong key to fill – our characters almost didn’t even look illuminated in comparison, they just looked flat and ambient and not very interesting at all.”
The solution was to add noise patterns and light energy through a subset of the voxels. “That worked much better because then you could actually see what the actual lighting environment looked like casting onto our characters on those un-lit voxels,” notes Kramer. “They could cast real shadows and have darks fill sides – every once in a while you could see a part of them light up. We would also paint maps for all the edges of the voxels and have those emit onto others. Rather than burying large mesh lights into the center of the character we ended up making the texture of each voxel a little bit emissive.”
A central character built by Imageworks, Q*Bert, required special attention to lighting, which the studio handled in Katana and Arnold. “He’s a round character, but once you make him a bunch of squared off voxels that are all aligned to each other, it’s not actually that straightforward to rim light him or shape him and make him look round,” says Kramer. “He would turn his head and if there was a back rim light, it would catch the voxel faces in a certain way and would flash on for a second and flash off when the angle was just right. It’s similar to the problem you have sometimes when you’re lighting glass window panes on a building, there’s a trick that we always do where we warble the glass a little bit or we take each window and turn it just slightly so that not every single face is not 100 per cent dead on CG perfect – otherwise it looks really fake if all the faces reflect at the exact same angle or if the glass is impossibly flat.
“Q*Bert had that problem a little bit so we did vary up the normals of the voxel faces,” adds Kramer. “We actually ended up transferring a portion of the normals from the underlying smooth character onto the cubes themselves to give a little bit more of a rounded shape and catch more light from back rims. We would iterate over every single voxel face and we would compare its normal to a point on the underlying smooth character that that voxel was associated with. We would compare the normals of that inner smooth surface to the geometric normal of the voxel face.”
“If they were close,” notes Kramer, “within say 10 degrees of each other, we would actually use the smooth normal on that face rather than the geometric normal. If they started to diverge too far it didn’t really make sense to copy that normal across, it just gave you weird lighting. So in that case we would discard the smooth normal and go with the geometric normal. We ended up calling these ‘hybrid normals’, where procedurally in each frame of animation the entire character was analyzed and the normals of the underlying character that were close enough to the geometric normal – if they were within that 10 degree threshold we would copy them across. With Q*Bert it’s subtle but it gives you a little bit of shape with the reflections on his side and allows us to shape him a little better with light.”
Destroy the voxels
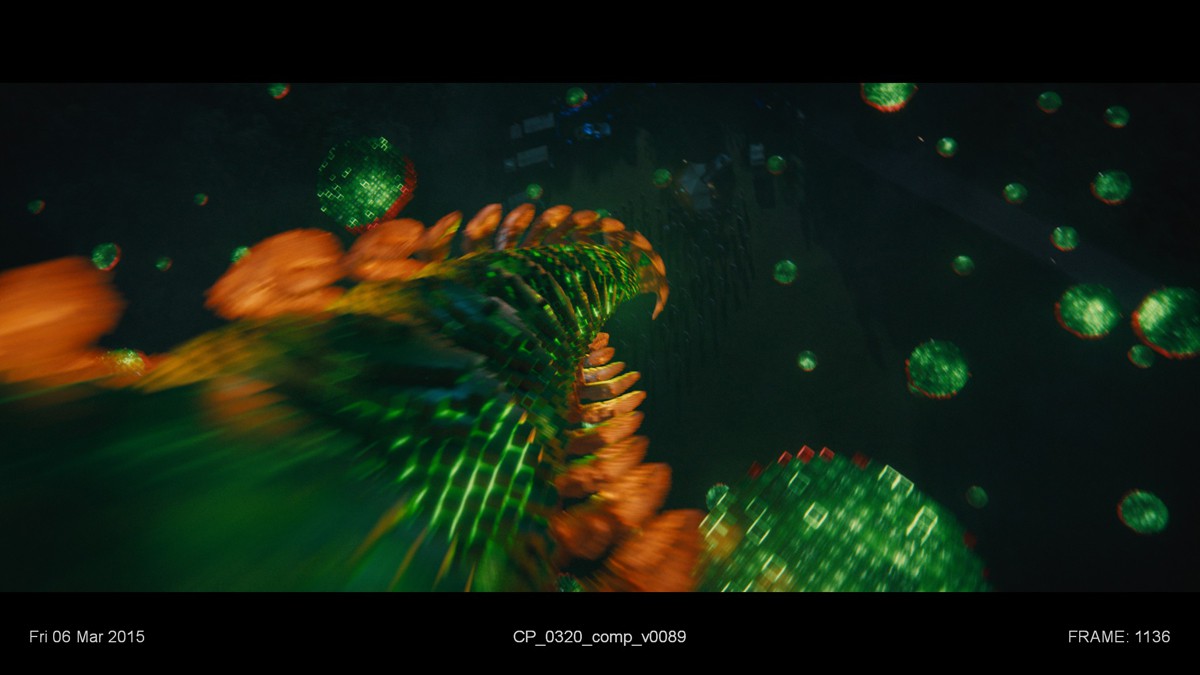
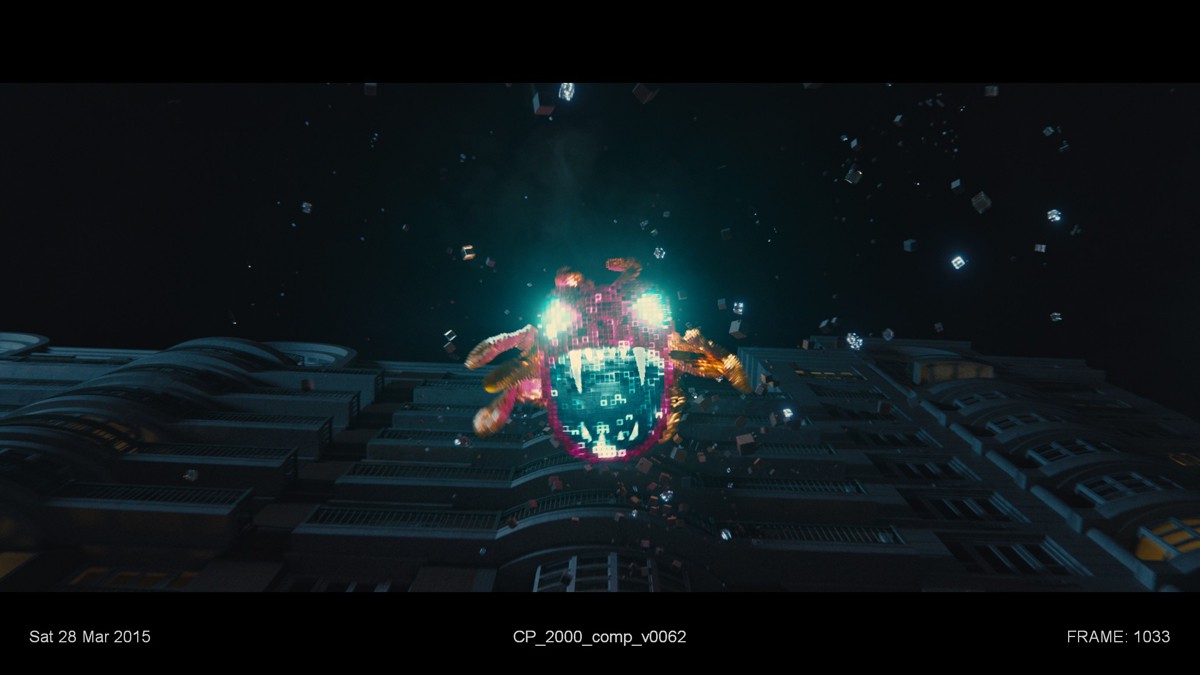
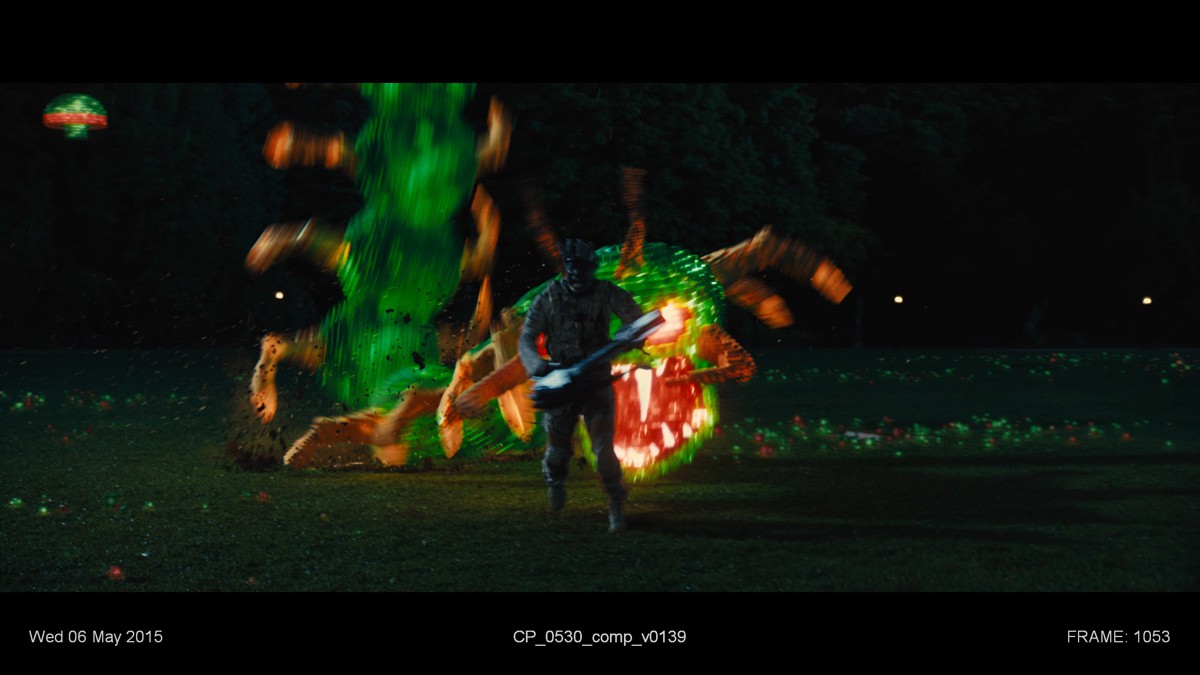
Both the arcade characters and real-world objects and locations face destruction – in voxelized form – in the film. One sequence involved the humans blasting away a giant centipede as it descends from the sky. To deal with the destruction of the long and segmented character, the animators handled the initial break-ups. “It was tricky for them because they were flying around these long creatures that could split when we hit them,” explains Larsson.
“The animation rig for centipede supported splitting him into two and shortening him on the hits. The animation team would decide where he splits and where he goes after a split. That was handed off to the effects team to voxelize Centipede and also to add debris. We’d take one segment that was hit, say the head or body part, and we would hit it and shatter that in voxels and do an RBD sim. Then any voxels that came from a creature, it would disperse into all these voxels and they would crumble and fall apart into dust. There was so much dust from all the shooting that it was just building up layer after layer of voxels on the ground throughout the sequence.”

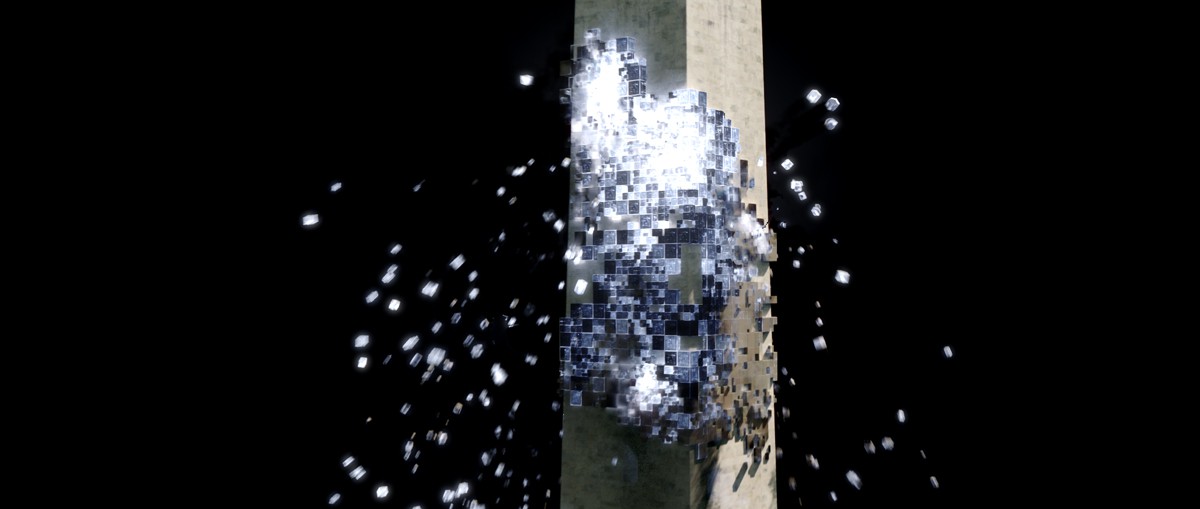
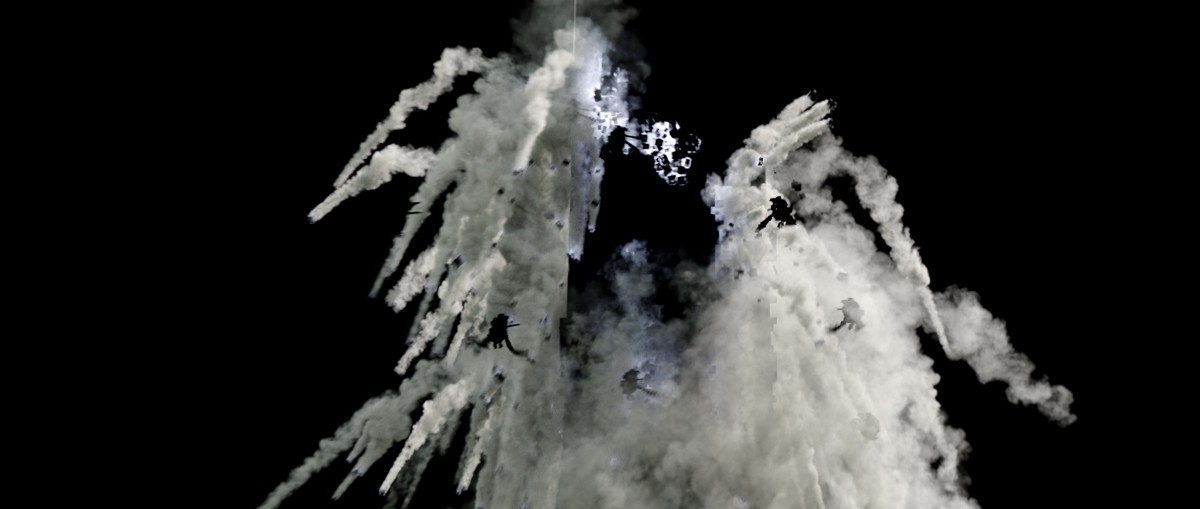
Imageworks orchestrated a somewhat similar approach to its destruction shots – of which there are many in the final Washington D.C. invasion – with rigid body sims in Houdini. “At the point of impact,” explains Kramer, “we would convert all of those cubes into rigid bodies and glue them together and allow them to break apart. Instead of just flying apart as single voxels, we would glue them together so you would get more interesting shapes of them cracking and coming apart. We also had a system to sub-divide the voxels when they were impacted. One voxel – the first level octave of impact would convert to four new voxels, and each of those would create four new ones, and so on and so on. In that way we could do a very detailed destruction simulation right at that point of impact where we could subdivide and subdivide the cubes down into something relatively small. And then radiating outward from that impact point the voxels would get a little bigger and bigger and we wouldn’t subdivide as much.”
“The final death of a character would end as voxel bits all over the ground and rather than keeping all of the voxels around for the rest of the sequence, they would then dissipate into a finer particulate dust and disappear. So we had them subdivide into a very small particulate sized voxels and float upwards and disappear into thin air.”
Real-world locations and constructs also suffer destruction. “We wanted it to live in the same game world, but also give hints of the real destruction,” says Kramer. “It was important to keep the voxels very large and keep the destruction very cartoony and make the shapes very readable. We found that getting too detailed with it started just looking like traditional destruction. So as buildings get hit you see very large overlapping cubes and a few small ones dappled in. Initially we started with keeping every voxel on one grid space and trying to be slaves to the rules of what rasterizing something in 3D might look like – analogous to 3D pixels. But it looked more interesting to have varying sizes and overlapping voxels.”
“We’ve also got some pyroclastic smoke plumes that come up off the ground out of some of the impacts, too,” adds Kramer. “We’d do a traditional simulation for that, but then in the end for the rendering we’d advect cubes through that volume and color them with the temperature and density of the smoke. They end up looking like flowing cubes through the volume.”
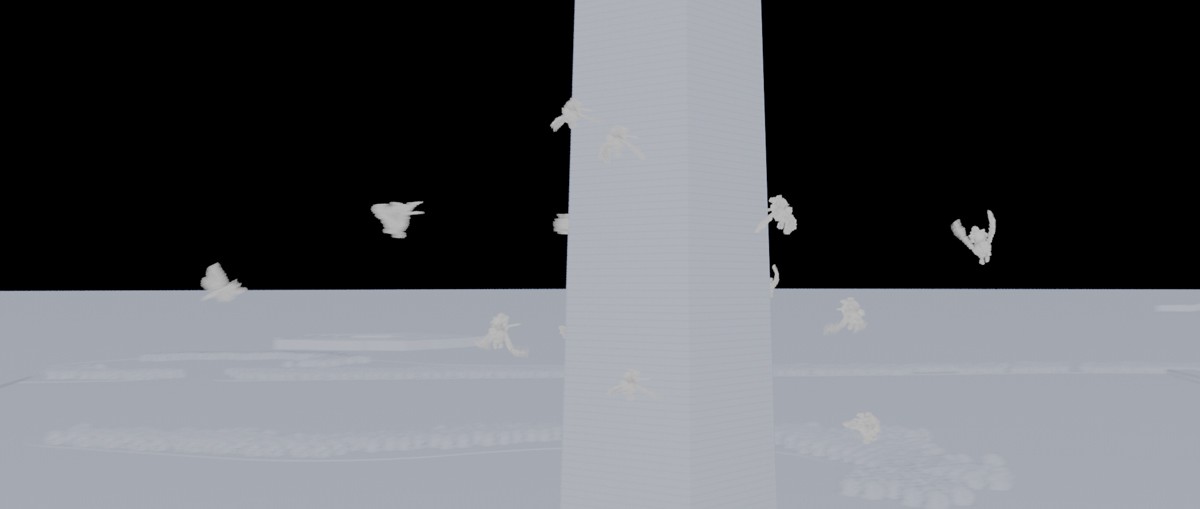
A major Washington D.C. destruction shot involves a 360 degree move around the Washington Monument as it is attacked. “That was a difficult shot and the reason was, as anyone shooting reference or backplates in D.C. knows, is that it’s very restrictive what you can do,” states Kramer, noting that surrounding buildings and environments were also required to be in the shot.
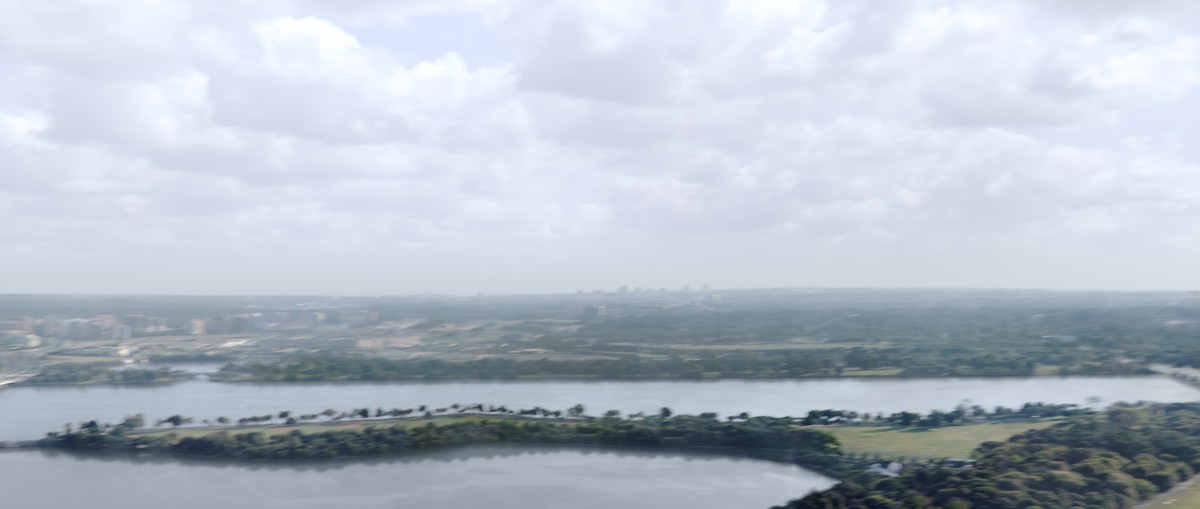
Imageworks referenced previs for the shot and planned four different locations they thought could be filmed from – in a helicopter hovering in an allowable area – to acquire tile references to stitch together. “We did that but unfortunately because it’s high security,” says Kramer, “we had a Homeland Security Officer in the chopper with us – myself, the pilot, DP and the Security Officer. Ultimately he wasn’t going to allow me to get as close to the perimeter as I wanted to, he was worried that a wind would take us into the restricted area.”
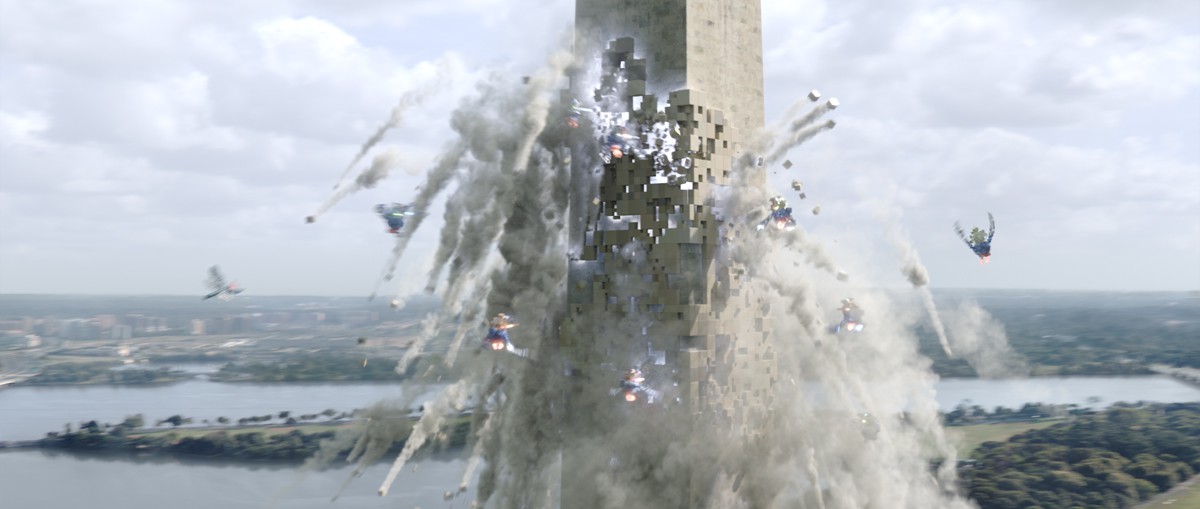
The solution then, says Kramer, was to go on foot. “John Haley, our Digital Effects Supervisor, acquired reference from the ground while I was in the Helicopter. He could walk up the National Mall and take lots of pan and tiles and panoramas and reference of buildings around there. The thing that also saved us a little bit is that you can actually go inside the Washington Monument and take pictures from the top. There are these thick ugly glass, almost plastic, windows that are really scratched up in there – so the photography is not great but we did get really good reference for what you might see if you flew around it. Given all that, and the helicopter tilesets we brought that back and reconstructed it. We got some low res models of the area and started re-projecting what we did have through those images and augmenting the ground and fixing buildings that weren’t in our model but were in the photography. Jeremy Hoey, our Matte Painter, lead the effort to make a 360 panorama and then we built the Monument as a CG asset.”
All images and clips copyright 2015 Sony Pictures.