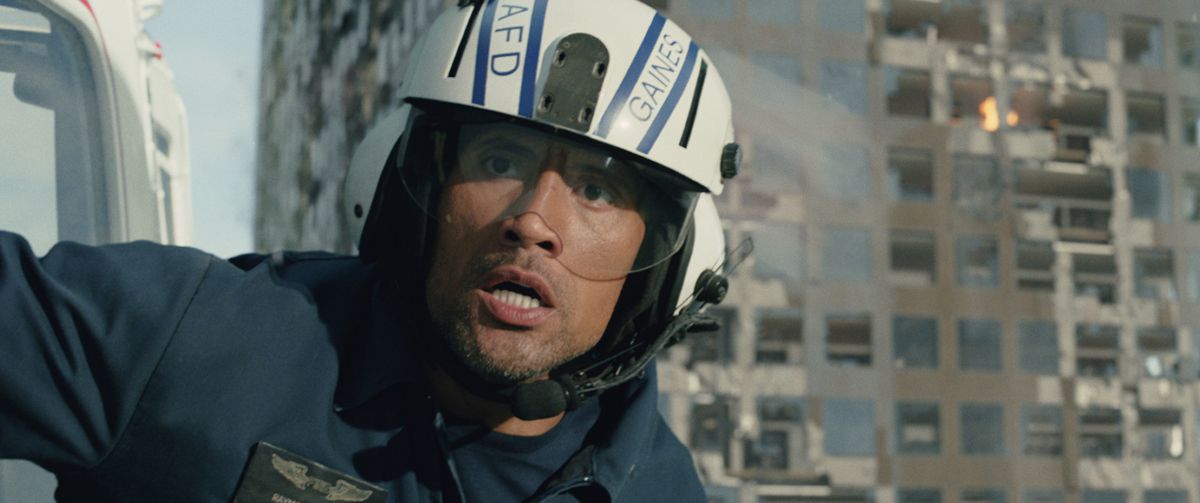
Brad Peyton’s disaster flick San Andreas recounts the efforts of a rescue helicopter pilot, Ray Gaines (Dwayne Johnson), who must rescue his estranged wife, Emma (Carla Gugino), and their daughter Blake (Alexandra Daddario) after a series of major earthquakes and aftershocks rattle Los Angeles and San Francisco from a heretofore unknown fault line. Under visual effects supervisor Colin Strause and visual effects producer Randy Starr, a host of vendors staged widespread destruction and carnage and even a tsunami through several locations. fxguide finds out the ‘How To’ behind some of the film’s biggest effects.
How to…plan for destruction
San Andreas was filmed in Queensland, Australia and at locations in LA and San Francisco. Previs from The Third Floor and Proof aided in laying out the destruction that would turn the family story into a full-blown disaster epic. For that, a look into the history of earthquakes would also be required. In fact, Strause notes that his first few weeks on the film involved researching earthquakes. “I went through YouTube and Google, and found reference for every scene in the movie. I would go through and find all these videos of building demolitions, buildings collapsing, landslides – I would pick my favorite that I like the most and then I would cut these – I was editing together my own little look and feel clips. Here’s LA destruction, San Fran, tsunami – I made all these look and feel clips, and then once they were done we were delivering one Quicktime to the client or vendors instead of here’s 55 reference Quicktimes. I know what that’s like as a vendor so I wanted to make it easier on the facilities.”
During the shoot, in both Australia and on location in California, a concerted effort was made to acquire set scans and extensive photographic reference. “We actually did a LIDAR per take,” says Strause. “With the new FARO scanner, it was so fast that sometimes we were doing two LIDARs per take – where the Technocrane started and where it ended. We had it every single day in Australia and in San Fran and then at the same time, we had another one and sent it through LA and SF, then combined it with surveying and photography done by each of the facilities. Hydraulx did all the LIDAR then cleaned up the assets and gave those to all the vendors. We literally LIDAR’d a significant portion of San Francisco. Scanline also rented a helicopter and shot San Fran and Hoover Dam. And Method did Downtown LA and Cinesite delivered the canyon.”
How to…stage a rescue
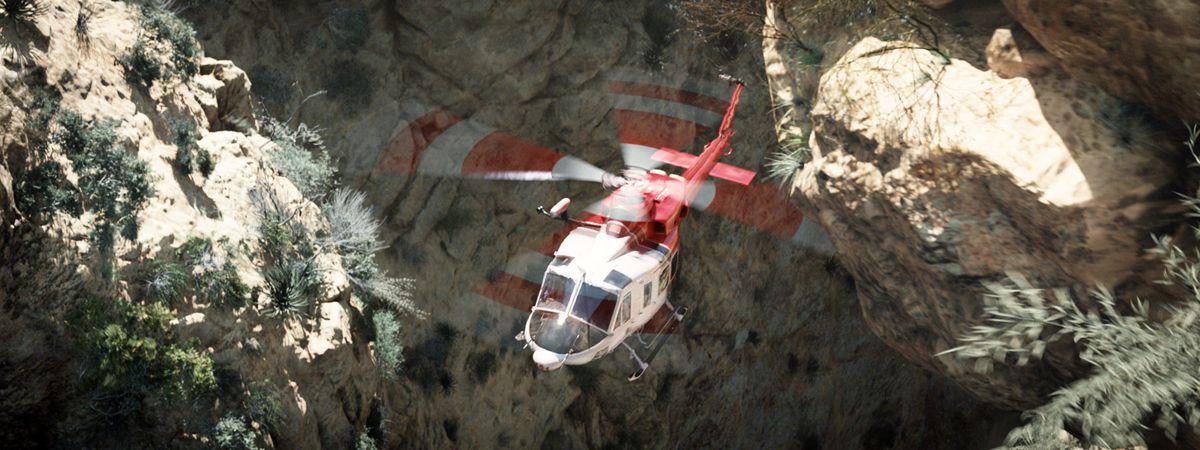
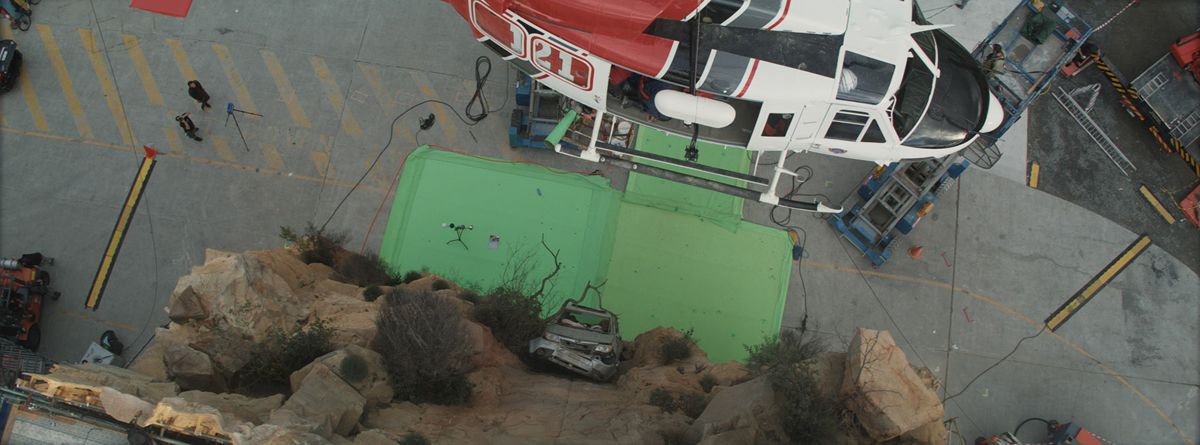
The film’s opening sequence sees a driver, Natalie (Morgan Griffin) forced off the edge of a cliff in the Hollywood Hills after a rock fall. Dangling precariously in a canyon, she is reached by Ray and his Los Angeles Fire Department crew who stage a daring rescue attempt. Part of the rescue involves a hair-raising ‘tip the hat’ manoeuvre the helicopter angles in to hover in the canyon.
The final sequence was realized via both practical set-piece photography in Australia, and visual effects from Cinesite, which incorporated a CG helicopter as well as a digital canyon environment and vegetation based on reference photographs.
Watch part of the rescue.
The initial car crash was originally, according to Cinesite visual effects supervisor Holger Voss, intended to be an all-in-one shot shown in slow-mo and featuring a speed ramp. “The idea,” says Voss, was that the car would be chased by the camera car and the car spins and we do a crash zoom onto Natalie’s face, and when the car tips backwards we go back to real speed and the car starts to tumble. While planning that, the production team had actually done experiments with a car on four cranes – a puppeteered car – so they could have the real actress in it and play it slow motion, then they would shoot higher frame rate, but it didn’t quite work out.”
“So,” continues Voss, “the next idea was to have a car on a cable doing this power slide on the road, and we would do a face replacement and we would augment the car with CG panels. But then in the rehearsal shoot with the stunt performer, the Ranger said, ‘There is no way there’s a car going over this cliff.’ So they asked the pursuit car drivers to shoot a clean plate. When the rocks come down and hit the car, they wanted to stick with the live action car, and we just put a CG left hand side on. So we had to matchmove that and we rendered a full car and replaced what needed replacing based on the impact of the rocks. Then for the shot of the car sliding and going backwards, it’s a CG car and a CG Natalie.”
The actress was also filmed inside a ‘hamster wheel’ type rig for shots of the car spinning over. Cinesite them comp’d in backgrounds and added in CG props such as broken glass, a cell phone and a hair brush.
Wedged in the canyon, Natalie and her car await the arrival of the Los Angeles Fire Department helicopter, which ultimately angles into the canyon before starting the rescue. Voss was called upon by production to acquire background plates for the canyon. Initially this was to be via a camera helicopter that would shoot plates to line up with the Australia footage, but Voss was concerned that line-ups may end up being tricky. So he adopted a photogrammetry approach instead.
Behind the scenes of the rescue shoot.
“I went down a back-up route which was shooting tons of stills to do photogrammetry and re-building the environment completely digitally,” explains Voss. “I rented a couple of 5Ds with different lenses, went into that helicopter and shot hand held out of the side window. That was at Glendora Mountain.”
The Cinesite team then used Agisoft Photoscan to re-build and create the canyon geometry. One important addition was animated vegetation, dust and debris caused by the rotor-wash. “We called it set dressing and it enhanced the appearance a lot,” says Voss. “In the end we had about 40 plants pre-cached that could be scaled and combined to assemble the variety of plants, without having to pull the data for 3000 plants that appear in the final shots.”
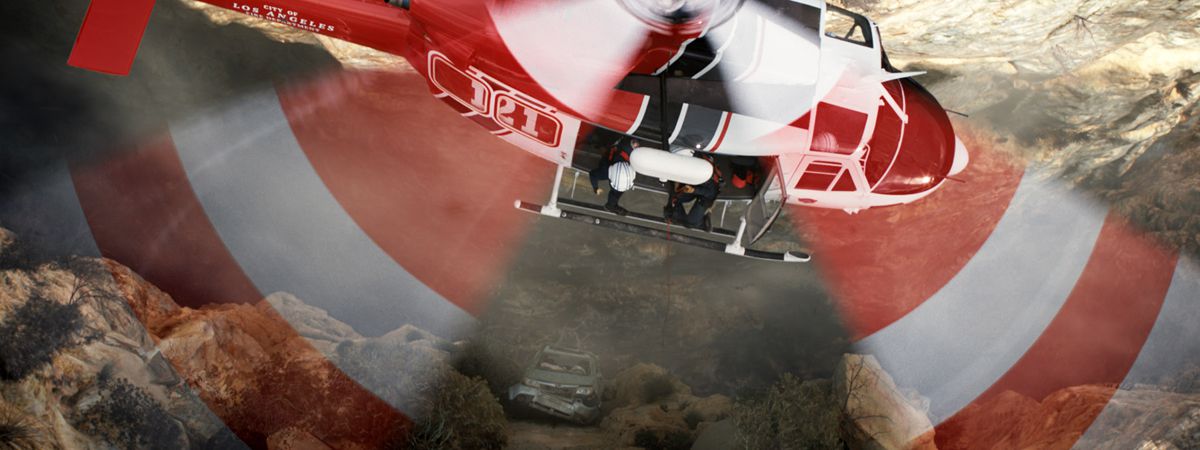
The helicopter was a Method Studios asset (built for the LA quake sequence) that Cinesite adopted into its own pipeline. “It had to match the air to air helicopter being shot in LA and the helicopter hull used on the set piece in Australia,” says Voss. “We got some textures from Method and additional texture shoots too. In the end it looked so good we would replace the real helicopter hull with our CG copter in some shots.”
For the helicopter rotors, Voss went for a realistic solution, having in previous shows sometimes completed them with a textured roto plane. “This time we actually went for the full glory, 12 motion blur samples fully raytraced rotor blades, and took the hit that it was slightly expensive to render. We looked up the perfect rotor speed from the original helicopter and did the right angle/pitch of the blades too.”
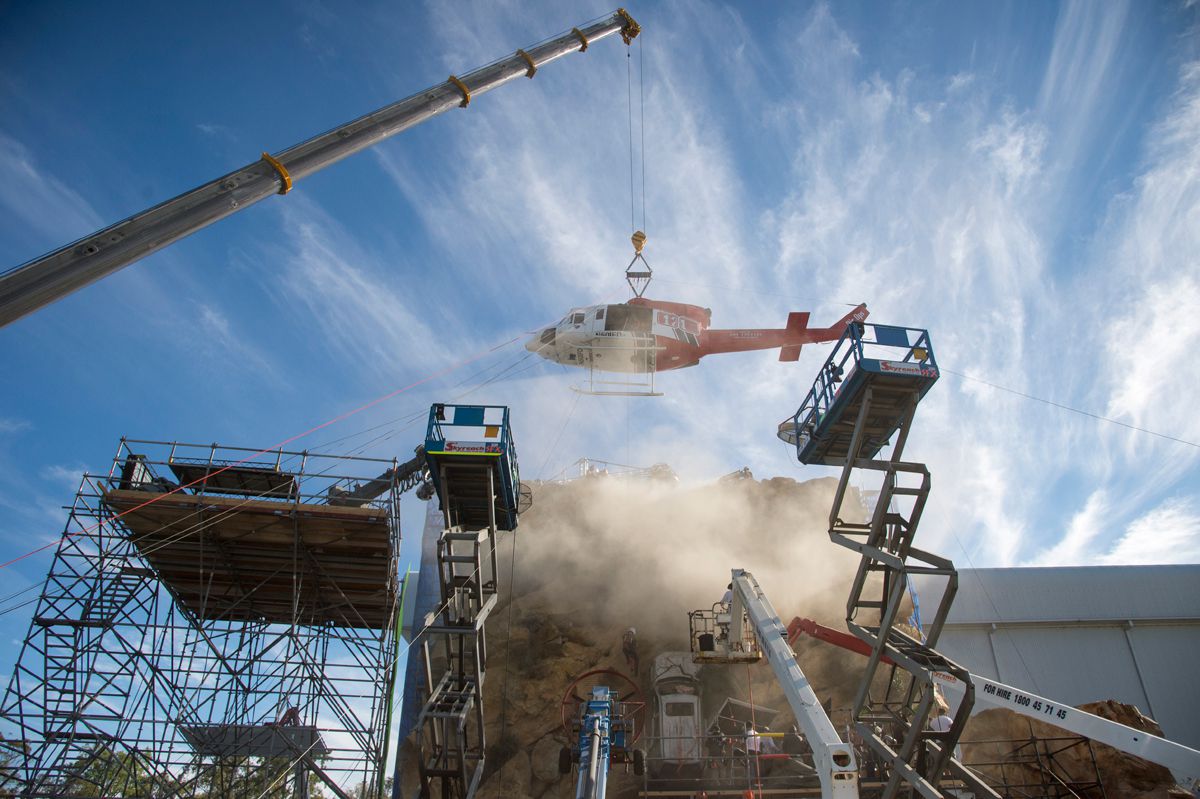
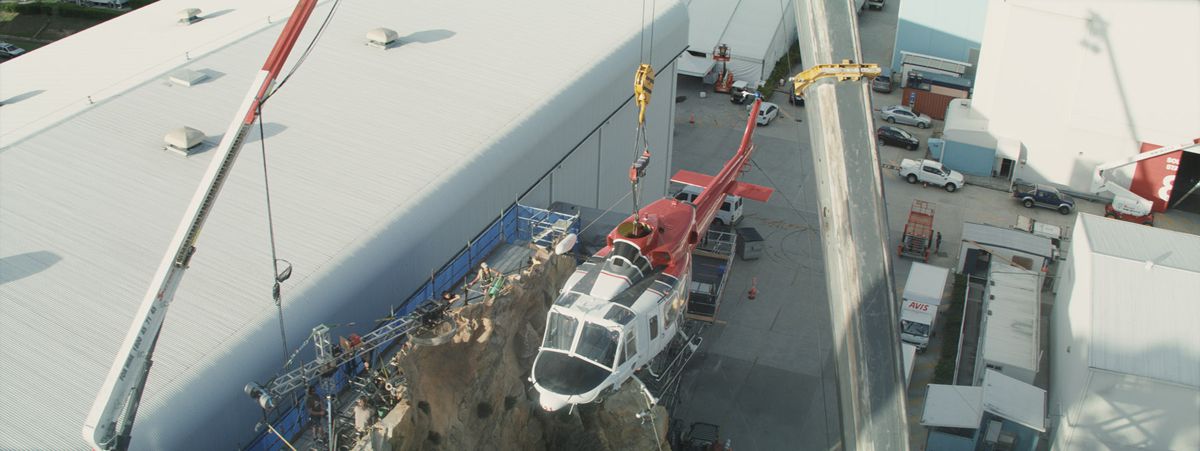
How to…film helicopter plates
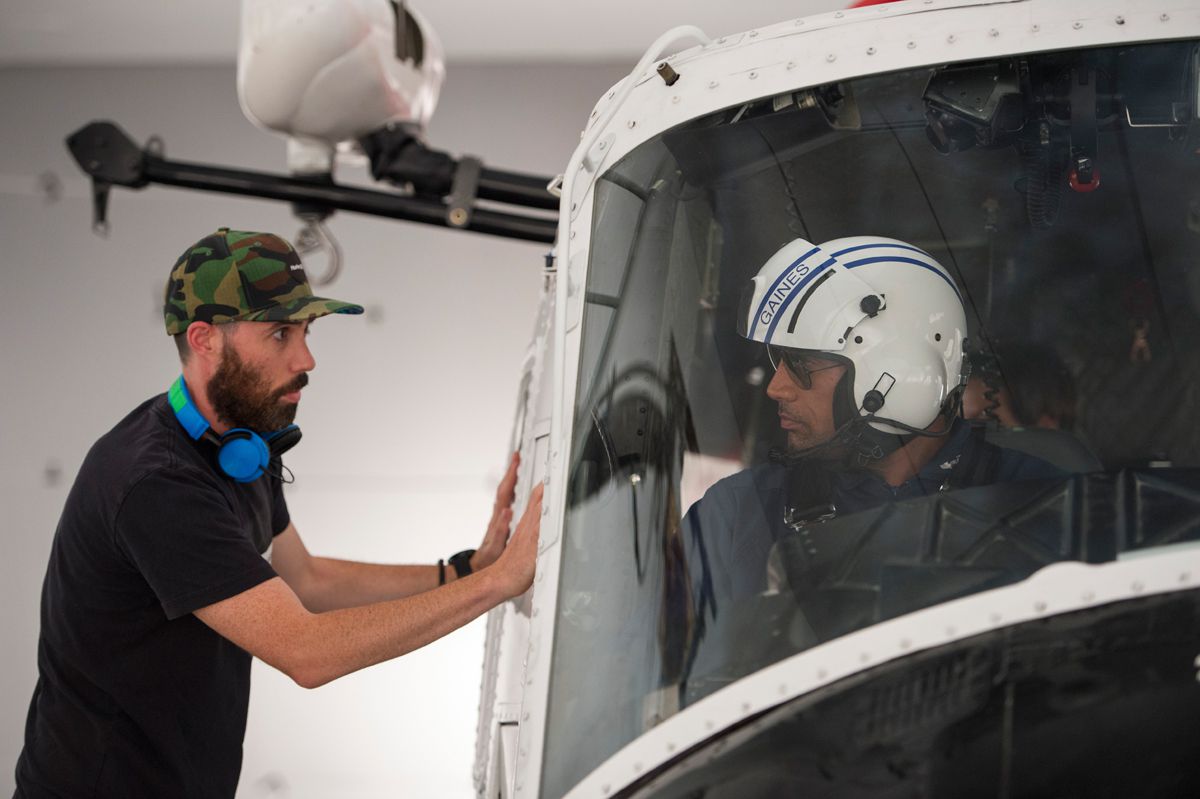
Many scenes required Ray and other characters to be positioned in the rescue helicopter. For these, the actors were filmed in a helicopter cab on a gimbal and composited into aerial backgrounds. Determined to not have to deal with ordinary greenscreen plates, Strause pushed for the chopper plates to be filmed initially outside, but when that was determined as unfeasible, against a white background instead.
“When you have your main character as a helicopter pilot it can’t look bad,” says Strause. “Originally what we wanted to do was shoot the gimbal and boat stuff (seen at the end of the film) outside. But during prep we noticed that Queensland has these thunderstorms that roll in and it’s really windy. So our plan of putting our chopper gimbal outside probably wasn’t going to work out. So we agreed to do it on a stage. I said if we’re going to shoot this on a stage, I would not do it as a greenscreen cove. We did it as a white screen on everything. We built a full hemisphere dome, completely lit from behind all around with a white screen, and had our helicopter gimbal inside of that.”
“The crane arm with a light attached to it was also inside the dome,” adds Strause. “Steve Yedlin, the DOP, was great at making these shots work. He is the most absolutely tech-savvy DOP. He takes photographs and goes into NUKE and is checking all the exposure ratios and doing his own comps. The guy even wrote his own custom film grain tool that we used for the DI in the movie. Because the screen’s all backlit, every single sheen highlight, everything on the helicopter was a real reflection of the dome, and then we only used tiny greenscreens attached the helicopter that was just big enough to go behind Dwayne’s head or Carla’s for her hair. Sometimes it was just a matter of luminance keys and a little bit of roto.”
Strause had also initially envisaged a complicated, but expensive, helicopter gimbal. When that proved impossible, he turned to the innovative Australian crew to bring in an ‘old-school’ pneumatic gimbal. “They had built a version of this for Unbreakable for the plane stuff,” relates Strause. “It’s not motion control – it was literally two guys pulling levers and a third guy spins a knob that spins the lazy susan on the gimbal.”
“Literally everything thing we had for the gimbals was completely analogue,” continues Strause. “But it worked – it meant that in six or seven hours I was able to rehearse every single gimbal shot in the movie for the helicopter. Then on the set I would block out all the scenes. We had an iPad with a VR sphere where we took the previs and rendered out 360 degree domes, and used a VR viewer, so the iPad would show us a window into the previs. That meant we could get eyelines and everything perfect.”
During the shoot, the crew also made use of a tire that had been incorporate into the gimbal assembly. “If we slammed the gimbal down,” states Strause, “it would squish the tire and give the helicopter a little bounce or thump just to add some real turbulence and bump to it. These techs were completely low-fi and analogue and old school. But that stuff in the helicopter feels real. We had a little spinny motor oscillator at the back of the gimbal that gave a little wobble – so if you look at a shot every single cable and strap inside that helicopter is wobbling around like you get in a real helicopter.”
How to…destroy Hoover Dam
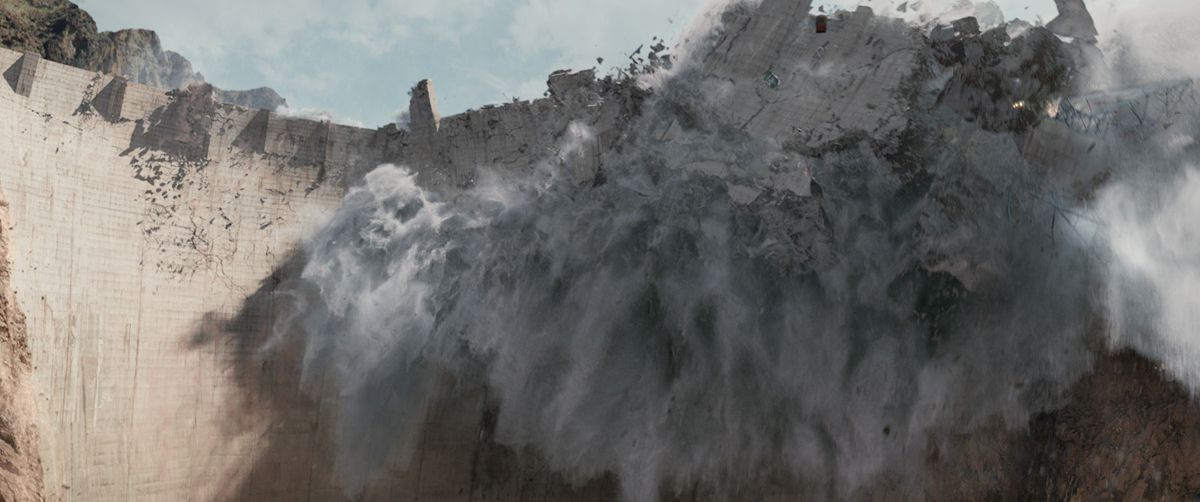
While testing their earthquake prediction equipment at Hoover Dam, Caltech seismologist Lawrence Hayes (Paul Giamatti) and his colleague Dr. Kim Park (Will Yun Lee) find themselves amidst a quake at the location. The magnitude 7.1 event causes the dam to collapse, and with it cars, people and rocky debris. Scanline handled the sequence.
Gathering reference to replicate Hoover Dam initially proved challenging for the Scanline team. “Production tried to do a shoot there,” outlines Scanline visual effects supervisor Bryan Grill, who shared duties on Scanline’s shots with co-visual effects supervisor Mohsen Mousavi. “It would make sense to get a helicopter with a camera and shoot a lot of the plates at the very least for reference. But what we found out was in order to shoot there you have to show them the script. And I think once they saw the script and saw ‘Hoover Dam collapses in an earthquake’, I don’t think they were too happy about that.”
So, knowing that a professional data gathering approach would not be possible, Scanline visited the dam as tourists, capturing as much reference as they could that way. “We had one guy,” recalls Grill, “he jumped on tour helicopter and convinced them to take the door off and he hung outside and took photographs around the dam. We used Photoscan to reconstruct all the data and modeled from there. The rest was pure modeling. We also did our homework and looked online for plans and for what the scale of the environment would be. The Photoscan model got us to a place where we could do additional modeling on other areas.”
For shots of the dam collapsing, Scanline utilized its proprietary Flowline water sim tools, specifically referencing the way the structure had been built. “It’s built incredibly strong,” says Grill. “In fact at the bottom of the dam it’s built so wide that an earthquake probably couldn’t do much to it. It was built out of big blocks of cement, so we tried to use the blocks of cement as being the one area, that if it did crack, the solid block probably wouldn’t but the gap or connection point between the two blocks would probably be the weakest. So we started there.”
“Then it became more ‘movie magic’ and just trying to tell an exciting story,” adds Grill. “For the water, everything has a story behind it and we try to theorize why it would happen. Originally we had some previs where it felt like the water was sloshing so much, that the sloshing combined with the breaking created this big push of water through the dam. We did a version like that for the trailer, and after that the studio and director thought it looked too much like a tidal wave, so we had to re-think it. So we kept the sloshing but the water never really sloshed higher than the dam, and the amount of pressure of water behind the dam was what eventually pushed the dam through.”
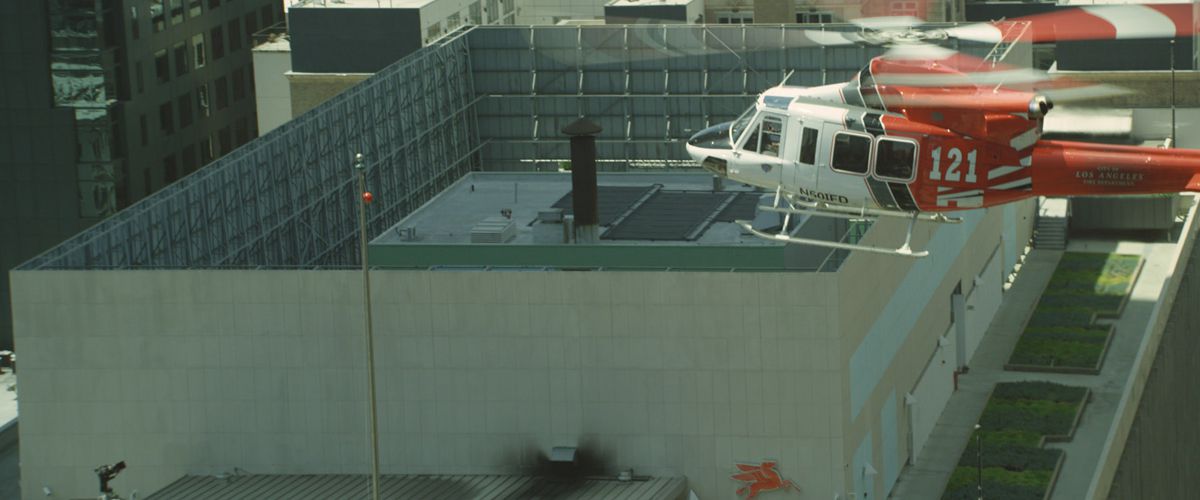
How to…realize a rooftop rescue
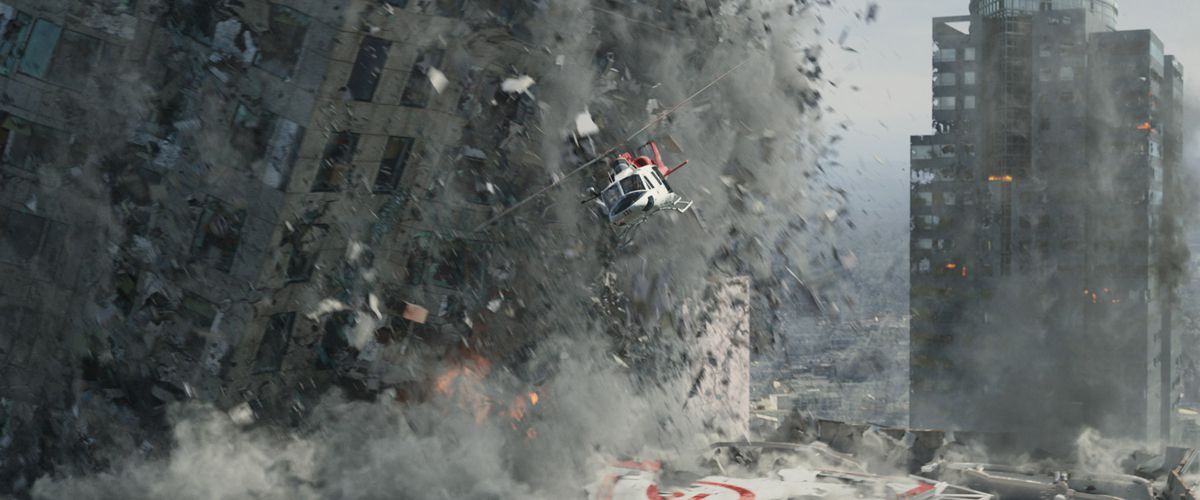
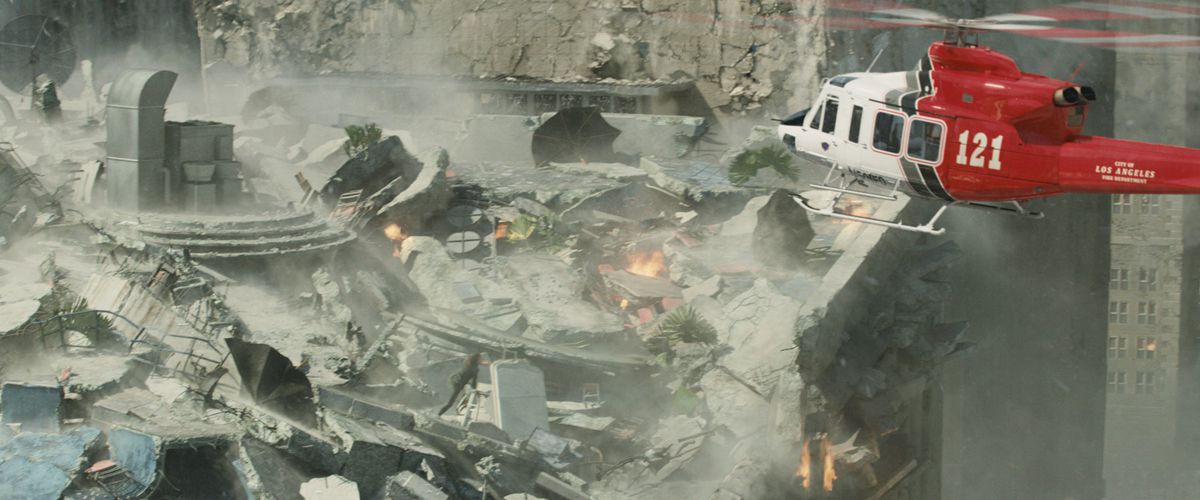
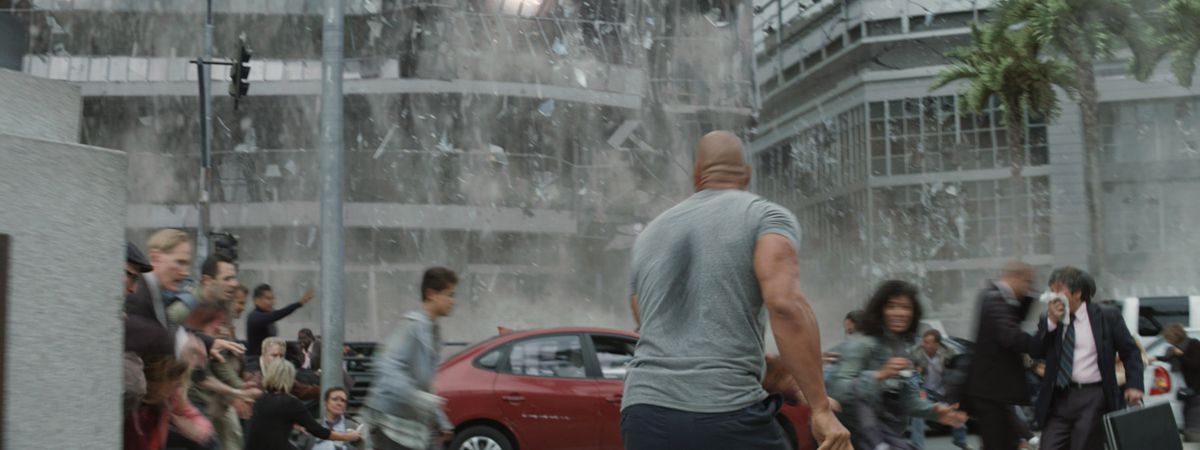
While Emma is lunching with her new fiancé’s sister Susan (Kylie Minogue), Los Angeles is hit by 9.1 earthquake. Chaos ensues and Emma calls Ray for help, who is able to rescue her from the roof of the building as it collapses. Method Studios in LA and Vancouver delivered effects for the sequence, which included a three-minute long tracking shot as Emma escapes, shots of the helicopter approaching and scenes of buildings disintegrating as Ray and Emma fly away.
The Third Floor was tasked with previs’ing the ‘one-shot’. “We accomplished this by blocking out the interior design of the restaurant, emergency staircases, elevators and rooftop,” outlines Third Floor previs supervisor Todd Constantine. “Then we blocked one massive running shot through the environment. Once we had approval with the path of action and overall camera angles, we layered in hand-animated explosions, people, fx, and camera work needed to film the shot. This sequence and scene files were then used to map out and produce the final shot. I’m very proud to say that what was planned ended up exactly on screen. The rest of the sequence was worked out like a normal action sequence. Also challenging was the sheer size of the environments and that taxed our video cards and machines quite a bit. It was all worth it though as the work explodes on screen, leaving us with the satisfaction of destroying the place we all live.”

The three-minute, 4,500 frame shot was a ‘daunting formidable beast of shot’, according to Method visual effects supervisor Nordin Rahhali. “In some ways it’s representative of the feel of the film – an experience for the audience to ride along with these characters at the base level to see what it feel like to witness this incredible act of nature. You’re taken from a perspective of a helicopter and watching the event take hold, and in this one shot you go into this restaurant and become part of the event along with Emma.”
Live action for the sequence was filmed on several different stages in Queensland. “They had built a stage for the top restaurant,” explains Rahhali, “then there was another stage for the collapsing section After she goes up to the top of the restaurant and she sees the collapsing buildings and we see the pool sloshing around, and that was a transition point to a different stage – we called it the pancake set – she was rigged on a harness with wires and it was full greenscreen minus a small set piece she was standing on – it was all rigged so that the camera, her and the floor could all move on a gimbal, and she was puppeteerd in the air a little bit as everything was collapsing. In the end we did replace everything in CG. As she wakes up and reaches up to her ear, she had to climb up to the top of the roof, that is a different set piece as well. That was a partial set and then there was a full digital take-over as the camera boomed up as high as it could go and we do a takeover into a fully CG environment.”
During the tracking shot, Emma opens a fire escape door but soon realizes it is now just a void. “That shot was supposed to be a very quick shot,” notes Rahhali, “her opening the door and realizing quickly that everything’s gone. There’s no more stairwell and you’re just looking at sky. While we were shooting, the first chinks in the armor showed up! Brad said, maybe Kylie Minogue’s character runs out that door- maybe when Carla opens up the door she sees Kylie’s character holding onto something and falling further, to make it more scary. I immediately went to Randy Starr and said, ‘I think Brad’s trying to make this shot a bigger deal!’ It wasn’t Kylie in the end, but it did turn into a longer shot – it was no longer a throwaway shot. It’s really its own shot – almost 10 seconds with full destruction and everything.”
B-roll from the rooftop sequence.
Method created the rescue helicopter – a Bell 412 – that then became a shared asset amongst the other vendors. “We made it based on reference of a real Bell 412 and the buck that had been filmed in Queensland,” says Rahhali. “We had to take account of some slight variations in the landing skids, the radar nose cone and the winch housing, so we made a base model and then had extra components to add on.”
The LA surrounds featured in the rooftop rescue and fly-away were realized via a LIDAR and photography reccy in the area. “We only had a short time to get everything we needed,” recalls Rahhali, “so because of that we did something I’ve never done before which is we had three teams that went out with LIDAR stations, and we co-ordinated a grid pattern downtown, and we had walkie-talkies to help. And we pretty much just canvassed the entire corner of downtown we needed. Then we had limited access to the tops and mid sections of buildings so we could get a little higher at each point. At the peak we had three teams of LIDAR and then teams of people doing video-grammetry and photogrammetry for all the action. It was a very complicated intense couple of days.”

Method replicated buildings and rigged them for destruction in Houdini as the helicopter departs (shots of the chopper narrowly avoiding the collapsing buildings were supervised by Method Vancouver visual effects supervisor Bruce Woloshyn). “We basically had two hero buildings with a small team of artists in order to figure out how big the building needed to be,” says Rahhali. “And then we came up with some guidelines for what the effects department needed out of those buildings. Once we discovered what the steps were, we then went through the process of classifying all of the downtown buildings we would see in all of the shots in terms of how hero they were. Is it right in our face? Do we see the building fall apart where we also see the insides of the building? Do I also need to be concerned that the concrete breaks off, and then inside that there’s a steel girder.
“We also had a team working on the dust itself,” explains Rahhali. “I didn’t want it to just be a soft puffy cloud – there’s dense pyroclastic clouds, then stuff that’s diffused down a little bit – a mix of soft, dense and crunchy. There’s also hue variations between the clouds – slightly browner, bluey or white. The dust ends up becoming its own character, and in some ways is the most prominent part of the destruction. It’s great to work on these beautiful destruction sims, but you can forget that a lot of dust is covering this, and that’s what makes it look real.”
The sequence also required digital doubles. “For these,” says Rahhali, “we could use a library of Massive agents and modify them to make them more business like because it’s downtown LA and we had mocap from the library and could flesh out with hand animation – made digi-doubles come to life. The moment we put the Massive agents into the shots, I colorfully shouted it out as I saw these crowds run away from a pyroclastic cloud explosions – this shot from an awesome shot to OMG it’s the most terrifying shot you’ve ever seen.”
How to…shake San Francisco
Several of the vendors on the show created scenes of San Francisco and LA experiencing earthquakes. For example, Hydraulx crafted a number of on-ground shots of buildings shaking and collapsing in San Francisco, using a newly set-up Houdini pipeline.
“We’ve never used Houdini before, so this was our first project,” notes Strause. “We had been using Thinking Particles, but it was tough jumping between Max and Linux and Windows. I was always anti-Houdini and never really got it, but now I love it. It sits in our pipeline really nicely. There’s also more people doing it – back in the day it was a bit of a black art. It was all on Linux, multi-threaded, we could run it on our renderfarm.”
Behind the scenes of the shoot.
For street shots in San Fran, production filmed with the actors and with the real buildings in the backgrounds. For their shots, Hydraulx would then completely replace the buildings. “We LIDAR’d every single building and built every building for a block and a half in either direction,” says Strause. “We had to build everything the way it was designed – the studs, the dry-wall, we had a little random furniture generator that would generate things when the rooms started popping apart and let you see stuff inside the houses. We had to figure out in Houdini how to collapse floors, because when the last big quake hit in San Francisco, all those houses, the first floors collapsed. There’s some really iconic photos of what that looks like.”
Strause says that although there are some grand destruction shots in the San Francisco scenes, many were planned to be ‘background’ views of buildings collapsing. “Brad wanted it to be more on the street when everything’s falling apart. Even if it wasn’t the best vantage point, it’s the most dynamic, it’s the scariest for the characters. You see Transamerica breaking down in the background, but it’s out of focus! It was a huge simulation we did, but it didn’t matter, you’re pushing into the girl and the boy and hearing how scared they are. That’s what that shot is about.”
How to…skydive into San Fran
Watch part of the skydiving sequence.
Ray and Emma attempt to make it to San Francisco by helicopter, but when that fails and they crash-land, they are blocked by an expanding fault line. Their next solution is to borrow a plane, but with nowhere to land they parachute from the aircraft and land at AT&T Park. Production filmed actual stunt drops, aerial reference of San Francisco, with Hydraulx augmenting the performers and backgrounds.
“We could do the real drops,” says Strause, “but we had such a tight window to do it in. We had time to do one jump from the airplane – the airport the plane could take off from was so far away that we were only going to get one jump. The plan was we could do one jump – it’s got to be awesome – two real skydivers, they went all the way down into the stadium. Once they did the first jump, then they got out, we got a barge floating out in the harbor. They’d take a boat from the stadium which is luckily right on the water, take them over to a helicopter, they’d get in the chopper and take off, and we had a second helicopter that was filming them and then they would jump out of the helicopter and we got another two or three takes using that trick.”
A few extra jumps were performed at a nearby skydiving school, while helicopter tiles were filmed over San Francisco. “So if there was desert in the background instead of San Fran, we replaced that with a helicopter tile,” explains Strause. “We made the chopper go down and every 500 feet we’d shoot a tile, go down and shoot. Then we would add in destruction matte painting and CG buildings.”
In order to sell the notion that Johnson and Gugino were the actual skydivers, a face replacement and body prosthetics process was employed. “We took Dwayne and Carla and used our six RED Dragon camera set up at Hydraulx and filmed him in six different angles and put that onto his CG face that was tracked on,” says Strause. “Then for the body we had the male skydiver who is the best in the world, wear a muscle suit made by ADI. The suit started falling apart on us after so many skydives so we had to go and do some pretty serious suit clean up. But the bulk of the chest really worked.”
How to…bring a tsunami to San Fran
Watch part of the wave sequence.
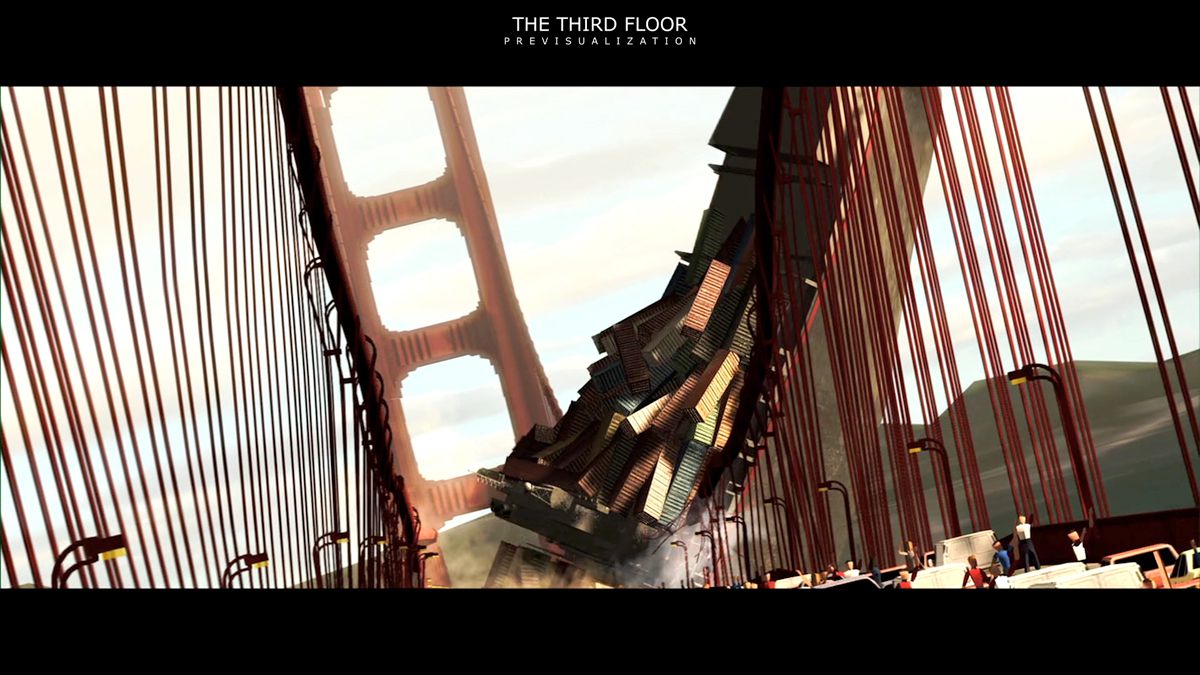
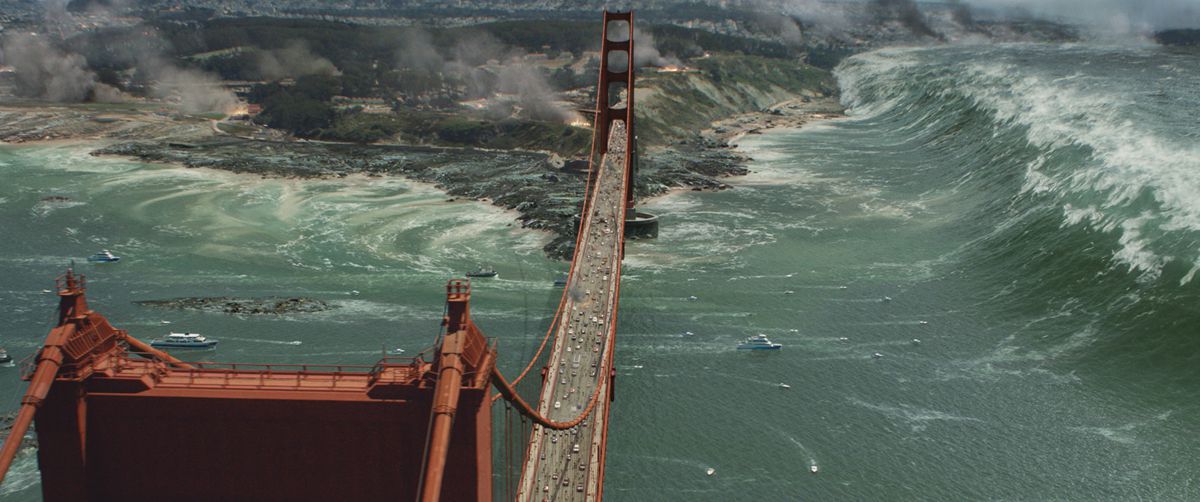
The quake causes a tsunami to rise outside of San Francisco. After commandeering a boat, Ray and Emma speed out past the Golden Gate Bridge in the hope of getting over the incoming wave. It ultimately lashes itself upon the bridge, and the city, causing widespread destruction to a shipping container, cruise ship and most of the foreshore. Scanline created visual effects for the massive sequence surrounding the bridge.
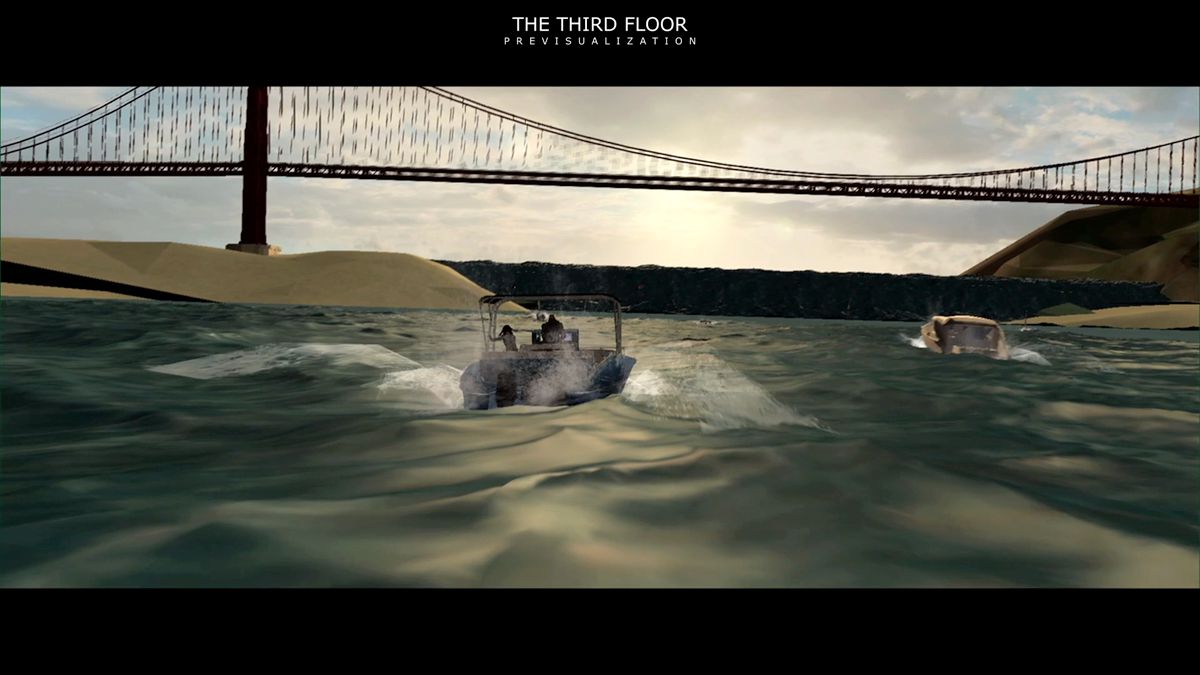
Early blocking for the sequence came in the form of previs from The Third Floor. “The director’s vision of the start of the scene was to have all the water from the Bay start rushing out, alerting Ray to the danger of a tsunami,” says Constantine. “We built the entire pier system of San Francisco as well as the Bay and Golden Gate Bridge area. We built both low- and high-resolution versions of each location so we could optimize each option during previs. Various boats and ships were built and animated to fill out the frame as Ray and Emma race to get over the wave before it hit. Partnering with Scanline, we were able to use their proprietary water rig to give the tsunami and the flooded city a realistic, dynamic and look. The decision on scale of the tsunami came from the director, as he wanted the wave to pull along a cargo container ship that eventually destroys the Golden Gate Bridge. We hand animated all of the people, boats and destruction of the bridge during the sequence.”
As they had done for Hoover Dam, a team visited the Golden Gate Bridge to capture reference. “One thing we couldn’t do was get on the bridge to film, or close the bridge down,” states Grill. “So again we went there as tourists where we walked up and down the bridge taking textures and everything, and we went on boats and shot from a helicopter. I wanted to shoot as much practically as possible because we needed something to match to. We pretty much lined up every shot and shot it as close as we could.”
The next step was involved accounting for the many types of water required for the scene as the tidal wave approaches. “The way the sequence goes is that the water is starting to suck out of the San Francisco Bay,” explains Grill. “So what we had to do was recreate below the water line what it would look like and also show how the water is sucked out. So we had to show the sand on the shoreline. We were able to, with Flowline, colorize and give directionality to that sucking. We noticed a lot of imagery from the Japanese tsunami you got these tidal pools or shifting shapes in the water that were really interesting. We used a lot of that to help show the water.”
Flowline enabled the main tidal wave ‘wave’, plus whitewater pieces and distant ocean where required. Ray and Emma were filmed on a boat gimbal some of the action, but also replaced with CG doubles (more on this below). Scanline also had to match their Flowline water to plates of real water, and build a digital Golden Gate. Then, adding in the container ship – which loses many of its containers – required an initial sim. “We did a type of cloth sim where, once we found the right tension that we felt gave us the right weight and mass, then we were able to do some more procedural stuff based off that,” says Grill.
The cruise liner being overtaken by the tsunami was initially intended to be just one shot, but grew to a couple. “In the first shot,” relates Grill, “we had stuff like sim’d chairs coming off. But other shots only required a little damage to it, anything loose had been knocked off it. It’s not like the boat split in half and we had to show all the state rooms. Because of how over the top those shots are, we were able to get away with not having to build it brick for brick.”
How to…boat through the streets
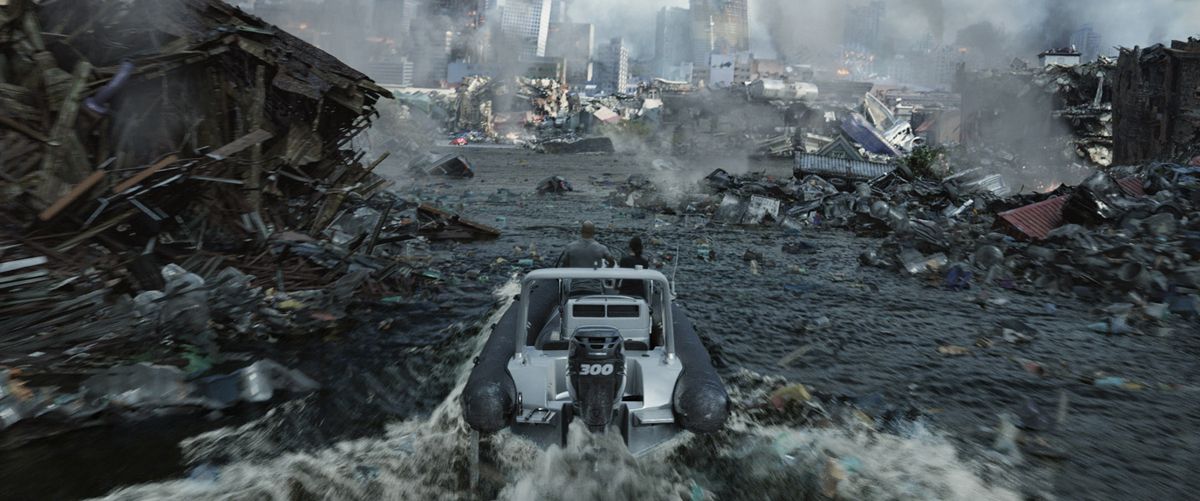
The tsunami floods the city, trapping Blake and her new found friends Ben, and Ollie, in a half finished building. In their commandeered boat, Ray and Emma explore the San Francisco streets, which are full of debris and depleted buildings. Once again, Scanline employed its fluid sims, plus a monumental CG modeling and rendering pipeline, to deliver the shots.
For street views, a team had photographed areas extensively, from rooftops to ground level. “What was important for us,” says Grill, “was that we basically found our hero images and we built the buildings on that block, and then we matched lighting to reproduce the photography. We didn’t necessarily want to be locked to any lighting per se, we felt if we could match the city block and show it to the client – here’s a photograph and here’s us matching the photograph to the lighting. Once we felt confident that everything felt photoreal, then we were confident to move the light around knowing the metals and bricks would react properly. Once we did it to the actual buildings, now nothing was going to be 1:1, because everything was going to be pretty much destroyed or damaged.”
The tower becomes engulfed with more water.
Johnson and Gugino were filmed in Queensland on a boat gimbal, which had been re-purposed from the helicopter setup. That meant there were limited movements the boat could take, as well as there being no motion control or repeatability. Shots were therefore constructed moving the gimbal and the Technocrane in tandem for the desired position. “Then we also created shots that were a digital boat with digi-doubles,” comments Grill. “There’s a long shot as you see them going through the city, which was a hookup to the end of the shot, so it was mostly CG.”
Creating the debris in the water proved even more challenging. Reference of recent tsunami damage from Japan showed debris to mostly be wood and mud, but that was due to the incident taking place in a predominantly rural area. The San Francisco debris was therefore more consistent with trash, hard objects and oil. “I have to hand it to our pipeline team,” admits Grill, “it took us nine months to figure out how to render that. A lot of it is repeated stuff. The size, color and other things change for each piece.”
“We had a few levels of debris,” says Grill. “First, what we call our static debris, and that was debris that hung up against whatever buildings were still left. We were able to create chunks of debris and place them where we wanted. That included cars and a lot more big wood pieces that might have gotten caught up. After that we had the floating debris. When we were walking down the streets taking photos initially, we took photos of garbage cans and anything. Then we included things that might have come out of houses – we had curtains, dresses, anything that would be loose.”
Scanline modeled and textured over 250 assets, then worked with The Chaos Group to write a plugin that allowed the debris to be rendered in V-Ray and repeated to amass nearly 20 million pieces around the city. That work was spearheaded by Mohsen Mousavi at Scanline. “With this plugin we were able to reproduce and scatter and double up and triple up to get the desired effect for the really wide scenes,” explains Grill. “Also, every piece of debris was moving and the water was against that and reacting.”
All images copyright 2015 Warner Bros. Pictures.