In part 2 of our Terminator Salvation coverage, we have interviews with artists from both Asylum Visual Effects and Rising Sun Pictures. We also have an extraordinary exclusive video look at the practical effects done by Kerner Optical.
Kerner Optical Podcast & Video
If you did not listen to our original podcast here is that link again. This fxpodcast from last month discusses the work of ILM and Kerner Optical.
Asylum Visual Effects
Asylum Visual Effects and Rising Sun Pictures both made substantial contributions to Terminator: Salvation. John Fragomeni, from Asylum, and Gregory Yepes and Sean Mathiesen, from Rising Sun, chat to fxguide about their visual effects work for the film.
John Fragomeni, visual effects supervisor – Asylum
fxg: Can you give me an overview of Asylum’s work for Terminator: Salvation?
Asylum: As a broad brush strokes overview, the VFX disciples Asylum covered were extremely wide and varied. We produced 268 shots. Our work included very detailed, articulate, photo-real 3D character development, motion control multiple pass set extension, crowd population and miniature integration. We completed 8K matte paintings for extensive digital set creation and extension, 3D giant claws, exterior wall, Terminator gun turret and hunter killer craft.
We also transformed a deserted rail yard in Albuquerque, New Mexico into 2018 post apocalyptic destroyed LA. We built a 3D interior of an 80 foot missile silo for set extension. We created full digital backgrounds of burning forest and CG water for a chopper crash sequence at the riverbank. This included CG rotor blades shearing off as the Chopper plummeted into the river. Our design team also created the 2D and 3D graphic design for the network matrix that represents the core of Terminator cyberdyne network – essentially ‘Big Brother 2018’.
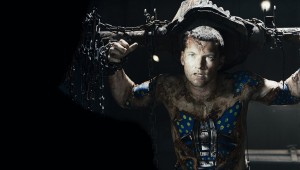
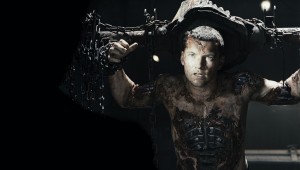
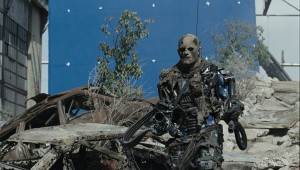
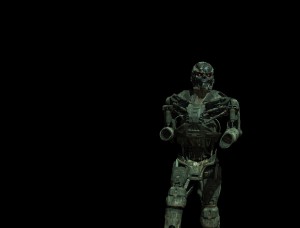
The most challenging was the 3D character work we did for the key Terminator character ‘Marcus Wright’(aka Australian actor, Sam Worthington) as well as 3D T600 Terminators. Marcus is part human, part machine, a cyber being. In collaboration with overall VFX supervisor Charlie Gibson and director McG, we were involved in taking the spirit of the Stan Winston Terminator design and re-defining the concept and design of how Marcus looked. He had to be unique! It was was very rewarding to involved in the concept development of a such an important character.
fxg: This new film is grittier and dirtier – how did that impact on your approach to the effects? What was your brief for the look and feel of the shots?
Asylum: The development of the visual effects was an ongoing evolutionary process. McG wanted a more grittier look to the film overall, so a lot of our work in 3D and 2D was approached with this in mind. For example, John Harb did the concept work for destroyed LA which set the tone for the environment. McG wanted it to be bleak and oppressive. As such, we pushed our matte paintings in a desaturated monochromatic direction with respect to the color, materials and overall look of the set design.
For Marcus, who’s part man and part robot, all of his face and internals were done in CG. This was because the body needed to be excavated to reveal all the working of his robot internals. The Stan Winston team provide a practical prosthetic of his damaged skin, and basically the interface between the edge of his skin and the cavity where we see into his body. Asylum actually re-designed the look of the Marcus endoskeleton and head and this evolved and changed throughout the process.
The original Stan Winston Terminator model was a lot more solid and more like an internal armour, as such there was not a lot of negative space to see inside the Marcus. McG and Charlie wanted Marcus to become a more evolved robot. The challenge for Asylum was to keep the spirit of the ‘classic’ Terminator robot in play within the re-design. Also the concept and first 3D renderings of the re-designed Marcus was a lot more dirty, grimier and damaged, which was true to the original Winston concept look frames. However, this too was re-thought and we moved towards a cleaner hi-tech look.
fxg: Can you talk about you interacted with the overall vfx supe? Did you need to match shots produced by ILM and the other vfx facilities?
Asylum: Charlie Gibson was the Senior and overall VFX Supervisor for the film, and he invited Asylum to be involved. Myself and fellow Asylum Visual Effects Supervisors, Nathan McGuinness and Phil Brennan, had worked and collaborated closely with Charlie on both Pirates 2 and 3, and we have utmost respect for his creative and technical talent. Charlie was our go-to guy and throughout the project and he provided creative direction and advice on set when shooting and when developing and designing the visual effects.
If you know Charlie he is very hands on and involved in the process and the film needed this because of the scope of VFX in play. Charlie takes a very visceral approach to designing VFX and always had his finger on the pulse for the overall look, feel and texture of all the final composites. His role was critical as he was not only dealing with Asylum and ILM as the main VFX vendors but also a host of other companies producing shots for the film.
In the design of visual effects we used the concept art as references. In most cases we didn’t have to match to other vendors’ looks or work as most of our work was very specific to complete scenes and sections of the film. As such, asset development and finishing was contained at Asylum. However, we did share our CG assets that we had designed with other vendors and we incorporated into our pipeline models of the Hunter Killer and Gun Turret from ILM.
fxg: What kind of reference or previz did you look to for your shots?
Asylum: We did previz on only three of our scenes. In our case the nature of this film was that many of our scenes had characters and environments that underwent a change in direction after shooting, as such, a lot of our look development evolved throughout the visual effects finishing process.
The studio provided great concept artwork and this was our jump-off point and set the tone for the look development of the scenes. The scenes that we worked on did not have any previz but I know previz was utilized on specific sequences by other vendors. The bulk of our work was building huge digital sets and assets, and articulate character 3D for integration into live action such as the 3D creature development of Marcus and the T600. However, as mentioned early we did enter into extensive concept development for the re-design of the Marcus endoskeleton, Marcus head and the T600 head. We completely replaced the practical head with a new 3D T600 head for all the Downtown LA shots.
fxg: Could you break down the Marcus 3D endoskeleton and head shots?
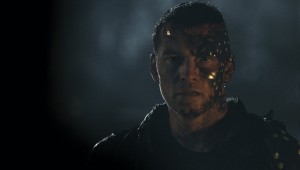
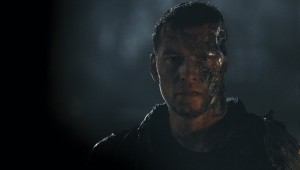
Asylum: It was important to Charlie and McG that when you look at Marcus the 3D doesn’t detract from the actor’s performance, as such, the CG had to be one with the actor. Creatively and technically, the Marcus 3D character work was a challenging but exciting task. We had to seamlessly blend and integrate live action plate, practical prosthetic appliance, 3D flesh and soft tissue, 3D nano substructure and a fully articulated and animated 3D metal endoskeleton.
This character development was not just enhancing an appliance on the actor with some CG. The Marcus endoskeleton had to have real depth, so you could look inside the chest cavity and see flesh, metal skeleton, wires muscle groups, a synthetic respirator system, pipes, articulate moving gizmos and a beating heart. His blown-off face was combination of soft tissue and nano substructure and where there should be muscle and bone there was a metal skull and hi-tech articulating mechanical pieces are moving the metal jaw as he speaks.
The process started with shooting the live action plate. The actor (Sam Worthington) wore a make-up appliance which had a prosthetic wound and blue screen where 3D endo needed to exist. When shooting we made sure we took precise, set survey precise, camera data, measurements and lighting references for the scene. We also filmed his performance with three additional witness cameras from different angles for 3D integrity.
The Marcus endoskeleton and head underwent a complete re-design at Asylum. After the new design was approved we proceeded with modeling, texturing and shader development. Concurrently during this re-design phase we were able to continue with the tasks of tracking shots, match-moving the actor’s performance, development of our match-move rig, and doing the required rotoscoping and paint clean up.
Asylum’s talented senior 3D team comprising of Sean Faden, Greg Stuhl, Jeff Willette, Denis Gautier, and Andy Cochrane went about designing and developing a show specific 3D pipeline to handle the complex processing and integration of CGI for Marcus and the T600. Our prime considerations when R&Ding our pipeline and procedure for our 3D work on Marcus and the T600 was the robust flexibility of the pipeline. We wanted to be able to make ongoing changes without impacting on the work already in progress. The design of the Marcus endoskeleton and head was evolving throughout the process, and as the VFX supervisor it was comforting to know that we could make last minute intuitive improvements without any adverse impact on the workflow. This streamlined workflow made everyone’s life just that little bit easier and let us focus on making the robots as cool as possible.
The primary challenge in creating CGI prosthetics is matching the movements of the computer animation to the live action photography. In the case of Marcus, the actor’s entire shirtless upper body needed to be motion matched. Asylum’s CG team devised a process of motion matching that involved 3D rotoscoping followed by a proprietary technique of using 2D tracking data to refine the 3D match-move animation. The primary benefit of this process is that a rock solid free-form 3D match-move is possible using the principal photography plates.
Asylum’s CGI Marcus endoskeleton consisted of a fully articulated upper body endoskeleton encased in a deforming continuous polygonal mesh created from a scan of the actor’s body. For each shot, a matte of the wounds on Marcus’ body was created by keying and rotoscoping the digital blue portions of the live action makeup appliance. This matte was converted to a geometry outline, and the outline was projected onto the 3D rotoscoped deforming mesh of the actor’s performance. This projected outline was used as the input to a procedural process in Houdini that modeled the wound edges, “tearing open” the deforming mesh of the actor’s body and revealing the articulated metal endoskeleton embedded in the CGI wound interiors.
By procedurally creating a custom model for Marcus’ wounds for every shot, we could automatically capture the development of Marcus’ wounds as he accumulated damage, as well as match any slight placement changes in the makeup appliance from one shoot day to another.
Since all but the darkest nighttime shots were lit and rendered with full diffuse and specular global illumination, the actor’s entire body was match-moved, to provide consistent and correct shadowing and interreflection between the live action plate and the metallic CGI endoskeleton.
Final rendered passes of the CGI were supplied to our compositors with simple “illumination equation” elements such as specular, diffuse, reflection, and beauty passes broken out so the compositors could spotlight and sweeten the CGI to taste. For some of the especially difficult shots where Marcus was trashing around, the CGI flesh, soft tissue, nano substructure, wound interiors and metal endoskeleton were rendered as separate passes with mattes, so that final comps could be fine-tuned more articulately.
Most of our compositing was completed on Flame. Asylum is committed to the use of Flame as its primary compositing tool of choice because of the strength and flexibility of its tool set, and the pure brute force it provides to push shots through the pipeline quickly. Additionally and most importantly, Asylum has an amazingly talented roster of artists and lead compositors. Mark Renton, Joe Ken, Tim Davies know how to extract the best qualities and performance from Flame.

fxg: From my own point of view, I became really interested in visual effects after Terminator 2, which of course was a big step in CG vfx. I was wondering if that film had the same impact on you or other artists at Asylum? What’s it like working on a Terminator film?
Asylum: We all grew up admiring the work of Cameron, Stan Winston and ILM on Terminator. The Terminator franchise established a new level in VFX filmmaking and it certainly set a standard to aspire to. When Asylum was invited to be involved on Terminator: Salvation, the facility buzzed with excitement and everyone wanted to be attached to the film. We were presented with a fantastic scope of VFX disciplines on this project, most notably the 3D creature and character work was an opportunity for Asylum to showcase its talents and artistry.
As one of Asylum’s Visual Effects Supervisors on Terminator: Salvation, I spent 5 months on set in Albuquerque, New Mexico and 6 months in post-production. Over that period there was never a dull moment. We all became totally immersed in the filmmaking process and we knew from the outset we were involved in something very special. To deliver complete photo-realism to all our work required a dedicated group of Asylum producers, coordinators, technicians and artists. Modeling, texturing, tracking, match-move, rotoscoping, rigging, animation, fx-animation, matte painting, animation, lighting, rendering and compositing – every Asylum department in the pipeline contributed with exacting detail to the look that defined the extraordinary visual effects feast that is ‘Terminator: Salvation’.
It was an unbelievable journey and experience!
Rising Sun Pictures
Gregory Yepes and Sean Mathiesen, visual effects supervisors – Rising Sun Pictures
fxg: What did RSP’s work for Terminator: Salvation involve?
RSP: We had some pretty involved “day for night” shots which required sky replacement, selective colour treatments and enhancements to the environment. We produced some full CG stormy ocean shots with an osprey helicopter which included several different layers of rain and atmospherics. We also had stormy night shots with the Hunter Killer, a sequence with the Aerostat flying device chasing our heroes and some terminator hand replacement shots with Marcus Brody.
fxg: How did the aesthetic of the film impact on your approach to the effects?
RSP: A lot of the look of the film was achieved in the DI step done after delivering the vfx shots, but we did have to ensure that our imagery had the appropriate range of color values so it could get manipulated extensively in DI and still hold together. For the “day for night” shots we had to match the look of the DI much closer, due to the value ranges being limited to match the required darkness levels.
fxg: What kind of interaction did you have with the overall vfx supe?
RSP: We had very frequent chats with the overall vfx supervisor for the show Charlie Gibson very regularly. We would ftp the work to be reviewed as Quicktime movies overnight and then used cineSync to review the material over a conference call. We spread the work on T4 across both our studios in Sydney and Adelaide, so we would conference in both offices during our chats with Charlie. Charlie was able to mark up any specific instructions through cineSync which made it easy to recall the specific instructions later on during reviews with the artists. We would use a similar process to review or chat about things with other vendors, using the client-side vfx hub at Warner Brothers to share data such as models, textures and such between the different vendors.
When RSP got involved, the shots ILM were working on had already been quite developed. Charlie provided us with some of their final shots as reference and of course the trailers, which had already been released and had a wealth of reference material.
fxg: What kind of reference or previs did you have access to?
RSP: In some cases like the Aerostat sequence we had a very basic Avid preview of the action, so we had to go through the process of doing very basic blocking or postvis in order to ascertain the desired action. Once Charlie was happy with the overall composition we would then proceed onto more refined animation tweaks.
For the Hunter Killer/Submarine Destruction sequence, we received a rough animatic from Production, built from animated 2D artwork and video clips edited against the film’s dialogue shots. This gave us the tone that Charlie Gibson and McG were looking for. We then created low-polygon Hunter Killer and Submarine models as well as simple but evocative CG environments and started animating variations using Cinema4D. We would send these options to Charlie and Conrad Buff and then review the edited variations in cineSync. It took a few rounds of feedback to establish the best ideas and most effective storytelling before we transfered everything into Maya and started to polish and refine the ideas into their final shots.
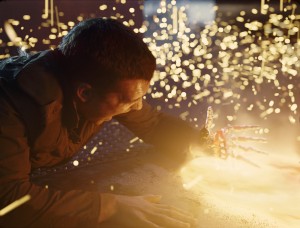
fxg: How did you approach the terminator robot hand shots?
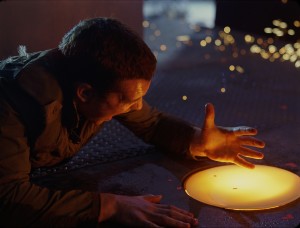
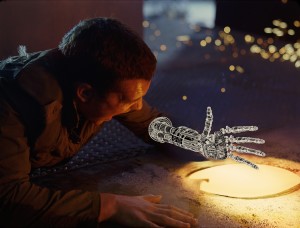
RSP: The terminator hand shots were a ton of fun to do, we were given a robot hand as reference and we decided to use Houdini and Mantra for these shots due to the extensive shader development that was going to be required. We also used some of the new Fluid Dynamics features in Houdini in order to create the molten lava elements. Doing the entire effect in Houdini allowed for seamless interaction of these elements with the rest of the terminator hand. We started off by painting out the entire live action hand of the actor and then carefully placed a CG version of the human hand to get a close match-move of the live action one.
Only after we had achieved a good match from live action hand to CG human hand did we then parent the cg terminator hand to the CG human hand. Since the terminator hand would be searing hot we added some subsurface effects beyond the metallic look to indicate the temperature of the hand. We also used the initial CG human hand to give us some scorched skin detail near the base of the hand to blend into the rest of the live action hand. We also generated several spark and steam elements as well as some touchups on the plate in order to enhance the effect of the heat glow from the lava.
fxg: Can you talk about the modelling work involved in your CG builds for the Hunter Killer, Aerostat and Osprey? What tools did you use to model and animate these machines?
RSP: ILM was the lead vendor in relation to the Hunter Killer, so we used one of their models as a starting point and only made adjustments as necessary during the texture mapping process which does vary from one facility to the next. The Aerostat was a new device for the movie so we did extensive concept artwork, using original concepts as a starting point, before we began our modeling work. The modeling work for the Aerostat, Osprey, Terminator hand and other props were done in Maya and the textures were done in Photoshop.
fxg: How did you achieve the explosions in the CG Hunter Killer sequence?
The explosions in the CG hunter killer sequence were mostly composed of several live action elements mixed in with CG debris. What made these shots tricky was having to match the appropriate speed and intensity of the effects in order to match the proper scale of the Hunter Killer. Using the previs we had worked up, we provided Charlie with lens and camera data for the submarine in the sequence. Then Charlie and the crew at New Deal Studios filmed elements of a static miniature submarine shape exploding underwater. They filmed several takes and from the angles that we needed for the sequence. These elements were scanned and combined in Shake with the CG submarine that we animated in Maya, as well as a few ancillary explosions, oil slicks and debris that we created with Houdini. Finally the water environment and algae/particles, also created in Houdini, were added for the final effect.
fxg: There’s a great deal of atmospheric work involved in the Osprey scenes. How did you execute those shots? Can you talk about some of the compositing challenges?
RSP:We spent a great deal of time during the beginning of the project gathering reference from documentaries and other movies showing stormy conditions. We decided to layer a great deal of CG atmospheric elements in order to create the desired effect, and some of these elements included: foreground rain, background rain, rain sheets, foreground fog, midground fog and background fog, and water spray. All of these elements were generated in SideFx’s Houdini and rendered using SideFx’s Mantra renderer.
One of the key challenges in these shots was not only creating the right stormy conditions but also to get the proper sense of scale in the effects. It can sometimes be really easy to make something feel like a miniature by not adding the appropriate amount of detail in the different elements, so we were very mindful of that. The other challenge was ensuring that all of the elements were illuminated consistently by environment lights and spotlights which required careful synchronisation of lights across several assets.
Interviews with Asylum and Rising Sun Pictures by Ian Failes
