Disney stereographer Robert Neuman discusses his work for the 3D conversion of The Lion King, recently re-released in cinemas. The project involved unarchiving the original Disney CAPS files, and the creation of an entire depth score for the film.
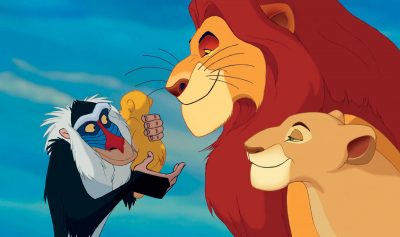
fxg: Central to the conversion of The Lion King was the ‘depth score’ you made, kind of like a color script or music score that matched the emotions and beats of the story. Can you talk about how that was developed?
Neuman: Well, we had the privilege of having the original filmmakers to work with, so the first thing we did was have a spotting session with the directors Rob Minkoff and Roger Allers and the producer Don Hahn. We watched the film a couple of times, once with sound and then again with the sound down, and basically I had them tell me from their stand-point what the big moments were and what their feelings were about the use of 3D. I bounced off ideas and made sure everything fit within their vision for the film.
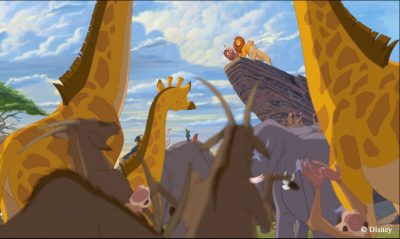
After that I would watch the film and basically chart out what I felt the emotional content was. I tried to quantify what the peak point of action was and make that a ’10’, and what were the quieter moments with expositional dialogue or that just were a breather in between action or big emotional beats, and these would be a ‘1’.
Then I created these depth mark-ups, which was really the most intense part. For the shots that are 10s, like Scar having his final encounter in the showdown in Simba, or the big emotional moments when Simba sees his father in the sky – for those moments what you want to do is give them the most stereoscopic depth as you can, while keeping it comfortable for the audience. In the quieter moments, I give it the least amount that will still make the shot look good. I want all the shots to have an aesthetically pleasing quality and feel like nothing’s cardboard in them.
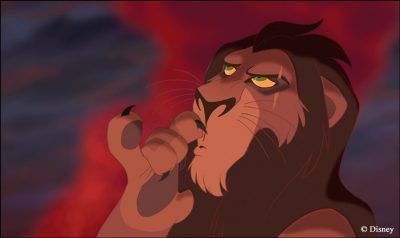
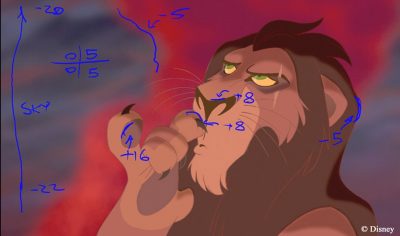
fxg: How did you work your way through the film?
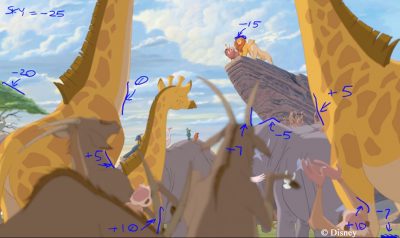
Neuman: The really tough part is going into those shot-by-shot. We have a system that’s part of our digital review playback system, that also has the ability for us to annotate the shots. What I would do is load up each shot from the film and, informed by how much depth I want to give it overall, I would construct these depth mark-ups. When you’re doing those, you actually have to do it monoscopically – almost the best way to do it is to close one eye and look at the shot and just imagine what it would look like in 3D. Fortunately, I’ve done enough CG stereoscopic films that I have the experience in setting cameras and knowing what kind of parallax I’m going to get from points in the scene.
So, I could look at the shot and imagine where I want things to be in 3D space, and then assign values to different points in the shot. I’d pick different features that would dictate what the structure of the shot would be, and try to assign parallax values to that. Let’s say there’s a simple shot where the camera’s locked off and the characters aren’t really doing anything complex – a shot like that I could just go through and mark-up one frame, which would define the environment and the character in 3D space. But for shots that had camera moves and characters walking in and out or moving upstage and downstage – for shots like that I would have to mark-up multiple frames. You’re talking about approximately 1200 shots in the film!
fxg: Once you’d done the depth mark-up, what was the technical process in terms of going back into the original film and files?
Neuman: We started earlier by restoring the original CAPS files [Disney’s digital ink and paint Computer Animation Production System]. We had our tech team write scripts that could re-create the CAPS operations as modern compositing nodes, and basically build a compositing graph that re-created the CAPS imagery. They would find all kinds of arcane things. This was done in 1994, which is a lifetime ago in terms of computers. So they might have a ‘turbulence’ node – well, what does that mean in terms of modern compositing operation?
It was then a matter of running the extraction or do-archiving scripts on each of the sequences and then pulling up each shot that resulted from it and doing a diff on the images to see if the newly extracted one on the re-created graph matched the original CAPS. Once we had a match we knew that the shot was good for the artists to work on.
fxg: Did that still entail much other work like roto or other preparation?
Neuman: Yes, but the roto work was all done totally in parallel. Each artist did a whole shot basically from running the extract script to saving off the final image. Any kind of roto work required for each shot wasn’t done in preparation, it was done by the artist. The basic workflow included separating backgrounds, overlays and characters. But if the characters are interacting, there was a tendency to animate them back then on the same level – that way the animators could work out all the interaction between them. We used Shake to composite the elements back together.
fxg: One of the interesting techniques I’ve read that you used to achieve the depth maps was a kind of character sculpting with gradient primitives. Can you talk about how that worked?
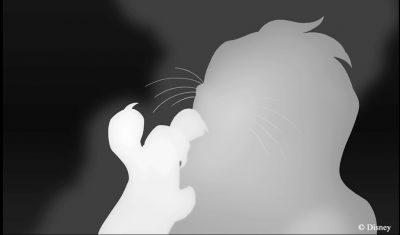
Neuman: There were three main tools for creating the depth maps. One was just the most basic level for the character, which was just to give them a roundness, a puffiness. It was as if you were going to cut out a mylar balloon in the shape of say Simba and start blowing air into it. What you get is a general puffiness, but you don’t get any specific articulate shape. You don’t have one leg out in front of the other or the muzzle out in front of the mane. But you do have this really good starting point which is a nice rounded character.
The challenge is then to add structure into that. We have tools to create these primitive gradients – cube primitives, ellipsoid primitives and joint primitives. The cube primitives would be used to add structure to something. A human face or lion face tends to have facial planes – planes of the cheeks or planes along the front of the face. By combining these cubes which we could track in with the motion of the character with the general rounding, we would get something that would have that rounded quality plus have that structure that the cube created. It would be a layered thing – primitive upon primitive.
Then we could add joint tools, say for the legs. The joint tools would create a gradient that followed along an IK chain. We could then dial in the value at any cardinal point on that chain, and that would allow us to articulate the limbs. For other things, say if we wanted the nose to pop out more, we could track in an ellipsoid primitive. So it was just the layering and combination of these primitives along with the general inflation that would give us something that started to look like the character.
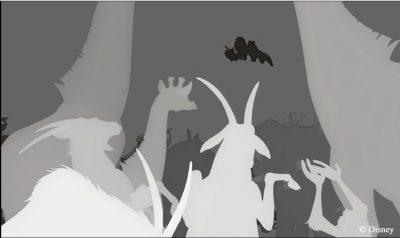
One of the other things we developed was an intelligent depth painting tool that would allow the artist to give little gray scale hints at different points of the character. They could put a little dab of gray of varying values at different points on the character and they would begin to blend to form a depth map that strikingly begins to look like the character as you add more locations.
fxg: Was a similar approached used to add depth to backgrounds? And how were effects elements like dust and rain dimensionalized?
Neuman: For backgrounds, we used the same gradient tools, although it was simpler because obviously they didn’t have to animate. If we needed to do Pride Rock, say, a stack of cubes would be something we started with. For more detailed stuff, artists could also just go into the original background plate and actually paint in detail if they needed to.
For effects, say for example the column of smoke during the climatic fire sequence, it basically has a rounded type of quality. So it didn’t need much more than that general inflation. But rain was a different matter. The challenge there was that we had the original 2D effects-level artwork that was drawn for the rain, and we needed to take this flat curtain of rain and make it something volumetric. We didn’t want to do what they do sometimes with conversions where they create CG particle effects and add it on top – we wanted everything to really be rooted in the original artwork. So what we did was just took the original rain effects level, and we would duplicate and scale it to create a volume. We’d scale it up and move it closer to camera, for example, and that would allow us to create more of a volume. To vary the depth even more, we had some fractal noise patterns that we would use to modulate the depth of the drawings to break up the individual curtains.
fxg: The other aspect of this conversion of course is enabling the artists to see the results at their workstations – how did you accommodate this need?
Neuman: Every artist working on the conversion had a micro-polarized 3D monitor on their desk, along with their regular color-accurate monitor. Any shot they were working on they could see in real time in 3D. Beyond that, some things are hard to gauge. If you look at the way micro-polarized monitors work, they’re interlaced so you’re only seeing every other row of pixels. That doesn’t give you enough details to judge certain looks like ground contact. So we have some visualization tools that allow us to take a depth contour and slide it through the shot.
We then had this (usually) green line and if it was traveling through say Scar’s paw and it was also intersecting the ground plane at the same place, we’d know we’d made good ground contact. So those kinds of things allowed us to really accurately dial in the depth. Then we also had ways to drag the mouse over any part of the image and get a read-out of what the depth was, which was extracted from the value of the underlying depth map we’d created to make the image.
fxg: If you were making a 2D line-art film now and wanted to produce it in stereo, how would you approach it? Would it be a similar process to what you did for The Lion King?
Neuman: It would be. In fact, we had contemplated doing stereo for The Princess and the Frog, and just timing-wise it didn’t work out. But we would have taken largely the same approach. Through the experience we had with Lion King, there’s certain things we’ve learnt that we could do while the film was being animated that would expedite the process. Part of the thing you’re always trying to do is isolate certain parts of characters which aren’t necessarily designed that way – you don’t always have a line that’s closed off that would allow you to use keying or paint-based tools to select an area, which you want to do to isolate parts of the character to have control over articulating their limbs, for example.
If you were actually going to be doing this concurrently, it would be quite easy for whoever is animating it to create a self-colored or invisible line that would close off different regions and allow you to isolate them. I would probably take an approach like that, but essentially I would do the same thing because there’s really no other way to get volume into the characters.
Images and clips copyright © 2011 Disney Enterprises, Inc. All Rights Reserved.

Hope to see it in Shanghai cinema.
Pingback: El Rey Leon en 3D « miguecartoon
Pingback: The Lion King 3D : in-depth With Disney | CGNCollect