With more than six million views on YouTube, Honda’s ‘Hands’ commercial has been watched and re-watched by everyone from racing car enthusiasts to leaf blowing gardeners. Such is the incredible scope of the extended spot, which features a set of hands folding, twisting and turning iconic Honda products from over the years.
We talk to some of the VFX minds behind the TVC – Nexus Productions technical director Dave Walker, Analog Studios director Mike Merron and Analog lead 3D artist Simon Reeves – about how they filmed with real hands, proxy models and then created the final Honda icons in digital form.
fxg: Where did you start with a project like this?
Dave Walker, Nexus: The way we split it up was Nexus (which was also the production company) did a lot of the previs and the animatics stage and then shared animation with Analog. We had a script and general idea from Wieden + Kennedy. We did the storyboards and turned that into a board-a-matic so that we had some rough idea of timings. And from there we started doing some more live action tests – actually just recording the director’s (Adam Foulkes and Alan Smith) hands on a 5D with some proxy objects. We planned it out pretty minutely really, what hand was going to be where, what action we needed to do to get the transformation into the next object. At the same time Analog did lots of tests of tracking data.
Mike Merron, Analog: After having thought about this being a tricky thing to achieve seamlessly, internally what we started doing was shooting our own tests with a fixed POV and trying to figure out how we could track through different cuts. And also exactly what the hands were holding, knowing they’d need to animate and move and guide animation. We ended up cutting out little bits of cardboard and stitching them together and making little rigs and shooting that to see if we could track to it, and also what happens if we had say a little motorcycle and needed to make it the size of a car.
We messed around with different bits of foam and tracking markers and cardboard and we’d cut it up and then try and use some sort of crude mix and overlay method to get the hand in the right kind of position, drop in another section of tracking geometry and then continue the motion. To make sure that was working, we had to get that straight back into Nuke, and using the warp tools we had to stitch and patch our way through different takes. It was working pretty well even on basic models and little metal toy cars with tracking markers.
fxg: What was the planned approach with filming with the proxies?
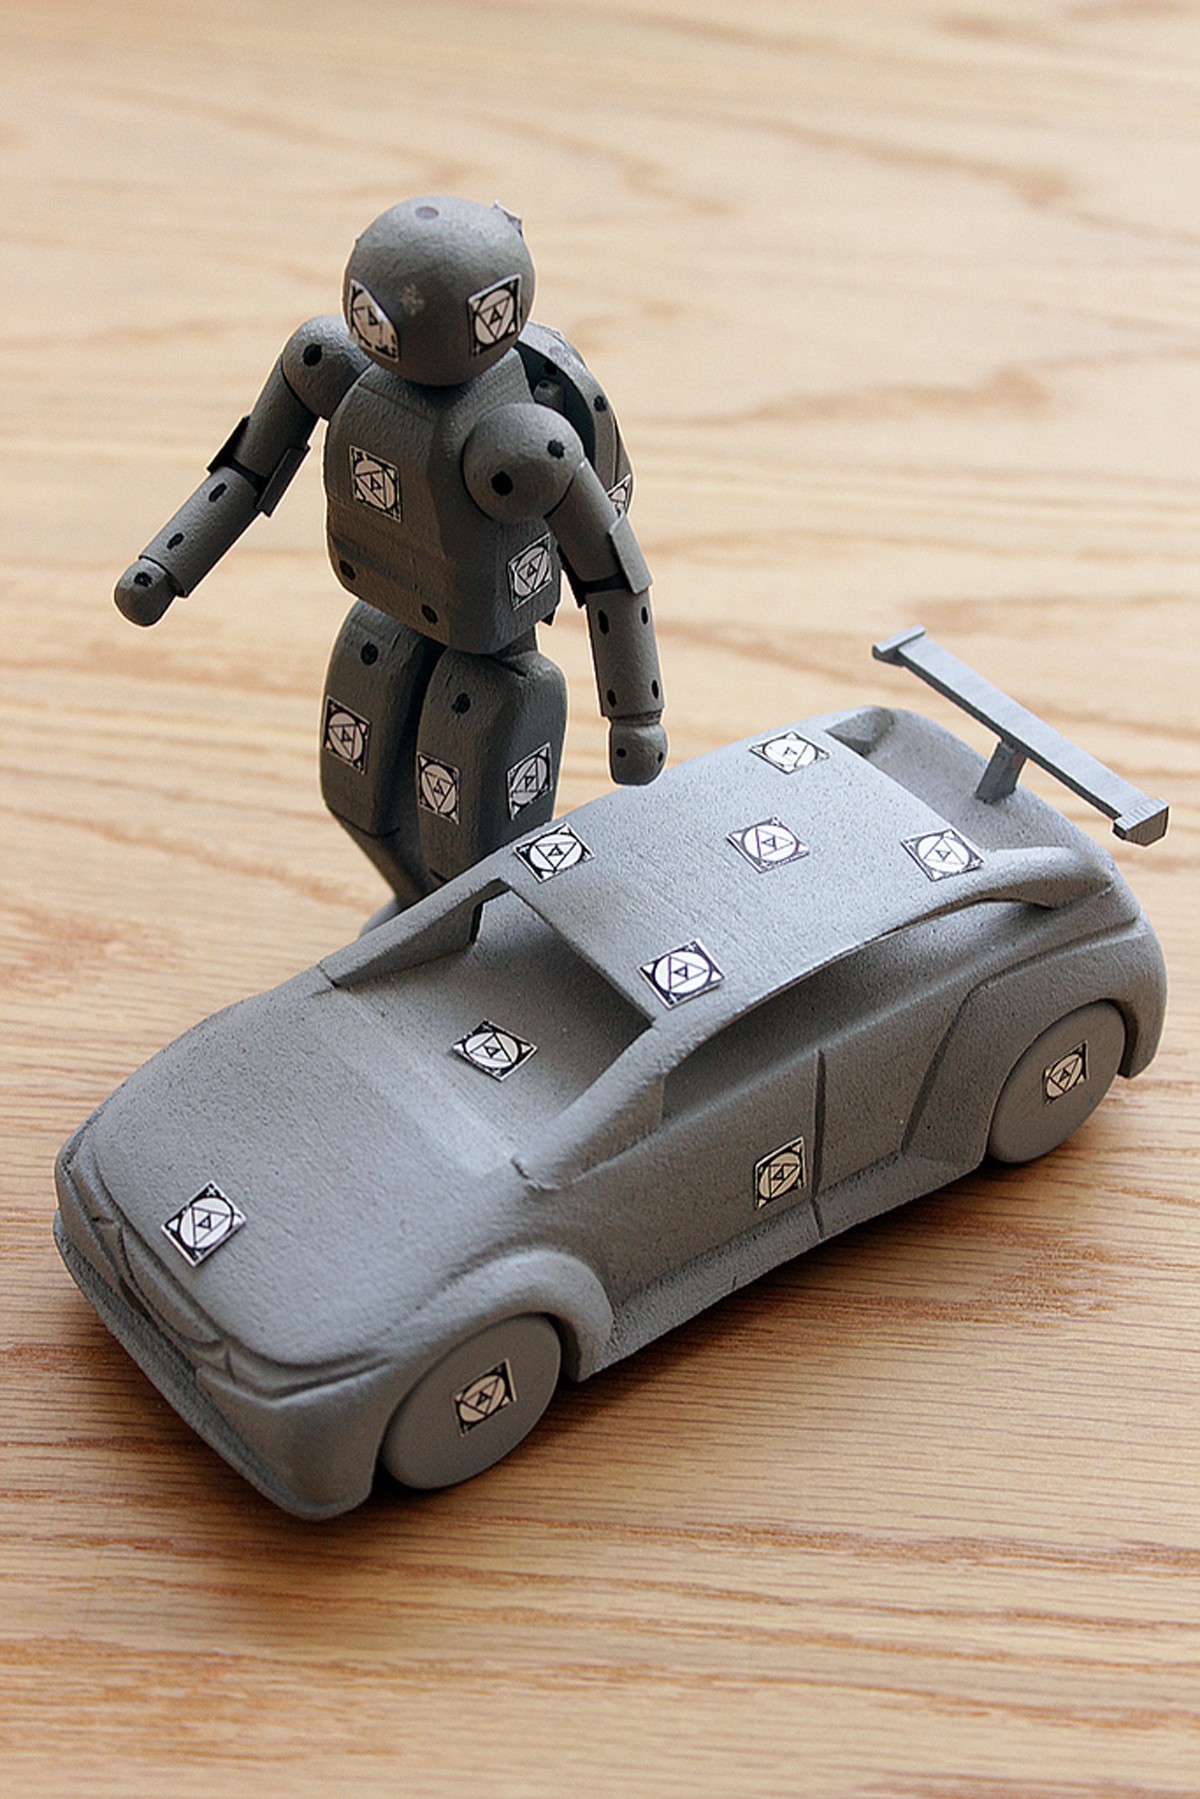
Walker: From our point of view, it was important for the performer to actually have something for him to physically manipulate. We did a few tests with him not having anything in his hands and not only was it impossible to track, it just didn’t have that weight to it which kind of sells most of the transitions. We worked with a company run by Andy Gents, a modelmaker, and he very quickly knocked up 20 or 30 different models for us out of wood. Ideally we would have liked to finish the CG modeling first and then had the vehicles 3D printed because then everything would have been the right size. But the schedule didn’t allow for that so they were both being modeled and manufactured at the same time. They hinged things and put wire through them and then we planned it all out.
Just some of the Honda products in ‘Hands’
2RC143 bike
2013 Honda TT Legends Fireblade
HB25 leafblower
CR-V
Honwave T38 inflatable boat
2015 NSX concept
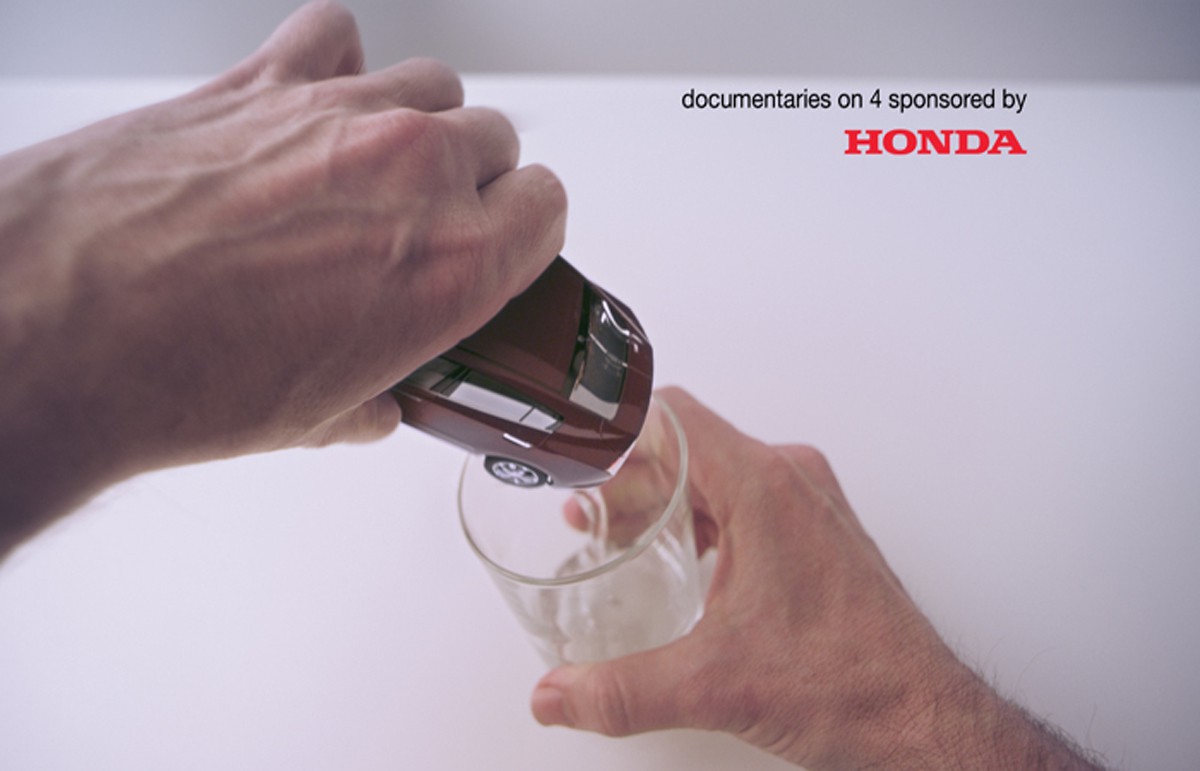
FCX Clarity car
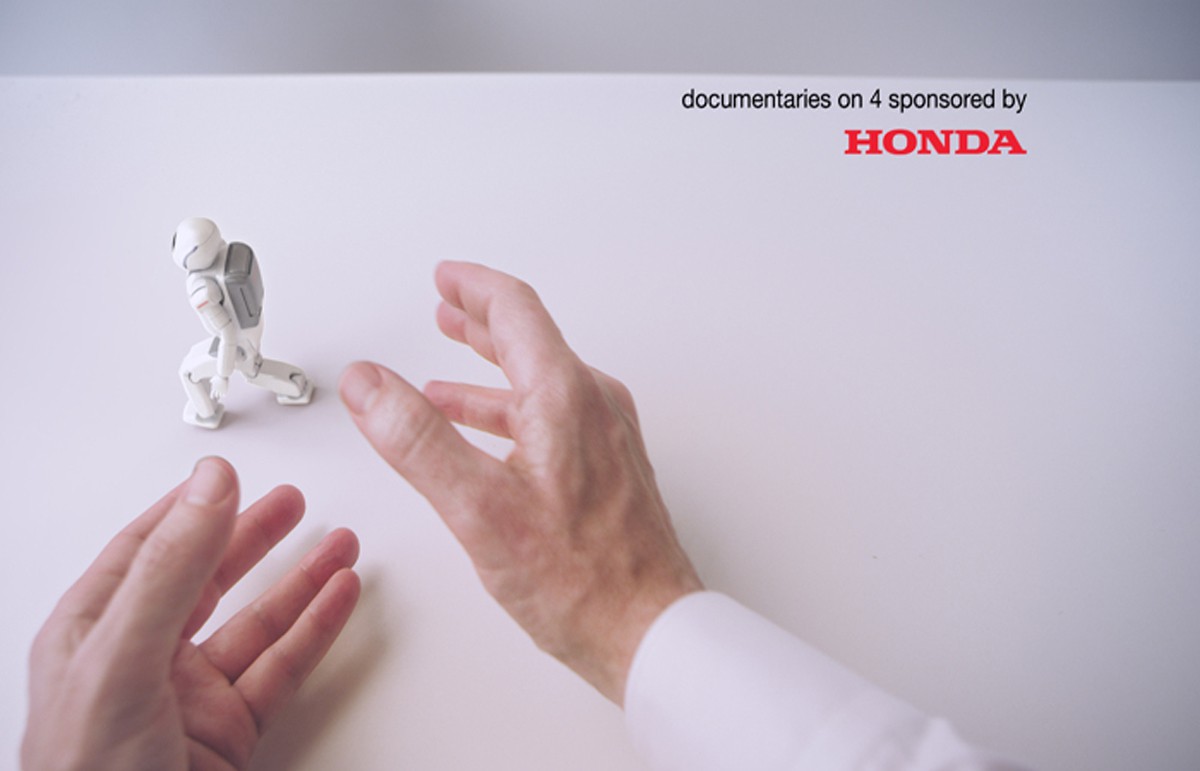
ASIMO
1990 NSX
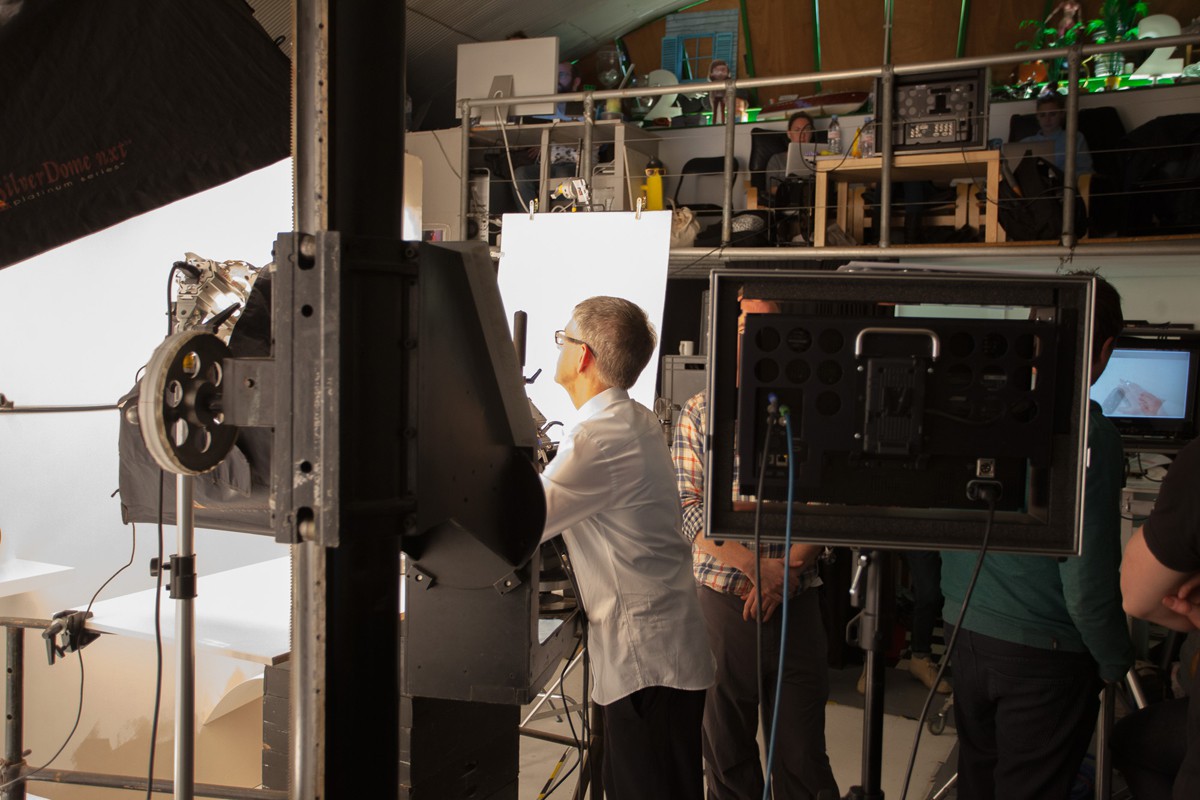
fxg: What was the studio set-up?
Walker: It was all about getting something that felt quite natural. In terms of the actor, he had to be fairly comfortable in an almost at-rest position with his hands in front of him able to do the work without any straining. We shot it on a RED EPIC which gave us a very compact front end, so he could have it almost underneath his chin, with a monitor off to the left hand side which gave him a view from the camera. Then it was quite difficult for him to actually get his hands in the right position because he wasn’t actually looking at his hands – he was looking at a referenced image.
Some of our rigs required centimeter accurate hand positioning to get it right, and if he’d been off by a couple of millimeters there’d have been a gap between where his thumb was and the bit of geometry where it was supposed to be pulling out – so he did a very good job on that. In terms of lighting, it was was a pretty standard sort of room. It was supposed to be an engineer’s desk. There were a couple of shelves in there with some piston rings and other objects.
fxg: And you mentioned the animatic earlier – how closely did you follow that?
Walker: The animatic was very important, so we had very well established hand positions for every object that gets replaced. After he’d done the action on the specific rig, he’d hold his hands roughly in place, we’d swap out the rig for the next piece of geometry, and then spend a couple of minutes lining it up by eye and would do the mix via overlay, he’d do the next action and he’d hold it again, and the process would go on. We were almost editing it in our ends as it went along, with the last shot we got being the preferred take and then we’d match it to the start position of the next take. It was maybe about 30 or 40 different takes.
fxg: How successful were tracking markers and tracking software here?
Merron: For the tracking we used PFTrack to work this all out. The tracking markers themselves – we re-modeled those and made sub-divided sections of them. We stuck the markers on the models, but they weren’t used specifically for point-based tracking or anything quite that manual. They were essentially just a back-up. We placed the tracking markers on in places that we thought we would need them, took the models back to the studio here at Analog. And then we scanned each model in on a turntable using the Artec scanner. So we had a linear 3D model of the geometry used in the shoot, and we also had a position of where those tracking markers were. So then we could have a little 3D model of those tracking markers placed onto the scanned models, and used that to drive geometry based tracking in PFTrack.
The really nice thing about that is that most of it was fairly automated to give us some decent key frames, and then where it does kind of slip you can use those tracking markers to do manually pinning for certain key frames. If the hand occluded certain sections, it came in really handy.
fxg: Was there ever any consideration towards doing CG hands?
Merron: It was never going to be a CG hand spot, that just wouldn’t have looked right. We did scan the hand actor’s hands using the Artec scanner – the idea was that then all of the hands would be roto-animated to give us contact shadows, reflections and a clear occlusion and shadow method to put back onto the objects. Also as part of the shoot, we used witness cameras which in our initial tests proved to be quite good. The tricky session came afterwards when we had to work with Nexus roto-mating the hands. We know that they’re grabbing these props, but with the CG props which might be a slightly different shape and what-not – even though the witness-cams are there and you’re animating from the main POV, even if you’ve got the fingers in the right place, sometimes they didn’t feel like they were touching the actual CG object. It was very tricky!
Walker: In terms of Nexus’ animation, that was ultimately the hardest thing, trying to get two minutes of high quality frame-accurate hand animation with five fingers and lots of bend. In the end the only solution really was chucking multiple people at it.

fxg: How did you go about building all the Honda products?
Walker: We got reference from the agency and then continued our own sourcing from the internet. Being a Honda job, they were very picky about small details in each of the pieces of geometry. Even down to the leaf blower, it had to have the right number of screws in the handle. That took a lot longer than expected, to be honest. It was fairly painless but went through a revision process. We worked in Maya and Max.
Merron: Analog also used Max and Maya. Initially we weren’t going to re-topo any CAD data but because we knew it would go back to Nexus to be animated, where it had to be re-topo’d it was and where we could try and get away with having actual CAD data, we preferred to use that.
Simon Reeves, Analog: We had very long shots, so there would potentially be ten products in one shot, so reducing the amount CAD stuff we could get away with was helpful.
Merron: It became quite unwieldy trying to manage all these models in one render, so having all these models ready to go with point cache on them needed to be detailed in the right places. We had an established car rig, that allows us to add cushion to wheels and suspension. And on the dirt bikes that had squashy tires. The same with the quad bike that rides over the hand. We used the Analog-scanned hand so we had an almost exact topologically accurate representation of the hand that we could drive over the top of with the quad bike.
 fxg: And then for animation, how did you plan out and do the transitions?
Walker: We’d laid out exactly what we wanted to happen in terms of the hand positions across each of the transitions. We had an idea of the pacing and how fast they should take place. We would then roughly time out when things morphed into each, so occasionally we had geo on top of each other and lots of stretching and morphing of one object into another and turning on and off different things. It was trial and error basically to see what worked. There was also lots of secondary animation put over the top like wheels bouncing up and down or suspension cushioning whenever things are moved around. We just really had to chop up models and know where the cuts had to be. The vertex count had to be kept the same for when they were doing texturing, lighting and rendering, everything would just work.
fxg: There’s also a fair amount of effects work from water to leaves and other things – how did you handle these?
Merron: The water coming out of the bottom of the Clarity, for example, was mostly in-camera. Andy Gent had rigged up a tiny little tube through one of the solid models of the car, and sections of that physical model had foam to grip, so as he would pick it up he could grab the solid parts of the car and squeeze the foam and at the same time they would siphon in some water through the tube and it would run out the end. Once we laid the CG car onto that, there’s a section where it has to link to what comes out of the exhaust and when it falls back onto the plate again. So rather than use anything too complex, it was a very simple method. We used standard particles inside of Max but then using Frost from Thinkbox to mesh those particles together. We could do a little droplet that comes out of the exhaust and wobbles around a bit – a simple cloth body sim mixed with Max particles dropping out and lining up with the shot piece of water. With Frost you can mesh together different sections of geometry, be they particles or soft bodies, into mesh. From there it’s pretty simple to shade it to look like water.
The smoke and what-not is FumeFX which is fab. And the particles for the leaf blower – the Civic bursting out of the Fireblade – that was a combination of Box#2, a dynamic particle simulator inside of Max, and also SimCloth, an old Chaos Group plugin. It’s pretty old-school and not many controls but very simple to get good cloth to blow around without having to do anything too heavy on the simulation side.

fxg: What was your rendering tool of choice?
Reeves: We decided to use Softimage to render through V-Ray. It worked out really well.
Merron: One of the reasons we decided to use Softimage for the rendering via V-Ray is the point cache stuff coming back from animation – because there was so much geometry coming back from Nexus, almost like duplicates of cars – where it would go from a solid car in the pack shot, then it would swap out for a different piece of geometry in the same place which would be bending or folding or doing all sorts of other animation. That would mean the Max files were completely clogged with models and geometry and point caches, and so was incredibly slow. But Simon had written some nice ICE compounds which would alternate the caching and the model side of it – we could scrub forwards and backwards inside of Softimage and we simply couldn’t do that in Max. But Soft and V-Ray with this amount of geometry was amazing.
Reeves: And in the end it was split between five or six shots. That meant we had ten objects or up to 13 objects in there, and each one of those had five passes, say, so that meant we had upwards of 30 passes in the scenes. That would be fairly difficult to manage in Max, but in Softimage it was much easier to cope with all those passes, switching between them, loading geometry and caching in and out.
Merron: If we had stuck with a render pass manager instead of Max for handling passes and that much geometry, we would have spent more time waiting to render than actually rendering – so spending any time creatively lighting and shading would have been very difficult for us.
Walker: It was exactly the same at our end. In terms of animation and the rigs, it wasn’t that bad because we were a lot of the time using proxy objects. The last thing we do is switch over to the proper topologized objects. Some of the geometry we were modeling was so high res like the tires and the CAD data coming through was thousands and thousands of vertices. As soon as we started turning all that on, our machines started choking as well.
Merron: It was like 25 pack shots in a row! That’s a lot of high res data.
fxg: How were these shots, or what seems to be one long shot, composited?
Merron: It was all Nuke. On the face of it, it seems very simple – you’ve got one locked camera perspective and a white background and hands. And you’ve got him holding a model and you think, ‘Oh, I can see what has to be removed, paint it out, overlay a 3D model on top which should cover that completely…’. The initial ingredients were all very straightforward but what you realize very quickly is once you start painting out or removing the gray objects, what’s behind on the white table are very soft and subtle shadows – it’s very easy to see the paint strokes or clean masks or parts running through it. So blending those soft gradients and shadows together proved incredibly difficult.
The other part that was very hard was that these hands and fingers are articulating very finely and all the gray models had to be removed. So through the RED camera, we got Andy to slowly rotate his hands in different positions, clench his fists, show each finger individually to try and get as much clean plate reference through the hero camera as possible, and not just rely on photos which can be difficult to comp through. That was made a lot easier, I must say, by Nuke Assist, which means we could have a few extra people without having to buy extra licenses.
It was made of about 40 different takes and squeezed into six sequences with positions me and Dave had discussed would work for a natural cut, and which would enable us to get into each of the different sections. So for example, the TT will explode into the little yellow car is a great spot because the hands leave frame or become very static. The other one is the Clarity where he picks up and does the drink with the glass. With all those 40 takes, the morpher became absolutely critical in Nuke – mix and overlay was great and would get you almost all the way there on the shoot – but the spline warper inside of Nuke was the weapon of choice to get this to be seamless.
Credits:
Client: Honda U.K.
Head of Marketing: Olivia Dunn
Creative agency: Wieden + Kennedy, London
Executive creative directors: Tony Davidson and Kim Papworth
Creative team: Chris Lapham and Aaron McGurk
Producer: James Guy
Client service: Laura McGauran and Paulo Salomao
Production Company: Nexus
Directors: Smith & Foulkes
Executive Creative Director: Chris O Reilly
Producer: Tracey Cooper
Production Asst: Fernanda Garcia Lopez
Director of Photography: Clive Norman
Editorial Company: Trim Editing
Editors: Paul Hardcastle and David Slade
VFX Companies: Nexus Productions & Analog
Physical Models: Andy Gent
Pingback: Making of Honda Hands | 3D News, Tutorials, Anwenderstories rund um Ihre Lieblingssoftware
how much did the campaign cost? for my GCSE media studies coursework, i’d really appreciate of you could get back to me asap