When Microsoft announced the Xbox One in May 2013, Ryse: Son of Rome was confirmed to be one of the first titles available for the next-gen console. For Crytek, that provided a chance to develop a game with characters and environments seen in a level of fidelity they had not previously tackled.
“In the past,” Crytek art technical director Christopher Evans told fxguide, “we had really focused on a polished experienced for the main character and then good looking characters for two, three or four main helpers to the protagonist. The protagonist on the Crysis franchise always had a mask and it was a first person game. So it was the type of game where we put more rigging work into the hands than the face! But on Ryse, one of the key pillars was ‘six feet to six inches’. We had this on posters around the office. When we looked at the next-gen hardware working with Microsoft – we tried to think, ‘What’s the biggest benefit here?’ And we felt we could really make characters that serve the story and get an interesting type of emotional intensity in the gameplay.’”
One example of this was that during gameplay, the camera could zoom in extremely close to the characters at any time. Crytek wanted this to look as high fidelity as a CG film, or a pre-rendered cut scene on a previous console generation. “A lot of us on the graphics side are always looking at films and cut scenes,” says Evans, “and wanted to have that same visual fidelity between more linear, story-driven moments, and the game itself.”
So how did Crytek achieve this? Partly, it involved implementing more of a film pipeline into the existing game workflow at the studio. But it also required continued development in the areas of virtual production, facial rigging and animation, cloth simulation, lighting and rendering, caching and destruction tools.
Virtual production
Looking to take advantage of the XBox One’s next-gen features, Crytek sought to improve the facial appearance of its characters. “In CryENGINE, we wanted to see a character seamlessly walk up to you and start talking, have it look like a cut scene or as close to a very hyper-realistic character as possible,” states Evans. “To do that, it meant taking aspects of film production methodologies and strong-arming them into a real-time rendering pipeline. The issue is that to do this successfully, you need people who have done both, lived in both worlds.”
See how the virtual production took place in this behind the scenes clip.
Performance capture: That involved moving to a Maya workflow and continuing the reliance on virtual production. For Ryse, Crytek looked to Andy Serkis’ The Imaginarium to provide both body and facial performance capture services. “We were actually their first project,” relays Evans. “We wanted a partner that was invested in getting those performances from the stage into the game. Andy Serkis and his team were really invested in that. We all saw the promise in a next-gen launch title, and the chance to set the bar for what players can expect from storytelling on these new hardware platforms.”
Imaginarium relied on Vicon’s T160 cameras with Blade 2 software for capture. On the stage, a special ‘cut’ of Crytek’s CineBox was used for virtual production to preview performances in real-time. “This allowed our director to look through virtual camera hardware that we built and see the actors and environments in the game engine. This allowed him to make rough blocking and layout or lighting decisions on the stage.”
“We had white-box versions of all of the characters there running live on stage,” continues Evans. “We even had an elephant for the Boudicca scene. For that the performer was riding an improvised saddle and we could see her on the elephant and the director Peter could make decisions about how we wanted to shoot different things based upon a better visual representation of what he was seeing.”
And that virtual production process continued in CineBox after performance capture was finalized. “It was a real benefit,” says Evans. “As the cut scenes are coming together, you’ve already selected your takes and the actors have already wrapped months ago, but Peter had the ability to step into those scenes with the virtual camera and re-shoot camera on the final, high fidelity, cutscenes.”
Facial capture: A major decision by the game makers was whether to go with a ‘4D’ capture approach, that is, also capturing a mesh diffuse video for the facial performances separate from body capture. “My background is in rigging,” says Evans, “so I really felt strongly that I just wanted to see how high a fidelity facial rig we could push. That basically means parameterizing and driving the facial rig with the headcam data from the stage. A 4D approach may seem romantic, but it has so many issues we could be here for hours if we get into it.”
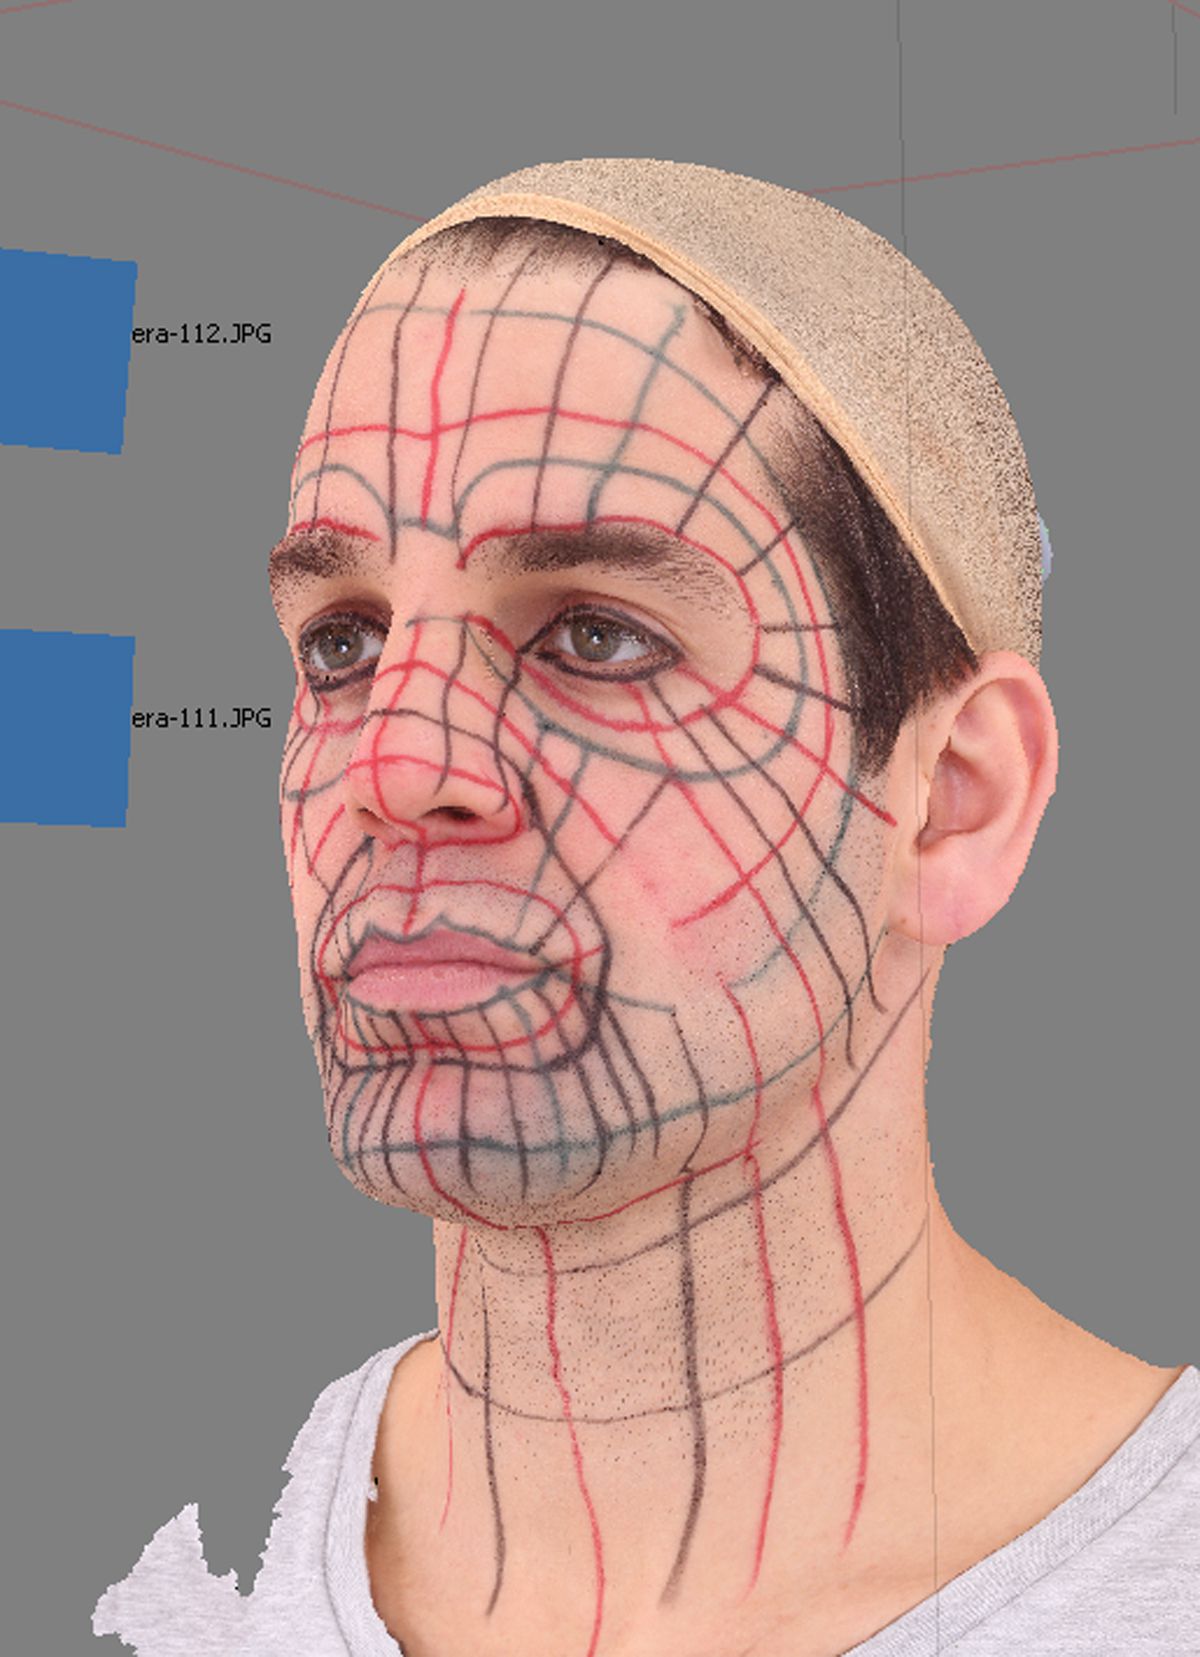
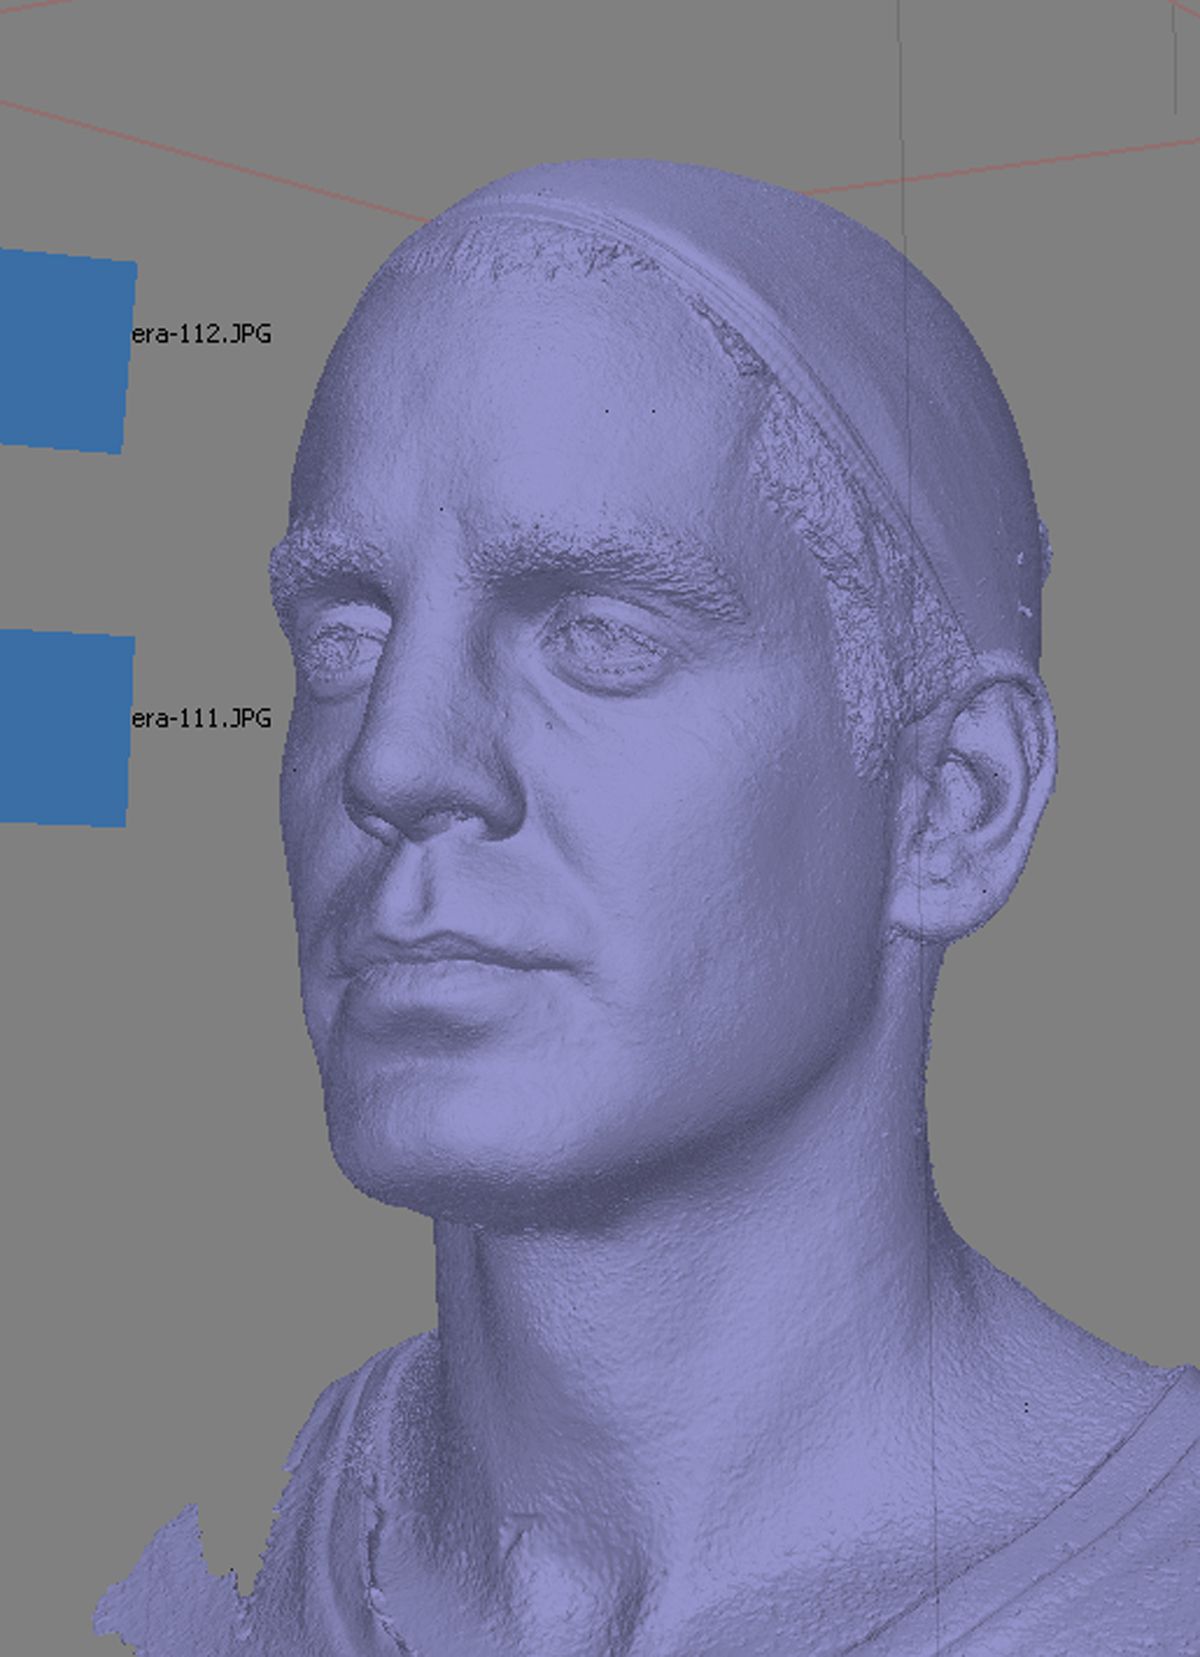
Ultimately, the faces seen in the game are facial rigs, and so required lengthy FACS sessions for each performer – a task undertaken by Infinite-Realities. Markers were drawn on their faces to track skin sliding, with just neutral scans acquired for a diffuse pass. Crytek worked with 3Lateral and Cubic Motion on different aspects of their facial pipeline. 3Lateral is a rigging outsource vendor, headed by Vladimir Mastilovich. “Vlad and his team are some of the best facial guys I have ever worked with,” says Evans. “The goals of Ryse were aligned with the goals of what Vlad and his team had dreamed possible. We basically set out to get film-quality FACS rigs running on console hardware.”
Evans explains that after the stage capture, “we would take the head-cam footage from The Imaginarium and we would send that over to Cubic Motion, who would run it through their solver to get a first pass. They’d have a suite of software from us allowing them to work in-engine. Cubic also used some Maya tools from us that allowed them to check all of the performances in-camera and they can make decisions themselves about facial occlusion and who’s looking where.”
The facial animation would ultimately be married with body mocap using Crytek Scene Manager, another Maya tool the studio has written. “This allows us to load a complex scene with everything turned off,” says Evans. “We can say, ‘Hey, I just want this guy’s head hi-res, this guy’s head and body with a LOD, and assemble the scene like that. Our facial rigs were pushing 400 megs per Maya file. If you reference in a 400 meg face – on some of the ship scenes we just have a tonne of soldiers standing around it was just enormous – so the animators really needed a way to work interactively.”

Facial rigging
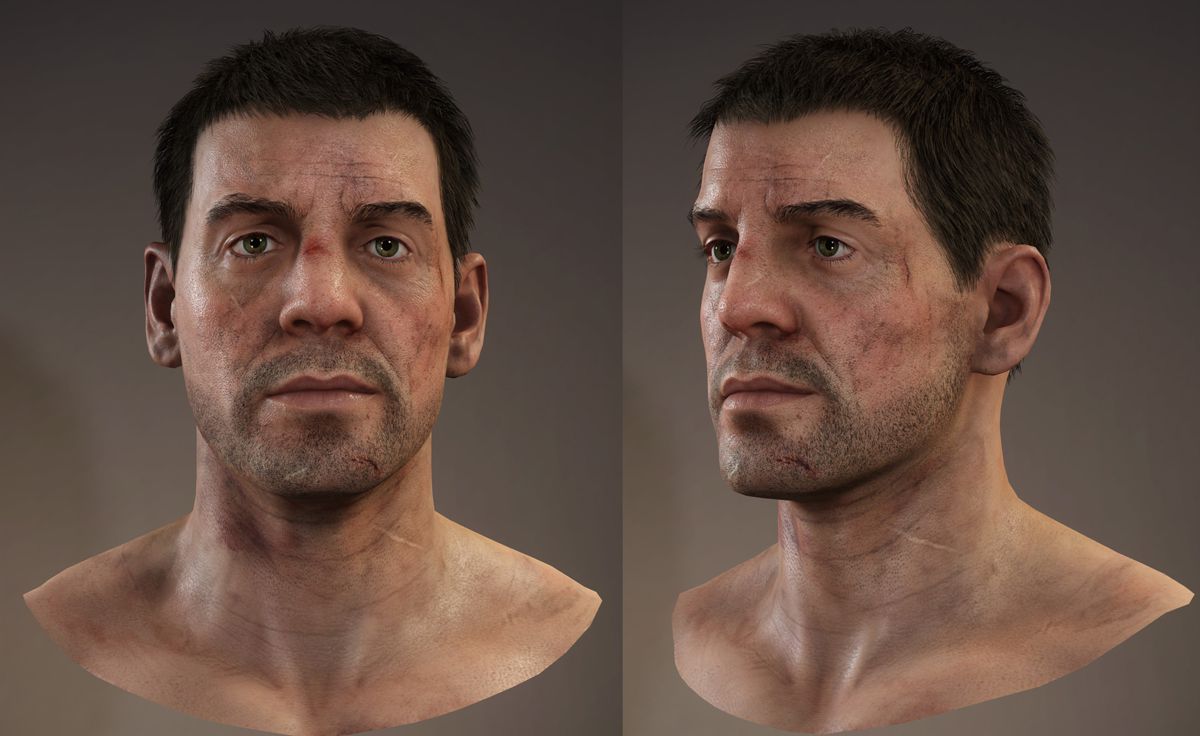
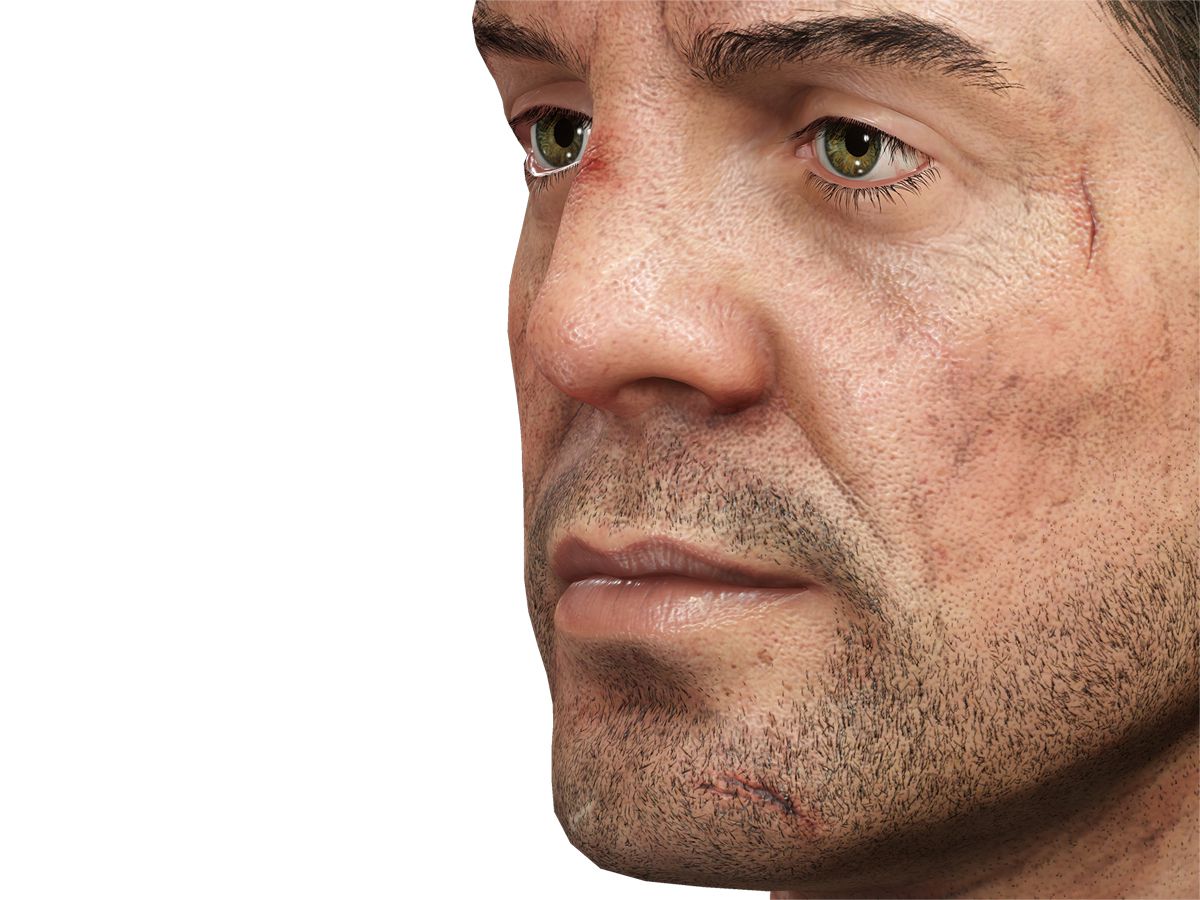
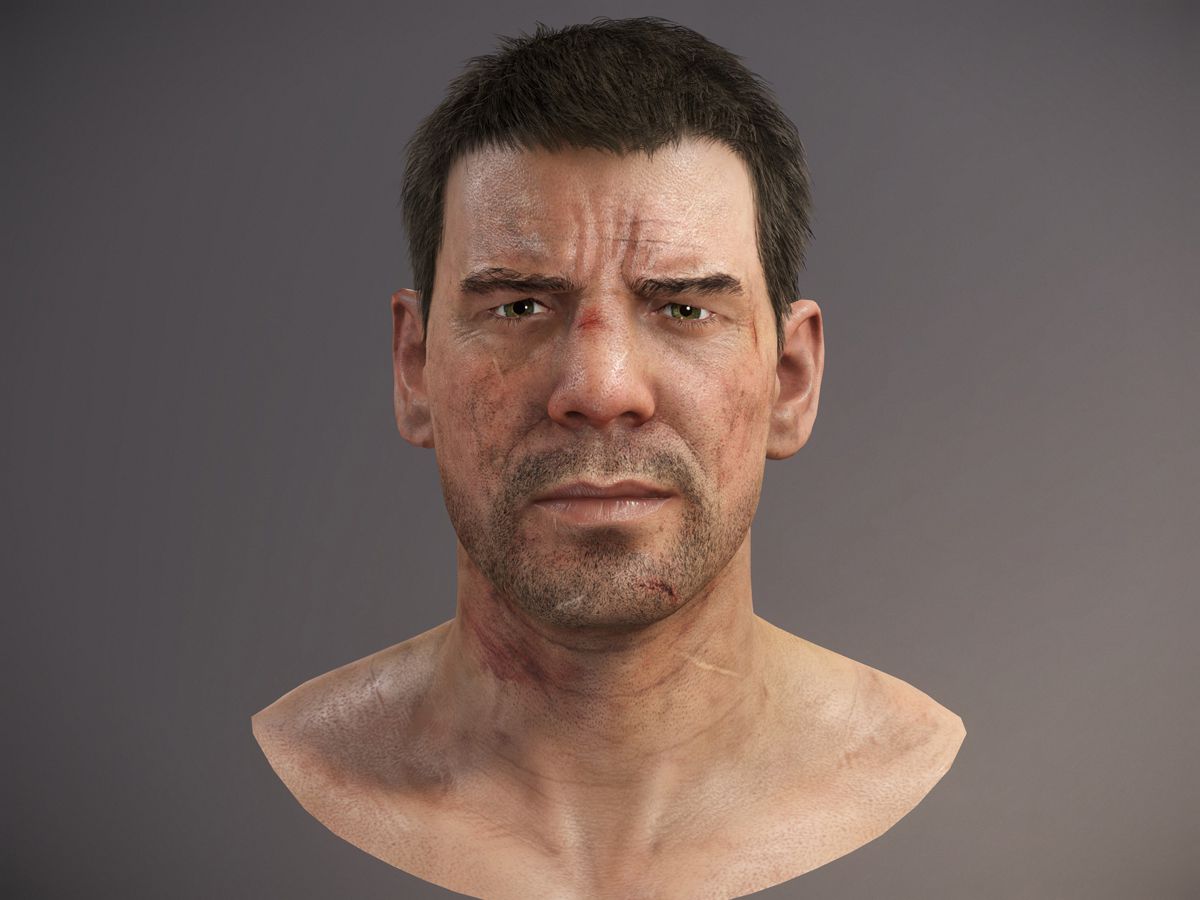
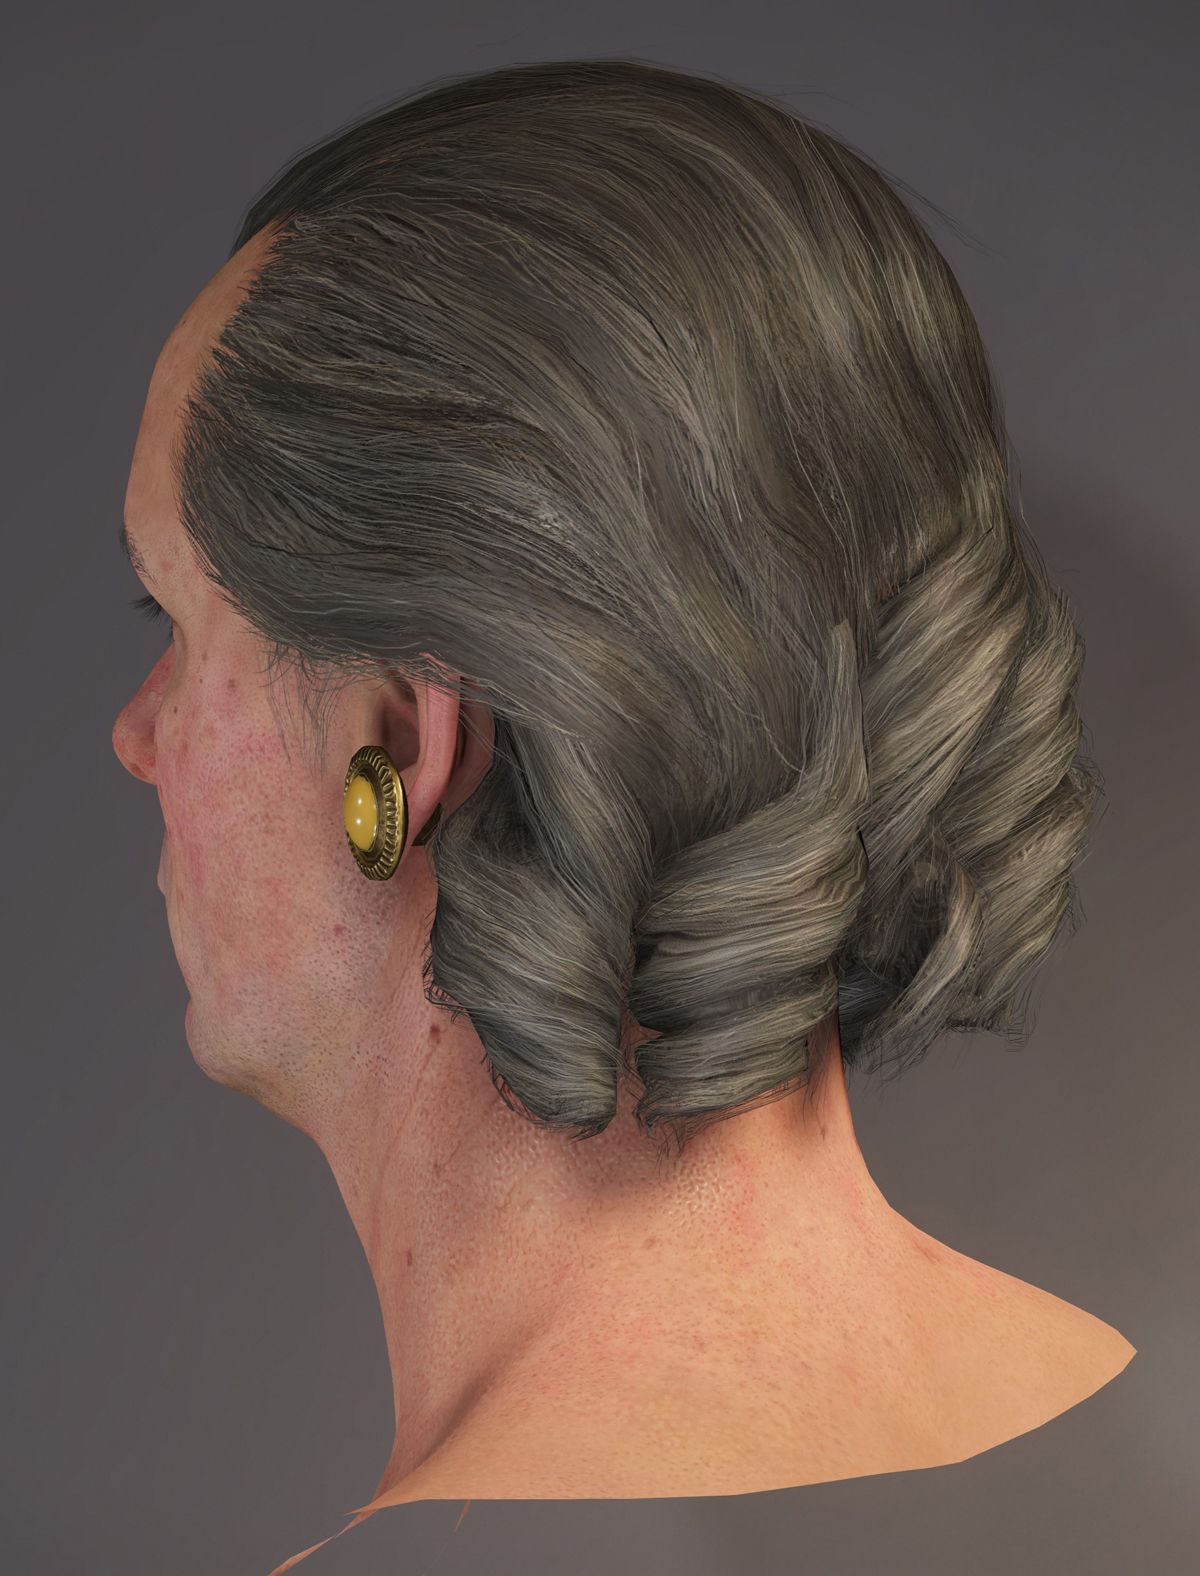
Ryse’s central character, Roman general Marius Titus, has 260 facial joints and 230 corrective facial blendshapes (the complex nature of his face meant that Crytek had to outsource extra rigging to 3Lateral for this human intensive work).
Blendshapes: The way the faces worked involved having blendshapes running as ‘fixer’ shapes on top of the joint-based rig. “All of this is to try to target that initial blend shape rig you had,” explains Evans. “You roll the blend shape rig out to animators – it runs faster – 40 Hz in Maya, whereas the joint-based rig and the joint-based logic to hit that blend shape rig, that runs at 8 frames a second and it’s super heavy and takes a long time to export.”
“But having the blendshape fixers running on top of the joint-based facial rig is critical, this is what allows us have this fidelity in the game itself,” adds Evans. “So in the first two meters we cull all of the facial blend shape fixers based upon importance – how much they contribute to the final pose at run-time. So the blend shapes fade off after two meters. You’re then left with an 8 influence 260 joint face, and then we cull it down to 96 4 influences and then again and again. There may be more joints in the face than needed but some of them aren’t used for skinning – they’re used to break up the facial hierarchy into these levels of detail.”

The result is that the cheek may have say 13 joints at the end of the branch, but it has a parent and another nested parent. “So as you move further away the individual leaf joints deactivate and only the parents move,” says Evans. “And that allowed the faces to seamlessly LOD as the distance changes. I really think it’s the only way to go about really high fidelity faces in a game where it blends in and out. If you just have blend shapes you can’t just cull them and LOD them out.”
In terms of LODs, Evans notes they cross several different mesh topologies. “We change skinning algorithms – we go from CPU skinning to GPU skinning within LODs. We cull out different parts of the face like eyelashes. The face has about 10 or 11 different pieces that all blend and have different levels of detail based upon different LOD distances. This added a lot of complexity, a coder could no longer ask what LOD he was looking at, each part had a different LOD set up allowing us to retain the highest fidelity, while being as aggressive as possible in kicking what’s not needed.”
Watch some of the tech behind Ryse in this video.
Cloth simulation
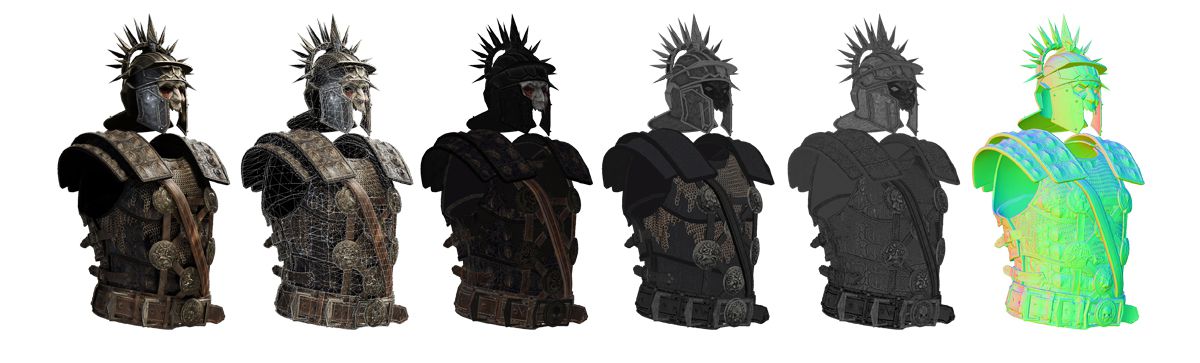
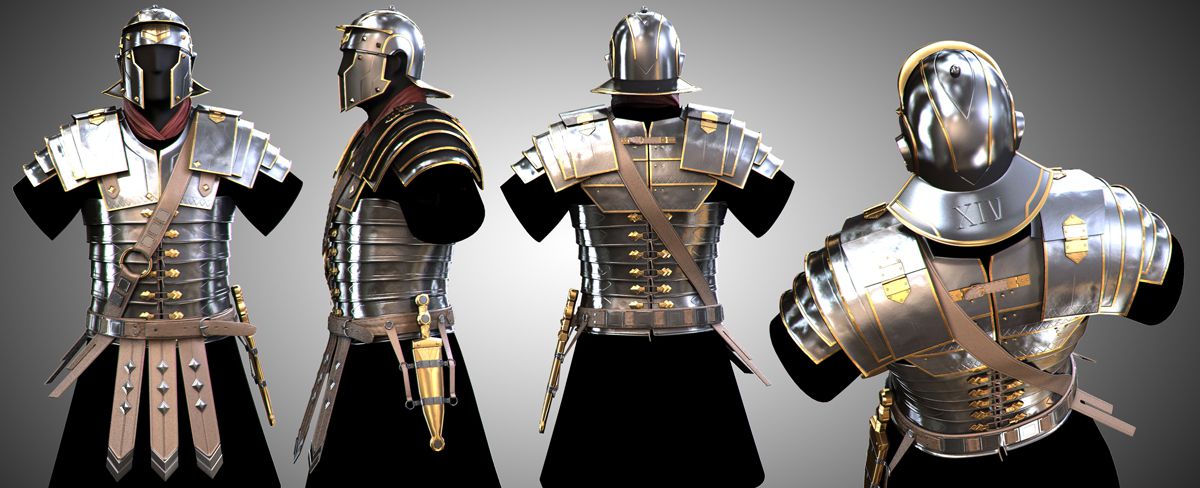
Oftentimes during Ryse there are many, many characters on the screen, and many wearing leather and cloth tunics, aprons, armor, leather straps, and helmets. “All of Marius’ armor is articulating, and much of it simulated,” says Evans, “even including the little ties down the front and back that are leather and properly deforming. As his armor comes apart in big poses those metal segments can part and you actually see four rows of leather straps that run up the inside between the tunic and the armor that are also deforming. Marius was a labor of love for Abdenour Bachir, the artist that modeled Marius and I.”

Film pipeline: To realize the realistic movement of the characters’ clothing, Crytek again moved towards more of a film pipeline. “A lot of games, and our previous cloth system, was based on ropes and joint chains,” describes Evans. “The spring system springs the joints together which put the onus on the character TD or rigger to say, ‘OK I need to think how is it’s going to move in all main poses, so I’ll place joints in a specific configuration and skin them.’”
“The new cloth pipeline we developed,” says Evans, “is setup exactly like a film workflow. The render mesh and the simulation mesh are separate, you can focus on a tessellation that gives you a good result without worrying about the rendermesh. At runtime we wrap deform the render mesh with that sim mesh.”
Targeted animation: One particular challenge was the tunic skirts worn by Marius and the soldiers. “It was interesting because under the skirts they’re basically wearing a diaper and we didn’t really want to see that,” says Evans. “So in death animations, the animators could target their animation using a special 66 joint rig on Marius and about a 40 joint rig on his cape. The rig, developed by Riham Toulan, would deform the sim mesh and was dynamically driven, if an animator doesn’t actually have to go in and tweak it, it makes an OK fall back pose for every animation. So we can go ahead and batch all of Marius’ thousands of animations and it will batch the joint movements of this skirt rig. I’m really proud of the system because not only is it a wrap deformer deforming the final render mesh with the physics mesh, but it can target animation as well.”
Watch a video showing in-game clips.
Crytek faced a couple of early bugs in making the cloth animation and simulation work. “The character had to deflect or block an attacker behind him,” explains Evans. “He rotates 180 degrees and teleports a meter and a half in one frame. It feels very cool and responsive, as in ‘Bam!’, you’re knocking the guy back – but for the cloth solver it was a complete nightmare. In those first tests his skirt would just come off, and the next thing you know you’re fighting in the buff, so we had to figure out a system to deal with that.”
“So for cinematics and in specific animations,” continues Evans, “the animators could say, ‘I want to target 50% of my rig and 50% the solver,’ they could dial this in the Maya rig and it would update in the engine or in really fine detail situations when Marius gets knocked down or we pull the camera in for a second, the animators can actually use the rig to quickly sculpt out exactly how the cloth will look and it’s 100% their animation. It blends quickly to their animation and blends back to physics based on their keyframing an attribute on the skirt main control.”

Parent/child: Crytek also implemented a physicallized joint system for the armor that also catered to ‘dangly’ straps and other pieces. They could chain together relationships of different joints. This even allowed them to constrain joints to planes, lines, and use it as a type of ‘runtime rigging’. “The armor shoulders can bounce around and give secondary motion but also they have hinges that hang off them at front and back,” says Evans. “We had a system that could go from ball joint to prismatic joint to hinged to ball joint. You can stack them and they evaluate from parent to child – that allowed for the armor and different things to feel interesting. We also used it for deformables like the brush of his helmet, the leather straps, and even for flesh on the face.”
Lighting and rendering
Improvements in character modeling and animation were accompanied, of course, in improvements in Crytek’s approach to rendering. “In general,” says senior rendering engineer Nicolas Schulz, “at the beginning of the project we were thinking how could we improve the graphics quality. We wanted to improve the quality everywhere – not just in specific features but the image to look better every time. For that we decided to focus on the quality of materials because that’s something you see all the time. It’s right in your face. In the end, the quality of materials and the fidelity of the image were a big focus for rendering.”
Physically plausible: A way Crytek saw to improve material quality was to improve consistency; they saw switching to a more physically based rendering paradigm as the method for doing that. “You have a rule-set which is very well understood and is very clear,” notes Schulz. “Everyone can stick to it. It also helped us improve consistency under different lighting conditions because things were just behaving a lot more like you would expect them to behave.”
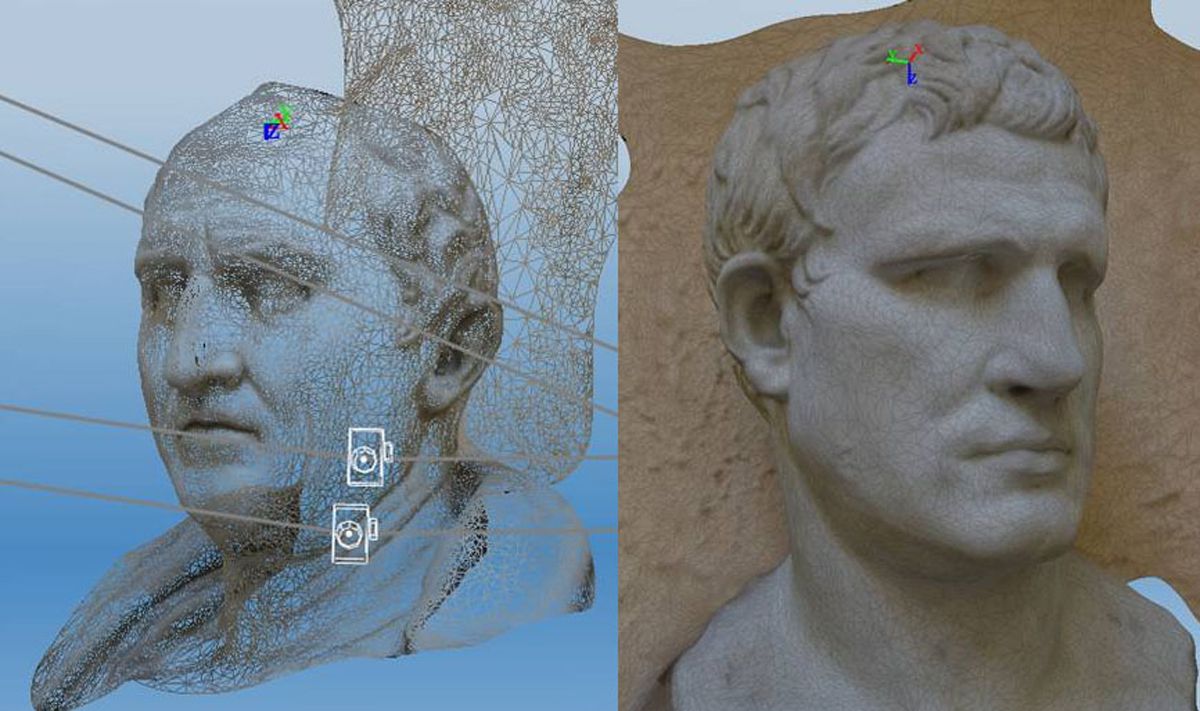
Reference: In order to get a feel for the kinds of environments and lighting that would need to be replicated in the game, artists conducted a reference trip to Italy. “There we did a lot of photogrammetry and scanned a lot of different objects and we walked around with stereo pocket cameras,” says Evans. “As every image lets you take stereo pairs, we were able to use a tool called Photobump which allows us to generate normal maps and meshes from stereo pairs.”
Reflectance ratios: Even though the game was not designed to be photorealistic (it’s hyperrealistic but still stylized), the look had to match what one might expect from a high quality pre-rendered trailer. That still necessitated establishing a physically based rendering pipeline. The studio’s first port of call in making that possible was to consider surfaces and real-world reflectance ratios. “We were looking at ratios of lighting,” says Schulz, “how bright a sunlit area is compared to a shadowed area. On a bright day the ratio is 1:5. We always tried to incorporate this to some degree. We were deviating from it in the end for artistic reasons, but we tried to use that as a base at least.”
Dealing with light fall-off: Another area where the gamemakers implemented a more advanced kind of physically plausible approach was dealing with how light diminishes over distance. “The radius based models that are commonly used in games do not look natural at all, they look like you have just a circle around the light source,” explains Schulz.
Another important area of research was indirect lighting. “This is very important for metal because it has very high reflectance ratios – you see a lot of indirect reflection on metal,” Schulz mentions. Crytek used light probes to sample the lighting for different materials. “Here we would capture an environment in all directions and store the result in a cube map,” says Schulz, “so you have basically six images which form a cube and capture all incoming lighting. For Ryse, we worked on how we would pre-process that cube map to work with different roughness levels of materials. If you have a rough material, you know that the specular highlights are a lot more blurry. They are a lot less obvious compared to a more polished material like a mirror. One focus was to make sure the algorithm we chose to convolve the cube map would match very closely how our BRDF works for direct lighting.”
Many of the outdoor scenes in Ryse involved harsh sunlight and a lot of indirect lighting. “We also had white or bright materials like stone,” says Schulz. “We had to make sure the ambient occlusion would not be too dark on those materials and we had to make sure the lighting wouldn’t be too flat. If you’re just using cube maps, you just have a few of them in an area because of processing restrictions. The resolution of indirect lighting’s not very high. So a sky that is not overcast, that is say mostly blue, you can easily get flat results because what we have in the cube map is just blue and would look very boring.”
This means Crytek had to establish a new kind of light source that could modify the indirect light without breaking the materials. “These became known as ‘ambient lights’ and were used to mimic local bounce and occlusion effects,” says Schulz. “The ambient lights were born out of a need for these outdoor environments requiring more gradient in the lighting.”
Lighting armor: In previous games, such as the Crysis series, Crytek had relied on screen space ambient occlusion, but this only works with diffuse lighting – it does not take into account specular or reflections. On Ryse, the characters were wearing a lot of metal (mostly reflective), so the gamemakers had to come up with a technique that would, as Schulz describes it, “occlude light in the direction of a reflection vector and not just around the whole hemisphere of a pixel, like you would do with standard SSAO, which mostly works with diffuse.”

“We started doing some experiments already at the end of Crysis 2,” says Schulz, “to go more in the direction of a directional occlusion algorithm, which we call screen space directional occlusion (SSDO), and we also improved that a lot for Ryse. We are storing not just the constant occlusion per pixel but also the main direction of the occlusion. That information can be used to do a better, more accurate, reflection occlusion. For example, this was done for the armor and the swords and metal parts. If you disable that reflection occlusion on metal, everything will look a lot more flat and a lot less like GI.”
Cache based pipeline
The complex characters and other parts of the game requiring complex simulations, such as collapsing structures, benefited from Crytek’s new GeomCache pipeline. This was written by the studio and compiles from Alembic. “It allowed an artist to go into Maya and just work on the scene as he wanted it to be, sim it out, do whatever he wanted, tearing cloth, super high fidelity, and then just press a button and get it into the game engine,” explains Evans. “On previous titles we had to rely on a ton of scripts to look at the way vertices were moving and place joints and help us bake a complex deformation to joints. And really some of the time it was one-third doing something cool and then two-thirds would be getting that into the game engine. So it was very liberating to have this one button pipeline where we could just focus on doing something cool and then immediately see the results in the game engine.”

Working with VFX vendors: Destruction sims, in particular, took advantage of GeomCache. In fact, Crytek could even work with traditional visual effects vendors on shots. “There were two sequences that Important Looking Pirates worked on,” shares Evans. “They could do whatever they wanted in Maya and press a button. Not only were they delivering content, they delivered the sequences they worked on running on our game engine. I guess that’s the whole point of a standard cache interchange format. It’s the reason ILM and Sony wanted to go with Alembic to begin with.”
GeomCache supports instancing, streaming and buffered playback, despite compressing the Alembic cache to a filesize that was around 10 per cent of the original .ABC size. “Alembic is already a format that is compressing data a lot but it’s too much data to stream in realtime,” says Schulz. “You would need too much storage on the disk and we were almost running out on disk space for blu-ray. Also the streaming rate for reading from the disk is also limited. So we had to compress the Alembic cache a lot more compared to what it was before.”

Destruction
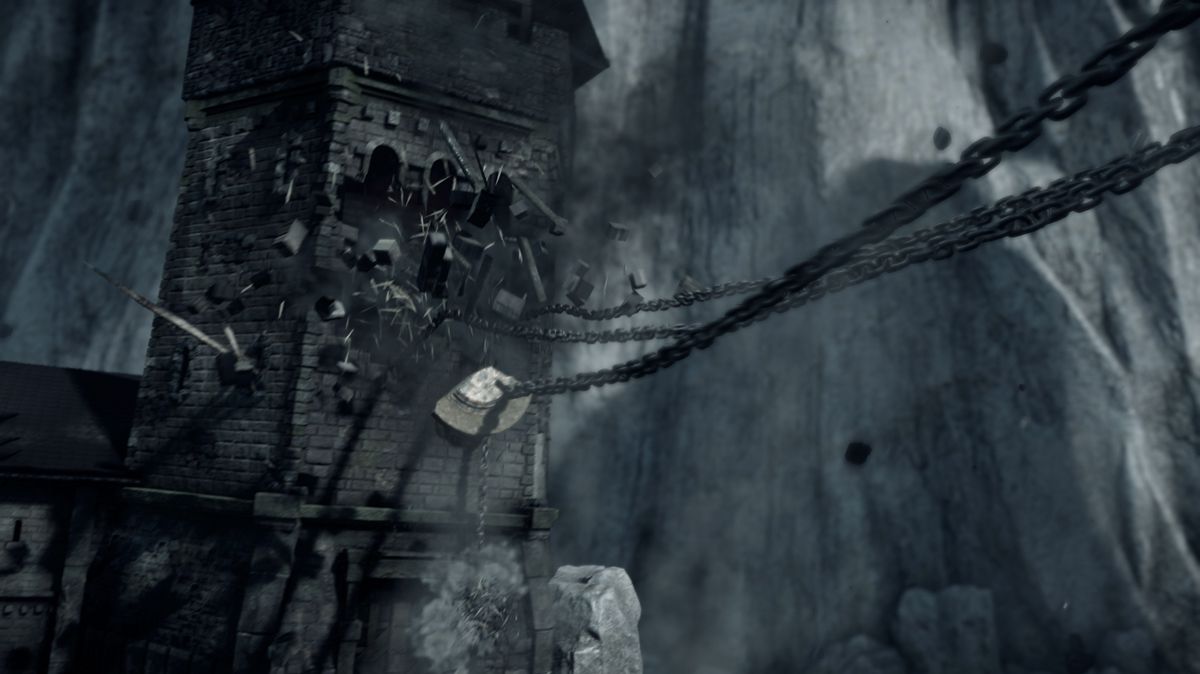
One of the reasons Crytek went with the GeomCache pipeline was that it helped enable the destruction of the Barbarian structures in the game – these are the roped-together towers that when fall look like a collection of sticks and toothpicks. “It was important to me that when you’re destroying these objects that they feel like they’re falling apart,” says Evans, who notes that because of the reliance on Alembic caches Crytek was able to work in particular with Next Limit and its relatively new Caronte rigid solver for the task.
The toothpick problem: “I was trying to solve this pinned together toothpick tower problem,” notes Evans. “Using their solver was very, very fast for these structures and they support Alembic. It updates every rigid as it’s solving it, so you can watch it in realtime as it’s moving all the pieces around – you don’t have to wait until the next frame.”
For example, artists could stop at a frame and re-adjust the scene to suit. “There are some places where I didn’t think pieces would go bouncing down a flat surface as far as they were going to,” says Evans. “I just stopped the sim, moved my collider and started again. And you can see my colliders animating across time. It’s very fast, especially for the pinned together structures. It would automatically detect how close these wooden pieces are from each other, and pin them together using X number of springs.”
“With our cache pipeline,” adds Evans, “we can also key visibility when there’s breaking sticks and boards. We could unhide nice edge treatments on some of those pieces where we couldn’t do that before. We could keyframe transparency and visibility – the format even supported animated vertex colors. For some of the sequences where there’s very complex interaction with water, we wanted to just cache it and forget about it, we could do a lot of work in Maya, cache it out to vertex colors that even worked hand in hand with the shader programmer – who could take that animated vertex information and do white caps and foams on the sea. That’s just something we wouldn’t have been able to do before – take artistically generated information from Maya and handle it like that.”
And certainly, from destruction to cloth sims, virtual production to the detailed facial rigging and animation, Crytek has succeeded in its quest to ensure the game looks incredible from ‘six feet to six inches.’
Pingback: The tech of Crytek’s Ryse: Son of Rome | Occupy VFX!
Pingback: Readings on Physically Based Rendering | Interplay of Light
Pingback: The tech of Crytek's <b>Ryse</b>: <b>Son of Rome</b> | fxguide
Pingback: The tech of Crytek’s Ryse: Son of Rome | CGNCollect
Awesome