Visual effects artist Victor Wolansky recently finished a spot involving complex 3D tracking in HD. fxguide caught up with Victor and got a detailed breakdown of the shot. We also picked up a few tricks about how to agressively use 3D tracking in a tv commercial world.
The pitch
The first script started as a spot with so called “talking heads”. In other words with simply people talking about what the rail road association does. After hearing the director’s thoughts, Victor Wolansky came up with a different idea, which he represented with a quickly made 3D animation. He utilized 3DS Max and some simple objects, but it was good enough to convince the client to sign on for the new script.
The problem arose early as to where to shoot. The client is actually an industry body and thus an association of many companies. This meant that no one real place or location could be used to shown in the spot, because of the risk to showing unwanted favoritism to just say one or two of the member companies. The answer was to re-create a completely ‘new’ control center and location, that looked unlike any of the clients real locations. This meant creating a virtual set for the interior shots, such as the control center and the laboratories. For the train shots, there was a whole new problem, it was too complicated and expensive to shoot people inside a real train cabin with the train actually moving on location, and also too complex to shut down a section of rail line, not to mention it could have been very risky. So the answer was to shoot inside of the terminal of a station but have a huge green screen outside the train cabin, and comp in a moving background. Later a second unit took to the road to film matching background plates.
Thus the project was to have one long continuous shot for the whole spot, using zoom ins and zoom out of monitors on each one the shots to create the illusion of continuity between all the shots.
How to achieve this
The spot was to be aired in NTSC SD, so Wolansky decided to shoot in HD and use the extra resolution to allow for the zooms in post. The team shot using a steadycam, but they still needed to stop close enough at the end of each shot to all for the zoom to be seamless and not to extreme.
The production was faced with which HD what format to shoot the spot. “HDCAM SR would be perfect, 4:4:4 is the best you can get today, but was too expensive. Varicam did not seem to be the right format for many reasons, as there needed to be greenscreen. The only format seemed to be 720P at one point and after doing tests it showed me that is also too noisy. I thought of HDCAM, but what about compression? HDCAM compression seemed to be too high for greenscreen work So we finally arrived at connecting a D5 deck to the uncompreessed DH-SDI output of the Sony CineAlta camera and that produced the best possible image within the budget.” explains Wolansky.
Another important aspect on this project was that every single shot would need to be 3D tracked in order to replace the backgrounds. The track needed to be perfect as the idea was to completely fool people with the 3D generated or comped background into thinking it was shot in camera. “Do we use tracking marks? They are handy, but sometimes they are also a problem, especially if you need to remove them from behind say loose hair… ” says Wolansky. Based on his understanding of current 3D tracking technology, “I decided to not have many tracking markers at all, just a few in the background greenscreen wall, where the 3D screens of the control center would be located. After that we’d just rely on the natural elements of the set to be our ‘perfect tracking marks’, things like chairs, tables etc.”
Several monitors were in the frame in the foreground and background with people walking in front of them, so they need to have a green screen attached to the monitor screen. Instead of using a piece of green cardboard, the production feed the ‘hot’ monitors with green signal from a laptop so they did not have to worry about to have shadows or special lighting on those screens.
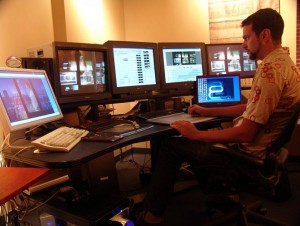
Many digital stills were taken of the sets to have reference of the placement of the light and for further reference to properly lighting for the 3D background. Wolansky also took HDRI pictures using mirrored balls to provide HDRI images for reflections and later lighting. Quick tests of color correction, lighting and keying were made on set using a laptop with After Effects and 3DS Max.
View a by side quicktime of the live action and the final comps

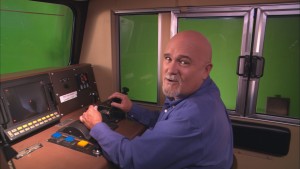
Opening shot
This shot was made on a very tight space, in the real cab of a train. It was very difficult to light, as the green screen had to be outside the train and quite far away. This meant it was not possible to cover the whole surrounding area with just one green screen without visible seams. So they had to be careful about the placement of the seams and rehearse the camera motion several times to place the greenscreen correctly. Also, the cabin had windows with glass all around. Those windows could not be removed and naturally had a lot of reflection. While reflections can add realism and help sell the shot, the production had to to be careful to be able to still pull a good key. To help they had a vectorscope connected to the camera feed, so that they could evaluate the levels of the green screen and monitor them during the shot.
In post the first step was stabilize the shot. “I needed a very steady travel to the center of the screen in the cabin control area,” explains Wolansky. “The motion of the steady cam was steady, but the move did not perfectly resolve to the optical center of the target screen, that being said the cameraman did an excellent job for such a complicated shot.” This stabilization was the first step and done using, 2D3 Steadymove Pro, an After Effects plugin, and the tracker in Monet to automatically reduce the bumps and make the motion more stable. Next, using the tracker in AVID DS, the motion of the shot was completely removed and then animated again to have a perfect path to land in the center of the monitor that will lead as to the next shot in the spot.
This shot was 3D tracked using PFtrack 3.0, from Pixel Farm, before the stabilization, PFtrack has a unique feature to import a model made with primitives after the shot is tracked, and then perfectly match it with the motion of the camera. “I modeled with primitives, the windows of the cab, the console and interior walls, plus I imported a basic model of a human torso and a basic model or a human head, which were tracked to match the motion of the head of the person driving the cab” he explains. All these models were tracked to cast shadows and light on them and to create a better illusion of the light and motion on an exterior shot. This 3D tracked motion was exported to 3DS Max to create a plate for the BG, a simple gird, far away from the cab. At t this stage, with just a checker texture, this was used later imported into AVID DS to track and provide the motion for exterior shot seen through the windows of the cab.
As mentioned above, the 3D tracking was done before the stabilization of the foreground. The background that has to be stabilized needs to have the same motion applied and then, composited all together. Keying was done using Keylight. The matte painting for the background was a single very big image, since the background had to be much bigger than the HD1920x1080 foreground to accommodate the motion of the camera.

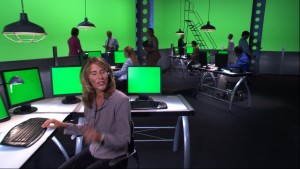
Second Shot
In this shot the camera starts by coming out of a monitor on a desk, and reveals the actor seating and then fully zoom into another monitor. It was a complicated motion path that needed to be perfectly timed and executed. Like the previous shot, and every other shot on this spot, it had to be stabilized, motion removed, and then re-animated to come out from the center of the first monitor and land in the center of the next one.
PFtrack 3D Monitor screen tracking
The shot was 3D tracked with PFtrack using the modeling features of that program. Grids were created to match all the screens of the monitors with greenscreens in the shot. Textures were then applied to those grids, rendered in 3DS Max and then all the monitors were replaced with only one pass with no need to individually track each screen. This was a lot faster and each one of the screens worked perfectly in perspective.
Control station comparison shot
The background screens, walls, columns, stairs, and other elements are all modeled, textured and rendered in 3DS Max using Global Illumination with Final Render. Wolansky decided to render them as a multi-pass render with separate passes for Specular, Diffuse, Reflection, Shadows, etc, This allowed the final look to be controlled in the AVID DS without having to re-render everything. Motion blur, to match the motion blur of the live footage, was actually added after the 3D render using an After Effects plugin to save time.
The people walking upstairs in the catwalk and the offices were all textures mapped on simple girds rendered in 3DS Max. The few trackers in the background were erased with AVID DS using a paint stroke with the tracker tool.

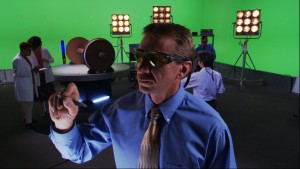
Third Shot: The lab
This was the most difficult shot to complete. The actor had to write on a surface that was actually not there. For the camera motion in the shot, the final frame had to come to rest on a very small screen. A robotic arm with a laser beam had to scan the train wheel on the rotating table. This arm is located between some objects in the BG and some of the actors that are watching the wheel.
This actors in the shot had to be rotoscoped but also the two main characters in this shot have dark glasses which the client requested in post be made to be clear glasses as the ones used on set were too dark. Clearly this was an extremely difficult task, since one can only barely see their eyes through the glasses in the HD foreground plate. To solve this, the first step was to do detailed roto. Given the need for detailed motion blur roto, Wolansky used the OpenGL accelerated Silhouette Roto, which made the process so much faster.
After creating the mask for the glasses, Wolansky had to increase the luminance by almost 500% and then reduce the color. “The result was incredible noisy. Thanks to Tinder Tools, I got rid of the noise, and composed the new glasses over the old shot. Now I had the shot with the new glasses and also a mask to add the robotic arm behind the people”. The shot was 3D tracked using PFtrack and some objects such as the wheels and the axle were modeled using the primitives and their motion tracked to be used as a matte object to hide the laser beam. The background was modeled and rendered in 3DS Max using the same technique in the earlier shot and everything was composited using AVID DS. “The non destructive way of compositing of the DS was essential to finish this project,” adds Wolansky.
Monet was used to track the screen for the portable computer on top of the oscilloscope that connects us with the next shot. The application was also used to track the same screen in the next shot, as they were filmed as two separate shots. In reality the screens did not match perfectly. To solve this, they were tracked to a certain point and then the RAW animation curves of each corner of the tracking were exported. This data was used in the corner pin tool of the DS, as well as with the next scene curves, and the gap between the two tracks was adjusted by hand.
Aerial train shot

This shot was purchased from a stock footage source, but the train belongs to one of the companies of the client association, so it’s logo had to be removed. The shot was stabilized, accelerated, and then the mountain and clouds were added using the AVID DS. Uniquely this one shot was scanned in 4K to be able to make the zoom out of the train cabin without having the image pixelate.
The logo was erased using a still picture of the sequence, cloning and painting in Photoshop and then tracked back in the moving train. View a movie of the making of this train sky replacement
The final spot worked extremely well and the client Association of American Railroads, (AAR) was very happy with the result.
Learn More
If you would like to learn more about 3D tracking and the theory behind the algorithms as well as hear tips from the people who write the code of nearly every major 3D tracking application in the market, join our our sister site, fxphd.com.
Starting in Decemeber as part of fxphd.com’s new term there will be an in-depth profile on 3D tracking, including how it works, how to get the most from it and how to solve the most complex shots.
You can download a brief tutorial showing why a program like pftrack can do so much more than just a 3D track – and how it was used in this project for monitor replacement and texture extraction.
