Apple’s recent QuickTime 7.4 update caused numerous problems for applications from Adobe, RED, and more. While QT is used in high-end facilities around the world, it was a good reminder that the media wrapper is more closely linked to iPods than professional users. In this article we look at ways for pro users to maintain both sanity AND pixel purity when dealing with QT…with a key role played by After Effects CS3.
Over the last several years, more and more high and middle end facilities are upping their investment in both software and hardware from Apple. It’s reasonable — and expected — to see a license of After Effects in use alongside a flame. Or a Final Cut Pro workstation feeding a Smoke system. Our article today concentrates on the OS X side of things in the QuickTime/AE world, as cross platform concerns could fill up another whole article.
The recent release of 7.4 caused a myriad of problems for pro users using QuickTime. MPEG4 movies wouldn’t play. Adobe After Effects experiences permissions error that happens about 10 minutes into a QuickTime render. According to the folks at RED, the release caused “stability issues with both RED Alert! and Final Cut Pro when working with RED footage. RED does not recommend that users upgrade from QuickTime 7.3 until these issues are resolved.” Protected media that artists own wouldn’t play, the list goes on and on. These issues are are a reminder that the end user needs to be vigilant in taking care of their production systems.
At fxguide, we’re fans of Apple’s pro software and hardware — including Final Cut Studio, which is where we turn out hours of programming a week at our vfx/mograph training site fxphd.com. But this doesn’t mean that there aren’t shortcomings for professional users when it comes to using them. Yes, it’s true. We can both love and hate Apple — and this certainly doesn’t mean we don’t appreciate the effort from the Pro Apps group.
The concentration on iPods and iPhones has helped create a financially stable company, which serves in overall ways to help keep products like FCP in the hands of professional users. But because of the overwhelming income derived from consumer products, the company’s number one priority regarding QuickTime isn’t with the professional users. With this article, we’re hoping to help end users by covering just a few tips on how you can make sure your systems continue to be production ready and stable. The general advice isn’t just for QuickTime — you’d be well served following it for any software. It just happens that QuickTime’s frequent updates mean it can frequently hose your production system.
After that, we’ve got some great After Effects notes on getting much better YUV to RGB conversion than can be done with QuickTime directly. Why do you need this? Because QuickTime falls incredibly short in this manner as well, giving no built in way whatsoever to help users make good conversions. So if you want to maintain more dynamic range from QuickTime movies in After Effects, Nuke, Fusion, Shake, Toxik or other apps….keep on reading.
Beware of Updates
Regarding upgrades, there was a key lesson to be learned with the release of QuickTime 7.4:
After an update, don’t immediately upgrade software on production machines unless you absolutely have to.
At fxguide and fxphd we wait at least ten days to do testing on the upgrades, giving enough time for bug reports and warnings to appear around the web. The key is to treat your production machines as production machines and resist the temptation to hit “Install” for new updates that popup. This is how we treat our dedicated “big iron” systems such as flame and smoke — we would never consider upgrading the system software without blessing from Autodesk. If you’re making money from a system – don’t mess with it. For instance, Shake 4 was only officially certified to run on OS X Leopard months after the initial release of 10.5
Tim Clapham, artist owner of motion graphics and animation company HYPA.tv in the UK, is teaching an After Effects motion graphics course over for us this term over at fxphd.com. He is wary about upgrading apps too soon. “I’m always cautious to upgrade software on production machines,” says Clapham. “I normally wait a few weeks and check the forums to see if any problems have been reported. Then I’ll upgrade one machine at first, normally my home computer. If it all seems to be running smoothly then I’ll upgrade all our machines. The temptation with automatic updaters is just to hit update, this can certainly be detrimental in a production environment.”
So how do you avoid these pitfalls? First, once you get your system up and running and stable, make a backup copy of your system drive using a tool such as Carbon Copy Cloner. Set it aside and use it to restore a working system later on down the road. Do this after each major application or QuickTime upgrade you make to the system. This will allow you to easily roll back to a pre-install state if you need to. The key to this is to keep your application on your system drive and setup files and image/movie data on a separate drive. Separating the two will make things much easier in the long run.
As mentioned earlier, don’t install software for several weeks after a release. We do extensive beta testing for After Effects, Flame, Smoke, Nuke, Toxik and other applications, so we’re well aware of the pitfalls that can caused by new installs. We’ve learned to live with this over years and have really rough skin to allow us to deal with the issues. But we also have stable production systems up and running as well. Even with extensive beta testing, it’s impossible to cover all the possibilities users around the world might run into on their systems. Letting others install the release software first will let them run into the hitches you desperately want to avoid.
Even waiting three days to install QT 7.4 would have saved a lot of users headaches — the more time you can wait, the better. A few simple Google searches after a release can give you a wealth of information about how stable a release is. If you have a working system upon which you’re making money — why change it? If you want the latest HD movies from Apple…install it on your home system or notebook with the understanding you might not be able to do backup production with it. But don’t mess with your livelihood.
When you’re ready to upgrade, test all workflows to make sure that things haven’t been “fixed” which impact your workflow. QuickTime is a moving target — and when you combine it with updates for After Effects, Final Cut, Nuke, and more the testing with each update can be quite involved. That’s one reason we seldom upgrade QuickTime with every dot release.
“Disaster” Recovery
So you had a quick trigger and installed QuickTime 7.4 on OSX already…but there is no obvious way to downgrade. Are you stuck? No. Thankfully, the makers of the shareware application Pacifist have provided the tools to help you with this. The basic procedure is to:
1. Download and install Pacifist.
2. Download the appropriate version of QuickTime from Apple’s web site:
OS X 10.5.1 Leopard
OS X 10.4.11 Tiger
OS X 10.3.9 Panther
3. Make sure your system is updated to the version number listed for each 7.3.1 flavor of QuickTime.
4. Drag the QuickTime 7.3.1 package onto the Pacifist icon, or choose “Open Package” and open the QuickTime 7.3.1 download. Click “Install” and make sure you “Use Administrator Privileges”. When installing, make sure you replace files when asked.
You should be good to go.
The Good News Regarding QuickTime Uncompressed and AE CS3 for Pro Users
While we have a visual effects concentration at fxguide.com, all of us work or have worked at facilities where high end graphics design has been an important aspect for the company. Those areas have been largely outfitted with workstations for After Effects — the de-facto leader in motion graphics design. This can be seen over at fxphd.com where our After Effects courses taught by Clapham and Mark Christiansen are frequented by names familiar to longtime flame and smoke artists.
One hitch in the workflow has been conversion from 10-bit or 8-bit YUV (or in the digital world more accurately called Y’CbCr) into RGB in After Effects. The same workflow hitches hold true for getting the same footage into 3D compositing packages such as Nuke, Shake, Toxik, or Fusion.

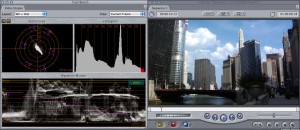
In versions of After Effects prior to CS3, Adobe relied on QuickTime’s YUV to RGB conversion which, quite frankly, could hardly be called professional. It is technically possible to transcode the data, remapping 8-bit YUV to 10-bit RGB without losing key image data, there are no means for doing so directly within QuickTime or in applications which use QuickTime to input data. In the ‘YUV’ formats, it is possible to have whites which are outside the (255,255,255) RGB range. In the image to the right (as viewed in FCP), we have an 8-bit Uncompressed QuickTime file sourced from DVCPROHD. Note on the waveform that there are image values above “100”, showing detail in the clouds.
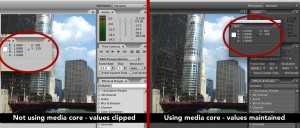
Importing this footage into earlier versions of After Effects would clip this data, relegating all values seen as above 100 in Final Cut to 255,255,255/1024,1024,1024/1.000,1.000,1.000. This is commonly referred to as “clipping the overbrights”. What does this mean? When transferring imagery to After Effects from high end workstations even uncompressed captures in FCP, you’d lose the highlights in the imagery…never to be gotten back. This can also be seen in Apple’s own Shake, which uses QuickTime to do the conversion to RGB. Before AE8, one would need to grade the footage a bit darker in the highlights, bringing the levels down to 100. The side effect of this would be losing some of the dynamic range in the imagery.

Enter After Effects CS3/8. With the new version of software, Adobe decided to handle some of this transcoding from YUV(Y’CbCr) to RGB themselves. Adobe’s “Media Core” is a shared media space which allows them to more easily translate and exchange material between apps on a single platform , such as Premiere and AE on Mac. Or between different platforms — such as AE on Mac and Windows. By controlling the image data translation themselves, they are no longer held in check being reliant on another company’s software.
What does this mean for the end user? It means that in color managed 16 and 32-bit projects you can import QuickTime movies of several different codec flavors into After Effects and no longer lose the overbrights. A side benefit of this is that you can then export a 16-bit image sequence that maintains the full bandwidth of the imagery for use in other applications such as Shake.
However, as with all good things, there are several caveats. First, only Intel-based machines support this workflow — it is not supported on OS X Power PC. Second, support for movie codecs which under go Media Core translation is limited to the following five types:
v210: 10 bit YCbCr 4:2:2 (Apple Uncompressed 10-bit, Blackmagic/AJA compatible)
2vuy: 8 bit YCbCr 4:2:2 (Apple Uncompressed 8-bit, Blackmagic/AJA compatible)
UYVY: Microsoft 8-bit YUV 4:2:2
dvc: DV Codec
dvcp: DVCPro Codec
While this codec list is limited, it does include the useful 10-bit and 8-bit uncompressed formats, as well as DV formats where one might commonly find overbrights. Key codecs missing from the list are Apple’s new ProRes codecs and DVCPROHD.
What are the rules for maintaining overbrights?
1. You must be working in a 16-bit or 23-bit project.
2 The input footage must be one of the supported codecs
3. Adobe’s default rules which cover pixel aspect, format, image size, and frame rate will handle most situations. If you have a movie for which this not working yet is one of the supported codecs, you can add to the default interpretation rules. A file is located in the AE application folder called “Interpretation Rules 802.txt”. This is a config file which you can modify to allow (or disallow) the use of Media Core for various files. Guidelines for the format of the file are listed at the top of the file.
4. This workflow is only supported on Intel-based computers (OS X and WIndows). As mentioned above, it is not supported on PowerPC-based OS X systems.
The 8.0.2 update included bug fixes for correctly interpreting PAL footage when encoded with v210, UYVY, and 2vuy codecs.
Working with Shake, Nuke, Toxik Fusion, and More
imgcapright(08Jan/ae/aja.jpg,Export as AJA Kona 10-bit RGB, making sure you use the 64-940 optionThe changes in AE8/CS3 means great news for getting full range image sequences from v210, UYVY, 2vuy, and DV codec QuickTime movies. Previously, had one tried to export 16-bit or higher image sequences directly from QuickTime Player Pro or Final Cut Pro there would have been clipped whites in the images. This is still the case due to internal QuickTime issues (“issues” is the kind word).
Instead, use After Effects to convert the images to 16-bit half or 32-bit float image sequences. You’ll end up with the full range in a format that can be read in any high end compositing application. And if you do 16-bit, they can now be used in Flame’s batch as well.
The Gluetools Cineon/DPX QuickTime Components are a great solution for getting 10-bit material out of QuickTime and into an image sequence in standard format. However, conversion of overbrights is not supported at this time by the plugin. So if you want to export movies with overbrights, you’re better off using After Effects.
If you don’t have After Effects, there is a “hack” way of getting from an 8-bit YUV to a 10-bit RGB QuickTime movie using the latest AJA codecs which are a free download at their web site. Once you install the codecs, you can then use QuickTime Player to export your movie as a 10-bit Kona RGB movie. You need to make sure that the settings for the video export are to SMPTE (64-960). If set to Full (0 – 1023), the exported whites will be clipped. You can then load this footage into an application which supports RGB. You will have to do a levels/gamma adjustment to it, but at least your overbrights won’t be clipped.
Testing, Testing, Testing

There are more key points to maintaining a high quality workflow in a consumer QuickTime world, but the biggest of these is probably testing. We can’t overemphasize the need to verify workflow. Don’t just assume that you can easily get from one format to another. As an example to show what we mean, try downloading and working with our test clips. They include 8-bit Uncompressed, DV codec, and the original DVCPRO HD versions of a scene which was shot using DVCPROHD on the HVX200.
All three versions should handle the overbrights in Final Cut Pro. The key is how you maintain these in other applications. Try loading them directly into Shake, for instance. You’ll find the overbrights clipped. Export an image sequence from QuickTime — your overbrights will be clippped on all versions. In After Effects, the 8-bit Uncompressed and DV versions should load with overbrights intact, yet the DVCPROHD version will clip since it is not one of the supported codecs. So once you’re in After Effects with the supported codec movies, you should be good to go.

But how do you work around getting DVCPROHD from FCP into AE? You might think it’s as easy as switching your FCP sequence from the DVCPROHD preset to 8-bit uncompressed and exporting a QuickTime movie. It’s not. Try it and see for yourself. It is a perfect example of how baffling and crazy dealing with some of these issues are with QuickTime and FCP. Before continuing reading this article, try and figure out how to work around this problem. It took a lot of testing and trial and error before we finally figured out what was happening and in the head shook our heads at the solution.
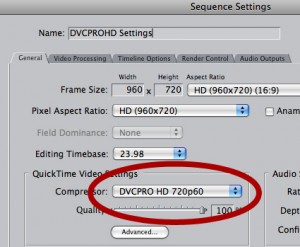
The bottom line is that it seems to have something to do with pixel aspect ratio. The 960×720 sequence setting wasn’t causing problems with DVCPROHD clipping overbrights, but a simple change of the sequence settings from a DVCPROHD codec to 8-bit Uncompressed caused the overbrights to be clipped. You can even see this directly inside Final Cut using the waveform monitor.
The workaround for this? The sequence must be set to 1280×720 square pixels (or other square pixel format).
We rest our case about testing.
Wrap-up
These are just a few of the MANY caveats for working with QuickTime in production. We find QuickTime and FCP to be so great and wonderful….yet at the same time are shocked at the hoops we must jump around at times to make things work. Tollowing the guidelines in this article will help you get the most out working professionally with QuickTime. We’ve worked hard with key After Effects users to develop and test the workflow that we use in production. fxphd profs Mark Christiansen and Tim Clapham also helped with the information in this article — and they are currently teaching some great AE courses over at the site. We’ve also been fans of Stu Maschwitz’s blog and writings about getting imagery in and out of After Effects at a high level.
There are a lot of people out there sharing information about how to get things done in our digital world — and its a good vibe to remember. Speaking of sharing….if you have any questions or comments, please feel free to post in our forums.
