We’ve seen incredible cinematics from Digic Pictures before – Mass Effect, Halo, Assassin’s Creed and more. But what does it take to make a great cinematic trailer? Where do you start and what parts of the storytelling process are most important? We explore the process, using Digic’s recent launch trailer for CD Projekt RED’s The Witcher 3: Wild Hunt, including everything from concepts to modeling, hair, skin, mocap, animation, effects, environments and rendering.
Killing monsters is hard work
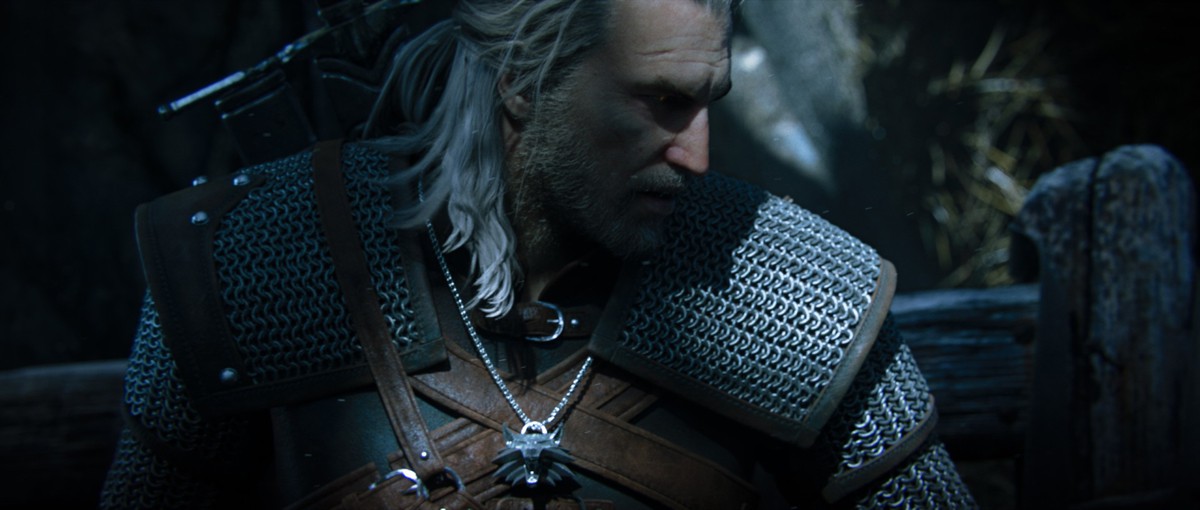
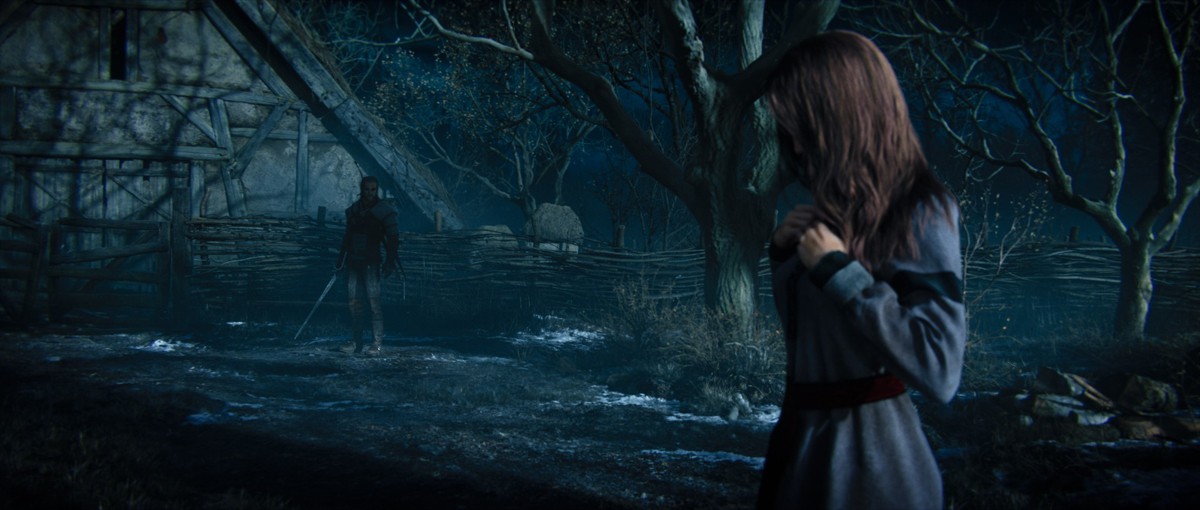
In The Witcher 3: Wild Hunt, players take on the role of Geralt of Rivia as he roams the Northern Kingdoms and battles often magical threats, i.e. monsters, in an open world setting. It was important, therefore, that the launch cinematic reflect the ‘dark and haunting’ atmosphere of CD Projekt RED’s game. “One of the main ideas that they wanted to convey was the harsh ‘reality’ that killing monsters is actually hard work,” relates Digic project director Peter Sved. “It is gruelling, difficult, and mostly unpalatable – there’s nothing glorious or ‘romantic’ about it. Even for the best monster-killer out there, it takes everything he’s got to get the job done: his best skills and smartest tricks – and even for him, victory comes at a great cost.”
Using a detailed storyboard from CD Projekt RED, Digic prepared an animatic for the trailer by firstly laying down the key parts of the battle between Geralt and the partly-invisible vampire using game reference. “It was ideal that by the time we got involved,” outlines director István Zorkóczy, “that CD Projekt RED were able to provide us with plenty of game reference and concept material, both for the Witcher and his capabilities, as well as for the characteristics of the vampire, so that we managed to develop the ideas in the right direction.”
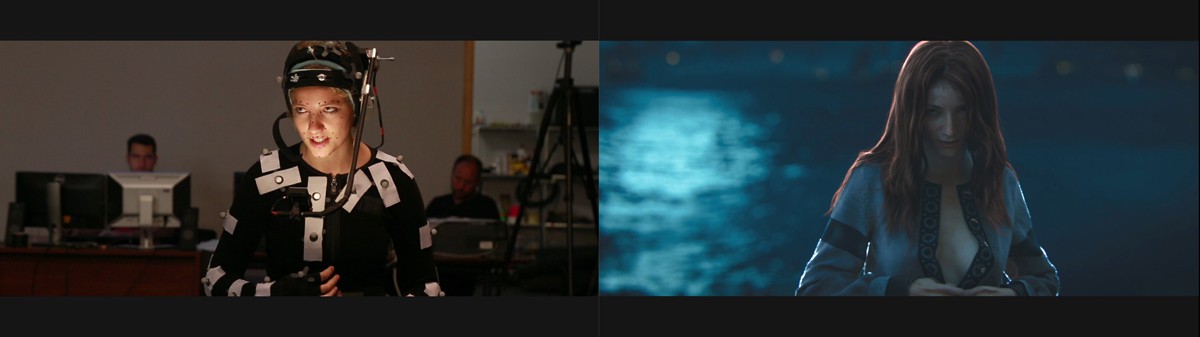
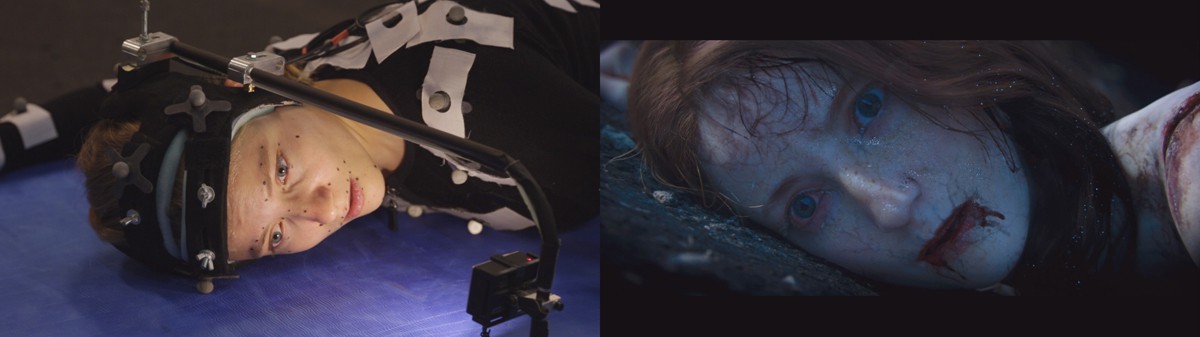
The team launched into motion capture from actors and stunt performers early on, using it to help build the scenes and test cinematic ideas. “For most parts, like the conversation between Geralt and the vampire, we actually recorded PCAP data, meaning body mocap, along with head-mounted camera (HMC) footage of the actors’ facial performances, timed to the final VO lines being spoken by the VO performers,” explains director assistant Dávid Ringeisen. “This technique, coupled with being able to use the full likeness of our actress later on, made the facial animation workflow fairly smooth for our animation department, helping to achieve convincing results throughout the film.”
Interestingly, audio was an early element in the animatic to fine tune the mood required. “In this particular case,” says Zorkóczy, “it worked so well that the track we originally used as temp music made it all the way into the final version – A Hole in the Sun by Two Steps From Hell. The final audio mix was provided by CD Projekt RED who did a wonderful job, and really nailed the right tone for the film.”
Wrangling a Witcher
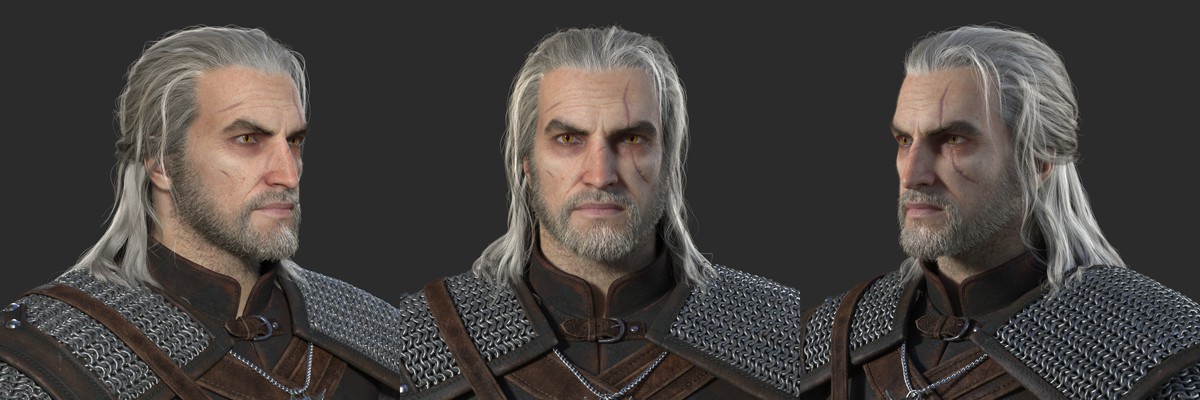
To design the main character Geralt for the trailer, Digic drew on art direction established by CD Projekt RED in the game and in promotional material. “They would identify key features like his build, his hairstyle, or his cat-like eyes resulting from the magical mutations of his training,” says lead character modeler Tamás Varga. “Most of our work was focused on subtle tweaks, because within the game the player usually sees him from a third person camera view, and thus the in-game model is somewhat ‘larger than life’. For example, his hands are a bit oversized and so we’ve scaled them back to present somewhat more realistic proportions. We also tweaked the body a little bit to bring it closer to the stunt performer, in order to get better results for the mocap-based animation.”
Some aspects of the stunt performer’s face – acquired during performance capture – were also applied to the Geralt head model, which was initially a ZBrush sculpt provided from CD Project RED. “It took some back and forth with them to find the right balance,” notes Varga, “where the model was still a faithful representation of the character and at the same time our animators were able to fully utilize the capture data. In the end we’ve managed to reach a pretty good mix that both CD Projekt RED and us were really happy with.”
The main character’s hair was ‘combed’ in Ornatrix, then detailed in Yeti. “Geralt’s hair was assembled from a number of separate pieces divided into static and dynamic parts,” describes lead hair TD Csaba Máté. “The ponytail, and his loose/hanging locks of hair were dynamic, while the part held together on the top of his head was static. His beard and eyebrows were also created using Yeti, and a peach-fuzz layer was also added for greater realism – as was the case on the vampire as well.”
Vampire visualization
The beautiful girl who de-materializes and then becomes a vampire required significant work to achieve both forms. The process began with scanning, where Digic primarily adopted a photogrammetry approach for acquiring detail. “We cast a local actress for the performance capture,” says Varga, “whose face we also scanned, including a full set of FACS expressions and some more complex facial poses. We also cast a local model for the body of her human form, with the body proportions that CD Projekt RED was aiming for. Then we combined the body and the face scans and added some subtle tweaks in ZBrush to create the final character.”
Performance capture.
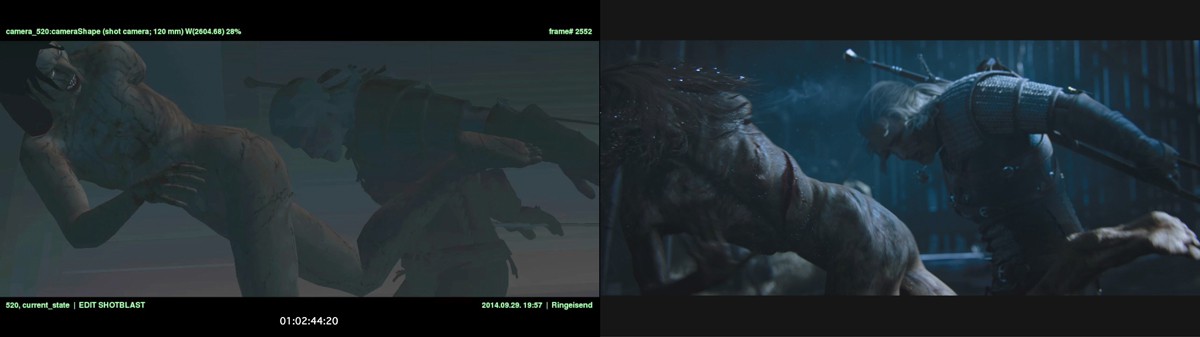
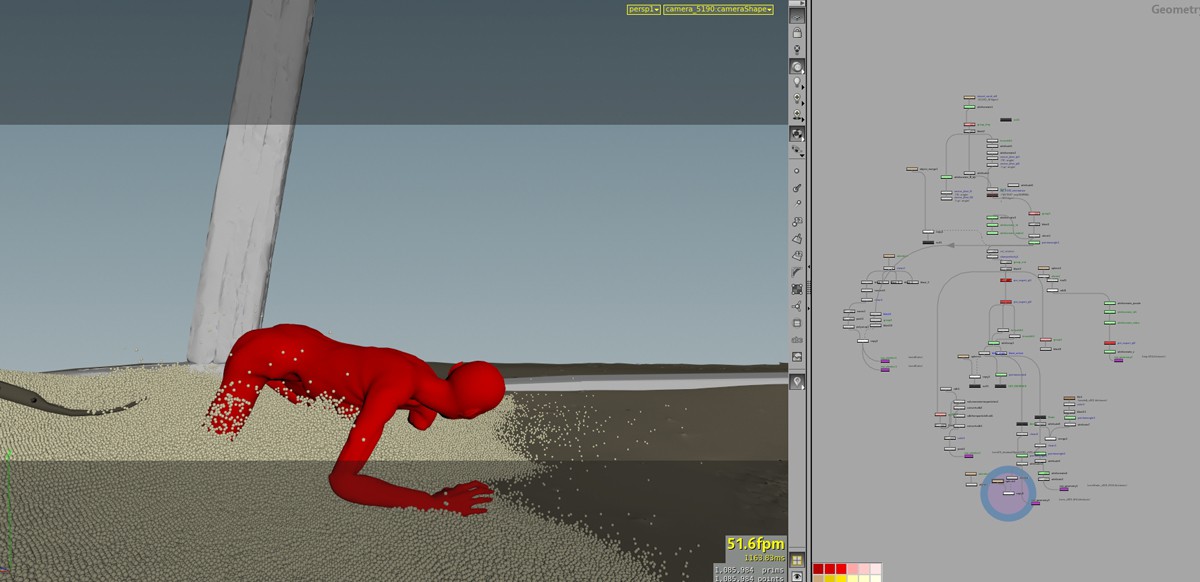
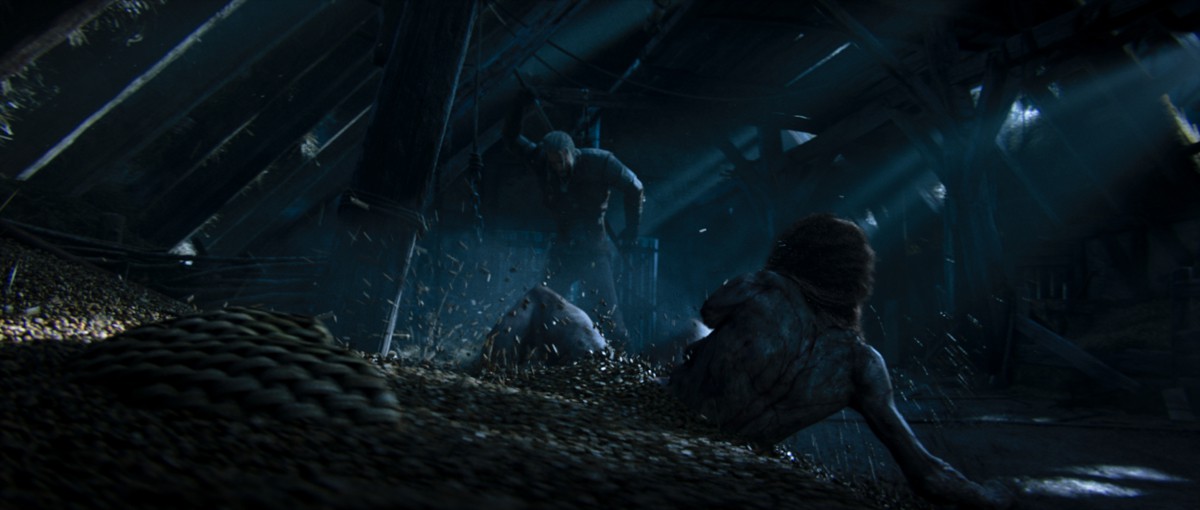
The girl’s body remained the foundation to create the vampire since Digic wanted the creature to be as close as possible to the human form. “We brought the final girl model into ZBrush, at which stage our lead character artist began to sculpt the monster stage of the vampire, using a concept painting from CD Projekt RED as a guideline,” describes Varga. “In the beginning we were exploring an even more emaciated look, based on studying pictures of anorexic patients and such, but we soon decided to give the character a much stronger, more ‘muscular’ look, while keeping the slightly exaggerated bony and sinewy features. It was also our idea to add digitigrade feet in order to make her look more bestial – which also helped a lot later on, for example to make the monster form taller than Geralt, and also to get that really disturbing crawl animation at the end of the fight.”

On top of the sculpt, Digic built a relatively detailed model, looking to preserve all the deformations in the base mesh without having to rely on animated displacement maps. “The creature was rigged using a muscle system to create the base deformations based on the anatomical skeleton of the body model whose scans it was built upon,” says Varga. “Because of the anatomical alterations of the monster the modeling team also had to come up with a slightly non-human muscle layout that defined the final shape of the character. The muscle deformations were essential for the thin and bony look of the character; skinning tools have a hard time defining properly deformed volumes of the body.”
Like Geralt, the girl/vampire’s hair was achieved with a combination of Ornatrix and Yeti. “The biggest challenge regarding her hair was probably the part where she lets her hair down at the beginning of the trailer,” suggests Máté. “Two separate hair assets were created: rolled-up and let down/loose, both created from the same curves so that we could blend between the two states. Simulation was then added on top of the blending, for the final result. Another interesting challenge was adding the tiny pieces of silver-dust which are stuck in the monster’s hair during the fight – this was achieved using Yeti as well.”
Face-off

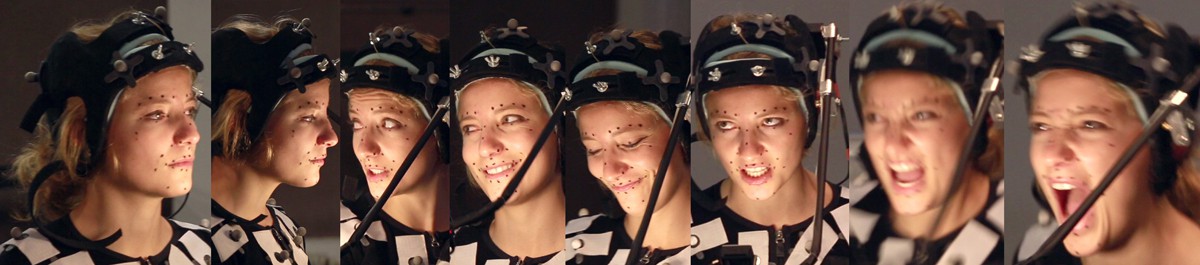
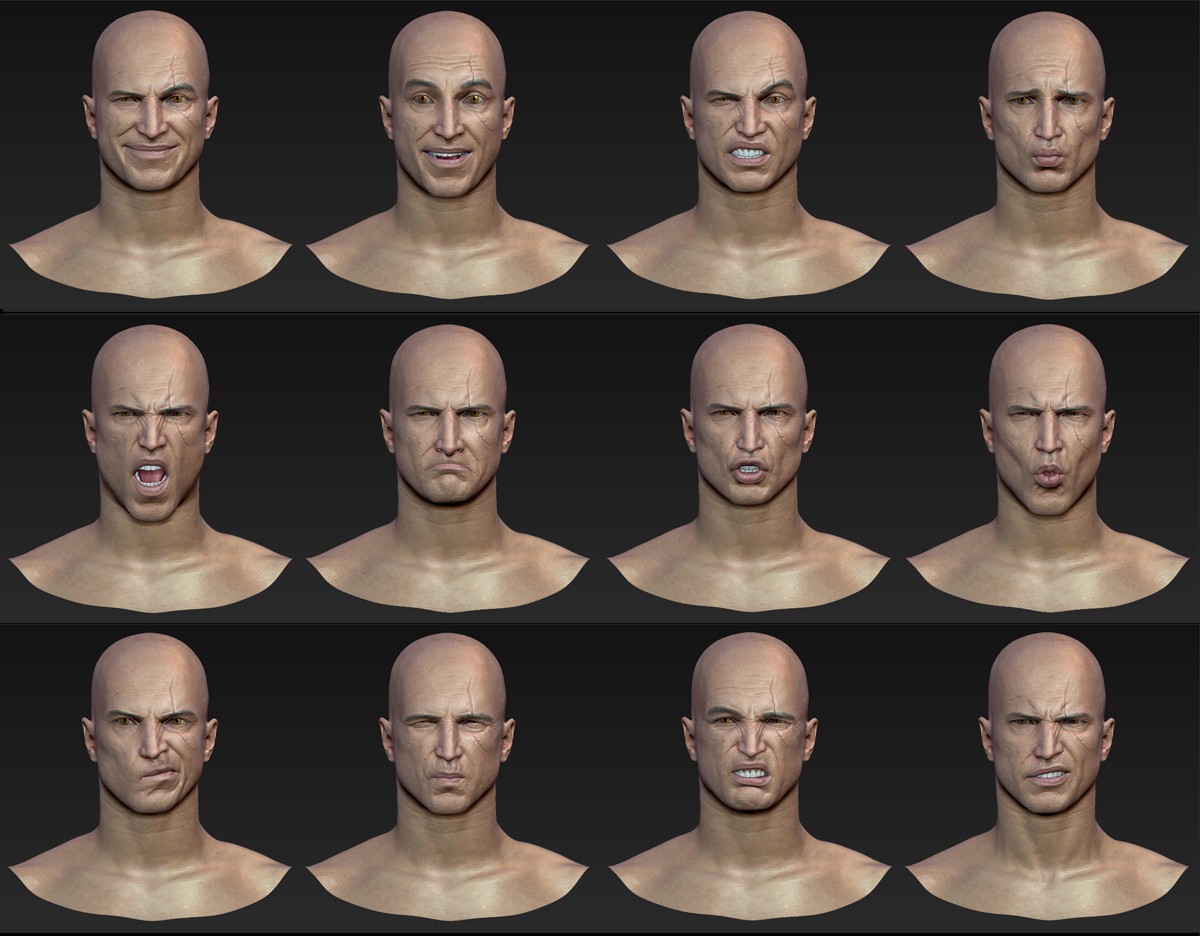
A full performance capture and facial scan approach was undertaken to deliver facial animation in the trailer, always with artist-driven refinements. “We captured a lot of data,” says Varga, “including neutral states, basic and complex facial expressions, and polarized photos for the textures – all for Geralt’s stunt performer as well as the actress and body model for the girl. However, in the end, all three characters ended up somewhat different in their final execution.”
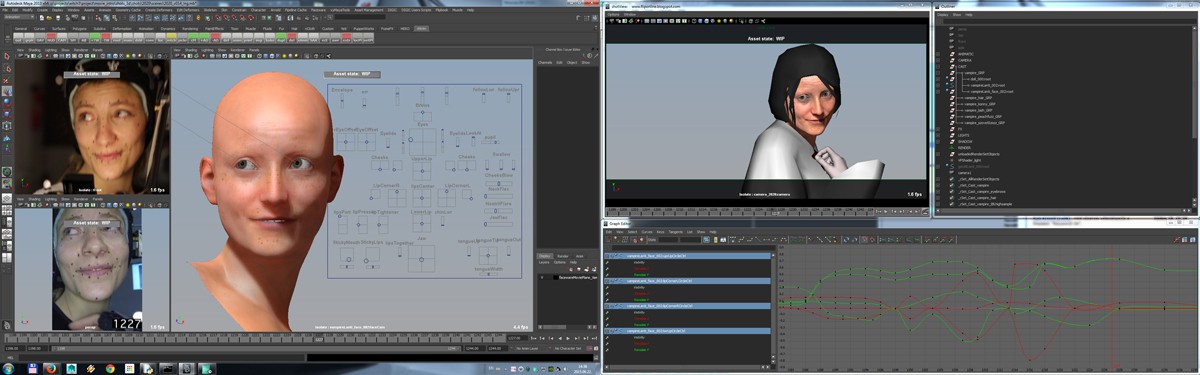
Digic’s facial animation pipeline is based on a derivation of the FACS system, utilizing relatively dense polygon models that can accommodate all the subtle deformations, including skin sliding and folds and wrinkles. “The system uses about 60 base blendshapes, fed into our custom deformer that handles things like left/middle/right separation, in-between shapes, and also corrective shapes for the combinations of the various FACS action units,” explains director of animation division Gábor Horváth. “This allows us to iterate very quickly on the shape library, and it is also a big plus that the deformer uses GPGPU acceleration to speed up viewport feedback for our animators. This pipeline was originally developed through our previous work back on Halo 4 and Call of Duty: Advanced Warfare – however we’ve tweaked and refined it in the past years, and continue to do so all the time.”
Performance capture session.
Most of the base shapes and some of the correctives were based on the facial scans, but both these and all the additional shapes were then also hand-sculpted by Digic’s modelers, referencing face camera footage and photo shoot material. “Once the basic rig has been built,” says Horváth, “it is taken through a ‘training’ session. The animators identify key frames from the facial camera’s feed, then the modelers tweak the shapes and set the controls to match these expressions. This way, we have a solid foundation from the start, which is then further refined during the production phase through many iterations of back-and-forth communication between modeling and animation.”
The girl’s facial rig was an almost 1:1 match to the actress, who was only featured in a few shots. “However,” notes Horváth, “these are some of the most important and emotionally loaded ones in the entire trailer. So we’ve spent a lot of effort to get every detail as tight as possible. Particular attention was paid to her smile, going through basically daily iterations until we felt it was right.”
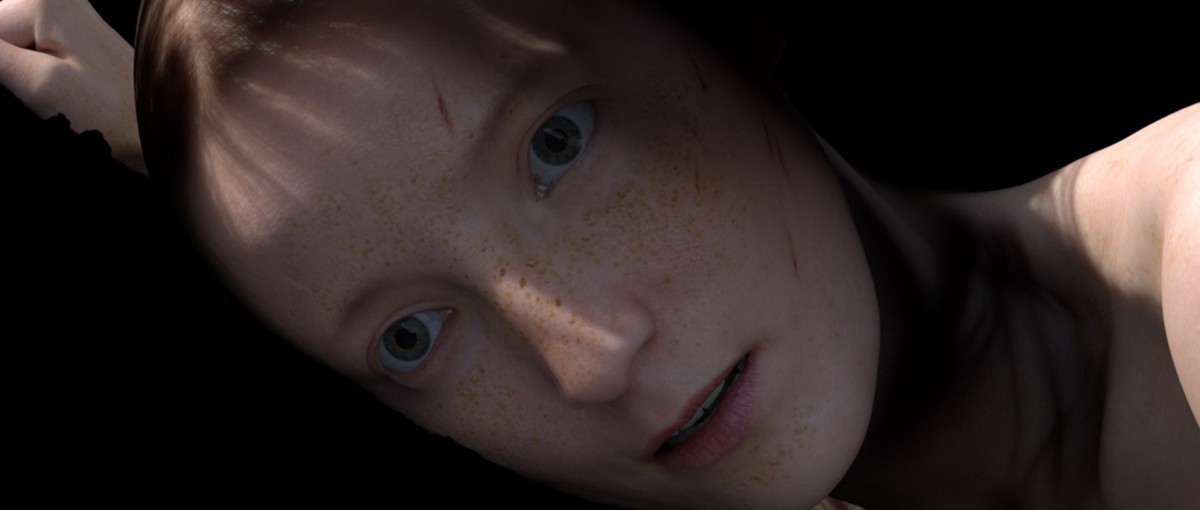
Geralt presented a different challenge, since his characteristics had to resemble the in-game version of the hero. “We also wanted to include even more realism from our stunt performer’s facial expressions,” says Varga. “Ultimately, we ended up combining his scans with the in-game model’s ZBrush sculpt, thus we were able to draw upon the FACS scans to sculpt his elemental expressions and transfer the facial-capture data to his face rig. This approach paid off well in key scenes like Geralt waking up in the morning after finally succumbing to his injuries.”
The vampire’s facial rig required much more manual sculpting. Although mostly in fight poses, the monster had to also express key emotions such as triumphant over-confidence followed by surprise and shock. That meant Digic would take real-life actress scans and exaggerate various elements. “The bone parts are more exaggerated,” states Varga, “the skin is thinner and tighter, and the large fangs change the mouth area considerably.”
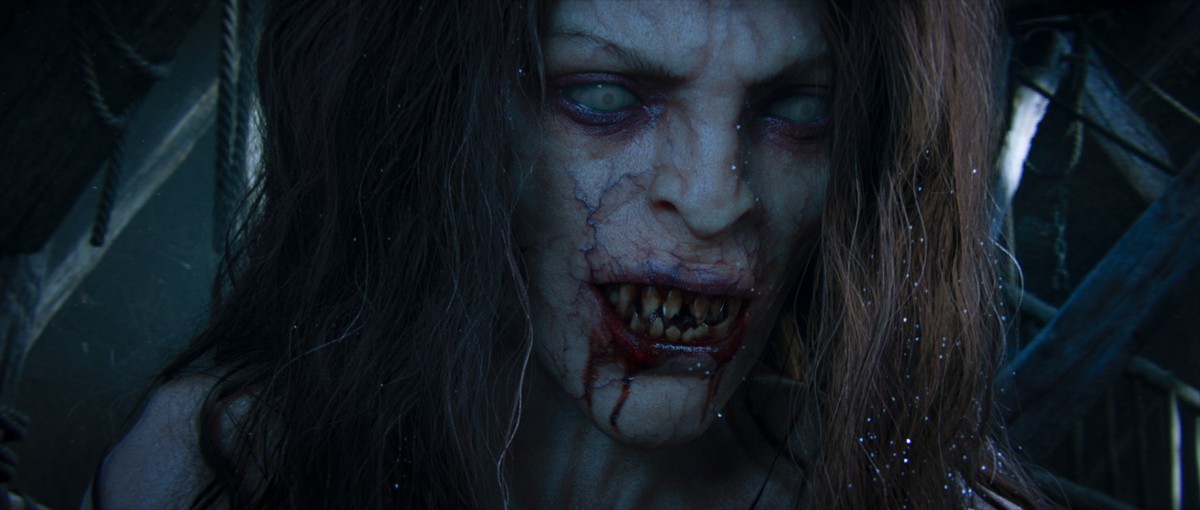
To make those changes, Digic started by taking the existing blendshape library of the human form and transferring it onto the face of the monster. “Then,” says Varga, “we started to manually sculpt the shapes to accommodate the changes. The lips in particular had to be a lot more flexible, so that she could both close her mouth, but also be able to reveal her fangs and smile at the same time. We’ve also spent a lot of time on her eyes in order to get a more monstrous look, yet also be able to express pain and fear when she’s mortally wounded by Geralt.”
Head-mounted cameras recorded footage of the actors’ facial motions during performance capture. “These were then used,” explains Horváth, “to provide the basis for the final animations down the line. Firstly, the most appropriate takes were selected, then processed using Faceware’s Analyzer and Retargeter. This method reduced actual animation time considerably, since the results provided great reference and a starting-point for our animators with regards to timing and dynamics.”

Artists then conducted detailed facial animation work, refining animation from the facial rigs and witness-camera footage. “It is important to note though,” says Horváth, “that we didn’t always ‘blindly’ follow the reference videos 100 per cent faithfully, deviating in certain cases where we felt that the given performance was a bit too strong and our rig produced better results with a more subtle approach. It was also part of our workflow to have a certain amount of back-and-forth between the cast department and animation department to refine the face-rig, since getting it right the first time is of course impossible, especially with a complex rig like hers that had to be able to do pretty much everything. Of course, getting useful facial video from the P-cap session is not always possible – for example on highly dynamic stunts, when wearing a head-mounted camera would be dangerous. In such cases, it is up to our animators to come up with something great from scratch.”
Indoors and outdoors

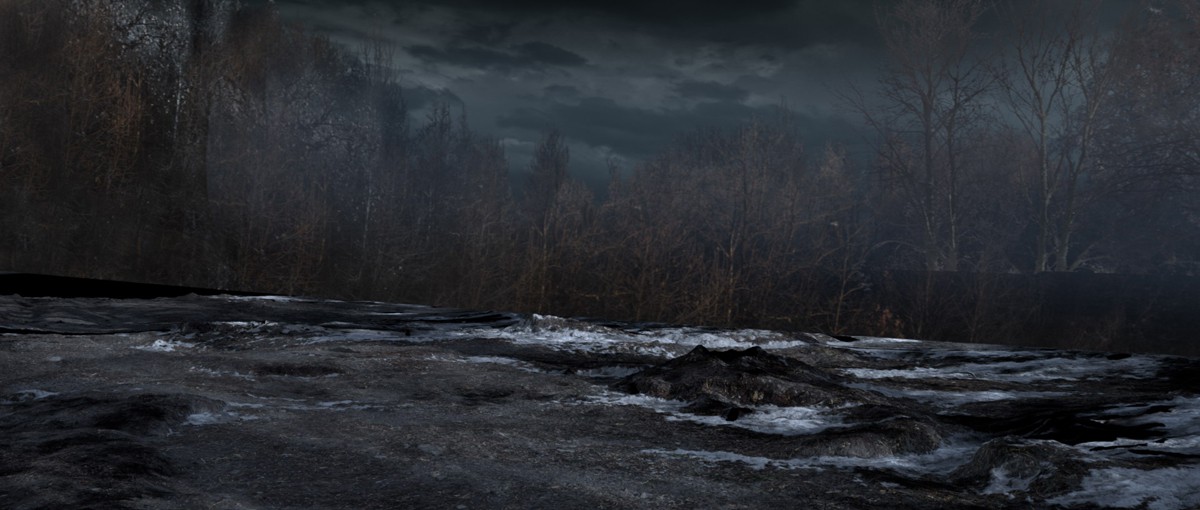
Digic relied on various methods to bring the environments of the launch trailer to life. “In many shots,” says director of environment division Zoltán Pócza, “we have used traditional 3D, projection painting, scanned objects, ground patches, stock videos and matte paintings. All these elements were created by different groups of people usually and they had to come together nicely in NUKE – something that was done by our amazing comp team.”
The studio had use of a 50 camera Photoscan system, developed for character scanning, but that could also be employed for scanning large objects. “We have used the scanning process for car wrecks for a previous movie,” notes Pócza, “and scanned standalone objects and ground patches for The Witcher 3 trailer as well. These give the best results when used ‘locally’ for a specific area, since it’s not too flexible.”
The scanning process was utilized also for creating realistic trees, although heavily leafed trees were devised with a mix of scanned trunks and branches and crowns made in Houdini. The barn environment featured a thatched dried straw roof. “It was something that made us scratch our heads for a while,” admits lead environment artist Raymond Wégner. “We haven’t done that before and we opted for a procedural approach that provides us with the opportunity to generate that roof based on primitive geometry volumes. It was done generally in Houdini and after several iterations we have reached to a point which was sufficient for most of the areas we wanted to use it for. Where it wasn’t enough we used various projections to touch it up.”
Instances of effects
The launch trailer had several effects challenges, too, including the look of the invisible vampire when she is covered with glimmering silver dust. This was prototyped in Houdini, and for the final asset the little speckles were instanced with Yeti. Many other small effects were also generated in Houdini – dust, debris, blood, sparks, flying leaves, breath, smoke, atmospherics and even scenes of the vampire crawling in a corn pile, which relied on Houdini’s grain tools.
Spells from the game are also featured in the trailer. “Quen is the defensive one, where Geralt is defending himself with a big orange ball against the flying cart, which is about to crush him,” explains effects lead Dániel Bukovec. “The other is Aard, he is using this as an offensive spell, when he tosses the vampire away with it. The Aard effect is affecting the environment, moving things in the barn, raising dust and debris from the floor. These effects are composed from dynamic smoke sims, geometry effects (not simulated), and particle instancing, made in Houdini. There were also some dust components made with FumeFX.”

Light it up
Although completely CG, the trailer still made use of real world camera movement and close attention to lighting design. “We wanted to achieve a somewhat foggy/misty moonlight atmosphere in the night shots,” outlines lead compositor Balázs Horváth. “We looked at a lot of movie references for this rather than real-life photos, which we found can be misleading. For example, moonlight scenes photographed with a long exposure often look more like some strange daytime lighting, instead of what one would imagine as moonlight.”
“We decided to render the scenes using neutral lights, then grade the scenes in compositing to be more ‘night-like’, adds Horváth. “This way it was easier to light all the individual render layers and matte paint layers to be of a uniform intensity, as opposed to if everything had started out already being underexposed and blueish. Lighter patches of fog along with strong rim lighting representing the moon’s light, and a darker sky provided the basic overall lighting principle.”

Inside the barn, Digic crafted a dusty atmosphere using volumetric rays to further emphasize the moonlight. “Achieving the desired look and lighting for the barn interior proved to be a fairly complex task,” says Horváth, “since we had to come up with a solution that not only reflected our vision, but also worked in every single shot and camera angle, while also fulfilling all the technical criteria that comes with the territory of hard-to-render interiors.”
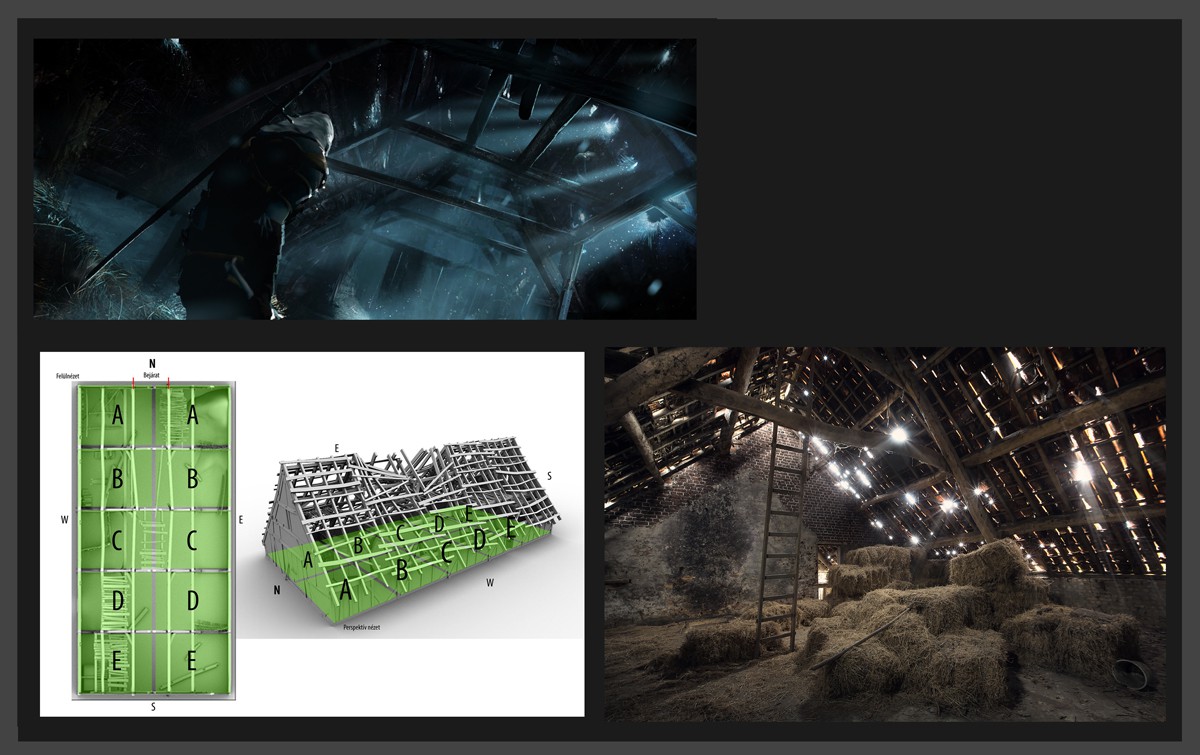
One of the important tasks artists had to determine was the exact position and size of the holes in the roof – for lighting and composition reasons, as senior compositor Péter Hostyánszki explains: “There were several factors to take into account: the composition in each of the hero shots; what objects the light falls on, and how it acts in each shot; and last but not least, the lighting had to cover the choreography of all the action in the barn in such a way that it would work with the necessary drama and storytelling at every given point – ie. when exactly each character should be in shadow / light.”
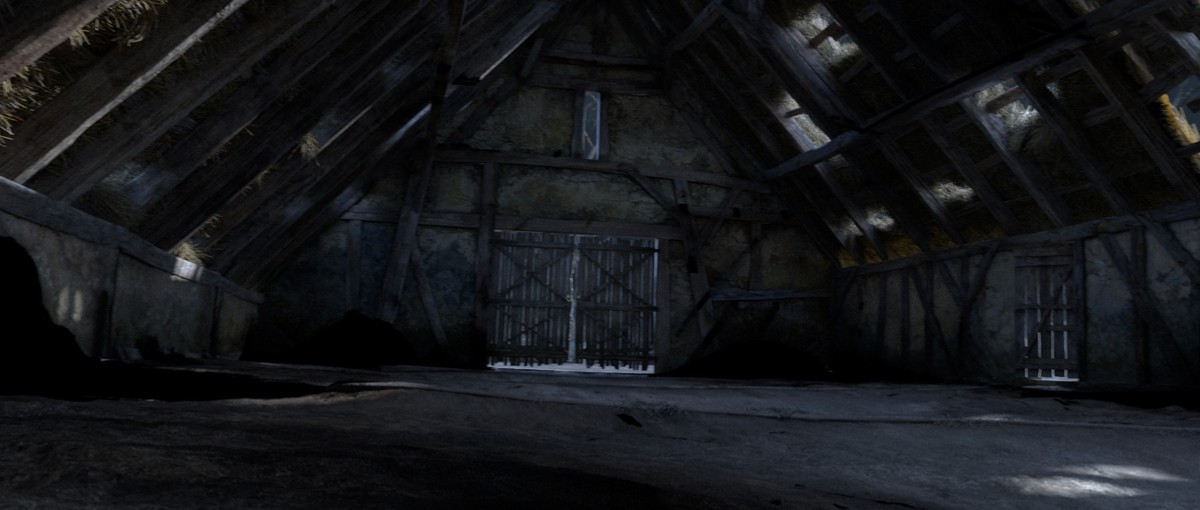
To deal with the barn lighting, artists first created a proxy version of the interior set with the thatched roof was represented by divided up planes. “The direction of the key light itself was settled relatively quickly,” says Hostyánszki, “after which the aforementioned method eventually determined the final layout of the holes, and thus the final roof asset.”
“Volume lights, and their effect on the environment, also played an important role,” continues Hostyánszki. “The volume lights themselves couldn’t actually be used for lighting as such, since their effect was essentially “uncontrollable”, brightening up the entire interior. We only wanted them to have certain local effects on the environment, so we place some cylindrical lights at their locations, allowing us the level of control to finely brighten only the local areas of the set.”
The characters also required their own lighting in addition to the ‘thatched roof holes’ method. “In most cases,” states Hostyánszki,”this meant one or two textured lights, with the textures simulating the holes. [see shed character lighting] With this type of lighting, the challenge was to achieve beautiful lighting on the characters while also taking care not to deviate too much from the direction of the key light, which was clearly visible due to the volumetric rays – which was often quite limiting as to where these lights could be placed.”
Render-time
Digic was an early adopter of Arnold for rendering, a tool the studio has embraced whole-heartedly and often works with Solid Angle on refinements for the software. “We’ve been using physically based shading for years now,” says lead compositor Balázs Horváth, “but we also found that if we properly split shading into AOVs then some tweaks can easily be done in post without visually breaking the shaders’ internal logic.”
Most animated shader/texture effects were also achieved in compositing. Horváth explains that the reason for this “is that achieving the right timing for these animated effects takes a lot of iterations, and we can tweak masks and run through iterations a lot faster in compositing as opposed to doing these in Maya with shaders and having to iterate 3D renders. One example of this is where the monster’s skin changes after being poisoned: here all of the vein and skin animation was added onto the monster in NUKE.”


“Another technique we used,” adds Horváth, “was importing 3D animated Alembic objects from Maya into NUKE, for texture projection work in post. We found that this worked better than projecting textures via UV channels in certain cases, for example where strong motion-blur was causing serious artifacting.”
It was also important to show in the trailer, reflects project director Peter Sved, that the Witcher universe was “not about your stereotypical good versus evil characters – everyone has their own side of the story. The lullaby sung by the girl/vampire in the trailer is a great example of this: it is in fact a song that a ‘monster’ would sing to her offspring, about the terrible Witchers, who come and hunt them for money. It is an ambiguous world in this sense, where Geralt is not clearly a positive ‘hero’, and thus the film works deliberately to arouse some sympathy towards the girl/vampire.”
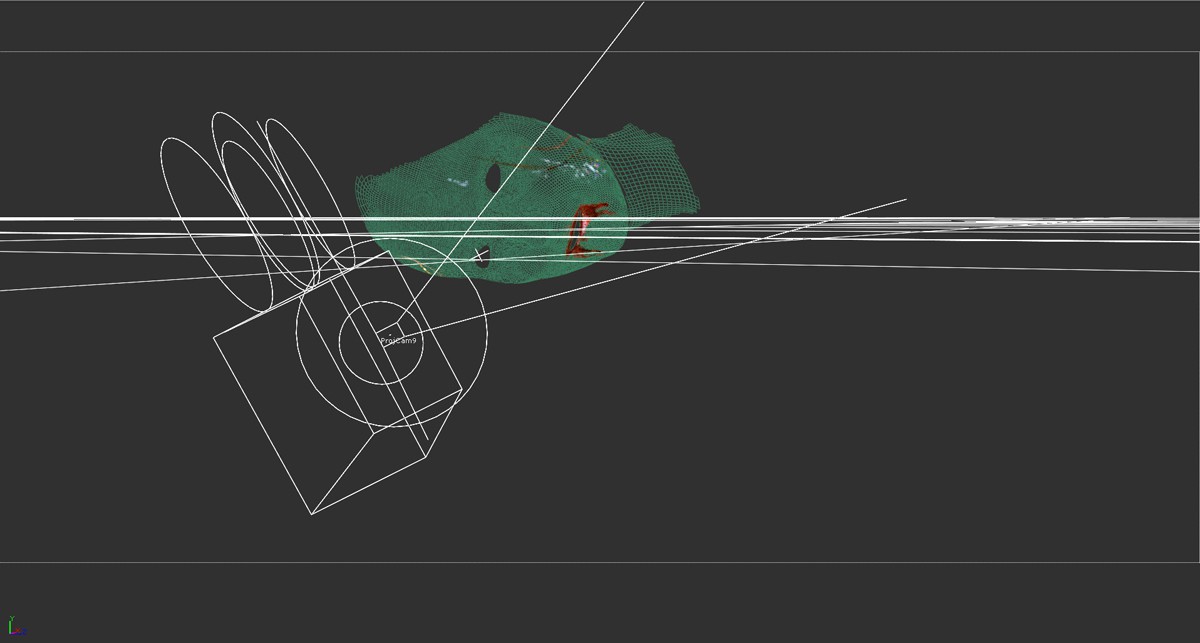
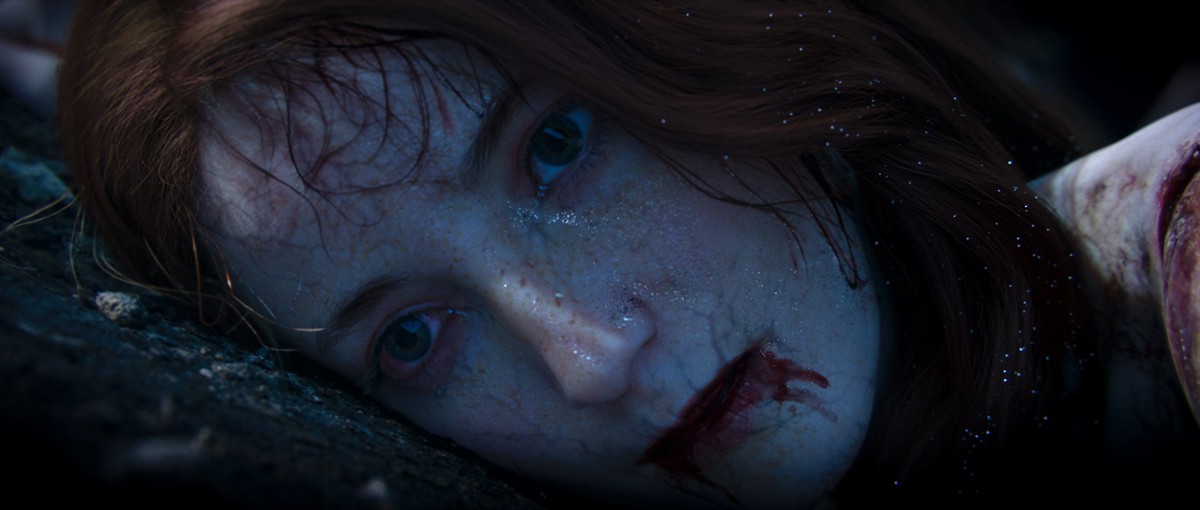
SHOT BREAKDOWN – THE DYING GIRL
wow
what is the name of the actress behind Orianna’s model?
I read the whole article for this info. All I could find is the actress, The girl etc.
Zsuzsanna Rácz
This is amazing!