Director Tim Miller’s first feature, the Fox film Deadpool, hasn’t just raised the bar for subversive, fourth-wall-breaking comic book movies, it also pushes the art in terms of visual effects. From completely synthetic environments for the freeway chase, to a fully CG dialogue-delivering metallic character in Colossus, to a unique approach to Deadpool’s facial animation and an unforgettable frozen moment opening title sequence, the film showcases a raft of impressive tech. We talk to Miller, overall visual effects supervisor Jonathan Rothbart and VFX vendors Digital Domain, Atomic Fiction, Blur Studio, Weta Digital, Rodeo FX, Luma Pictures and Image Engine about just some of these key scenes.
It started with a test
Most comic book fans will know about Deadpool’s long road to the silver screen. Hired as director, Miller pitched his version of the film to Fox and ultimately produced an all-CG test starring a mo-capped Ryan Reynolds in a frenetic freeway fight scene. Fox did not move ahead with the film but a few years later that test leaked, and the Internet fandom loved it, ultimately greenlighting Deadpool. Miller, who has owned and run Blur Studio for the past 20 years, had accumulated a wealth of storytelling experience in the animation and CG realm, which he now had to transplant to a live action film.
“Directing actors wasn’t difficult at all,” Miller says, “and in fact I really loved that part of it. I’ve done a lot of that through mocap and I think being an animator helped. On a live action set it’s the same way as it is on mocap and in animation – it’s people moving through space delivering dialogue and you’ve got to make it feel natural. There’s no real big different between animated characters and live action characters. They’re a little harder to control, but other than that it’s not all that different. I was very used to analyzing the way characters move through space to a degree that live action directors don’t normally do. You’re just trying to replicate reality through a different medium and you have to pay closer attention to reality in order to replicate it in CG.”
“The mechanics of directing – where do we put the camera and for how long? That was a little bit of a mindfuck for me,” the director confesses. “In mocap and CG that happens but it happens at a different time. I can always go back and get a close-up. I can always do a crane shot later if I have an idea, but when you’re on a live action set you have to plan it all ahead. And then everybody has to get on board with that plan and the plan has to fit in with the budget and schedule.”
To help him through the film’s visual effects challenges, Miller enlisted Rothbart to help pull off what would be around 1200 extremely challenging shots – both technically difficult but also required to fit into Miller’s ‘R-rating’ approach to the comic book story. “We kept on saying we really should have put up a quote board on this show, because I’ve had the most insane conversations with my crew about how much blood and gore and other weird stuff there should,” says Rothbart. “And even the dialogue for Deadpool informed the VFX, so for example I’d be having this conversation with Weta Digital, who did some facial animation, saying, ‘No no no, his eyebrows need to go up on ‘shit’, and down on ‘fuck’.’”
Designing a title sequence for laughs is harder than you think
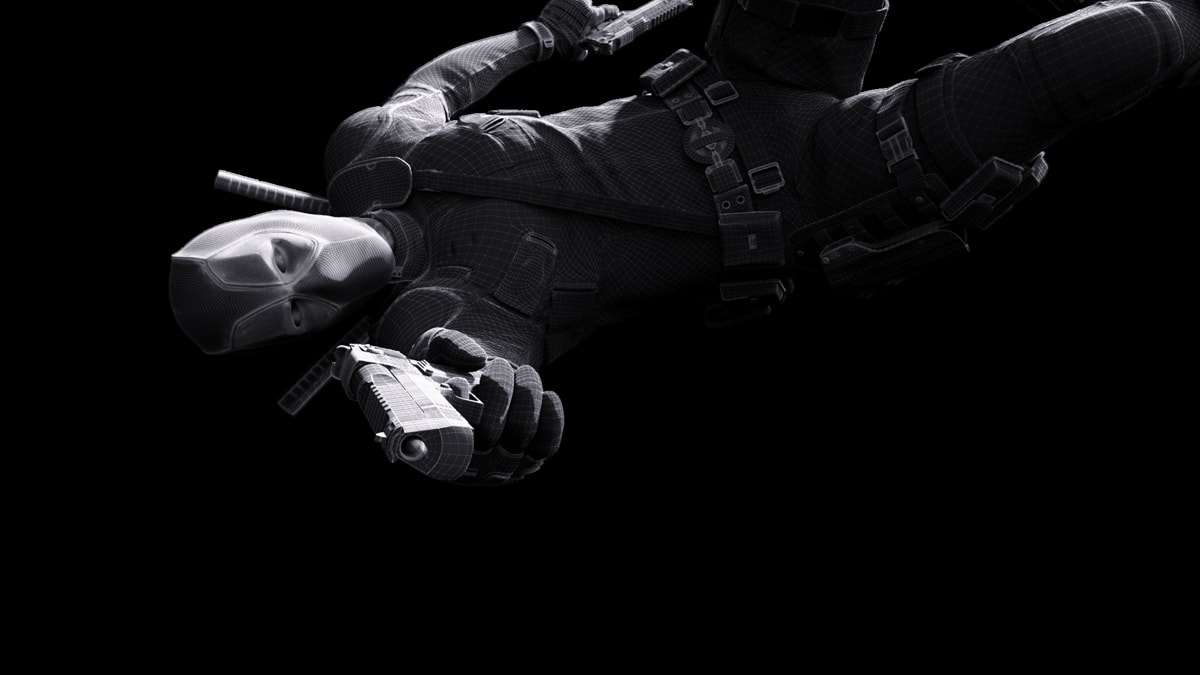
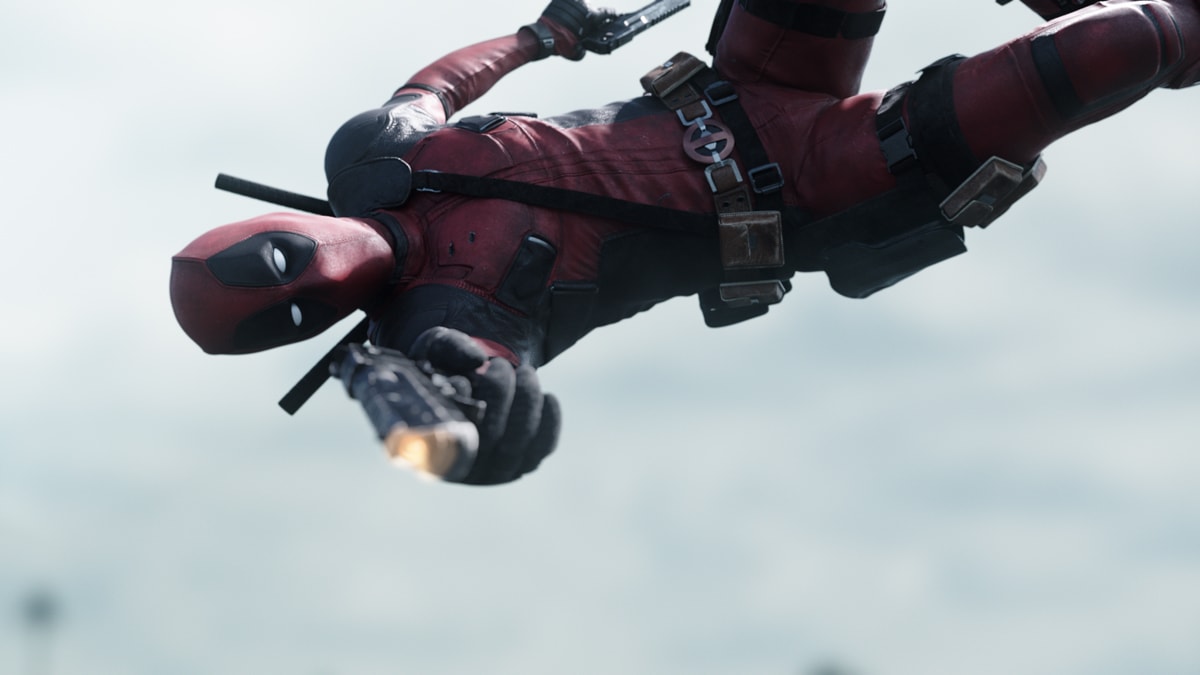
Deadpool’s opening titles – a 85 second full CG frozen moment mid-freeway crash that’s populated with such titles as ‘Directed by an overpaid tool’ and ‘Produced by asshats’ – has already garnered incredible attention and praise for establishing the irreverent tone of the film. But just formulating and pulling off a sequence that establishes the right feel and introduces Deadpool was not easy. In fact, it took careful planning from Blur Studio, under visual effects supervisor Pauline Duvall, to bring to the screen.

Just working out how to introduce the central character was a challenge. “How do you introduce a character that is so not the usual super hero?” – that’s one of the questions Blur’s Franck Balson, who helped devise the sequence, had to ask. “Basically we came up with the idea of introducing him by his junk – it’s frickin’ Deadpool, man! He’s not your traditional superhero. Then we had the idea of a constant pullback inside the car that reveals all the thugs Deadpool is fighting, and he’s pulling a pulling a wedgie on one of the guys, putting his eyes into the fingers of another dude.”
To make the all-CG shots, Blur initially previs’d the action. Then, since the frozen moment was intended to hook up with a later view of the crash that would be orchestrated by Atomic Fiction, Blur received assets from Atomic and then adapted them for the studio’s 3ds Max and V-Ray pipeline. “We had to up-res a lot of things,” notes Balson. “The title sequence is macro photography for half of it, where you get really close to small parts of the car.”

These macro views had their own sets of challenges, one being texturing in high detail and establishing the camera movements and poses early on to eliminate extra unneeded work. “The thing we also played the most with,” adds Balson, “was how defocused should the things be? We actually travel quite a distance through the car so the moment you start having too shallow depth of field you don’t really have enough time to register the jokes and the elements you want the audience to see. What we had to work out was parts of the image where it wasn’t overwhelming and beats where there were nothing so the audience could laugh and appreciate the joke and then move onto the next one.”
How to make a freeway chase when you don’t have a freeway
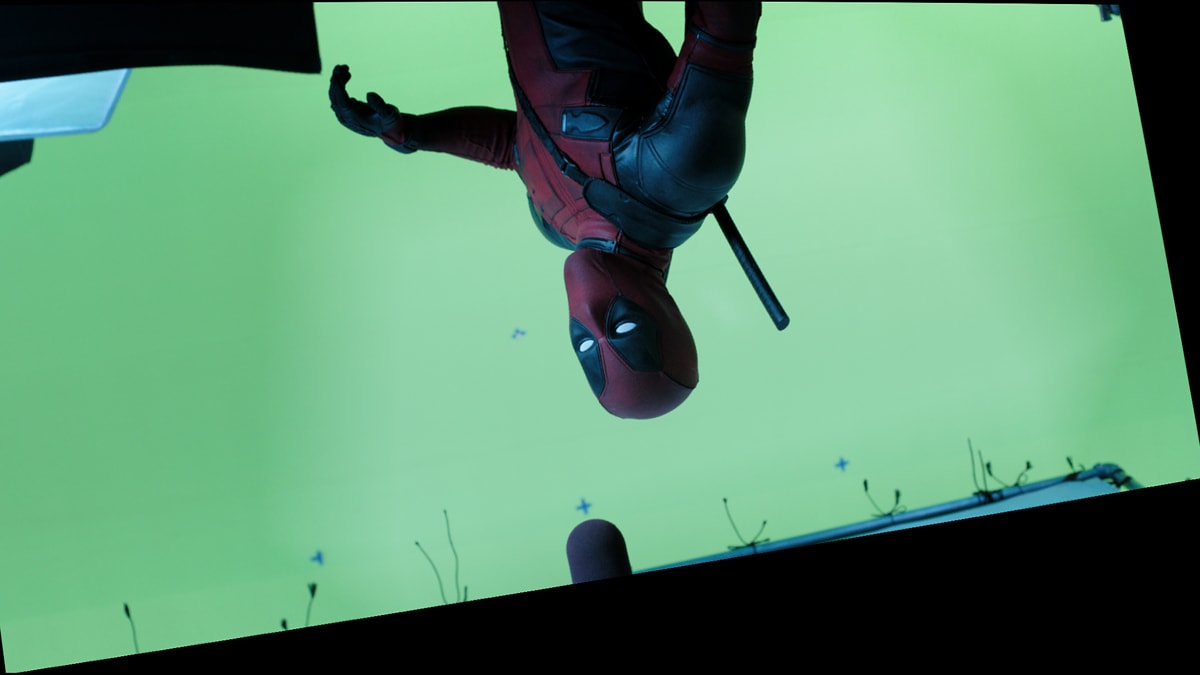
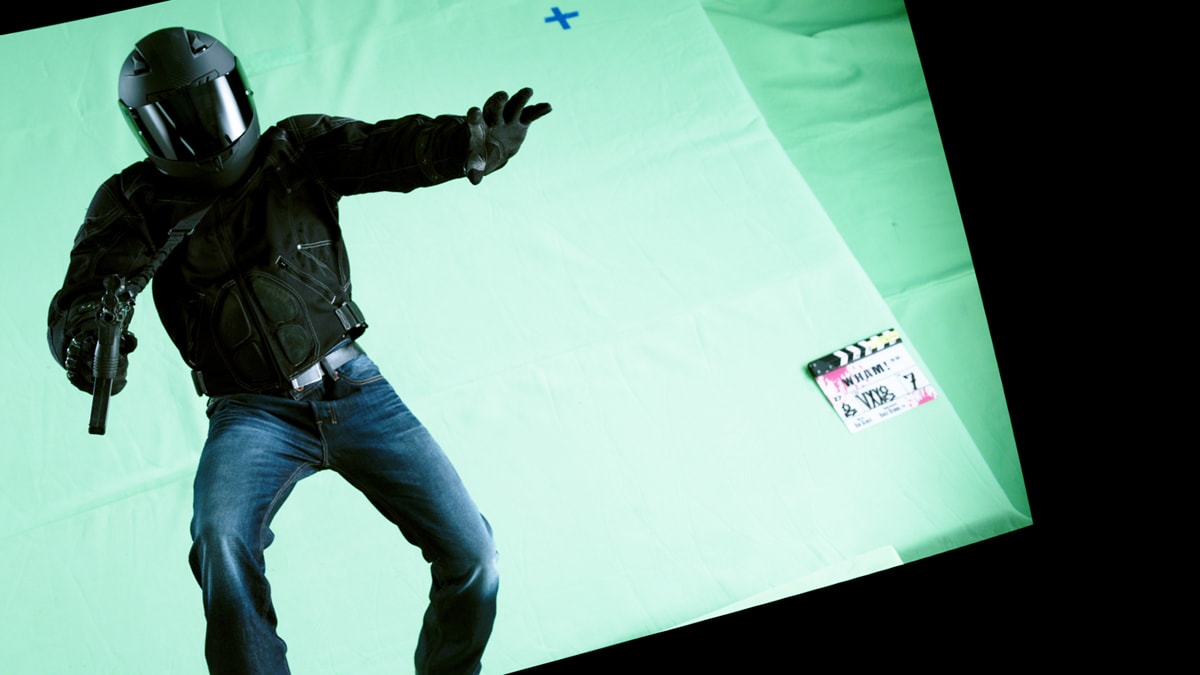
One of Deadpool’s signature sequences is a freeway battle as the titular character takes on a group of evil mutant Ajax’s thugs in their moving vehicles. Audiences had had a glimpse of the scene in the leaked CG test footage that Miller and Blur had produced some years earlier, but of course now it was revisited for the feature film. Except there was one problem – it was difficult to find a freeway that could be used for choreographing the complicated set of stunts. The solution was to have vehicle interiors and other action filmed on greenscreen, making use of multi-cam freeway plates shot in Detroit and projected with LED lightboxes, and then for the vehicles, the freeway and environments to be constructed digitally.
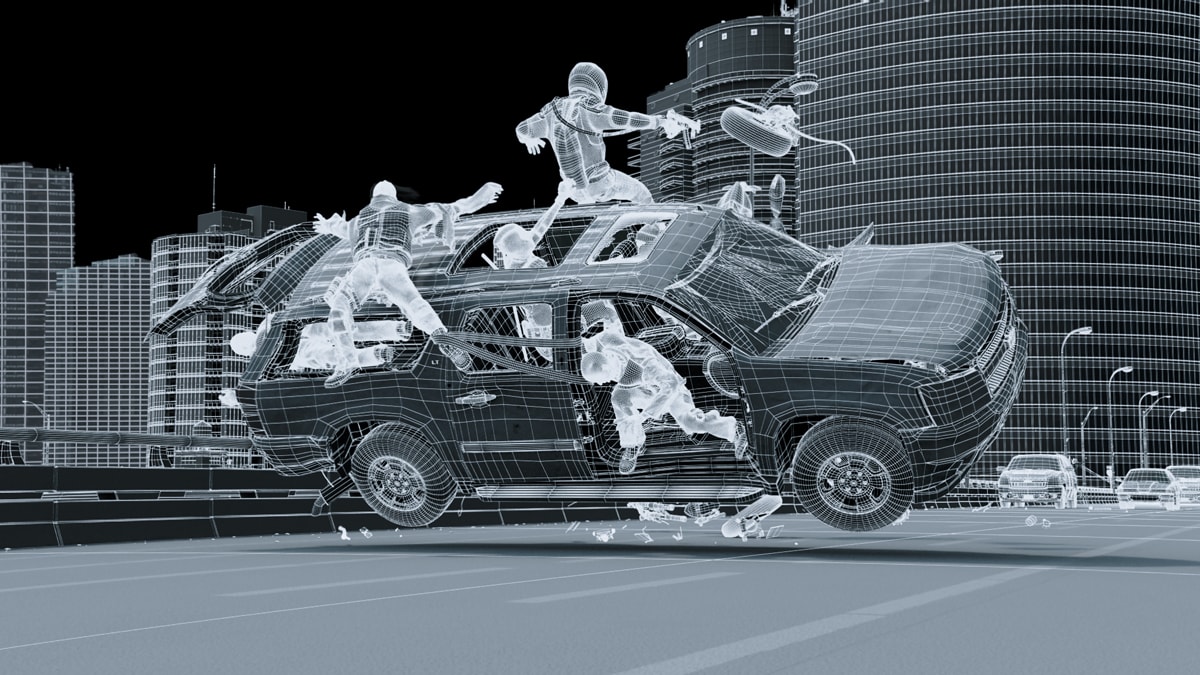
Based on previs by Blur, production gathered background plates while filming in Detroit with a seven-camera RED DRAGON rig. Rothbart and DOP Ken Seng then devised a lightbox system for the greenscreen shoot. “We set up these LED panels all around the car using the Detroit plates,” explains Rothbart. “I lined them all up in the seven camera view and edited it so we had certain chunks we would use for each part of the sequence and then could map it out. For example, where the fight takes place in a tunnel, we had our tunnels loop. So the lights would dim, everything would go black and then it would come back to normal lighting as they come out of the tunnel. It meant that later on we got all that interactivity when we put the CG environment in.”
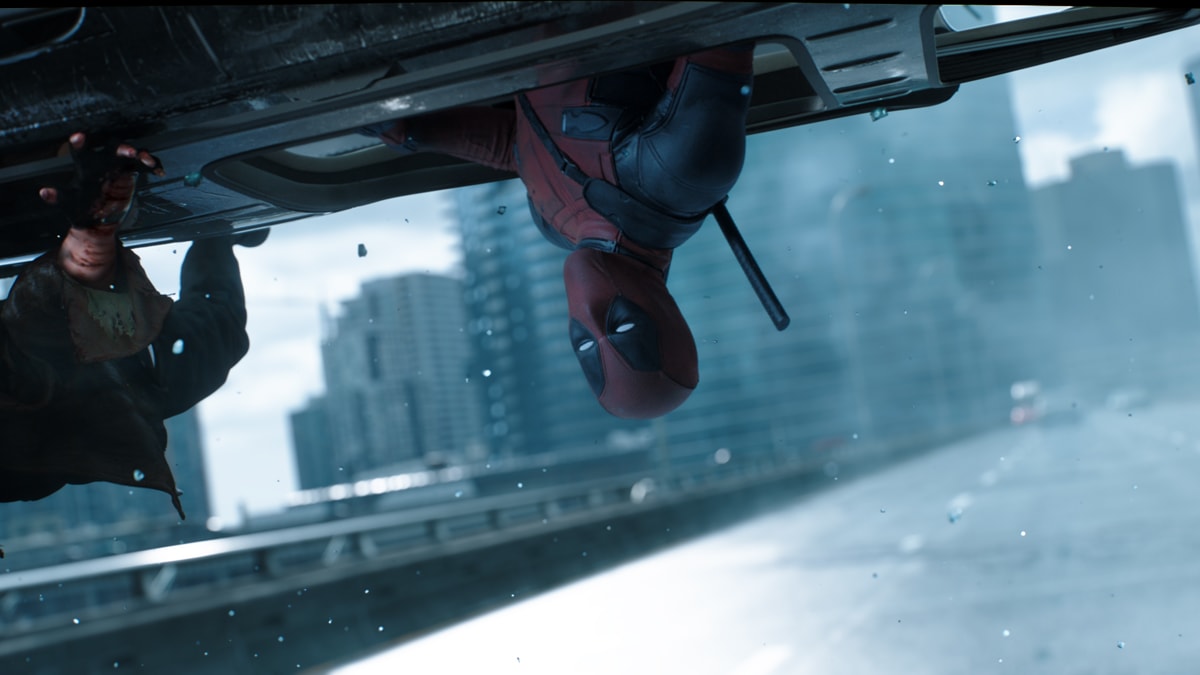
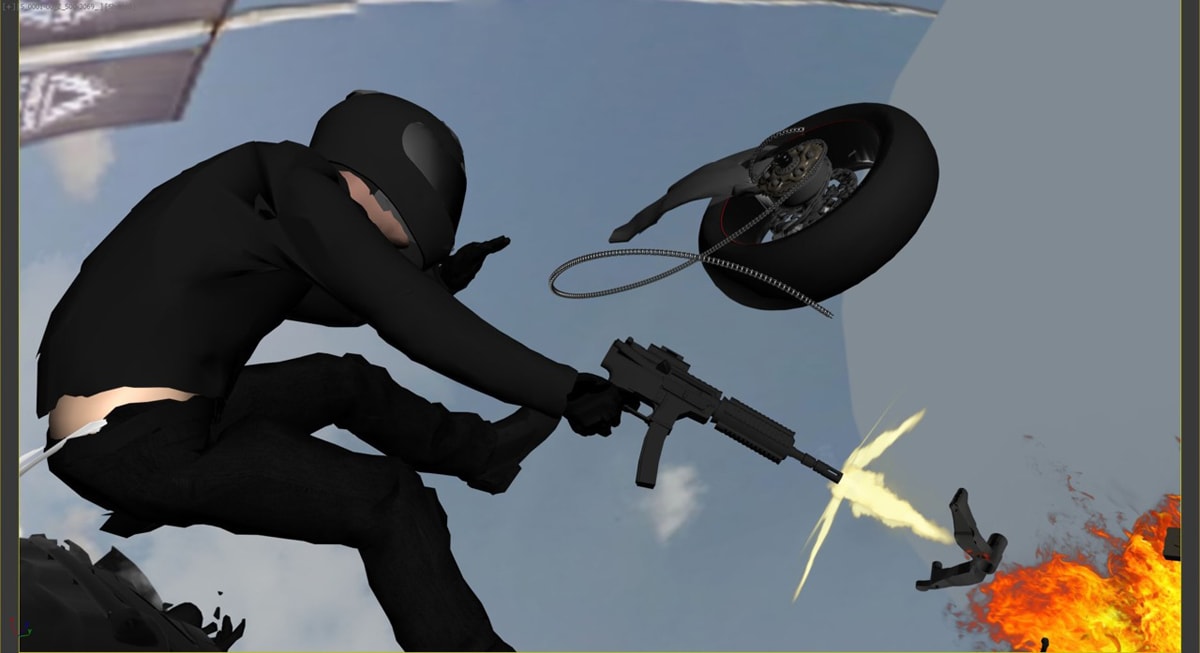
The greenscreen shoot also involved several stunts, such as one part of the sequence where a thug hangs off the back of a vehicle. “We actually had him on a treadmill and scraping along the ground of a treadmill as he went along,” says Rothbart. Other stunts that could not be performed safely were captured on a motion capture stage to facilitate action for CG thugs and a CG Deadpool. “Even the guys on the motorcycles,” notes Rothbart, “we would capture on a rig that would be like a motorcycle to get their motion and movement.”
Then, Atomic Fiction began crafting the necessary environments the freeway sequence would go through; intended to be a city made up of a mix of Detroit, Chicago and Vancouver. “We built the city very much in a way modeled after how we did it on The Walk,” discusses Atomic Fiction visual effects supervisor Ryan Tudhope. “Our pipeline utilizes Katana and our animation team was working in Maya. What we did was break the city up into about 12 sections. Once we had these different sections we were able to break apart from a crewing standpoint. We had the environment teams who could work concurrently on each section. Then Katana and our pipeline could really efficiently pull in whatever sections we needed for a given shot.”
“We would also vary the look of things a bit,” adds Tudhope, “because the one thing we didn’t want to do was have the audience see the same looking stuff for four minutes. So everything from the design of the city, which was a more run-down industrial area, then as we moved through it was an older 1930s-50s architecture and we come out to a more modern side of town which was the Vancouver glass skylines. Even the wet down on the road, we would change our road shader from section to section a bit so it felt like certain areas were wetter than other areas.”
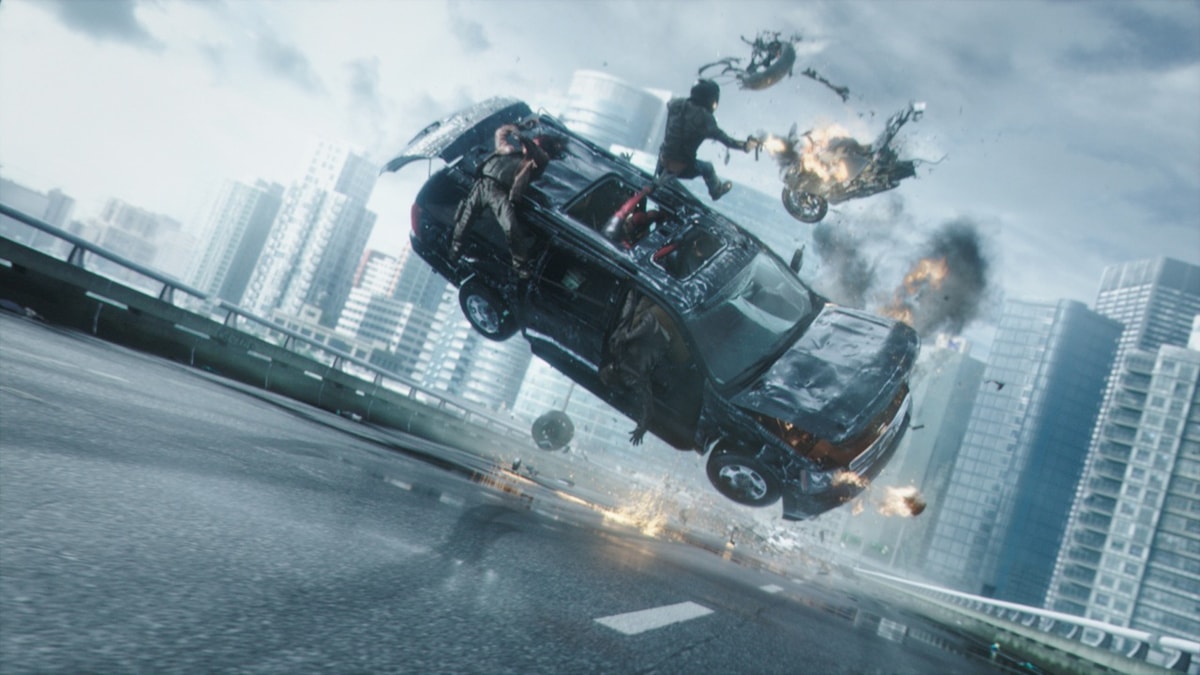
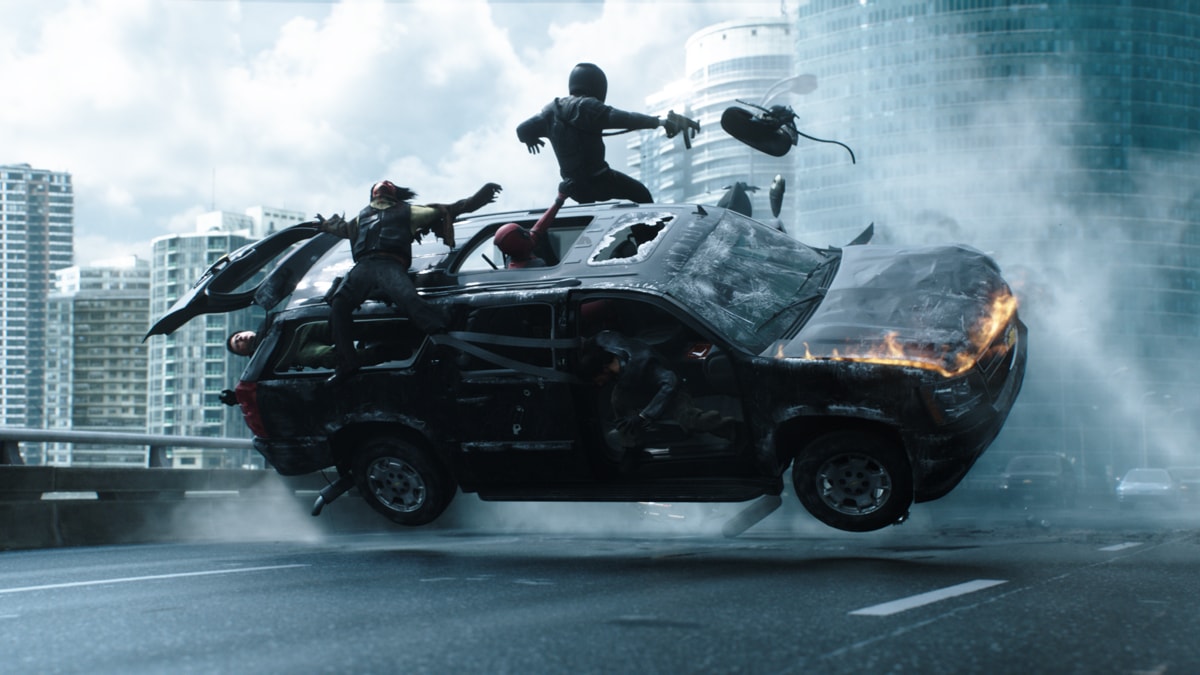
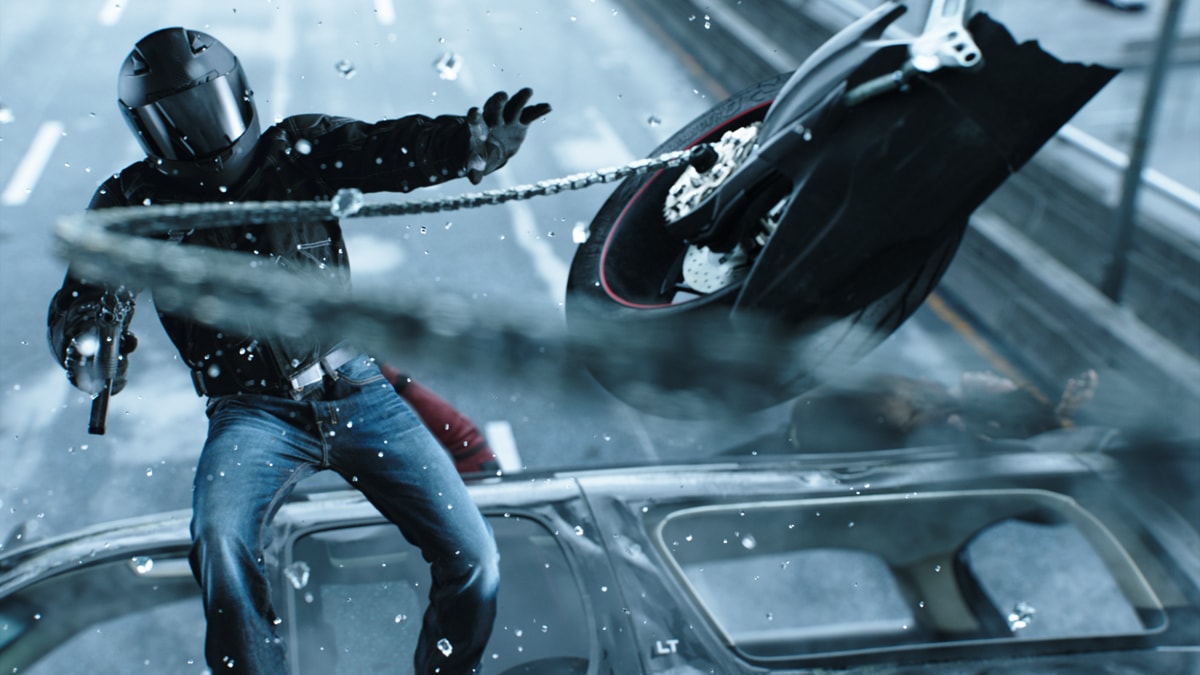
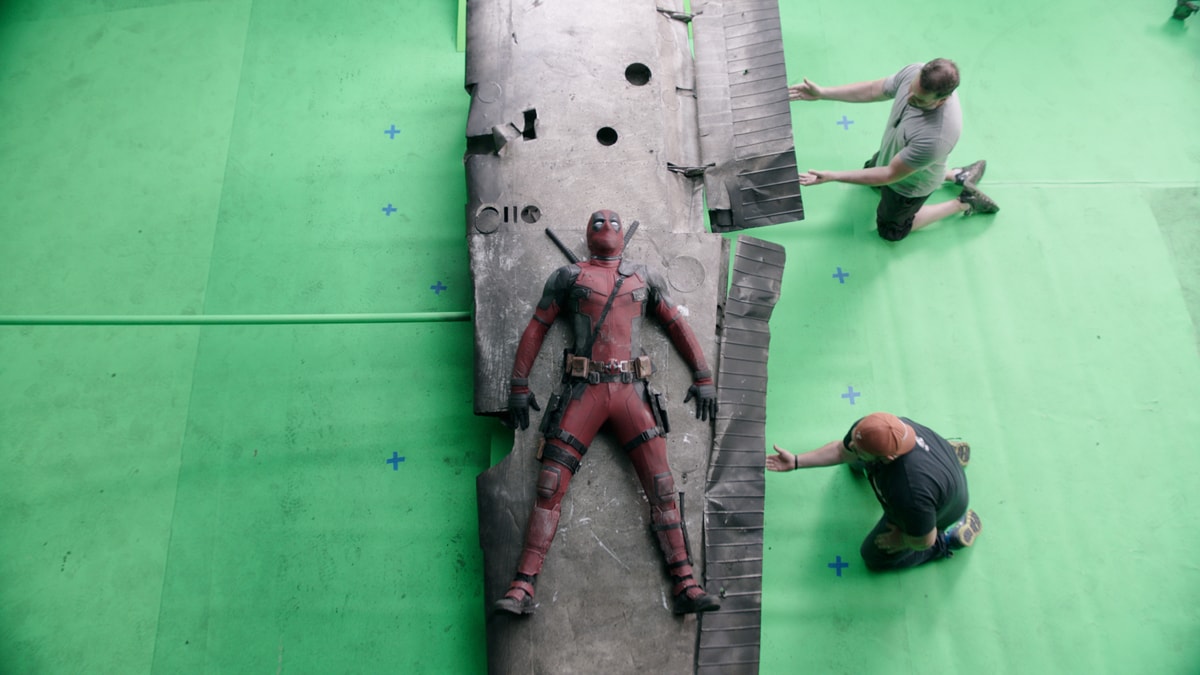
The crescendo of the freeway sequences results in a final death-defying ballet of crashing vehicles which leaves Deadpool inside one of the cars as thugs take aim. This section of the sequence was filmed on Vancouver’s Georgia Viaduct, with backgrounds augmented by Atomic Fiction to look more like the city they had been detailing for the freeway. A whole raft of effects shots take place here too as Deadpool counts down the limited number of bullets he has to take out the thugs. Shots ranged from CG Deadpool stunts, digital weapons and muzzle flashes, macro views of the bullet numbers, and a host of blood and gore enhancements.
The many faces of Colossus
We’ve seen Colossus before in the X-Men universe, but Deadpool’s Colossus is something different, something very different. In fact, Colossus is a mish-mash of more than five different performances from actors and stunties acquired on-set, in motion capture and via facial animation techniques – all designed to represent an older and more battled-scared Russian metallic mutant that was faithful to the comic books. But to get there involved a significant combination of live action performance then digital work by Digital Domain, which utilized its MOVA and Direct Drive tech. Blur Studio also contributed several key Colossus shots.


Firstly, an on-set performer, Andrei Tricoteux, who was 6 foot 9 and occasionally wore a gray tracking marker suit, performed as Colossus. Sometimes he even wore platform shoes or an extra hat-piece or be on a platform to be even taller. “That meant he couldn’t move too athletically being so tall in those shoes, especially during the fighting sequences with Angel Dust in the scrapyard,” remarks Rothbart. “There, where he was fighting Gina Carano who is an amazing fighter, we would do a mix between what he wore – if they were doing grappling we would put him in in his platform shoes, in other parts he would be out of them so he could be a little more dynamic. We also noticed that Gina was so fast and so strong, she would do the moves and we would pull him out and put a stunt guy in there with pads to hit and let her go to town.”
Actor T.J. Storm carried out Colossus motion capture for body motion. Yet another actor, Glenn Ennis, a stunt performer on the film, was the inspiration for the chiseled jaw look behind the character and underwent a FACS session to acquire the right face shapes. Actor Stefan Kapičić was the final voice of Colossus.
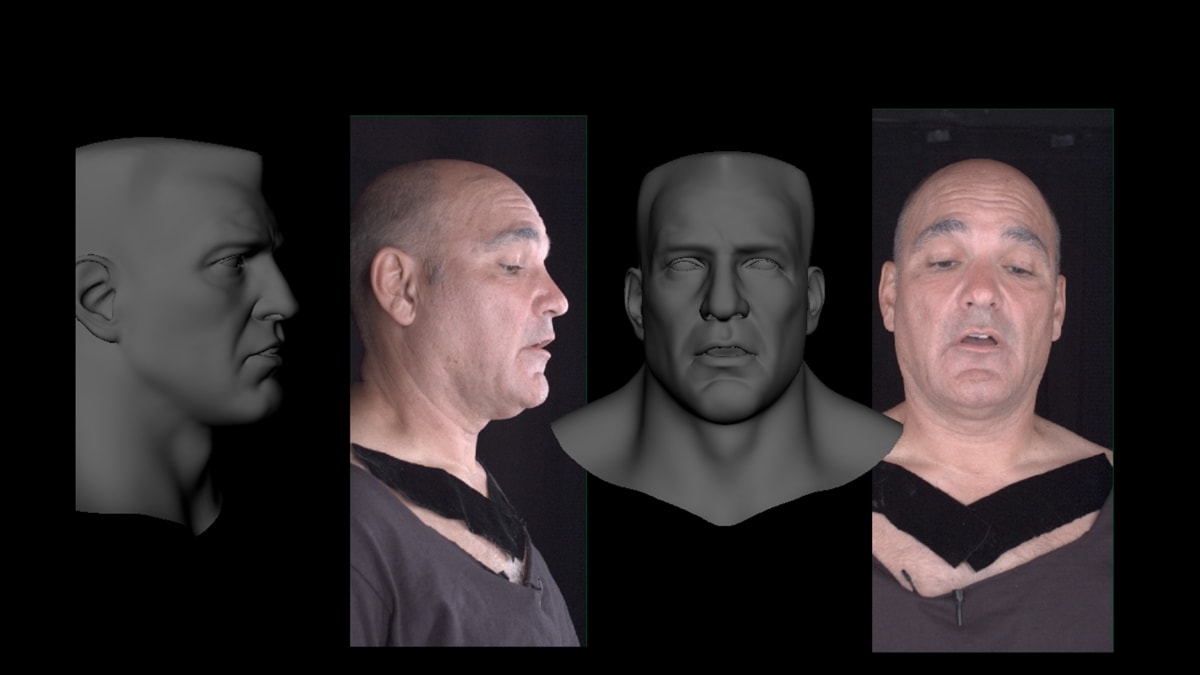
That’s when Digital Domain stepped in with its MOVA setup which relied on capturing the Colossus dialogue in a multi-camera setup on a performer painted with phosphorescent paint spray on their face. In this case, this was MOVA team member and motion capture supervisor Greg LaSelle himself who would re-do the Colossus lines with the intended performance in mind. “It was challenging to do face sync where the audio was recorded first,” says LaSelle, “but it was really great to get through all of Colossus’ shots for the entire film. It’s basically a realtime capture system so the camera was just rolling and Tim was saying, ‘Try again’ and ‘Do this’ – you’re just whipping through shots.”
Since MOVA provides a 1:1 way of capturing facial performance, Digital Domain had to re-target Greg’s performance (remember, Greg doesn’t look like Colossus) to the CG model of the character. To do that Digital Domain used its Direct Drive system. This involved taking the MOVA motion and re-targeting that to the CG Colossus. “The Direct Drive system we developed,” explains Digital Domain animation director Jan Philip Cramer, “is all about taking the motion and re-targeting that onto any character you like but maintaining all the details and high friction, the subtle wrinkle details that you capture with MOVA but transferred onto a completely different looking character.”
“We also do a regular face solve like with traditional facial mocap and we put that onto a FACS rig,” adds Cramer, “so the animators still control what we did but we maintain all the beautiful detail of the skin sliding and the additional high frequency information that you simply don’t get when you marker up the face and run around with the head cam.”
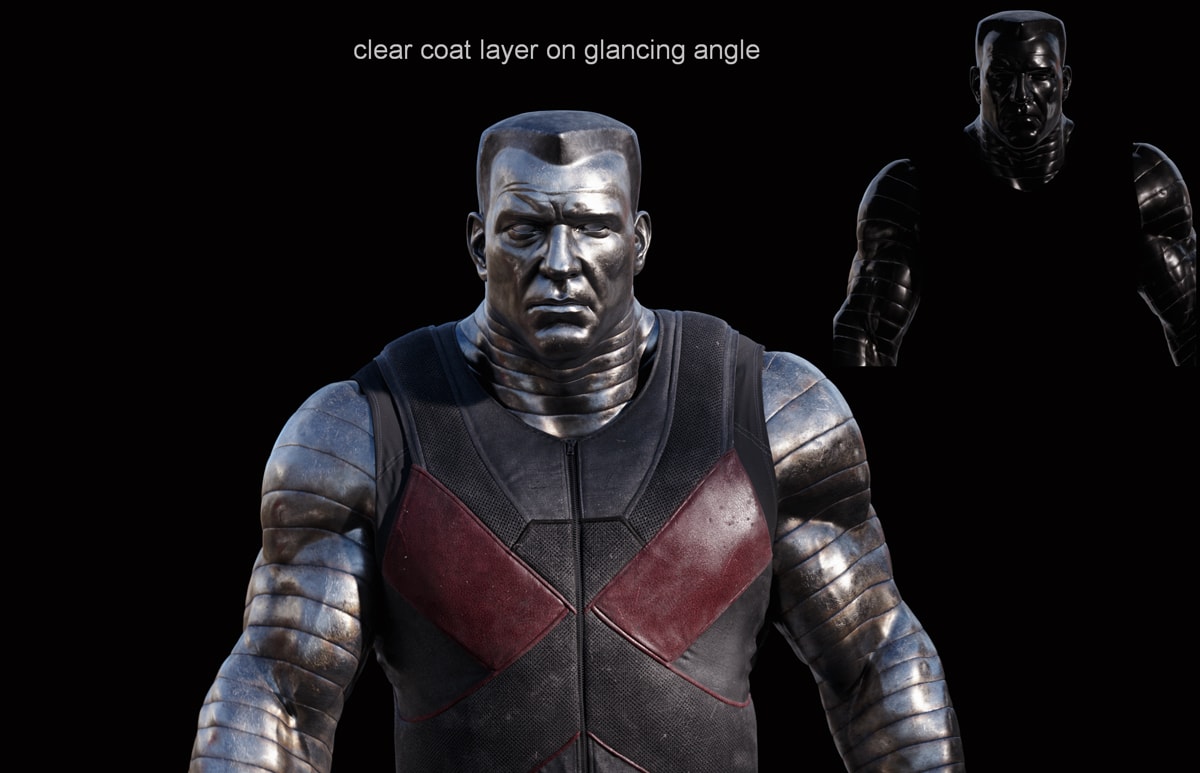
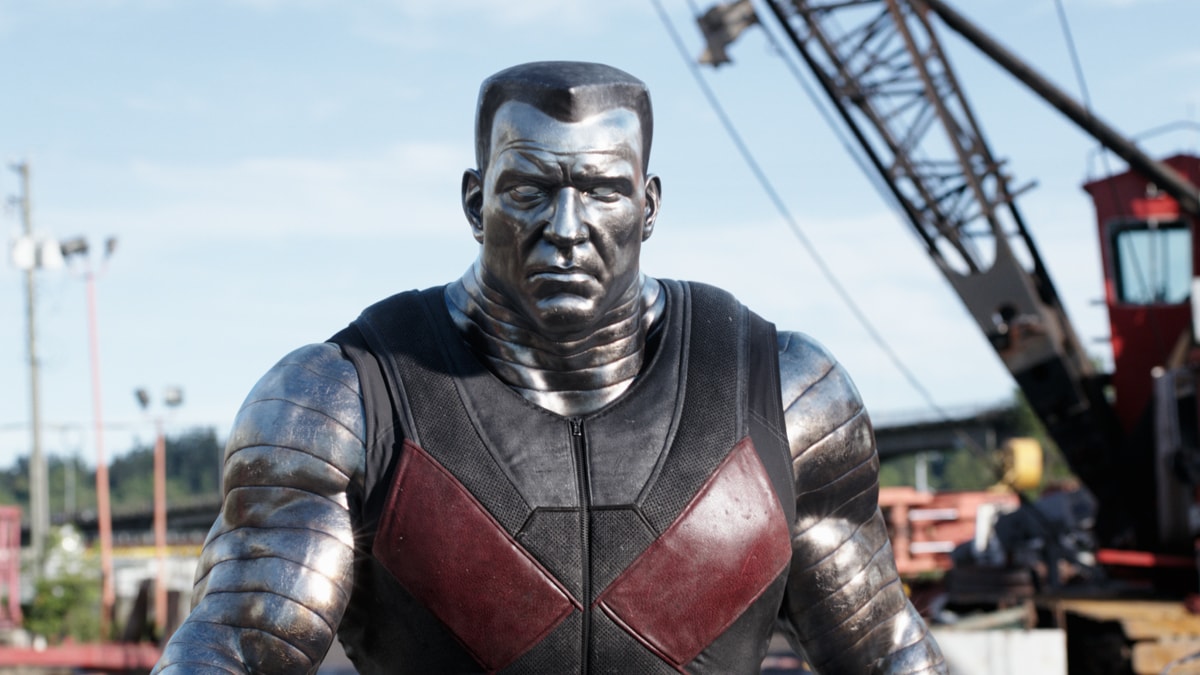
If the facial performance weren’t complex enough, Colossus’ metallic finish provided a whole new set of technical challenges. The first was to make his chrome finish not look too ‘chromey’, and for that Rothbart sought out specific reference. “We even went so far as going to a metal company and had them give us a whole bunch of different samples of different types of steels,” the VFX supervisor says. “For Colossus’ main body, we ended up with cold rolled steel as the metal look. His hair, which is a much darker look, we used hot rolled steel. It was important to have a patina, and mostly around his ridges you’d get this rainbow-y coloration, when metal gets overheated or when you get oil on it over time. We worked that into it as well, just to make it look different.”
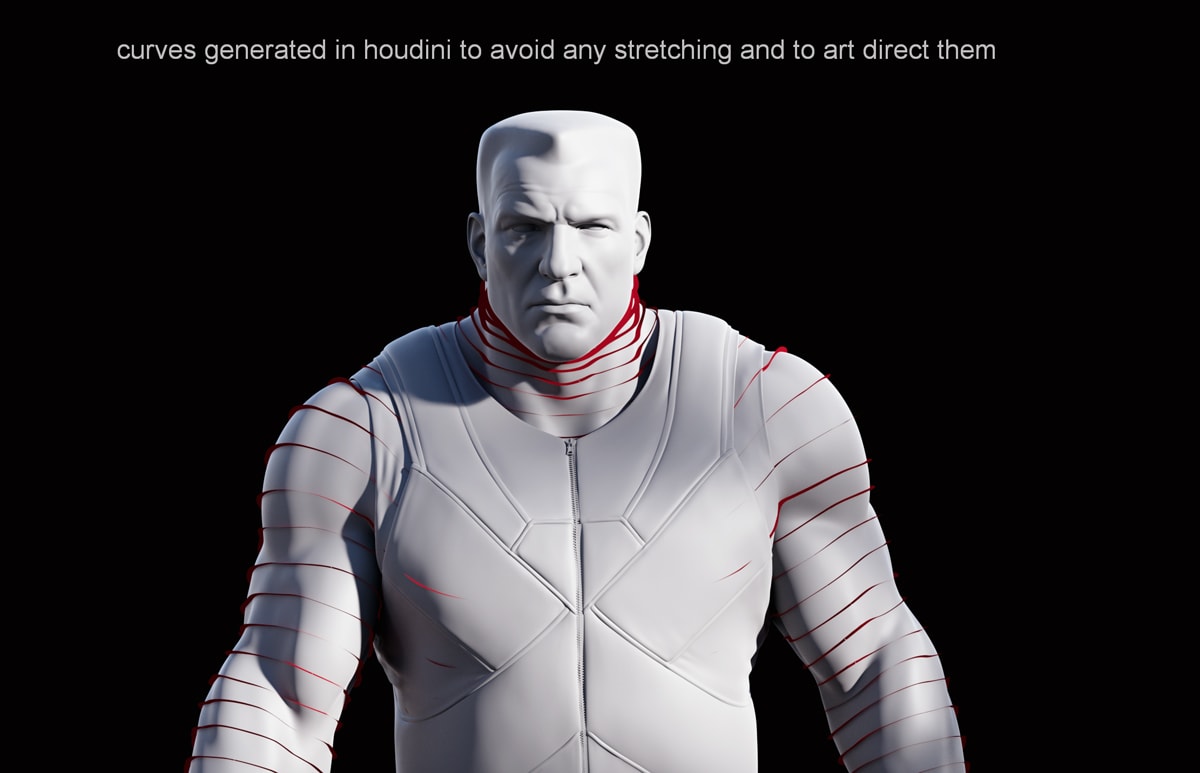
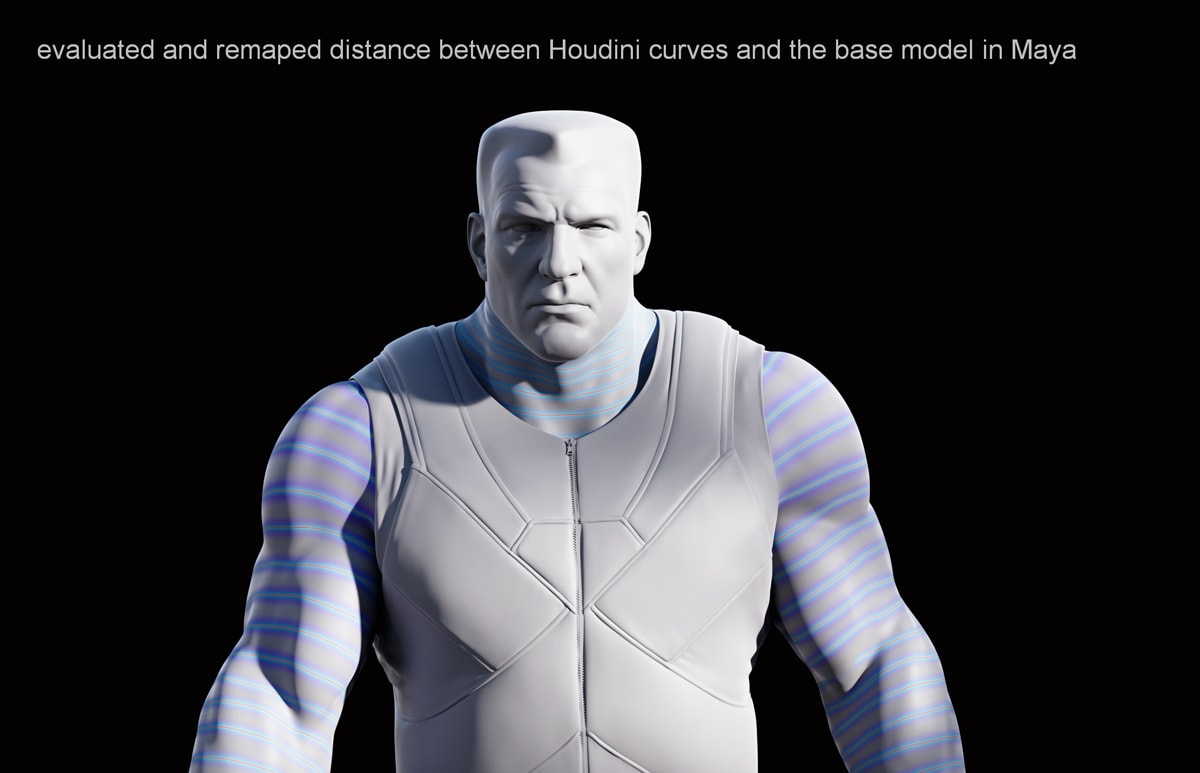
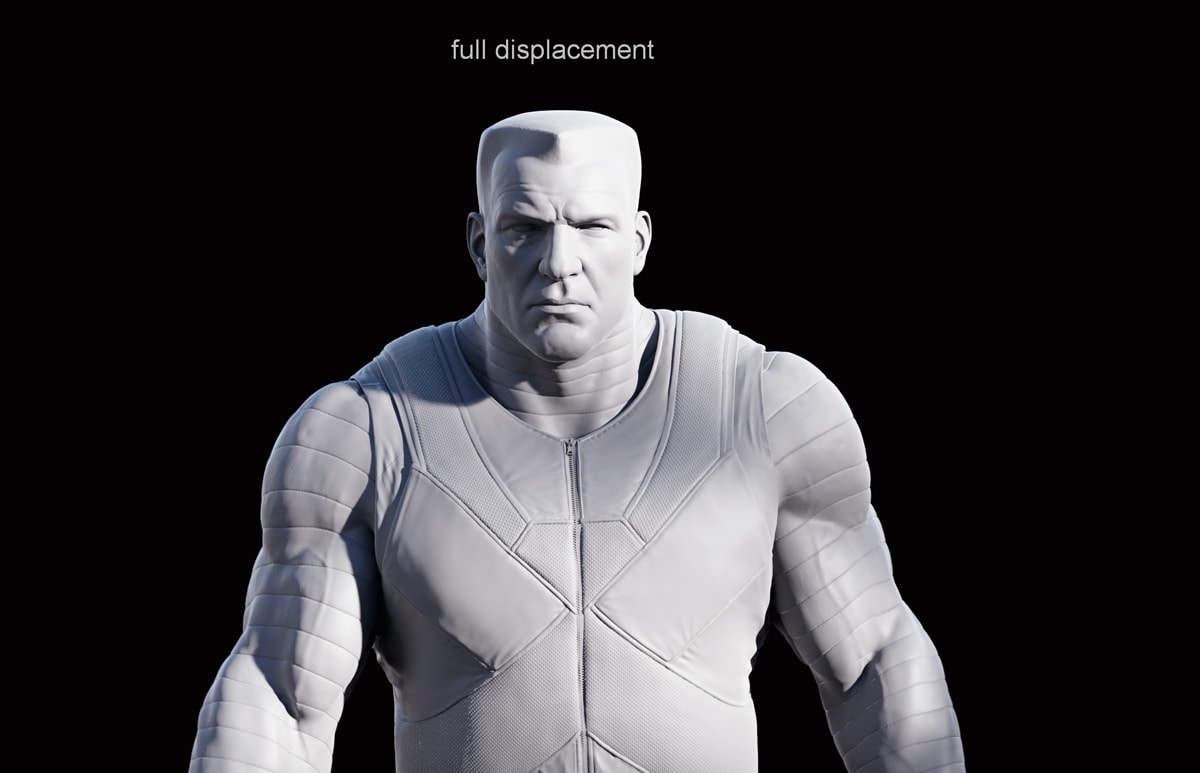
What made that final patina complicated, however, was that Colossus’ ridges and lines in the comic book were perfectly straight. “Once you get into animation and movement,” says Rothbart, “those lines fall apart. They can’t ever be looked to his body because then they get all squiggly and strange. So DD had to come up with this system in Houdini where the lines would animate along his body based on the positions he was in and the motions he was doing. They were pinned in certain areas but allowed to move in others. So what you ended up with was a live texture. Where these ridges were, that’s what drove the texture. So all the textures on Colossus had to be live and couldn’t be painted and locked into his shape.”
Digital Deadpool
As much as possible, Deadpool himself was brought to life with stunts overseen by supervising stunt coordinator Robert Alonzo and stunt coordinator Philip Silvera. But where the character’s actions were more extreme, various VFX facilities relied on a shared model and textures built by Digital Domain. “Going through the CG process was almost the same thing they went through for the costume design of Deadpool,” notes Rothbart.
“The costume is made of this mesh so all the dirt would get into the gutters and the cracks and crevices of the costume. Then all the ridges of the mesh would stay nice and clean, so anytime sun would be on it and the light hits it, it still takes that orangey hue but as soon as it goes in the shadow it dropped to this more blueish of the dirt. So dialing in that balance to our CG costume was a bit of work.”
Those textures, almost like heat marks around the lines were rendered procedurally in V-Ray after artists had hand-painted vector maps to give the correct flow of the anisotropic reflections. Further work was also required to integrate Colossus into what were massively shifting outdoor environments owing to varying weather conditions. “When we knew he wasn’t going to look good,” says Digital Domain visual effects supervisor Alex Wang, “we made sure to integrate Colossus so that he looked good first and then we would replace the sky and alter the plate as much as we could by say adding more sunlight or spec highlights in the plate.”
Blur would also take on several Colossus scenes using DD’s asset, including an awkward taxi ride and ‘damaged’ Colossus shots after the final battle. “DD delivered a model and textures to us and we we would match what they had,” outlines Blur visual effects supervisor Pauline Duvall. “We referenced all sorts of damaged metal and the way it tarnishes. We also had to deal with Colossus’ facial animation and also his ridges and the way they ride along the curvature of his body – the way that those ridges glided along his muscles, the textures had to take on some more movement.”
“That cab ride scene,” identifies Rothbart, “is just so funny. Tim wanted to do things to mess with Colossus, who’s almost like the comic relief in the film. We have this 7 foot 8 guy stuck in the back of the cab for the ride – he’s hunched over. Then we had him drink a cup of coffee and we had to give him a straw to sip because he’s so scrunched in there. Then we had him put his pinky out so he’s drinking it like a dainty girl. Blur is so great with character. It’s just a funny scene in the movie.”
Emoting, the Deadpool way
Ryan Reynolds performs much of Deadpool behind a full face mask – it formed a solid shell from the upper lip up and resulted in what Rothbart describes as ‘chinwag’. “We got so much emotion from Ryan,” he says, “but we realized that we needed more expression and animation in the eyes and face. The immediately posed the problem of a blow-out in visual effects shots and the possibility that every Deadpool scene might require tracking markers on Reynolds and a 3D head replacement with lip sync (since a simple spline warp did not yield desirable results). Instead, however, a much more ingenious 2D-ish solution was devised by Weta Digital and used for about 250 facial animation shots.
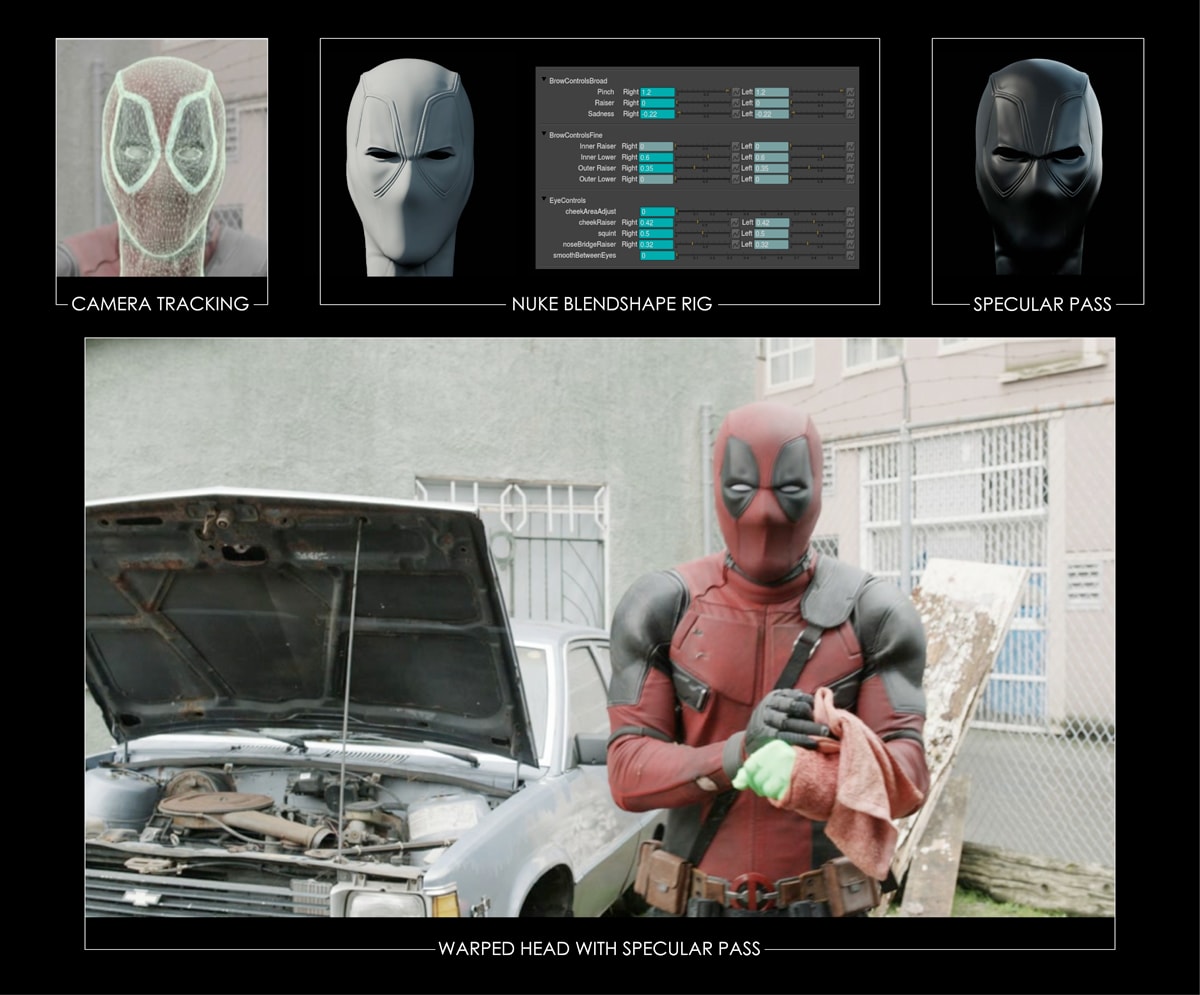
Essentially, Weta Digital relied on a method (developed by compositing supervisor Ben Morgan) that employed a camera track of Deadpool’s head, then warping the head with a blend shape expression rig made from 3D geometry. In NUKE, artists could then push around these pre-defined ‘Ryan Reynolds-based’ expressions with sliders, all of which came from relatively simple footage of the actor performing the original lines in front of a camera with no mask on. The idea was that Weta Digital would perform this facial animation work on the original plates and provide that to the other vendors as new plates on which other VFX would be incorporated.
So, how did the system actually work? It began with Weta Digital receiving a package of materials, including Deadpool digi-double assets. Some of them had mask expressions built in. “We exported all of these OBJs as OBJs separately from the Maya files into NUKE and we oriented the head facing a 50mm camera framed similarly to the way Ryan Reynolds was framed in the reference clips,” says Weta Digital visual effects supervisor Charlie Tait. “We called this ‘Headspace’ – that was useful to us because it meant we could animate in the same sort of context. That means we could have the Deadpool head next to the Ryan Reynolds head.”
Using this so-called Headspace camera, artists could project a UV ramp on each of the different Deadpool models and wrap it to make it like a texture. “Then we took a neutral pose of the head with no expressions on it,” continues Tait, “and we subtracted that in texture space from the other. So we effectively had the difference between the neutral pose and any given expression. Then we would put a multiplier on all those different expressions, add them all up, add them to the neutral pose and that is now our UV ramp.”
As well as completing a range of VFX on the film, Image Engine was also tasked with several Deadpool facial animation shots. Interestingly, these were used in promotional materials such as IMAX trailers and an Empire Magazine piece. Using dialogue video recordings of Reynolds, Image Engine undertook a mostly 2D process but with 3D assets, as visual effects supervisor Robin Hackl explains:
“We would accurately match move the head of Deadpool. Then once we had the match move and reference for the animator to take over, we did a 3D animated version of our Deadpool head. For our 2D approach, we wouldn’t actually do a final 3D render. But once we had the 3D animated head, we move that asset into the effects department – we had a process where we rendered the difference between the static non-animated matchmove head and the animated head. That would give us a ‘distort vector pass’ – a Houdini rendered layer – we would then be able to take that layer, apply that in NUKE in comp and thus deform the original master plate, pushing the pixels around to effectively match the 3D animated head.”
That UV ramp was then used in the correct camera space to perform a warp on the plate. “Ultimately,” notes Tait, “all we actually do in the end is perform a single STMap warp using that projected UV map, with all of those sort of differences of possible expressions built into it. The way that was all controlled – how much of each expression we’re using – was a node made in NUKE with a bunch of sliders that referenced what was actually going on. You’d have eyebrow raises, a pinch and cheek raises, all sorts of possible facial expressions.”
There was still one more important step in the process that was necessary arising from the mostly 2D approach that had been adopted. If the mask expressions had been generated as a 3D render, changes in lighting would be reflected in the moving topology of the mask, say as Deadpool raises his eyebrows. When Weta Digital simply warped the plate, the shape of the forehead did not change because the light falling on it was only being warped. So a solution involving a special spec pass was concocted to achieve the appropriate look, as Tait explains.
“Given that we were using geometry and the blend shape rig in NUKE was determining where things were going,” says Tait, “we had this bridge between NUKE and Maya where, when you were done with your animation, you’d export that animation to Maya and you would get a render out of Gazebo, our real-time renderer, back from that in a few minutes. That would have the geometry doing the same thing that you’d designed with your blend shape rig in NUKE. And then we basically had to make a corresponding rig in Maya. What you would get basically is a spec pass and in that spec pass you’d see much more change, say, in the black patches on Deadpool’s mask specifically. So we would grade the spec out a little bit in the grade in comp and add this lighting pass back on, and as he raised his brows, now instead of just seeing the brow lines go up and down, you’d see the light moving across other bits of his forehead. It was remarkably successful.”
No flat fire, please
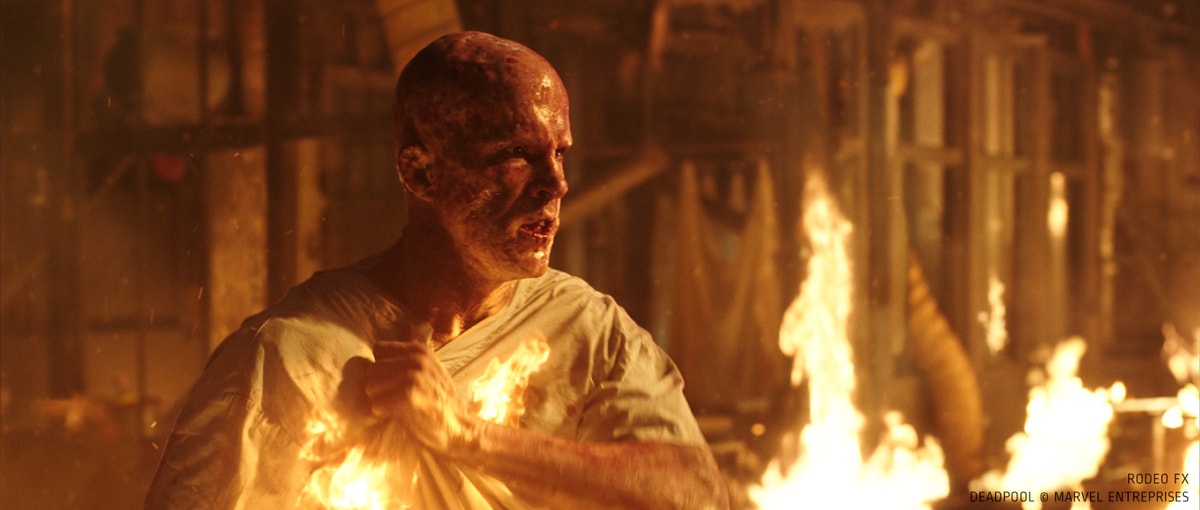
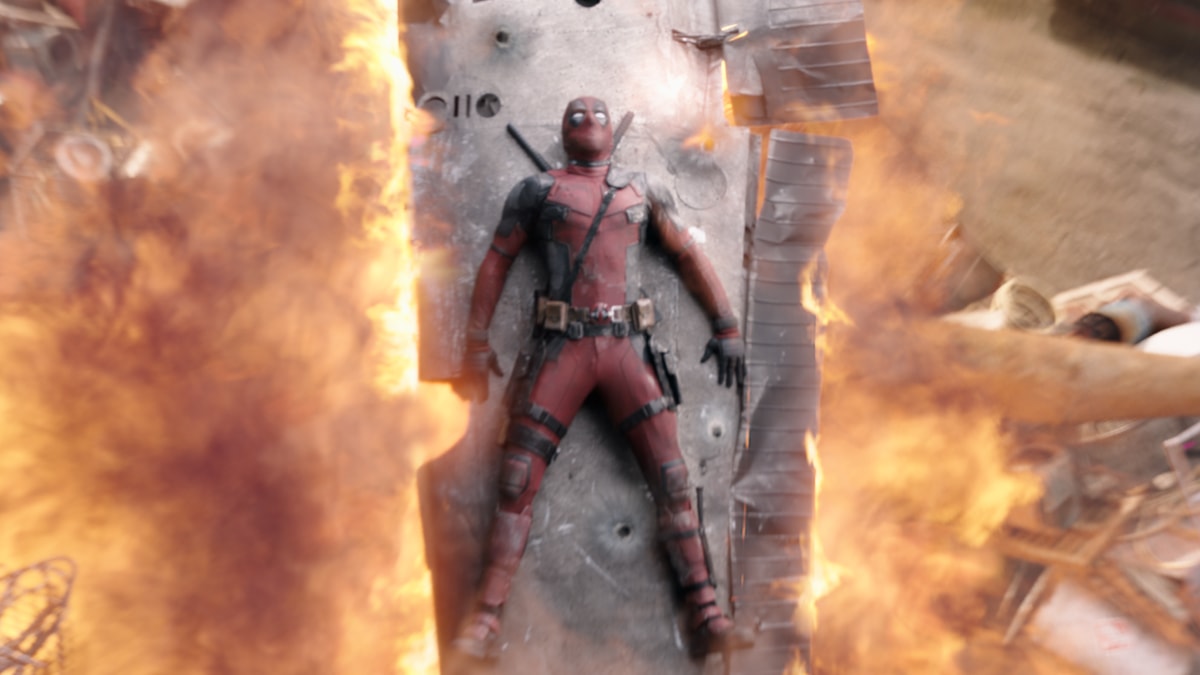
Soon after Wade Wilson’s transmutation renders him heavily scarred and disfigured, he faces off against Ajax inside a burning warehouse. The scene is notable for its high physicality but also the realistic fire engulfing the building. Some of the fire was there during the shoot, but the scene was heavily augmented by Rodeo FX. The studio carefully constructed the scenes with convincing layers of burning building, smoke, embers, debris and other effects based on an early desire of Rothbart that the fire not look ‘flat’.
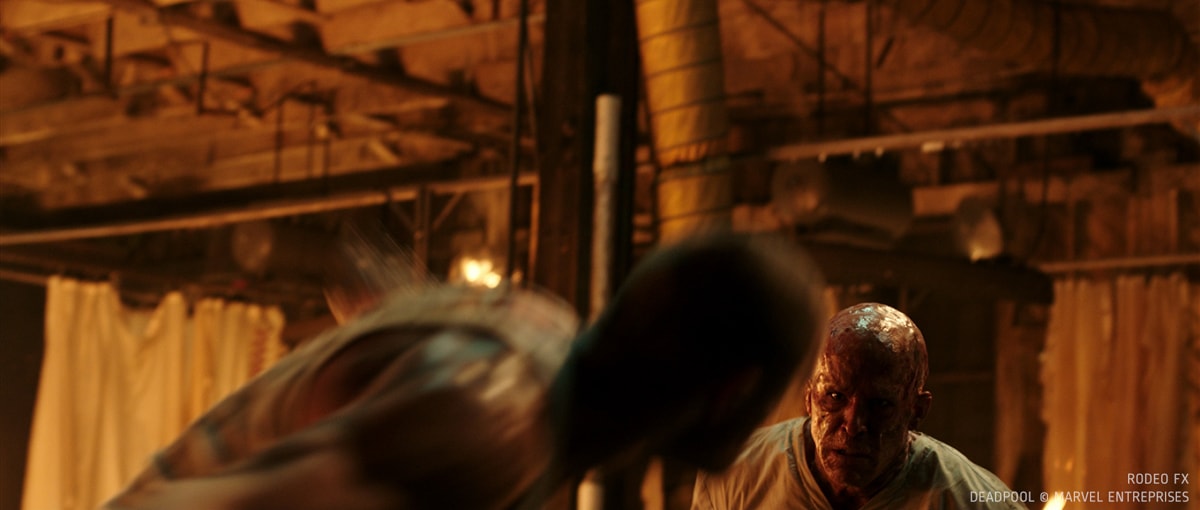
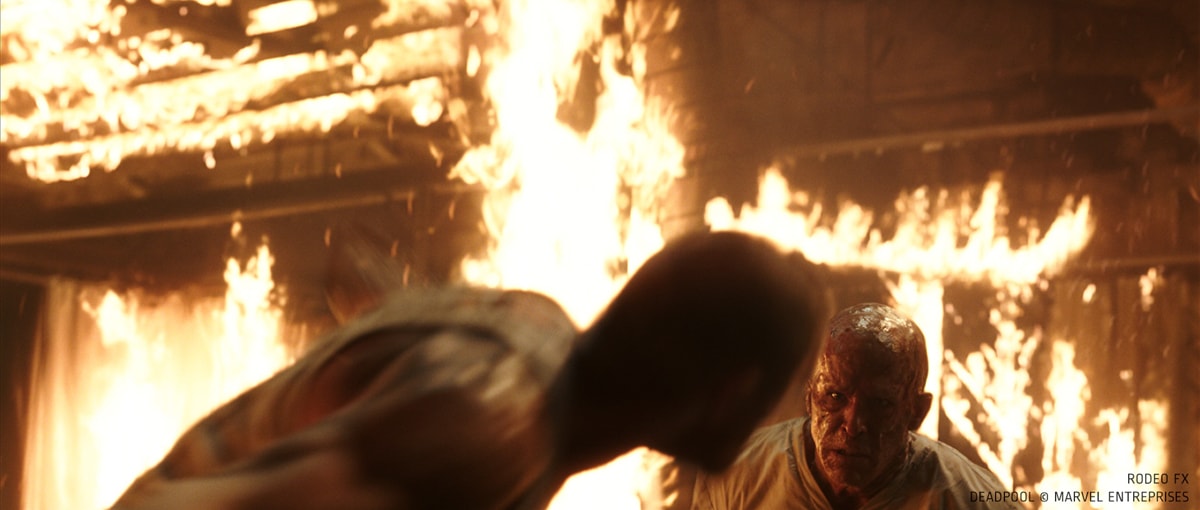
“Jonathan said he didn’t want it to feel like as you get more and more fire you just see a flat image as more fire is comp’d on,” recalls Rodeo visual effects supervisor Wayne Brinton. “To immediately deal with this, I noticed on set that there were a lot of doors, beams and pillars and exposed walls, lots of different areas. So we went with the idea that we don’t ever need to feel like the place is on fire so much as it’s burning down. Why I made distinction between the two is that when you add fire you add layers on cards and if you need more fire you add another card. But instead we made sure when we were putting fire we weren’t just layering generic fire on a card, we were actually burning an element. It meant the fire wasn’t just on top of things but actually layered in different spaces between the back wall and the camera.”
Rodeo also staged their own elements shoot where matching pieces of the burning set were built to full or half scale and then set on fire. “I had the edit with me,” says Brinton, “and we would look at a shot and think about where it would be cool to add some fire. Then we set something up to match it like a burning wall or pieces of debris dropped from a ladder.”
To augment the practical fire and these newly shot elements, Rodeo also generated CG fire sims by generating rendered caches and placing them into the scenes on a shot-by-shot basis. That was aided by a LIDAR scan of the warehouse environment that helped in developing a match-move. However, effective integration – that did not look flat – was still a challenge. So Rodeo adopted an approach that relied on the lighting from the on-set fires. “We would use the exposure of the fire that was there, take that as like a luma key and had that almost like a fall-off so the hottest spot was the real fire and then things would fall off away from that,” explains Brinton. “We would take that and use it like a light pass on top of the fire that gives you that soft diffuse feel to it. Anything that was closest to the real fire got more of it to match the plate, and anything that fell off would be able to get less of it.”
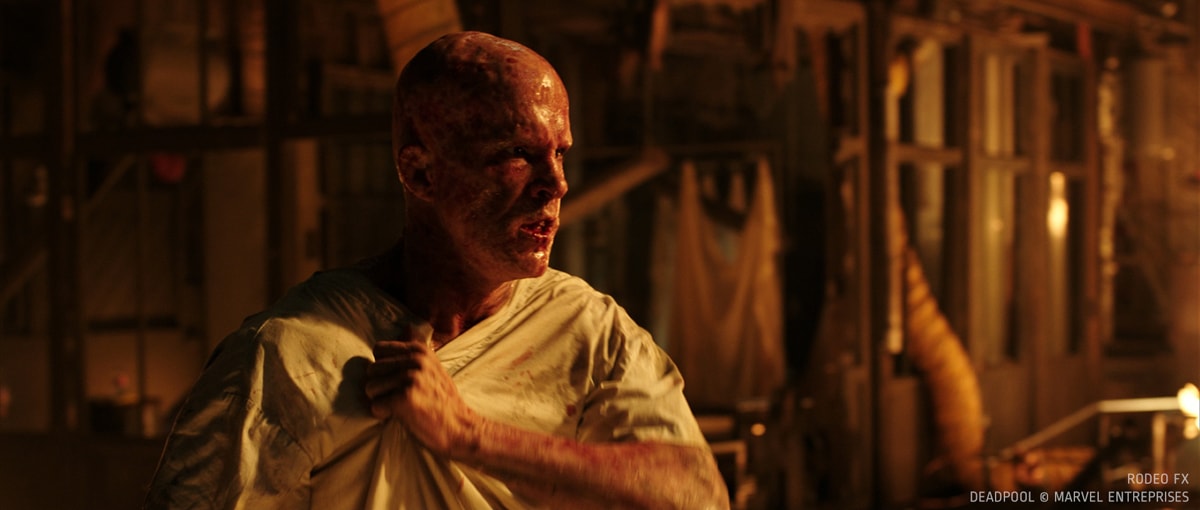
Other challenges in the burning warehouse included replacing much of the floor with CG areas and debris, since the floor used for shooting had incorporated stunt crash mattes. Another, more unexpected, challenge came when Rodeo was asked to give Wade a CG penis. “Ryan had been filmed in this scar make-up (by Bill Corso) from head to toe,” says Brinton, “and at one point he has to rip off his burning clothing, which we did as a cloth sim, but then once they’d done the edit they realized because he was effectively naked he had to have this CG penis. We had to make a concept, have it approved by the director and the executives and Ryan. Then we went into modeling, rigging, texturing and lighting, animating and comping. It was in six shots – it was never hero. It wasn’t meant to be comedic – it was one of those things that’s when it’s there it looks so natural that you don’t even notice it. When it wasn’t there it looked really weird.”

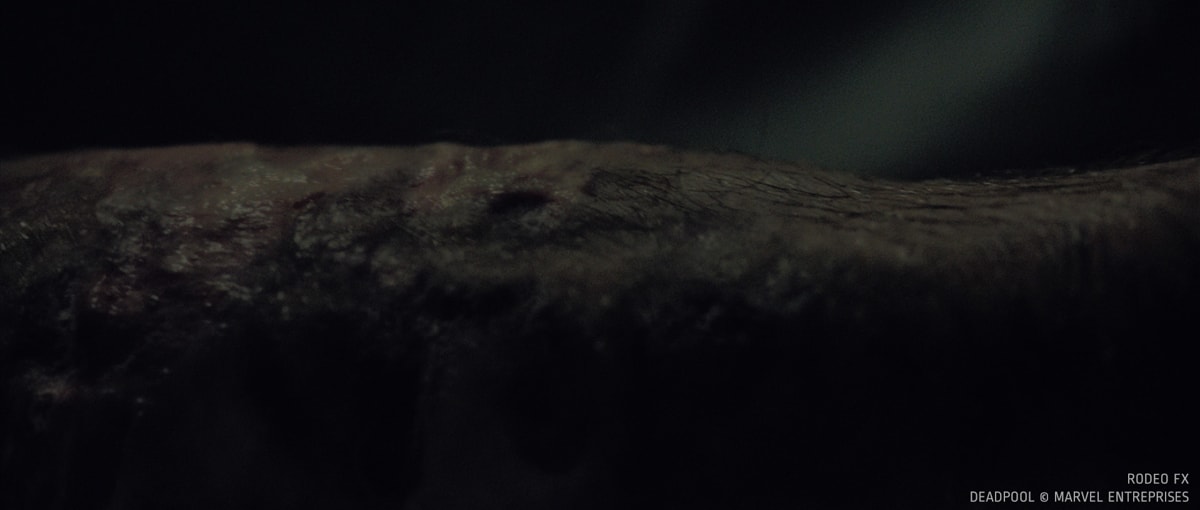
Earlier, Wade’s transformation is depicted with a horrifying skin scar effect that runs over his body in macro views. These were completed by Rodeo. “We had rotting fruit and maggot-eaten meat as reference for this,” advises Brinton. “We built up these tumorous effects as textures and then took all the layers into NUKE. Then we used UVs of the geo to map these textures onto the model and then all the lighting passes to create the depth and 3D topology to reveal these things coming on. The more the compositor was getting grossed out from his own work, the more I knew we were closer to a final.”
Well, it is R-rated…
Always intended as an R-rated film, Deadpool relied heavily on practical, make-up and digital visual effects for its blood and gore. One of the vendors responsible for significant gore effects was Luma Pictures, which Rothbart says impressed him with the limits they were willing to go to. “When we started this show, the deal is, this is Deadpool,” recalls Rothbart. “I would say, ‘You should take this as far as you can take it and just try to make me say please stop.’ They went for broke. They had this one shot they showed us as Deadpool cuts this guy’s stomach and literally his entire intestinal track goes flying out of his body along with massive amounts of blood. And I said, ‘OK guys, you got us!’. And they said, ‘Well you do have 50 feet of intestines’ but I got them to just make it a foot and a half.”
Luma adopted several approaches to this kind of work, one of which was shooting real elements. “One of our artists went down to Home Depot and got all this PVC piping and bought all the corn syrup and a pump,” says Luma Pictures visual effects supervisor Vince Cirelli. “He pressurized all these PVC pipes with a cap and then created this little lip that he’d yank off and then all this gore and blood would spew out of these pipes. It just covered the room with stuff!”
Shot from multiple angles, the elements could then be worked into the plates via their Sprite-o-Mater tool which is usually used for generating sparks but was upgraded to handle blood spurts. “Anywhere we could get away with not using a simulation we actually used the old video game trick by using sprites that match the camera angle,” states Cirelli. “Sprite-o-Mater blends between the views based on camera angle for the artist. They can cycle through a library of these blood and gore elements that are shot with a camera setup.”
Houdini was still used for more complex blood and gore sims, including soft rigid body work to handle things like the intestines mentioned above. In fact, having seen Luma’s work on that shot, Digital Domain sought to match it in a scene where Deadpool cuts off his hand-cuffed arm to get away from Colossus. “He’s slicing away on his wrist with a bowie knife – it’s just gross – but DD not wanting to be outdone by Luma has buckets of blood pouring out,” relates Rothbart. “On the third or fourth shot I was like, ‘OK guys he’s already lost two buckets of blood – we’re good.’”
Later, shots of Deadpool’s hand growing back were achieved with a digital limb by Luma in another gross, but comical, scene. “It was tricky because it couldn’t be like a baby hand, because a baby hand actually doesn’t look like that,” notes Cirelli. “It needed to be a fetus hand. They were sending us this horrible reference of fetus’ but it was so we could get that translucency right. We used a multi-layered shader in Arnold for the sub-surface and we actually had geometry inside that geometry to really get the veining.”
Working together: the final battle
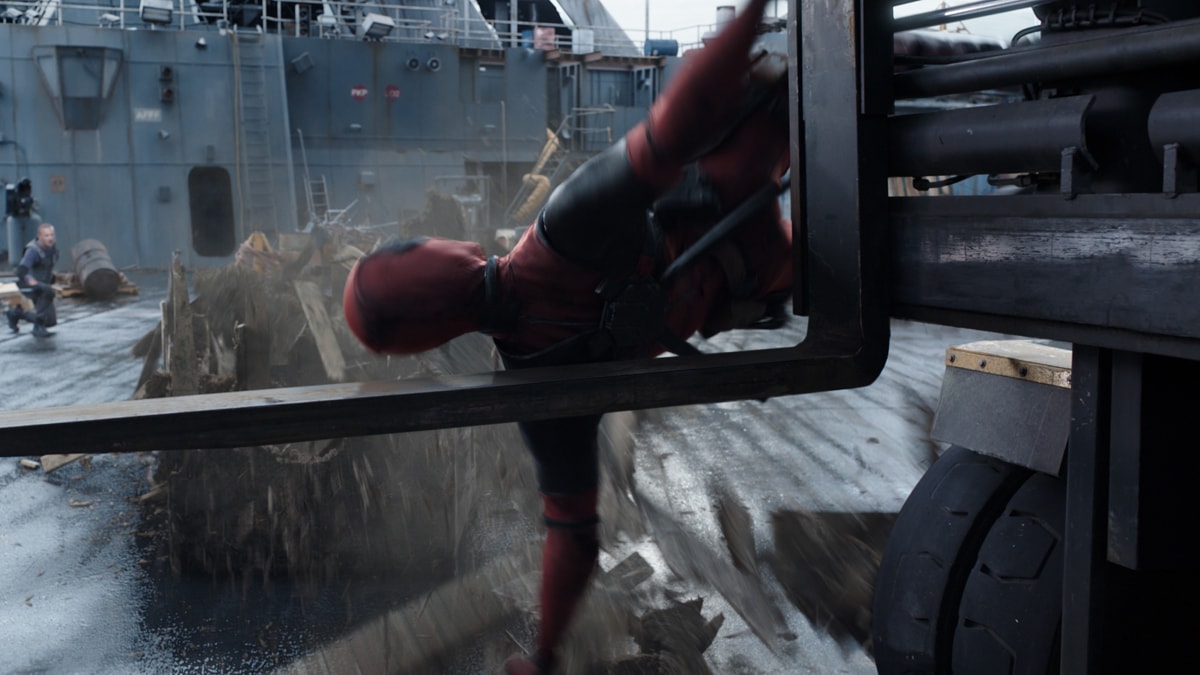
A final showdown in a scrapyard pits Deadpool, Colossus and Negasonic Teenage Warhead (NTW) against Ajax, Angel Dust and a bunch of thugs. The sequence made heavy use of practical sets and stunts, CG characters and effects and digital environments, including a dilapidated helicarrier that ends up tilting and destroying the area. Perhaps even more impressive is that this sequence evidenced the high level of collaboration on the show. Luma handled a fight between Deadpool and Ajax. Digital Domain worked on Colossus (as discussed), NTW exploding scenes and parts of the deck of the helicarrier. Rodeo also contributed matte painted backgrounds, Blur had Colossus damage shots and Weta Digital produced the Deadpool facial animation.
One spectacular scene from the showdown, realized by Digital Domain, sees NTW use her explosive powers to launch Deadpool on a piece of metal up to an area that Ajax has the superhero’s girlfriend hostage. “Tim described NTW to me as a fuel air bomb,” says Rothbart. “They’re these bombs where they launch them and explode but only ignite when the fuel spreads out. So you get this massive combustion moment but spread out into this huge large area. But we also needed something to show the genesis of the effect, so DD came up with something that looks like the solar flares of the sun.”
And while this final VFX-heavy sequence did showcase some of the most complicated work in the film, one section probably best illustrated the endearing tone and the boundaries being pushed by the director. This is when Deadpool is stabbed in the side of the head and begins to hallucinate, conjuring up cartoon characters that dance around his face. “For that scene,” illustrates Rothbart, “Tim had found this French animation artist who had a unique style and did all the 2D work and then we comped them into the plates. They are super fun and at one point Tim was second guessing himself and thinking he had gone too far, but we assured him they were amazing and they definitely belong in the film. It’s just another example why Tim was the perfect guy to direct this movie.”
All images and clips copyright © 2016 20th Century Fox.
this is amazing!