Ever since its showing at the South by Southwest film festival in March, audiences have been raving about the visceral, immersive and downright crazy experience that is Hardcore Henry. Russian director Ilya Naishuller exploits the action POV idea to great effect in telling the story of a man who wakes up a cybernetic super-soldier and quickly stumbles into a world of misadventures.
fxguide explores the tech behind Hardcore Henry, from the bespoke head rig mask devised to shoot the POV perspective to the visual effects required to tell the film’s over-the-top action.
A mask for true immersion
At the core of Hardcore Henry is its first person point of view, an experience Naishuller first experimented with in his 2013 music video Bad Motherfucker for Biting Elbows. Producer Timur Bekmambetov then convinced the director to expand on that technique for Hardcore Henry – this meant going POV for a full feature film, complete with an array of audacious stunts.
So how did the filmmakers capture the action in a way that truly gave the POV experience for the audience without the jerky action that might typically come from simply strapping a camera on an operator’s head? The answer lay in a custom-made head rig mask.
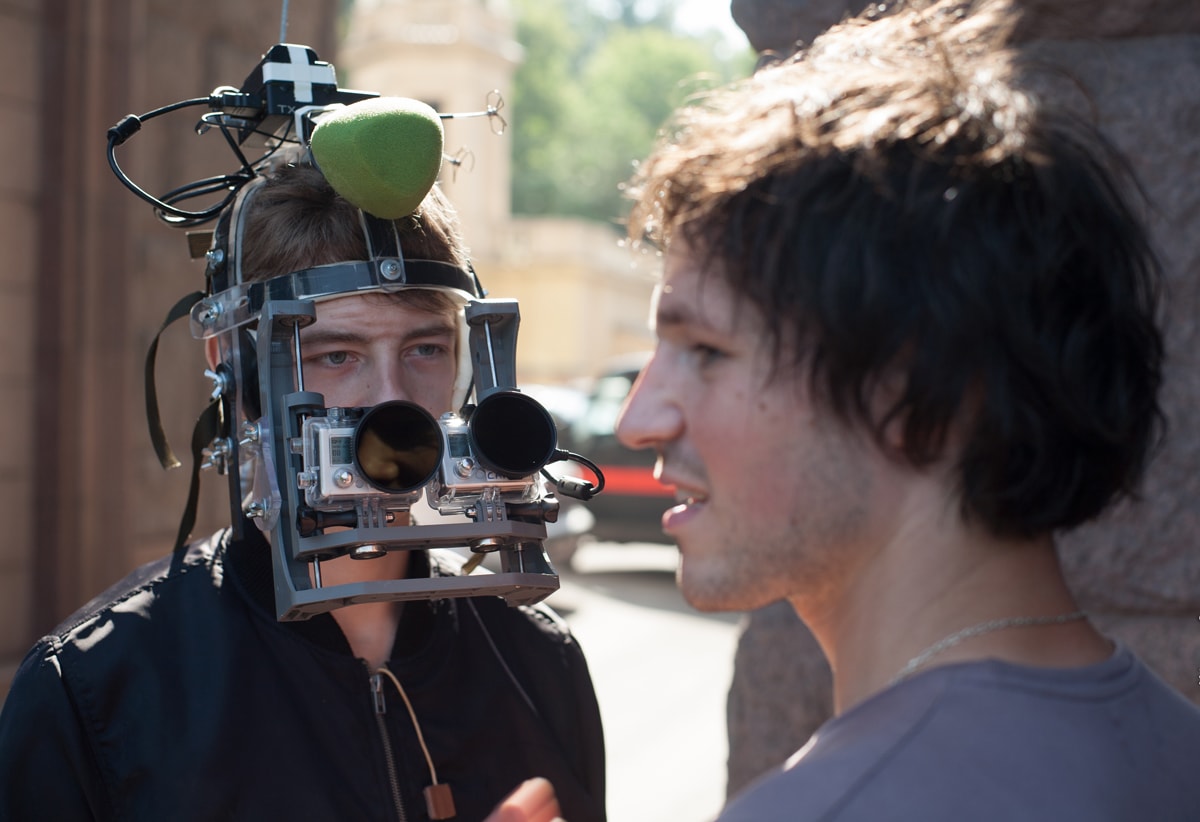
This mask had its roots in earlier first person shooting systems devised by one of the film’s POV operators, co-producer and mask designer Sergey Valyaev. “Back in 2008,” he explains, “I had first assembled a system for shooting from the first person with a cap, security camera and Archos video recorder, which allowed us to convert an analog signal to digital, but in a cosmically terrible quality. After a couple of days playing with this self-made system, I realized that having the camera fixed on the forehead does not provide the desired immersion, and it also shook badly.”
Valyaev saw that the viewer would be better immersed and could identify the protagonist if the camera was fixed on the protagonist’s mouth. That approach found its way into filming for a number of Biting Elbow clips – Stampede / Insane Office Escape and then the Bad Motherfucker music vid. “Having the camera at this position allows the viewer to see the main body from the shoulders and chest. The more evident the human body in the frame is, the more immersion is happening on the screen.”
But for these clips, the existing camera rigs on the market – mainly for GoPros (since that camera had an incredibly desirable form-factor and quality level) were deemed unsuitable. “The default GoPro head bandage isn’t suitable,” suggests Valyaev. “You won’t film anything but shaking with it. Besides that, if you attach a GoPro to your forehead and bend forward, the camera will capture only half of your body. For the full POV experience, you need your camera to capture the whole body.”
https://www.youtube.com/watch?v=FpKyhZXRZoM
In fact, Valyaev observed that many extreme sportspeople had captured better footage by holding GoPros in their mouths. “That excludes the shaking, and allows you to film with the right angle. But you can’t speak. You drool and your jaws hurt. Motorcycle, hockey, rugby and other helmets allow you to attach camera to the right spot. You can even install a heavy DSLR camera and accessories to them. But unfortunately these helmets aren’t designed for filming, thus you’ll be uncomfortable with them. Plus you can’t film the stunts looking through the visor of a heavy helmet.”
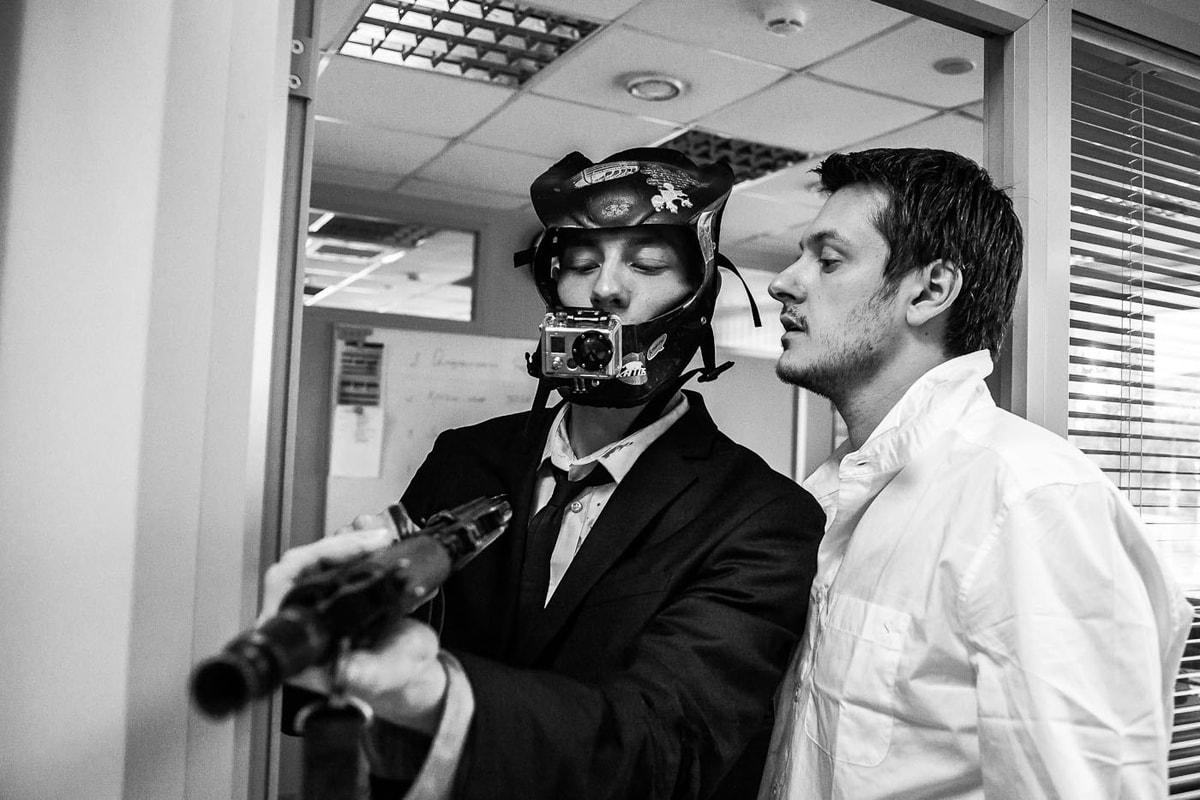
With this knowledge in mind, those first couple of POV clips directed by Naishuller were shot with a Predator mask bought from an Airsoft store. “We cut a hole in it for a better view, leaving only the ‘jaw’ to fix the camera on it,” says Valyaev. “The mask looked nice, but was terribly inconvenient. It greatly tottered on the head, the operator’s face sweated in it and it was impossible to install auxiliary equipment on.”

Those frustrations ultimately led Valyaev and a team to start development on a new head rig prototype in the form of a mask. Lessons learned from previous experience drove the design. “It was very important for me to make the mask fit any face type,” notes Valyaev, “while always being held securely on the head and did not limit the operator’s viewing angle.”
The process began with concept sketches drawn by designer Gleb Reznichenko. “Mikhail Kuznetsov then made a few three-dimensional models and we decided to make first prototype,” outlines Valyaev. “To create it, I went to my friend – Oleg Savin. His company Gearcraft manufactures tactical gear for the military, so there was a lot of useful tools for prototyping such as flexing machines, 3D printers and lasers.”
https://www.youtube.com/watch?v=dIqyPlWGPc4
At first, things did not go quite to plan. “The mask was terribly inconvenient to begin with,” admits Valyaev. “It pressed heavily on the face and didn’t work as I planned. So together with Gleb we had to do more and more sketches, experimenting with form. Within a few weeks I was drawing new designs every day, and then every evening together with Oleg we tried to make them.”
Hardcore Henry was filmed predominantly with the mask fitted with GoPro HERO3 cameras (GoPro provided production with several cameras, many of which were written-off in the film’s insane stunts). Three DOPs worked on the film over its production schedule: Pasha Kapinos, Vsevolod Kaptur and Fedor Lyass. Occasionally two GoPros would be fitted on the mask – this wasn’t for stereo but instead for multiple exposure levels and for backup reasons, or to send video via wifi to the director to help compose shots. The mask, which would be worn by at least a dozen operators and stunt performers, became ready only just in time for principal photography. “At that time, I had three-dimensional renders of the mask, and I was one step from creating a prototype,” says Valyaev. “Naishuller thought to ask for help from film industry Innovators or GoPro, but when I came to his house and threw the first working prototype on the table, all the doubts were dispelled.”
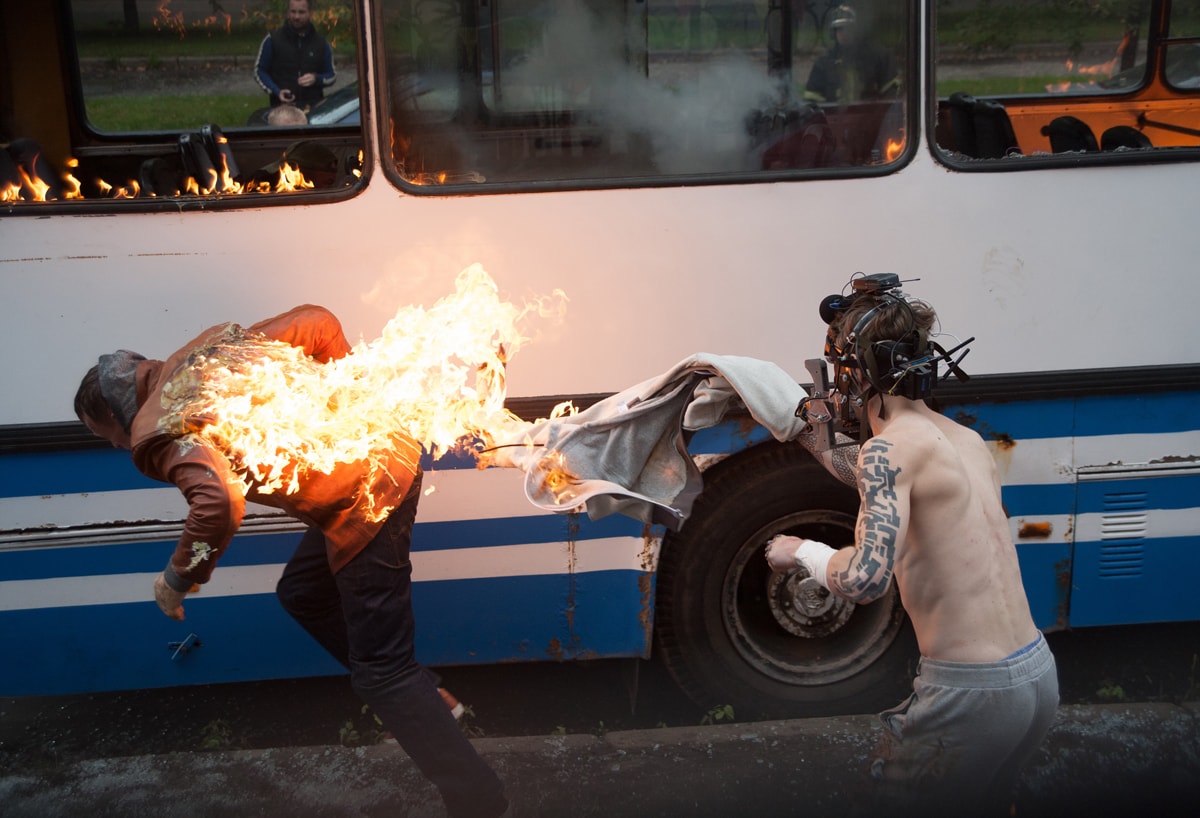
That didn’t mean the mask was completely ready to go. Indeed, it was changed and adapted throughout the shoot – a difficult task for Valyaev since he was not only the creator of the mask but also one of the film’s POV operators and co-producer. “I think I only slept a few hours every day while we were shooting. In the early mornings we did technical camera tests together with the director of photography, then at lunch we created action scenes with Iliya, and in the afternoon I trained hard with the stunt choreographer and crew.”
One feature added to the mask for Hardcore Henry was a magnetic image stabilization system. This was crafted by one of the film’s DOP’s Seva Kaptur, Vladimir”Kotihov and a team of engineers. “Technically,” states Valyaev, “it didn’t work as a stabilization system in the conventional sense. The resulting image wasn’t as smooth as say shooting with a Steadicam or three-axis stabilization. But Naishuller believed that too smooth camera movements looked too far fetched for the viewer, and deprived them of the sense of presence. The idea then was that the magnetic system would not remove all the shaking, but smoothed out small camera fluctuations while walking.”
The magnetic stabilization was at first, according to Valyaev, “very cumbersome, heavy and interfered with the operator’s view. When we first installed it on the mask, I was very annoyed by the fact that I could see only the image in front of me and could not look at my feet. But in the process of filming, I got used to it and now, looking at our film, I’m sure it was worth all the torment.”
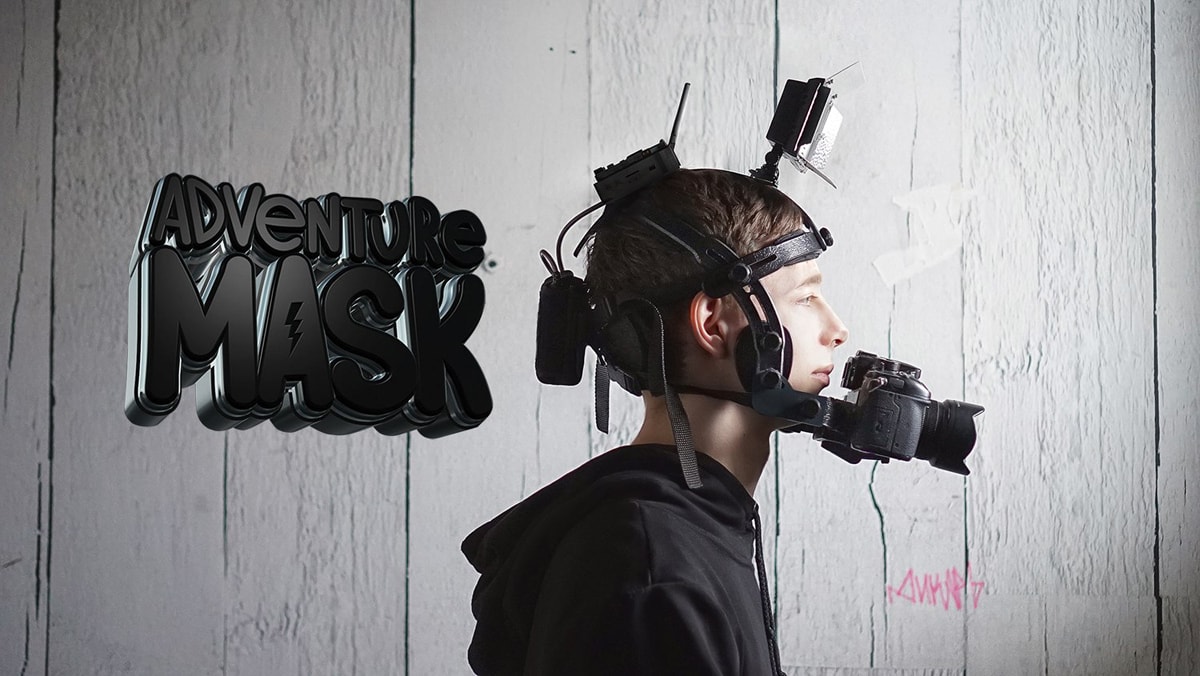
The mask, which became known as Adventure Mask (a consumer version is available now for pre-order at http://adventuremask.com), eventually consisted of hard-wearing shockproof plastic and was capable of holding three to four kilograms of equipment, not just a camera. Those extra pieces included a microphone, wifi transmitter, light panels, extra batteries and a magnetic or three-axis stabilization system. It can hold a GoPro, other action camera, a smart phone and even a DSLR with interchangeable lenses. “All the fasteners are made of light titanium,” notes Valyaev, “so you don’t have to be afraid for your camera.”
Hardcore VFX
Capturing the action of Hardcore Henry was challenging enough, but how did the VFX facilities on the film deal with the equally challenging GoPro and POV plates? In these case studies, we look at the methods behind triaging footage, augmenting the already heavily physical and practical action with extra elements and producing compelling visual effects shots.
VFX case study – Zero VFX
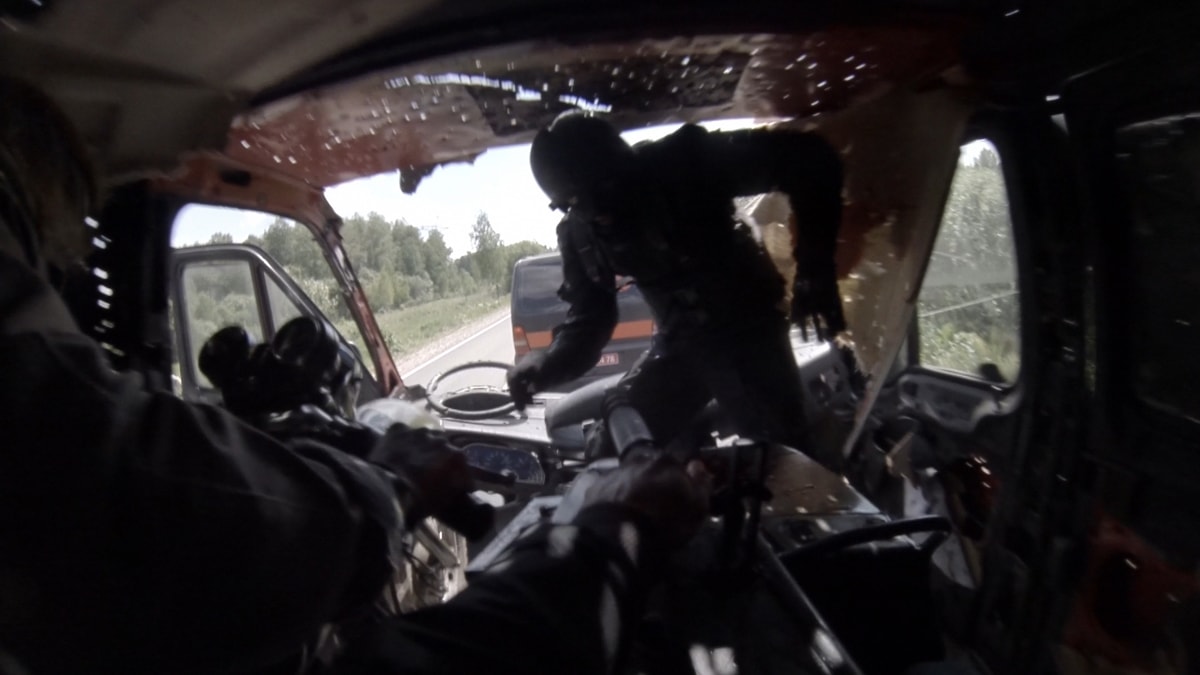
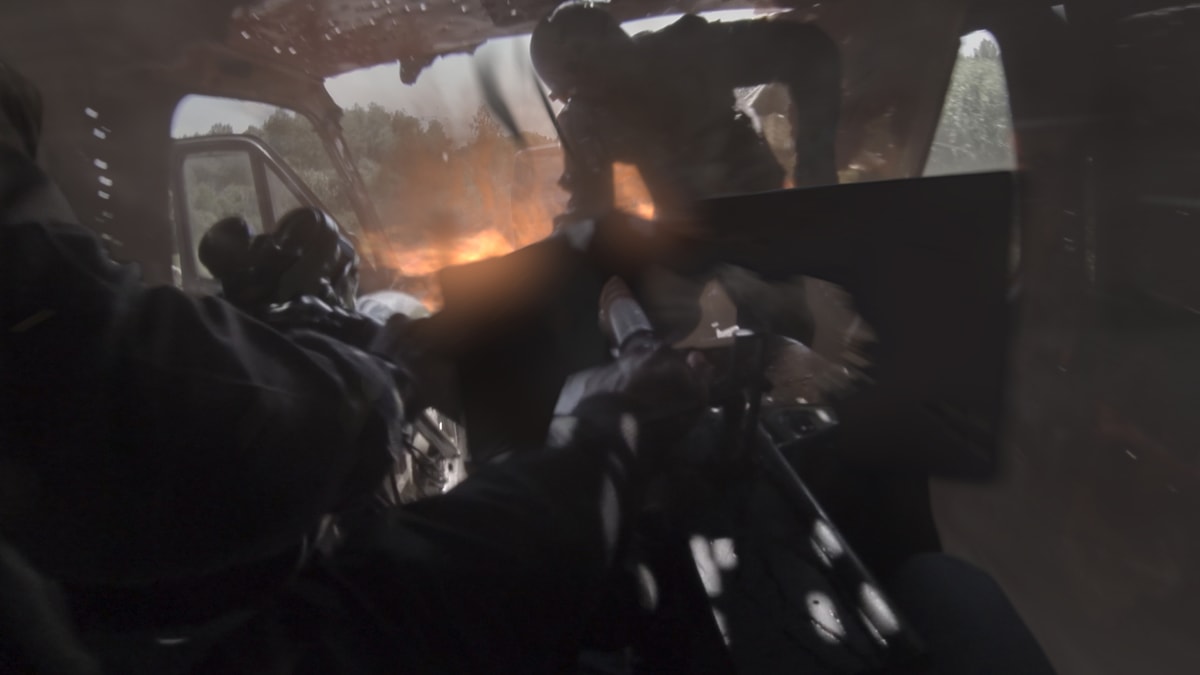
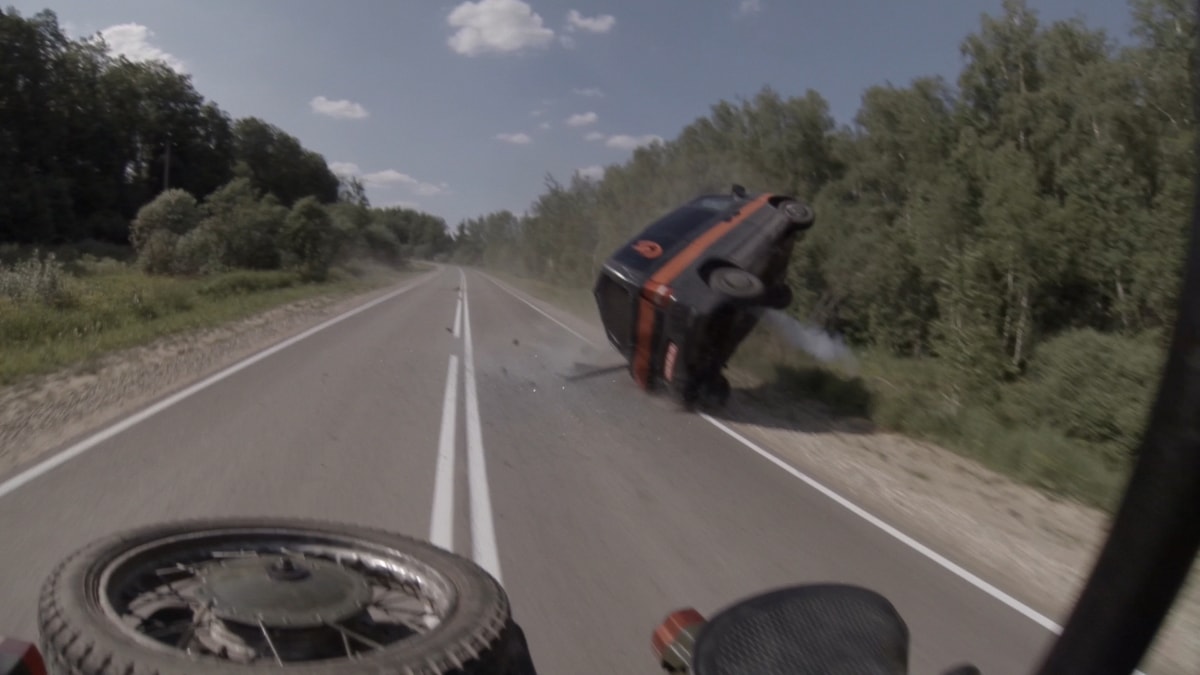
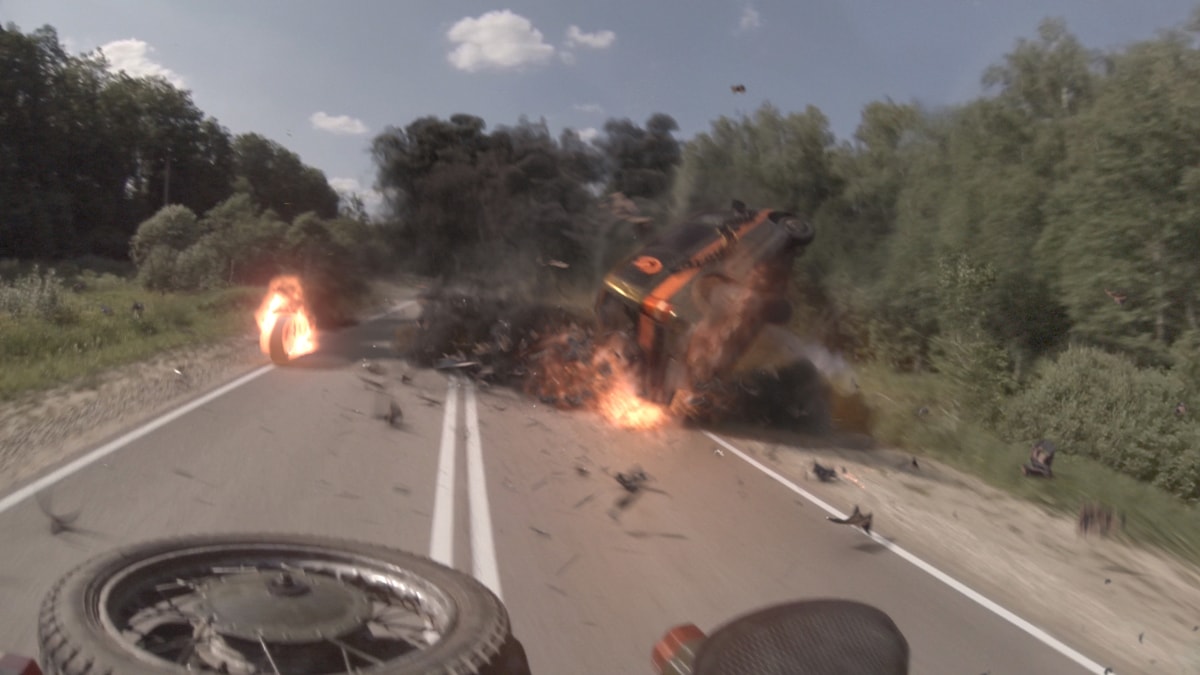
Zero VFX is well-known for its seamless visual effects integration work. That same approach was just as important on Hardcore Henry, where the studio focused on a daring highway chase that involved motorcycles, exploding vans, and a machine gun.
https://vimeo.com/162835354
First, though, Zero had to deal with the GoPro footage. “The footage has a pretty extreme lens distortion that was interesting to work with,” outlines Visual Effects Supervisor Dan Cayer. “In general, we always want to track an undistorted version of the plate to generate a CG camera. In this case we allowed our tracking package to calculate the distortion and help to inform the amount needed to flatten the image before executing the track.”
“This way,” adds Cayer, “the camera is set up to render non-distorted images. I wouldn’t say the GoPro footage made us work in a different manner than normal, but the amount of distortion involved was much more extreme than usual, and made working slightly more complicated.”
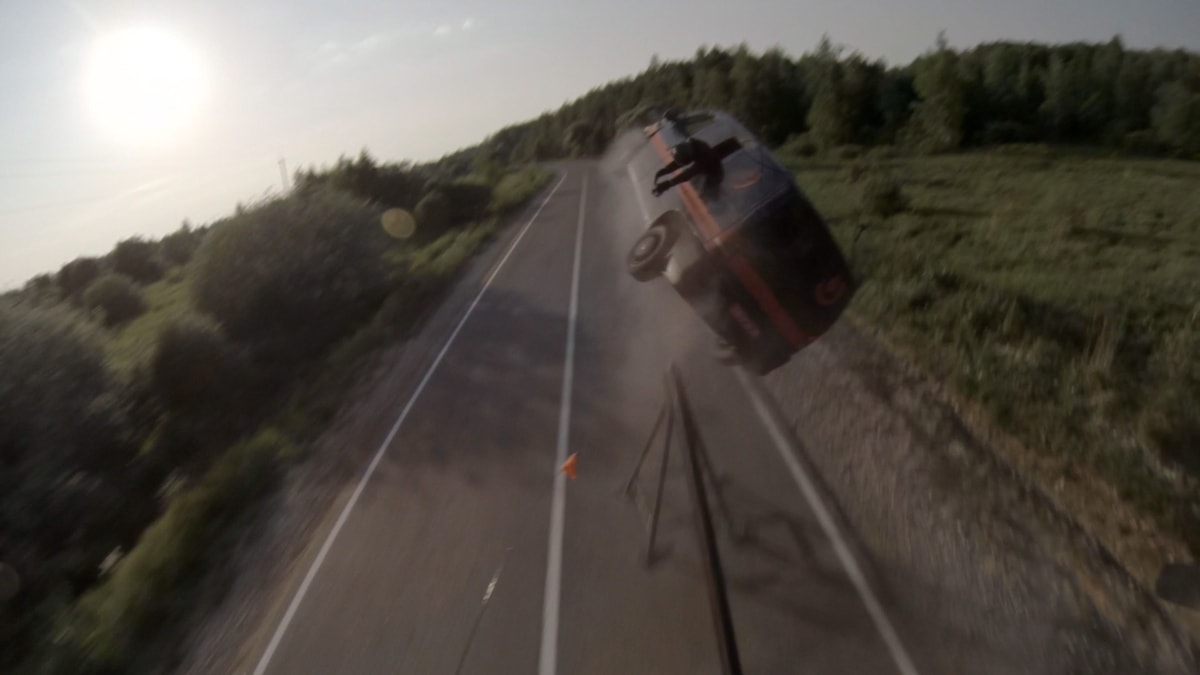
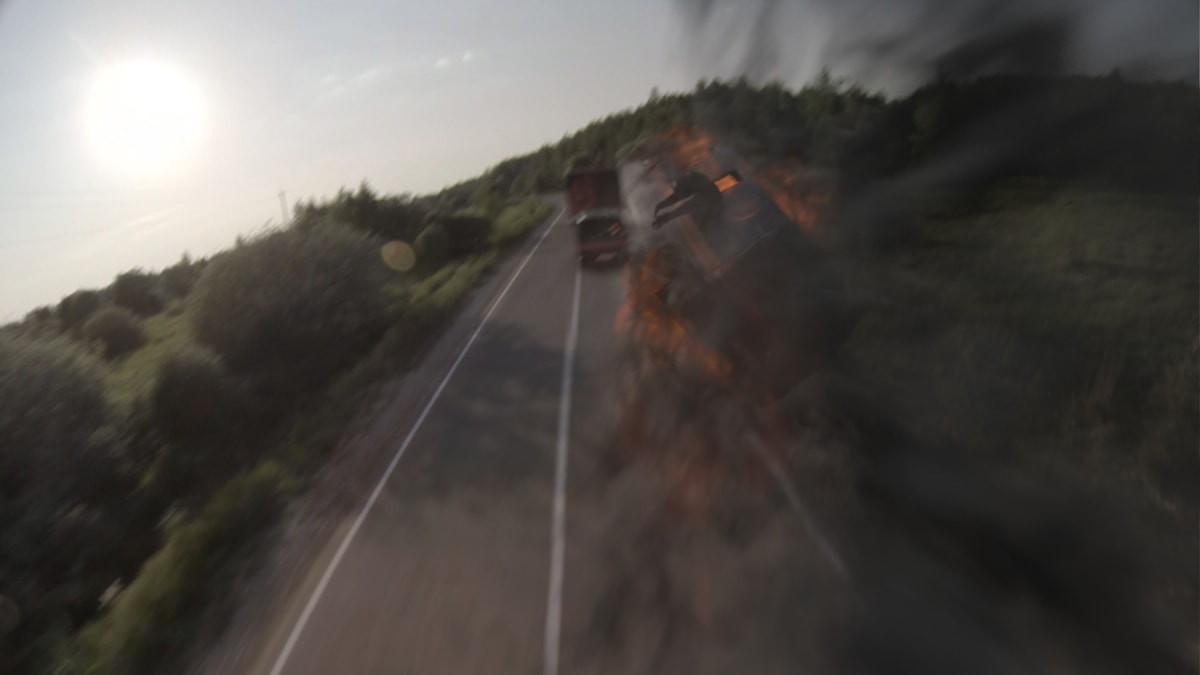
Zero incorporated an array of CG elements into the sequence – vehicles, stunt doubles, set extensions, explosions, bullets, blood and what Cayer describes as “a lot of digital carnage throughout.” Some of this work involved transitions from practical stunts to digital take-overs. “The two major van explosions where started by flipping a practical van on set, but all the destruction and explosions themselves where CG elements, and by the end, the vans themselves were mostly CG,” says Cayer. “In other instances, the van would be a pre-damaged practical van on set. We would then replace it with an intact CG van that would fall apart and eventually become only the practical one. In the opening shot for this sequence, we needed to see the full caravan of vehicles drive past, and these were entirely created in CG.”
Usually, a VFX studio would rely on on-set scans and reference photography to re-create CG elements. But in the case of Hardcore Henry, these materials were hard to come by as the production team had been focused on the choreography of the scene. This left Zero to build their CG vans based on the filmed action and to object track the footage in order to allow for essential match moving.
“Having a CG representation of the scene,” explains CG Supervisor Don Libby, “allowed us to run explosion simulations on the CG vans and tailor the look and performance to compliment the composition of the shot. The rendered FX were then composited back on top of the plate. The CG vans also allowed us to render interactive elements such as reflections and light cast from the explosions. We could then enhance the look of the practical vans in relation to the added FX. We also replaced most of the stunt vans with damaged versions of the CG vans after the explosions took place.”
Later, the rendered CG elements for the chase would have to be distorted in the final composite using the pre-calculated lens information. “For the plates used in the composite,” says Cayer, “we’d continue to work with the original distorted images, as not to lose any quality through an undistortion process. Combining those plates with the newly distorted CG renders then created a perfect tracking match. Since the show also had lots of paint work associated with stitching the different takes together, we would undistort supporting plate material used in the stitching and matte painting process, then redistort once it was repositioned or tracked into place.”
That stitching work was immense. For the highway chase, 43 plates were pieced together to form one seamless take. “The footage was edited together before Zero got started on the project, but the cut was flexible enough for us to shape it while adding the in between footage to make it look seamless,” states Cayer. “Stitching some of the takes together was more straight forward than others. If the viewer was supposed to be driving down the street and look backwards to see an explosion, the edit came to us with a hard cut of images facing forward, then switched to images looking back at the van that was traveling behind.”
Interestingly, Zero’s role here was to generate content to make it feel as if the viewer had actually turned their head and glimpsed the side of the road as they turned. “To do this,” says Cayer, “we used 2.5D matte painting techniques, working with clean plates we’d generated, and the 3D cameras from our tracks.”
However, some stitches proved more complicated, such as a shot of the motorbike driving straight through a van. “Five different takes from the on-set footage were needed to achieve the desired momentum and full progression through this object,” notes Cayer. “To achieve this, we used a combination of a full CG vehicle interior and digital stunt doubles, as well as some old fashion 2D compositing to pull it off.”
VFX case study – Mammal Studios
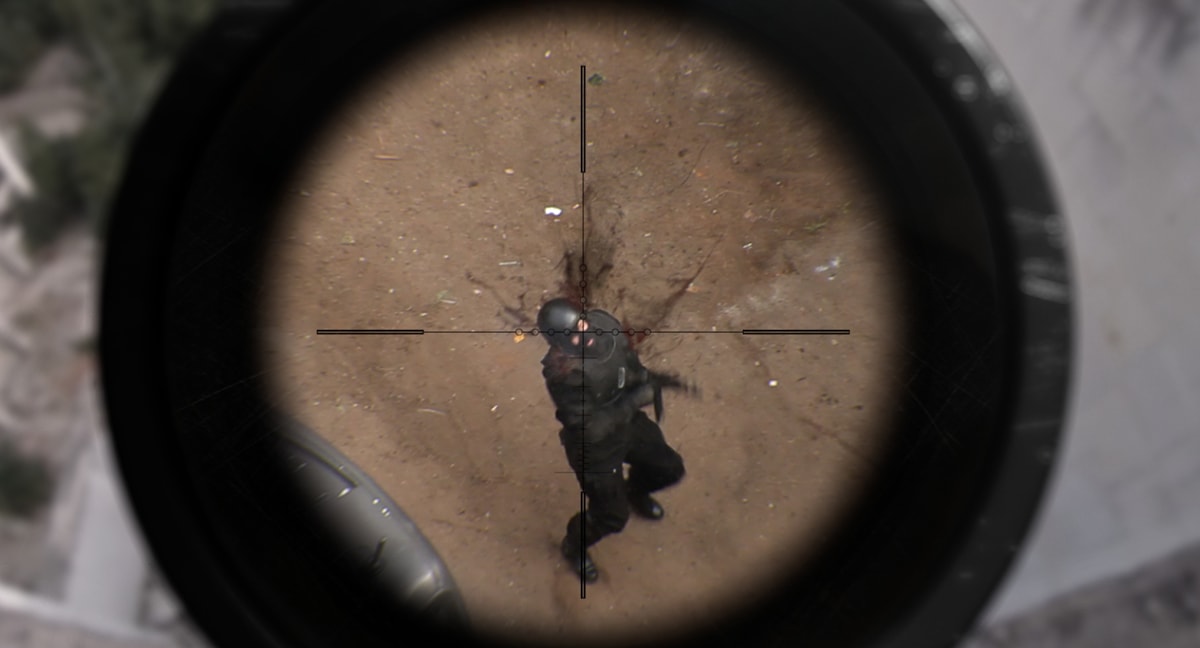
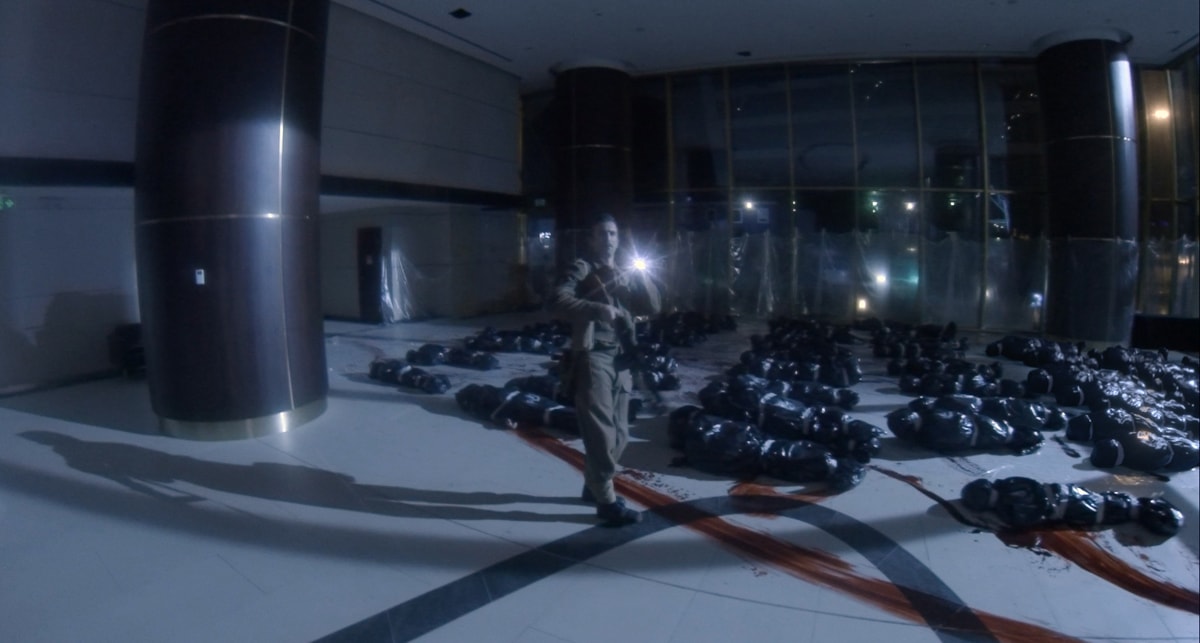
Mammal Studios took on a number of sequences – a sniper shoot-out in which Henry and a ghillie clad Jimmy (Sharlto Copley) take out a caravan of mercenaries arriving at a desolate collection of cement buildings, an ambush and a battle against a group of mercenaries. The work included adding extra blood and gore, implementing sniper scope views and readouts, bullet hits, explosions and even a room full of CG body bags. They also provided stitching to create seamless shots.
As with the other vendors, Mammal’s immediate hurdle was dealing with the GoPro wide angle lens footage. “Getting a proper 3d solve needed a decent flattened image map,” comments visual effects supervisor Gregory Oehler. “While not perfect, we were nonetheless able to use these maps to do our tracking, CG and compositing and get most of the way to match moving. Hand-to-hand tracking locked in the remainder. Also challenging, both in tracking and compositing, was remedying the rolling shutter issues. Because of the frenetic nature of the movie – the practical muzzle flashes, high-speed movement, quick transitions from light dark areas, etc. – the sensor’s image scanning may create partial exposures, wobbling or skewing artifacts on the footage. A fair amount of paint and composite work was required to fix these issues before tracking or compositing took place.”
To start that process, Mammal created NUKE nodes generated through 3DEqualizer. “This did a great job of unwarping the images for tracking and compositing,” says Oehler. “Reversing the process re-warped the images for completion. Most work was composited in NUKE, and aside from about doubling the image size, this method proved a useful pipeline tool for all our GoPro work.”

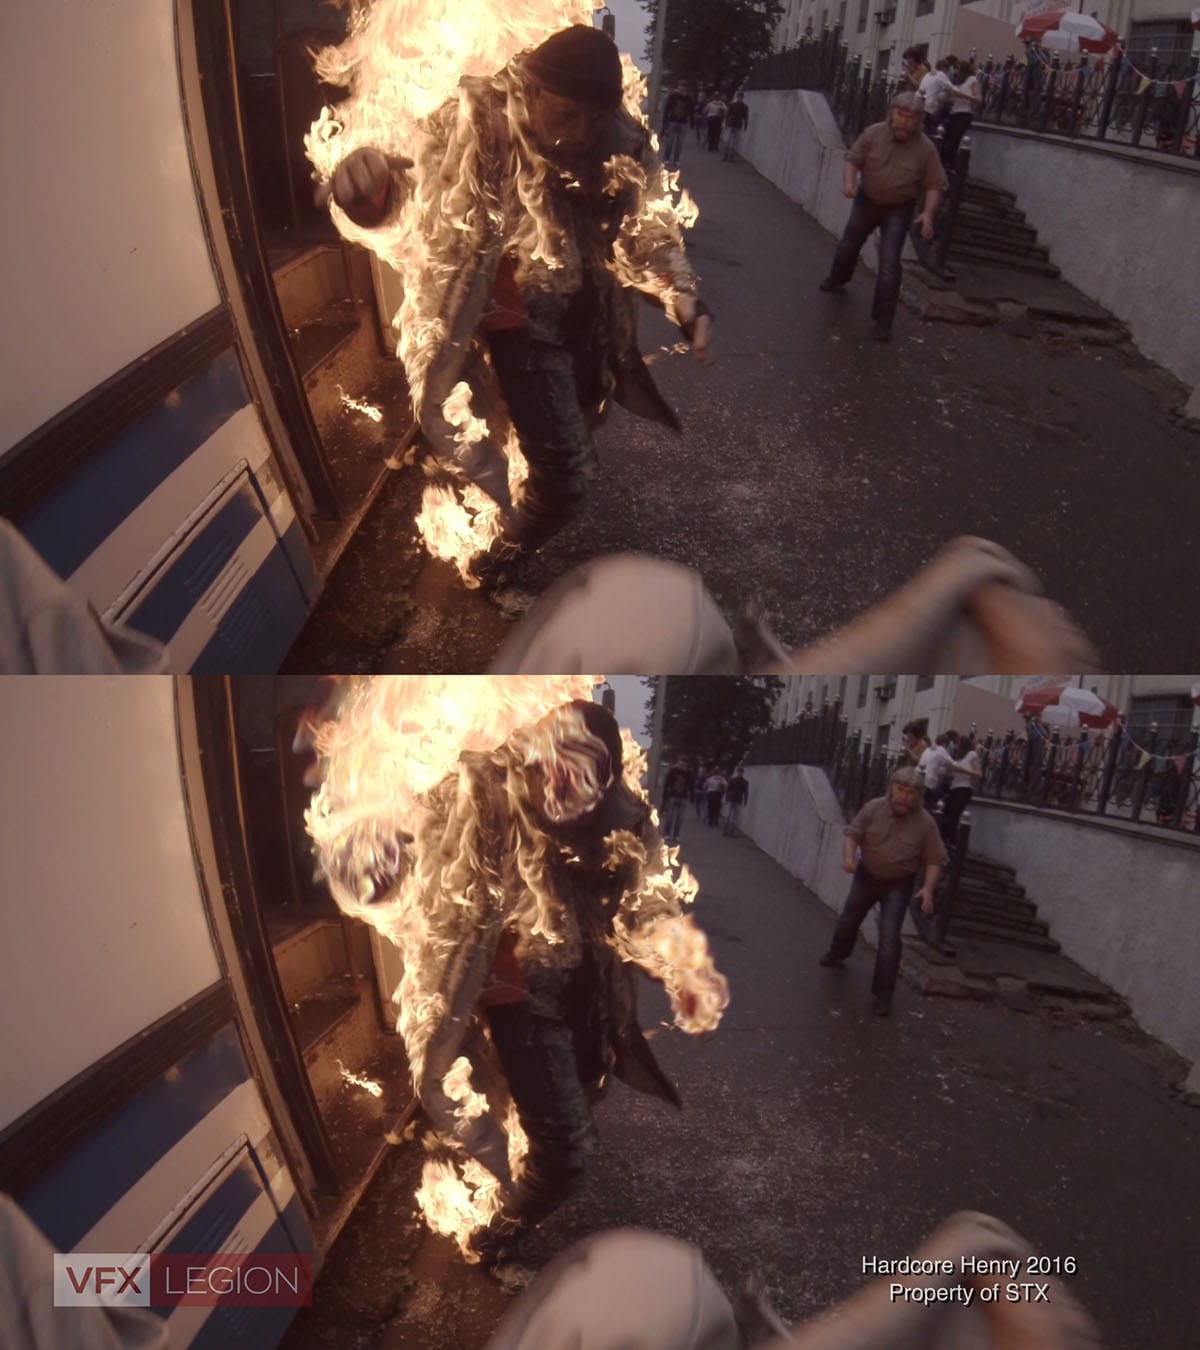
In one particular shot, one of the assailants is wearing a mirrored suit to shoot a flame thrower at Henry. Henry reacts, avoids the flames, but then Jimmy is hit and ignited on fire. “The shot was a bit thorny as Henry (seen in terms of the camera POV) must narrowly avoid the flames, yet pan with the fire stream as it blazes near and past camera before hitting Jimmy nearly 180 degrees from the assailant,” outlines Oehler. “Turning back to the assailant, Henry needed to rush and disarm the mercenary while flames continue to fire.”
“We first assembled and morphed several shots together to create a seamless action clip,” adds Oehler. “Even though this shifted camera positions a few times in the course of the shot, the tracks, with additional 2d tracking, held up well. Next we removed the camera, crew and rigging in the mirror suit reflections.”
Mammal needed to re-build much of the space, however, because in addition to the incendiary and battle effects, artists had to add several body bags and construction set dressing, remove a wall of crew members, a large stunt hoist and floor protection beneath the assailant. “Without set photos or measurements, we were challenged to derive set dimensions,” outlines Oehler. “From the internet, we pooled photos of the Russian Academy of Sciences building in Moscow, where the scene was shot, to help gauge window and pillar scale next to other objects in the photos. This helped generate gross measurements and geometry and assisted in flushing out the scene and gain some real world data.”
A CG fire sim was crafted in Maya and rendered in Phoenix. Says Oehler: “We matched the GoPro shot practical fire a few shots later, which is a bit more blown out than much of the CG fire seen these days but felt a bit more genuine. Augmented with our practical embers and Nuke generated particle embers, we added fire, smoke, atmosphere, gunshots, plaster hits, breaking glass, sparks and blood.”
VFX case study – VFX Legion
VFX Legion, a unique player in the effects industry via its structure of remotely connected artists, also tackled a wealth of Hardcore Henry shots. These included several with extra gore and violence, the creation of a CG blimp and some seamless stitching of their own.

Like Zero and Mammal, VFX Legion firstly established a workflow for triaging the GoPro footage. “GoPro is a mess for visual effects,” the studio’s co-founder and creative director James Hattin admits frankly. “Between the lens, the compression, and the limited dynamic range we become very limited in what we can do with the plates. Tracking was probably the hardest piece of the puzzle. Our artists Albrecht Steinmetz and Mark Evans used 3D Equalizer to track as best they could and would send dewarp nodes to be used in NUKE.”
Hattin notes that this approach tended to work best for only the center of the image. “This show was captured at 4k and 48FPS, by the time we made the plates to work on the show, we were down to 2k at 24FPS. There wasn’t a lot of latitude to punch in and use just the least distorted part of the image. It was up to the 3D artist to try to match some of the fish eye (not ideal) or the comp artist to fudge the pieces together with spline warps and grid warps. It was probably the most gruelling project, simply because of the footage.”
VFX Legion’s CG blimp, seen in the film’s opening escape sequence, was modeled in Maya and textured in Substance Painter by 3D lead Rommel Calderon. “It was rendered in RedShift,” says Hattin, “which allowed us to iterate renders very quickly. There was a lot of back and forth with the renders, distortion, and tracking. We purposely removed some of the detail around points that weren’t as likely to hold up in the track, but the first note we got back from Ilya was that it needed more detail. So we roughed it up and made Kyle Spiker, one of our 2D leads, work an extra day or two to manually tighten up the movement and make sure it sticks to the practical set.”
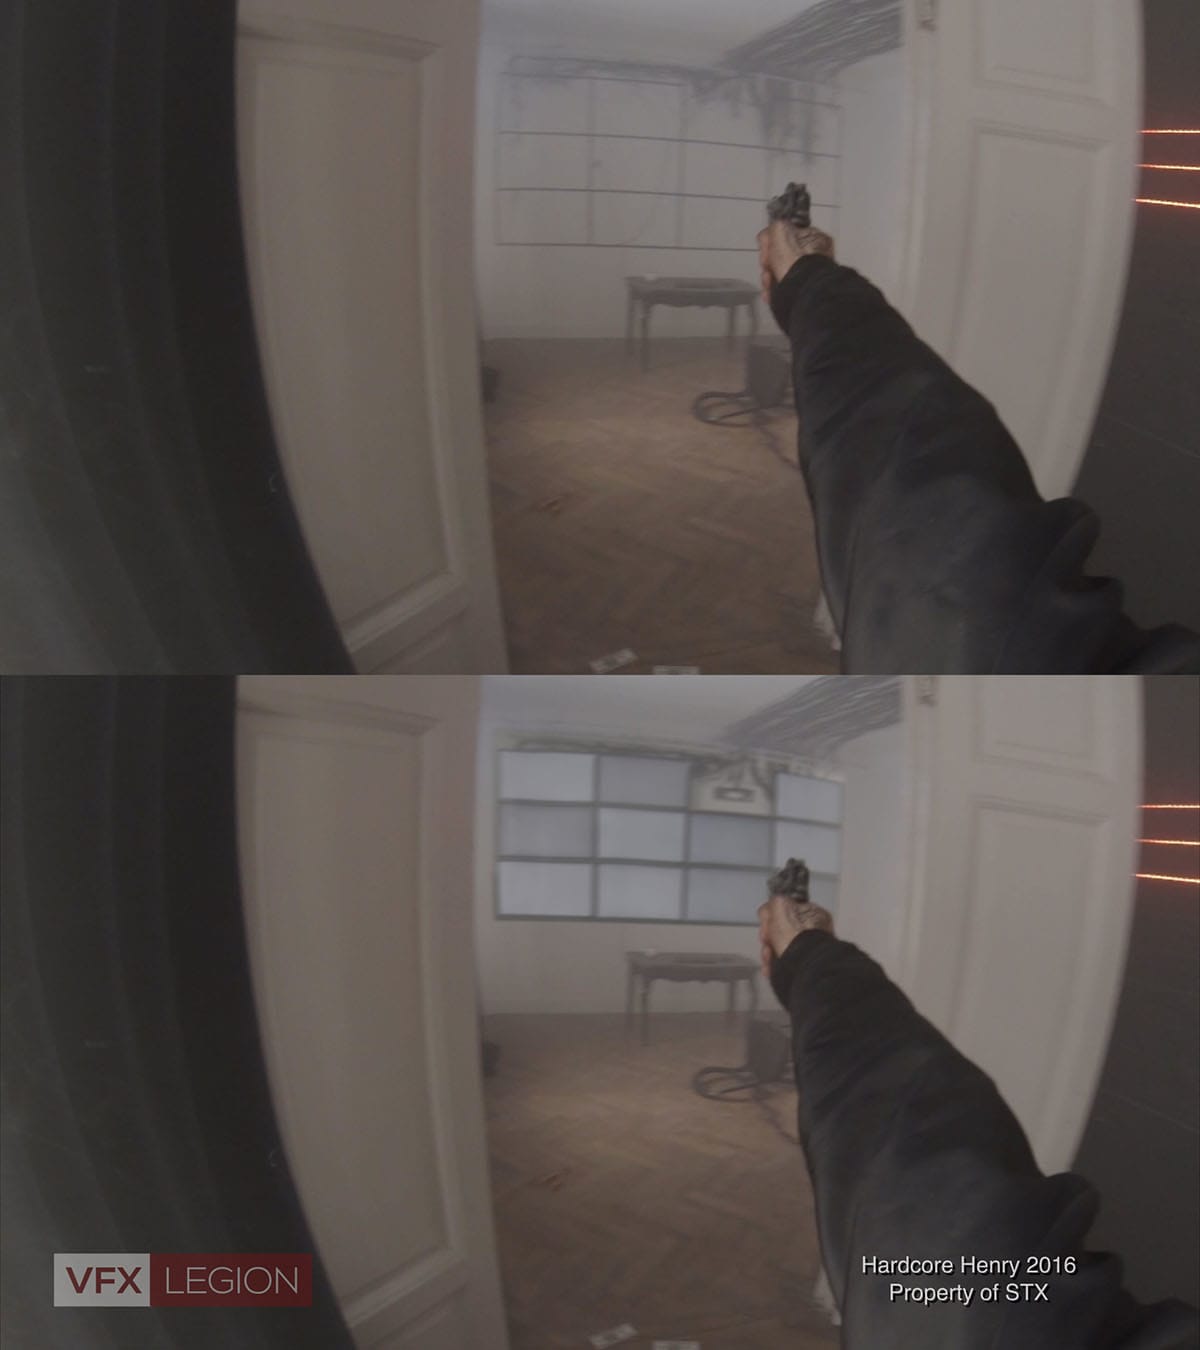
For compositing, the team relied mostly on After Effects. “AE was a great tool for being able to slide things in time around easily and find good stitch point,” discusses Hattin. “We were allowed some flexibility in the edit to use more of the head or more of the tail of shots to get what they needed for a solid stitch. Sometimes it was just a clever crossfade, other times though, it was a morph.”
In one particular shot that involved several hanging lights from the ceiling, VFX Legion took over the work from another vendor. “The crossfade that was done previously, between two plates, caused all of the lights to double up for about 10 frames,” says Hattin. “It may not have been noticeable at speed, but Ilya was determined to ensure that every cut and every transition was solid. We gave it to Rafael Perez up in Toronto and he was able to morph the two plates together perfectly. It was a real challenge that only lasted a moment, but it made a significant difference if we compared the old version to what Raf had achieved.”