fxguide has been following the development of Remedy Entertainment’s third person shooter Quantum Break for several years. Back in 2013, Microsoft announced the game from the Alan Wake studio with a teaser trailer during an Xbox One reveal event. In it, a young girl seems to hold a special time bending power that reveals a ship crashing into a bridge. That dramatic effect in the trailer – full of destruction – was made possible with Pixelux’s DMM software, a technology fxguide has explored in-depth in other games and film visual effects, and now we wanted to know more.
But, we had to be patient.
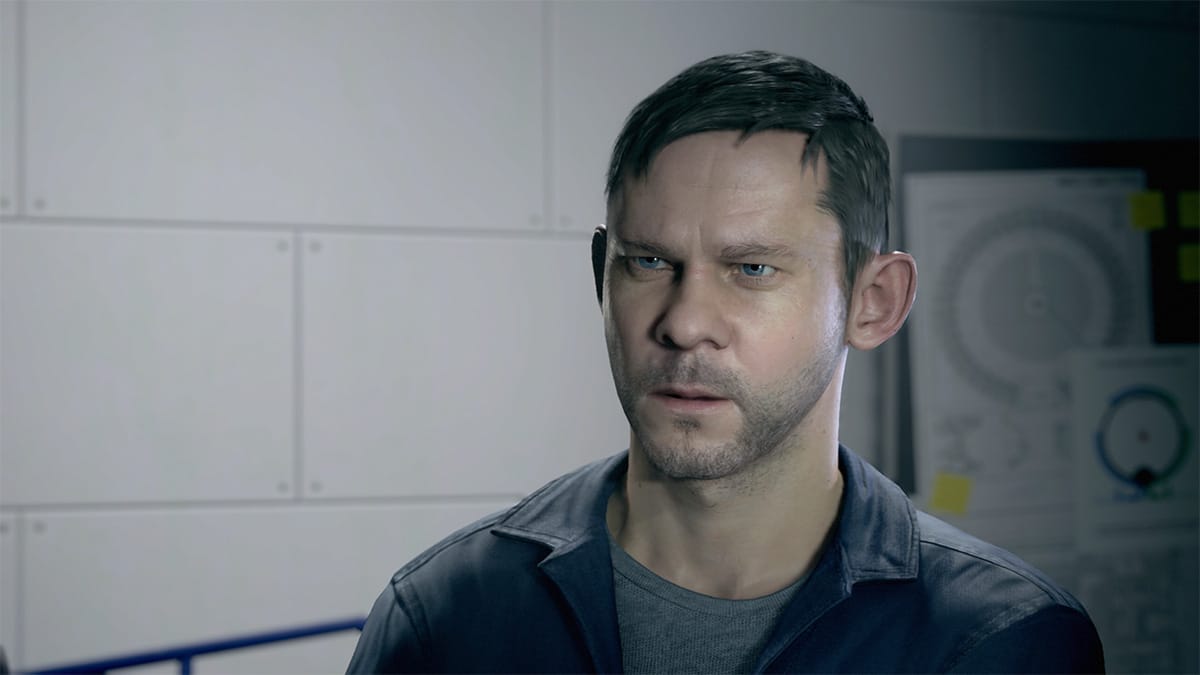
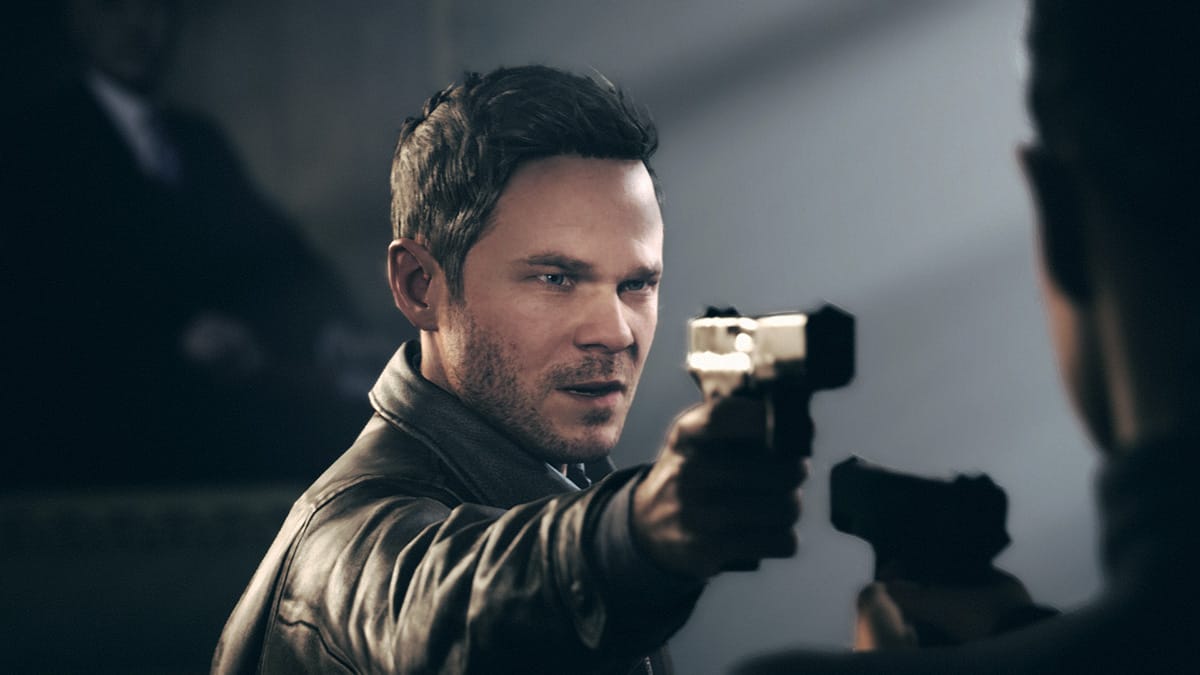
Earlier this month Quantum Break was finally released and since 2013 the game has gone through a number of iterations before now focusing on the character of Jack Joyce (played by Shawn Ashmore), a main with time manipulation powers in a world where time ‘stutters’.
To mark the game’s release fxguide sat down with key members of the Remedy team to discuss not only destruction effects, but also the art of crafting a cinematic-like 3PS, game engine design, character creation and performance capture.
We’ve also been able to obtain a wealth of behind the scenes imagery and video clips from the game.
Here is the Quantum Break story, direct from the artists.
Quantum Break’s cinematic origins
ELMERI RAITANEN (senior visual effects artist): Cinematic third person games have always been Remedy’s strong suite, so luckily we are already in our comfort zone here. We love to draw inspiration from pop culture classics and modern TV-shows. We wanted to create a believable sci-fi story, so in addition to the obvious Hollywood blockbuster references (Inception, Looper, Interstellar etc.) we took thousands of photos of for example real-life laboratories from CERN, NASA and Helsinki University. We also brought some film industry veterans in to join our ranks and help us work with Quantum Break, they brought some valuable insight and techniques to the table from that side, which really helped.
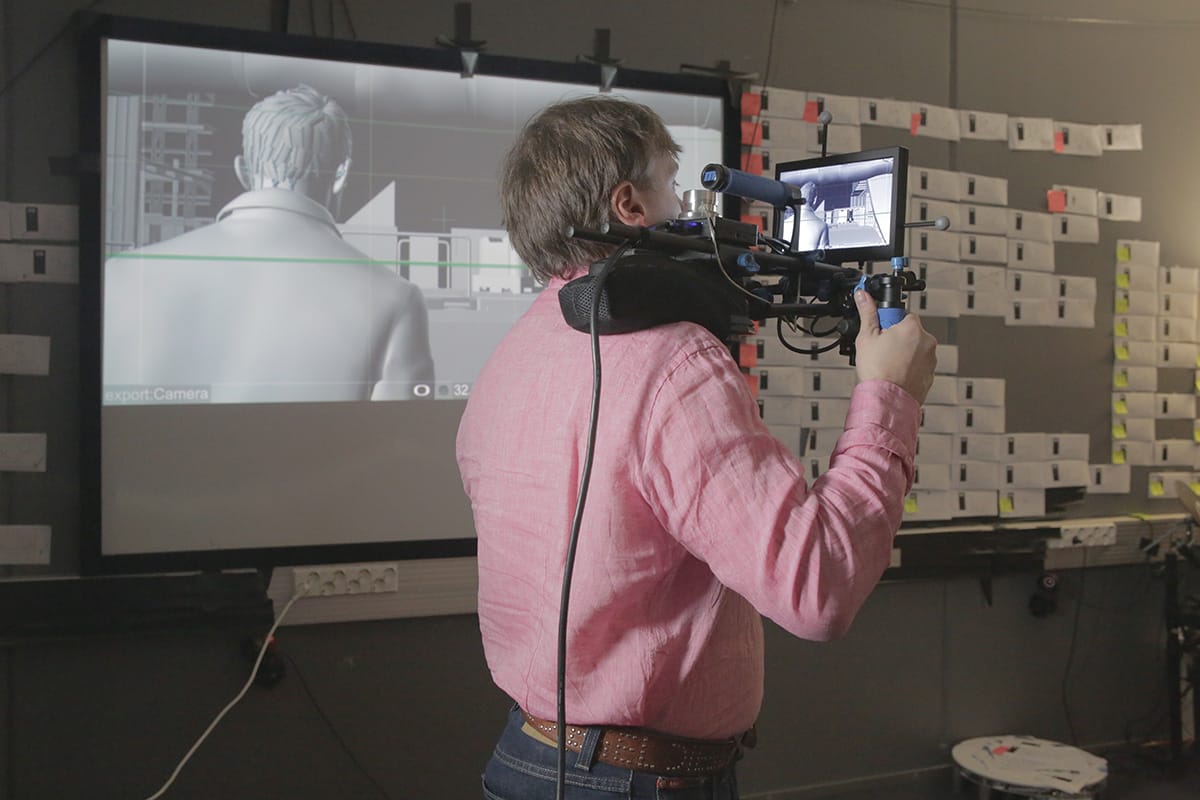
The playable parts in the game transition pretty seamlessly into in-game cut scenes that are lit shot-by-shot in a similar fashion to film. In order to make the cut scenes feel consistent and familiar to the audience, we selected a certain set of prime lenses that are also used in real life. We also tried to move the camera only in a way that’s possible with traditional cranes, drones and Steadicam rigs, and always made sure to keep the “camera man” alive, so to speak.
From the engine side we tried to make the image look as realistic and gritty as possible. We used physical based rendering, a tone mapper that mimics the exposure of a film and in post we could add artistic imperfections like bloom, vignette and film grain. All the scenes were finally carefully color graded to keep the look consistent throughout.
Solving time: Quantum Break’s tech requirements
ANSSI HYYTIAINEN (scripting lead): The idea of having scenes with broken time was on the table very early on. One of the early references was the Philips Carousel TV commercial, in which the camera flies through a bank robbery scene and shows a number of very dynamic looking situations frozen in time. In our case we wanted to have the player to adventure in scenes where the time is acting strangely, and obviously if you want to demonstrate not just frozen but also broken time, you can’t do that with static environments. To us, the most dramatic way to represent broken time was to put the player in the middle of some kind of massive destruction scenario, where things would be frozen, skipping like a broken record and playing forward or backward.
A whole collection of methods had to be implemented to visualize broken time, including some completely proprietary ones, such as geometric distortion waves, various particle effects and methods of recording in-game simulations for the purpose of playing them back in reverse or whichever way later. Some methods involved using 3rd party simulation tools, such as DMM and Thinking Particles, and creating methods to play back the baked results of those simulations in the game efficiently.
Also from the very beginning – and partially because face tech in Alan Wake wasn’t fully fledged – we really wanted to have convincing facial animations in the game, so we put a lot of effort into developing all the tools and technology needed to capture and play back the performances of the actors; we wanted to make the best facial technology in games to date.
Adopting a physically based rendering pipeline
TATU AALTO (senior graphics programmer): After Alan Wake, we started taking rendering in our proprietary Northlight engine toward a more physically based and consistent look. We wanted cinematic realism with high quality lighting, but also wanted to keep everything as dynamic as possible since in the game time can fast-forward, rewind and quickly turn from day to night. Being a relatively small team, we felt that it was important to build consistency in our rendering pipeline so that we could target different moods without re-working large amounts of content. Having engine level systems for different gameplay situations had served us well on Alan Wake, so we ended up building on top of similar foundation.
On the material side, we adopted physically based shading to get good looking assets in all lighting conditions. Our materials are defined by four main components: diffuse albedo, specular albedo, smoothness and normal map. Additionally, we use textures to guide for example material blending, translucency and subsurface scattering. Our shaders are energy conservative and based on the GGX BRDF.
LAURENT HARDUIN (senior lighting artist): On the lighting side, we wanted to build a unified solution for not only static and dynamic geometry, but also for scattering media. In Alan Wake, we used volumetric lighting as an effect, but going into Quantum Break, we wanted every light in the game to build atmosphere and contribute to participating media. Most of the direct lighting in the game is dynamic and respects the inverse square falloff. We rewrote system to handle complex materials like eyes and hair, and to perform well on situations where there is lots of lights visible simultaneously.
For the indirect lighting, we developed our own global illumination system from scratch. We started by prototyping fully dynamic Voxel Cone Tracing and some variants, but realized quite early on that the quality we were after wasn’t really possible with the current generation of hardware. Indirect lighting in the final game is based on precomputed light probes distributed on a voxel representation of the levels. We build sparse voxel hierarchy around static geometry with half meter spacing at its highest detail. Further away from meshes, we use two levels with two and eight meter spacing to cover empty space. Using hierarchy, we can do seamless transition from static to dynamic geometry and fill bouncing light to scattering media. In addition to irradiance, we store light transport from sky dome and sun, making it possible to relight scenes when time shifts.
In order to account for finer granularity of detail than light probes can provide, we employed screen space techniques for ambient occlusion and specular reflections. Screen space techniques work nicely with dynamic content so they helped us ground everything into the same world. The solution we ended up with allowed us to achieve realistic and consistent lighting across all types of medium and scales of detail.
Just how were these time stutters going to be done?
ANSSI HYYTIAINEN: With the vision we had for time fracture scenes, the main technical question was: how are we going to implement in-game destruction that also allows the scenes to freeze, skip and rewind? That problem can be divided into two categories: destruction components that are simulated in real-time in-game, and destruction components that are pre-baked animation data which is merely played back in real time.
https://youtu.be/8__e5mrNlvo
For the first category, we used Havok for the real time physics simulation and our own proprietary particle system simulated in real-time. For both of those components we created a system that was able to record the results of a simulation in-game, and then play it back whichever way we needed. That same system is used in the stuttering destruction scenarios mainly to drive rewinding and skipping particles, as majority of the mesh animation is pre-baked.
For the case of pre-baked destruction, the stutter playback problem is relatively easy, as typically pre-baked data lends itself to be played back whichever way. So for the in-game playback we built tools that allowed the artists to represent the playback of any animation as an arbitrary time curve, and we created some noise functions to drive the playback, and even a method for using audio to drive an animation playback (which would naturally tie the motion on the screen to the sound the player hears).
https://youtu.be/S4451KfyiqQ
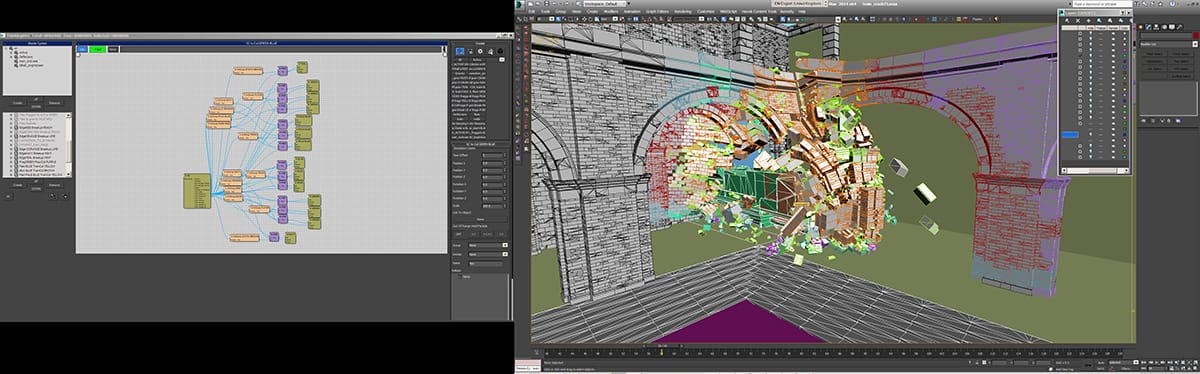
As for creating the destruction data, early on we already had a reasonable start in the form of being able to import and play .FBX animation that contain only rigid bodies. So with fairly small effort we were able to pipe Thinking Particles simulations from 3DS Max into our game engine, as long as we weren’t trying to represent deforming meshes. For deforming meshes we did some testing, and ended up implementing baked DMM playback into the game. We also used these destruction tools in some cases to create completely static frozen time set-ups. For example, in the early E3 2013 demo where we see Dr. Sofia Amaral being rescued from a drone crash, the debris floating inside the room started life as DMM and TP simulations.
https://youtu.be/osX5zIEDCBY
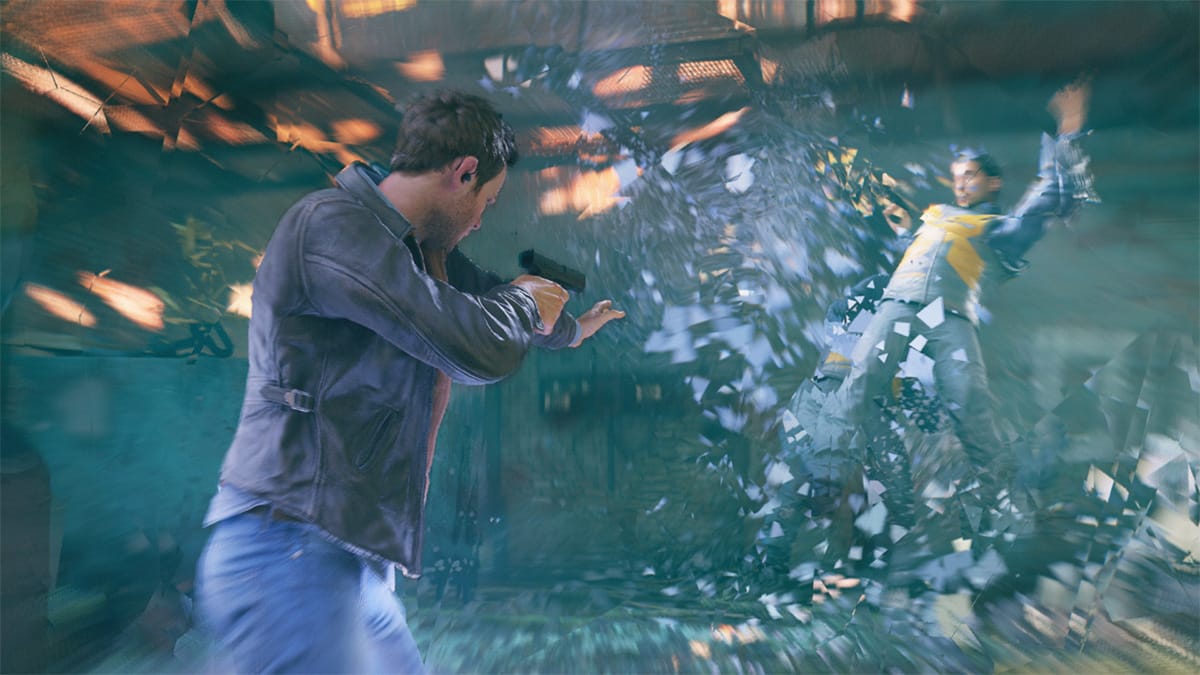
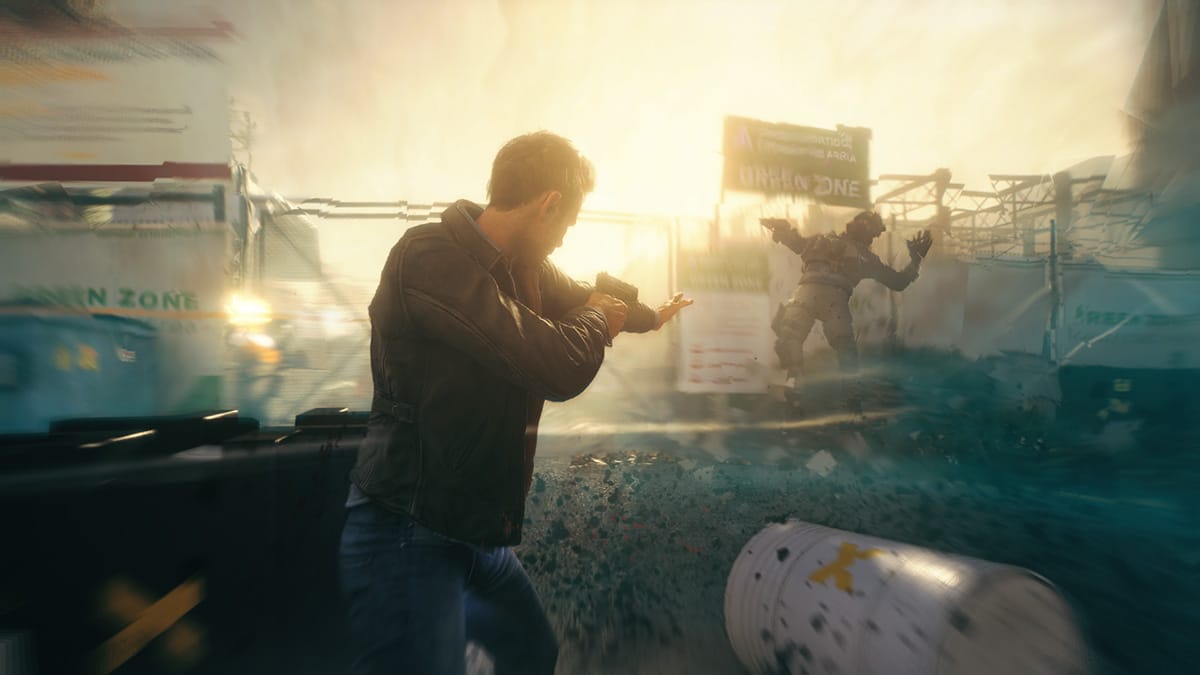
Apart from the traditional destruction work, a large part of the look and feel inside the stutters comes from the proprietary in-game effects. Because it was important for us to make the stutters feel unstable and dangerous, we built a system for dynamic wave simulation, which is actually distorting the geometry and driving various other effects. This wave simulation can be affected by arbitrary objects, but also uses audio analysis of specific samples we’ve tagged to drive the intensity and behavior of the waves spreading over the scene. These waves are then used to displace dynamically tessellated geometry to emit many different kinds of particles and to create caustic-like lighting effects. Every time-related effect in the game, such as the time powers, uses this system to create what we hope is a consistent and unique look.
The art of effects and their role in the story
ELMERI RAITANEN: Coming up with the visual language of time being broken has probably been one of the biggest professional challenges for many of us here at Remedy. The high level concepts we tried to live by were “time turns things up, not back” and “time stutters should feel unstable and unpredictable rather than serene moments of frozen time”. It’s not an easy task to visualize something being in an indefinite state of quantum superposition, which was something our story team had on their minds.
https://youtu.be/TARSUlKmss0
It was apparent that we needed to create something really unique, and didn’t want time stutters to have too many traditional sci-fi or fantasy elements in them. It had to be somewhat believable, so we tried to justify the use of techniques and effects with some kind of pseudo-science. In a stutter, light itself would probably behave differently: light sources would leave long exposure trails, some wavelengths or colors would be muted totally while others would be amplified, there would be chromatic aberration and geometric distortions. There’s something oddly satisfying when a solid, rigid structure like a steel beams or concrete floors undulate organically like water.
For the sake of storytelling, we also had to kill some “visual darlings”. Sometimes, when we stumbled upon a beautiful, emergent and unique prototype, it would turn out to be too obscure for gameplay purposes. One of these “darlings” was a weird feedback loop where the previous frame of the game would be projected on top of the level geometry from the new point of the camera when you move it. Hypnotizing and endlessly interesting to look at, but impossible to use during adventuring gameplay due to the confusion it would create.
At some point we realized creating audio for these peculiar visualizations would be a nightmare, so we actually ended up driving the intensity and behavior of the effects with the game audio, making everything just a little bit more interactive.
DMM: a Quantum Break history
JAMES TOTTMAN (senior visual effects artist): We utilized DMM throughout Quantum Break in a number of different ways, but it took some time to realize its best place amongst our toolset. Having used KALI (MPCs adapted of DMM) in several films before coming to Remedy (Harry Potter, Wrath of the Titans, Seventh Son), I was already very familiar with the software, and was actually one of the main reasons I was brought into the company. However, the utilization of DMM in games is quite different to that in film. Whereas in film we are constantly pushed to increase resolution in a bid to aim for perfection, in games the target is to achieve the highest quality within a certain memory budget. Even with the ever increasing quality of video game these days, it’s still probably going to be a while, if ever, before we can run physics simulations in real-time to the same quality of those used in pre-rendered film.
https://youtu.be/RXaHdsAvmdw
For this reason, it quickly became apparent then that using DMM for fracturing was going to be difficult and ultimately, we rarely used DMM for its fracturing capabilities as to do this we would have needed to be running with tetrahedra counts well in the tens of thousands to get the quality that we wanted, which was too far out of our memory budget. Our game engine could probably have supported those numbers had it been the only thing in the scene but combined with all the other crazy effects we had going we had to work more efficiently. In the end we decided that DMM was the best tool for soft-body deformation.
This was still great for us though; the ability to create bending or deforming objects in video games has been something that has rarely been achieved well before and usually developers would have to fake this effect through clever techniques such as geometry swaps, blend shapes or even hand animating a rigged mesh, all time consuming and often unsatisfactory methods. Now that we could use DMM for this, it all became relatively straightforward and even better when we combined the pre-simulations with the games time-manipulation we could really show just how smoothly the simulations work bending the objects over and over again. Once we had this idea locked down, we tried to incorporate as many deforming objects into the game as possible so we could have the opportunity to destroy them using DMM: cars, doors, walkways, metal beams, bridges, chains, cargo containers and so on.
How Remedy integrated DMM
ANSSI HYYTIAINEN: During the R&D phase of Quantum Break, we had already decided that we wanted to have deforming objects in the pre-baked destruction sequences in the game. Technically we already had something to play back vertex animation in real-time, but that method didn’t scale very well into complex meshes. Typical in-game meshes contain so many vertices, that representing animation data for each vertex quickly becomes far too data intensive for real-time purposes. So we set about looking for an efficient way to compress vertex animation data into more feasible sizes.
https://youtu.be/yX-WTvMulmE
Early on we created an implementation of a mesh skinning algorithm that was able to generate a bone setup for arbitrarily deforming mesh animations. However, the amount of vertex and animation data in the meshes we use tends to be so large that the turnaround time from a regular deforming mesh into something that can actually play back in the engine became anything between hours to several days, or even weeks if we amped up the quality. Technically this method worked, but was not practical enough for production as it proved to be too slow for iterative purposes. Eventually we ended up abandoning the method altogether.
For the next iteration we decided to try using DMM for baked soft-body destruction. DMM simulation is already in itself a kind of a data compression mechanism: it simulates deformations on a tetrahedra cage, and that deformation is transformed into a visual mesh with much larger number of vertices. This simulation method itself would give us a nice starting point for the real-time playback of complex deforming meshes, as we would only need to play back the deforming tetrahedra cage, and then basically skin the visual meshes to that.
As we use 3DS Max for our main pipeline for in-game geometry our first DMM test were created with the 3DS Max DMM plugin. That gave us a good idea of the data intensity of this method, but unfortunately there were pretty large list of things that made the 3DS Max plugin somewhat impractical for complex scenes. Fortunately, the Maya version of the plug-in had been developed further and solved most of the problems we had at that point. It was far easier to create a content creation pipeline for Maya that was to be used solely for DMM objects.
Back to the bridge crash: learning DMM
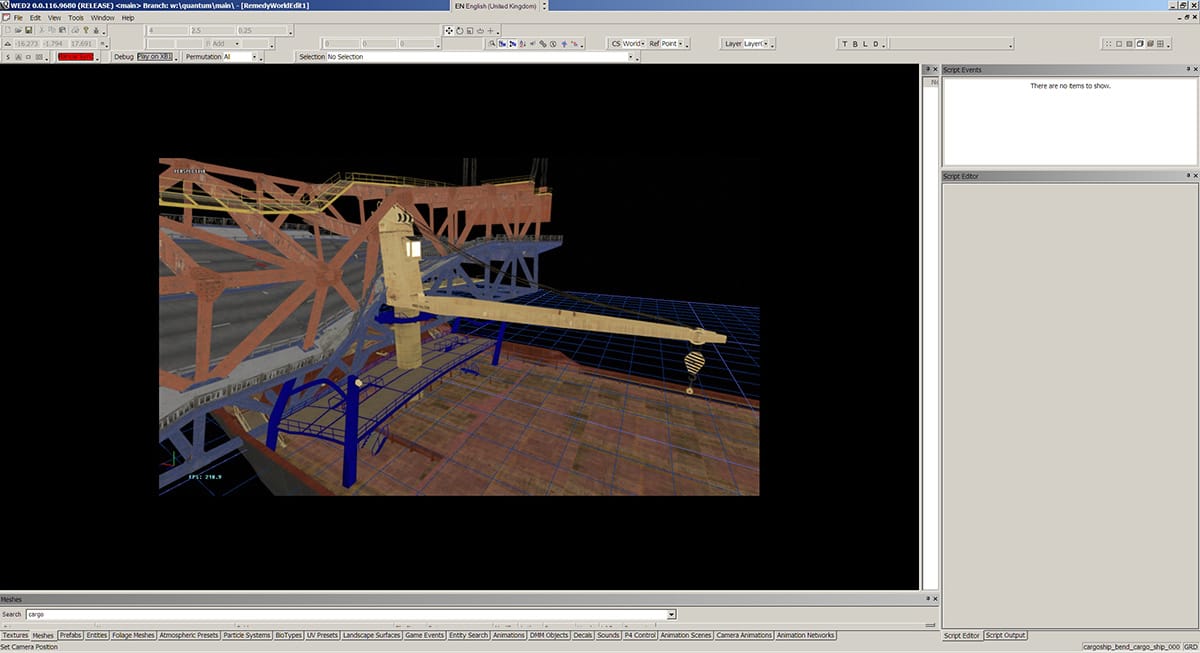
GREG LOUDEN (senior narrative designer): During pre-production on Quantum Break there was a goal to create this key set-piece action sequence with a ship crashing into a lift-bridge that would then freeze during a stutter in time, forcing the player to navigate the scene and escape. The premise for the bridge crash scene was that due to the idea that time is breaking down, and the ship had literally skipped forward in its own timeline before the bridge had the time to lift, causing a full impact between the two and destroying the lift-bridge almost entirely. The clash of metal from the ship and the lift-bridge made DMM the natural choice due to its strength for this type of effect: realistic soft-body deformation.
For the VTAR we used DMM to simulate the bridge crash at the highest resolution possible to achieve a photorealistic effect in an offline render, which was eventually shown at the Xbox One reveal event in 2013. However, after this we then had the large task of converting the DMM simulation into a real-time game environment and that task was undertaken by Paul Chipchase, our Principal Engine Programmer here at Remedy. It took some time, but after lots of back and forth with the DMM team this was finally made possible. Now we finally had DMM running real-time in-game, but this meant that we had to start making some compromises.
JAMES TOTTMAN: One difference between video games and film is that in film you have all the cameras and shots locked in before you even begin to start work on the effects, you have set boundaries to work with. In video games though, the player is given the opportunity to see everything up close, at all times and from almost any angle, which meant that we really couldn’t cut any corners, every part of the simulation needed to look good, both from distance and up close. This caused several problems however, as there was no way we could simulate with a mesh high-detail enough for gameplay, it would be too memory intensive. In the end we figured that the best plan was to simulate the bridge crash with a high enough detailed mesh for the in-game cinematic, and then from there take the coolest individual frame from the simulation, give it over to the environment and let them build on top, creating an even higher detail, static version for in-game use.
https://youtu.be/Kx3iryQc7rQ
This allowed us to create an environment with the richness and fidelity we wanted for gameplay purposes, without losing quality on the cinematic. Our main focus for this scene was to give the player this feeling of being stuck in a moment of epic destruction: a frozen cargo ship smashing through a lift-bridge, colliding cars, ripped asphalt, metal beams, objects all frozen mid-air around you, while you make your way through the center of it all. It sounded like a cool place to be, at least from a video game perspective!
More time for destruction
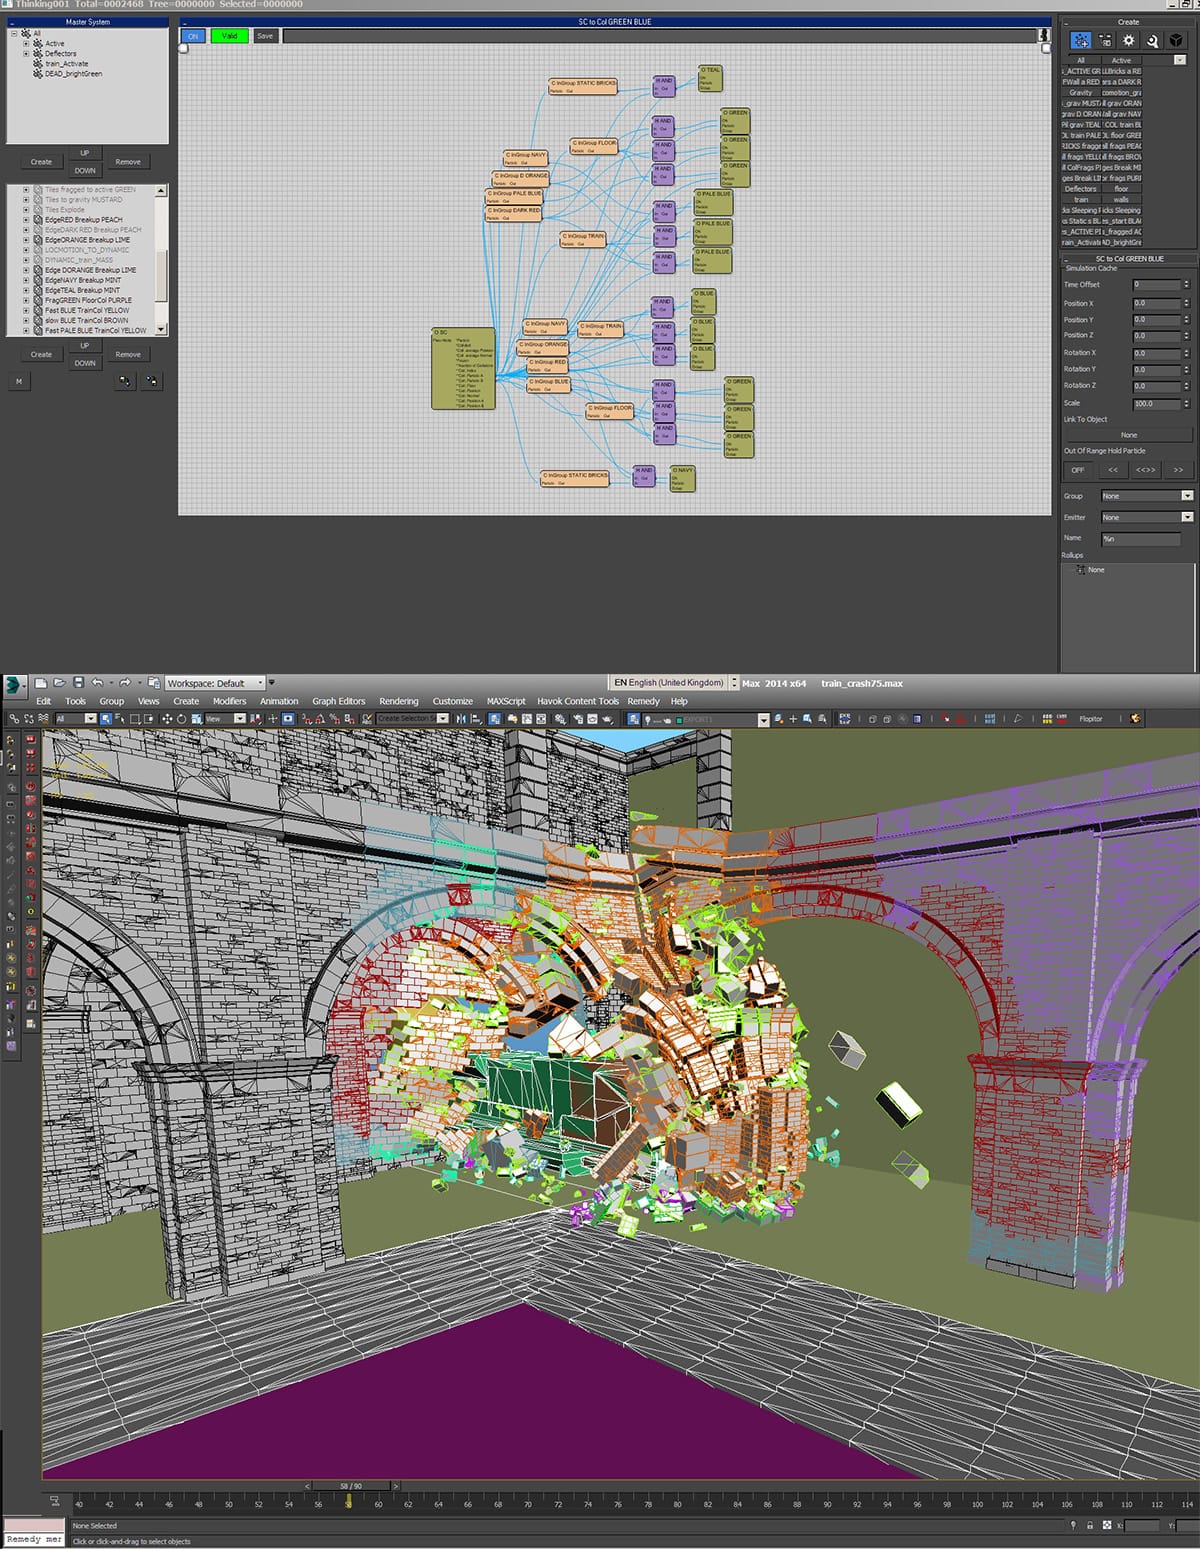
JAMES TOTTMAN: We actually used a number of different destruction software to create the time fracture sequences, and one of these was near the end of the game where we witness a train crash straight through a building. At this point in the game the world is really starting to collapse and objects are all going out of their natural timelines. This particular scene has a train which stutters forward on its own timeline and ends up crashing straight through the building that you, as the player, have to access.
For this sequence we needed to simulate a lot of broken rubble, as you can imagine, and having already ruled out the use of DMM for fracturing elements we decided that Thinking Particles (TP) would be the best tool for the job. We could have used a procedural approach here for the destruction, but it created a problem of indefinite amounts of debris, which was a risk. We decided instead that the best thing to do was pre-fracture the building in the areas only where we needed the definition. The benefit of pre-fracturing the building meant that we could use TP to simulate the scene with a finite amount of elements, and in the end I think we simulated with around about 5000 objects in total.
https://youtu.be/Hpq8p2ioKq0
The beauty of TP for me is that it has really nice functionality to cope with large scale simulations. In particular, the Shape Collision (SC) operator was fast to use and seemed to handle lots of data easily, as demonstrated by the destruction effects in the movie 2012. The SC operator was good not only for its speed but also because it is very forgiving when it comes to interpenetrating faces. When this does occur, objects tend to stick to each other, unlike other RBD solvers which tend to explode. Combining this feature with the clever rule based grouping system in TP, we were able to simulate large collections of debris seemingly as larger fragments which would then breakdown further with secondary motion as they collided which gives a nice organic feeling to the destruction.
https://youtu.be/qkDXaA7NcfQ
What we tried to do with this scene – and other similar ones in the game – was to create something more than your classic “train smashing through a building” scene, which we’ve all seen a million times before. With the combination of the stutter element to this scene, we were able to fully utilize our timeline playback tools to make the train and the destruction it causes to become stuck in a vicious loop, moving forwards and backwards in time. All this is happening while the player tackles a number of enemies in and around this spectacle, creating a rather unique backdrop, especially when you are clever enough to lure the enemy into the oncoming train.
Acquiring Quantum Break’s characters
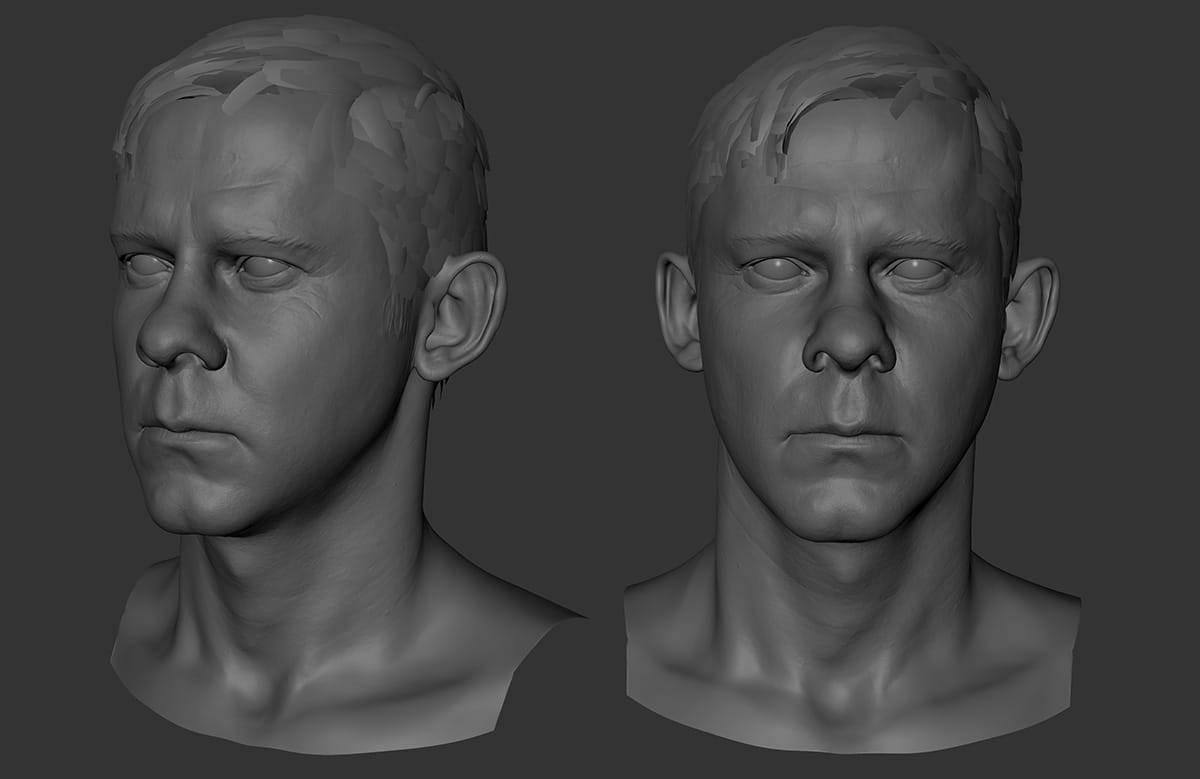
HENRI BLAFIELD (senior technical animator): In general, we try to get as much reference of the actors as possible, meaning that we have to scan the actor completely from head to toe here at the Remedy studios. While scans are an important part of the model creation process, they are really only a highly detailed reference for the character artists, who still need to completely model the characters.
To make sure we have all the answers at hand for any part of the character, we shoot additional photos and videos covering all possible deformations and character visual details. Model creation starts from the captured 3D scans, while working the finer details of the character are still refined by this additional reference footage.
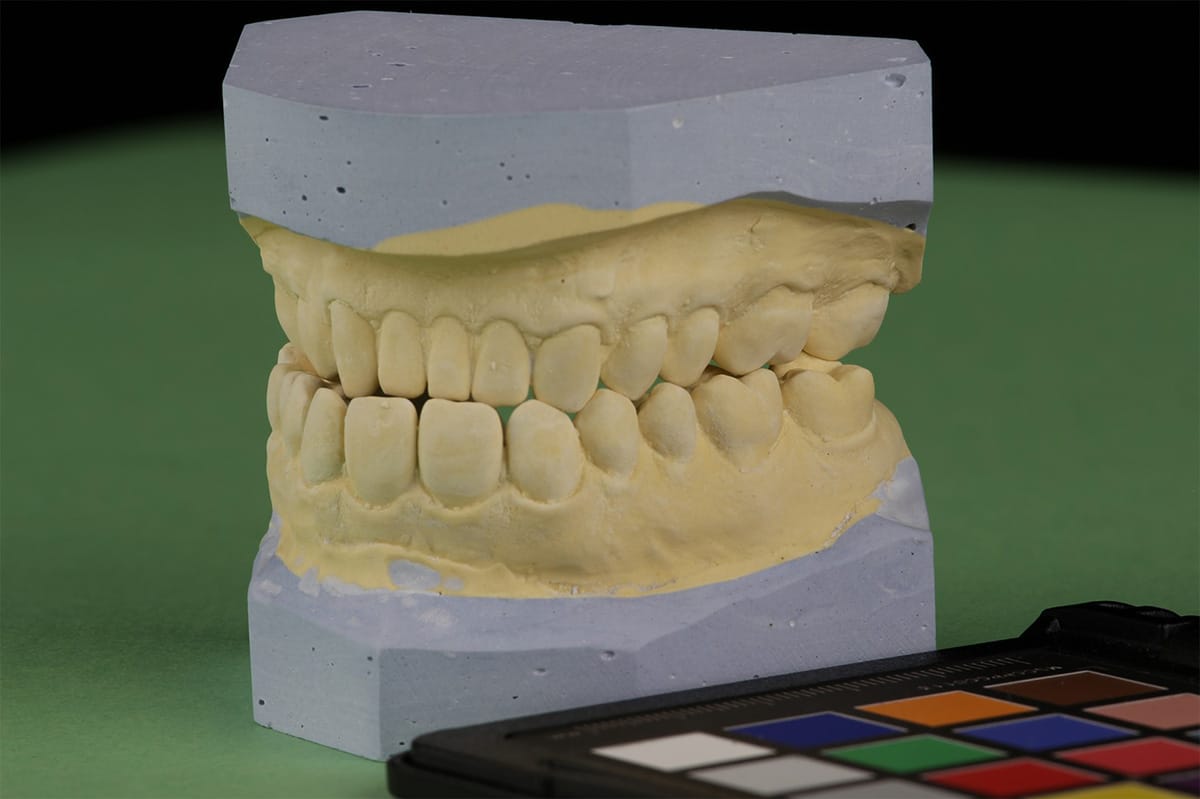
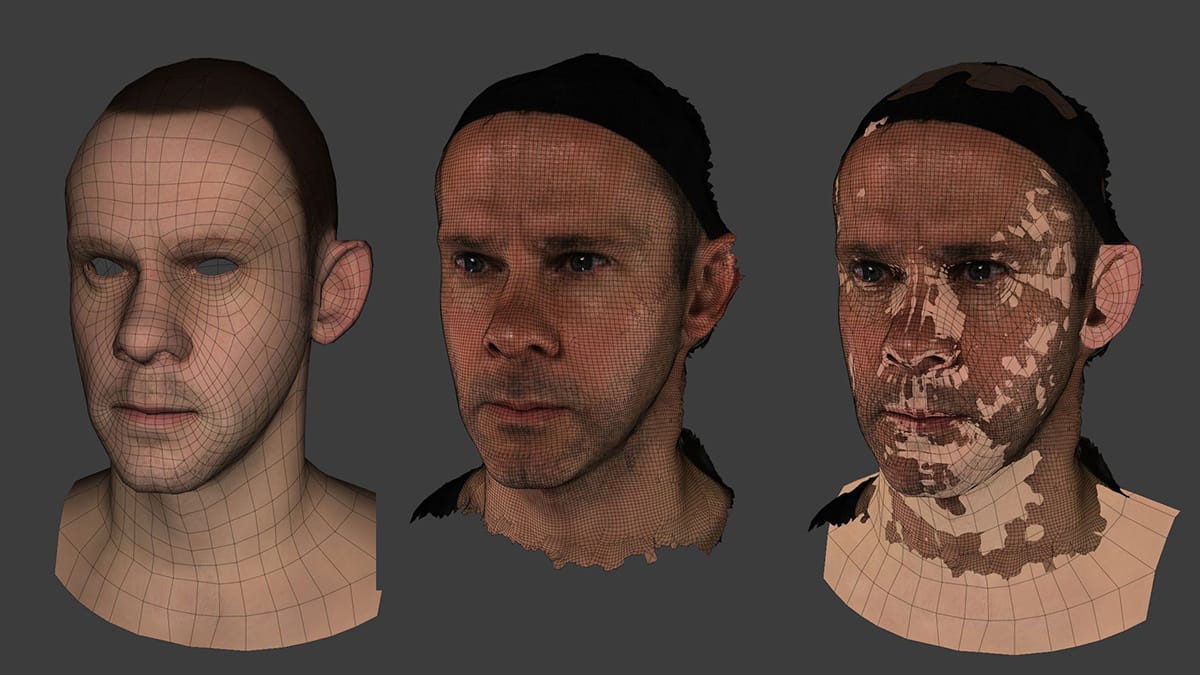
For Quantum Break we had three different scanners in use: a head and hand scanner consisting of 26 DSLR cameras, a full body scanner with a rotating platform, and a stacking scanner for the teeth models. The usual process for a main character was done in five steps.
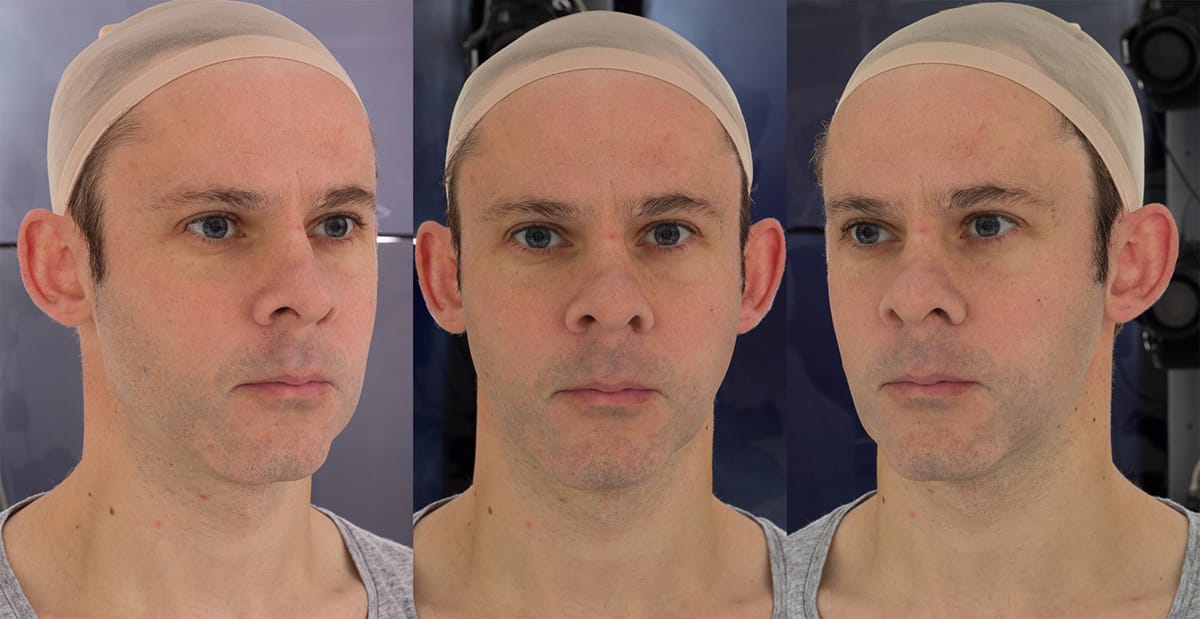
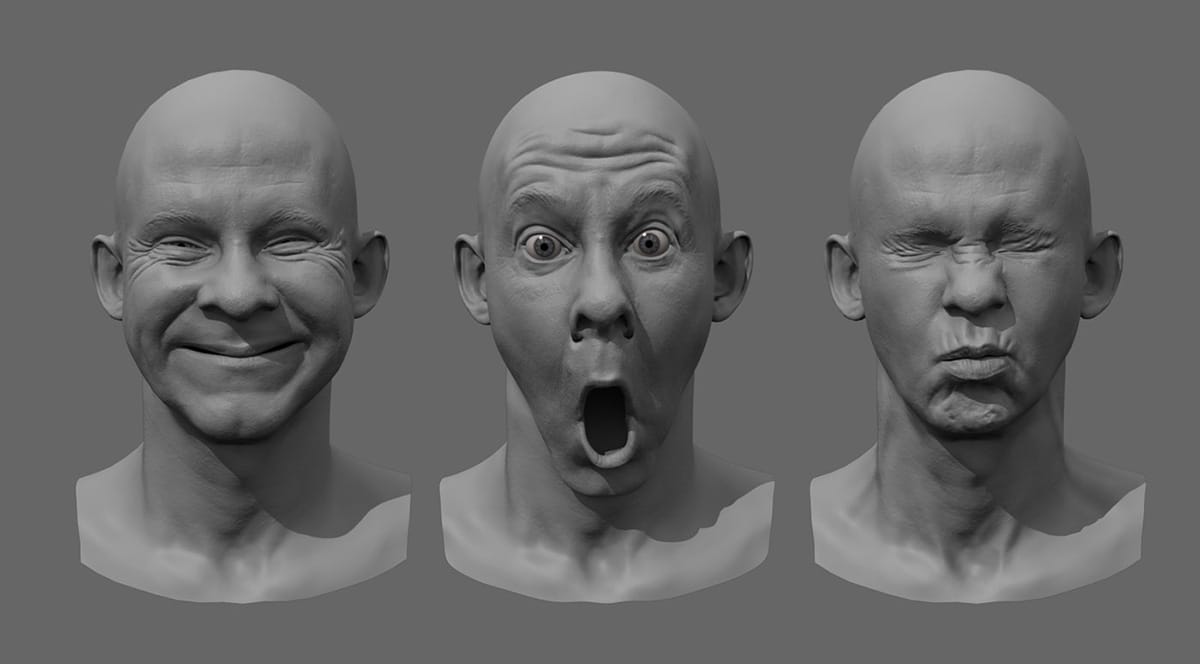
First step is high resolution scanning of the face. In a typical scanning session, we scan two base meshes of the head. These are neutral poses that inform how the head looks in the base model. First pose is the one that is used as the default head for each character and second pose is needed for areas that are occluded in the first scan, namely eyelids and area surrounding lips and eyes. Following these we do 12 more shots that are composite poses based on the FACS (facial action coding system). This data set will drive the final in-game model based the performance capture data. In addition to this we shot deformation poses for the neck to be used in building real-time deformers for this area.
Second step is hands. Using the same scanner, we get a good approximation of the actor’s hand. We shot three different poses, one for reconstructing the base model and two for reference. Third step is teeth. The actor is sent to a dentist for dental cast, and the plaster model is scanned with our robotic scanner. Fourth step is body scan: we take two full body scans of each actor. These are shot to inform us of the actor’s bone structure.
Fifth and final step is body deformation reference. We shot extensive two-sided reference videos for body and cloth deformation to help us out in rigging and the pose space deformer setup process. The result from all of this was that we had an unclothed model of the actor. We then did separate scan sessions for the wardrobe, scanning all of our clothing initially on a mannequin. For the finer details like stitching and fabric surface, we do a separate scan for just these details and embed that data into the full scale model of the costume.
We also made sure to record as much reference as possible for the rigging team. This included having the actors wear their respective outfits and do a series of motions for cloth simulation and deformation purposes. For some actors, we recorded video footage of them going through a series of neck poses that we could use as reference for the neck rigs, these ended up being Maya muscle rigs that were baked down to runtime pose space deformers.
Getting the most out of performance capture
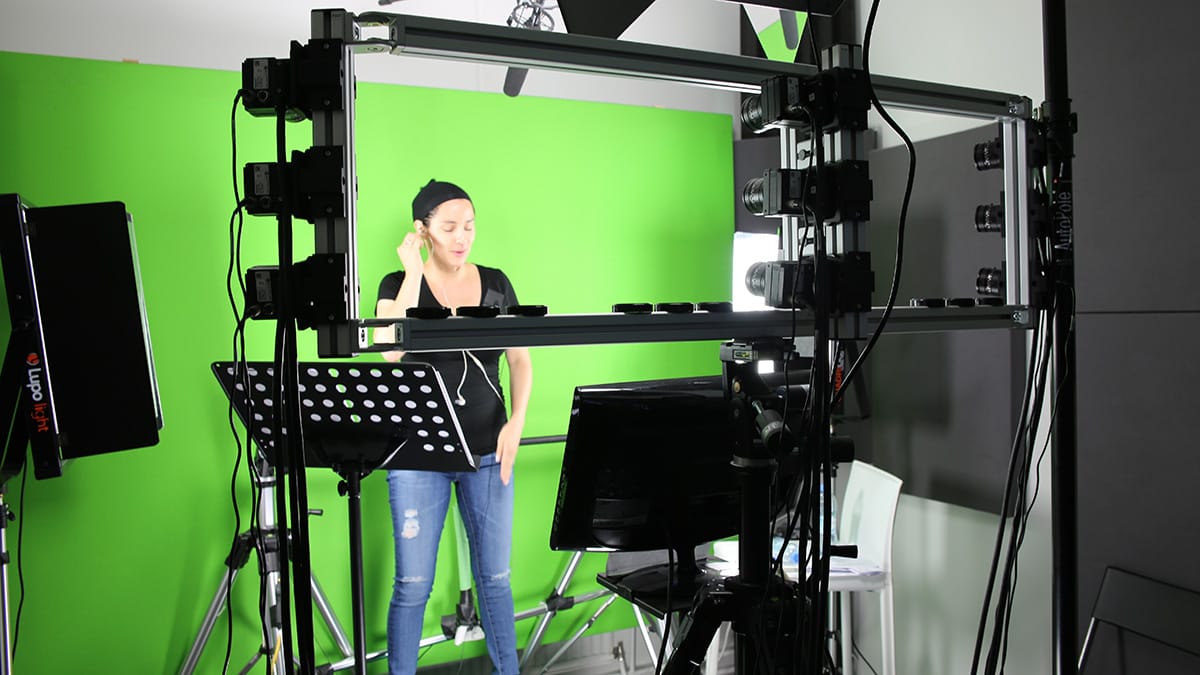
ANTTI HERVA (lead character technical artist): We partnered with Dimensional Imaging early on for facial animation since we were concerned about the quality and turnaround time of the FACS rigs we had looked into during the early stage of the Quantum Break. Given the quality bar that we set after the criticized facial animation in Alan Wake, we knew we had to up our game and that it would be hard to afford the facial animation polish bandwidth usually needed for FACS based approaches involving digital doubles in games.
The global nature of the facial motion reflecting the complex interactions of the skull, muscles, connective tissues and skin were inherent to DI’s data, and that really sold it to us. It did however limit us to the resolution of the multi-view temporal mesh reconstruction and optical flow data which in turn limited the effective vertex count of our universal facial topology mesh used for tracking. Then there was the restriction on the appearance of the actors during the shoots as facial hair would affect results and potentially make them untrackable.
https://youtu.be/sUubOZS6nDg
We then needed to compress the resulting point caches to efficient high fidelity runtime bone data. We opted for artist control in bone placement and skin weights over skinning decomposition methods such as skinned mesh animation that we had used for compressing offline cloth simulations while our Havok integration was being worked on. We also devised a method for retargeting facial animation between meshes using facial range of motions since the amount of non-playable character work in the game was unclear at that time.
The scale of the project suggested very early on that tracking throughput was key to our success. We experimented with having multiple levels of detail in our tracking meshes while upscaling the results but found that using a standard tracking mesh density had the least overhead. Ultimately we shipped just under 5 hours of facial data with 4 trackers working fulltime hitting up to 30 minutes of data per week for in-game lines and 20 minutes for cinematics. We optimized the process with deformers that allowed us to track less points for the lips and eyes for content we knew would likely not be seen up close. Despite these optimizations this approach guaranteed us an unprecedented motion quality tier throughout the game compared to a FACS based approach where the rig blend shape complexity and solve fidelity are usually a lot more varied for various reasons.
The footage from Dimensional Imaging’s helmet mounted camera (HMC) setup with onboard lights was used for all eye direction reference from the cinematic performance capture shoots we had at Digital Domain in Los Angeles. We also shipped some sequences for the final game using the facial data from the HMC, but it was clear that the two onboard cameras were no match for the 9 cameras in the DI4DPro system. This meant the actors had to ADR their performance later on at our studio, but the results turned out great and we are very happy with the outcome.
Character traits: grooming and animating
KRISTOF MINNAERT (senior character technical artist): It was quite clear early on in development that we were going to use Havok simulations to tackle hair and cloth dynamics, and it was a matter of just “doing it”. There were only so many problems we could tackle at once and more complex approaches to hair and cloth were deemed out of scope.
https://youtu.be/Xn9p0tYm_o4
When it came to cinematic animations however, we came to the realization that we would have to drastically improve the toolchain in order to have acceptable turnaround times. Initially, all sequences and shots were handled inside Motion Builder, baked down to a single animation file, exported and implemented in-game. Any change to a shot would mean re-doing all of the previous steps, so we linearized the source data, allowing the cinematic animators and scripters to do non-linear editing directly in-game using our proprietary timeline editor software.
Part of that new toolchain also allowed an animator to hook up Maya or Motion Builder directly to the game. This meant that animators could tweak animations in Maya or Motion Builder and see the results directly in-game. This resulted in a huge boost in turnaround times and quality, as we could author animations to truly complement effects and lighting without having to go through an export-reload pipeline loop.
ANTTI HERVA: On top of the animation pipeline improvements, we introduced a runtime pose space deformation system. This system handles all of the non-physics-based secondary deformations on any given character. This allowed us to drastically reduce the amount of animation data being pushed in to the game.
It was very important to be able to augment the facial data with both animator and runtime systems driven eye direction animation, and for this we built a soft tissue eye rig and controls to sculpt and tune some of the key shapes on the fly. When treading the steep edges of the of the uncanny valley, we found that often very little extra facial animation polish was warranted, suggesting that less was more. Most of the work was iterating on the stabilization of the point caches, the orientation of the character’s head to ensure proper alignment and ensuring lip contacts in plosive phonemes.
Thanks to the artists at Remedy for participating in this piece. You can find out more about Quantum Break at http://www.quantumbreak.com/