Sure…IBC was several weeks ago, but we’ve got some more stuff we found interesting in the show. We cover items such as the RED camera, Gridiron Software’s AE plugin Nucleo Pro, announcements from The Foundry, as well as a few more bits on wiretap apps for Autodesk products. This week’s podcast contains interviews with RED camera principals as well as Blackmagic Design’s Grant Petty.
RED Camera
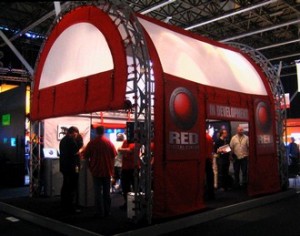
IBC saw the first public display of imagery from the Mysterium sensor, at the digital theater in the RAI convention center. The footage was shot at almost 5K resolution and displayed using the Sony 4K projector. The images were outstanding in quality, especially considering they were created so early in the development process. There are still frames available for viewing at the Red website. There were several setups shown, including a closeup of an Oakely watch with a very shallow depth of field, a white Porsche, and shots of Red employees and models.
The camera is still in the early stages of development and expected to ship in early 2007 (March or April timeframe — can you say NAB?). Developing sensors and a camera is obviously not a simple process — a lot can go wrong — but the company seems to be be making timely headway to completing the project. An interesting aspect of the process is the online information distribution, in which the company representatives detail progress on the camera in various forums around the web. This also leads to a ton of speculation and rumors in the fourms, but as #22 in line for a camera here at fxguide we’re optimistic that the company will deliver a working camera.
 We have a lot of information in our podcast this week, as well as interviews with Red’s Ted Schilowitz and Graeme Nattress, but we thought we’d go over some of the details regarding the Red camera. These specs are all subject to change — as they have several times already — and these are all forward looking plans…nothing is written in stone at this point.
Aquisition
The full pixel array of the Mysterium sensor is 4900×2580, but the actual usable shipping active pixlels will be 4520×2540 (or about 4K). The sensor will output up to 60fps at 2540P, 4K, 2K, 1080p and 720p. The camera will also output 120fps (windowed/cutout of the sensor) at 2K and 720P. The plans are for there to be a high speed serial interface out which will allow you to capture the full, uncompressed image as long as you have the drive speed/capacity to do so.
Of course, you’ll need quite a large and fast array to record that amount of data, so Red announced plans for their REDCODE codec. This is a variable bit rate wavelet codec which will output RAW 10-bit 4:2:2 at 1080P, 1080i or 720P and also 10-bit log 4:4:4 at 2K. Via the codec, the data rate effectively drops from around 325MB/sec (12-bit log) to 28MB/sec for 4K 24fps footage. The plans are for the codec to support up to 30fps. This allows one to capture the 4K REDCODE RAW to an onboard recorder such as a single hard drive — where 28MB/sec is well within its range.
Conversion to Something Useful
The REDCODE codec is a RAW format image, so there needs to be some conversion done to the footage before it is usable in a project. The company introduced “REDCINE” software which is their hub for converting and formatting imagery from the Red Camera. The thought is that eventually manufacturers will support the REDCODE RAW codec within their software (such as Final Cut, Avid, etc), but until that point this application will be used to convert the footage into Quicktime, DVCPro, DV, or image sequences
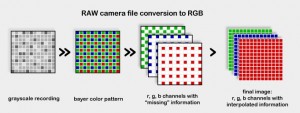
The first step is for the imagery to be demosaiced. The RAW format by its nature is a grayscale representation of what is picked up by the sensor….generally with each array element recording a specific value in the resulting RAW file. There are many ways in which this RAW file is recorded — it varies from manufacturer to manufacturer — but the idea is that the file is a RAW recording of what the sensor picks up.
In a Bayer filter such as the one used for the Mysterium sensor, the various array elements are filtered so that each array is recording a single color of light — either a red, green, or blue value. What you end up with is kind of a checkerboard of color pixels that then gets re-interpreted into a full color image. Colors are then interpolated between these recorded values to end up with a final RGB image. There are capture technologies available which record 3 colors per pixel (such as the Foveon sensor) so that there is no demosaicing and higher image color fidelity. This interpolation and the resulting issues is one reason there has been much web-based discussion about the “true” resolution of the camera, especially color fidelity. Graeme Natress responds to this in our podcast interview and feels that the end result isn’t as bad as skeptics would have one believe.
After the demosaic process, a color profile is attached and applied to the image to convert the colors actually recorded by the camera into something meaningful to the human eye. This is due to the fact that all sensors react differently to light and need some kind of interpolation to get to a known color space. The next step is to apply basic color correction to the image, including white balancing, gamma, saturation, etc.
Finally, the images are resized and encoded into the final format. The benefit to this process being that if you have an appropriate codec on your system, you can transcode into your desired format. This really provides a lot of flexibility right out of the gate. The drawback of course is that this process can take some time…not to mention the fact that you’ll have copies of both original shoot files as well as files output from the REDCINE software. As mentioned earlier, the thought is that manufacturers will include native support. However, this process will surely take some time and will depend upon the adoption of the camera.
The Next Steps
Red will be building towards production over the next several months. They plan to announce more information regarding the REDCODE codec and REDCINE software over the coming months — as well as further refine the industrial design of the camera. The process is obviously a difficult one with all the technical challenges that come with such a project. The sensor development process alone is fraught with obstacles such as dead pixels and poor silicon. On top of this, the RED camera isn’t going to be for everyone. But all of of us here at fxguide have all been involved in successful companies led by a creative and strong individual such as as Jim Jannard (founder of Oakley and RED camera). They are definitely not to be dismissed and we’re optimistic about the future.
Finally, while the test footage shown at IBC *looked* very nice, the proof will be in the final imagery that is generated. We won’t know how useful it is in an effects production environment until we can work with the footage first-hand. At that point we can take the REDCODE RAW processed output into our favorite compositing software and start doing some keying, effects, and hard core grading work and see how the imagery holds up.
The Foundry
IBC saw the company’s European show debut of Furnace 3 for Autodesk systems products, a new Tinderbox 4 plugin set for After Effects, and demonstrations of their Forge dust busting software. And for those design-minded folks out there, an update of The Foundry’s design with a new typeface (Bank Gothic for those who are interested).
The latest Furnace collection features eleven image-processing effects new to the Autodesk platform. The toolset has been available for Shake for some time now.
The new plug-ins are designed to significantly enhance workflow and productivity for Autodesk’s Flame, Flint, Fire, Inferno and Smoke artists. The Furnace 3 collection includes: Correlate (an fxguide-influenced plugin), an intelligent solution to help automate the alignment of two clips; fast new matting tools including MatteToRoto, a plug-in that helps artists to effortlessly edit and tidy ill-defined RGB and alpha mattes without the need for time-consuming rotoscoping; and DeNoise, an enhanced noise and grain removal plug-in. You can view a preview of the Correlate plugin by viewing a QuickTime overview from our fxphd.com website.
Some of our favorite new plugins in v3 of Furnace:
ColourAlign automatically removes any discrepancy in the alignment of the three colour channels in an image.
Correlate is designed to help automate the alignment of two clips. Given two separate passes over the same scene Correlate can analyse the spacial and temporal information with the images to produce aligned sequences. The plug-in can also be manually tuned from a single intuitive interface, allowing the simultaneous adjustment of the timing, special positioning and grading of one clip to match another.
DeNoise is a noise and grain removal plug-in that uses The Foundry’s advanced motion estimation technology to average pixels along the direction of motion, thus reducing the noise without introducing any of the artefacts typically associated with noise reduction. The plug-in is even able to remove the extreme levels of grain typically found in the blue channel of some film stocks.
MatchGrade will automatically perform a non-linear transformation on the colour histogram of an image in order to match it with a different image. This allows sequences that were shot with subtly different lighting to have the same ‘look’. MatchGrade will also perform much more severe histogram corrections with ease, such as those required for day to night transformations. This plugin is most effective on subtle differences.
MotionBlur uses The Foundry’s advanced motion estimation technology to add motion blur to sequence. Blur can be added automatically based on the amount of motion in the sequence or the shutter time can be set manually.
All Tinderboxes have now been updated to support 32-bit processing in After Effects 7. Tinderbox 4 includes 20 new plugins for After Effects. They include:
BleachBypass: exactly mimics a film lab bleach bypass process where the silver in the negative is retained giving a very stylised look.
Cartoon: flattens colour and adds edge lines to give a hand drawn cartoon style look to images.
Kaleid: produces a classic kaleidoscope prism effect on an image. This is achieved by simulating the inter-reflections of a triangular prism over a picture.
LightWrap: wraps background light around foreground objects to smooth composites.
Median: applies an NxN median filter to an image. Median filters do an excellent job of removing single pixel noise or scratches from an image while only causing a slight reduction in sharpness.
Water: procedurally simulates the effect of water droplets rippling on a surface. The effect can also be output as a procedurally animated ripple matte.
Tinderbox 4 is expected to ship sometime in September. Boxes are $500 / £275 per box — but through the end of September all four boxes can be purchased for $1,500.00 / £825.00. Existing customers can upgrade for $250.00 / £137.50 per box.
Gridiron Nucleo Pro
The folks at Gridiron are faves of us here at fxguide — and its not some kind of super cool sexy design plugin. Or particle system. Or keyer. Instead, they strive to improve workflow in After Effects by speeding up rendering on multiprocessor machines. During normal AE RAM previews or renders only about 50% of each core is used, leaving almost 2 cores worth of processing power untapped. On top of that if you have more than 2Gigs of RAM the extra memory isn’t utilized.
Towards the end of 2005, Gridiron released their Nucleo plugin which worked wonders on a Quad G5 system. Using Nucleo, you can see CPU use almost pinning 100% on all four cores — and will gobble up as much available RAM as you tell it to. This capability is available for final renders or RAM previews. It makes a huge difference by spending $500 ($350 upgrade) on a plug-in without needed to drop a load of cash on new hardware. This isn’t an inexpensive plugin but the background render feature makes it well worth its value, especially on quad core machines.
How does it work? The plugin actually starts several “extra” instances of the After Effects rendering engine running in the background. When you call on Nucleo to do its thing, it sends the renders off to these different processes, effectively managing the task of this distributed rendering. Pretty slick.
So what more could you do? Gridiron found some great ways of further increasing productivity with their release of Nucleo Pro. The plugin provides the functionality of Nucleo, but with new modes of Background Rendering, Spec Preview/Render, and Commit to Disk. The standard Nucleo modes are also included, but renamed Fast Render and Fast Preview. You can download a QuickTime quick preview of Nucleo Pro to see these features in action.
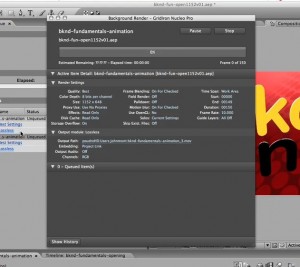
Rendering an AE comp always ties up the UI, not allowing you do anything else in the app until the render is done. While artists (as least myself) certainly appreciate this opportunity to slack, enjoy a cup of coffee, and surf the web — the reality is that sometimes we’ve got tight deadlines to be met. Nucleo Pro’s background rendering allows the artist to start an After Effects render in the background on the local machine and continue to work in the same or a different project. Nucleo Pro has its own background render queue manager and listing so that you can monitor progress or even temporarily pause rendering if it is competing with the foreground app. I generally found that the impact on the main app wasn’t all that great…Nucleo Pro did a good job of being nice to the foreground app and giving it the CPU power that was needed, transparent to the user.
The second main component of the new plugin is Spec Preview/Render. Unlike Fast Preview, which will render your composition to RAM as a one time event, Spec Preview will continually try to render your entire composition for previewing. So if you have a 300 frame comp — and are working on the first 60 frames or so — Nucleo Pro will happily go along and preview render any areas of your timeline that it can. Its quite interesting to be working in one part of the timeline and see the green cache bar get filled in for the rest of the composition. After you get that first part right, you can look at another part of your comp that has been rendered for preview and make any adjustments as necessary. And while you’re doing that….Nucleo will go to work on the first part of your timeline that you just changed. You can even have Nucleo Pro cache these preview frames to disc so they’ll be available immediately for use if you quit
Hand in hand with this is Spec Render — which will continually render your composition in its final form to disk. An interesting way to work is to turn this on when you’re almost done with a comp. As you’re completing some final tweaks, the final render is going on for the rest of the timeline. Once you get your tweaks done…sit back and wait for the rest to finish. How does it work? It actually renders PSD files for each frame and saves them to disk. Once all the frames are there, it’ll do the final conversion to QuickTime or any other format.
Finally, the last new feature is Commit to Disk. This allows the artist to select several layers (continuous in order) in a composition, render only those layers, and then have the result automatically brought back in. The original layers are locked for safety and turned shy (off)…and the new footage is brought in immediately below them. If you change your mind and need to edit the original layers, they are still in the composition and easy to modify.
These new additions to the Nucleo original can make a huge difference when working. There is a bit of a lull/drag on the system but it was well worth the benefits acheived when using the plugin. As with other distributed rendering systems, you won’t see temporal plugins achieve the same kind of speedup that other operations will. This is because they are time-based, it is not a simple thing to divide operations up between different processes. There is also a bug/slowdown in the way that After Effects handles rastering Adobe Illustrator or EPS vector art. This leads to a slower startup time for Nucleo in comparison to compositions which have no vector art. If you have a short composition, your speed gains may not be quite as impressive — but for longer renders you still get a significant bang for the buck.
You can download a demo version of Nucleo via the Gridiron website.
Blackmagic Design
We’re big fans of Blackmagic’s DeckLink cards here at fxguide. They play an integral role in the creation of training material for our fxphd.com sister site. We record footage from the UI using the HDLink cards and edit it together using Final Cut Pro. The setup works great, especially with customized Compressor scripts and Applescript droplets.
At IBC, Blackmagic Design announced Intensity, an ultra low cost HDMI capture and playback card. It is a very small HDMI capture and playback card that instantly switches between 1080HD, 720HD, NTSC and PAL video standards. You can display the output of your Mac or PC on any monitor with an HDMI input.
There were several cameras announced by Sony which include an HDMI output, alllowing the user to capture uncompressed footage directly from the camera without going through any kind of DV or HDV compression algorithm. Since the card uses the same codecs as other Blackmagic Cards, footage can easily be transferred between systems with DeckLink and Intensity cards — making output to tape quite simply.
We spoke with Grant Petty, CEO of Blackmagic Design, in our podcast this week.
More on Wiretap – shrink.quicktime and On Tap
shrink.quicktime
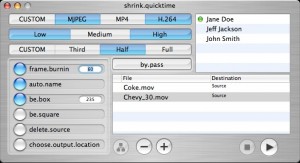
From IBC, we mentioned some tools utilizing wiretap for getting footage to and from the Autodesk StoneFS arrays. One tool we overlooked is shrink.quicktime, developed by Alan Latteri.
The app is still developmental but gives the idea of where they are going with it — providing access to the framestore with any quicktime aware app. All you have to do is install WireTapComponent.component into /Library/Quicktime. The browser is very rough at this point — as it is in testing — but all you need to do is enter the IP of the flame, and browse the framestore. When you get to the top-level of the clip you want, click choose and save the link movie where you want.
It basically just saves a quicktime file with some header information. You can then open this movie in any QuickTime application and use like normal as the data streams live off the flame. There are a few caveats that will all be fixed eventually: only works with 8bit clips, audio requires Wiretap 2007, since the Wiretap API is still PPC only, you will get wretched performance on Intel (in fact you need to switch Quicktime Player to open in Rosetta because of this limitation).
You can download a beta version from their website.
On Tap
We also covered On Tap, developed by Karbonized Software, Inc., a small company in Montreal. It uses the Flash browser plug-in to give you a rich, interactive web-based view on your Stones. On Tap, which was in beta at the time, has just been released.
Among its features that we weren’t able to see at IBC is a web-based review and approval solution that we think is worth taking a look at. Let’s take a closer look at how it works.
First, On Tap lets you look at any clip on any Stone in your facility through a web browser. It’s very fast, providing near-real time playable thumbnails, so its easy to browse your projects and their clip libraries to locate the clips you want to send out for review. Even without the review tools, it’s pretty cool being able to browse a Stone over a DSL connection from home, in near real-time. Well, at least cool from a geek perspective.
For each clip you need reviewed, you just drag it into your playlist. When all the clips you need reviewed are in the playlist, just selct Publish for Review. This pops-up a wizard that you use to set a password for the review, and to add your e-mail address so whenever a review is completed you are notified. With this information entered, you trigger a process that encodes full-framerate SD-sized versions of the clips in your playlist to the Flash video format. All this happens on the On Tap server, not on your web-connected client, so its quite fast.
When the encoding is done, the FLVs are added to a custom FLV player that you can either view right away, post internally, or package to move to an externally accessible website. It’s up to you to let your reviewers know where it is, but all you have to do is send them an e-mail with the URL.
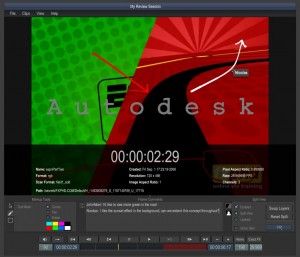
The custom FLV player not only provides a menu to select the clips you sent out for review, it also provides tools to mark up frames and add text comment per frame. These comments are saved so several people can review the same clips and they get to see everyone else’s review comments.
Source metadata, such as the clip’s source resolution, the project from which is originated, record timecode, and more can be displayed as a real-time overlay. You can even load two clips and then enable a split view.
A web-based review tool like On Tap will probably never be good enough to get final approval because the review clip is not necessarily full-resolution, is reduced to JPEG colour depth, and can’t be viewed on a broadcast accurate monitor. But it does make it easy to get intermediate reviews without forcing the customer to come on-site. It probably could be used very effectively by a workgroup inside a facility just to collaborate more efficiently.
All in all we’re impressed with this tool. It’s easy to install and use, both for the person who has to publish clips for review and for the reviewer too. We asked Simon and Fred, the guys at Karbonized to record a quick demo of this R&A workflow.
They also posted the Reviewer here, so you can see what it’s like from the reviewer’s perspective. You can also download it here. When the Reviewer loads you’ll need to enter a screen name that identifies who you are (usually your name) and a password. The password for this Review session is: fxguide

