eyeon made the release candidate of long-awaited Fusion 6 available to their subscription customers this week. In this special guest column, fxphd prof Matt Leonard walks us through the major new features in the software which include some serious enhancements to its 3D capabilities. Leonard is a long time Fusion user and spent time on the software’s beta program.
Overview
eyeon Software began life in 1987 as New York Production and Design. They were based in Sydney, Australia and primarily produced 3D and Visual Effects for feature films and commercials. As more and more challenging effects were being called for, NYPD began developing its own in-house proprietary toolset. As time went on these separate tools were combined into a single system know today as Fusion. Now based in the Beaches District of Toronto (Canada) and with 21 years of development behind them, eyeon Software has just released the 16th major version of its flagship compositing software Fusion. This year alone, Fusion is being used on the likes of Terminator Salvation, G.I. Joe: Rise of the Cobra and Night at the Museum 2: Battle of the Smithsonian.
What’s in the Box?
 So the question you are no doubt asking is “What’s in the box?” and the short answer is “A lot”. Of the two biggest changes, the first is to the 3D system which now supports multiple shaders, UV Mapping FBX I/O and a new GPU rendering system. The second is what eyeon are calling the RoI and DoD or “Region of Interest” and “Domain of Definition”. This system allows for user-definable areas to limit file reading and processing, significantly improving performance and memory usage for large scale compositions.
There are also a number of new and enhanced 2D tools, RED support via .R3D files and improvements in the areas of Spline / Polylines and Paths, enhancements to most of the main editors, the UI and overall performance, boasting an increase in speed of up to 80% on some tools. There has also being a number of important changes in how Fusion deals with Look Up Tables or LUT’s, including being able to be applied to both 2D and 3D views.
Core Changes
The major core change of Fusion 6 is without doubt the introduction of the RoI (Region of Interest) and DoD (Domain of Definition). Although both fundamentally employ the same technology, the artist utilises the toolsets differently. The Region of Interest is a user-defined rectangular area which not only tells the viewport what pixels to render, but also when using curtain file formats such as openEXR, Cineon/DPX, Fusion RAW, etc. only loads that specific region of data off the disk. The RoI can also be used in an Auto mode which means only the pixels visible in the viewer are rendered. This is especially useful when you are zoomed into an image and panning about.
The Domain of Definition, on the other hand, is often employed automatically when using Creator tools or Masks. When creating a Mask node, for instance, only the area of the image being affected by the Mask will be processed while the pixels outside the Mask are not rendered. This obviously greatly speeds up the system as in the past all pixels in the viewer would need to be rendered. Like the RoI, the DoD can also be user-defined by way of the “SetDomain” tool, and the non-rendered pixels can be coloured to help visualise what is and isn’t being processed.
An obvious question is that of compatibility with eyeon’s previous version 5 software. Fusion 6 will load Fusion 5 .comp files but some care needs to be taken now the RoI system is in place as many tools now behave differently. Specifically this affects tools that clip pixels outside the visible frame of an image. The good news is that Fusion 6 comps will also load back into Fusion 5, though this is not necessarily recommended. Obviously new tools from version 6 will not be present in version 5 and the connection between 3D tools will mostly be lost. With regards to existing plug-ins written for Fusion 5, these should be supported in version 6 without requiring any changes. I have tested plug-ins from both GenArts and The Foundry and found everything works as expected.
UI
On first glance the User Interface appears exactly the same, both in layout and functionality, but upon closer investigation you will discover two marked differences which come as a welcome surprise. Firstly we have the input menu pop-up, this is a small floating menu system that appears when connecting one node into another while holding down a hotkey. For instance, when you are connecting a Loader into a SoftGlow tool, holding down CTRL and dragging the output from the Loader into the centre of the SoftGlow node brings up a menu showing possible inputs of Input and Effects Mask.
Missing from the list is the Glow Mask input and this is because Fusion cleverly only allows you to connect valid inputs through this system, Glow Mask requires a specific Mask tool to take advantage of this input. Any input which already has a connection appears with a circle by it telling you the input is taken, although you can override it if you wish to. This new system can be particularly useful when connecting 3D tools together as some of these have half a dozen inputs or more and can be fiddly to connect up simply by trying to remember what colour inputs do what.
Another useful change to the UI is the addition of two interfaces connected into the mouse cursor. Firstly a new interactive rendering progression icon appears while Fusion is processing the flow, and secondly a colour inspector display appears near the cursor when colour picking from a display view. This new UI tells you everything from the RGB and Alpha value of the pixel through to its Object/Material ID number and embedded Motion Vector information. Other useful enhancements include a small top right display of the tool currently displayed in the viewer, enhanced meta data information in the File Browser, and the ability to add scripts, macros and settings to the tool shelves. On top of this of course we now have the ability to view stereoscopic images, but well cover that later in the relevant section.
I have personally found the new input menu pop-up extremely useful, and although you don’t need to use it all the time I am finding it’s a massive time saver for many node connections. Also, with the addition of Material and Object ID information coming from the 3D section, which we’ll cover later, the new colour picker UI is fantastic tool. One thing I would like to have seen is a more flexible UI layout system, where all panels could be torn off, moved about, resized, etc.
2D
When initially looking at the new features list of Fusion 6, it is possible that one could be slightly disappointed in the 2D department, given that only one new 2D specific tool has been released with this version (although we do have 2D tools written specifically to serve 3D, Stereo and DoD). However, all of the original 2D tools have received significant updates which is going to make life easier and most certainly quicker.
A new colour correction tool has been introduced called the ColourMatrix. This tool allows you to adjust individual colour values on RGB and Alpha based on numbers or mathematical equations typed into a five by five grid.
Many existing 2D tools have also been updated including the Tracker, which can at last output XY Paths allowing for either the X or Y values to be smoothed individually if necessary. The original Polyline option is still available if required though. The Blur, Glow, SoftGlow and Sharpen tools have all been updated with a Clipping Mode section. This allows for control in handling the edges of the image when performing Domain of Definition rendering. This is extremely important for tools like Blur which may require samples from portions of the image outside the currently defined Domain of Definition.
PreMult and Unpremult which can seam to be missing at first glance are present in the Channel Boolean tool, among others and users transitioning from other packages such as Shake would simply need to learn a slightly different way of working. This is often a point of confusion to new artist. A useful addition to the 2D toolset would be a Hue Correction tool, or more flexibility in the existing ColourCorrector’s Suppression toolset.
3D
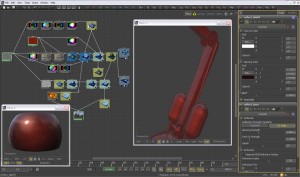 So at last we arrive at the big one – 3D has certainly received a large and significant upgrade. Of the original twenty two 3D tools, half have been revamped in some way, and a further twenty three new tools have been added to the mix.
The most significant change in the 3D arena is the introduction of several new material tools, or what I would refer to as shaders coming from a Maya background. These include Blinn, Phong, Cook Torrance and Ward (Anisotropic), along with Reflections/Refraction tools and Bump Mapping. One of the things which makes the new material tools so powerful is the ability to map other images and tools into the inputs of various controls, so for instance the Blinn tool can have other nodes driving its diffuse and specular colour, along with the specular intensity, exponent and bump map sections. Multiple materials can also be chained together, producing very complicated layered materials, to create such effects as car paint which has both a clear top coat and a base layer.
In conjunction with the new materials, eyeon have produced a number of what Im calling utility tools. Firstly the MtlMerge or Material Merge tool allows two materials to be blended together. This can be achieved by either adjusting the opacity of the inputted materials or by having a texture with alpha applied into one of the many input connects of the blended materials.
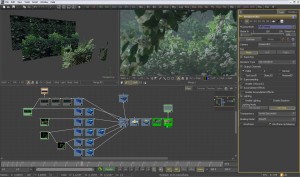
Another useful feature is the UVMap tool, which enables the artist to create UV Mapping co-ordinates for a created or imported 3D model. As in Maya or Houdini, there are multiple options including Planar, Spherical, Cylindrical and Camera (which lets the projection be driven by a perspective camera). Also in the mix of tools is Fog which creates a fog-like effect by way of colour correcting the image based on zDepth information. Another new tool, SoftClip, smoothes the effect of objects passing through the camera near clipping plane through a cross dissolve effect.
The TextureTransform and Texture3D tools work in a similar fashion to Mayas place3DTexture nodes giving you the ability to fully control how textures are assigned and repeated over a model. Also available is the Catcher tool, renamed from Paw3D which was released as a special eyeon plug-in for version 5.3. This tool clearly converts a Projection from being light based into a texture which enables alpha information to be projected onto a 3D model and form a hole though which other geometry could be seen. The Catcher is not restricted to the diffuse input of a material, and so it is possible to project specular intensity maps, or even reflection and refraction maps onto geometry.
Although we have not talked about all the new 3D tools in Fusion 6 let us turn our attention to whats been updated from the original 3D toolset of version 5. Firstly, as stated above, the Projector and Camera (when switched into projection mode) have been updated to support various types of projection output including light, ambient and texture. Locators and PointClouds can now be rendered in the Renderer when its switched into its OpenGL mode. While were on the subject of the Renderer, a number of changes have taken place here as well. Firstly the OpenGL Renderer which was originally designed as a preview / previz renderer has now been upgraded into a fully functional production renderer supporting Multisampling, depth of field, wireframe shading models and full 32bit output support. Both the OpenGL renderer and Software Renderer now support the output of not only RGB and Alpha, but also Normals, Texture Co-ordinates, Material IDs and Object IDs. The Software Renderer can in addition output zDepth, Coverage and Background Colour channels. Both renderers can also output Mono (normal 2D rendering) or Stereo (left eye, right eye renders, requiring two renderers).
Another addition to the existing 3D toolset is the update to the Shape, ImagePlane, FBX Import and Cube 3D nodes. Three new features have been added to these nodes, firstly Matte which enables the object to be used for masking out parts of the scene. Effectively, everything that falls behind a matte object doesnt get rendered. Also you now have a Blend Mode option; this specifies which method will be used by the renderer when combining this object with the rest of the scene. It works like a 2D blend and you have options such as Additive, Screen and Multiply. Finally, all these nodes have an Object ID output; this basically creates a specific number for the object which can then be used in a similar fashion to a normal matte inside colour correctors, effects tools, etc. All materials in Fusion 6 have a similar system aptly named Material ID.
Missing out the update to Duplicate which now adds randomness, Override which lets you change object specific options for every object in a 3D scene simultaneously, and various other cool 3D tools, we find ourselves finishing this section talking about the FBX Exporter. This tool provides a method of exporting a scene to the FBX format. Each node in Fusion is a single object in the exported file and includes objects, lights and cameras. The tool can be set to export a single file for the entire scene, or to output one frame per file. In addition to the FBX format this tool can also export to 3D Studio’s .3ds, Collada’s .dae, Autocad’s .dxf and Wavefront .obj formats.
Stereoscopic
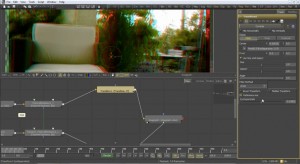 Although it may seam that the stereoscopic toolset is new to Fusion the software has a long history of stereo productions under it’s belt. These include movies such as Spy Kids 3D and Journey to the Center of the Earth. In Fusion 6 eyeon have improved the workflow by introducing a new toolset. The tools are split between 2D and 3D nodes and the display view now has new options for how your final stereo composite is viewed. A left eye and right eye pre-rendered / pre-filmed sequence can be brought in and viewed using the new Anaglyph node. This supports various Colour Types including the more normal red and cyan mix, along with various Anaglyph Methods including colour, monochrome, Optimised and Dubois.
Stereoscopic images can also be created and controlled inside the 3D environment using the stereo set up on both the cameras and renderer. The workflow on many occasions involves having duplicate or instanced nodes performing the same task for both the left and right eye. The StereoMix tool is used to assign independent materials or images to the left and right eye. This can then be viewed directly in a viewer and using various options you can see the image in different states, such as Colour Type, Anaglyph Methods, Left or Right Eye only, Crosseyed, Anaglyph, Stacked, etc. Returning to the 3D camera, it now has options for Eye Separation and Convergence Distance.
I would not class myself as a stereoscopic expert by any means, but I have been able to quickly and successfully composite stereo images output from the Maya 2009 stereo system and build my own setups inside of Fusion’s 3D environment using the tools available.
Other Changes Under the Hood
eyeon has also been hard at work in other areas of the software. For instance, B-Splines have now been re-engineered using Beta-Spline technology, this allows for better control over continuity not just relative weights as before. Roto shapes / masks can now be imported from a selection of other 2D packages including Shake, Silhouette and Nuke. There have also been significant improvements on how an artist can control and work with masks (Polyline and B-Spline). These include the ability to publish to XYPath, ease in and out Bezier handle control, and the ability to change the point of a spline at all key times, not just the current time. This can be used to offset an outer-polyline for all keyframes, for example.
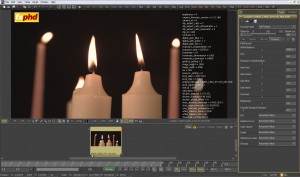
There have also been a number of changes implemented in the Spline and Timeline Editors. These include Smooth Points which can be used to filter noise from an animation path reducing high frequency noise. Other changes have been made in the way data can be selected and viewed via various menus and options in the Editors.
Fusion 6 has also improved its I/O capability most notably with the support of RED .r3d files. All the metadata obtained from the file is placed as is into the metadata stream including timecode, shutter_degrees, iso, exposure_time, etc. Other formats which have received some form of update include DirectShow, .png, .tif, .psd and .dpx.
Finally
It’s interesting to look back at the Laffey List, Pigs Fly forum and, of course, fxguide.com to see what was on the wish list for Fusion 6. Reading through it seems many of the top requests have been met in this release, which is great news for artists. The new 3D system is certainly turning heads, even those outside of the Fusion family are amazed at what’s been done, with comments such as this “Those guys have literally nailed the shader interface I have been looking for since 10 years ago or so”
For those people waiting for an OS X version, it looks like you’re going to have to wait a little longer. The requests on the forums were lower than I expected and it runs on Boot Camp just fine, so maybe there isn’t a massive need?
So what’s next for Fusion? I asked eyeon’s Joanne Dicaire, Director of Marketing and Sales, that very question. “eyeon has spent time in core architecture in developing Fusion 6, which is multi-core optimized including extensive use of SSE core extensions coupled with exploiting GPU technology,” says Dicaire. “Now the fundamental development is complete, updates to many tools and areas of Fusion will flow rapidly under the version 6 subscription banner. eyeon customers will enjoy upcoming releases with new features and functionality.”
Though eyeon are keeping quiet about future developments, and probably recovering from the launch of version 6, I can guarantee there are some very cool features coming through the pipeline in future releases. Having now spent weeks with Fusion 6, I can say I have been very impressed with this release. The speed and new 3D functionality is fantastic, the RoI and DoD are already saving me hours of processing time each week and the Stereoscopic tools are flexible and robust. Fusion has always been a worthy adversary to other compositing applications and this major upgrade helps to distinguish one tool set from another. Fusion artists will not be disappointed and people moving from other software will enjoy a robust and proven film compositor.
