Chaos Group’s V-Ray is one of the most important renderers in the world; it has grown from being popular for architecture visualization to a stable tool in VFX, automotive design and increasingly feature film. The renderer is extensive and focused on production. That production focus is most evident in its controls to ‘just get something great rendered’. V-Ray can be accurate, it can be scientific but mostly it just wants to deliver hard hitting visuals on time to get the project nailed.
Founder Vladimir ‘Vlado’ Koylazov sat down with fxguide for an in-depth discussion of the tech and the thinking behind this popular powerful industry workhorse. Vlado is known as being very accessible to users worldwide – he is a considerate and thoughtful individual who clearly cares about the issues facing artists.
Vlado explains that the aim for V-Ray is to have it as a ‘universal render tool’. “So you have all the practical tools you need to render,” he says. “We did not pick one specific area we wanted to develop V-Ray in, it basically covers very different uses. We tried to make it as universal as possible. Anything you might want from a renderer – we probably have it!”
The program clearly derives strength from this diversity but it also makes V-Ray fairly large for on-going development. The program has most recently been adapted to MODO on OSX – which is the latest in a long line of supported programs and operating systems from V-Ray for Maya and Max, of course, to V-Ray for SketchUp, V-Ray for Blender, and many others.
V-Ray has tools for almost any rendering scenario, and has found a real home in smaller to mid-sized companies, where “they never know what their next project will require,” comments Vlado. “V-Ray has tools for practically any task that may come to those people.”
The obvious risk is being a generalist product and not able to really excel through focus. Vlado acknowledges the issues and yet he feels that the company has tried to make the product have a set of established workflows and then within those workflows the developers have tried to make the path clear and increasingly more streamlined. Version 3 has changed the user interface to make it much easier to set up, and while the complexity is still there if one goes looking, common paths and, more obviously, popular setups are much more easily found ready to hand in the newer menus.

VRayVolumeGrid, for example, is a special kind of volumetric plugin effect that works with grid based cache formats from other applications such as OpenVDB (.vdb), Field3D (.f3d) and PhoenixFD (.aur). “There is also separate materials that are dedicated to hair rendering, skin rendering and so on,” adds Vlado. “They are separate modules that people who need them will use, but they are not expected to be used by everyone.”
Above is a render in V-Ray 3.05 of 148 million spherical particles with global illumination and motion blur. The particles are generated from Phoenix FD based on a fluid simulation, and then converted to a .vrmesh file. Similar to meshes, the particles are organized into voxels which allows V-Ray to load them on demand during rendering.
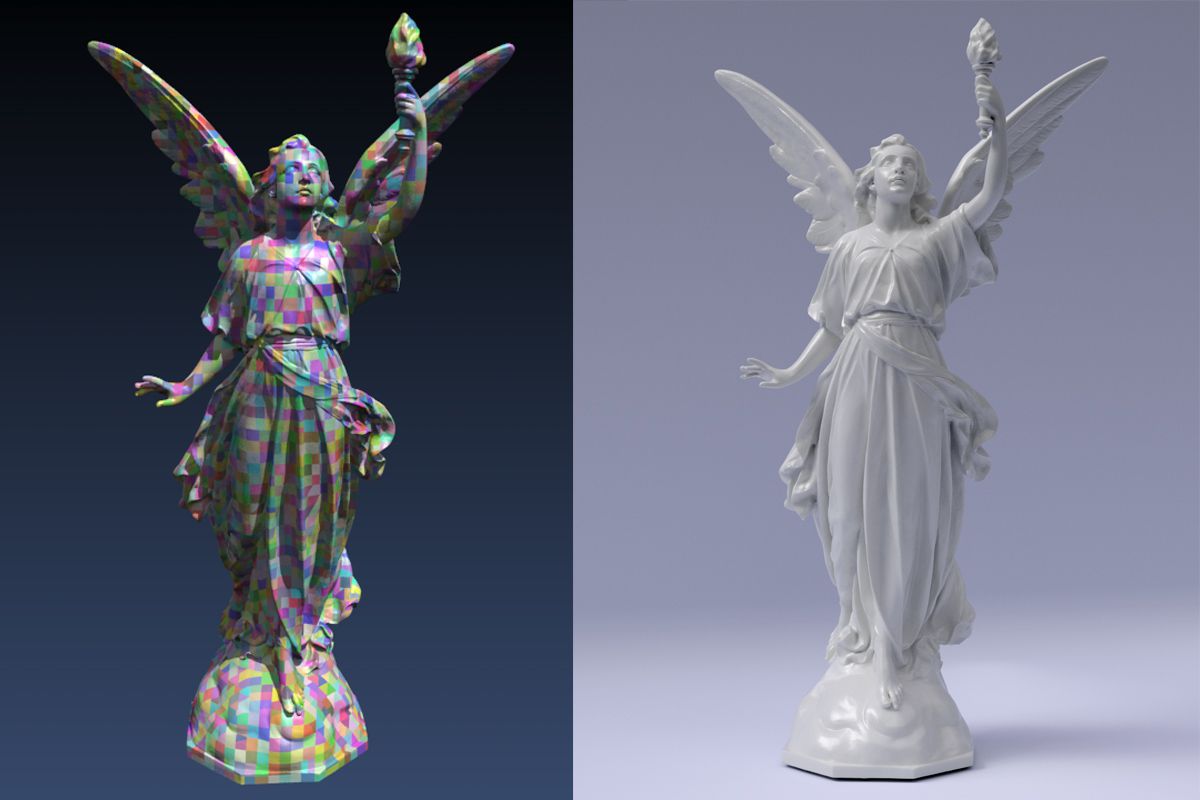
The Lucy model above is from the Stanford scanning repository. The model contains about 28 million unique triangles. Shown here is the original PLY file converted to a .vrmesh file using the ply2vrmesh tool, with the geometry split and organized into voxels of about 10,000 triangles each. V-Ray is able to load the geometry from the voxels on the fly during rendering, similar to how tiled OpenEXR textures are handled.

Vlado, like many of the leaders in the rendering industry, is quick to pay homage to Eric Veach, honored in last year’s SciTech awards for his 1997 PhD Thesis on efficient Monte Carlo path tracing for image synthesis, commenting, “It’s a brilliant piece of work, it’s probably the single most impressive thing in computer graphics that has happened in a long, long time, and it is used everywhere, and it made scenes that were impossible to solve before practically computable – even pure algorithms like Bi-directional path tracing – he actually managed to make bi-directional path tracing a usable algorithm.”
Vlado goes on to point out that even newer papers such as VCM (Vertex Connection and Merging) and others published at the last Siggraph in Canada all owe a debt to Veach’s importance sampling and the other ideas published in his PhD thesis. “I think it was the single most important thing that has happened in ray tracing,” says Vlado, “and I was very happy to see the Academy acknowledged him last year, even though it was published years ago.”
How bias are you?
An unbiased renderer will mean that you will get everything that is in the image, if you let it render long enough. It also means you can either let a single machine render an image, or let a hundred machines render the same scene and then average the images, and in both cases you will get a correct result. Unbiased is desirable and accurate but it is not necessarily the fastest production path.
The current trend is physically plausible lighting and shading with less hacks and more accuracy from complex ray tracing algorithms, this comes from the realization that it is a more efficient way to get good results. Says Vlado: “To me I wonder why it has taken so long, for me it was obvious, but I guess it was just a matter of perception that it was not fast enough – or that perhaps they could not get the look they wanted but I think today people agree physically based rendering is the way to go.”
V-Ray has had support for physically accurate lighting and shading for a long time, but a few years ago Vlado wanted to also explore adding bi-directional path tracing as it offers superior results in certain situations. Traditionally V-Ray has been uni-directional, he was interested to see how it would compare. The company did implement a valid solution but there are some techniques such as photon mapping for global illumination, and as with many other innovations, rather than just jump to the new approach, Vlado wondered if there was not a way to combine the old with the new, and combine bi-directional with photon mapping.
Chaos implemented VCM in V-Ray with Iliyan Georgiev. (See our coverage on Beam tracing at Siggraph 2014 for our fxguide one on one interview with Georgiev). While he is now working at Solid Angle, in 2009 Georgiev gave a talk at Sofia University in Bulgaria and he ended up consulting to the Chaos Group helping to implement the state-of-the-art bidirectional light transport simulation algorithms in the V-Ray renderer we have today (2013). He has also contributed to Weta’s rendering pipeline (2013) and even earlier to Disney Research.
This meant that V-Ray supports the traditional uni-directional path tracing and a new VCM algorithm, “but it turned out that some scenes that are not too complicated and don’t have say caustics in them,” notes Vlado, “it takes longer to get the same results from the VCM version than from our normal uni-directional path tracer.” The reality is that for many users on many shots, improved image quality or alternatively faster rendering is better since the scenes just don’t have the shot elements that VCM is so good at producing.
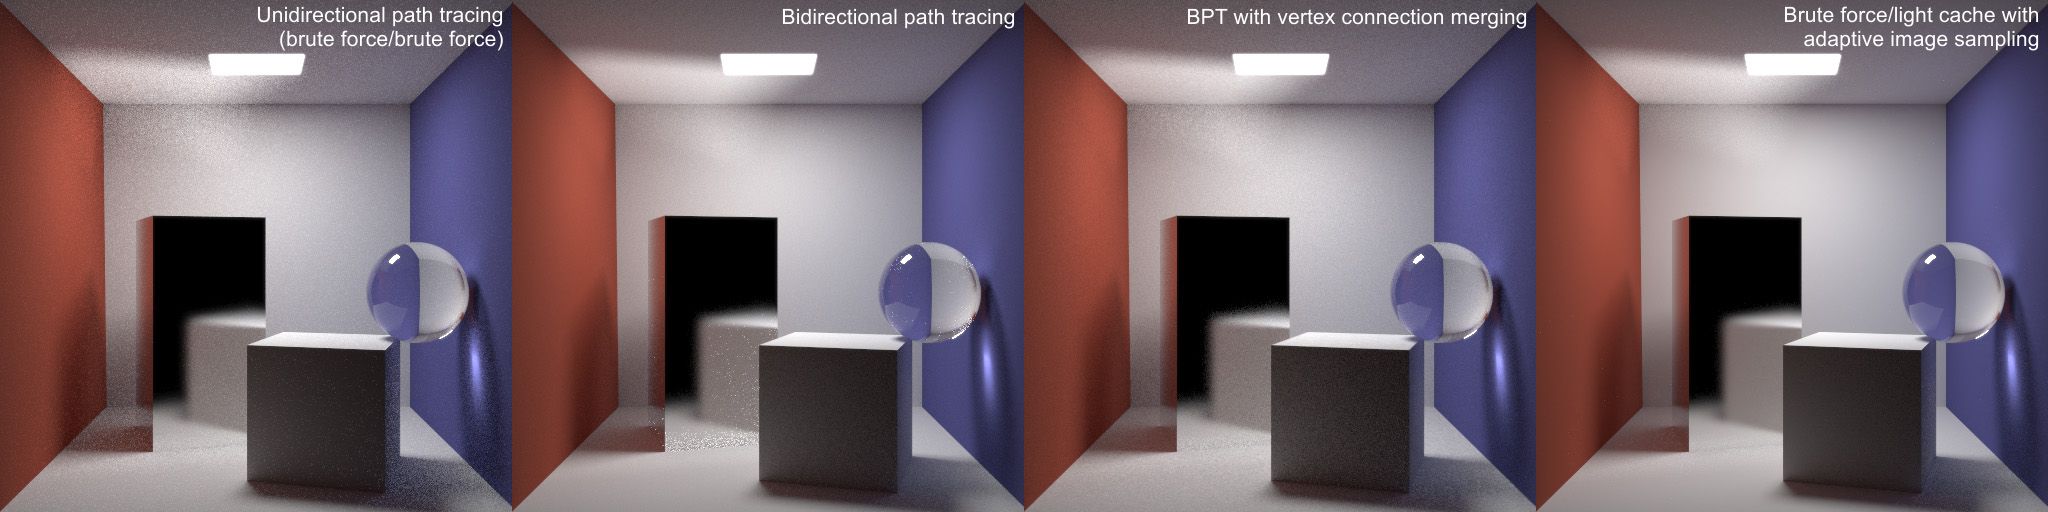
The images above demonstrate some of the algorithms implemented in V-Ray for handling the famous Cornell box. All images are rendered for approximately the same amount of time. The original scene is modified to include a reflective box and a glass sphere, which generate significant caustic effects. The unidirectional path tracing method has problems cleaning up the caustics noise throughout the scene. The bidirectional path tracer handles diffuse illumination and directly visible caustics much better, but has problems cleaning up the caustics seen through the glossy reflective surface. The VCM algorithm improves the indirectly seen caustics, but because it has more work to do for a single image sample, it manages to do fewer passes through the image for the same amount of time and the overall noise levels are slightly higher. Finally, using unidirectional path tracing with partial caching of diffuse GI through the light cache plus adaptive image sampling produces a very smooth result while allowing the renderer to spend more time on cleaning up the caustic effects. Note that these results are specific to the scene; the performance of the different algorithms is very much dependent on the type of scene. Path tracing can also be significantly accelerated by introducing some bias (i.e. omitting caustic effects altogether or clamping their contribution to the image).
“So yes you can get a ‘better image with VCM – not much better but one with different light effects,” explains Vlado, “so it might have subtle caustics visible here and there, thus it may look slightly better but it would take a lot longer to get there.” But the key to V-Ray is that both options are there, faster and more mainstream, and fancier but slower.
So how does VCM work in V-Ray?
This video above illustrates how V-Ray implements distributed vertex connection merging using multiple render server machines. During each image pass, render servers send back completed pixels and photon hits, which are accumulated on the main client machine. Before each new pass, the photon map accumulated from the previous one is sent to all the render servers so that they can use the the updated data when calculating pixels for the new pass.
So how does the Alternative Light Cache work in V-Ray?
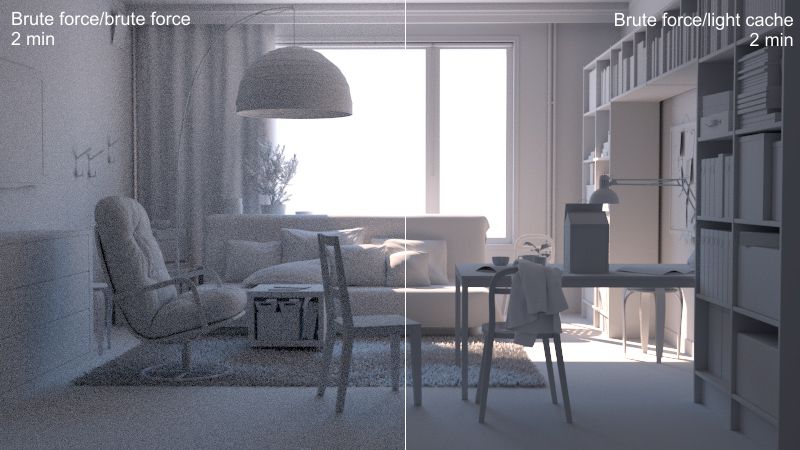
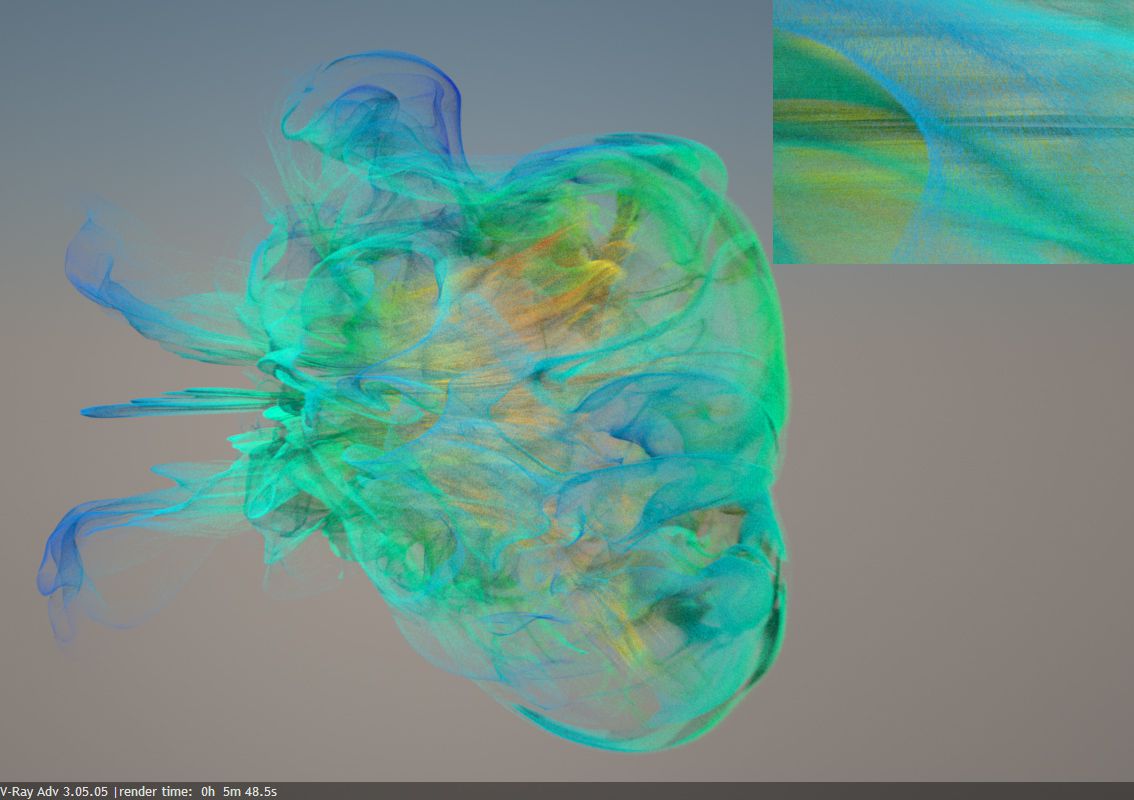
The light cache is a V-Ray specific technique which allows the efficient approximation of multiple light bounces. It is especially useful in interior spaces lit predominantly with indirect light. The light cache itself provides only a crude approximation of the scene lighting, but when combined with a more precise brute force method it can drastically reduce noise due to multi-bounce indirect illumination.
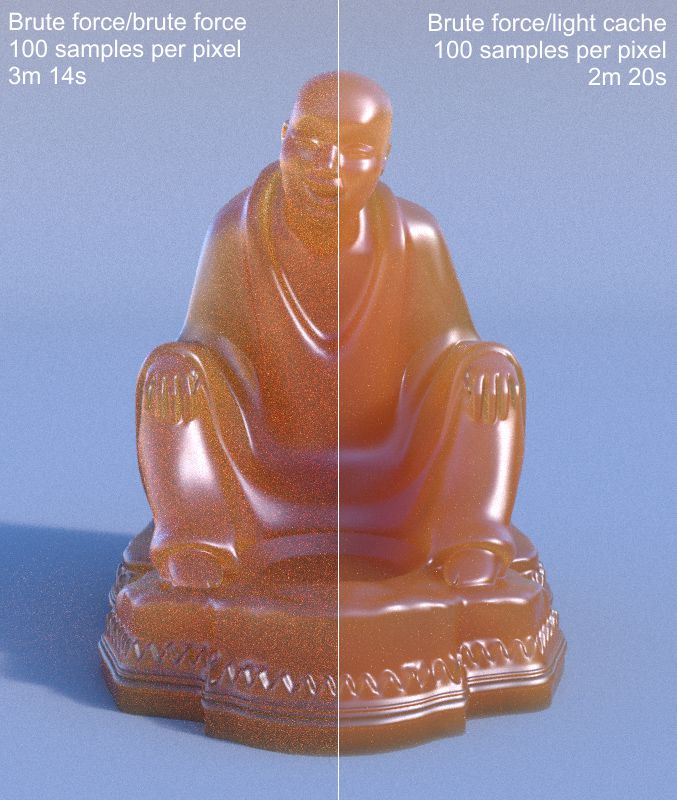
The light cache can also be used to approximate multiple scattering inside volumetric materials. This Buddha statue has a sub-surface scattering shader which simulates multiple light bounces with an anisotropic phase function accurately (as opposed to using a simplified BSSRDF approximation).
Hair

The light cache can be used not only for interior archviz style renders, but also in other situations where multiple light bounces are essential to the final look of the image. In this case above, the light cache is used to speed up calculations for secondary light bounces needed to represent blond hair. Again, the images were set to render progressively for approximately the same length of time.
Skin
Skin has also been worked on extensively, and while there is a lot of respect paid to having a physically based shader, the key oftentimes is matching the 3D skin to other real people in the shot or in the edit. V-Ray therefore has special skin shaders that, while being close to accurate in terms of physics, are actually more controllable for the artist to deliver matching shots. “It is based on physics but it is not perfectly physically accurate,” Vlado explains. “It allows more artistic freedom for artists to get the effect they need, and it seems to be working well for that.”
Vlado outlines how volumetric material such as skin is harder to describe than normal surfaces. First they have scattering unlike hard surfaces. Skin is a volumetric material with two parameters, one is a scattering coefficient and the other one is an absorption coefficient. These parameters are like colors on normal objects but only to a point. Getting these parameters to behave in an artist friendly way is not always easy. For example, the size of the object affects its look, a thin object may look very different from the same thing that is just a bit thicker.
In earlier versions of V-Ray the skin shaders looked great on the face but the same parameters on the ears could cause a green tinge, “which was very undesirable”, says Vlado. “That followed from the very algorithms of the SSS, and yet it is very much not want artists want to see.” Chaos Group’s solution was to provide a special fix that would make it much easier to get the face looking right over the entire mesh – with the same material. This special V-Ray SSS is much more ‘what you see is what you get’, it is not 100% accurate in its scattering but “the effect is much more convincing,” says Vlado. It is implemented with three dipole layers which are all blended together, so artists can control them and get more ‘expected’ results. It has a thin scattering layer, a deeper scattering layer and finally a final scattering layer. This is combined with a couple of reflection layers on top for precise specular reflections.
Interestingly, a few recent new renderers have adopted a spectral rendering approach, which is very apparent on dispersion diffusions seen as say a diamond refracts, but after a visit to USC ICT Vlado saw that human skin actually looks different when illuminated with white light that has a daylight spectrum versus a white light which is a combination of separate R,G,B overlapping components. “It turns out that the skin looks very different,” he says. “In one case real skin looks very natural, in the other case it does not, so that is when I realized that if you really want to render skin correctly you may need a more spectral approach.” V-Ray does have some spectral code now, used for the refraction of white light into a rainbow effect, but, notes Vlado, “I realized that it should probably be done for skin also. It poses other problems especially if skin textures are being painted by an RGB texture application and so I am not sure what the final solution will be on this yet.”
Specular highlights on detailed photorealistic faces are a very complex problem. As fxguide has identified elsewhere, the fine pores of the skin will break up the specular, so many artists are including higher resolution pore detail than can be seen at the render resolution, so that the specular highlights that fall on regions are themselves broken up and more realistically rendered. In short, the pore resolution can’t be seen, but the spec looks much more believable due to that high frequency information being in the face. However, for years it was noted that faces remarkably seemed to look much better closer to camera than they did further away. The same approaches to lighting, texturing and modeling just produced less believable results in a wide shot than a close up – the exact opposite of what one might expect. It turns out the problem is one of sampling and in particular the way the MIP maps blur down to simpler textures for the reduced texture samples of something further away. This problem was identified some time ago but solutions have been a long while in coming. In games there have been advances with LEAN mapping (Linear Efficient Antialiased Normal), but the whole issue is far from solved.
Not only is this a problem with skin but exactly the same problem happens with metal car paint. If one thinks about the problem, car paint with metallic flakes is designed to produce a different highlight, but just like skin specular this was being rendered less realistically with the car paint further away from camera.
To solve this issue for car paint, V-Ray has a special car paint shader, the results are brilliant and it manages the reduction of texture without producing an unrealistic spec highlight. The solution – while producing great results – is not exactly cheap computationally. The car paint shader is rendered with normal MIP mapping resolution levels. “The material can look very different up close and when it is far away,” explains Vlado, “because the MIP mapping tends to average out the normal map, when the object is far away it tends to look very smooth and flat – it doesn’t match to a close up render. We solved this problem in V-Ray in a specific way that needs extra memory, specifically for the car paint problem – but it takes 36 times more memory.”
So the solution is not a universal one, and right now there is no matching brute force fix for skin rendering. The solution is a type of directional filtering of the normal map, where the filtering depends on the direction from which you are looking at it and it is filtered in a way that preserves the overall look of the normals as you change distance. While it has yet to be applied to skin, Vlado sees no reason why the approach could not work there as well, it has just not been done yet.
Above: An early test of the implementation of VRayFastSSS2 material for V-Ray RT GPU
Large models
Very large models have been an issue, there has been a tendency to over model in recent times. V-Ray has had to deal with very large volumes of models for some time, dating back to when the program used only 32 bit addressing. V-Ray proxy was developed for geometry to split a large model into smaller chunks and then load these to the renderer as needed. “This has allowed us to render really large models coming from 3D scans or others applications,” says Vlado.
Today V-Ray is very much a production tool, and so while it is used a lot by smaller shops – it is also just at home in larger production pipelines (ILM is among V-Ray’s heavy users). But it is not just the size of the project that can dictate large render issues. The growth of LIDAR, 3D scanning and other point cloud options means that handling large data sets in addition to just complex models is key to any renderer.
Cameras
The camera support in V-Ray is also quite complex. Harking back to their architectural customers, the team needed to support shift and tilt lenses and this has served the effects customers who have needed to render 3D to match into less than perfect camera plate photography. There is a V-RAY Physical Camera in 3ds Max and Maya which has additional controls distortion, offset and tilt. “It is actually used quite a bit, we have had customers who have had to match renders to actual distorted material so matching that in the render was quite important,” says Vlado. “I also know that VR stuff comes up – and that people want to render spherical images with support for stereoscopic viewing and this is something that we are working on.”
Which brings up the broader issue of VR. Chaos Group recently invested $2 million in seed funding in a VR start up: Nurulize with Scott Metzger. “We find this whole thing very interesting,” says Vlado. “We have always been curious where the whole VR thing will play out. We have all watched The Matrix and thought about being in an environment and moving around, so when this opportunity came up we thought it would be really great, plus we want to make V-Ray suitable for this type of application.”
In order to produce content for virtual reality, one needs to work not only with a different type of camera, but it is clearly a real time world where textures are baked out and there is a lot of new approaches – in fact ray tracing is still not yet viable. Vlado wants to make sure the company is relevant, and working with an aggressively ambitious startup is a great way to focus one’s efforts.
GPUs play very heavily in the VR space, and away from VR, Chaos has had GPU code for some time and it has been steadily improving. Still, behind the main V-Ray code it has recently become very workable as an option and increasingly so as the team adds more features over time.
An early version of hair support in V-Ray RT GPU on two GTX 980’s from the Render Lab.
Chaos Group has also recently promoted its Chaos Labs including their Render Lab, which is somewhat of a playground for testing new things such as GPU improvements. It is also where they have been working with Motion Builder to render a real time character. At the moment it is a research project, but one that they are keen to get input on, and that project is continuing. It is also a place where the team are experimenting with interactive cloud rendering in 3ds Max.
The future looks bright for the group, and certainly in uncertain times the company has been growing and increasing their research from cone tracing to advanced GI on GPUs. “There is just no shortage of research topics right now!” jokes Vlado.