It was another big day at FMX, with a ton of VFX behind the scenes talks, plus game development sessions, workshops and industry discussion. Here we take a look at the hair simulation for the latest Tomb Raider, the latest with Arnold, MPC’s software development, Atomic Fiction’s work on Flight and use of cloud renderer Zync, Pixar’s OpenSubdiv and camera moves in the digital realm. Again, a big thanks to Matt Leonard and also to Alexander Kucera for helping to compile this run-down.
Splitting hairs
The first session of day two was a fantastic talk by Wolfgang Engel (CEO, Confetti Interactive) and Stephen Hodes (Development Relations Engineer, AMD) about the new hair rendering technology used in the latest Tomb Raider. This was the first time lighting and rendering hair per stand had appeared in a game. Wolfgang started the session talking about how Crystal Dynamics, the award winning San Francisco games studio, wanted something special for the game. In the past various attempts at hair rendering had been tried such as AMD’s Rubym, Nvidias Nalu Demo and Alice: Madness Returns but for Tomb Raider Confetti Interactive used Tressfx to enable artists to render thousands of hair stands on the GPU.
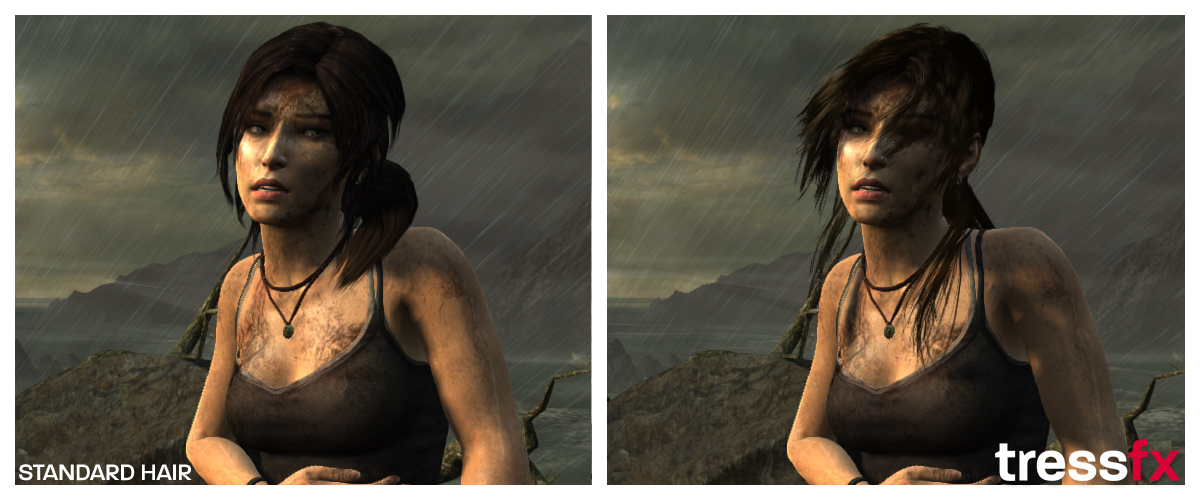
The new hair system was organized into groups such as Bangs, Caps, Fringe and Ponytail. The simulations were physically based using real gravity and true collision detection between the head and body. The system also supported wind and other dynamic forces and utilized a constant setup to maintain the overall hair style which could be defined by the artist. All the simulation is computed on the CPU though the updates are performed for each frame on the GPU. The hair itself has a parent child joint relationship setup using an IK (Inverse Kinematics) and a set of global shape constrain where used to help retain the overall hair rest position. Various shaders where used to control various aspects of the hair while in some situations special authored assets where needed to control the wetness of the hair, etc. At this point in the presentation Stephen Hodes took over to talk about the rendering pipeline which used transmittance estimation and k-buffering. Each hair stand was individually textured mapped along with being rendered with full Anti-Aliasing. Finally Alpha Blending was used to blend the hair successfully into the Frame Buffer. Lighting was achieved using a modified Kajika and Key model (which is like the BlinnPhong model but replaces the Normal with a Tangent). Two different specular highlights where used, one for the hair tips and one for the root of the hair. In addition two rendering profiles where used for both dry and wet hair. The system gave the artist over 50 slides to control both the look and simulation of the hair.
Hodes explained the shading of the hair consisted of (Ambient + Diffuse + HairSpecular) * Hair Colour + Light Specular. When it came to shadowing the team wanted to utilize Deep Shadow Maps but the system was too costly so a standard Shadow Map approach was used where hair shadows where approximated. Bottom hairs (closes to the skull) received darker shader values while top hairs received brighter values. These values could be picked by the artist to give maximum control. Each shadow term was to be stored in the per-pixel line list which combined the lights to each hair stand. Full 32bit colour and depth mapping was used and each frame utilized around 200Mb of memory space. Find out more about Lara Croft’s hair at AMD’s tressfx site here.
And you can also read the slides from the presentation thanks to Confetti’s Wolfgang Engel here.
The allure of Arnold
It was only in a small-ish room but the hustle and bustle outside the Solid Angle Arnold workshop showed just how much buzz this renderer has. In the session, Solid Angle founder Marcos Fajardo detailed the growth of his company (now more than 20 people) and promised a new website (traditionally a rendering formula) and that they would be ‘more open’.
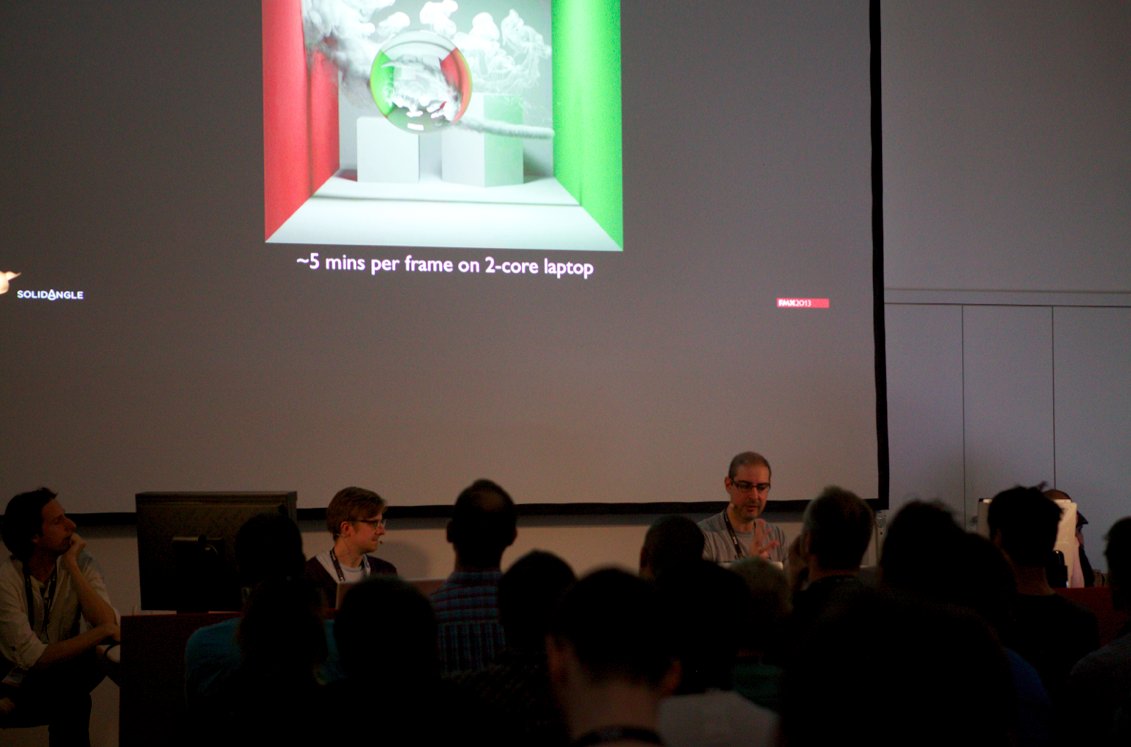
Arnold is at version 4.0.15 and is used by a long list of clients. Fajardo said it is now ILM’s primary renderer – part of that studio’s arsenal on Pacific Rim, Star Trek: Into Darkness and The Lone Ranger.
Here’s some of the new features in the current version (changes made since 4.0.6):
- Faster texture lookups on many-core machines
- Vastly reduced texture I/O
- Able to cope better with many-light scenes
- Subdivision, polymesh, ray accel, AtNode memory optimization
- Increased numerical precision, holes, objects far from the origin
- Faster ray accel build
- Auto-instancing and caching of procedurals (used on Elysium)
- Better compiling
- Smaller/faster .ass files
- Faster bump mapping
Benjamin Greasley from SphereVFX took the stage to demo the beta version of the Arnold for Maya plugin – Arnold’s direct link to the Maya interface. This utilizes the Arnold core-code but with the Maya setup. Finally, Szabolcs Horvátth from Digic Pictures showed us their Halo 4 cinematics work that relied on Arnold for rendering – some seriously impressive work.
MPC showcases its effects tools
MPC’s global head of software Michael Stein provided an interesting historical glimpse into the studio’s software production which now takes place in several of its global offices. In particular, Stein outlined Muggins, MPC’s 3D framework and data format that then allowed for the creation of crowd sim software Alice. There was also discussion on physics engine Papi which initially sat atop of Havok and then moved to Bullet. MPC of course has made strides in destruction effects with its DMM-based Kali tool. In addition, we saw hair sim Furtility and volumetrics and fluid sim tools in action. Stein said the future of software development at MPC would ‘focus on VFX from the beginning’ and allow for art-directable physics. Stay tuned to fxguidetv for an interview with Stein in the near-future.
Camera physics in the digital world
Technocrane’s Anthony Jacques discussed camera moves in the digital realm. He began with a history of camera tech from the first wooden boxes using a hand crank to the Technocrane – the first camera crane that did not require a person to look through the lens and so gave the camera a lot more freedom. Soon motion control rigs would be enabling repeatable moves.
Jacques gave some tips for digital camera moves:
- it’s imperative to set up your film back accurately
- after that setting the focal length should give you the correct field of view
- you need to set up your nodal point on set correctly
- live action usually is not nodal, meaning there is a parallax while panning
- this must be matched in the 3D camera
He also noted that cameras must adhere to physics, which means there is a limit to the acceleration of an object. Not speed. Acceleration. This means sharp changes in speed, up or down, directional changes. The acceleration can be derived by the second order derivative of the position change (translation curve). Ideally, you want your 3D curves to accelerate gradually with no more the 9.82 m/s or 1G. Some motion control systems can handle more or less.
Atomic Fiction’s Flight and how they use Zync
The talk on Robert Zemeckis’ Flight was split between Ryan Tudhope from Atomic Fiction and Todd Prives from Zync. Ryan kicked off the talk discussing the background of Atomic Fiction and how they wanted a big studio pipeline with a small studio efficiency. They achieved this by keeping overheads low, using commercial tools such as Maya, V-Ray and Nuke, and using cloud rendering instead of investing millions in localized onsite CPU power. For the movie Flight Atomic Craft worked on 400 shots with a team of around 35 people in four months. The kind of shots they worked on including digital environments and the signature plane crash sequence. Ryan first discussed how they created digital environments utilizing 3 Red cameras fitted with fisheye lens and mounted at 90 degree to each other. These was then fitted to a helicopter enabling them to capture a variety of sky plates. For a number of shots there was a requirement to change the pre-shot background plate, and this was achieved by projecting the footage onto digital environment geometry and then re-filming it with a new virtual camera.
From there Todd Prives took to the stage to discuss Zync, a cloud based rendering farm which runs off the Amazon’s S3 cloud computing project. Artists can submit jobs directly from the UI of Maya or Nuke and once the renders have been completed they are sent back down from the cloud to their local machine. The great benefit of Zync is that you only pay for what you use and final renders can be stored in the cloud so there are available straight away for compositing without needing to be uploaded again. For Flight, Atomic Fiction used 1,147,960 core hours over a 6 month period which scaled 330% month on month. Outside of Flight Zync has been used on over 12 feature films including Looper, Underworld: Awakening, Here Comes the Boom, Transformers: Dark of the Moon and Star Trek Into Darkness. With support for not only Maya and Nuke but also V-Ray, mental ray and more coming in the future no doubt.
The latest on OpenSubdiv from Bill Polson, Director of Industry Strategy, Pixar
(Reprinted with permission from Alexander Kucera)
We started the session with a quick history of subdivision surfaces. Invented by Pixar and first used in the short Gerry’s Game they made away with the constraints of both polygonal modeling as well as Nurbs modeling.
What’s wrong with Nurbs?
Nurbs surfaces are based on control vertices or hull points through which a b-spline is calculated. This leads to smooth curvature and inherent UVs. Both are good. However, Nurbs modeling relies on adding a multitude of Nurbs patches together to form you final surface. He problem arises at those patch seems where it can, and often is, mathematically impossible to create a seamless surface, much less when the “patchwork” is animated.
So Polygons then?
Short answer: nope.
Long answer: While polygons have no problem with arbitrarily complex surfaces or seem cracks, they have their own set of problems. First, they don’t have inherent UVs and unwrapping a complex mesh for texturing is no small feat. Second, to get smooth surfaces you need a very high amount of polygons or play cheap tricks with normals, which tend to quickly fall apart under scrutiny.
Subdivs
First, the world in general and Pixar in specific only calls then Subdivs. Not subdivision surfaces.
Also, they are the answer to all the problems above. Arbitrarily complex, while always maintaining a definably smooth, crack free surface. Also, with the addition of PTex there is no need for UV unwrapping anymore.
In addition, Subdivs support localized levels of subdivision. What that means is that the whole pipeline can work with the coarse base mesh. The modeler can then go into specific sections that need more definition, locally subdivide that area and make modeling changes there. Those will be saved and applied at render time. Bill showed an example of that at work. In Brave, which was originally supposed to play in winter, they had Merida’s horse run through a snowy plane. The plane itself had a resolution of about a vertex per square meter. Enough resolution to model snow drifts. However, for the horse’s path they locally increased the planes resolution to one square centimeter at render time to capture the fine detail of hooves disturbing the snowy surface.
At rendertime
The term “at rendertime” is misleading, because Pixar is now using a GPU implementation of the subdiv algorithm. The implications of that are far reaching.
At the simplest level “at rendertime” in the paragraph before means, the animator gets a live preview of those several hundred thousand faces in real time in the viewport (Maya’s Viewport 2.0 in this case, which has OpenSubdiv support built in already). Let me restate that, we saw a demo of a “low poly” mesh with about 3000 faces animated with bones that had the OpenSubdiv algorithm applied. What we saw on screen were about 3.8 million faces animated in real time. And since Subdivs have the added benefit of getting displacement at hardly any additional cost, those 4 million polygons were displaced as well. Very intriguing stuff.
This is not only interesting for VFX though. Since this realities GPU implementation also means games that adopt this will get much more visually complex. And in fact, while Bill could not mention any names, he went out of his way to let us know that major mobile company that produces very popular devices we all own and with the power to dictate the chip manufacturers what to put into their chips will implement hardware OpenSubdiv support within the year. Or as Bill put it, you will likely have devices with hardware support built in the next time you see me.
Good for Pixar. How do I get it?
That’s the nice part. You likely already have the technology available to you. For one OpenSubdiv is open source and all the licensing for the technology is available for free as well. Also, if you use Maya, you have access to all this already. Maya uses the exact same algorithm Pixar uses since Maya 5.0 and now also has the GPU implementation through Viewport 2.0.
So no excuses, get cranking!