Strange and evil things are afoot at the DurrrBurger joint in Epic’s UE4 virtual world. Co-Directors Gavin Moran and Michael Clausen assembled the squad for the launch of the cinematic short film, Hard Day’s Night, to promote the game Fortnite. “We really enjoyed making this piece. It was hugely challenging but ultimately rewarding,” commented Moran.
The entire short film is rendered in real time in Unreal Engine 4 (UE4). The film is both entertaining and also represents another significant step up in real time rendering and virtual production technology.
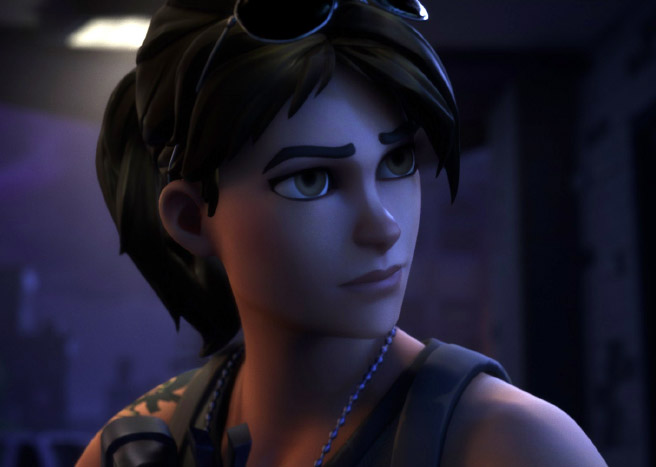
In the film, our heroes Penny(Amy Pemberton), A.C. (Andrew Kishino), Ken (Phil LaMarr) and Ramirez (Adria Arjona) save a survivor mother and daughter from an attack – which mirrors the actual game concept of building a fort during the day to fight off evil zombie like creatures at night.
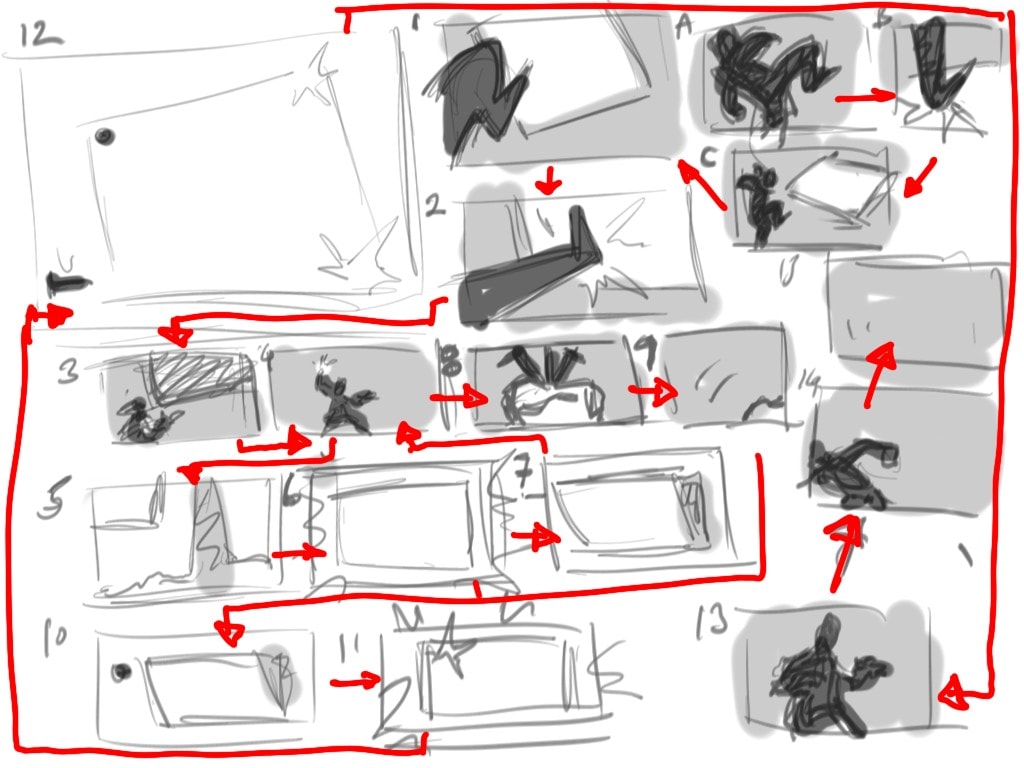
The Epic team produced the 132 shot short film using a combination of traditional CG approaches and new Cinematic tools, in part, developed specifically for this project. For some time now, Epic games has shown an interest in expanding the use of UE4 to include more narrative pieces, such as with their previous short film Kite. This approach allows the developers to use real projects as vehicles to solve and improve new narrative workflows.
The big three improvements this film represents are
- The alembic workflow of the faces from Maya to UE4
- The dramatic and impressive in game fluid smoke solutions
- A vastly amped up Sequencer which is becoming one of the most powerful new tools in this area, part LookDev tool, part editor, part playout device
The end result is that the facial animation in Fortnite is a major improvement on what has been seen before, the whole film has incredible production value and it plays from UE4 Sequencer in realtime, something that the team will be demonstrating at SIGGRAPH in LA in a few weeks and in particular, at DigiPro 2017 which runs the day before SIGGRAPH in LA.
But for all the impressive technology, the directors still wanted to tell a good story and produce the sort of high end character animation that pulls in a viewer and holds its own with material often rendered over hours not milliseconds. In the end they wanted the short to stand alone, even with all the new technical improvements.
The Story…
 The story needed to be tight, given that there are four heroes to follow, ‘fort’ preparation, and a fight. Additionally, the team wanted each of the four heroes to be in balance. No one of the four could dominate the narrative or the screen time. The inspiration therefore become a cross between Ghostbusters and Teenage Mutant Ninja Turtles.
Ramirez was particular difficult as she needed to drive the narrative but not be completely in charge or bossy. The team worked hard to balance action, dialogue and give each hero a unique personality in very short amount of individual screen time.
The script was developed much like any, with hand drawn notes and sketches. But unlike most projects, once the basic character assets were worked out, the directors could immediately try out camera moves and blockings in real time in UE4.
Moran, Clausen and the team work directly in UE4 and Sequencer, to explore what they wanted in the design of the story and as such they did not need to make a traditional storyboard as one might if working in a more traditional studio CGI film. “I tend to sketch out stuff on whiteboards or using Sketchbook Pro on a Microsoft Surface and use that to get a feel for flow. We then shoot very rough mocap and cut that into Sequencer as shots which will be the basis for our short. We may delete or add, lengthen or shorten shots as we go along,” Moran explained.
These notes and sketches are used to quickly get ideas and edits across to the other members of the team and are rolled into the edit as quickly as possible to get a feel for how they affect the flow of the piece.

Scratch dialog was recorded and edited until the directors felt that they had something that worked. “As this was a game that was being developed by the studio for a number of years, there were definite ‘Pillars’ which had to be touched upon. Things like scavenging, survivors, building, specialized skills and defending had to be included,” he explained.
“Trying to find a way to make everything come across in a 3 minute piece without being too dense was the greatest challenge we had,” Moran recalls. “When I was directing Kite, it was a much simpler piece and we always had the beginning and end and the middle was somewhat interchangeable based on available content. Once there was adversity, we were good. The Fortnite piece was much more complex.” The new animation shows much more complex character animation, especially in lip sync and facial expression.

As the voice actors were recorded on the West Coast and there was overlap with the actors who worked in the actual game, the directors hired a local voice coach/director to be a single voice instructing the actual voice actors. This dialogue was edited and the team decided against videoing the VO recordings, preferring instead to craft the facial animation performances just based on the audio and the skills of the Animators. The resulting character animation was more detailed than any that the Epic team had previously deployed, thanks to the new Alembic import into UE4. While the bodies and all the effects, etc are handled in the UE4 directly, the faces and facial animation was all Alembic animation that was imported seamlessly.
Along with motion capture performances, game assets were used to build sets and pre-visualize potential footage. Using Sequencer, the layout artists could create shots and directly assemble an edit of the whole sequence in Unreal before passing that footage to a dedicated editor. While Sequencer clearly aspires to someday also provide the sort of editing capabilities that an offline editing system facilitates, the team acknowledged that the role of the editor is still key and that this project benefited from having an explicit offline edit, which was done by Joe Wilson.
This dual process, not unlike Previz and editorial, saved a lot of back and forth time between the rough layout artists and editorial while improving shot continuity and screen direction. Any additional requests for coverage could be provided at the editor’s or director’s request. Upon completion in editorial, the cut was re-conformed in Sequencer where the shots were properly broken down, reindexed, prepped for production and then added to Shotgun for production management and shot tracking.
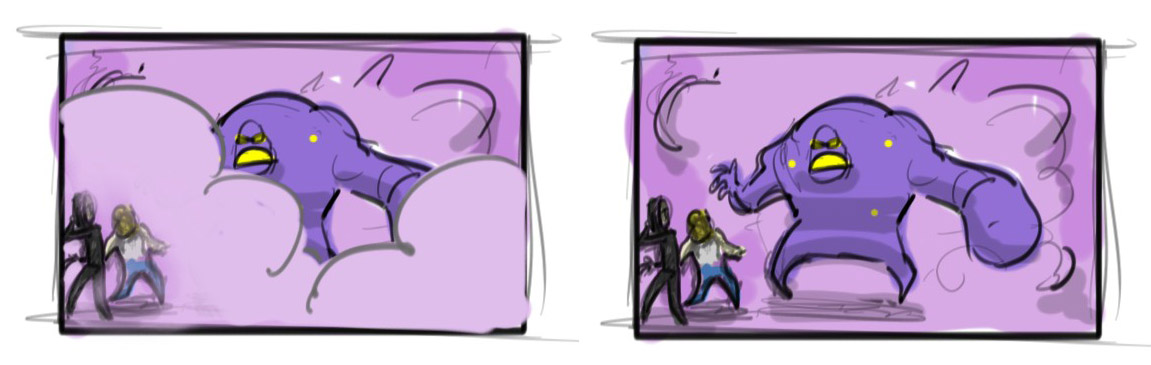
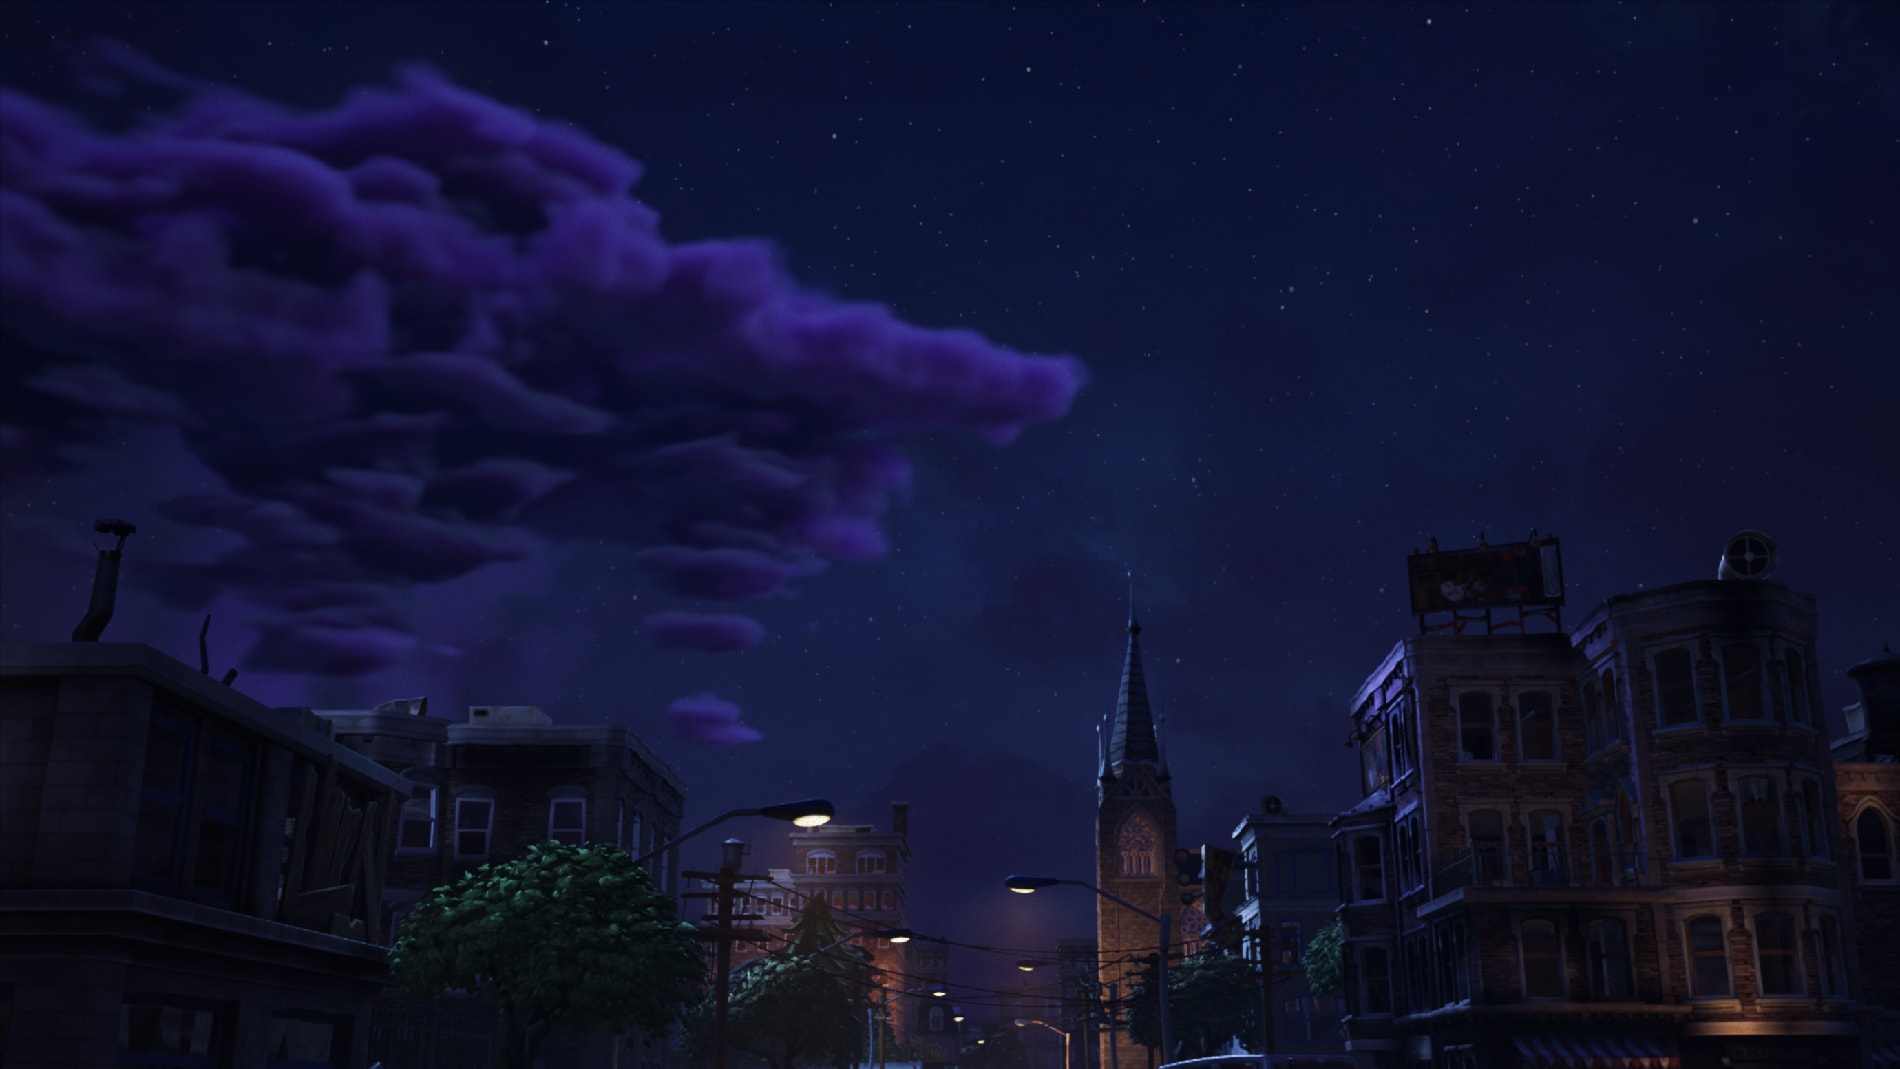
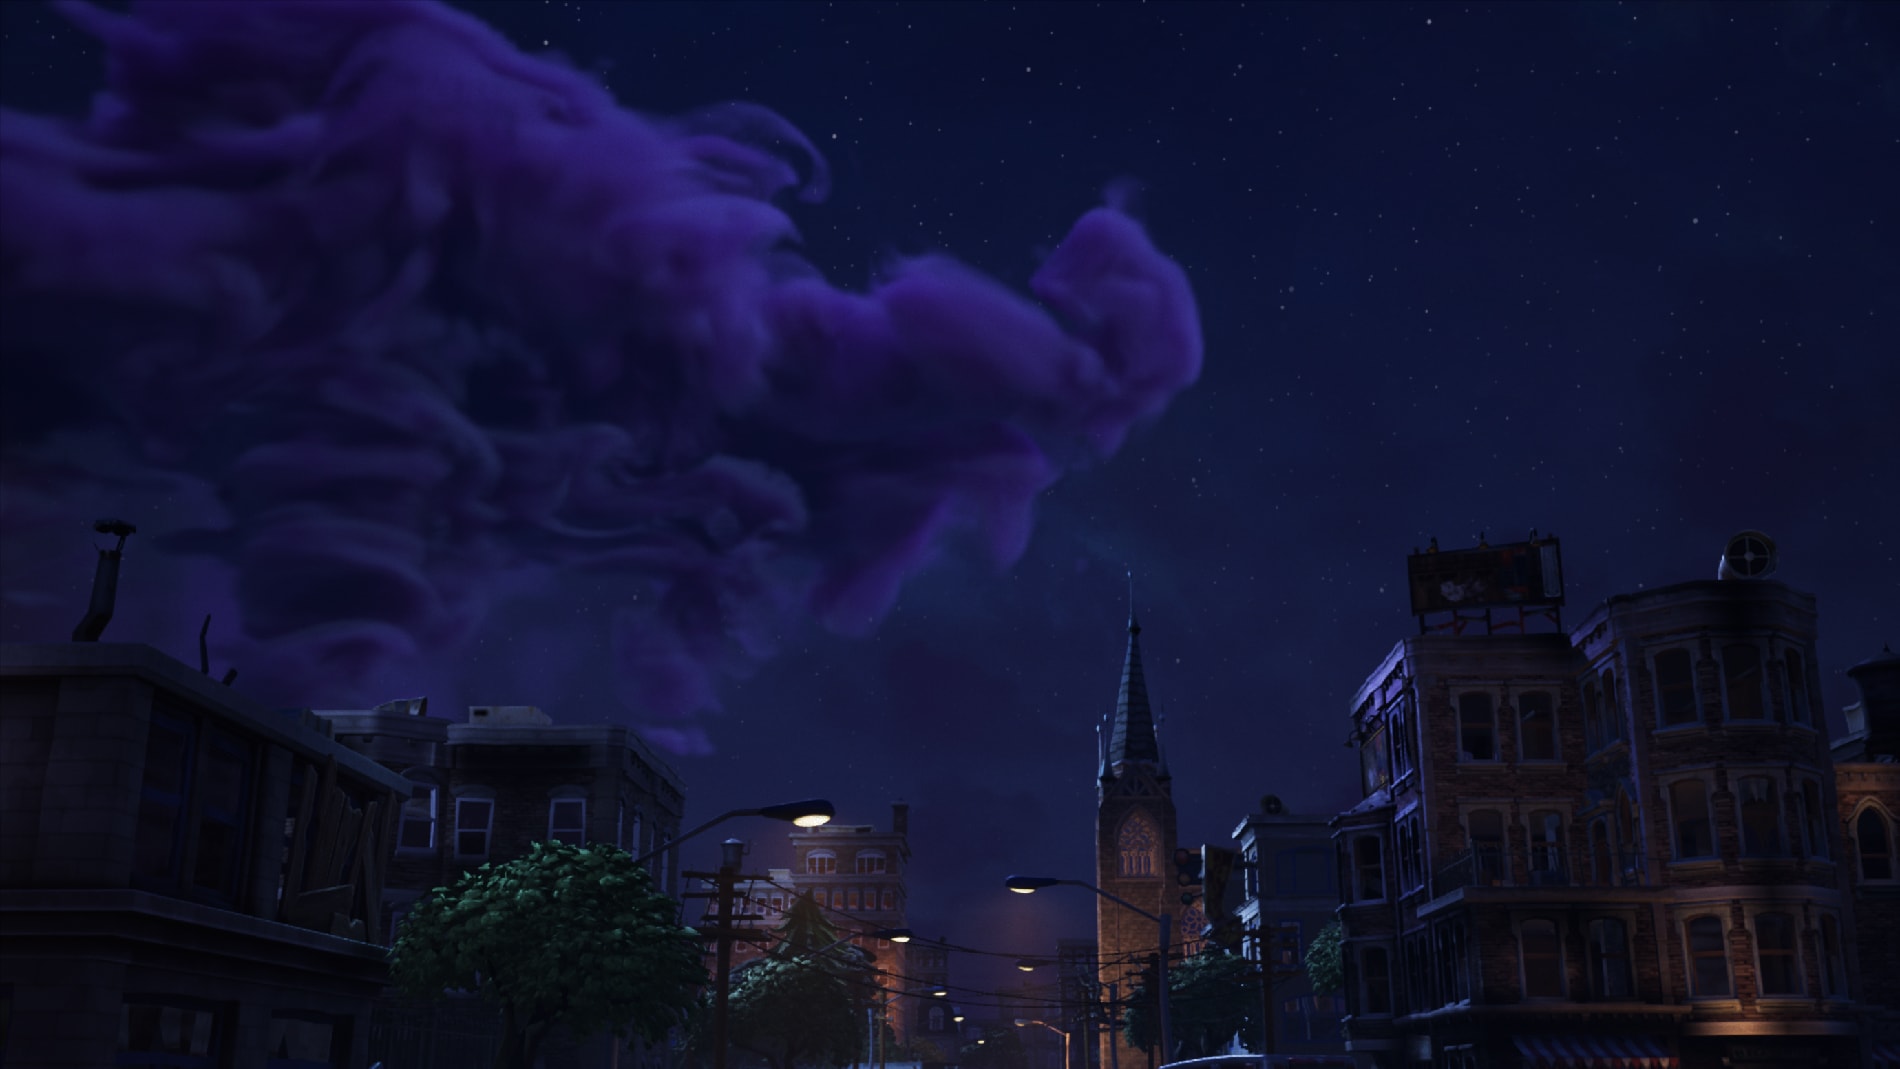
The team had other interesting challenges, specifically they wanted to keep the short from being violent and losing a general rating, but they needed to have our Heroes “dispatch” a lot of ‘husk’ bad guys. Due to Entertainment Software Rating Board (ESRB) restrictions, the creative solution to the husk deaths had to be very ‘non-violent’. With steel spikes shooting up, guns and other weapons this was a creative problem as much as a technical one. But luckily the problem connected nicely with a narrative issue of where did the bad guys come from? The story has an evil storm vapour cloud that menaces the city so the idea was hatched to have the zombies ‘dispatched’ immediately into puffs of similar menacing vapour.
The cool new tech…
Alembic
 In an effort to bring animated feature level performances to the Fortnite characters, Epic developed a hybridized FBX and Alembic workflow that overcomes the limited number of eight skin influences per vertex found in Unreal’s implementation of FBX. Using this approach, artists are no longer limited by skin influences and are able to utilize all of Maya’s deformations and rigging techniques. Characters are animated in Maya and brought into Unreal as two animations; one for the head and one for the body. The head animation is imported as an alembic cache, allowing for a one-to-one match to the to the originally constructed Maya deformations.
During the import into Unreal, alembic files are converted into PCA compressed GPU morphs, stored in memory and then blended per frame in real time. Alembic caching was also used to import rigid body destruction simulations. All character body animations are imported as FBX and Unreal’s Anim Dynamics capabilities supplied secondary animation details.
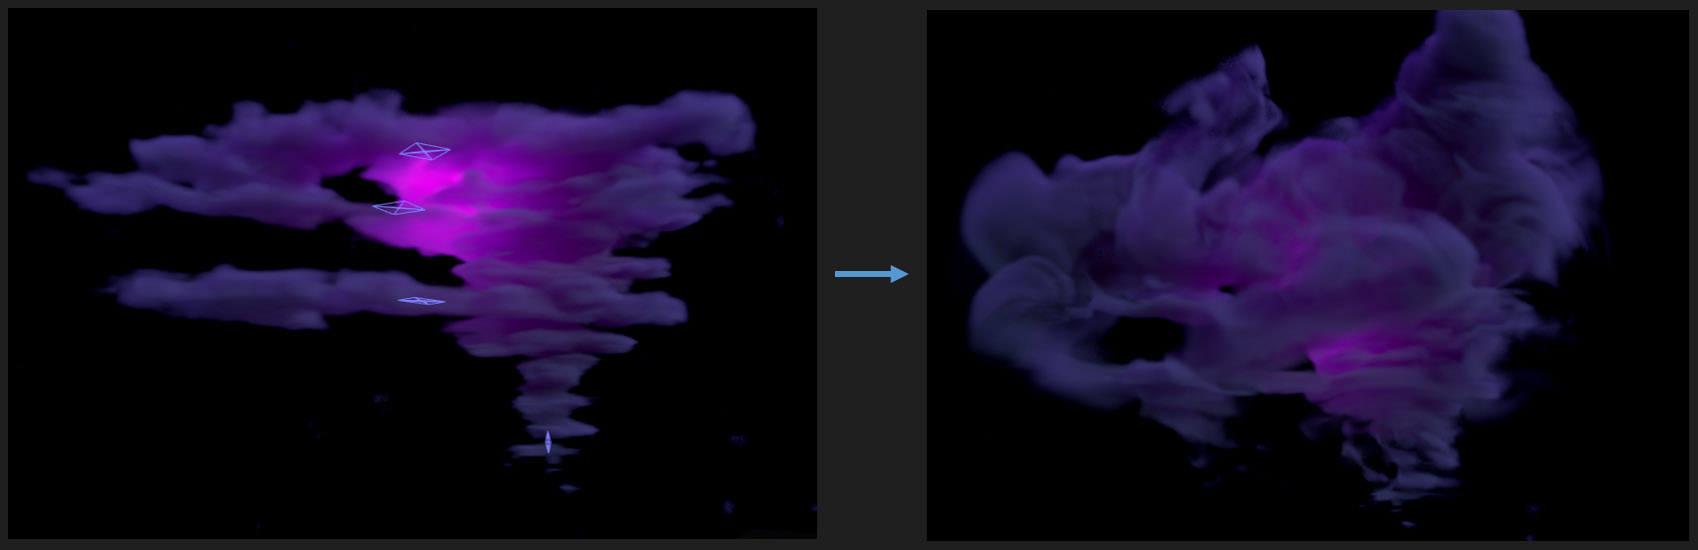
Original RAMIREZ (left) and the new version after Alembic importing was introduced (right):
The video above shows the quality improvement. Both side of the video are from Maya but the left hand side is a basic joint based rig that was being used on the earlier in-game cinematics for Fortnite. The second, on the right hand side, is the much more sophisticated rig that uses the alembic pipeline to get into the Unreal engine on a one to one basis.
Facial geometry and rigging included:
- Facial Rig: 200 Joints, Blend shapes, Lattices
- Head Geometry: 150,000 vertices average
The Fortnite team chose to forego baked lighting in favor of the increased flexibility of dynamic lights with cast shadows. This allows shot-by-shot adjustments of lighting values and set dressing placement. To achieve a high quality cinematic feeling, and still run in realtime, the team leveraged existing features like distance field AO to provide soft shadowing on indirect lights, or non-shadow casting lights.
For lights that required true soft cast shadows, artists used the newly added Percent Centered Soft Shadow (PCSS) feature on spotlights and directional lights. Final color correction was done via the new filmic tonemapper. Combined with Sequencer, the tonemapper allowed for final shot-by-shot color correction.The piece is rendered with traditional Deferred Rendering in UE4.
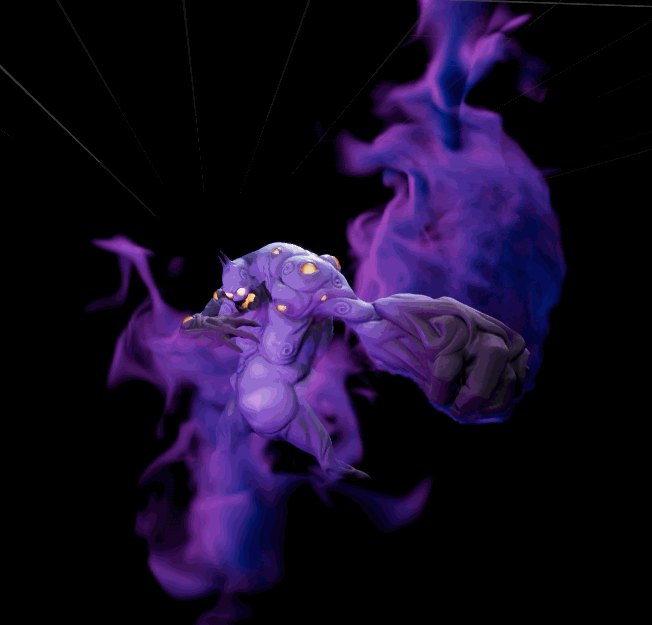
The Volumetric sim clouds of the Smasher
The storms and cloud effects add enormous visual complexity to the short film and are all done in Engine, in real time, thanks to some remarkable texture tricks and clever programming using UE4 blueprints.
The film required over 25 unique husk death effects. Each death needed to be lit correctly within the scene and respond to scene forces. By simulating the effect in realtime the results were more changeable. Volume textures were stored as “pseudo volumes” and laid out as slices in a standard 2D texture.
 Characters were voxelized using a simple trick known as “shadowmap voxelization” which used four views and combines them. In summary, this allowed converting character skeletal meshes into “smoke monsters” that could seed the density of the volume textures (see below). Mesh motion vectors were also captured during voxelization and added to the simulation during advection stages. Artists used velocity with a combination of curl noise and normals from the skeletal meshes.
Ryan Brucks, Principal Technical Artist at Epic Games, led the work on the volumes that were used for the husk death simulation and storm FX. Both used a similar shader which uses an approach of ray marching. This is an approach that allows you to render volumetric shapes within a 2d surface plane.
 The basic concept behind volumetric rendering is to evaluate rays of light as they pass through a volume. This generally means returning an Opacity and a Color for each pixel that intersects the volume. If your volume is a fully procedural mathematical function, then you can calculate the result directly, but if the volume is stored in a texture, you need to take multiple steps through the volume, looking up the texture at each step. This can be broken down into two parts:
- Opacity (Light Absorption)
- Color (Illumination, Scattering)
To generate the opacity for a volume, the density or thickness at each visible point must be known. If the volume is assumed to have an even density and colour, then all that is needed is the total length of each ray before it hits an opaque occluder. In UE4 Brucks wrote a tool that works out the opacity of the cloud/smoke at any point by advancing a ray through the volume texture over a distance of 0-1 in texture space and returns the linear density of the particulate traveled through. More detailed info can be found at his blog.
Unfortunately, this is only opacity, it does not yet account for colour or the general direction of light. To render convincingly lit volumes, the behavior of light transport must be modeled. As rays of light pass through a volume, a certain amount of that light will be absorbed and scattered by the particulates in the volume. Absorption is how much light energy is lost to the volume. Scattering is how much light is reflected out. The ratio of Absorption to Scattering determines the diffuse brightness of the particulate.
For Fortnite, Brucks was only focused one kind of scattering for simplicity and performance reasons, Single-Scattering. “That is basically how much light that hits the volume will be reflected back out” he explains. “Multi-Scattering refers to light bouncing from within the volume and that is generally too expensive to do in real time but it can be decently approximated by blurring the results of the Single-Scattering”.
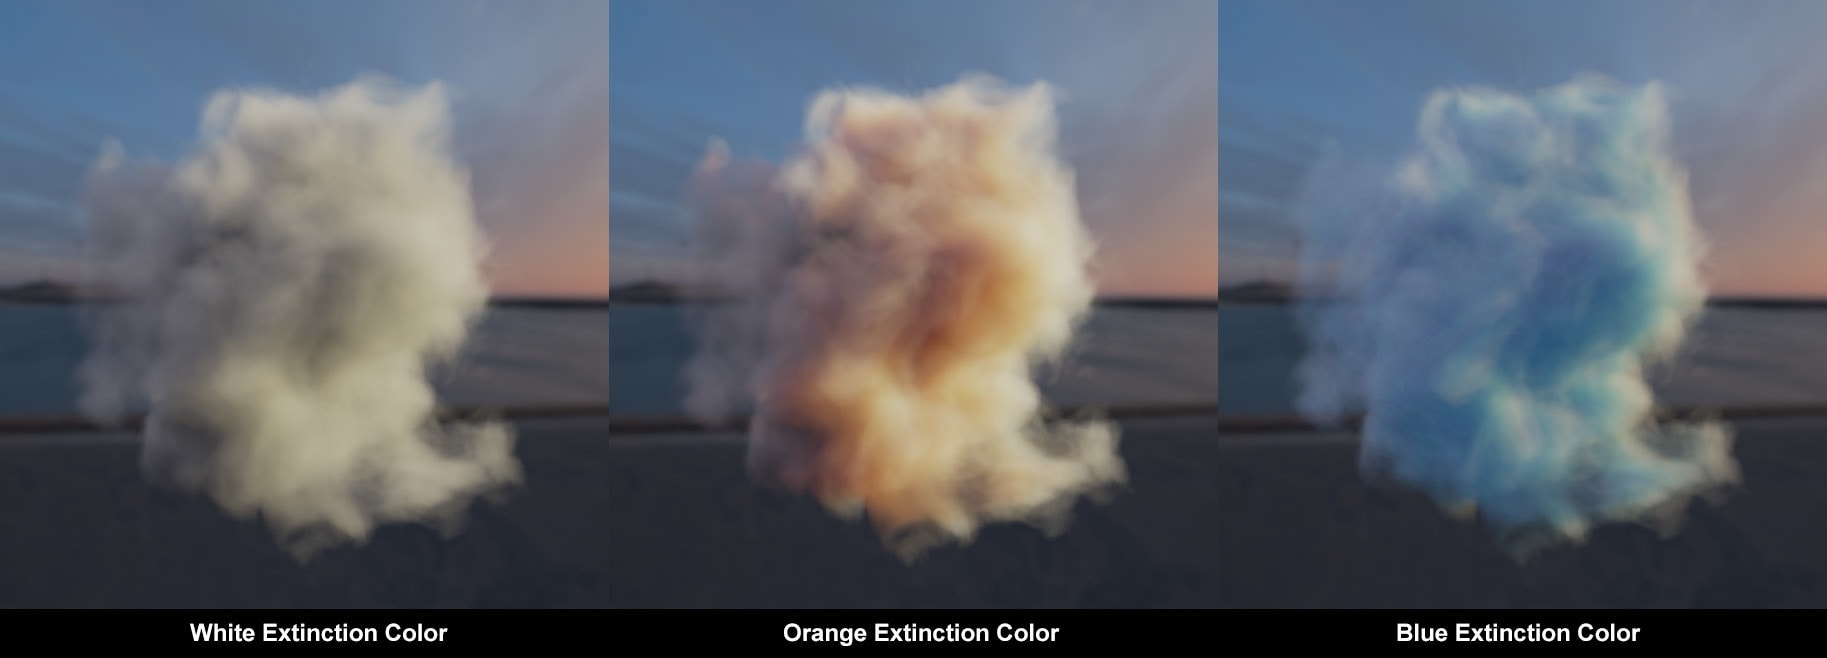
The light colour and intensity clearly contributes to colour. While the scattering from clouds in real life is mostly from mie scattering (which scatters light wavelengths equally), the Team wanted more artistic control over the lighting response. By using a color instead of a scalar for the shadow density, the light could be made to change color with shadow depth, allowing a wider range of artistic effects. This color is referred to as the Extinction Color.

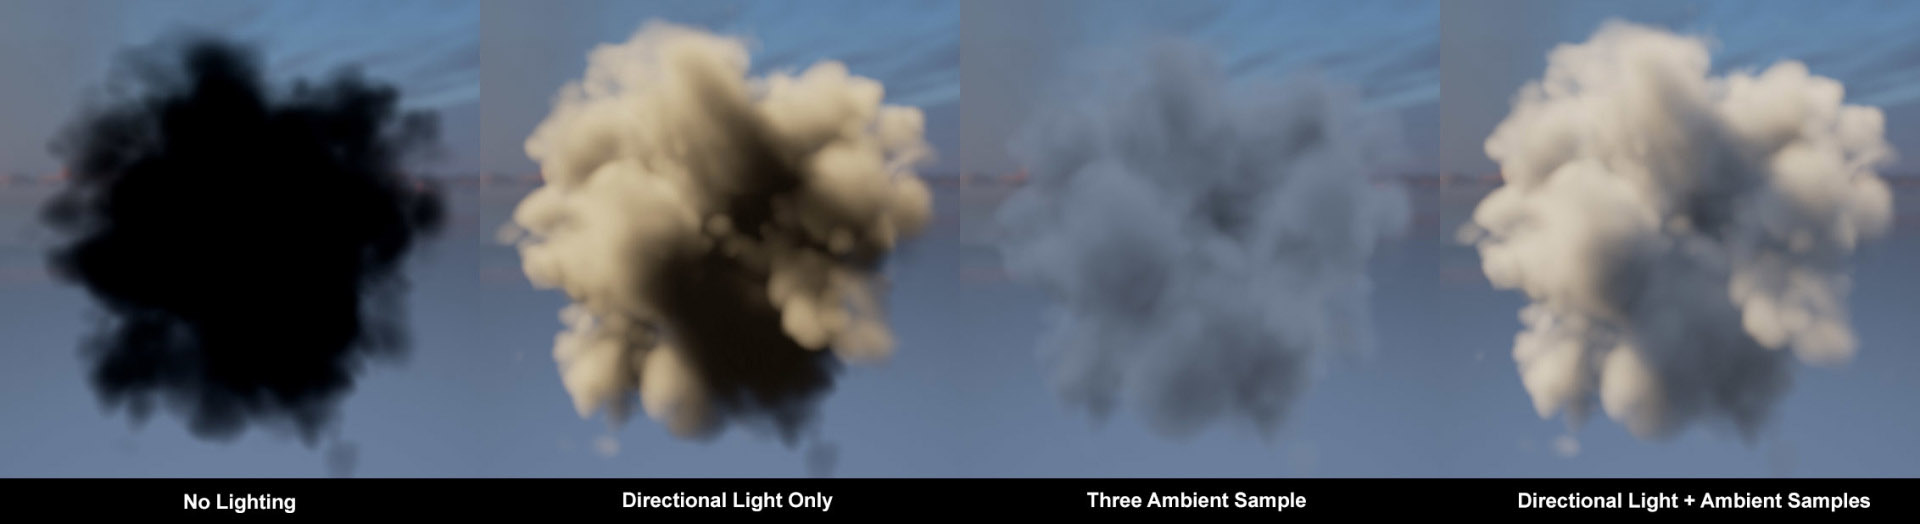
These various ray marching solutions were combined with ambient light levels to give the illusion of a big volume, while it is actually a 2D element with a complex texture. The Ambient light was approximated with 3 staggered upwards samples and the ray was jittered using Dither Temporal AA” to help reduce the number of steps required.
All the simulations were rendered with shadowing calculated as nested steps inside of the main raymarch loop, using single scatter with extinction color exposed to help achieve a more cartoon/stylized look.
The Storms
The storms elements, on the other hand, rendered all of their lighting into a separate volume texture every frame. “This was done since we knew we wanted to illuminate the cloud with lightning and we couldn’t afford to be tracing multiple sources as a nested ray marhc” explains Brucks. “This also meant we could get a bit higher quality lighting since the tracing is not nested when performing it inside of the volume texture itself. I ended up marching 8 random directions into a cubemap to render the ambient lighting for the storms”.
The lightning sources were injected as inverse squared point lights without self shadowing for performance reasons.
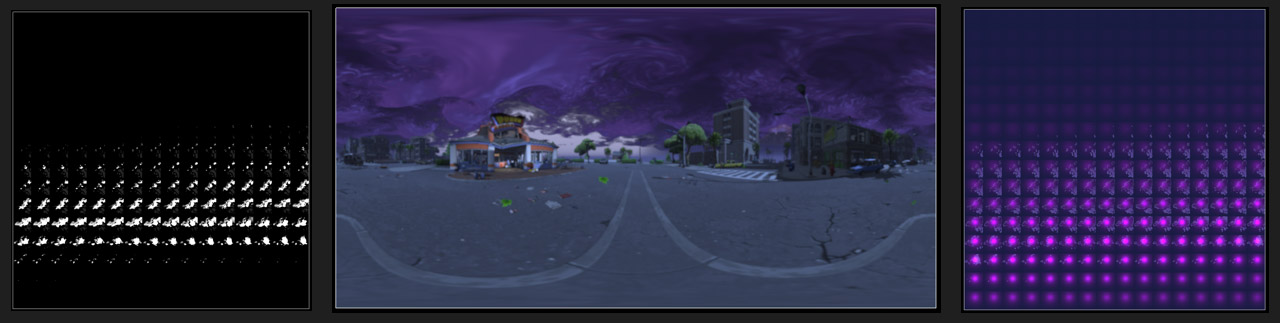
This image shows the PseudoVolume Density texture (left), Cubemap used for lighting (middle) and PseudoVolume Lighting Texture with an active lightning strike (right):
The storm shapes were a mix of procedurally defined and hand painted shapes. The storms were animated using an iterative 3D flowmap technique.
[clickToTweet tweet=”For the real time film Fortnite, cloud defining Velocity maps were hand painted in VR for some shots” quote=”Velocity maps were hand painted in VR for some shots. “]
Brucks developed and used an UE4 core graphical code tool, Blueprint, to actually paint clouds in VR for the project. “For the opening shot, the flowmap velocity was painted in VR. Doing that in VR made it easy to control the shapes of the painted wisps naturally, which can be difficult to express in 2D with a mouse.”
This video is an example screen record of the VR painting:
Other shots used curl noise as the flowmap velocity. This image below shows the effects of some hand painted flowmaps.
The flowmaps were used to groom the procedural shapes into a more whimsical look.
The comparison below demonstrates how it was used. All of the Storms were defined by a few procedural layer shapes. Planes, Ellipses and Funnels were used. Theses shapes could grow over the life of a shot because they were defined using distance fields with noise modulation.
The base procedural shapes for the opening shot was:
The flowmaps were used to groom the procedural shapes into a more whimsical look:

This is the same storm and velocity, but with the Distance Field cutoff threshold expanded over the life of the shot:
The Husk simulations:
The Simulations were based on the Navier-Stokes Equations for Incompressible Fluid Flow, applied using a combination of Blueprints and Materials in UE4. “The stages of Advection, Divergence Calculation, Pressure Iteration, and Gradient Subtraction were scripted using Blueprints. Each stage called an event to draw a material on the GPU. Each material allowed a different part of the fluid equations to be computed on the GPU using textures” comments Brucks.
Brucks recalls that the husk simulations, “had to be done on short time since originally I was only scheduled to work on the storms”. Bill Kladis, Senior FX Artist, suggested experimenting with using Brucks simulation blueprint to do the husk death simulations in Engine rather than importing them as Alembic or using a specialist plugin.
“We didn’t have any voxelization methods and a proper solution would have taken too long to write, so I ended up using a simple trick leveraging 2D scene captures.” Captures from four cardinal XY directions were taken and computed as shadowmaps within the volume. Then each shadowmap gets multiplied together to form a final result.

This volume texture stored the mesh motion vectors in RGB and density in Alpha. During the simulation Advection stage, the character volume texture was injected into the simulation, with UE4’s Sequencer controlling the contribution. The Blueprint also gave controls for automatically converting velocity to density.
“After I did a first pass hooking up a basic sim for each shot, Bill Kladis did a pass on tweaking all of the sims and Sequencer controls,” he explains. The simulations were also seeded using curl noise to aid in the chaotic dispersal happening quickly. Temperature buoyancy was also used to give different effects.
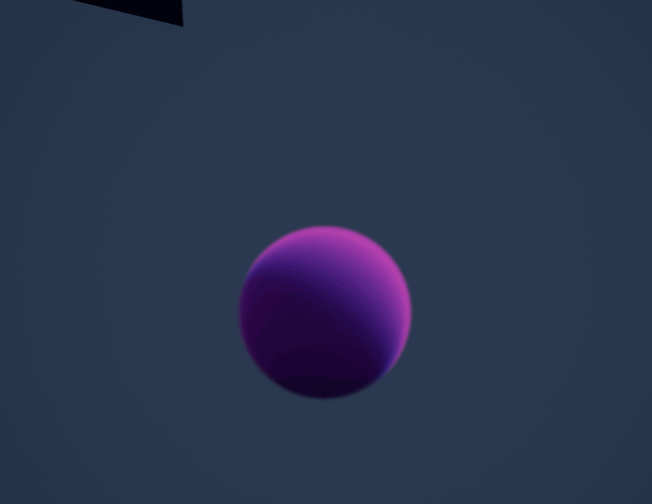
This test image shows the effect of the curl noise and temperature buoyancy with a simple smoke ball:
By using the mesh motion vectors, the smoke could inherit its motion from the mesh. “I didn’t actually use a solid boundary condition here since the husks were only contributing to each sim for a few frames,” Brucks explains. The velocity was simply additive.
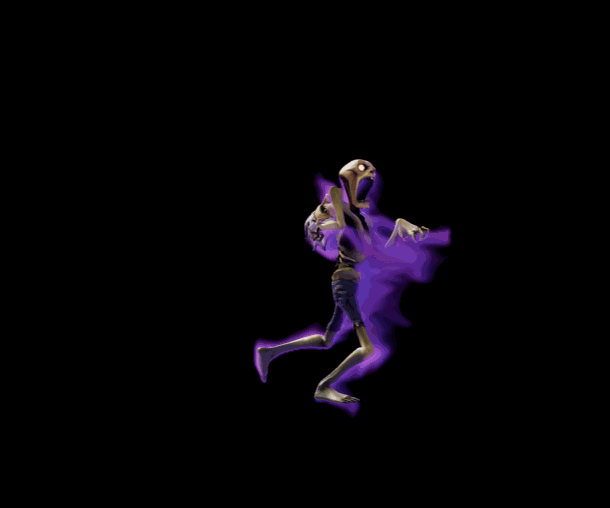
The clip below shows how the team could use a Velocity Threshold to control density contribution.
During an intense swing, more smoke is emitted from the fast moving arm.
The final fluid sim in the sequence – where the Burger falls and ‘smashes the Smasher’ – was handled in a custom way by Bill Kladis. He used a few meshs shaped like a donuts and keyframed them in sequencer to create the very stylized plume look.
Here then is the final Death scene
Volumetric fog
The cinematic short film also made of the new UE4 feature that is called “Volumetric Fog”. This feature was added by Sr. Rendering Engineer Daniel Wright as a built in UE4. It allowed the fog in a level to receive shadows and also allowed the team to write custom materials into the fog to add detail. They used the same PseudoVolume technique from the storms and sims to pass in the 3D texture data. “We created a texture with Curl Noise and used that to pan through the fog and distort the coordinates of the basic noise. That allowed for a cool ambient wispy fog effect” Brucks commented.
 There were two reasons the team could not use the built in volumetric fog for the clouds or sims. For one, they could not perform self shadowing or receive detailed sky lighting. The other reason was that the Volumetric Fog uses inverse squared distribution of voxels, which causes detail to be lost away from the camera. “It is meant more for overall scene effects that are relatively soft. Using a custom per-object ray march allowed more custom effects and detail to be maintained in the distance” explains Brucks.
Some of the more notable realtime effects used in the short include:
- FFT Bloom
- Render targets to calculate customized volumes
- Connected distant field AO to base materials, enabling indirect light sources (bounce and fill) to not use cast shadows and instead use soft AO shadows.
- Direct illumination (key and any lights that must cast shadows) using real time soft shadows with PCSS
Sequencer
Everything in the short film was generated at 24fps while being displayed at 1080 resolution. The engine is ‘looking’ ahead and simming (with real-time procedurals), as a result everything is live. “All pixels generated as you’re watching. This is less about generating the final image live, but as it’s all edited in sequencer, it’s about a real time pipeline that allows you to make decisions and fail faster,” commented Chris Evans.
Each sim was controlled via Sequencer. Sims were triggered one frame early to allow capture of motion vectors. Afterwards, the mesh contribution (density and velocity) could be key framed. This allowed for very rapid iterations vs traditional offline rendered simulations. Pressure iterations were run at half resolution as an optimization. Blueprints were also created that could convert any sim into a flipbook from the specified camera. Flipbooks were used as a fallback plan for any shots that could not afford simulation (for example if too many sims were needed on screen). The 3D simulations were rendered using a standard ray march shader. Extinction color was exposed to give more stylized color controls. All volumetric storm clouds were rendered using a similar ray march shader, but utilized 3D flow maps instead of full fluid simulations. An iterative flowmap technique was used to track longer curly wisps of clouds more accurately without distortion. Shapes were a mix of procedural layers and then hand sculpted in VR. The velocities used for the flow maps were also a mix between curl noise and hand sculpted velocities in VR. Procedural shapes were used more for shots showing lots of growth, as artists controlled the growth of the procedural shapes parametrically over the life of a shot.
Many aspects highlighted in the game are included in the upcoming UE 4.17, such as Universal support for blending, Autokey has been improved in Sequencer, with much more control on what is keyed, image plane actors and the world outliner has been improved in relationship to the Sequencer as well as production support for Audio Streaming, and a new plugin for help with real-time compositing pipelines, Composure.
The Actual Game
The actual game Fortnite, from Epic Games, will be available on PC, Mac, PlayStation 4, and Xbox One on July 25 2017, (as paid early access period across these systems). The final game will be free-to-play with an expected 2018 release.
The actual Fortnite game is a co-op sandbox survival game and is about exploration, scavenging items, crafting weapons, building fortified structures, and fighting waves of encroaching monsters. Players aim to work together to scavenge items they can use for building by day to build their fort, and to build massive forts and defend them from monsters spawned by the mysterious Storm.
Building will be a core mechanic in the game, and there will be “a lot of loot” buried within. Players can build and edit each wall of their fort with a 3×3 grid, lay down stairs, roofs, and windows, sculpting them to suit a particular need. This theme is reflected in the short film trailer. Due to this style of gameplay, the game was described as “Minecraft meets Left 4 Dead” by Tim Sweeney, the founder of Epic Games back when he discussed the development of the Game in 2015.

Where to see it at SIGGRAPH 2017 in LA
If you are going to SIGGRAPH, then Monday July 31st is the first ever Unreal Engine User Group at SIGGRAPH. Featuring CEO Tim Sweeney and Enterprise GM Marc Petit, as well as a variety of special guests, the evening will feature demos, talks including one on Fortnite.
Plus there will be an exclusive first looks at EPIC’s latest special projects, (and you might even get to Meet fxguide’s own Mike – Yes, fxguide will be there– sort of) #MeetMike. For more on MEETMIKE click here.
Fortnite will also feature at DigiPro 2017 which is a special one day production mini-conference that runs the day before Siggraph on the Saturday.
how much in mb is 1 frame of alembic format ?
Thanks for the great article! Would be more interested in knowing Anti-aliasing techniques used while making this.
Probably just SMAA
Temporal Anti Aliasing. It’s the only real time AA technique usable for movie rendering. It also makes Motion Blur better.
https://www.youtube.com/watch?v=yNQ47MY-Eo0
new alembic on ue 4.17?