Adobe has just shown its new Character Animator 2019 complete with Style Transfer for automatic face animation. (See our general story here).
We spoke to Dave Simons, Adobe Fellow and former Principle Scientist at Adobe running the Advanced group. Simons was one of the co-founders of Cosa which invented After Effects and was acquired to become a part of Adobe. He was the engineering manager on After Effects and in 2007 he switched to advance product development team. His team was tasked with moving research from the lab into products. “Basically we were trying to do tech transfer from research into After Effects and Premiere,” he explains. “Character Animator kind of spun out of that because we had done a lot of things and then we decided we’d do character animation. So we set down the Character path, and then somewhat to our surprise, it became a huge success. And now the team is effectively the Character Animator team, and they are doing that full time now. ”

Style transfer.
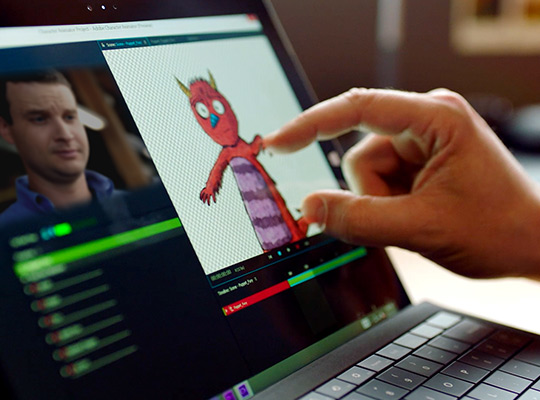
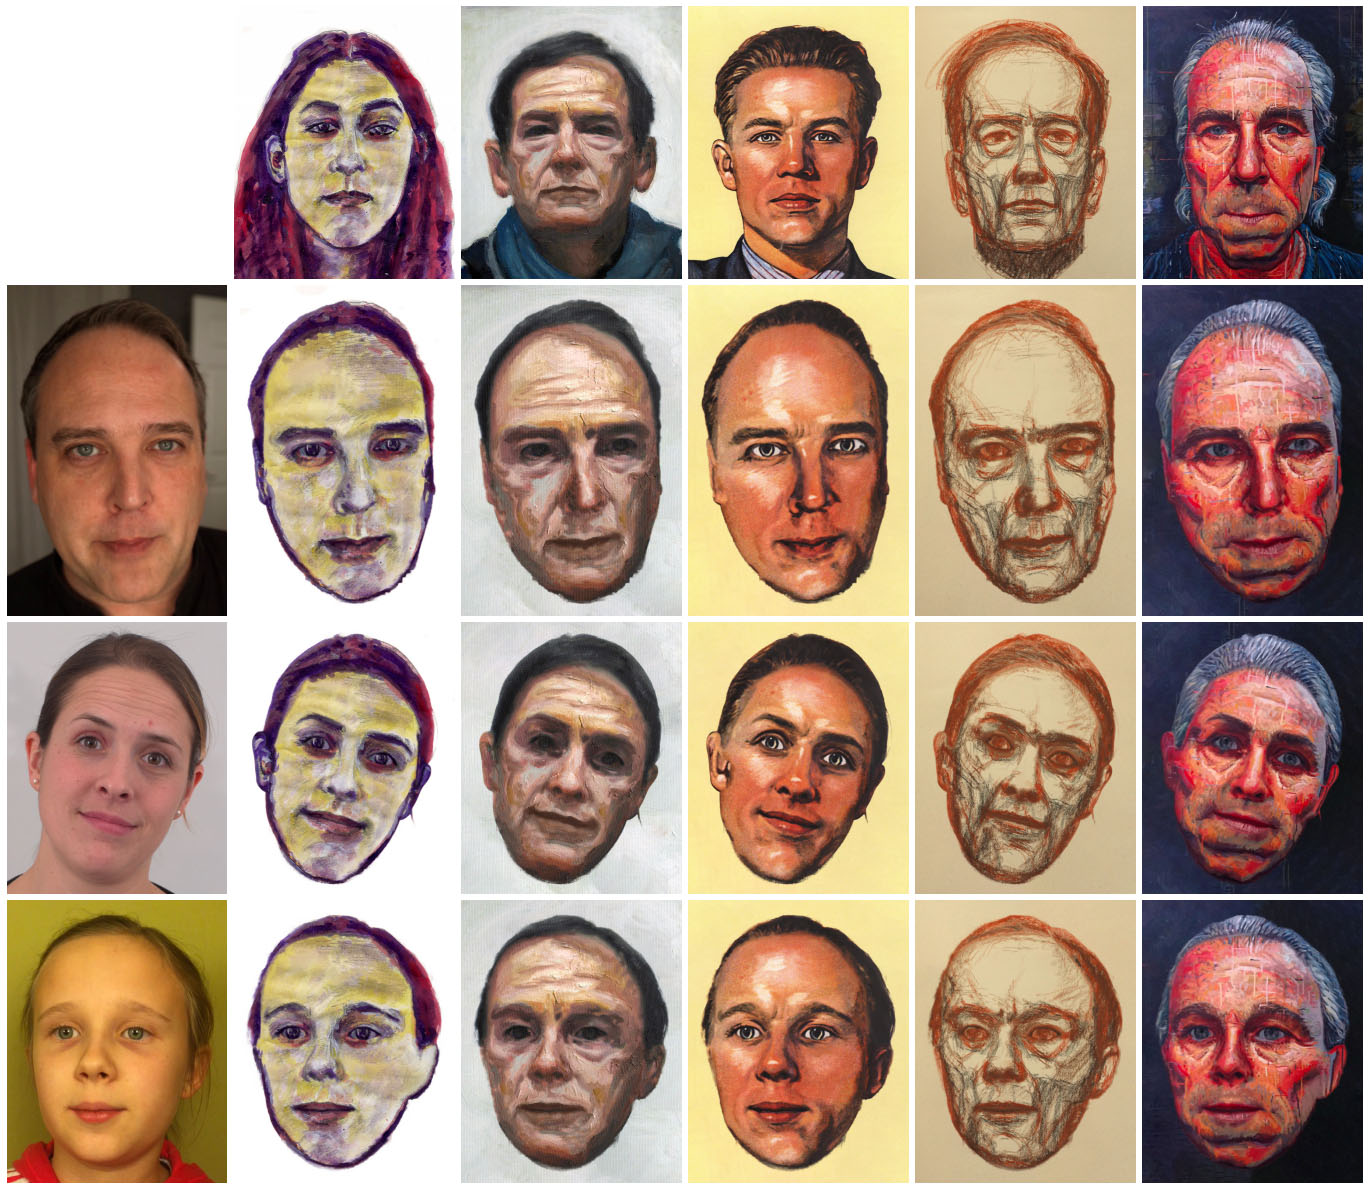
A new feature in Character Animator is the Style Transfer function that allows one to make a painterly version of any image of a person and then animate it in real time.
The facial style transfer comes from some published research papers on style transfer specifically Example-based Synthesis of Stylized Facial Animation that the Adobe Research team published in July 2017.
This tech directly led to the new features in Character Animator. The paper from last year was at the core of Jakub Fiser, PhD thesis at the Czech Technical University in Prague. “We hired Jakub as quickly as we could so he could continue his impressive work at Adobe” commented Simons.
The technique looks as if it is using modern deep learning AI, which has been published and shown elsewhere, but it isn’t. “The style transfer itself does not use deep learning, but we use it in some of the preprocessing steps. Style transfer and Content Aware Fill share the same component, PatchMatch, but while Content Aware Fill works only with the image being inpainted, the style transfer has a lot of hidden “images” (masks, segmentations, etc.) that guide the the transfer.” explained Jakub Fiser
Below is a special video we edited to show the new tool and explain how it works.
Adobe Character
The base of Character Animator has been now out for some time and it works by referencing a character file which is a layered Photoshop document. This layered document has specific named layers which can be addressed interactively to approximate real time lip sync. As the master program does face tracking, it resolves which parts or layers of the master Photoshop file to use and then displays them. The concept is very much like traditional Cel animation. There is no master 3D head of Homer Simpson below in this example from the UK. The program simply displays the correct 2D artwork from the master file to give the illusion of the one head saying the lines. Once the facial tracking could be done in real time, the ‘rendering’ was so simple that the system could be interactive and used for live cartoon character animation.
When Stephen Colbert is talking to Cartoon Donald Trump (see below) there can be an actor off screen reacting and answering in realtime so that the conversation can be seen live by the viewers. In the studio Colbert is talking to an empty chair with just a video feed so he knows what the audience is seeing.
The ability to produce live cartoon was impressive, but even when producing videos that will be viewed later, having immediate feedback is highly desirable. Unfortunately, the range of animation is limited to the master file. Adobe has extended it to walk cycles and other things, including in this latest version, the ability to have objects ‘held’ by the characters and ‘magnetically’ linked their limbs. The results are impressive but the system is not a complete animation package as arbitrary animation, for example Homer eating an odd shaped sandwich, is unlikely to be in the set up. Such one off actions are not worth building into the rig for and creating a new master photoshop file.
The various version of Character Animator have simplified animation workflows and given artists the ability to create more realistic and interactive content experiences. Some of the newer features have included, camera and layer depth improvements, improved effects to create realistic animations with parallax effects, zoom, rotate and pan to create realistic animations. Over time the program has steadily improved it’s lip-sync algorithm to accurately show the right mouth shapes to correspond with spoken sounds. In this new version, the advanced character rig is now able to drive personalised characters based on a photo and a sample style. This was possible before only if the operator hand edited a range of stylised original artwork. In the new Character Animator this process is automated.
Use outside Character Animator
While it makes complete sense to do faces inside Character Animator, the question arrises of using this technology as just a ‘video filter’ in other programs. Perhaps applying it to a car commercial for a ‘Vincent van Gogh’ style Toyota TVC.
The process published so far has been done just on faces, but the algorithmic approach could be used on any video, in say Premiere or After Effects. In such an approach, deep learning computer vision would need to be used to identify and segment the target objects and then this new approach could apply this to the target. As it stands this would be an offline process due to long render times. Adobe has no such immediate plans but it has done testing on video and it could work.
“The way the techniques works with the guiding channels work, it’s easy to add more. And so if you we’re using a deep learning, semantic segmentation of an image as the guide, it should work.” says Simons “If you’re doing say a car commercial, then you would need semantic segmentation that knows, okay, here’s a car, here’s the headlights of the car, here’s the hood of the car here, the windows on the car etc”. The segmentation does not need to be too accurate for it to be a useful as a guiding channel. And you would need an original style of painting that has a car in it to use as the source. It would also be possible to build a system that allows hand labelling of items but then again this would be much slower.
The Painterly Path At Adobe:
An fxguide Deep Dive
There are a series of papers and technologies that build to allow this style transfer to work. Here we work through both the techniques that Adobe uses and helped develop, but also interestingly, what it decided to not use.
Color Me Noisy
Colour Me Noisy was an important paper published in 2014. It added back into a computer generated scene, a human like flicker that make CGI images look hand painted.
It was first presented as an example-based approach to rendering hand-colored animations. As the animations flickered, it provided a visual richness comparable to real artwork. It did this while enabling control over the amount of perceived temporal noise. This was important both for artistic purposes and viewing comfort, and generating this by hand was tedious or even intractable to achieve manually.
The team analysed typical features of real hand-colored animations and proposed an algorithm that tried to mimic that hand painted look using only static examples of drawing media. In 2014 they applied the algorithm to various animations using different drawing media and got great results.
The Colour Me Noisy technology is a key component of the new Character Animator Style transfer. The 2014 technology is referenced again in the new application, which, once again, wants to add a natural flicker an computer animating face, so that it feels redrawn each time.
Stylit
Stylit was an earlier example of style transfer. It worked by taking the style of a drawing done of a ball and applying it to 3D model. This is a very specific solution, the source needs to be a ball and the target needs to be a 3D model.
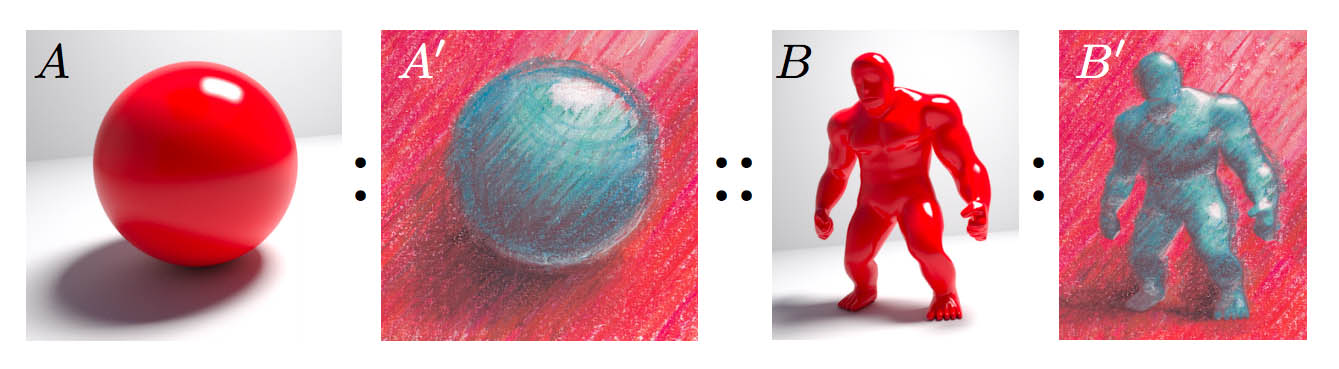
StyLit allows one to transfer the artistic appearance from the simple ball on a table – to a complex 3D model, since it ‘knows” the first is a ball and the 3D target provides AVOs to aid in the process. In this iteration of the style transfer the process is interactive. The system allows the artist to use any program to draw or paint the ball on the table and the results are dynamic. As you proceed, you can see your drawing or painting style transferred to the complex scene. (Or, you can use a drawing or painting that has already been created and automatically transfer it).
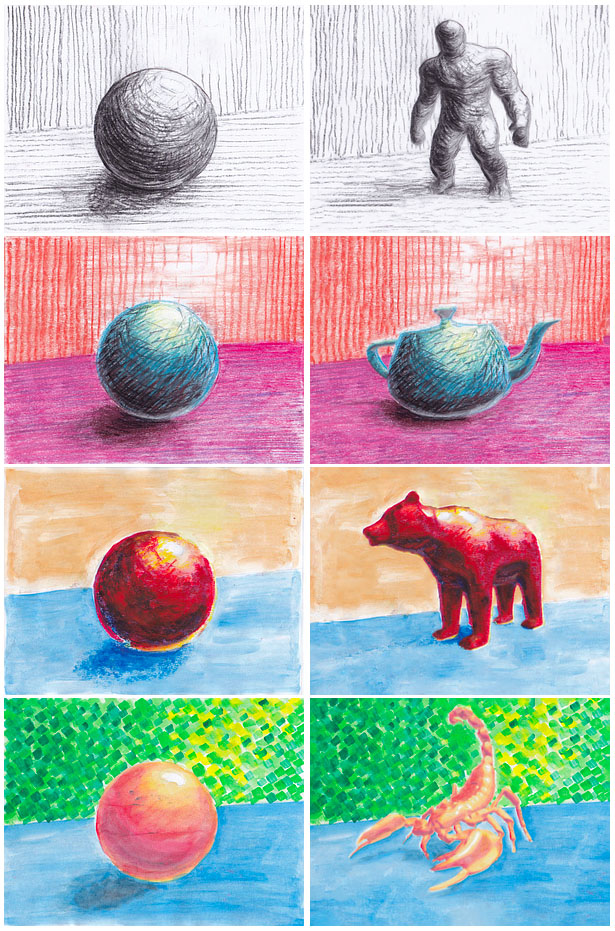
The solution is guided illumination. A ball is by definition an even set of surface normals pointing in all directions. If the program needs an indication of how the 3D model should look on the shoulder that points to the light, it references that approximate area of the ball with the same directional normals. The shoulder may be brightly lit if it’s surface normal is directly reflecting towards the light, so the area of the ball that also reflects towards the light is used. This also works for the ground plane, and the shadow area of the 3D model. We can copy the texture and illumination level from just below the ball on the ground plane to provide the colour and texture of the shadow just below the feet of any character and so on.
While this works it requires a specific input and the output is based on a 3D model with associated extra 3D data (AVOs) to be output. It is not a general solution but it did make for an impressive demo.
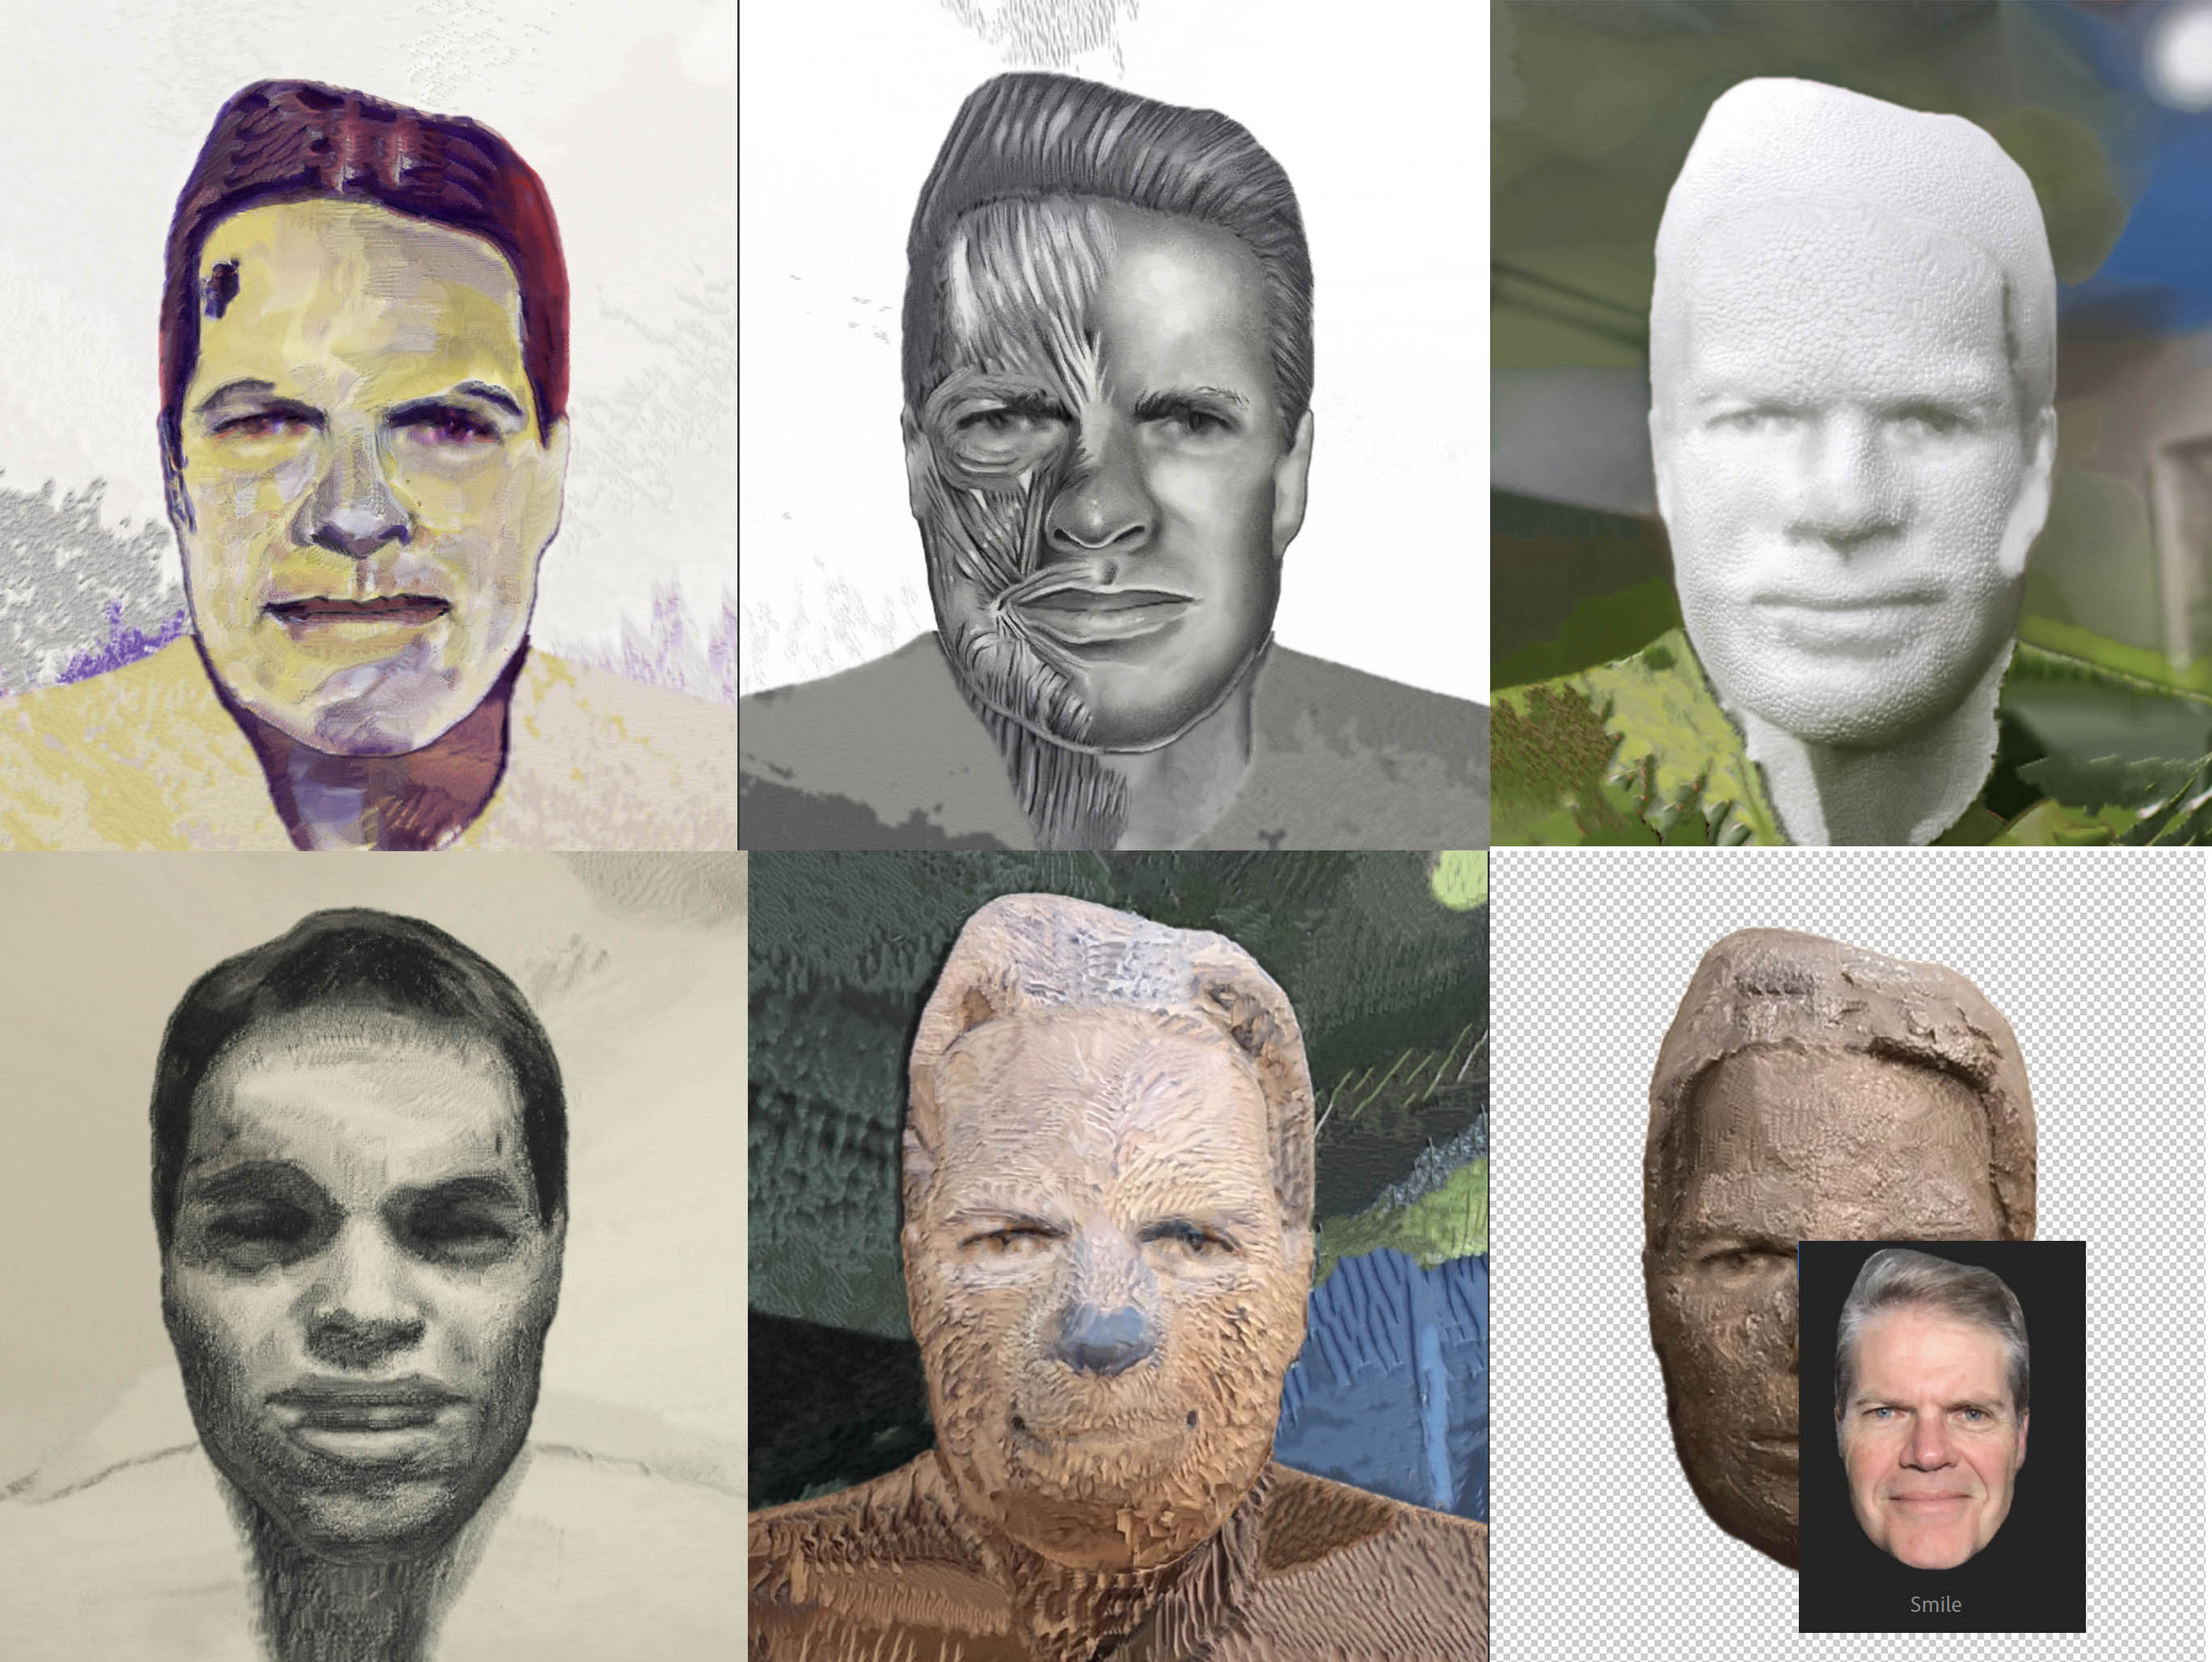
Example-Based Synthesis of Stylised Facial Animations
The next research approach Adobe moved on to solve was less restricted but still required an example to synthesize a new stylised face.
One of the key things the team turned to next was making this whole style transfer more useful, so that anyone could find a portrait and just use it as a template style to create a new face, as opposed to a process that required 3D rendering and also having to have the style that you specifically wanted drawn up on a image of a ball. “This was next step in the evolution of making similar technology but changing the inputs and the outputs to make it more useful and adaptable” explained Simons. “The main approach was the general notion of having the guiding channels be constructible from things that are readily available instead of what had previously had to come from specific 3D renderings”.
The process worked by
- Restricting the source and target to human faces as a starting point. Faces are not as specific as perfect spheres but they do follow a rough set of similar principles. Using face tracking, warping and image manipulation it is possible to move the style of one face to another. The approach was not to just do feature tracking and copy say a whole ‘eye’ from one source to a target. The aim was to copy the style from one face to another.
- In the Source and target images the faces are assumed to be normally orientated. This means things from the top of the source frame tend to influence things in the top of the target for example. It is assumed the faces are both up the right way in other words.
- The stages are identifying or segmenting parts of the face, are then adjusting for position and possible rotation. The special ‘Patchmatch’ then applies the matching transfer texture.
- Once all the style transfer is done, the program then adds in temporal artefacts to make the output look more hand painted. If you don’t add this ‘jitter’ back in it looks very much like a person is wearing face paint as opposed to being a painting of a face.

Artistic style transfer for videos
This work is in parallel with other approaches outside Adobe.
There had been work done such as “Artistic style transfer for videos” by Manuel Ruder, Alexey Dosovitskiy and Thomas Brox which had managed to transfer style from one source to a video target, but these did not have the same “Colour Me Noisey” style of noise added.
They also approached the problem from a very different perspective. Inspired by another paper A Neural Algorithm of Artistic Style by Leon A. Gatys, Alexander S. Ecker, and Matthias Bethge, which introduced an approach for style transfer in still images. This new paper uses Deep Neural Networks.
Deep Neural Networks, or specifically ‘Convolutional Neural Networks’ are one of the most powerful image processing tools. Convolutional Neural Networks (CNN) consist of layers of small computational units that process visual information hierarchically in a forward flowing logically manner. Each layer of units can be understood as a collection of image filters, each of which extracts a certain feature from the input image. Thus, the output of a given layer consists of so-called feature maps: differently filtered versions of the input image.
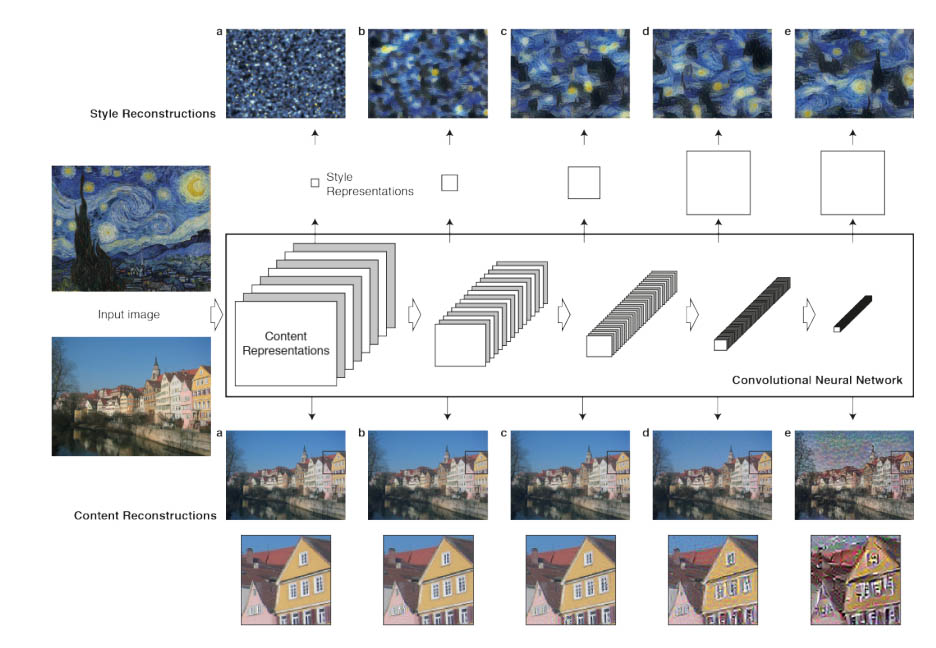
While CNN were used heavily for image recognition, a key finding of the Gatys et al work was that the representations of content and style of an image in the ConvolutionalNeural Network, are separable. To quote their published paper “That is, we can manipulate both (content and style) representations independently to produce new, perceptually meaningful images. To demonstrate this finding, we generate images that mix the content and style representation from two different source images”. Above in the diagram they showed how they could match the content representation of a photograph depicting the “Neckarfront” in Tubingen, Germany and the style representations of several well-known artworks such as The Starry Night by Vincent van Gogh.
This CNN approach is NOT the Adobe approach. It is a very important path forward, but Adobe only uses AI in their Deep Fill but they do not do a CNN deep learning approach that is very popular academically and in the popular press.
This is alternative approach by Adobe makes a visible difference. The Adobe style transfers often appear sharper and cleaner than the CNN approaches. This directly falls out of the fact that it’s based on Adobe’s Content Aware Fill, so the pieces the new image is made up solely of pieces of the original image cut up and rearranged and overlaid. “It always preserves the detail of the original strokes because in fact it is made up of them” explains Simons. “You can just imagine it like it is being cut up with scissors into pieces and then the program rearranging them”. The result is always going to be made up of colors and lines from the original. If there is nothing blurry in the original, the output cannot be blurry. This is unlike CNN style neural algorithms, which will reconstruction in such as way that they can introduce blurry artefacts not seen in the original.
But it is not as simple as just using Content aware fill, the Style transfer uses this building block a few others.
Deep Fill and Context Aware Fill.
Project Deep Fill, is a much more powerful, AI-driven version of Content Aware Fill, and it was shown for the first time at Adobe Max in 2017. The Cloak project was shown which used the Deep Fill to repair and modify both still and moving clips. The approach uses “millions of real world images to train the Sensei model” according to Adobe’s Jiahui Tu from the Photoshop research team.

Most importantly the deep fill could be ‘directed’ as seen in this image below:
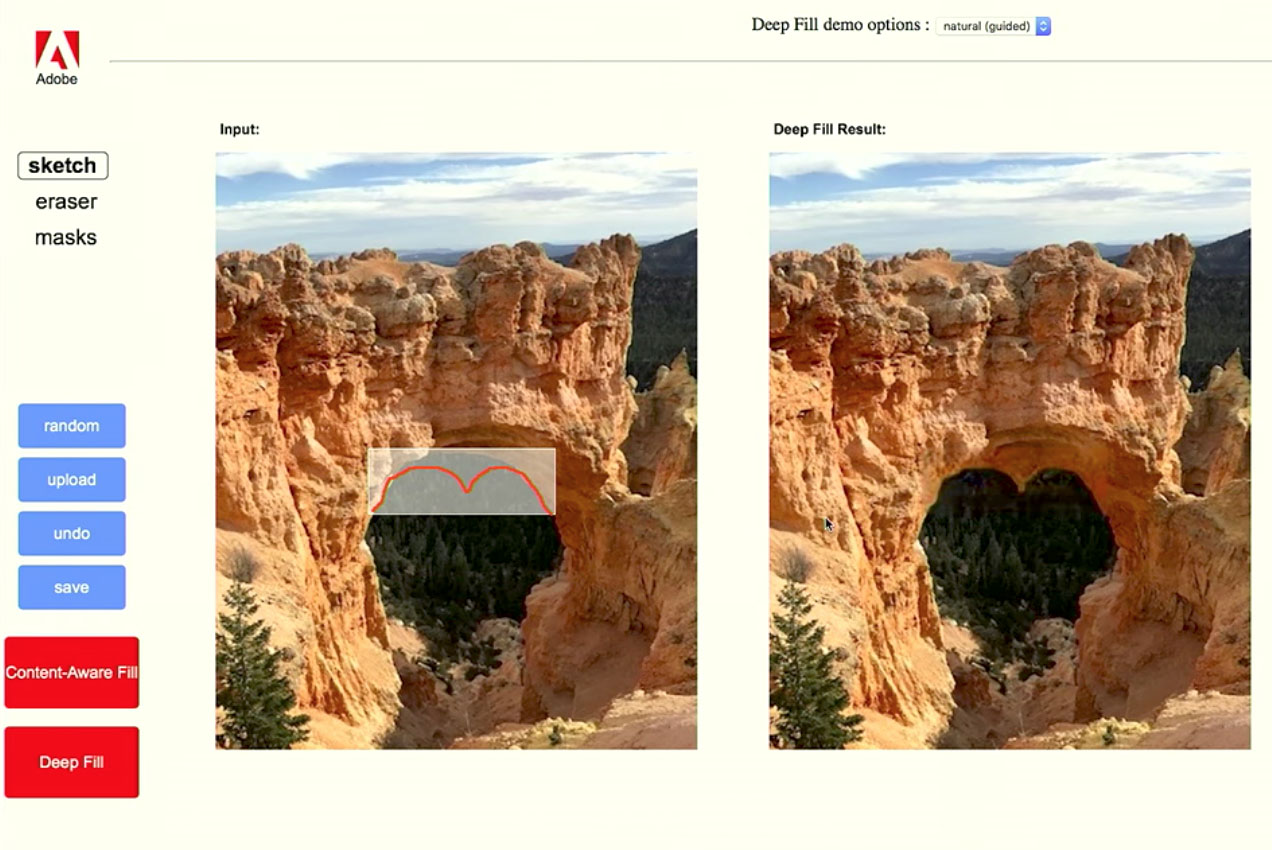
But Deep fill is not a completely separate technology from Content Aware Fill – but rather it is using other images to inform its decision.
Inside the Character Animator Style transfer there is a concept Adobe calls Patchmatch. It is the notion of a small patch of pixels being placed in the target image, using content aware fill but also getting the source from approximately the right place and thus what is in the patch is relevant. Content Aware fill works by matching edges. The way to think of Content aware is as an edge based patch. “It just matches the edges and who knows what’s gonna happen in the middle of it. We’ll just try to be continuous across the new image” says Simons.
In Lightroom there is a clone tool that finds good patches for cloning. You mark the skin blemish and it finds a good patch to put over it from the surrounding face. Unlike the classic Photoshop clone tool which lifts from a fixed offset and copies over to the new brushstoke, this Lightroom tool ‘auto-magically’ picks the best source for your clone blemish removal.
The Adobe Style transfer is a directed Patchmatch that content aware patches in a new eye, but uses the best parts from the eye’s of the Source image. The Segmentation and positional weightings all make sure the brush strokes used for painting the source eyes or mouth are used to clone/patch to create the new target eyes or mouth etc. But unlike the Lightroom filter which looks for the same matching texture… it selects the patch for the nose based not on the same texture but that the patch is very ‘nosey” (comes from the source nose).