Software developers try to cram as many new effects as possible into their product -after all, it’s those features which lead to sales. Workflow changes and fixes which help artists get their work done often get left behind. In this week’s podcast and story, we take a look at the new release of Adobe After Effects and how they bucked this trend.
This week’s fxpodcast is with Steve Kilisky, Sr. Product Manager for After Effects and David Simons who is the After Effects Engineering Manager. They walk us through the new features, which includes new 32-bit floating point compositing capabilities. Click on the link to the right to listen.
The release of After Effects 7.0 (AE7) is heavily centered on improving workflow and capability for artists. And it truly succeeds in this manner. Its not to say there aren’t new creative features in the software, but this release is a major overhaul in both the underlying architecture as well as the user interface. What are the highlights?
- 32-bit floating point workflow (Professional version)
- UI windows overhaul
- Graph Editor overhaul
- Motion Estimation Timewarp
- Improvements in rendering
- Integration improvements with Adobe Apps (Bridge and Dynamic Link)
While it would have been nice to see new creative features such as improved text handing, better 3D support, and improved masking — yes, I know what I wrote a paragraph earlier but can’t we have it all? — the release is certainly very solid and a big step forward for the application. Let’s dive into the major parts of the release….taking a look at it on Apple’s Quad G5 workstation….
32-bit Floating Point Workflow
The Professional edition of After Effects now supports 32-bit processing in compositions, in addition to 16-bit color support. You can import and export 32-bit OpenEXR, TIFF, and Photoshop files to work with in compositions, as well as import camera RAW files. This greatly opens up the potential of using After Effects for compositing operations for feature films and other high end output. Certainly the product has been used for such work in the past, but with built-in support for higher bit depth imagery it really opens up the potential for the product.
Even if you’re not working on feature films, the addition of 32-bit support is truly welcomed. Color correction — especially when dealing with highlights — is much more flexible and filmic in nature. Highlights bloom out beautifully when color correcting in 32-bit and then outputting in 8-bit for broadcast. Motion graphic design also tends to benefit a great deal from 32-bit support. This is evident when dealing with combining bright graphics and glows in a much more photographic nature…or introducing more contrast range (traditionally losing black and white detail) and then bringing back to normal. The ability to pass imagery through several color correction processes and still be able to regain image information makes things quite flexible.
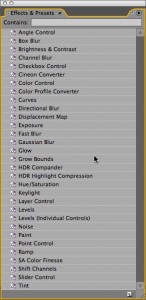
However, not all effects in the processing pipeline in After Effects are 32-bit native — just as not all effects were 16-bit native in prior versions. When you place an 8 or 16-bit effect into a 32-bit composition, a yellow triangle warning sign appears in the effects palette, letting you know that some kind of conversion is taking place. To work with an 8-bit filter the software needs to convert the bit depth of the imagery from 32-bit to 8-bit. This can happen either automatically or by using the HDR Compander. When converting automatically, you simply drag the 16-bit effect into your composition and the values below 0 and above 1.0 are simply clipped. Using the HDR Compander, you have adjustments for the level of compressing the full range down into 16-bit or 8-bit, which you can then expand back after the fact. Adobe has included an effects preset which links two of these effects via expressions — the first instance compresses the range and the second expands it back. Obviously, with an 8-bit effect this can have a devastating impact upon your imagery. With a 16-bit effect — and depending upon the color range of your 32-bit imagery — this impact of compressing the range and then re-expanding could be fairly minor. Whenever possible, its a good idea to design your composition to use these effects at the end of the processing tree — preferably the last step — so that you limit this as much as possible.
How do you know which effects are 8, 16, or 32-bit in their precision? In the effects palette, you can click the panel menu (the triangle in the upper right) and choose to view only 16-bit or 32-bit filters. Since Adobe didn’t have time in the development process to convert all filters over to 32-bit, they attempted to add ones which made the most sense for high bit-depth imagery. There was a lot of feedback from the beta sites about what was good to include and not include. Over time they plan to move more and more effects to higher bit depths.
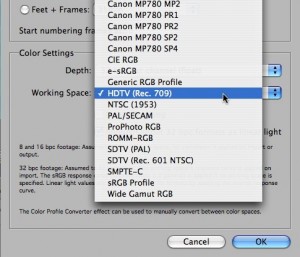
Adobe also has a first pass at color management in After Effects 7.0. You can set up an ICC color working space on per-composition basis so that with a correctly calibrated monitor, you’ll get an accurate representation of your colors. What is *not* included in AE7, however, is automatic conversion of imagery which you bring into a composition. So if you add an image with a different profile it will not look correct. Its easy to work around….just add a Color Profile Converter (Effect > Utility > Color Profile Converter) to your composition. Set the input profile to the working space of the file and the output profile to the project working space. Voila. Your image will look the same in After Effects as it does in Illustrator or Photoshop. If you don’t want to use the built-in color management you can still use third party tools such as Red Giant’s eLin and apply effects to Guide Adjustment Layers.
In a few weeks, we’ll be covering the new 32-bit workflow in detail with Stu Maschwitz of The Orphanage – who also helped develop eLin. Stay tuned for a detailed discussion on how to work with HDR and 32-bit in After Effects 7.0 in a production environment.
UI Overhaul
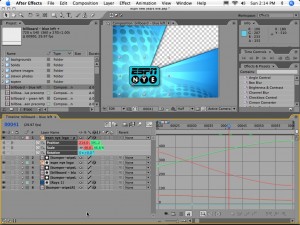
The UI for After Effects went through a serious overhaul for release of version 7.0. I spent the last month of 2005 designing and creating the graphics for ESPN’s New Year’s Eve broadcast (under creative direction of Tempo Communications in Chicago) using After Effects, Photoshop, Illustrator, and Autodesk’s flame. Using the new UI is night and day from the old one and makes a big difference when working on the product on a daily basis. Gone are the dreaded mishmash of floating windows all over the place, though for misguided floating palette fans and dual-monitor users you still have the option of using them.
In their place is a task-based UI which exists in a main “application” window. The window is broken up into frames and into these frames go the various palettes and panels. An arrangement of these items in the application window is called a workspace. The software ships with several of these arrangements and users can create and save their own workspaces. Artists familiar with Apple’s Motion and Final Cut — and even Autodesk’s Toxik — will be at home with this UI paradigm.
Frames can be resized by clicking and dragging. As your cursor passes over the frame boundary, the cursor changes to icon signifying that you can drag the frame size. As you drag the frame, the other frames automatically resize to fill the space. Zooming and scrolling within windows is much easier in this version….you can use the scroll-wheel or the mighty mouse nub to zoom when your cursor is over any window.
Graph Editor
I’ve always loved flame and its channel editor. While its undergone some overhaul and still needs enhancements, I appreciate its simplicity and ease of use. For artists familiar only with animation curves in flame and similar apps, the transition to After Effects was consistently called a brutal one. It took me a long time to get used to the speed graphs and I still continually missed explicity transform channels. With AE7, myself and others got our wish.
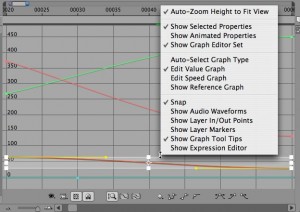
Animation graphs are now broken into two separate views — tracks and graphs. The track view will be familiar, but there is no more opening up triangles to get at speed graphs. These are now accessible in a separate Graph Editor view. You can view the channel parameters either as speed graphs or value graphs by hitting a button in the UI or using contextual menus. The contextual menu gives you quick access to how items are displayed and whether to edit the value or speed graph. You can change the values of position graphs, but you cannot adjust bezier curves or move the x,y, and z values separately since position data is still handled as motion paths.
When editing values in the graph editor, curves are surrounded by bounding boxes allowing you stretch or compress the graph in x and y. If you click within the box, the entire curve can be shifted in time (moving left-right) or by translating values (moving up-down). Holding the shift button when moving the box will constrain the movement to either horizontal or vertical movement.
You can also choose to display the expressions box along the bottom of the graph editor, a location which I prefer since it provides really easy access to editing expressions.
Motion Estimation Timewarp
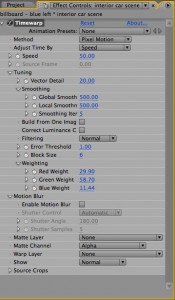
For version 7 of After Effects, Adobe licensed Kronos technology from The Foundry to create two versions of a pixel-based motion estimation tool. The first is Pixel Motion, which is available in the standard edition of After Effects. It uses the same underlying technology, but with simplified controls. The second, Timewarp, is available in the professional edition of After Effects. It provides a very high degree of control over how the image data of retimed footage is interpolated. Artists who are familiar with Furnace’s Kronos will be right at home when working with this tool in After Effects.
Rendering and RAM Improvements
Mask rendering has been improved dramatically in the new version of AE…almost twice as fast as in previous versions. There is also support for accelerated Open GL 2.0 hardware rendering in the software. Obviously, 3D rendering stands the most to gain but according to Adobe other improvements have been made. There is better support for blending modes in comps, motion blur on 2D layers, anti-aliasing, track mattes, 3D shadows, transparency, and accelerated rendering of common effects. When outputting renders, you can now create final renders using Open GL by checking the “Use Open GL Renderer” box in the Render Settings dialog box. For a list of compatible cards, visit the Adobe web site.
Note: There is currently a bug under OSX in which supported Nvidia cards are not recognized as allowing high fidelity effects. This was supposed to be fixed with the 10.4.5 update, but fxguide tests show the problem still exists (at least for the GeForce 6600).
For accelerating renders on a single workstation, I’ve had great success with a relatively new plugin called Nucleo from Gridiron Software. There are some bugs with the software, but for those who have been disappointed with CPU utilization on their G5 quad systems, the $150US for the product is well worth it.
You can use the product to accelerate RAM previews but more importantly accelerate final renders on a single workstation. Basically, you install the plug-in and when After Effects starts it launches several background processes of AE. When you’re ready to render, you add the job to the render queue and select “Nucleo Render” from the Composition menu. Nucleo handles sending your comp to these processes and collecting the render files — image sequences and Quicktime movie outputs are supported. Its nice to see all of the CPU’s pegged when monitoring activity with OSX’s Activity Monitor.
The software works best for longer renders, since there is a bit of setup overhead in distributing the renders across the various processors. I also suggest buying as much RAM as possible…in theory each individual background process of AE can support up to 3GB in the new software. My G5 Quad is set up with 4GB of RAM, which is adequate for standard definition broadcast use.
Adobe Production Studio Support
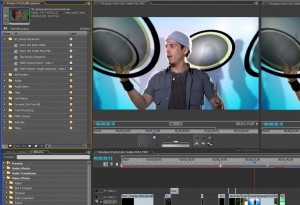
After Effects 7 wasn’t the only product introduced by Adobe in the last several weeks. At the same time, the Adobe Production Studio (Windows only) saw a significant upgrade with new versions of Premiere Pro, Encore DVD, and Audition. While sharing a common UI, one of the main new features of the release is called Dynamic Link….just one part of the expanding integration between various Adobe products.
From a user standpoint, this allows one to import an After Effects composition directly into Premiere Pro or Encore DVD without rendering. It shows up as a clip in the timeline of Premiere and can be slipped and trimmed — and the composition is rendered on the fly inside of Premiere. This could be useful for title animations or for menu design in Encore DVD. Clicking on the object in Encore or Premiere allows you to edit the original composition. For more complex animations and renders, this way of working might actually be a drawback as you wait for renders to complete inside Premiere. You can always go back to the old school way of working which is rendering out movies from After Effects.
Behind the scenes, the various Adobe applications share the same memory area and its handled dynamically by the apps. What this means, in addition to better handling of memory, is if you do a RAM preview of your composition in After Effects these rendered frames become automatically available from within Premiere or Encore DVD. So if you’re switching back and forth between the apps you won’t destroy imagery which is already rendered into RAM. The various apps are also beginning to share some of the same code between them (viewers and file browsers), which is useful from an engineering perspective, but also provides a common experience for the end user.
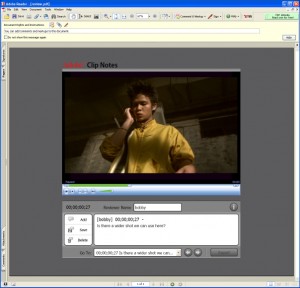
One very interesting feature in Premiere Pro is called Adobe Clip Notes. It’s one of the more interesting client review features I’ve seen, since it uses Acrobat reader to facilitate the exchange of information. How does it work?
First, the editor exports a Clip Notes PDF file from a Premiere Pro timeline. If the timeline contains comment markers, these are included in the resulting PDF file along with the QuickTime or AVI movie. In the UI for creating this PDF, the editor includes his/her email address as well as any comments for the client. This file is then emailed to the client.
When the recipient opens up the PDF (see image to the left), they can actually scroll through the clip and enter comments. Timecode values are automatically kept track of along with the comments, providing easy trackback. When the client is done, they click on the export button and a small metadata file is created and attached to an email back to the editor. All the editor has to do is import the file into Premiere Pro and all the client comments appear as markers in the timeline. Its quite slick, and I like the fact that the file created — Acrobat PDF — is easily accessible to clients.
Other Features, Improvements, and Conclusion
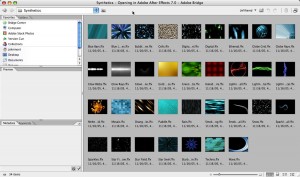
AE7 includes tight integration with Adobe Bridge. This is how browsing presets and templates is now handled in the software. Hundreds of new presets and templates have been included in the software, quite possibly in response to all the presets included in Apple’s Motion product. There are project templates, backgrounds, glows and flares, behaviors, transitions, and synthetics (shown to right) to name a few. As noted in our fxpodcast, these actually provide a great opportunity to learn new tricks with the software. Maybe I’ll actually start using Bridge for a change.
There is a new lens blur effect which aims to mimic the properties of physical cameras. Its great to have the filter automatically included in After Effects, though there are several third party tools available as well.
User preferences now include Auto Save settings. You can set the save interval as well as the number of files to save. I’ve had a couple of hangs in the new software (I’m not sure its caused by After Effects or something with my system), so its nice to have your work saved automatically in the background as a backup. I’m a big fan of auto save.
You can save an After Effects project as an Adobe Premiere Pro project (Windows Only). This transfers over folders as bins, individual edits, markers, keyframed effects, nested sequences and more.
You can create scripts in After Effects 7.0 directly within the application (Pro Only) as opposed to having to use an external text editor. Scripts for AE are written in javascript and provide the ability to control almost every aspect of the application. They can be used for automating imports, renders, sorting layers, and more. There are several example scripts which ship along with the software.
All in all, this release of After Effects provides a ton of workflow improvements as well as some nice — but not overwhelming — creative changes. I’m actually of the opinion that it is good for a software app to go through a release cycle where workflow issues are addressed and not simply packed with a ton of new creative features. It’s way to common to see software add more and more stuff without fixing things which would make working with it much more pleasurable. In this manner, Adobe has definitely succeeded.
We’ll be taking another look at AE7 in the coming weeks. Our fxpodcast will examine the new 32-bit workflow in AE7 from the ground up, allowing you to hit the ground running with a correctly configured setup. Then all you’ll need to worry about is creating beautiful imagery — and isn’t that the point in the end?
