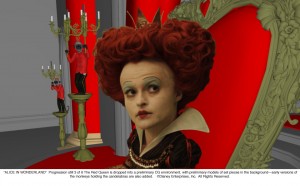
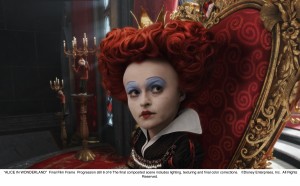
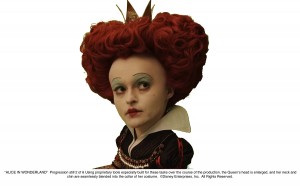
Tim Burton’s re-imagining of Alice in Wonderland features a cast of real and digital characters, plus some that are in-between. One such character is the Red Queen (Helena Bonham Carter) who appears on screen with an enormous and imposing head care of visual effects by Sony Pictures Imageworks. In this interview we focus on the Red Queen shots by talking to Carey Villegas, one of Imageworks’ visual effects supervisors on the film.
fxg: How did the Red Queen’s character come to have such a large head?
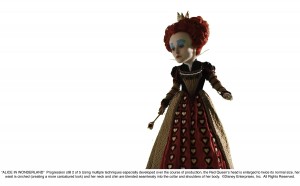
Villegas: Well, Tim Burton’s an artist himself, so he was always sketching designs for the characters. His style was to draw them with really large heads and eyes. So we wanted to incorporate his drawing style into the actors playing these characters. For the Red Queen, we really wanted to give her this caricatured feel – this enlarged head and a really tiny cinched in waist.
fxg: Can you talk about the early planning stages for accomplishing the Red Queen’s look?
Villegas: The first thing was – how were we going to shoot the character and translate this to the digital world? To increase the head size, we knew we couldn’t blow-up photography too much. There’s a limit to how much you can do this without losing quality, especially the kind of quality we needed in a high end feature film like this. We knew we wanted to shoot digital because we were going to use a real-time tracking and playback system on set.
We actually keyed the characters from the greenscreen onto a real pre-built background environment. So we had to use a high-resolution camera approach to shooting the Red Queen. There was also other scaling that had to be done throughout the movie for the Alice character. She spends a great deal of the movie being eight and a half feet tall, which was almost a 60 per cent blow-up. And for the Red Queen, we thought we’d have to make her head at least twice the normal size.
What we decided to do was go with a 4K camera, and after working with the DP, Dariusz Wolski, for a number of weeks and months, we opted for the Dalsa Evolution camera. It’s a prototype camera. Dalsa has another camera – the Origin – which is a huge camera, two and a half times bigger than a normal camera. But the Evolution is much smaller and offered us some real options. Still, it’s about 75 per cent bigger than a normal camera. We also knew that because there were only two of the Evolutions in existence that we couldn’t rely on just them to shoot the whole movie, so we opted also for the Panavision Genesis for a good portion of the film as well. So we had the Genesis, which has a 1920 x 1080 resolution with a 1:78:1 aspect ratio. And we had the Evolution 4K camera which is 4096 x 2048 with a 2:1 aspect ratio.
To view the green screen originals at 4K, you can download a .zip archive of hires JPEG images for viewing offline.
We knew we needed to bring these two resolutions together into one world, in quite a few different ways. One of those ways was just matching colour. The Dalsa camera has a very different way of capturing colour compared to the Genesis. And more importantly, for the size of the Red Queen’s head, we had to come up with a resolution fix to make those two cameras work. What I ended up coming up with was a pseudo HD resolution for the Dalsa.
We would shoot the Red Queen with the Dalsa in 4K and then we would re-size the plate all the way down to this pseudo rez which was 2160 x 1080. Essentially, we moved it down to what would be a centre extraction from the Panavision Genesis camera. So for the Red Queen we would scale down the whole plate – her body and her head and everything – and we would also have the non-scaled down version and we would re-attach her head from the non-scaled version back onto the scaled-down version. Effectively, we got a 90 per cent blow-up from that mix without doing a blow-up at all.
fxg: How did you then shoot the sequences on the greenscreen sets?
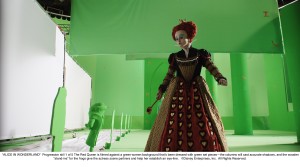
Villegas: In this case, it was probably the trickiest on-set greenscreen experience I’ve ever had to photograph. Essentially we had all these characters that had to be in the same scene at the same time. Alice performed a lot of those scenes with the Red Queen. In order to get them to perform the scene it was important to get the eyelines correct. We knew we could work out other stuff in post. We would have these platforms on set that would bring Alice up to her eight feet in height, or we would lower the Red Queen. There’s also a character they had to interact with called Stayne, the Knave of Hearts, who is a seven and a half foot tall character. So sometimes the actors would be on platforms, sometimes they’d be on stilts – whatever worked for the shot.
The other hard aspect of shooting on a greenscreen stage – usually when you’re doing that it’s just for a couple of shots, but here we had entire sequences being done this way. There was very small number of set pieces built. So we would try and give the actors something to perform with at all times – even if it was just a greenscreen or a green painted cloth- something they could sit on or step on. You name it, we had it! Every conceivable kind of the prop in the movie; painted green.
We also had to come up with an environment solution. The nice thing in terms of production design was that we built a lot of the environments, or at least a proxy of the environments, in Maya prior to the shoot. So what that allowed us to do was to have two monitors on set. One with the actor over the green background and one where you could see the actor roughly composited over the environment. They were crude representations of what the set would ultimately become, but at least they could be used as something to lock onto. We had to do real-time keyeing and also if the camera is moving you have to track the camera and represent that in virtual space. So we had systems in place to do that sort of work.
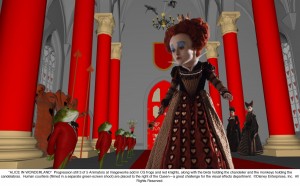
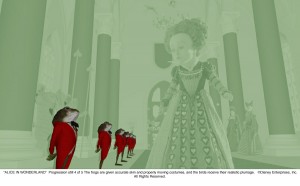
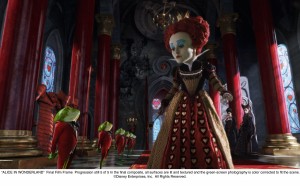
fxg: What were the tools and techniques you used to enlarge the Red Queen’s head?
Villegas: Initially, it was hard for Tim Burton to pinpoint how big the Red Queen’s head would be, and how small her waist would be. It was important for him, because some of the other characters weren’t normal size. You had this seven and a half foot tall man, an all-real head and computer-generated body. Tim wanted that character to be slender and thin. Then Alice would be eight feet tall at times, and two feet tall at others. It was very important when all the characters were in a scene together that, proportionally, they would fit. That’s why it was hard to make concrete decisions on things, because it was varied every time. So we had to come up with tools that were really interactive and would get as much visual information in front of Tim as quickly as possible, so he could make some aesthetic decisions.
For the Red Queen and Alice, I developed some plug-ins for Nuke. Normally, this would typically be Flame sort of work, but it can be very expensive using them and you can be limited as to the number of artists who can work on shots. To start with, we would do a track on her neck and collar. We would try and get a piece of her clothing, just below her neckline and do a one point track. Then we’d do a really rough garbage matte over her head. We took the 4K material and down-rez’d to a particular size. Then we had to re-attach her head with the 4K material, the 1:1 material, back onto the reduced resolution material.
So with our tools, we would track her head, do the garbage matte and then set how big her head should be by typing in a percentage. So, we’d blow-up her head say 185 per cent, and that would be typed in to the Nuke plug-in. And then if we or Tim thought it needed to be bigger or smaller, we could just change the percentage and it would work. That was just for crudely getting her head on her neck, but it really helped because we probably did hundreds and hundreds of iterations for these shots and early on at the beginning we didn’t quite know how big the head should be.
Likewise for Alice, we used the same type of principle. Instead of typing in a percentage you would type in her height. So we’d put in say ‘eight foot six’ and it would automatically take the 4K, reduce it and scale it behind the scenes. Then it came to the point where all the size decisions had been bought off on and we would have to finesse it. We would take the Queen’s neck and have to fit it back on her shoulders. We worked very closely with Colleen Atwood, the costume designer, to come up with a collar that would allow our post-production work to be a little easier.
At the end of the day, we had some really talented Imageworks artists who were able to integrate the neck work. It was probably close to 500 shots just with the Red Queen alone. We also had to warp her neck to put it back into place. If the Queen stood on profile, it became at some points a situation where the neck was wider than the person, and we’d have to try and squeeze all that back in, so when she would turn we had to do a lot of spline and mesh warping to make it work. We did that both in Nuke and in Flame.
fxg: Apart from the virtual environments, how were some of the other characters in those scenes accomplished?
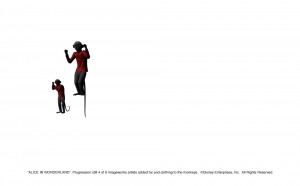
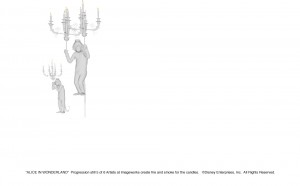
Villegas: We knew we’d have these CG characters that the actors had to interact with. So on set we would have people dressed in green leotard suits. Also, early on we were going to create all the characters in the computer, but we ended up supplementing them with live action characters. We went back and photographed a lot of the secondary characters. Those characters had to interact with some of the principal characters. So any time you’re watching the movie and you see the Red Queen and Mad Hatter and other characters behind them or even interacting with them, they’re not really there at the time we shot the Queen. So we had that added challenge of combining different plates, and not using motion control to do it.
fxg: What were some of the 3D and stereo considerations?
Villegas: That was a huge part of it. We knew right from the beginning it would be a stereo film. At one point we were going to shoot with 3D cameras, two cameras for the right and left eyes. We ended up not doing this for a few reasons. The number one reason was all the scaling we had to do which meant we’d be using the high-resolution camera. I don’t think even today there are any real 4K cameras like the Dalsa available for 3D photography. Even if we could have got a rig together in time, we only had two of these prototype cameras. Also, if we were doing a movie which was mostly live action with a few CG characters, it would have made sense for us to shoot stereo, but because most of our environments were computer generated to begin with and we were taking components and putting them into the plate, it made a lot more sense for us to dimensionalize it in post.
So once we made that decision, it was important for us to capture as much 3D depth information as possible on set. It was also important for us to work out where our characters were standing and how they were interacting in the scene. Especially in the case of a live action character interacting with a CG one – we really wanted to have a lot of depth information so we could put the 3D character in the right spot. So we had a lot of reference cameras – Sony 950s – all around the set. That gave us a good way to help triangulate and work out where everyone was in space.
If you’re creating stereo in post, there’s usually two routes you can take. The first one is rotomation, which is what we mostly used. You take the greenscreen photography, do a match move of it to have an accurate representation of how the camera was moving and then you go in frame by frame with a model of that character and try to mimic how the camera’s moving in the scene. Then you take that photography and re-project it onto the model and apply another camera to the scene to give you the second eye.
The second technique we used is based on displacement-type maps where you are rotoscoping only to define the character’s extremities, say an arm, and you roto that and then displace it. So you’re doing it more visually instead of using depth information. This technique I think is good if you don’t have any of the depth information from the set.
fxg: There’s a real hybrid approach apparent in the film. Can you talk about the visual effects philosophy going into it?
Villegas: We always knew we were going to have a combination of live-action characters and computer-generated ones. One of the biggest challenges for us was trying to bridge the gap between those two entities. It was important to Tim Burton that we didn’t have a bunch of real characters just running around in this virtual environment – they had to be integrated into it. Tim wanted to take the animated characters and make them a little more photographic and life-like. He also wanted to take the live-action characters and fit them into this caricatured world.
On a side note:
Mia Wasikowska who stars in Alice, was previously lead actress in the I Love Sarah Jane – a short film produced by our sister company fxphd, which went to to Sundance and was the basis of several courses at fxphd.
(NB: working title was Last Caress, Dir: Spencer Susser)
Copyright 2009 fxphd, Pty. Ltd.

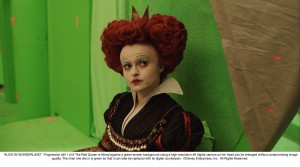
Can’t download the 4k files
good day
I would like to know is there a way I could create the red queens head for myself, we have a party and I would really want to look the whole part. so it must be a DIY head. Do you have any ideas?? please
hi!
I recently did a tutorial exactly on this thopic, the big head of the queen.
I was heavily inspired by this article here!!
So, thanks a lot for the creative input!
If you want to check it out pease watch it here:
https://vimeo.com/40754961