Alien Covenant on Land and Air…
In Alien Covenant, the crew of the colony ship Covenant, bound for a remote planet on the far side of the galaxy, takes an ill fated detour to what they think is an uncharted potential colony site. In reality this works out to be a very very bad move. In the ‘air’ the Covenant was mainly provided by Framestore, (along with some chest splitting alien effects). On the ground MPC provided a large amount of the visual effects nightmare in Ridley Scott’s latest Alien film. Covenant picks up the story about ten years after Prometheus, and things have not gone well for Elizabeth Shaw, thanks in large measure to David’s rather dark private god complex.
On Land : MPC
MPC was the largest vendor on the film, working on around 700 shots – of which 650 made the final edit. MPC’s work closely related to principal photography, with MPC adding elements and aliens to the action plates. In the film there are also a lot of full CG shots, about 60 shots in total are fully CGI. Ferran Domenech was the Visual effects supervisor for MPC. Most of the work was done at MPC Montreal, with about a 100 shots done in London, mainly environment work, along with the shocking “shower scene”, and some other flashback work.
The film’s overall visual effects supervisor was Charley Henley (Gladiator (2000), Prometheus (2012), The Jungle Book (2016)). David Bowman was the Dfx Supervisor for MPC and he also oversaw the on-set visual effects for MPC working with Domenech. The film was shot by Cinematographer Dariusz Wolski (Pirates of the Caribbean: The Curse of the Black Pearl (2003), The Martian (2015)).

The range of the work was varied from the CG Aliens to the full CG city and mountain environment of the 250,000 dead engineers and vast amounts of effects work.
Neomorph
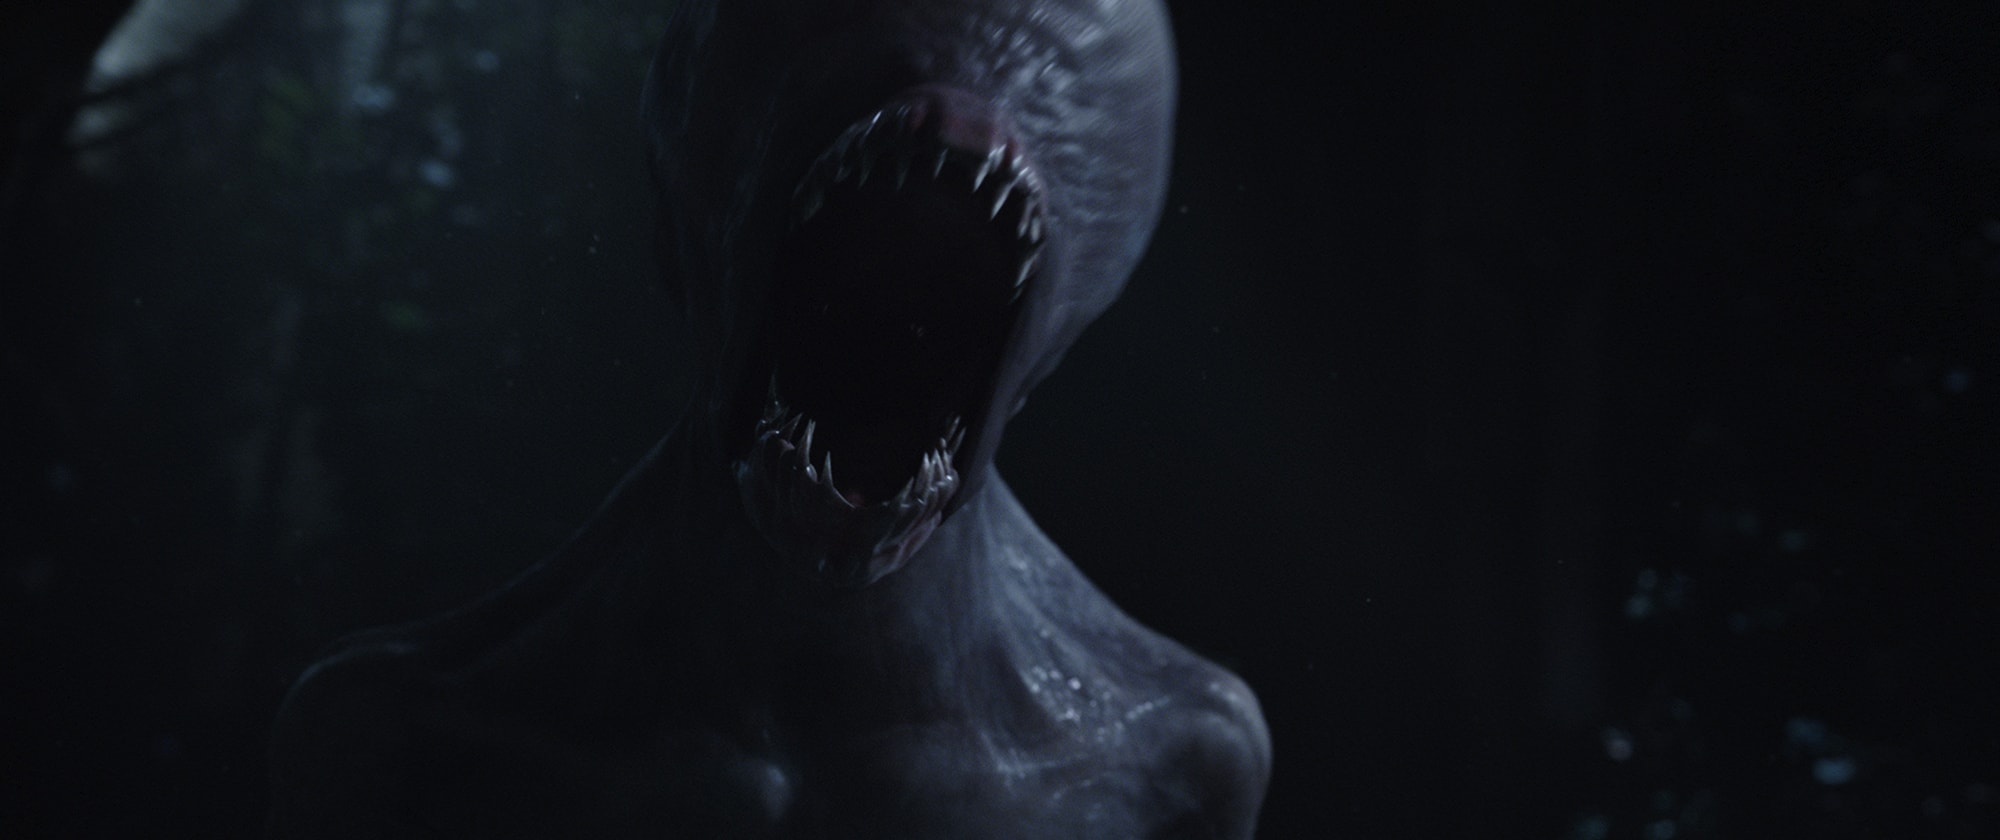
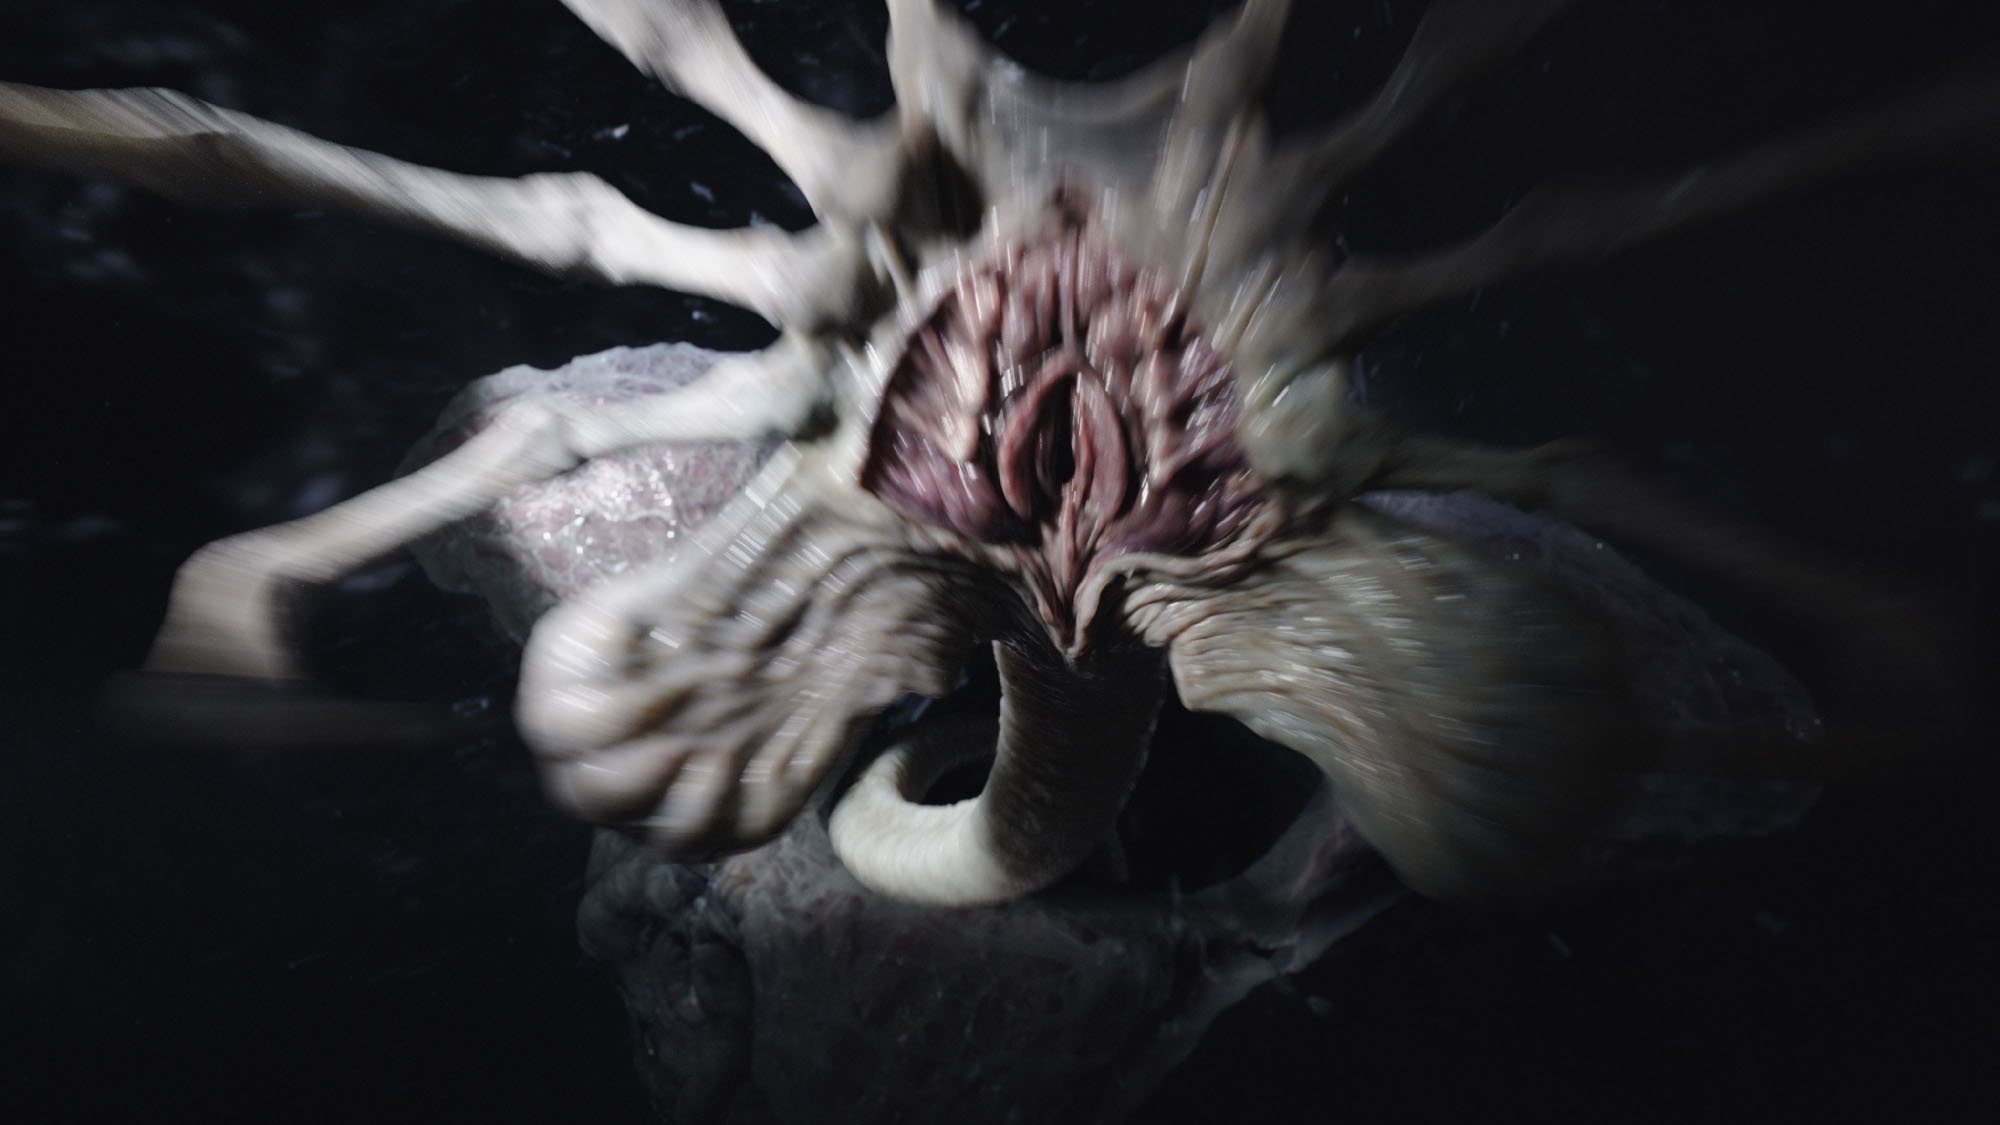
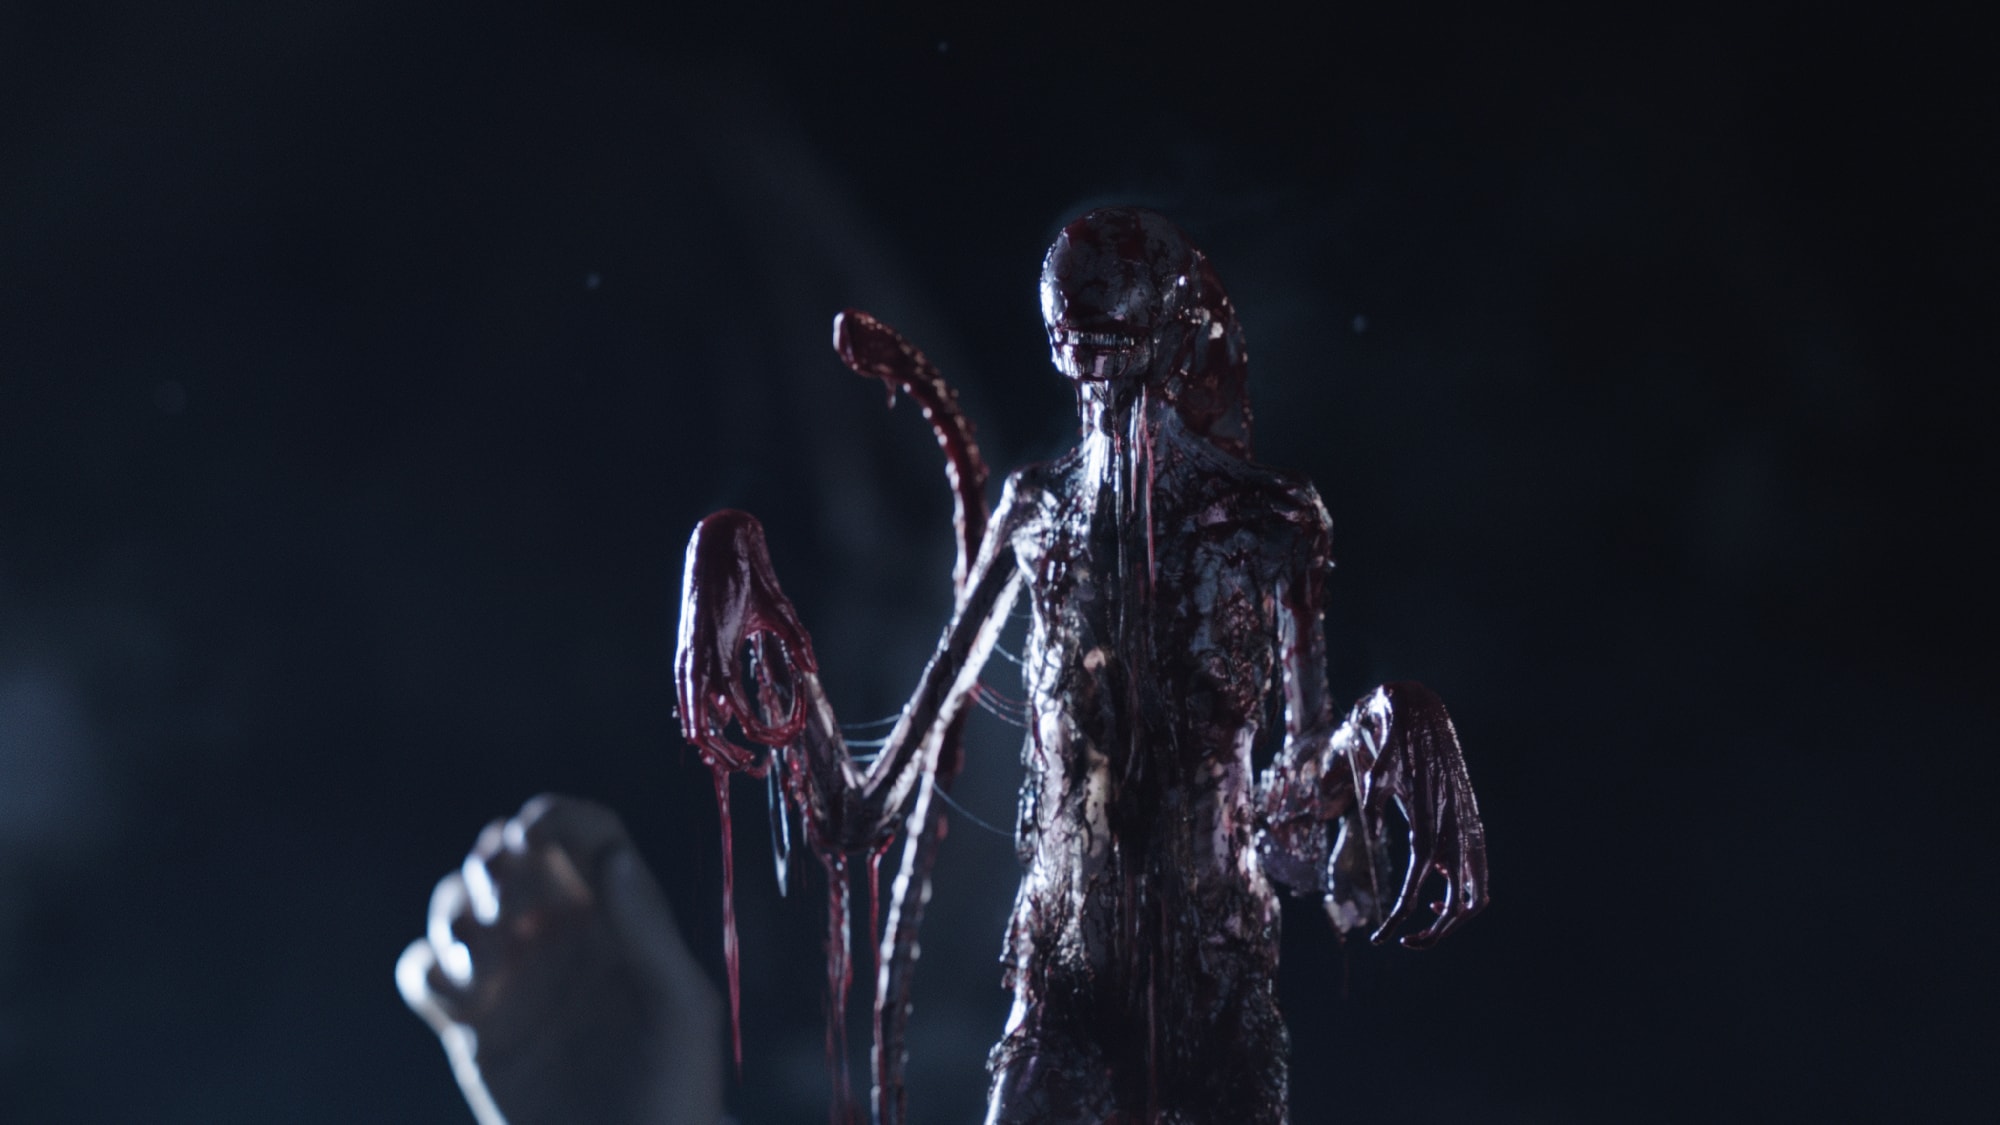
Alien: Covenant also introduces a new species in the Alien universe, the Neomorph. With early concepts and references from a goblin shark for its extendible jaw and skin quality, the assets team was focused on the emaciated model and pale skin shader to bring this new creature to life. The concept came from the art department, they had come up with a pale or white skinned concept that Scott really liked. “The skin was even slightly bagging in places, unlike the ’79 Xenomorph”, explains Domenech. For both characters bones, muscles and skin were created to give them a realistic feel when they move, but also how they react to light. “The birth of the Neomorph was also a challenge. It has four stages of life; baby, toddler, teen and adult. We needed to be able to blend and transform each stage from one to another to show its fast growth”.
MPC played with the translucency and the veins, like the Goblin Shark while making sure it felt like it shared DNA with the Xenomorph. An actual Goblin shark has distinctive eyes, the Neomorph does not but it does “have a small amount of protrusion, a bit like an eye socket – but very subtle. We had an animation control on it so we could move it slightly, to give the Neomorph the sense of a vestigial or remnant of his eyes. But you would almost need to know it is there, the texture is ever so slightly darker so when we animated it , it felt like a sensory organ”.
reference


Xenomorph
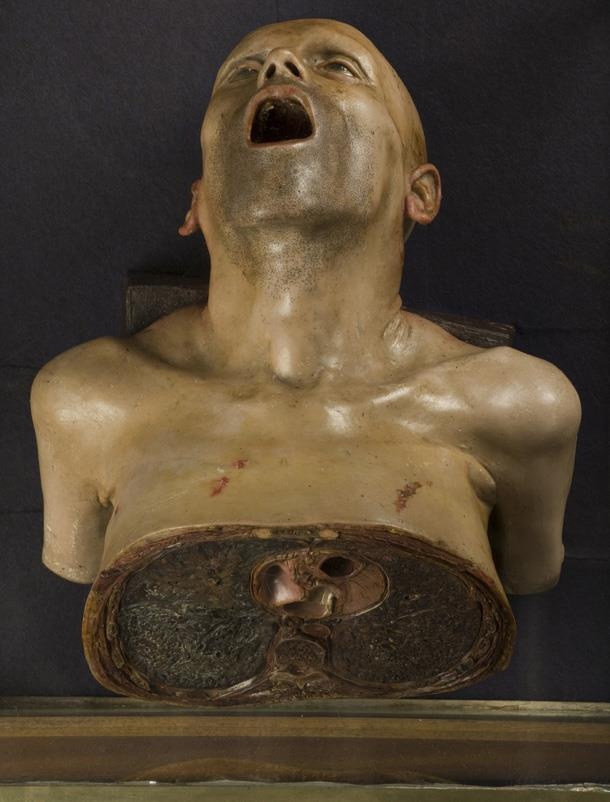
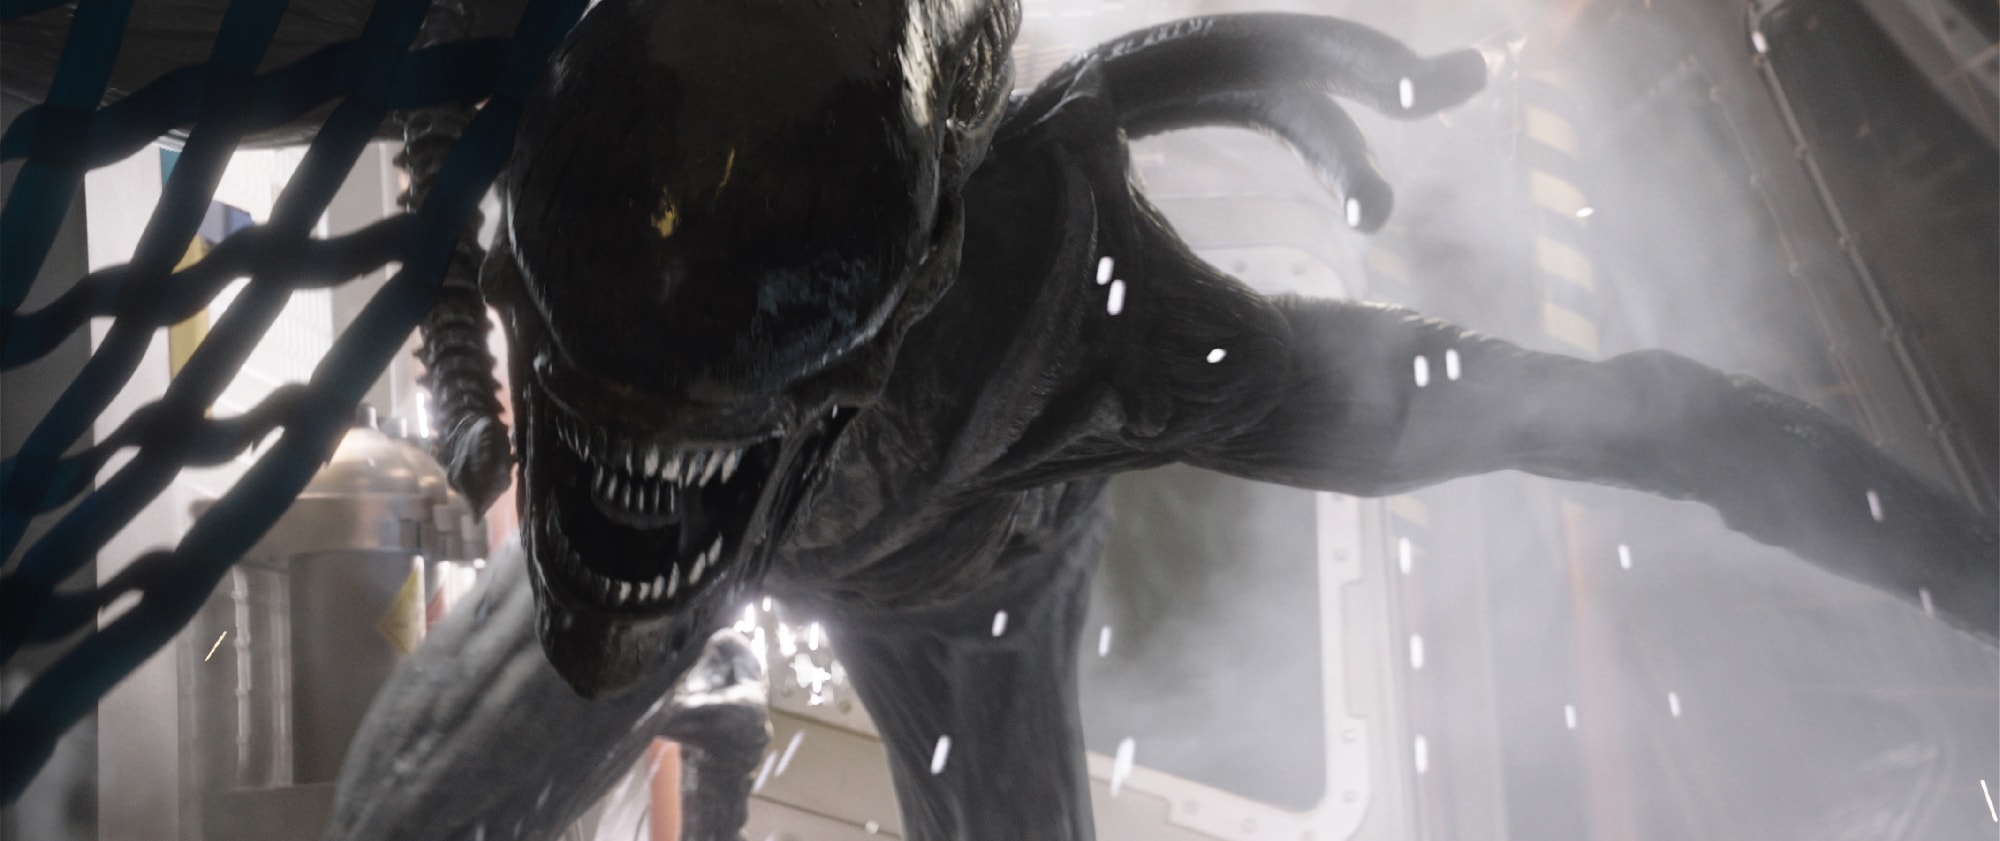
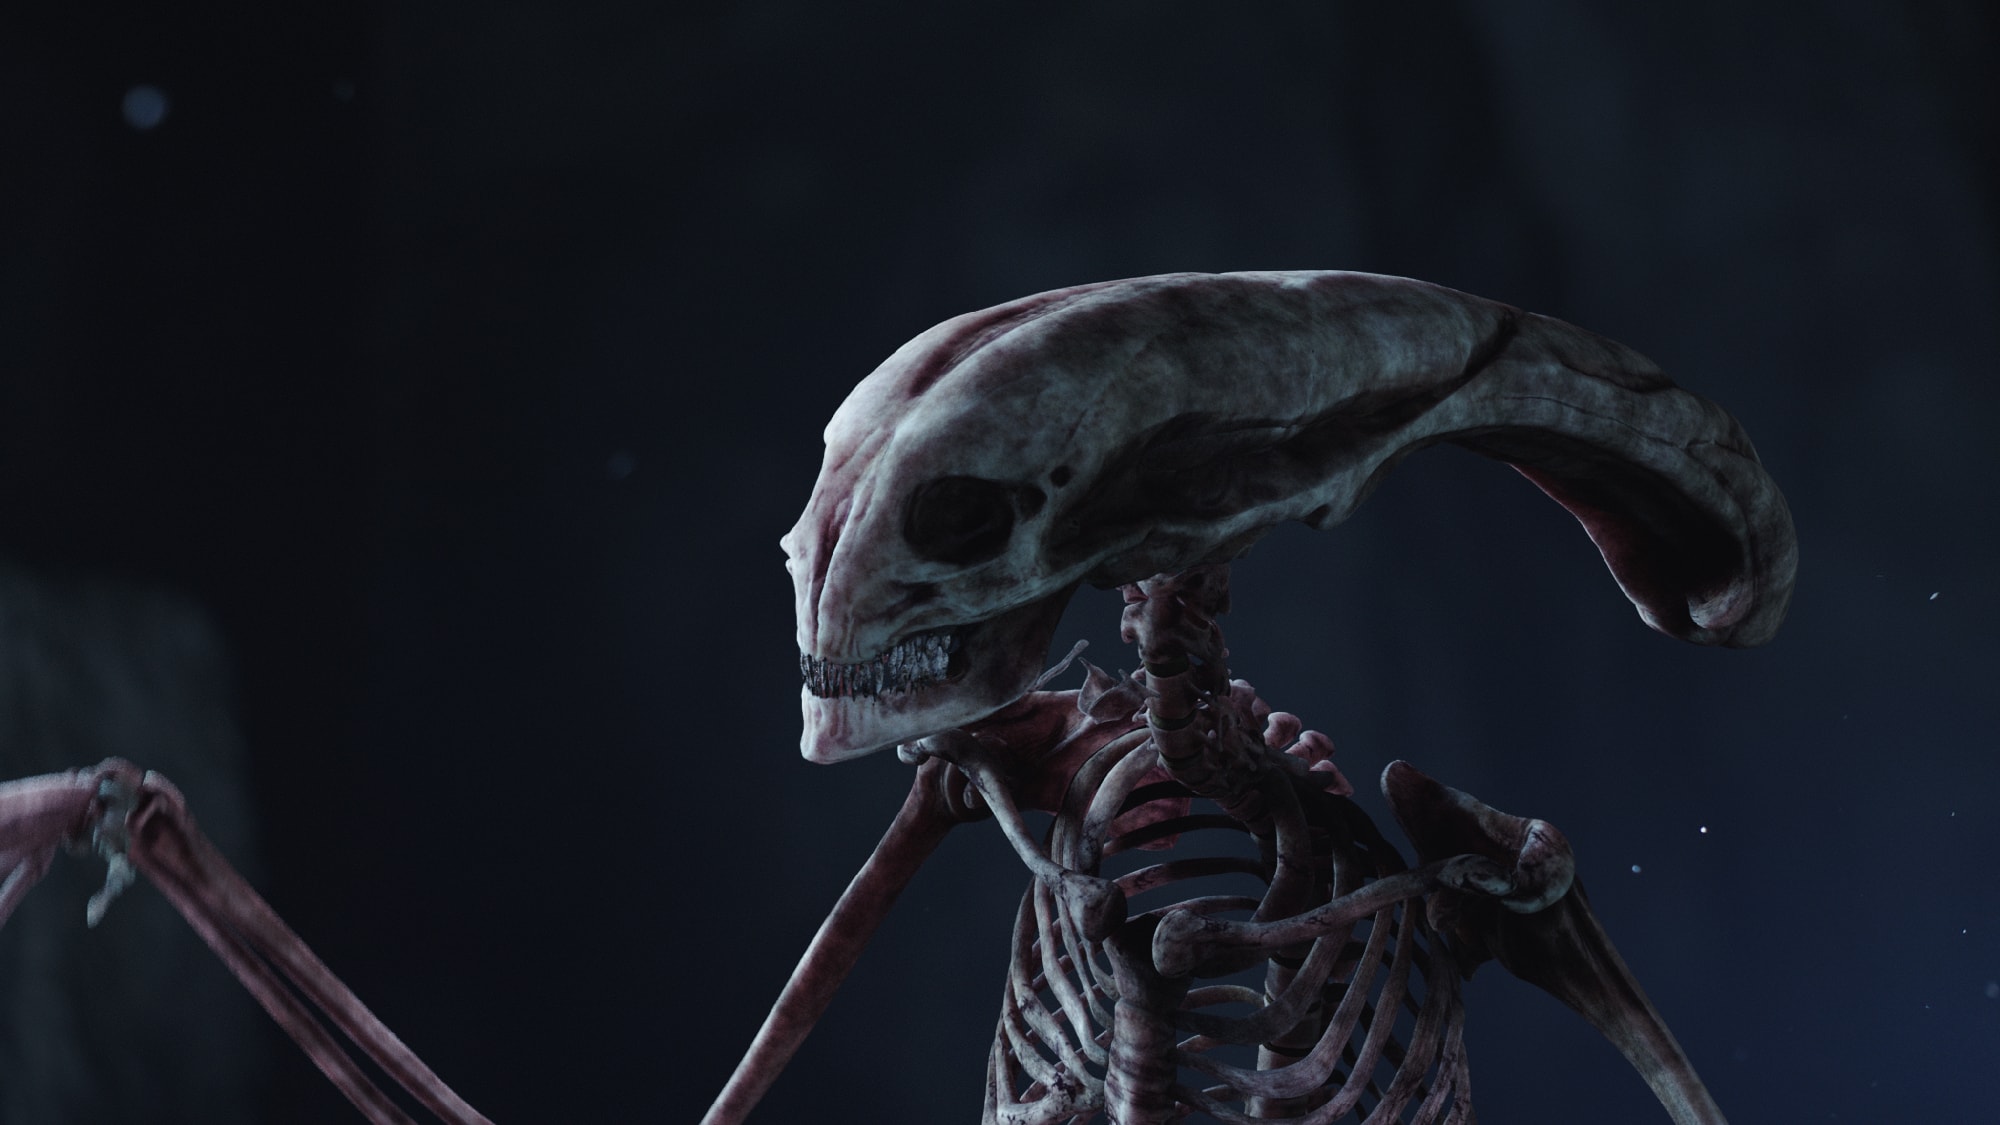
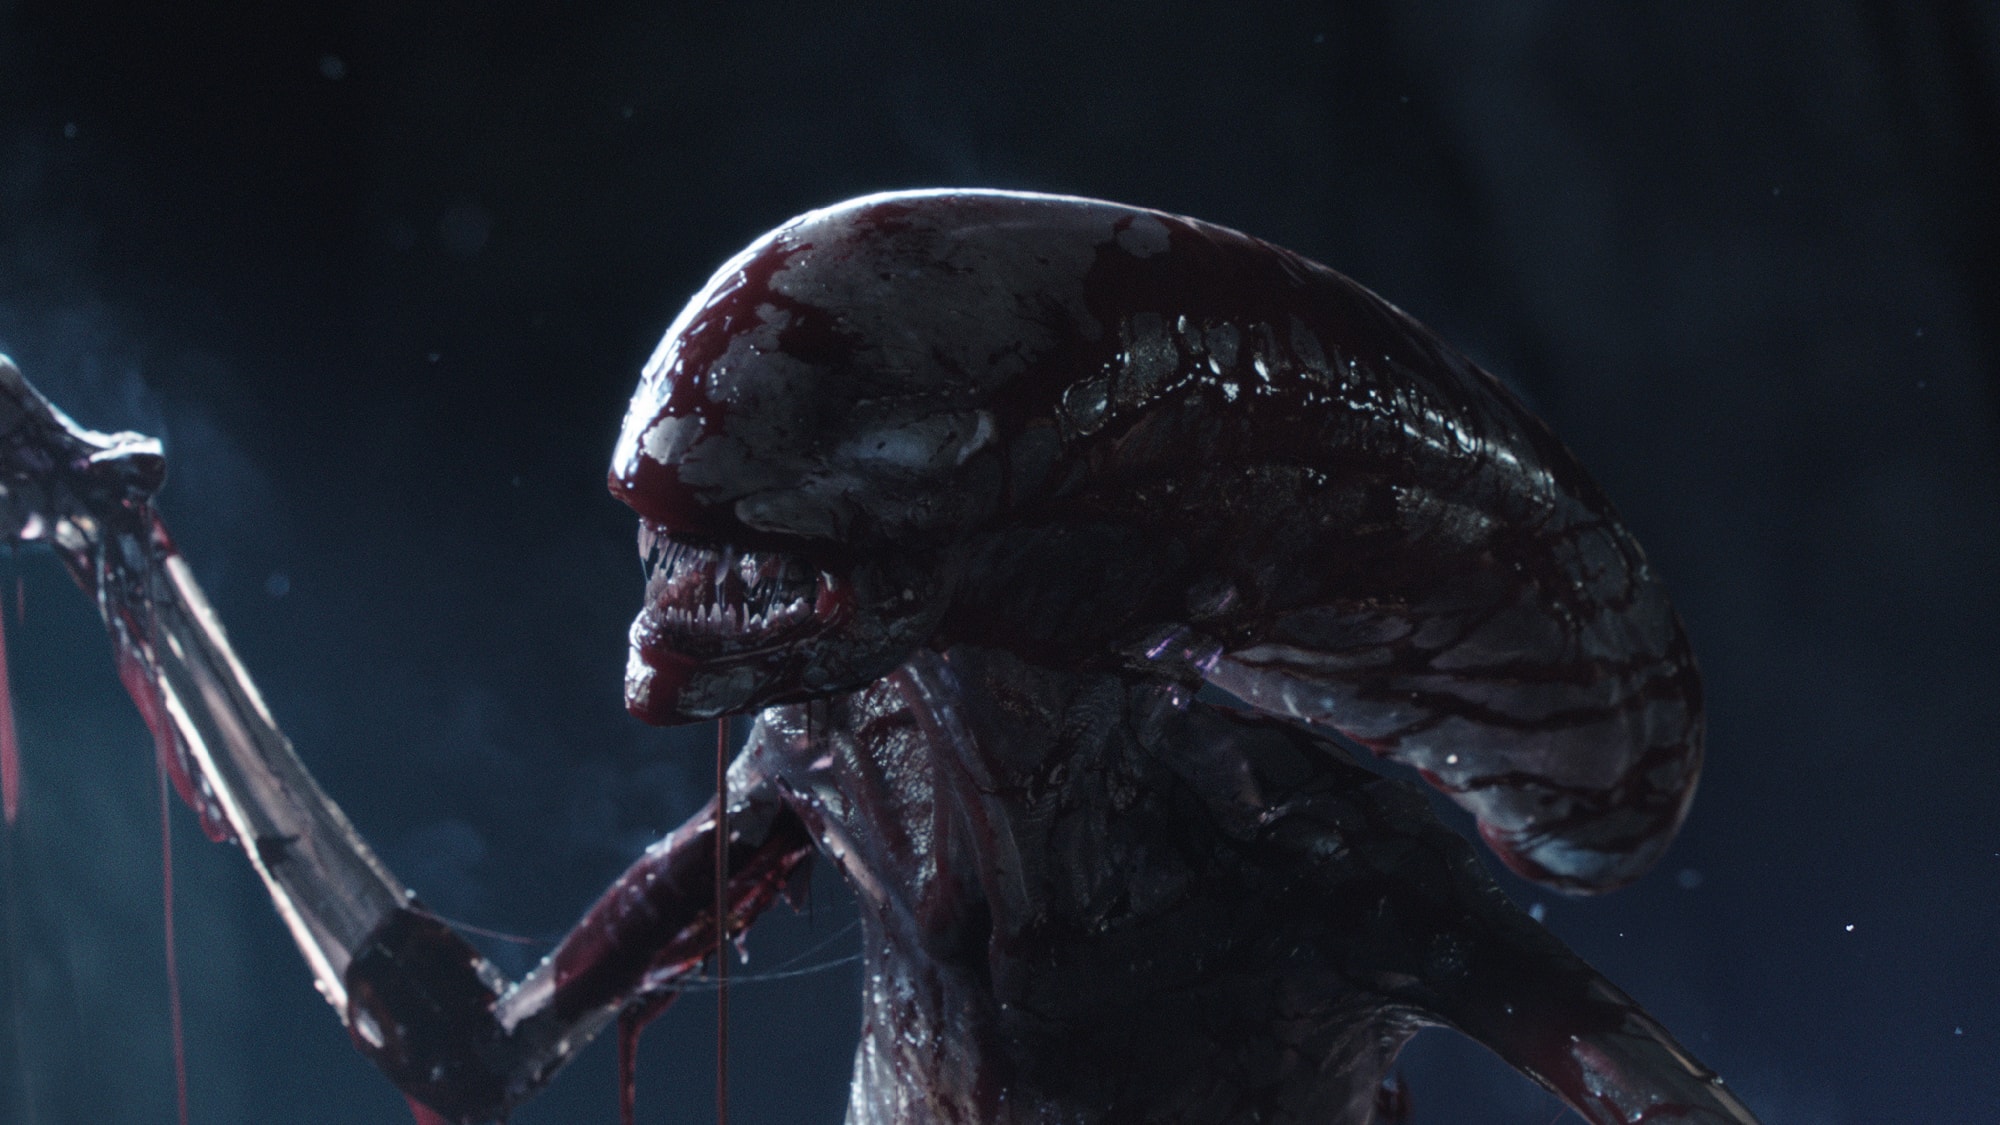
One of the biggest challenges for the assets team was to bring to life the character we already know, the Xenomorph from the original Alien 1979 classic. Domenech and the team met the Director in London early on and he outlined what he wanted. The aim was to retain the characteristics of the ’79 creature, but Ridley Scott wanted to move away from the rigid “puppet” from that original movie. “He said clearly – that is the creature. We then watched section of the film with him, and we talked about things he liked in terms of motion, and small details on the lips. He aso showed us new reference that he wanted to add”, recalls Domenech. One such reference were antique anatomical wax models from La Specola in the Museum of Natural History in Florence, “He really liked this wax sculpture, it is quite natural looking, .. to be used for medical students, it looks like a human .. and he really liked that and we wanted to introduce aspects of this into Giger’s design”.
The Xenomorph needed to not feel like a guy in a suit any more, “it needed to have its different non human proportions and its own physical signature” Domenech explains. The production built a practical Xenomorph to film on set. MPC’s Xenomorph was pushed to be faithful to the designs from for H.R. Giger, while being more waxy in appearance and jointed with limbs that a man in a suit could not do.
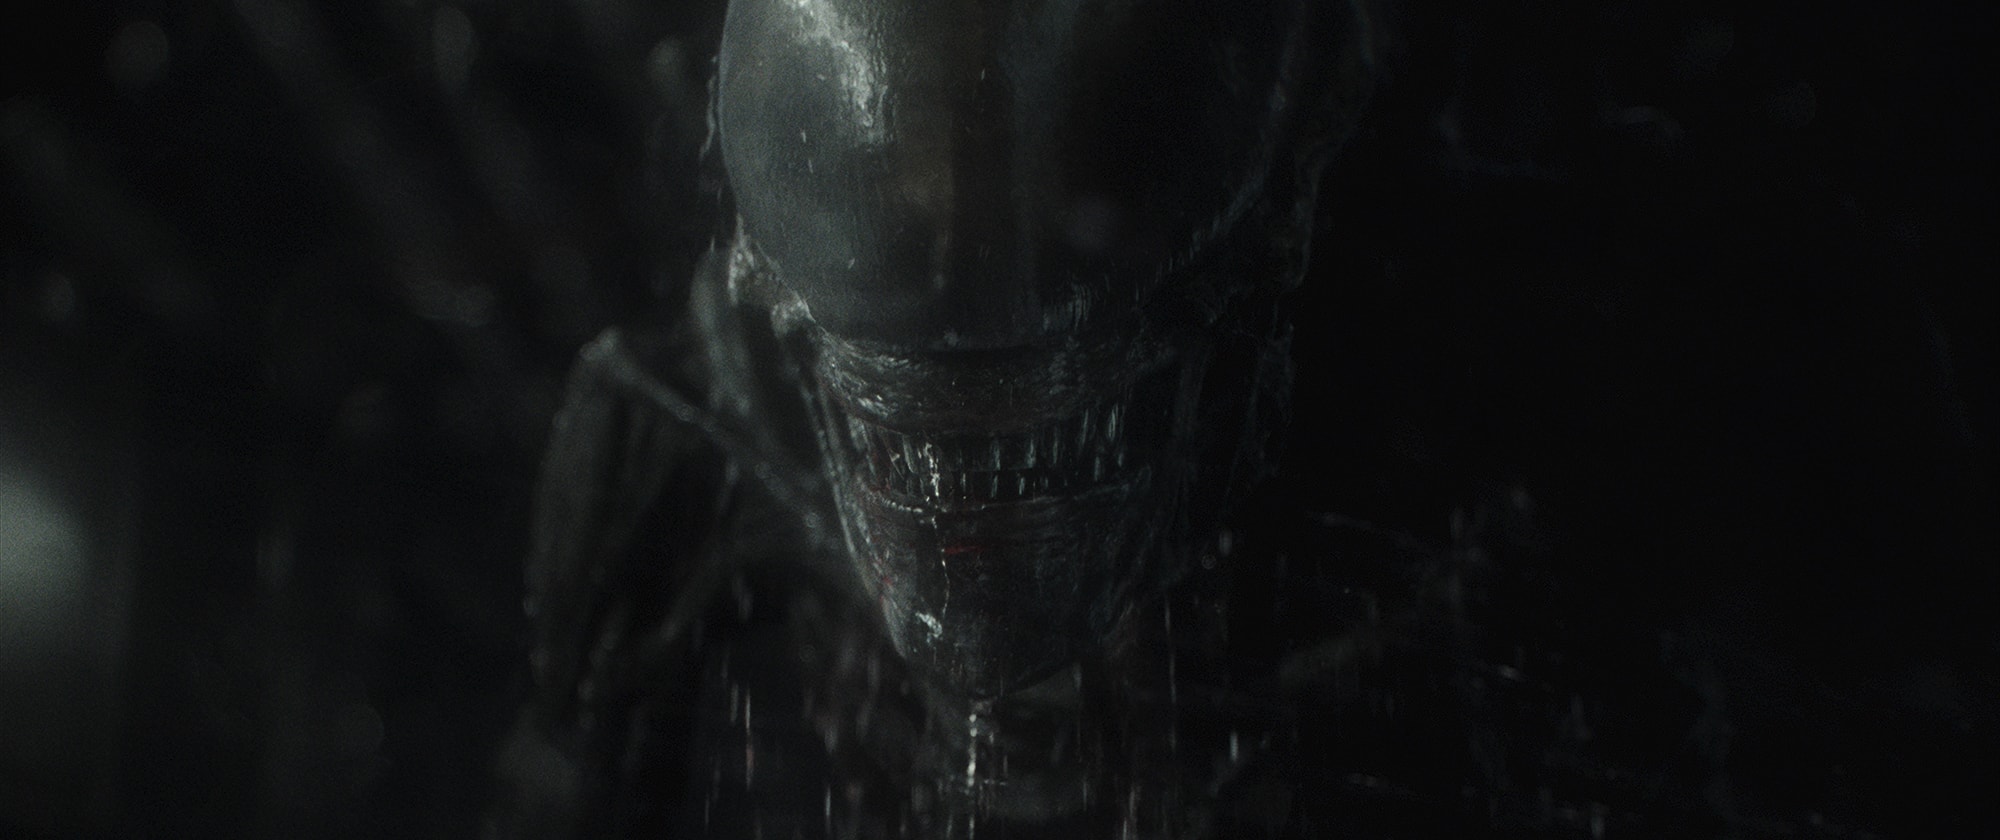 The MPC’s Alien has a thin skin, like a facia which is thinly over the alien’s muscles. ”
A lot of effort was put into this aspect of the creature, while working on the details that we all know about, always referring back to the original work and designs from for H.R. Giger. “The alien has a thin skin that covers everything, and it thins out when it covers elbows and ribs, where the texture of the bone has to come through. That thin layer is deliberate so you can see the sliding of material under the skin” explains Domenech. “There is also a sort of patchy wetness on top of that thin skin, and so when the alien moves you can see the flexing of the muscles”.
Animation
To develop the language of movement of the Xenomorph and Neomorph, MPC’s animators used various animal and insect references that were researched in pre-production, and others references suggested by the client. The Xenomorph creature is more of a hunter predator, with its more deliberate forward place and more stereo eye pair/sockets and the Neomorph being almost more sensory. The teams therefore crafted slightly different movements and poses for each.
The Xenomorph as the weaponised version of the two creatures comes across as colder and more insect like. “It is economic in its motion and only moving when needed, switching from predatory and contained, – to blinding burst of speed and ferocity in an instant” he explains. At two and a half meters tall, the Xenomorph moves like great cats and other fast but heavy mammals; switching between greyhound when at full speed, tiger when leaping and running, and ape when cantering. When stationary, observing and studying its prey, animators used bird and insect references as those were integrated into the accents of his head and upper body motion. “Praying mantis” with its clicking fast motion, and birds like the “Shoebill” with their stabilised head motion and otherworldly movements were matched carefully to ground the motions of the Xenomorph in reality. The original 1979 Alien film was also greatly referenced and studied for the more subtle details from the facial performance, its inner mouth and slow opening and quivering of its lips.
One particularly interesting reference was video of an actual tiger jumping at tourist on an elephant. The clip seen below on Youtube, shows such power and predatory explosive speed it served as a great reference for the Xenomorph attacking.
The audience knows from the flashback the virus kills everything instantly, and what does not get killed instantly – then the spores lie in wait for anyone to step on them and then the Neomorph’s come out of you and finish the job…killing anything still alive. In this film, the Xenomorph’s are presented basically as a weapon designed to perhaps clean up a planet of life. That Weapon was created by the Engineers, the audience assumes. The Xenomorph by contrast is from David tinkering over ten years. The film presents David as having taken the neomorph DNA, Shaw’s body, maybe any engineers left alive and used them as studies. Domenech and their team have their own well developed theories on what happened and when in the Alien timeline, (and they are not revealing them). MPC’s Supervisor is quick to point out that they have their private interpretation of the script, but for whatever is possibly revealed in any future scripts to be true it is important for animators and supervisors to consider a strong backstory to get good consistent character performances.
With this mental framework the team made the Neomorph more ‘slidish’ and very much influenced by the studied, contorted and extreme motion studies by actor Javier Botet. The Neomorph is derived from the references that they were provided by Ridley Scott and Botet motion studies commissioned for the film by production. Domenech explains how valuable it was to have filmed Botet. “He is just a very good performer, he did all this fast breathing, motion studies, – with a hood on his head. He did these double jointed finger movements and we took those directly as inspiration, for the scene in the Cathedral where one of the crew is decapitated. He (the Neomorph) was nervous, compared to the heavier, bigger and more confident Xenomorph who would just stay in the room with you confidently – in the spirit of the 1979 Alien”.
Having a strong back story combine with strong references is how Domenech likes to work. Once the animators have such a strong framework it is much easier for them to find consistently find for example, the odd motions of the Neo’s hands and stomach or the way the creature moves. Animators like actors seek direction not individual character pose instructions. The team benefits when everyone has a clear idea of backstory and great reference to discuss.
Another key reference was the work of Alesandro Babari’s meta-chaos short film METACHAOS and key-framed poses provided by the production’s concept artists of some of the more extreme key poses.
Both Alien characters were realised as fully key-framed creatures by the animation team and not motion captured. “Though many motion capture sessions and studies were used to test the monsters, the subtlety and personality of the two characters required repeated revision. Therefore, key-frame animation and references became the go-to approach to achieve the director’s vision and final animation” comments Domenech.
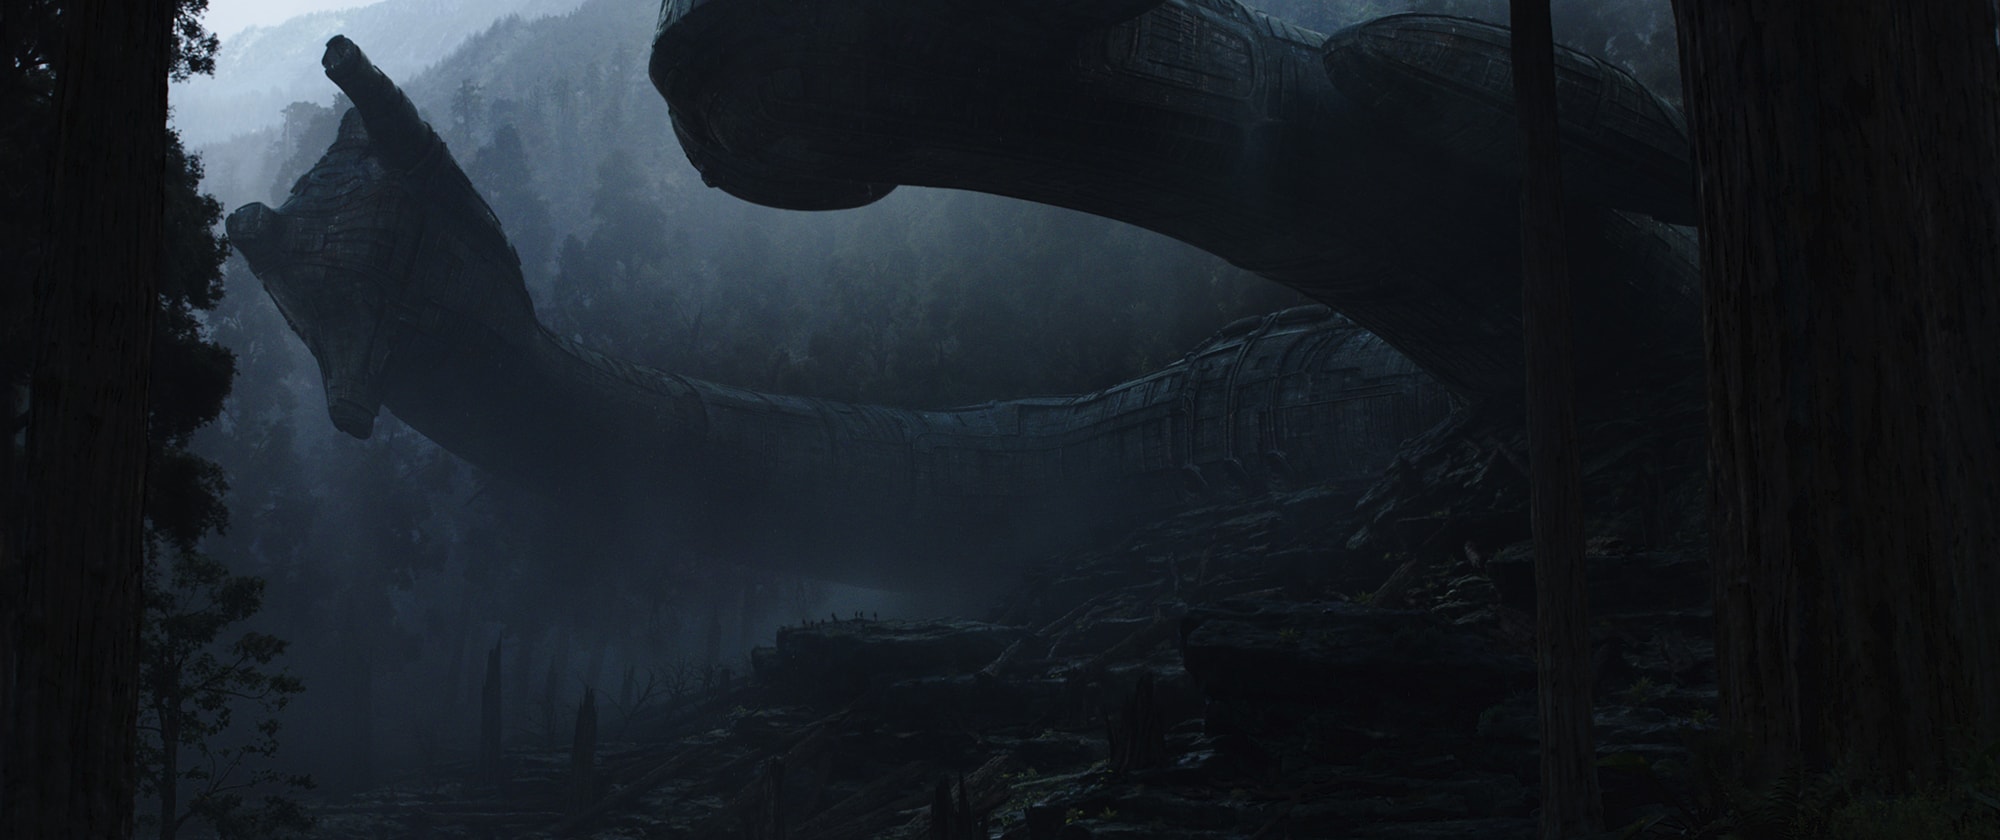
Environments
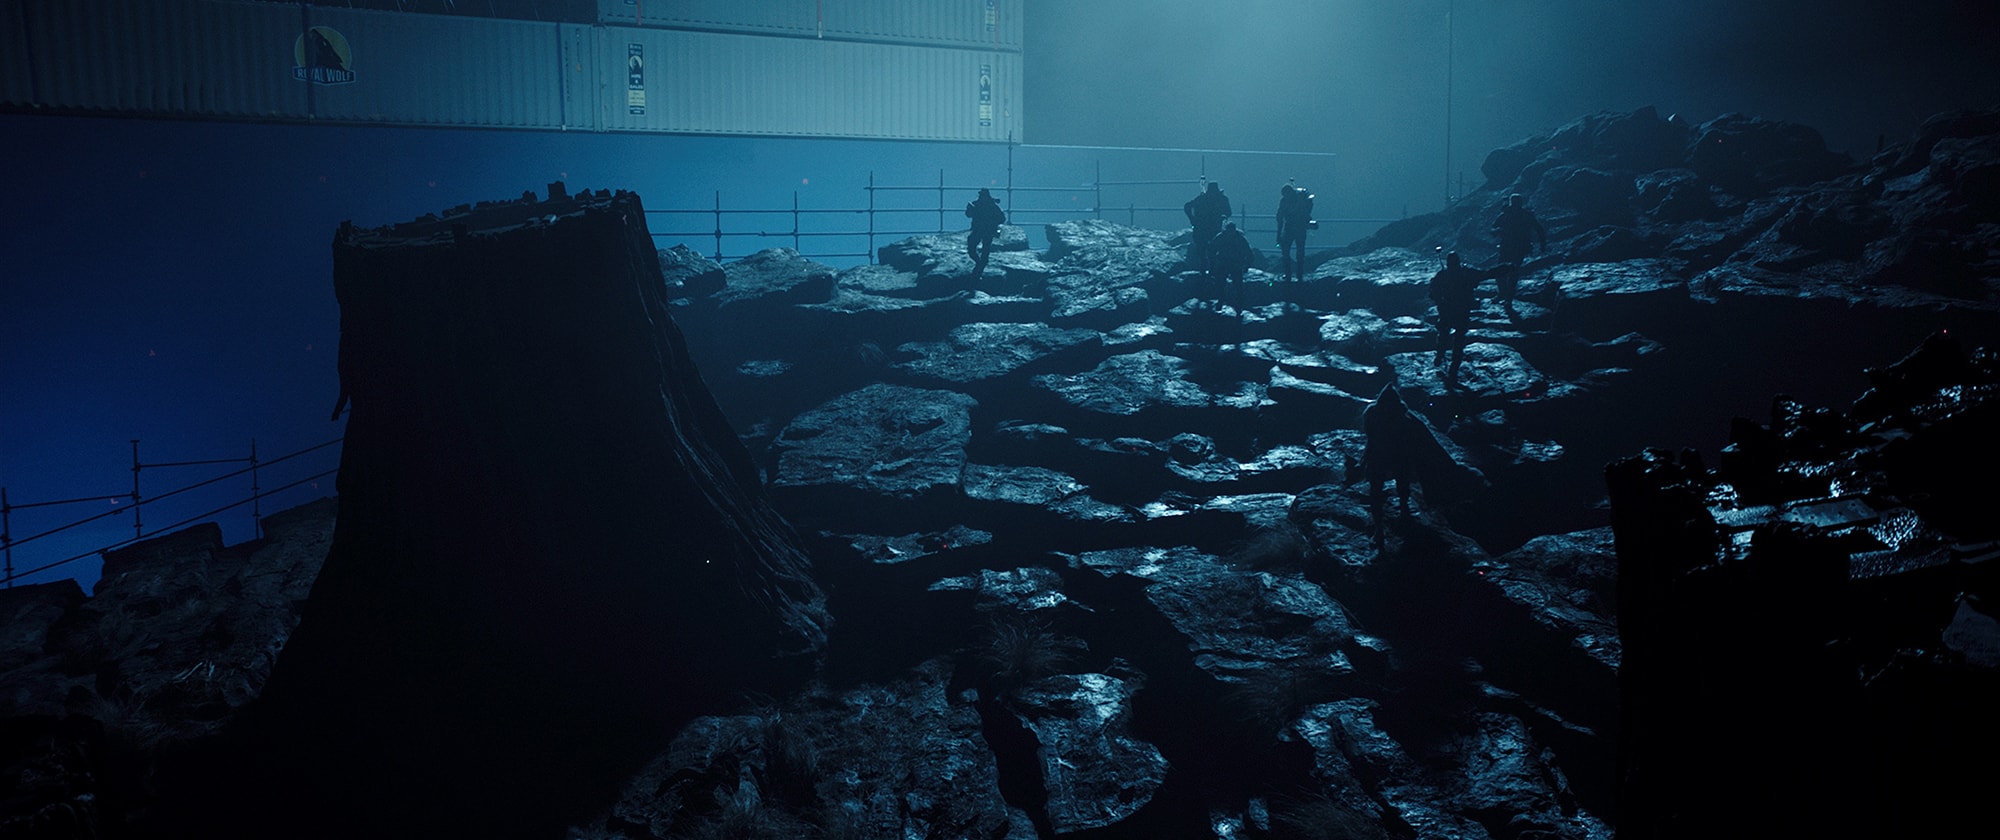
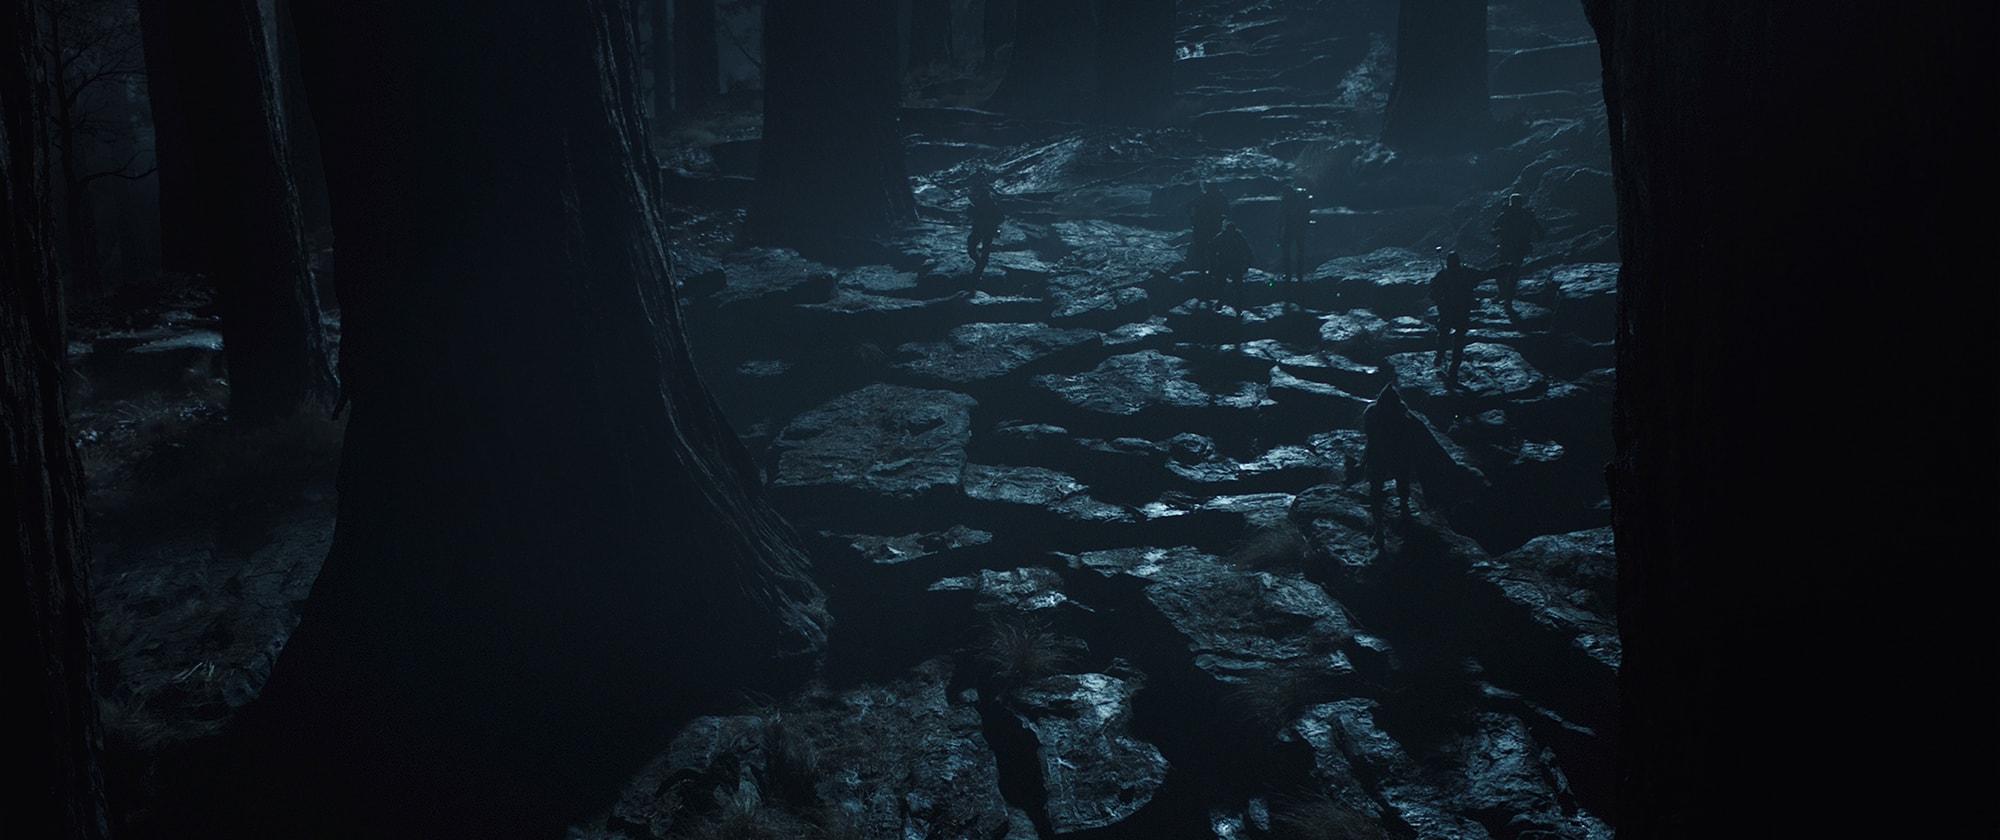
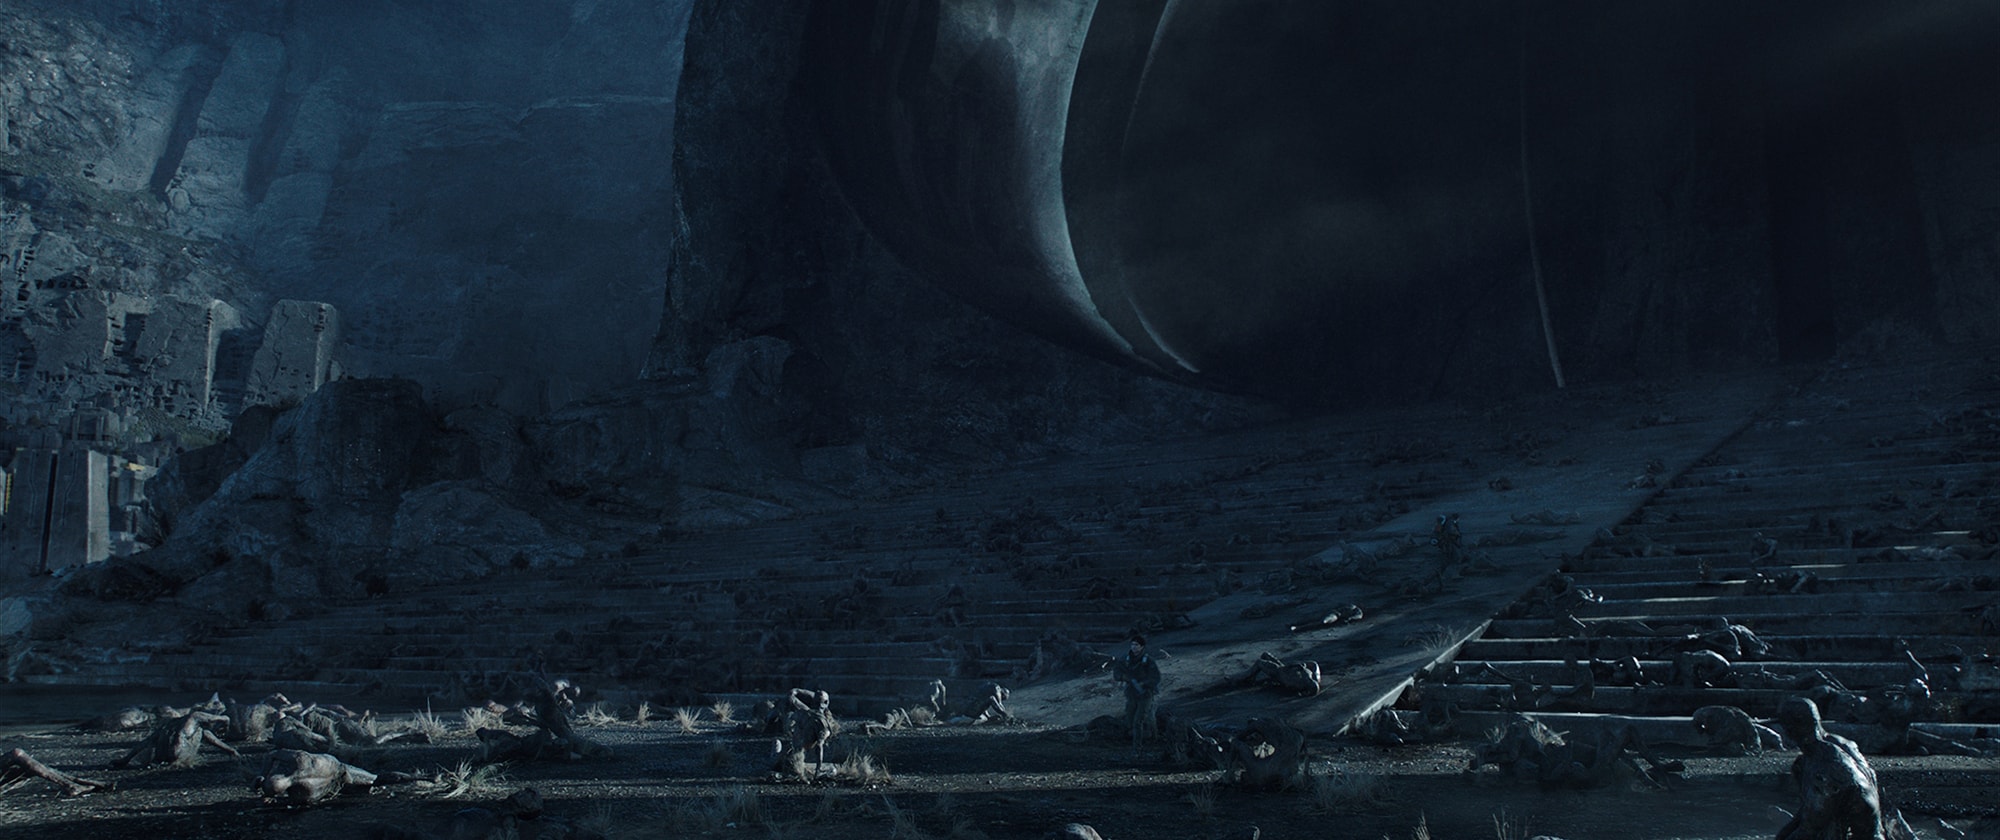
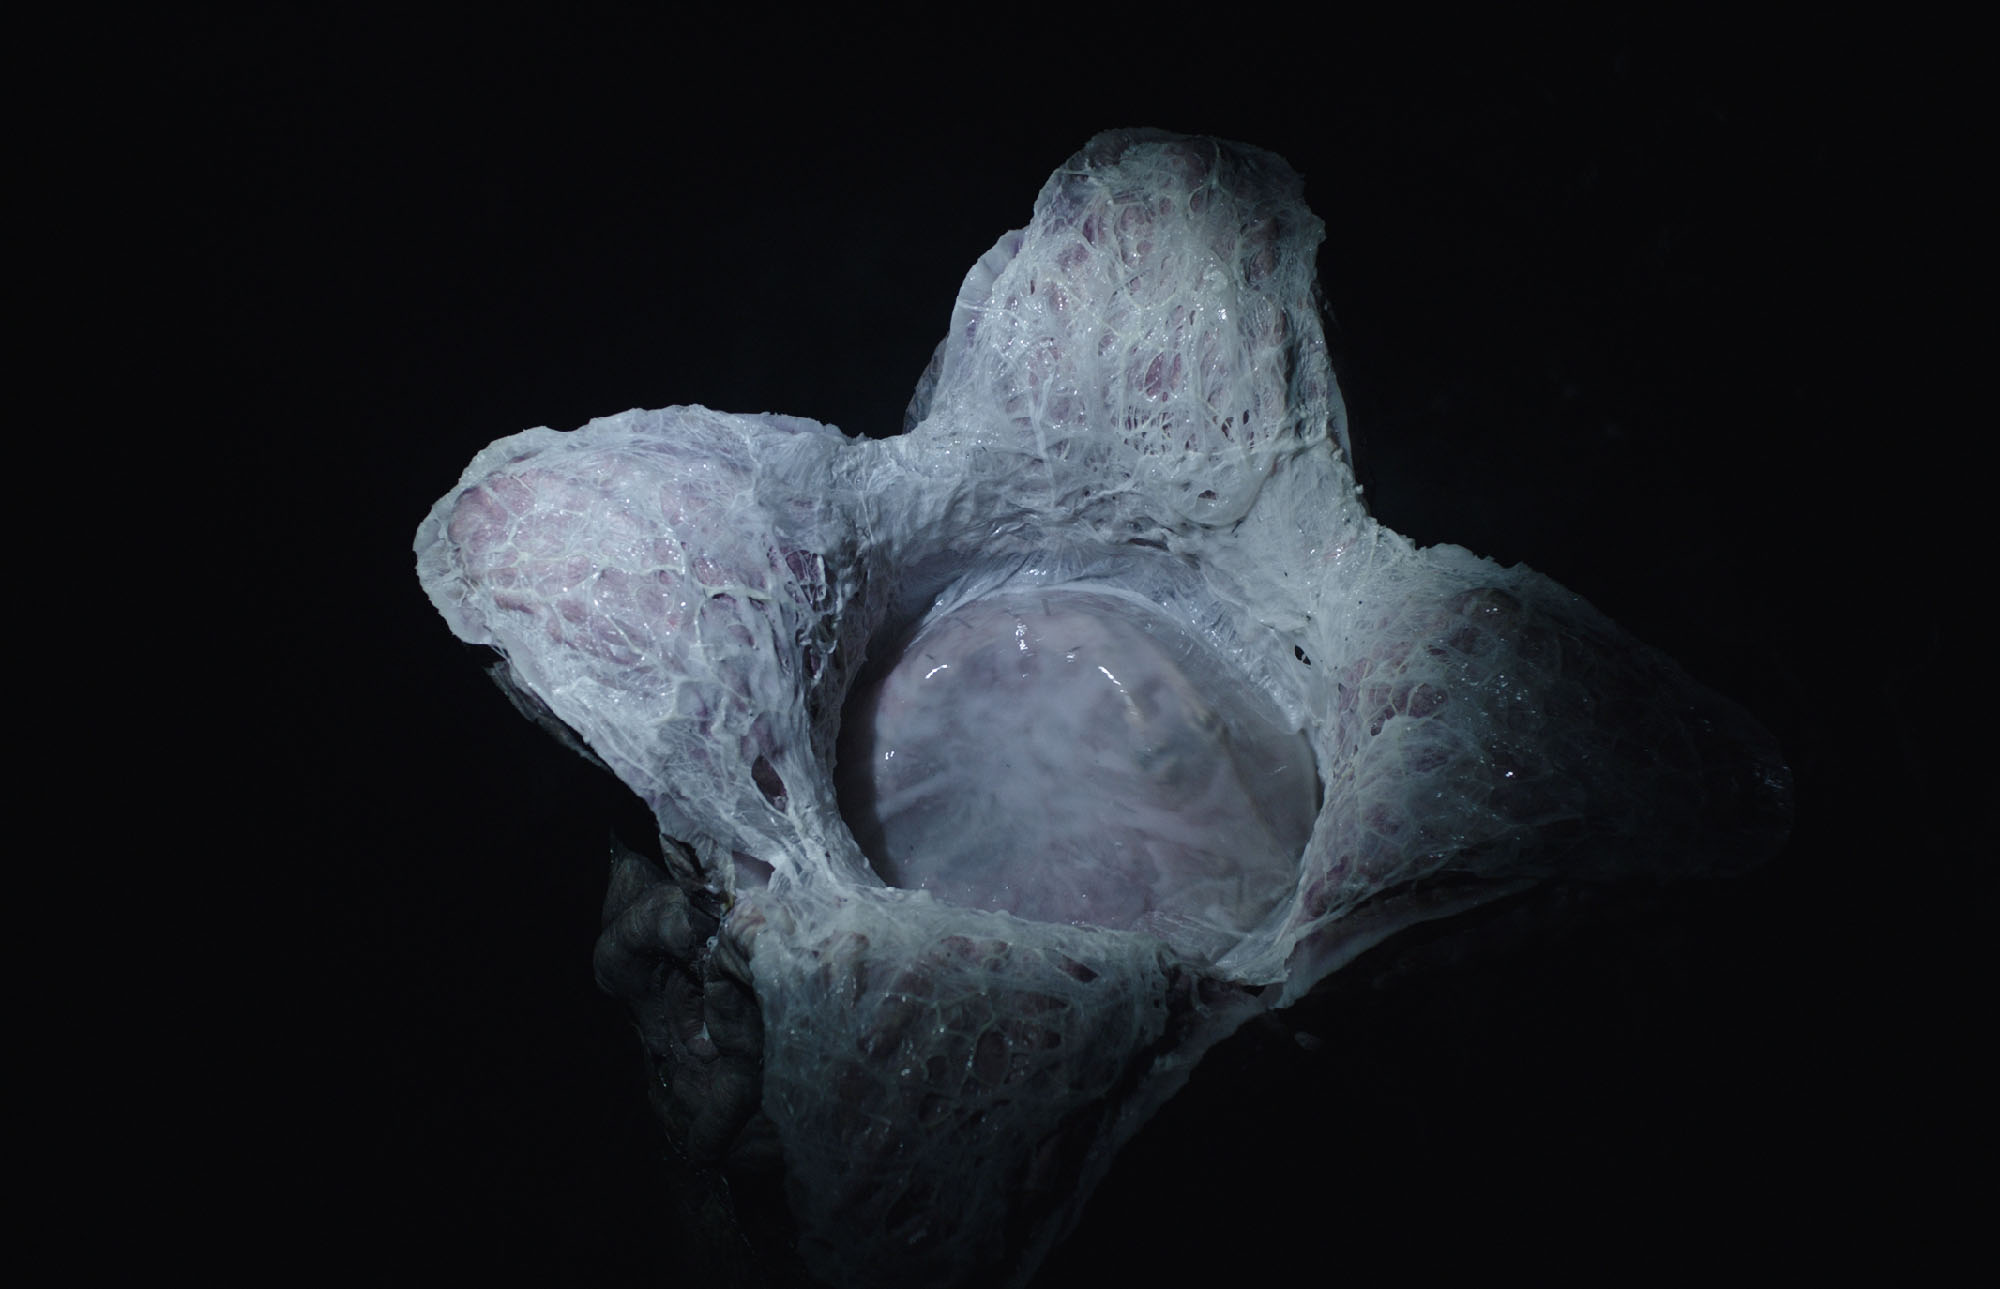
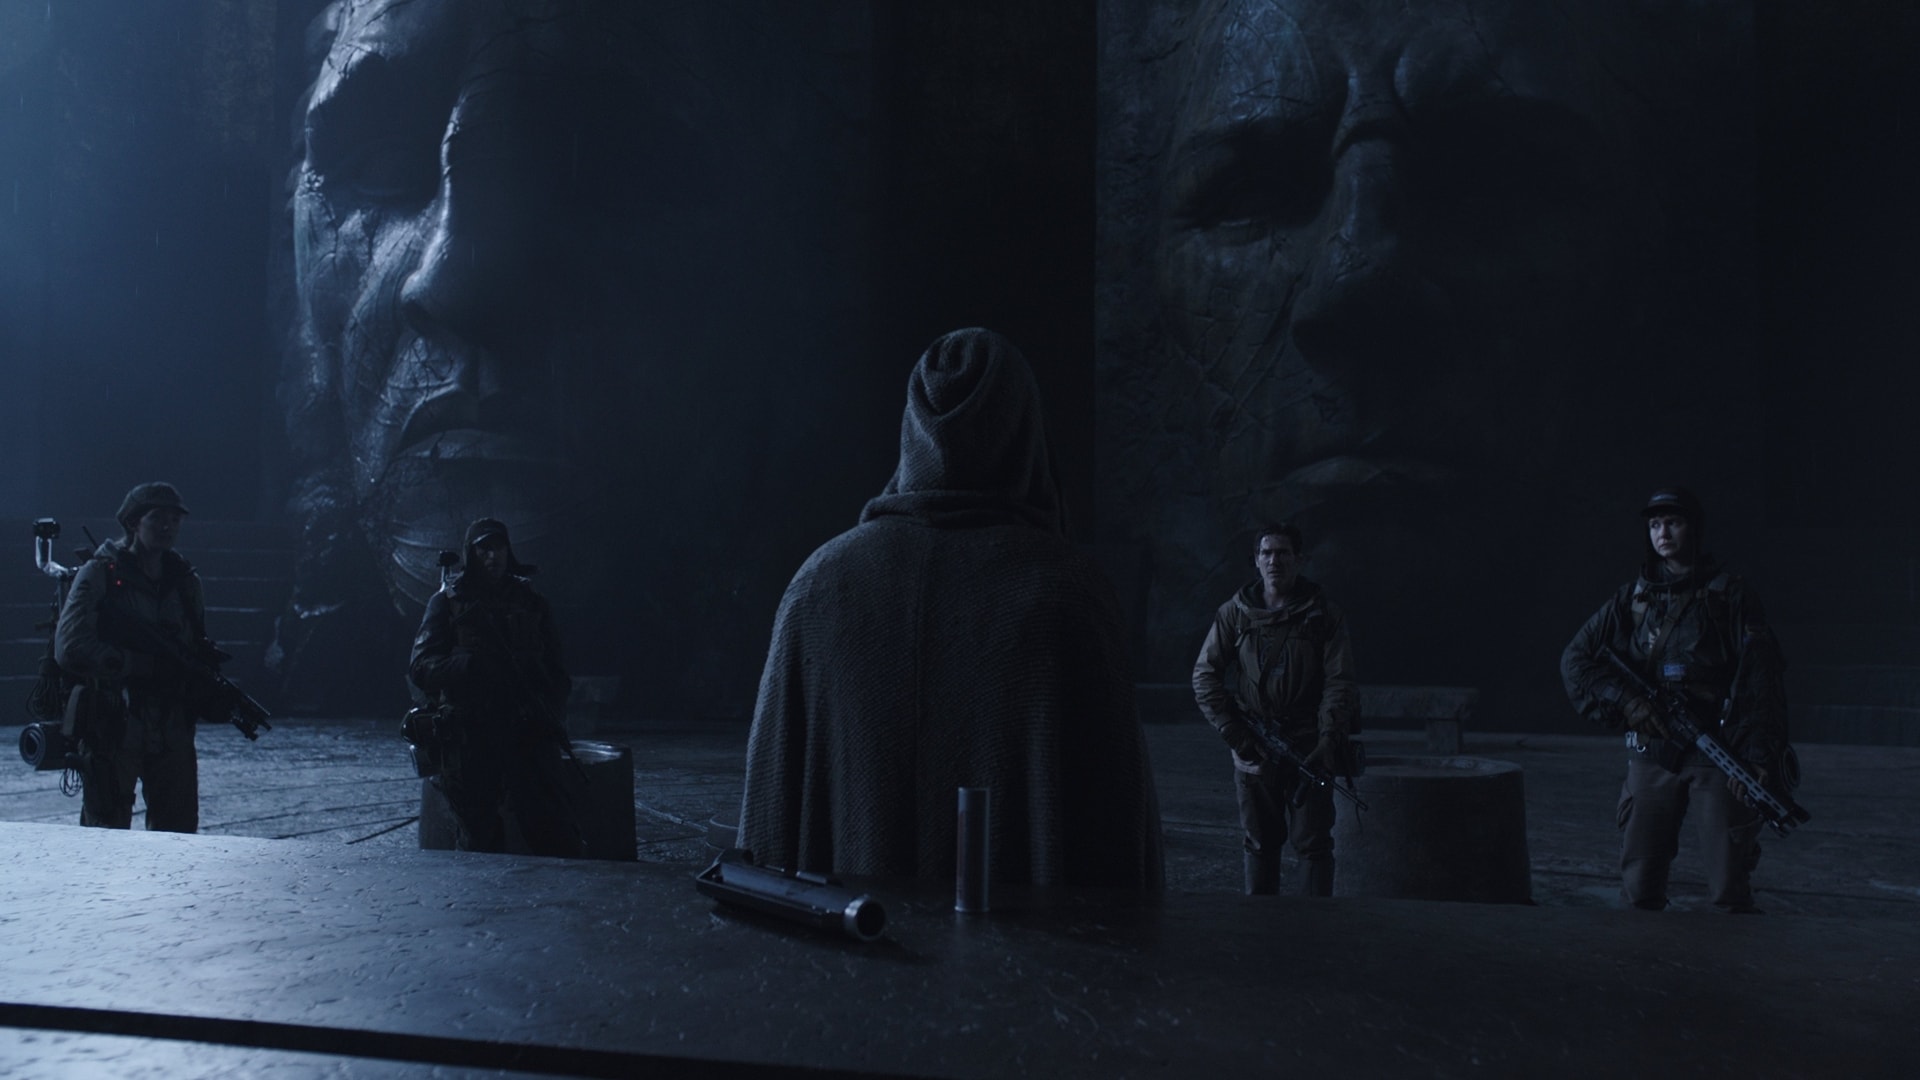
The environment work for MPC on Alien: Covenant was in two main sections. The first part was to enhance and extend the plates filmed in New Zealand, to give them mood and a more “out of this world” look. The mandate from the director was to make these environments as believable and real as possible, with very little touch of “Sci-Fi” look to them. The second and biggest task was to create the massive city of the engineers, with its imposing Cathedral and big plaza covered with dead engineers in the centre. “Based on early concepts, we realized very early the size of the city we had to build. To give ourselves a sense of scale, we compared it to a model of New York we had. From end to end, the city was covering almost 10 km wide, from the tip of Manhattan to the middle of Central Park. With this in mind, we started building rough models of buildings, based on some references of brutalism architecture explains Domenech.
In parallel, the software team developed a new tool to aid in the layout of the city. “Machi (means “city” in Japanese) helped us to create the first layout of the city and get an approval on the overall look of it. We then added more and more details to the city, by refining all the buildings, adding more trees and street furniture” he adds. The team constantly added detail to the shots until the very end of production. The city has a total of 15,000 buildings, 250,000 dead engineers in the plaza, and 500,000 trees covering the city ground and the surrounding mountains. Technical animation played a key role into adding subtle details to the Engineer’s characters such as muscle deformations, twitches, skin simulation, etc. The technical animation team also delivered realistic simulations for the movement on the trees for the city as the flow in the constant stormy weather of the engineer city.

FX
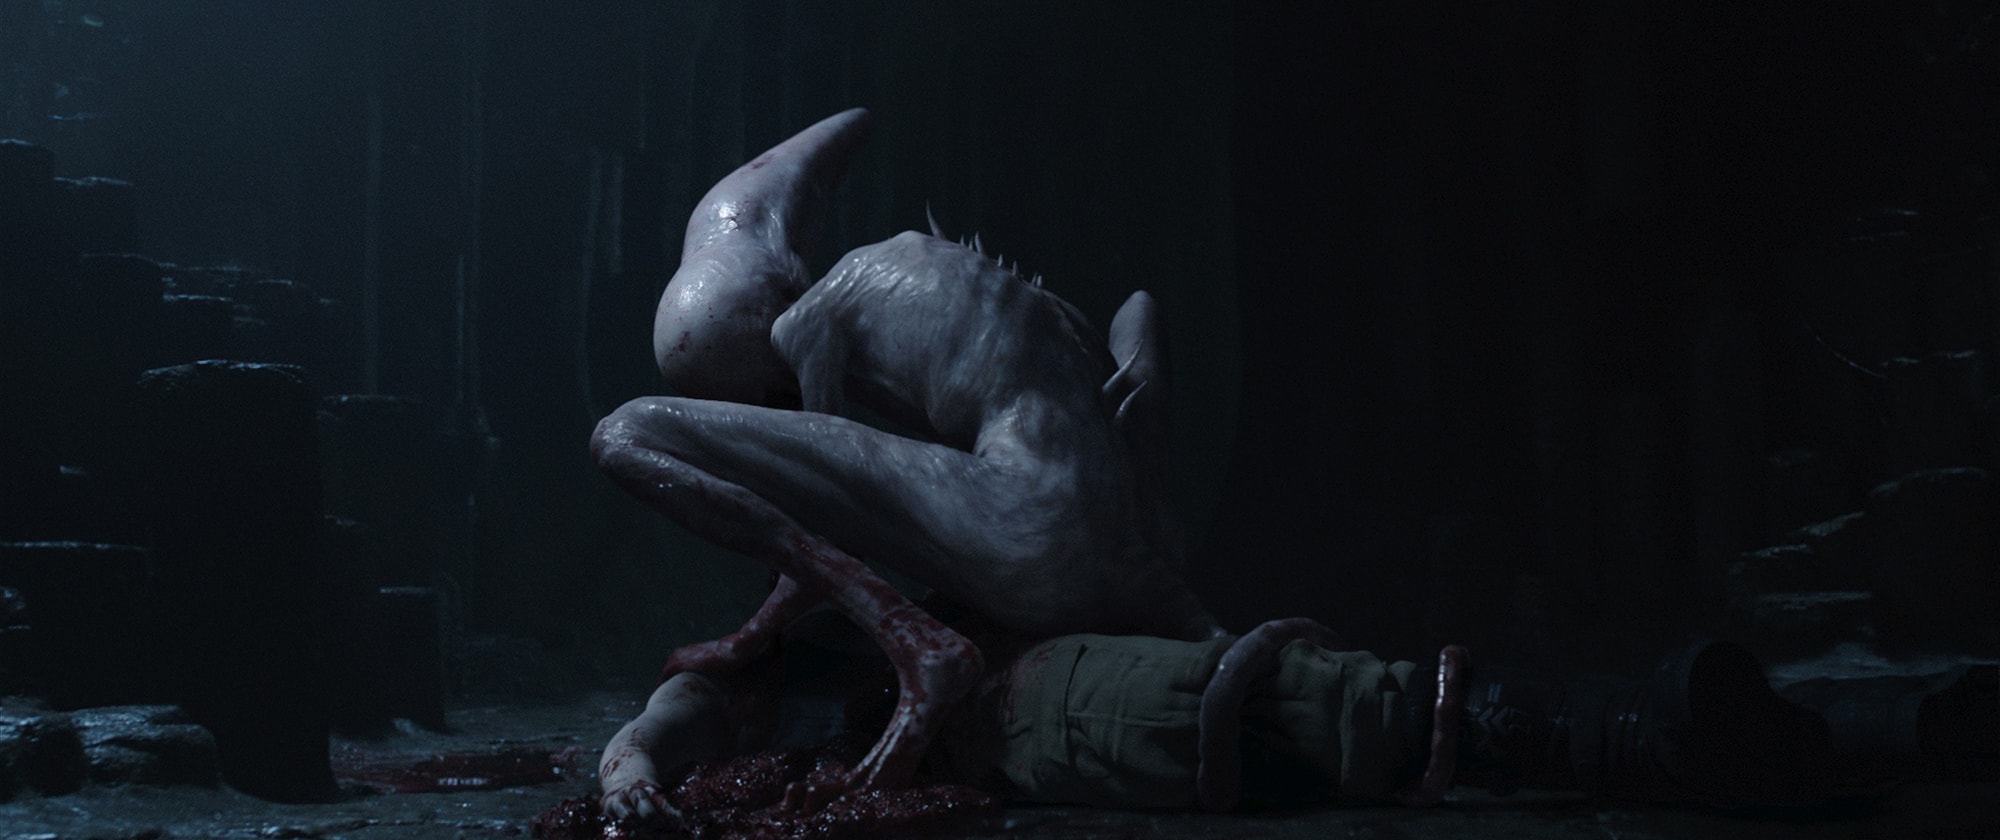
The FX team was one of the biggest that MPC had in Montreal. “Almost every shot we did has at least one FX element” comments Domenech. For the most difficult shots, the FX would deliver up to 15 different elements per shot. One of the early challenges was the birth of the Neomorph. The shots were complex as the character was small, it would be seen in extreme close ups and it needed to interact with things on set such as fake blood, the bag of simulated tissue or placenta and other elements like giblets of soft innards.


“We opted early on with an integrated solution, where all the elements were simulated together for the best result possible. There was a lot of different FX to support the action and the performance of the CG characters such as drool, blood flowing on the character’s skin, cracking glass, bullet impacts and blood, ships ripped apart by explosions (using our in-house tool Kali), etc” explains Domenech.
On the Medical Bay for instance, the team had to switch between four levels of blood and SSS gradually as the sequence progressed and the Neomorph grows from baby to teen in a minute. To make things even more challenging, they also had tons of animated lighting , explosions, emergency lights, gunshots, sparks, torches, etc to deal with.
Lighting and rendering massive amounts of FX volumes was a particularly challenging part of the film in terms of pipeline, data management, lookdev. The film had a huge variety of effects; particles, volumes, destruction, fluid simulations, explosions, animated textures, etc.
One of the biggest challenge for the team off the world was to deliver the numerous elements for the end lifter sequence, racing back to the Covenant, where Daniels and her team try to escape the city from the Xenomorph. For this sequence, the team developed new FX tools to blast the dead engineers on the ground when the lifter approaches, blowing the corpses away like sand-blasted brittle rock by the power of the thrusters, the engines also created a great amount of lifted dirt from the ground and down-wash, and also larger particulates like pebbles and dust elements to give a really moody and gritty feel to these shots. They also delivered elements for the thrusters of the ships, dust and mist to add depth and character to the city.

Lighting is always very challenging for Aliens. The show had a wide variety of environments and different light conditions. “On the Engineer’s planet we had to recreate the mountains of Milford Sound and the Engineer’s City at night, and also for daylight for the Dramatic Lifter Sequence. We had to control the movement of the light and shadow by animating “gobos” (large light blocking elements simulating the moving clouds casting shadows on the valley)” outlined Domenech.
On the Terraforming Bay sequence the team had to deal with tons of animated emergency lights and plenty of full CG Shots. Lighting characters is always tricky, but as the Aliens are dark in a dark film, it was particularly complex. “Making the Aliens sit on the plate was not enough, we needed to capture the essence of the creatures and adjust the lookdev (some times per shot basis) by adding more translucency, displacement, sub surface light scattering and retouching the wetness here and there”.
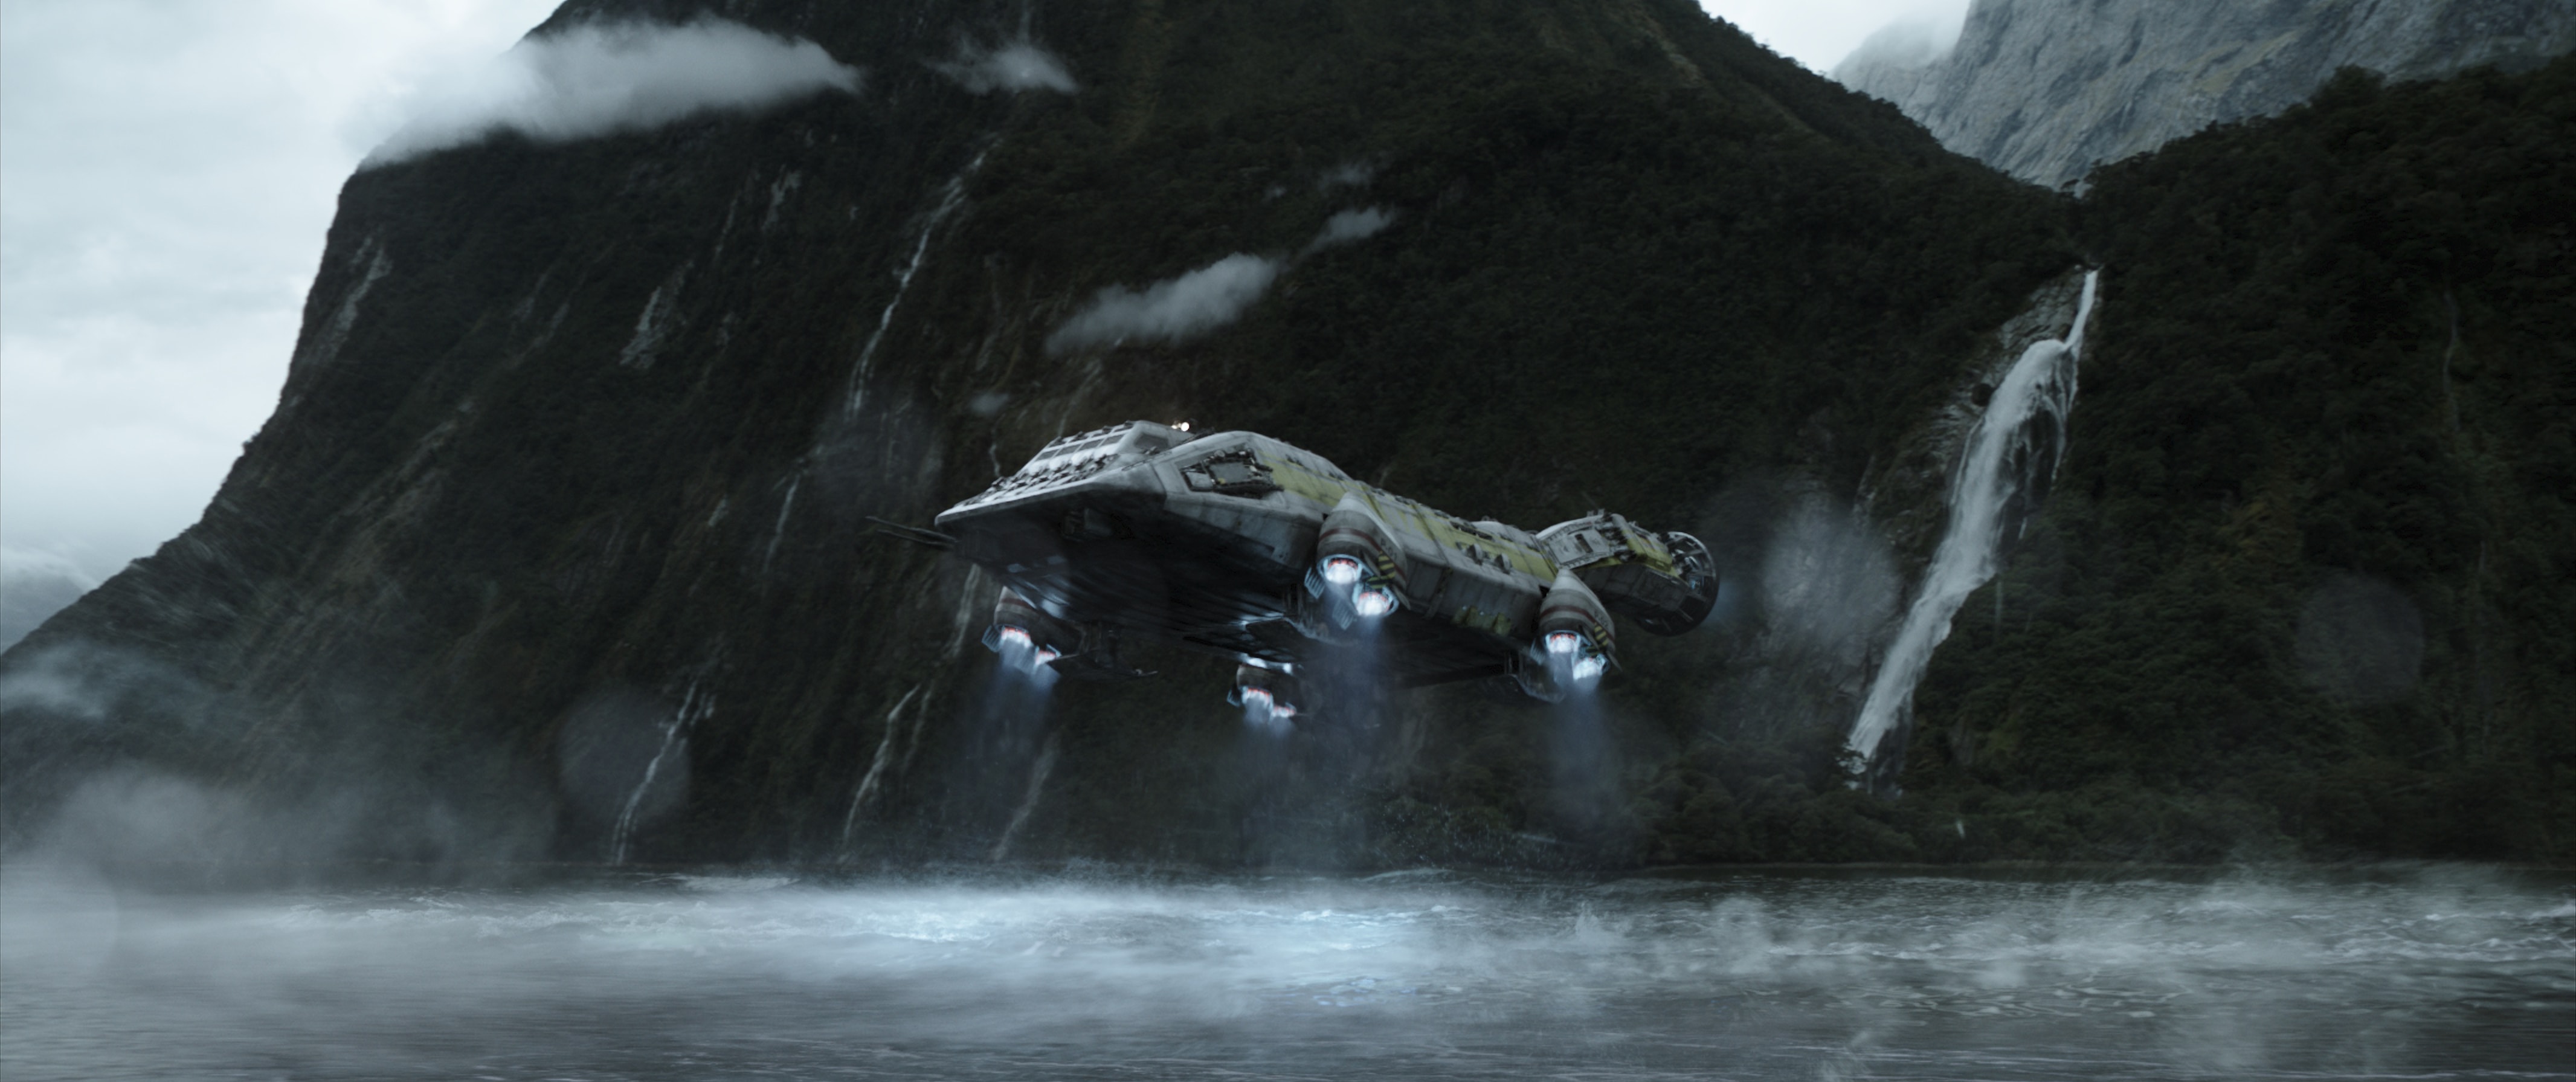
The Assets team also worked on the two main ships created for the movie; the lander and the lifter. Both ships were used as extensions to existing sets as well as full CG elements to the shots, so they needed to blend perfectly together and needed a lot of detail for the closer up shots in the movie. Our assets team also delivered digi-doubles used for the main characters for action stunt shots and far away views.
Technically all the shots were rendered in RenderMan using RIS. The team did multi-pass rendering for many of the Alien shots, but generally the team focused on getting the shaders right, to match what was wanted in RenderMan, rather than falling back on Comp to get the look right.


In the Air: Framestore
Christian Kaestner joined immediately after finishing up as a supervisor on King Arthur. Kaestner was extremely keen, but while he finished up, Spencer Cook (Animation Supervisor) and Stuart Penn (Vfx sup) went on set to supervised Framestore’s sequences.
Framestore’s work in this film was featured in over 295 shots covering the build and look of the Covenant ship, its space environment, as well as providing some cult horror creatures; the ‘Facehugger’ and the ‘Chestburster.’

The Covenant ship, was assembled by Framestore’s Montréal team. ‘It was about 1,000 meters long,’ explains Christian Kaestner, VFX Supervisor. We have done spaceships before of course, but every time you do one you want to do it better than you have before…in this film we needed something that would hold up in close-ups as well as wide shots.” The team was given a fairly specific brief including concepts from Steve Burg, who designed and concepted the ship with Scott. “Along with Charley Henley we worked through the blueprints; and a basic model, – they had done modeling work for the set pieces, so we had good reference… that was our starting point”. The team weighed up how to solve the various scale issues, the sails for example are almost a kilometer across, yet they are seen in both extreme wide shots and very close up during the repairs. “Anyone who has ever worked with Ridley Scott knows how much detail he likes to put into his practical set,’” adds Kaestner. “All of this was obviously great reference for us to build and get the spaceship onto the big screen.”
The lighting of any ship in space is an issue, in reality there is either very little light or one high con source which would produce a high contrast image with almost no fill light. Furthermore there is little logic in having a lot of lights on the outside of a ship during a long space journey. “That is one of those things where whenever you start a space sequence you talk about this. We spoke to Charlie about this, and he was talking to Ridley… luckily they had just finished the Martian with Ridley Scott so they were able to give us a quick and detailed brief” Scott’s attitude was that while he knew there is normally just one light source in space, – “he needed fill light and he wanted the ship to look good. The film had the advantage of being in deep space so they were not supposed to be close to any particular sun, so we could dial in the intensity of the sun light – as we needed, but Ridley was quite clear he wanted the right about of fill light to really shape and define the ship in space” explains Kaestner. The team ended up using the stars and nebulas in an HDR to get the lighting they needed.

One solution with the scale issue would have been to build multiple assets, but Framestore decided to go with just one model, with a very high degree of detail. The second shot of the ship is a long tracking shot along the ship that lets the audience see the ship in close up for about 500m of tracking shot. “all our setup was rigged with a lego block style instancing system, and we had 70,000 instances on the ship.. but at the same time we were keen to make it not look like it was just instanced through the use of special texture tiles that did not repeat.. it was a massive challenge but it was fun to do”, explains Kaestner. The team did find that to give scale a lot of lights were needed on the ship. In the end the model has some 20,000 lights along the hull, “if you think about it in hindsight it is insane, but it was fun to do”, he jokes.

The planet needed to look believable but at no time like actual shots of earth. The planet in the script is 1.5 times the size of earth, so the team came up with a multi-level atmosphere idea, that allowed the clouds from below to look fairly normal, but there were massive cloud towers on top of that that Framestore could layer up to make it seem unlike earth and also dangerous for the ship – as required in the plot.
Aliens
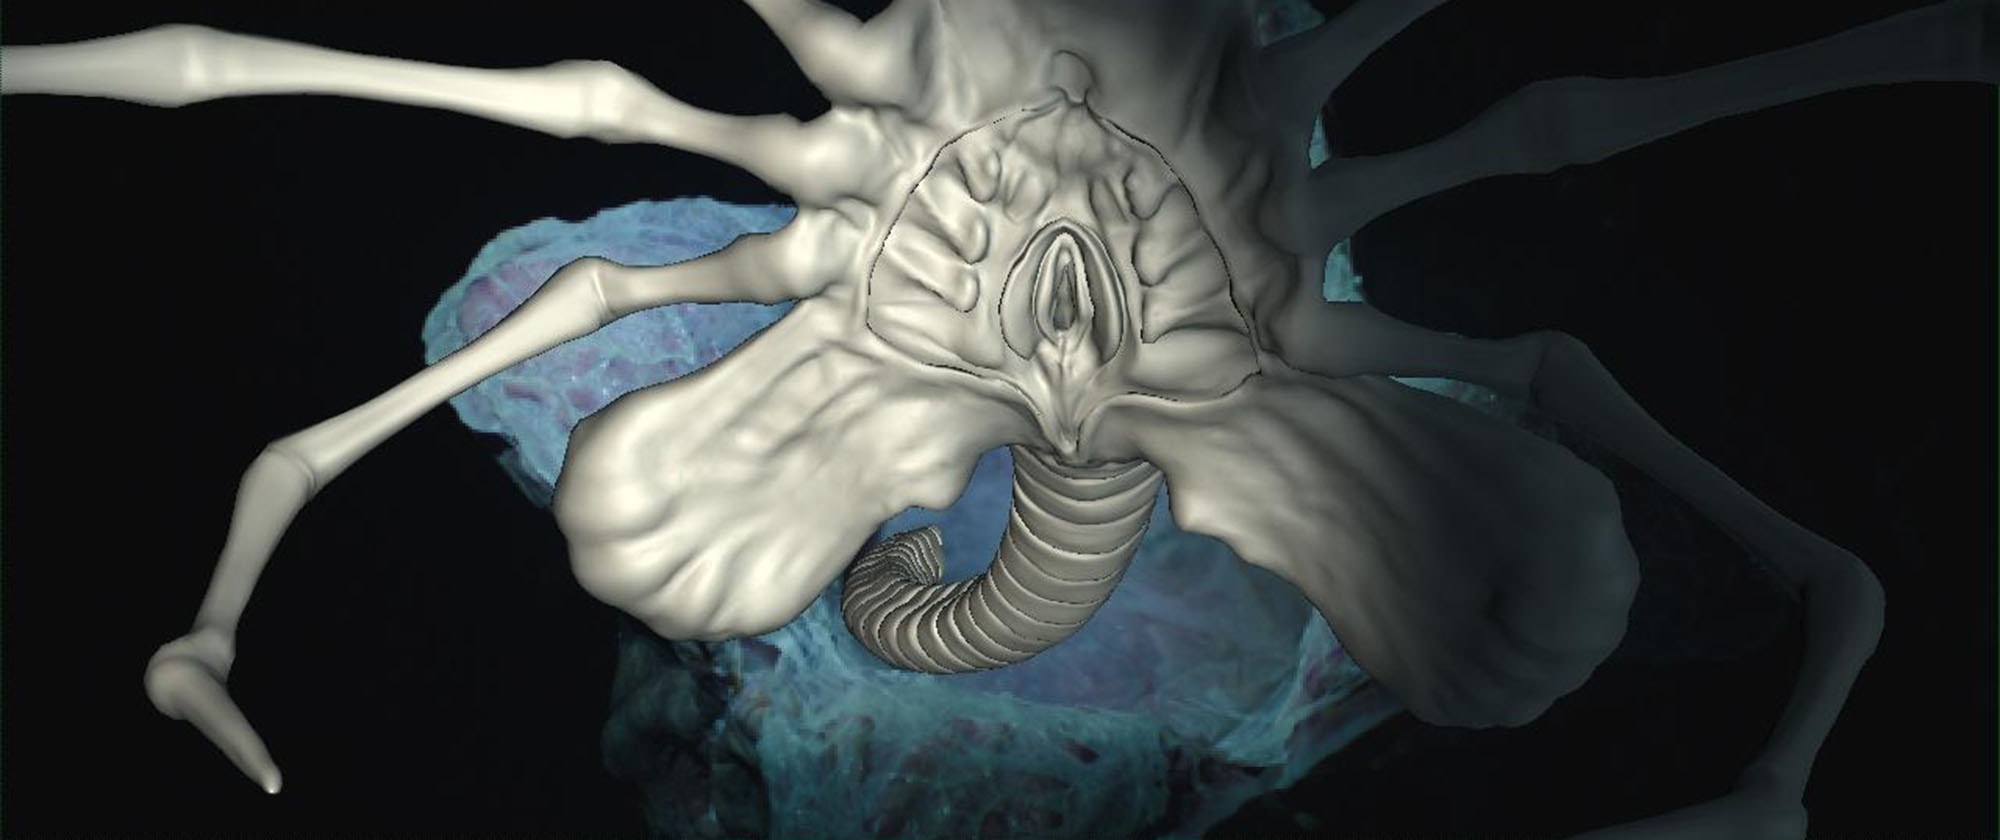
Framestore was delighted to work on the Facehugger, the iconic cult creature as featured in Scott’s original film. Keeping the feel of the treasured original, it was a process of tweaking an update within keyframe animation. “It has more leg joints than the original, and the ends of the legs have been re-designed,” explains Stuart Penn, VFX Supervisor. “We used a lot of reference from the original films, just to make sure that we were on track.” A prop had already been shot on set, giving great lighting reference for the team tasked with replacing the creature.


How to build an Alien…
Framestore also had to build the Xenomorph, which is built as a detailed model from the skeleton up to the translucent skin. In the film, the look of the creatures is almost more important than their movement, as the aliens, when they move, move extremely quickly. “We tried doing a run cycle for our own benefit, but we soon realised that there is not as much value in doing this for the Xenomorph compared to other creatures we normally do. We decided to focus on the individual shots to make them work in those shots, given it moves so fast, you have to work to get ‘weight’ in the animation” commented Kaestner. “I think in the end it worked out really well”.


Framestore built a model based on the on set puppet. They were able to sculpt additional detail into the surface using ZBrush, also building an internal skeleton, muscles and ligaments to aid the proprietary flesh simulation, which included the ability to make its egg sack pulsate in a disturbing way. Framestore’s hair system was used to ‘groom’ dirt over the Facehugger’s surface.
The chest-buster was initially planned to be around 20 shots, but it ended up being slightly shorter in the edit, “but clearly a really important part of the movie and a really important creature, so we had people queueing up work on the chest busting – it was really fun “explained Kaestner.
Framestore runs the same pipeline in both locations. A few shots on this film for example were done in one office and rendered in the other location. The team had great reference for the aliens, both visual reference and the onset silicon model made by the props department.
David and Walter
David and Walter are both roles acted by Michael Fassbender, which meant, especially the second act of the film, detailed face tracking and head replacement was required to have David fight and interact with Walter. Framestore’s work encompassed the Hall of Heads environment and digi-double face replacements throughout the film. Framestore split the David / Walter face replacement between Montreal and London.
Alien Covenant also had major effects contribution from Luma Pictures, Animal Logic, Rising Sun Pictures and Proof.
You forgot Peerless, who did the scene where David teaches Walter how to play the flute.
Thank you for mentioning me, I just want to point out that my name is Bavari and not Babari. Thanks!
Beautiful! Nicely done! Now, I am looking forward to a sequel.
Interesting.
But its kind of like watching a really good mechanic,
who’s really good with tools and has a fully equipped garage,
build a ford pinto for scratch.
Technically its a car,
and it took skills to do that,
but its a ford pinto.
Well, it’s a Ford Pinto that a lot of people really love 🙂