Monster Hunter is a science fantasy action film written and directed by Paul W. S. Anderson, based on the video game series of the same name by Capcom. The film stars Anderson’s wife Milla Jovovich. Dennis Berardi, the overall Visual Effects Supervisor and Trey Harrell, the Visual Effects Supervisor at Mr. X. Ayo Burgess (AB) was the Digital Effects Supervisor, at Mr. X.
In the film, there is another world, where humans co-exist with a wide variety of large and savage monsters. In our reality or world, a United States Army Captain Natalie Artemis and her U.N. security team get caught in a sudden and strange storm that pulls them into a portal to the monster world. There they find a Hunter, who has been observing the group, and together they face a series of brutal monster attacks. The film required extensive integration of full CG creatures and live-action. We spoke to Burgess about the challenges of achieving high-end digital creature visual integration. It should be noted that Mr. X did extensive VFX work beyond just the creature work.
fxguide: What was the basic shooting approach, was it to have the actors on a location or on set with green/blue screen?
AB: The majority of Monster Hunter was shot on location. Dennis Berardi and Trey Harrell spent about four months on location in South Africa and Namibia. There was just a single day of green screen studio work at the end of the shoot for wirework that required a more controlled environment than we could provide on location.
fxguide: Given the size of the monsters, and the nature of the fighting was there much wirework?
AB: There was a fair amount of wirework. The Diablos attack sequences, the Nerscylla hunt, the Apceros stampede, the Rathalos attack sequences, and the final showdown against the Gore Magala all contained some wire removal shots.
fxguide: Did you have any visualization tools on set, for framing, eye line, and blocking?
AB: We had a crew member as a creature stand-in holding a pole with a grey ball attached to approximate the height of the creatures whenever possible. We found this was enough to get the eye line and framing to work and didn’t encounter any major problems in post-production. We also utilized drones for eye line on occasion.
fxguide: The spiders were all different sizes naturally, but for the other monsters – did they remain the same technical size, or was there a need to be clever to make the individual shots and framing work?
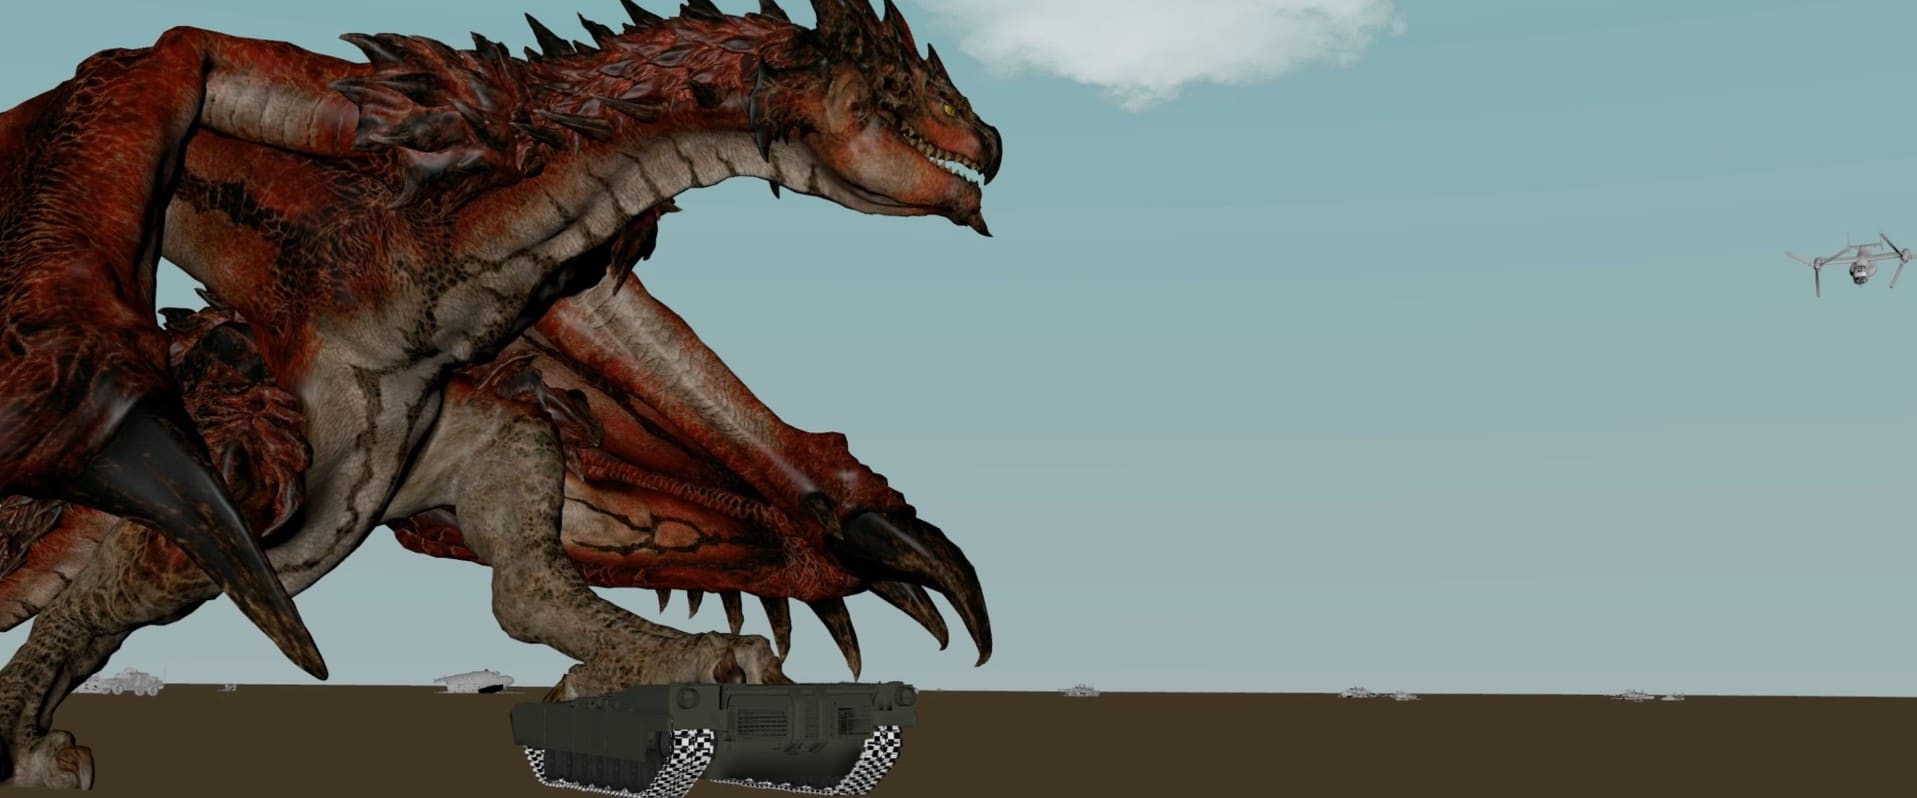
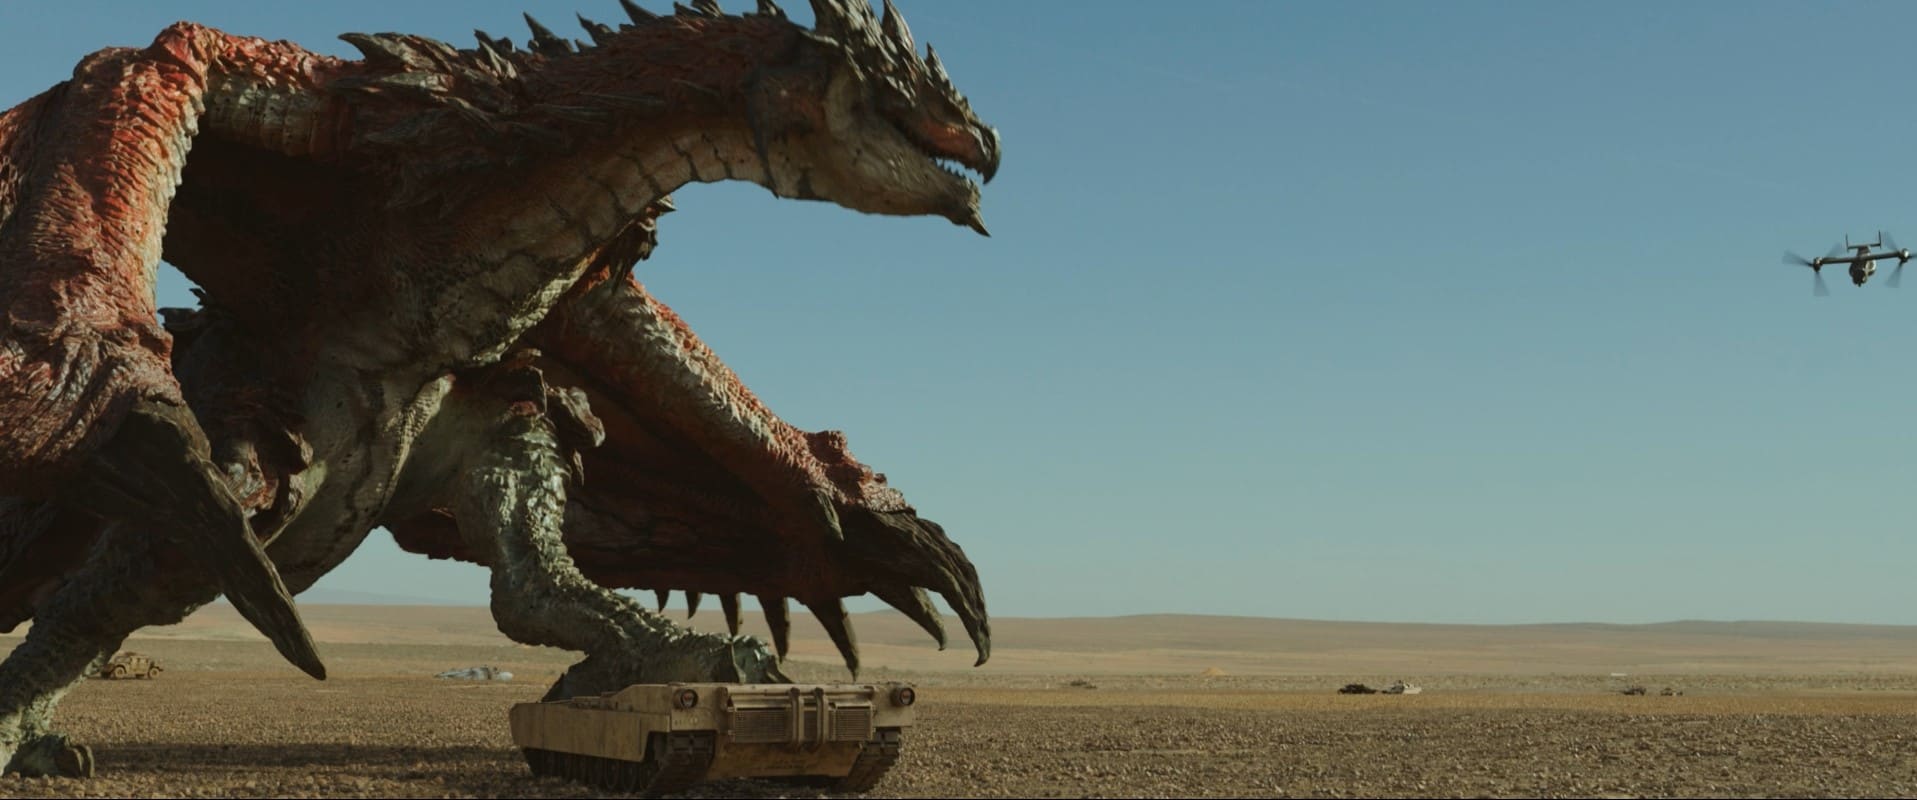
AB: We built our creature rigs to support arbitrary scaling so that we could absorb any notes on framing and cheat the scale in animation if needed. With the Nerscylla monsters we obviously scaled them up and down and they played in the movie at many different sizes, we scaled the Black Diablos in a few shots to help improve framing and the team at Black Ginger had varying scaling on the Apceros monsters in the Oasis sequence. We cached our animation for FX and lighting using alembic and the rig scale was stored as an attribute in these caches. Our creature shading networks were set up to read the rig scale attribute and use it to apply the correct adjustment to displacement strength or any other scale-dependent parameters. Meaning, once an animator set the scale for a creature it went through the rest of the pipeline smoothly.
fxguide: Were all the creature designs locked off before the shoot?
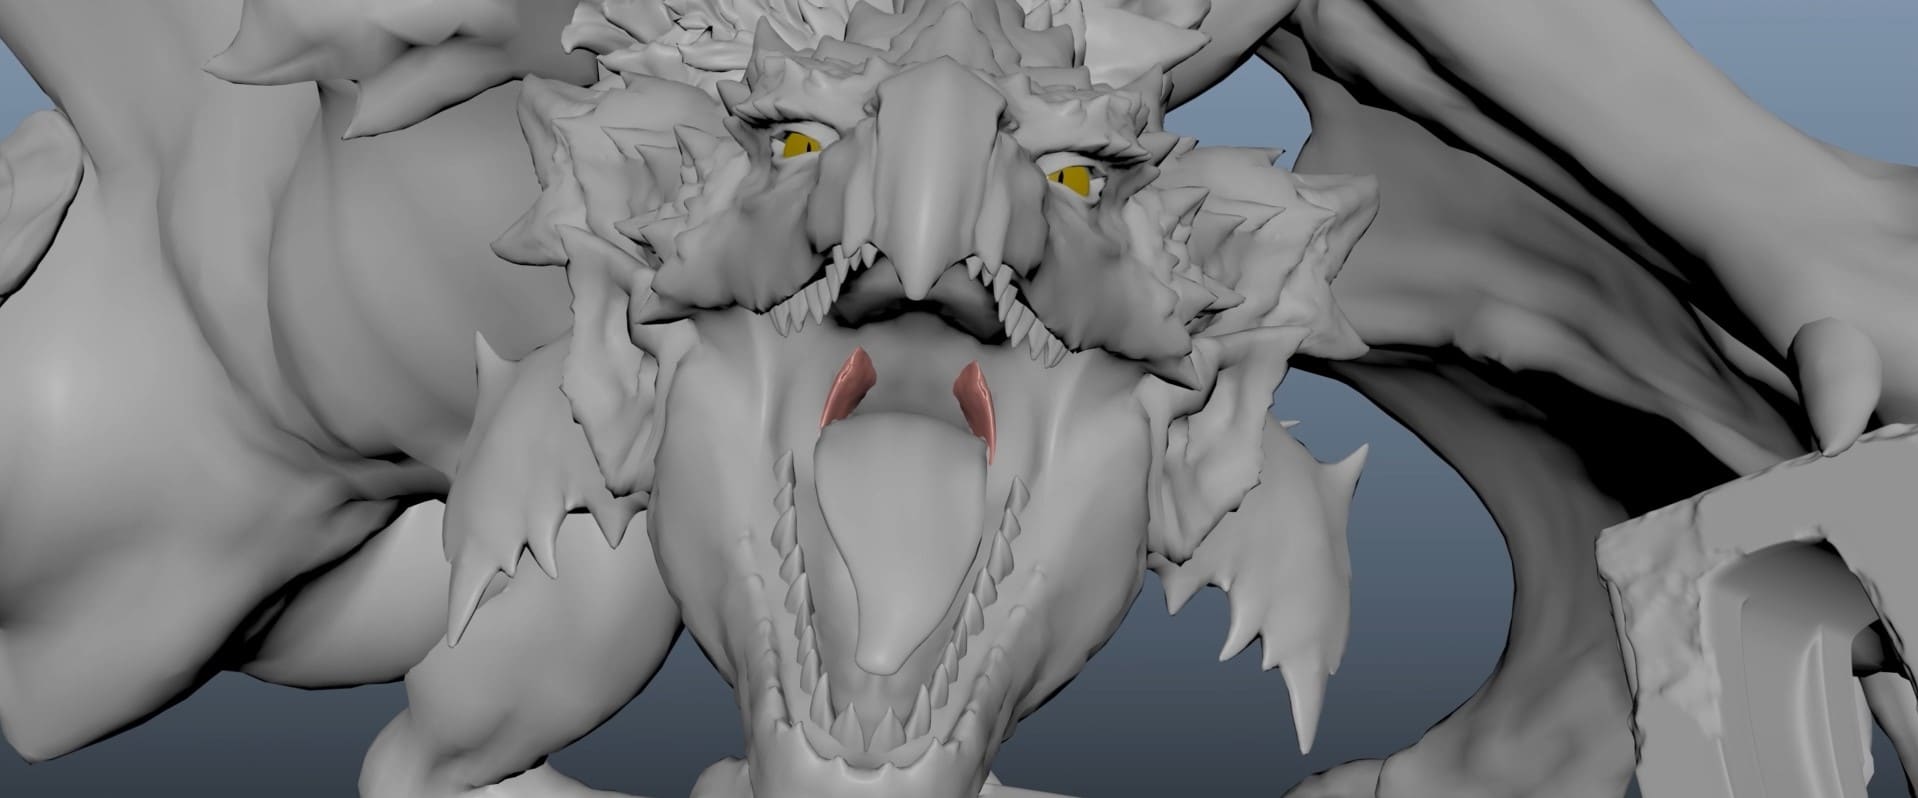
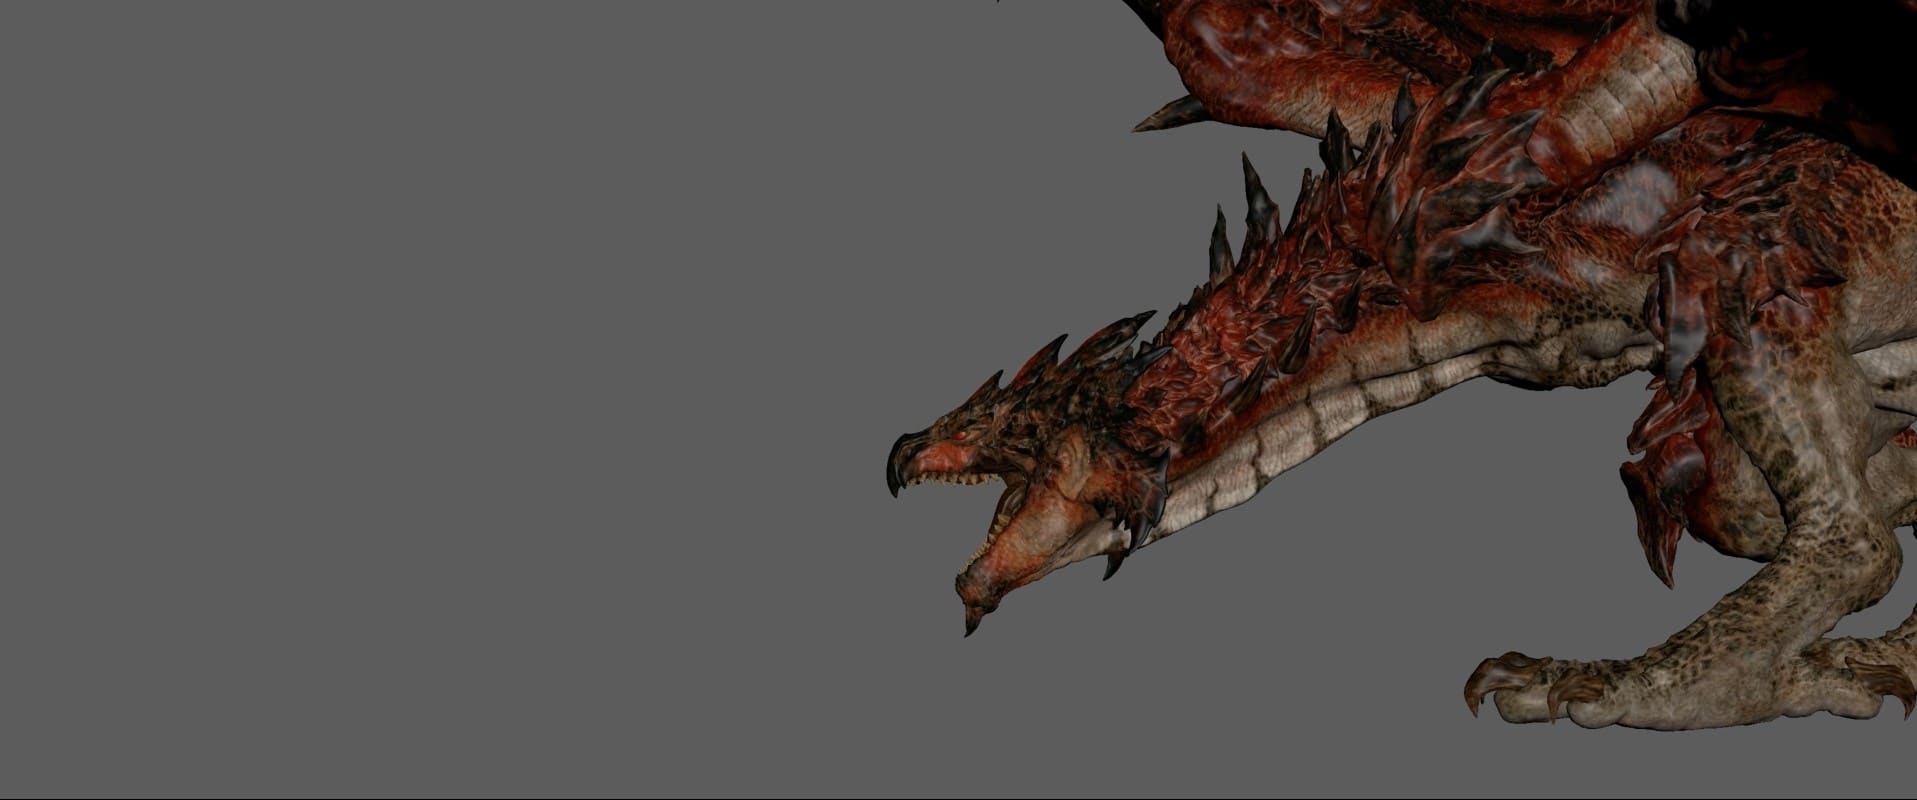
AB: Broadly speaking, the creature designs were locked before the shoot except for the Palico and the Nerscylla. Capcom provided game assets for each creature in the film for us to start with. Monster Hunter ‘world’ was the most recent Monster Hunter game at the time, and we received the Diablos, Rathalos, and Apceros assets from that game. These included high-resolution ZBrush sculpts and decent levels of detail in the model and textures. The Cephalos and Nercylla assets we received were from older games with much lower resolution models and textures so we had to do a lot more design work to bring them up to a level that could play in the film. We had previously built versions of Gore Magala and Rathalos for a pitch test we did at MR. X back in 2014-2015 to help get the movie greenlit.
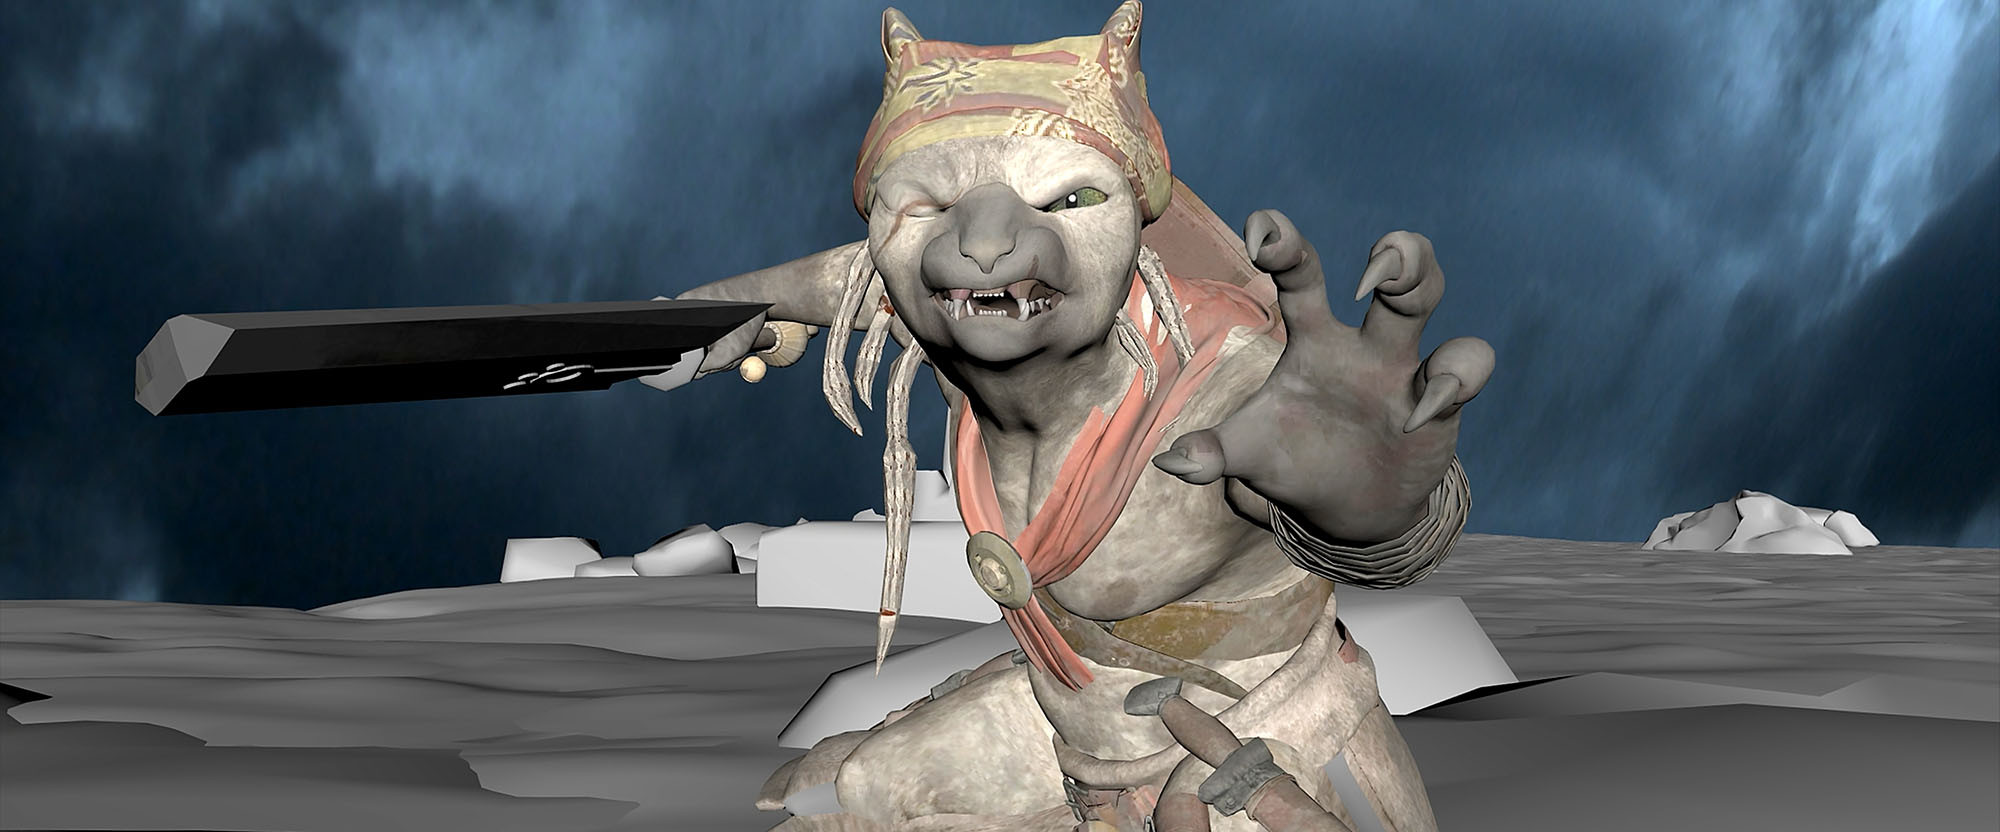
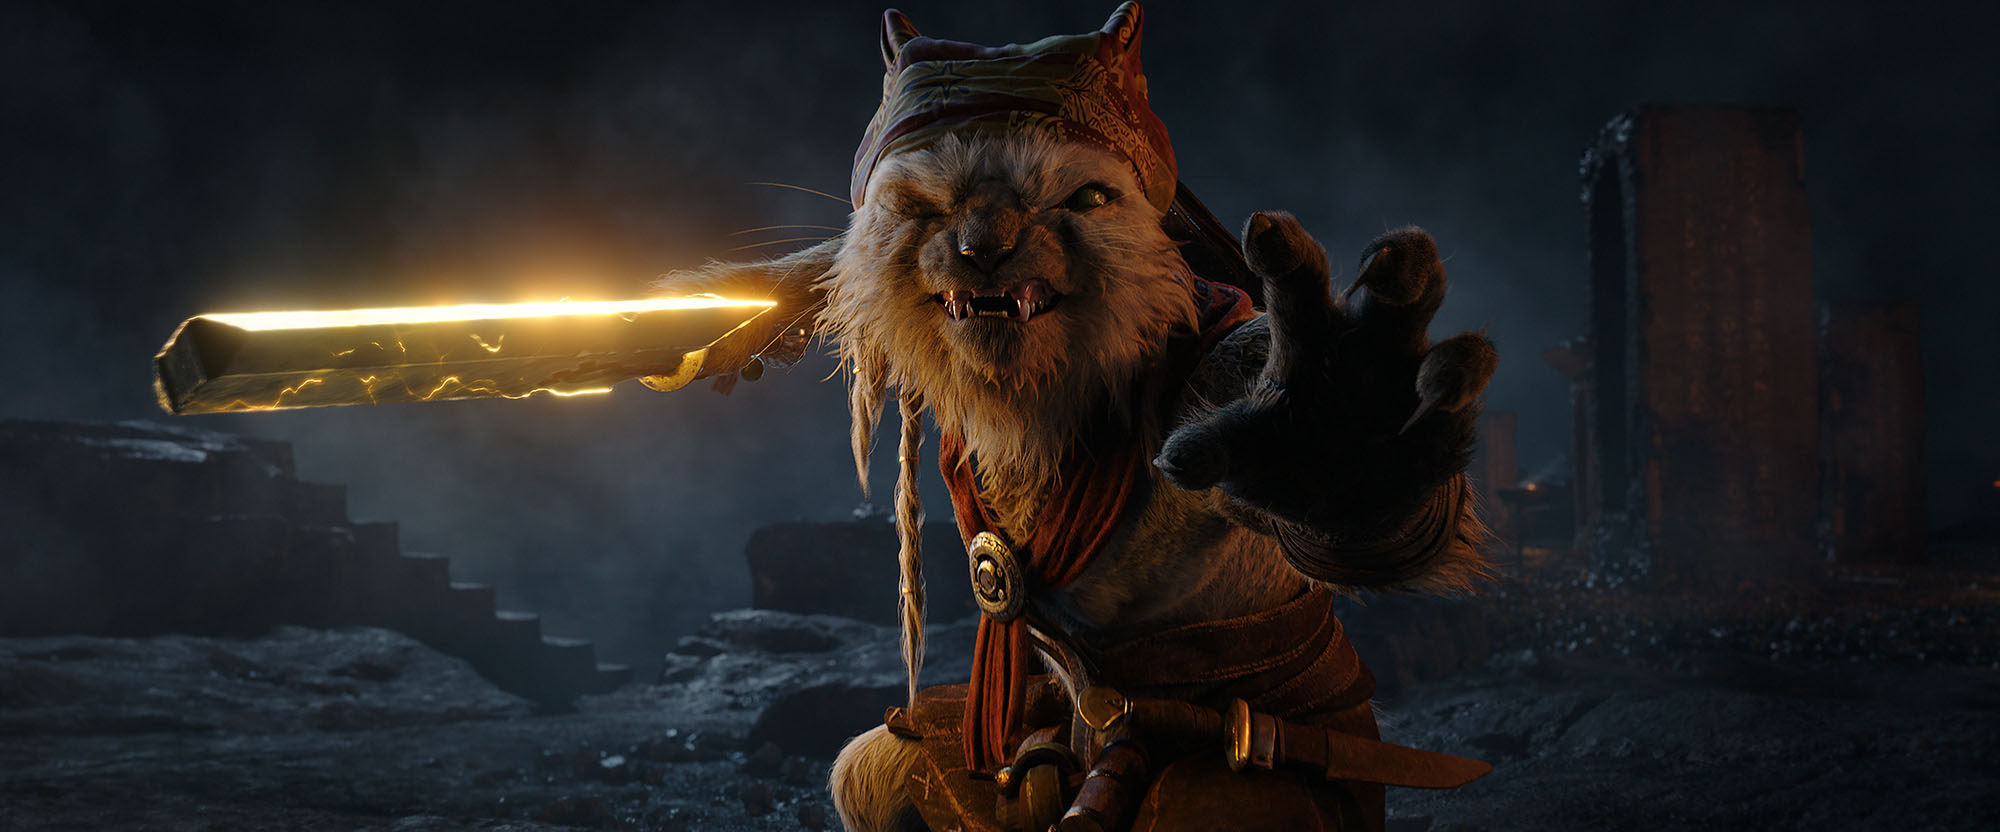
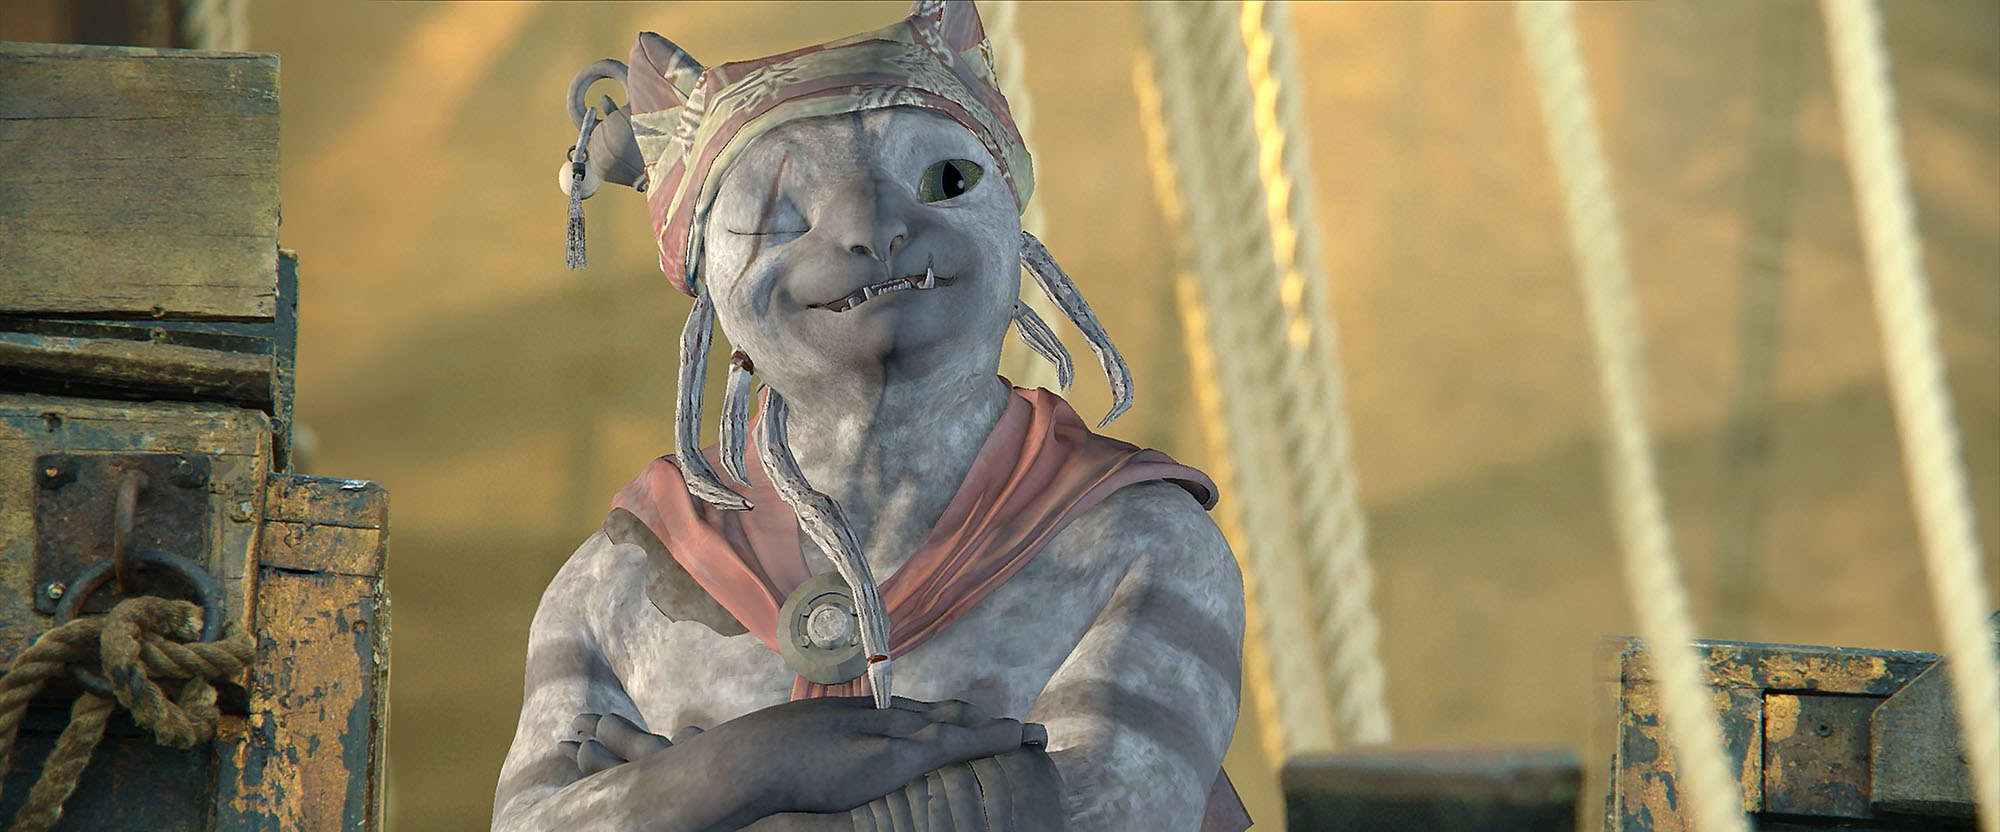
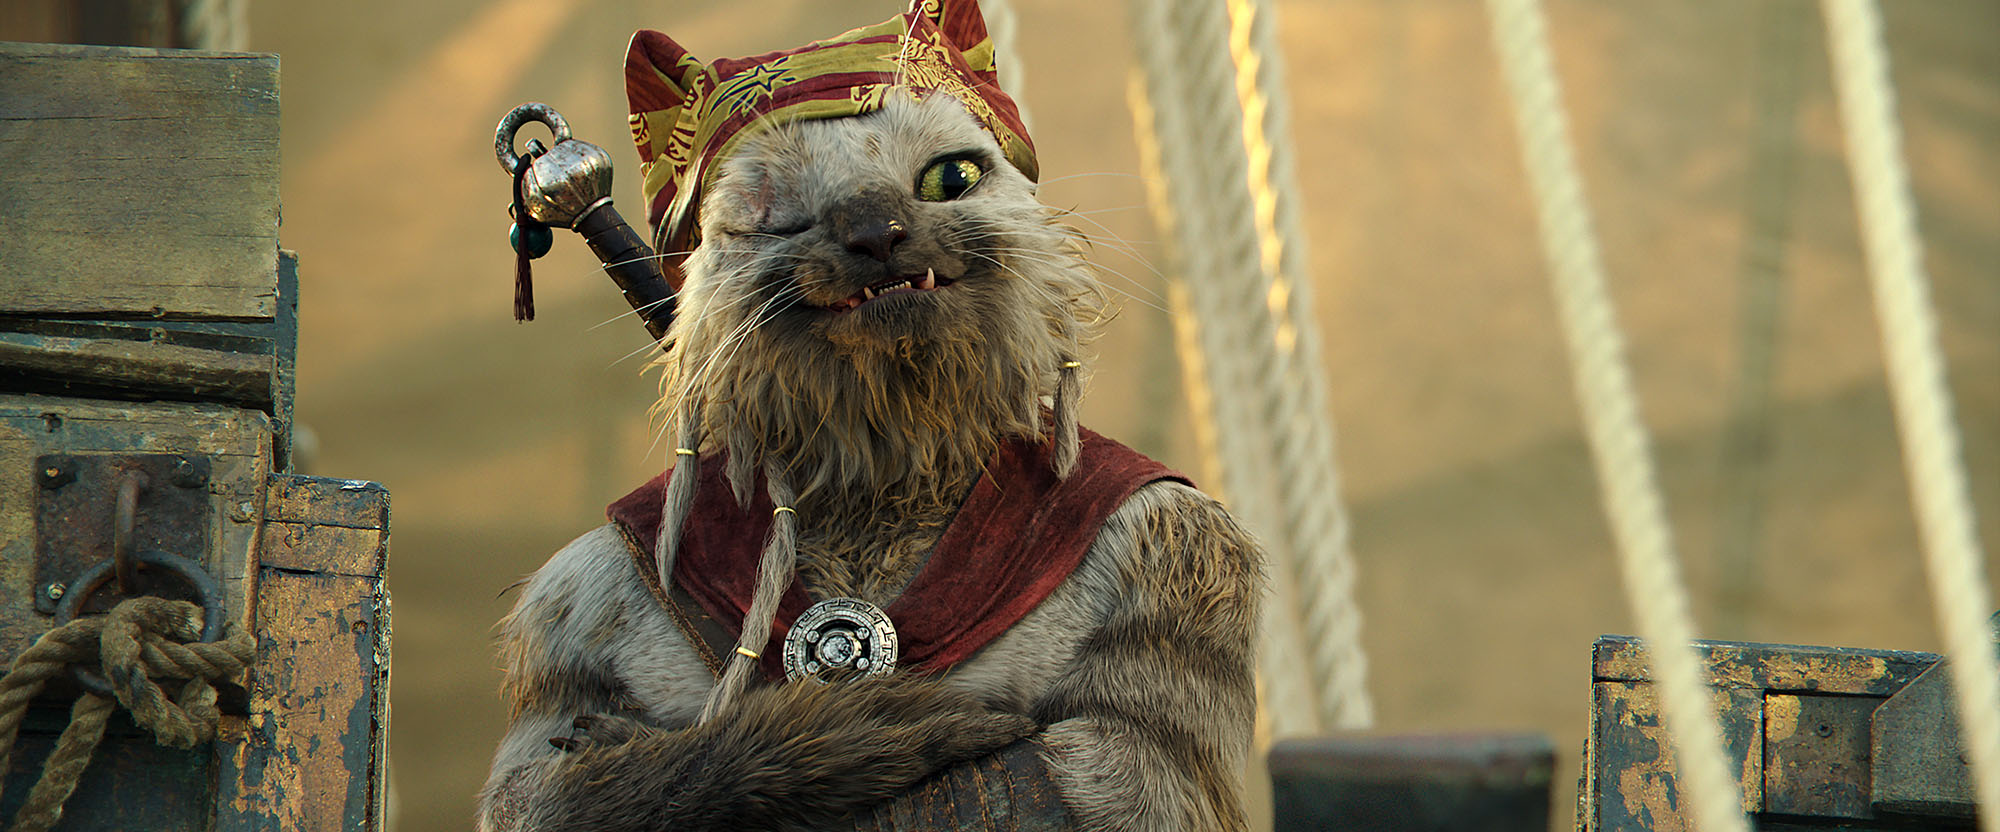
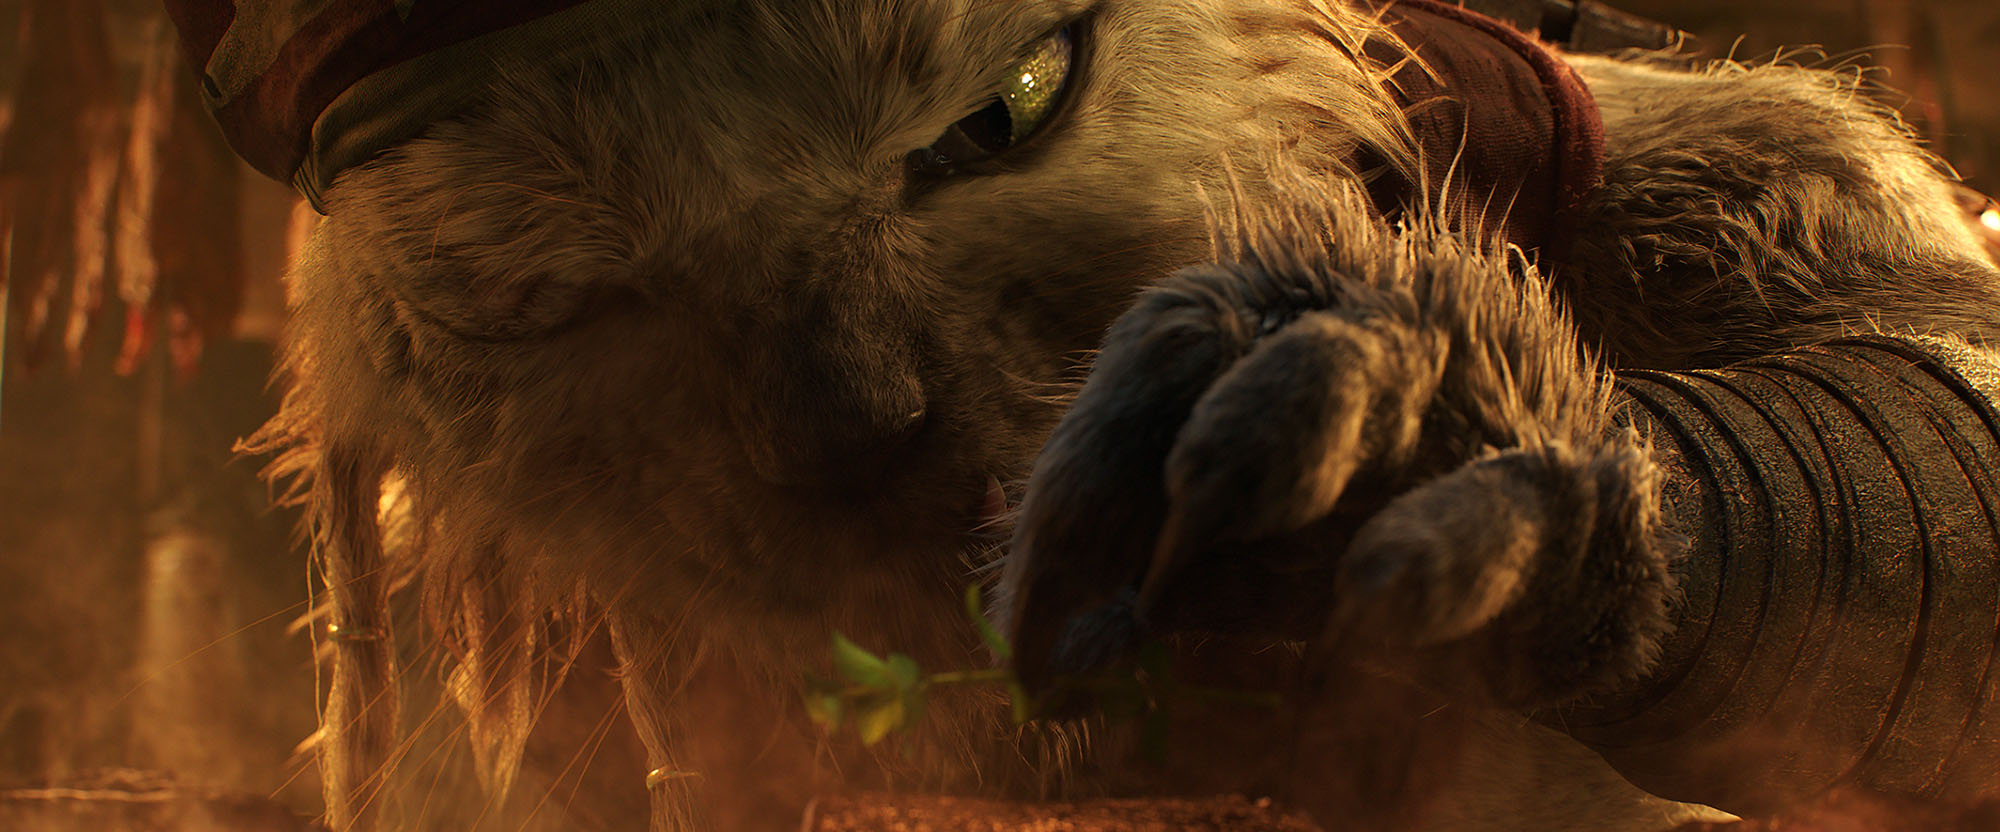
We did extensive development and design work on the Palico. Translating Capcom’s original character design to something that would work for the film required us to make significant changes. We made him less cartoonish and more grizzled and scarred. We added weathering to his weapons and armor, gave him dreadlocks, and made his fur matted and clumpy. The idea being that he was this gruff ancient warrior-chef who had been at the Admiral’s side for decades.
We also did extensive development for the Nerscylla creatures. This creature deviated the most from the original game design; we added an extra joint to the legs and changed the proportions of their heads and mandibles to make them more aggressive and fearsome. The decision to add the extra joint came as a result of early motion studies with our animation team, led by Tom Nagy our Animation Supervisor; we found that the extra joint helped the Nerscylla feel less skittery and small and gave a better sense of weight as they moved.
We made some changes to the Cephalos to make it more aggressive by adding sharper teeth, sharper fins and making it more muscular. Our partners at Black Ginger did the VFX for the Oasis sequences and developed the Cephalos and Apceros creatures.
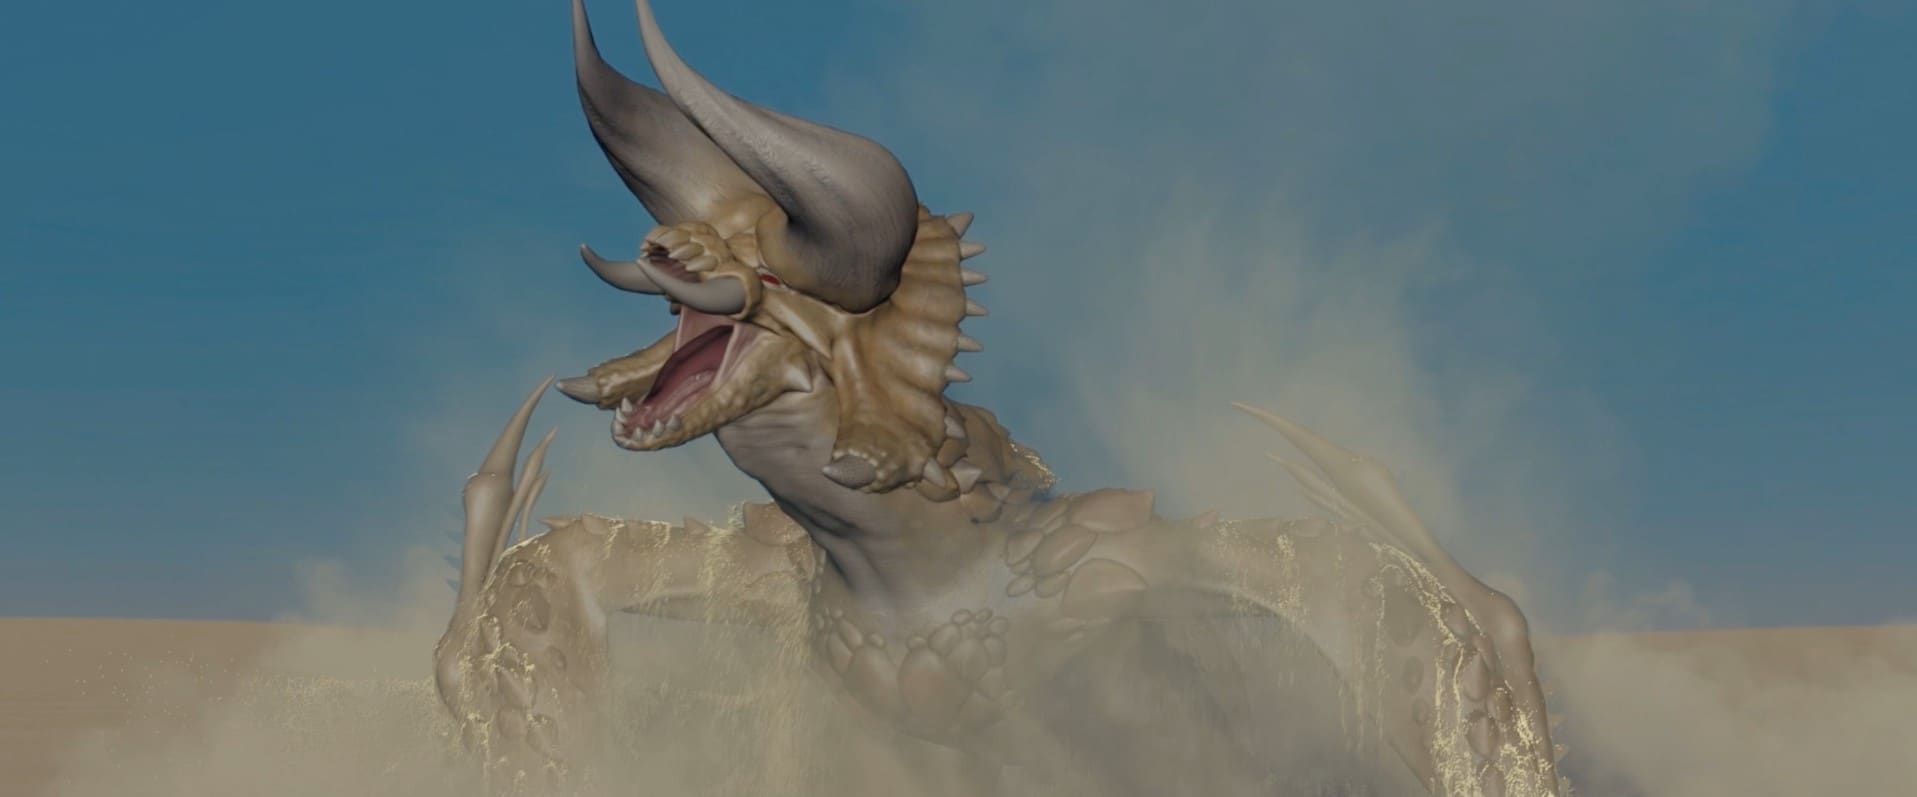
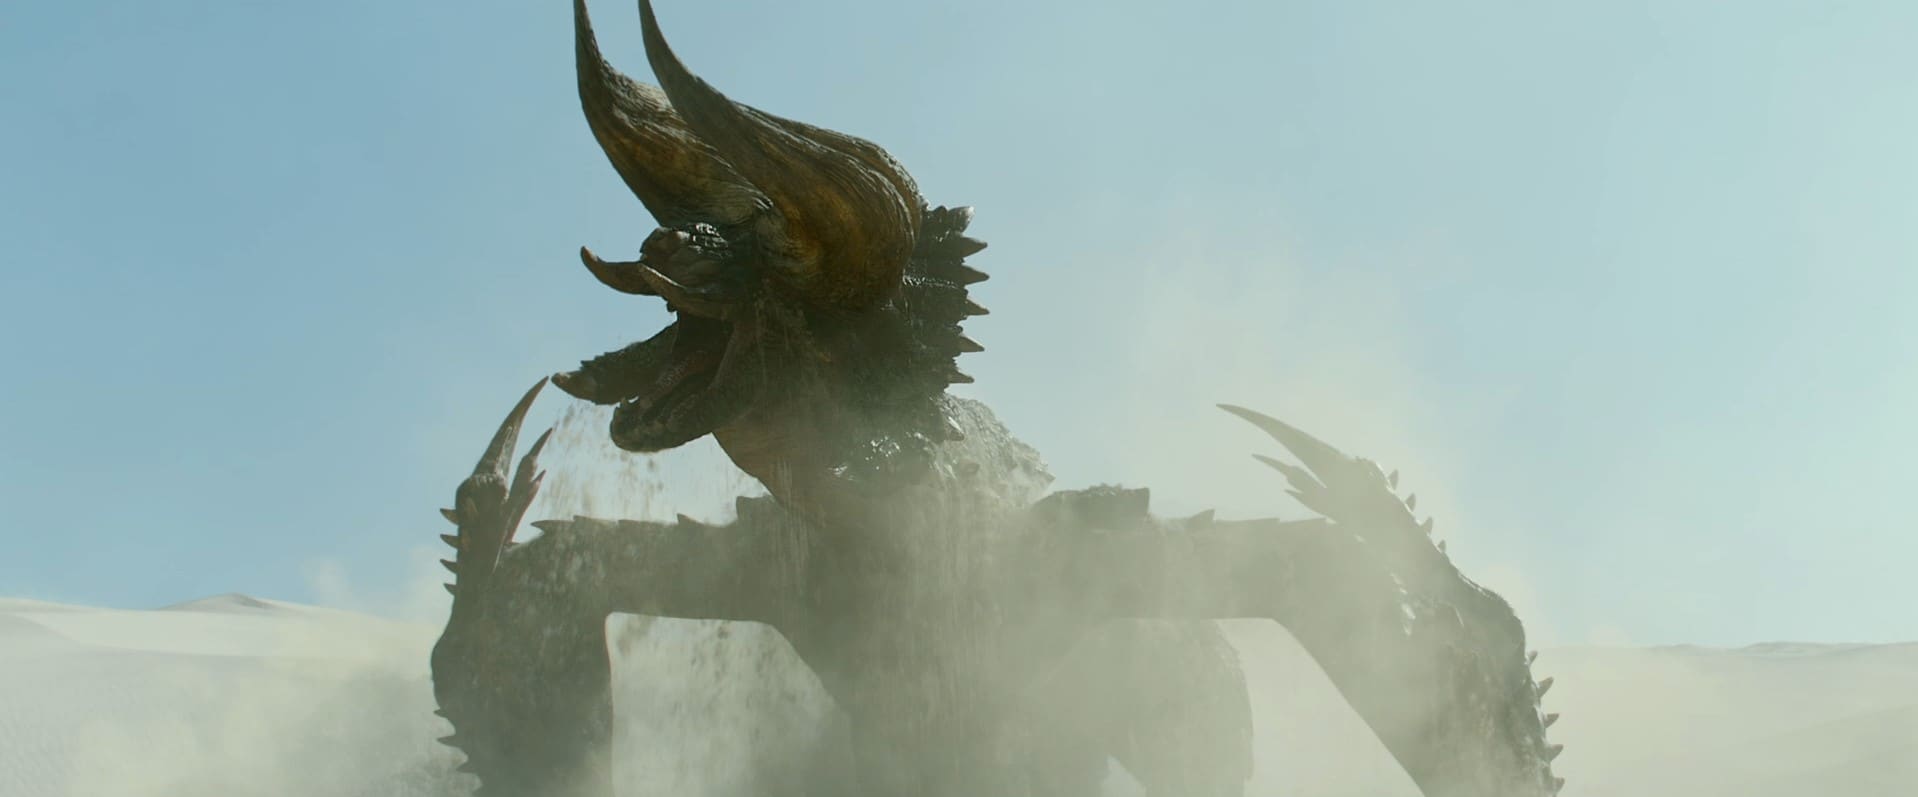
Development of the Diablos, Rathalos, Apceros and Gore Magala focused on adding finer details to the existing designs of the assets to bring them up to feature film quality. The Rathalos asset we built for our original pitch test differed slightly from Capcom’s design so we updated it to match the Rathalos design from Monster Hunter World much more closely. The monsters had over 120 4K UDIM texture tiles allowing for much more detail than was available in any of the original assets.
We collaborated closely with Capcom while developing the creatures and it was important to Paul W.S. Anderson, the Director, and Dennis Berardi, overall Visual Effects Supervisor, that we didn’t move forward with any design changes without the blessing of the team at Capcom.
fxguide: Did the on-set blocking and pre-visualizations change much once you were into post?
AB: We post-visualized most of the major sequences after principal photography wrapped. This gave us a chance to rapidly iterate on shots and make sure they worked in the edit before turning them over to full production. After shots were approved at a post-vis level, things usually went forward to final without any big surprises.


fxguide: I assume this was a Foundry Nuke pipeline? Were there any special gizmos, plugins, or Nuke tools you relied on?
AB: Yes, all our comp work was done in Nuke. PgBokeh and X_Tesla come to mind. We used PgBokeh to simulate the correct depth of field on our CG elements. Getting optical properties correct when trying to sell scale is extremely important, too little depth of field makes things feel miniature, too much can make shots feel flat and CG. Rendering with depth of field baked in isn’t feasible as any changes to focus distance or F-Stop could cost hundreds of render hours. PgBokeh solves this problem by giving us the ability to control these properties in comp and see the results in seconds. We used X_Tesla for generating lightning elements as part of a 2.5D solution to augment some of the weapon energy effects in the film in near real-time.
Due to the high shot count on the show and the need to be as streamlined as possible from lighting to comp we neutralized the plates for the major sequences. Lighting was done against neutral plates allowing us to re-use neutral light rigs with fewer per-shot adjustments due to differences in plate exposure or white balance. At the end of the lighting section of the comp the neutral grades were inverted and the rest of the comp could be done normally. This workflow significantly reduced the time it took to get shots integrated, allowing us to temp shots more quickly and determine what improvements we needed to make to bring shots to final.
fxguide: Given there was often fire or dust and other volumetric effects, how closely was the lighting working on the hero actors from onset, and how much did you need to ‘relight’ them to integrate them?
AB: The lighting on the hero actors worked well from onset, however, some of the onset photography didn’t include interactive lighting for muzzle flashes, weapon effects, lightning flashes, and fire so we did add interactive lighting to integrate the actors in those instances. We always seek to respect the original photography and comp our elements into the world of the plate, only adjusting the lighting on actors when necessary.

fxguide: Were there many body doubles used of the hero actors (Artemis /Milla Jovovich etc)? – I imagine there must have been a lot?
AB: MR. X Visual Effects Supervisor, Trey Harrell, directed the scanning sessions, while our partners from Black Ginger provided the rig, capture, and processing.
Every single actor and stunt performer in the film was scanned, and the entire principal cast performed FACS facial capture sessions within the same rig, providing pore-level solve detail, which was augmented by our cross-polarized texture surveys.
Digi-doubles were leveraged for situations where it wasn’t possible to achieve a stunt practically as well as for face replacements on stunt performers, the population of crowds on the Phoenix sandship and for full CG aerial shots.
fxguide: Were the hero weapons and props live/real or added/extended etc in post?
AB: All hero weapons and props were real. We scanned every weapon and prop that was used in Monster Hunter using the scan rig that was used for actors and stunt performers and made CG versions of each prop. We used high-resolution cross-polarized texture surveys as our basis for texturing these assets.
We used our CG props in full CG shots and match-moved them in plate shots to add weapon effects or extend some of the larger weapons. For example, there were two props built for the bone great sword that the Hunter uses, Tony Jaa’s character. One at full size which he used in most shots and another with a half-length blade that he used in challenging stunts where the full-size blade was too unwieldy to handle, we did CG extensions on shots where he used the half-length prop.
fxguide: How did you do the object 3D tracking?
AB: We used 3DEqualizer for all our camera and object tracking, then made refinements in Maya. Softbody rotoanim was done in Maya.
fxguide: Was there a close 3D LUT in use during the comps or was it only later that the final look got solved?
AB: The final look got solved towards the end of post-production. We made our own 3D LUTs to match the editorial dailies but had the freedom to change them if needed. We had all the footage shot for the movie at MR. X and transcoded the raw plates to OpenEXR ourselves. By the time we started sending shots to Deluxe for the final grade we had already established working LUTs for each shot and kept using them until the end of the project.
fxguide: You have done great action/monster type films in the past and you clearly have a strong lighting background, how did you work to facilitate making the lighting on the characters AND on the actor’s work?
AB: Like so many things in VFX making the lighting work relies on several things coming together. Most importantly we look to the onset photography to understand how Glen MacPherson, the Cinematographer, lit the shots. For all CG shots we would replicate his lighting design, for plate shots we would match into it. Much of the film is shot in exterior daylight with a lot of dynamic range, to combat this Glen used the sun as a backlight in many shots and then used a soft bounce to fill in the shadows on the actor’s faces. We took a similar approach to lighting the creatures.
The foundations of good CG lighting begin with good lookdev. If lookdev doesn’t work then you’re immediately struggling to make shot lighting work, so we developed and evaluated our lookdev in calibrated lighting environments. We also did technical reviews where we would check the various lookdev channels, e.g. albedo, reflectivity, roughness, etc. to make sure they were in physically plausible ranges. The process gave us confidence that our assets would respond to the shot lighting correctly.
Our shot light rigs were extracted from reference plates of chrome balls that were shot using the Arri Alexa LF onset rather than the usual workflow of shooting bracketed stills using a fisheye lens and stitching them to create an HDRI. Chrome ball reference plates were shot as separate takes just before or after the action was shot. Chrome ball reference plates contained: a chrome ball – for HDR extraction, and an 18% grey ball, and Macbeth color checker for calibration. We created CG equivalents of these 3 calibration objects and used them to calibrate our lighting to the reference plate. The advantage of this is we had a reference we could match that was shot with the same camera and lens combination as the actual shots. The disadvantage is that you’re getting less dynamic range compared to shooting bracketed stills to create an HDR.
We did chrome ball extraction in Nuke, converted to latlong and then used it as an HDR to replicate the lighting setup using our CG calibration objects. We extracted light sources from the HDR, converted them to area lights, and boosted them until our CG reference objects matched the reference plate. At the end of this process, we had a light rig that was ready to go for shots lit under similar conditions. Monster Hunter was shot on an Arri Alexa LF so the highlights of these reference plates clipped at around 55 in scene linear units. Converting light sources to area lights and boosting them to match the reference allowed us to recover that missing dynamic range and gave us the confidence we had a light rig that was in the ballpark of the original lighting conditions.
This process worked well throughout the show allowing us to set base lighting that matched into the onset photography quickly and from there we could add hero lighting to our creatures to help them look as good as possible.

fxguide: How many effects shots in total and how many Monsters ‘types’ did you provide?
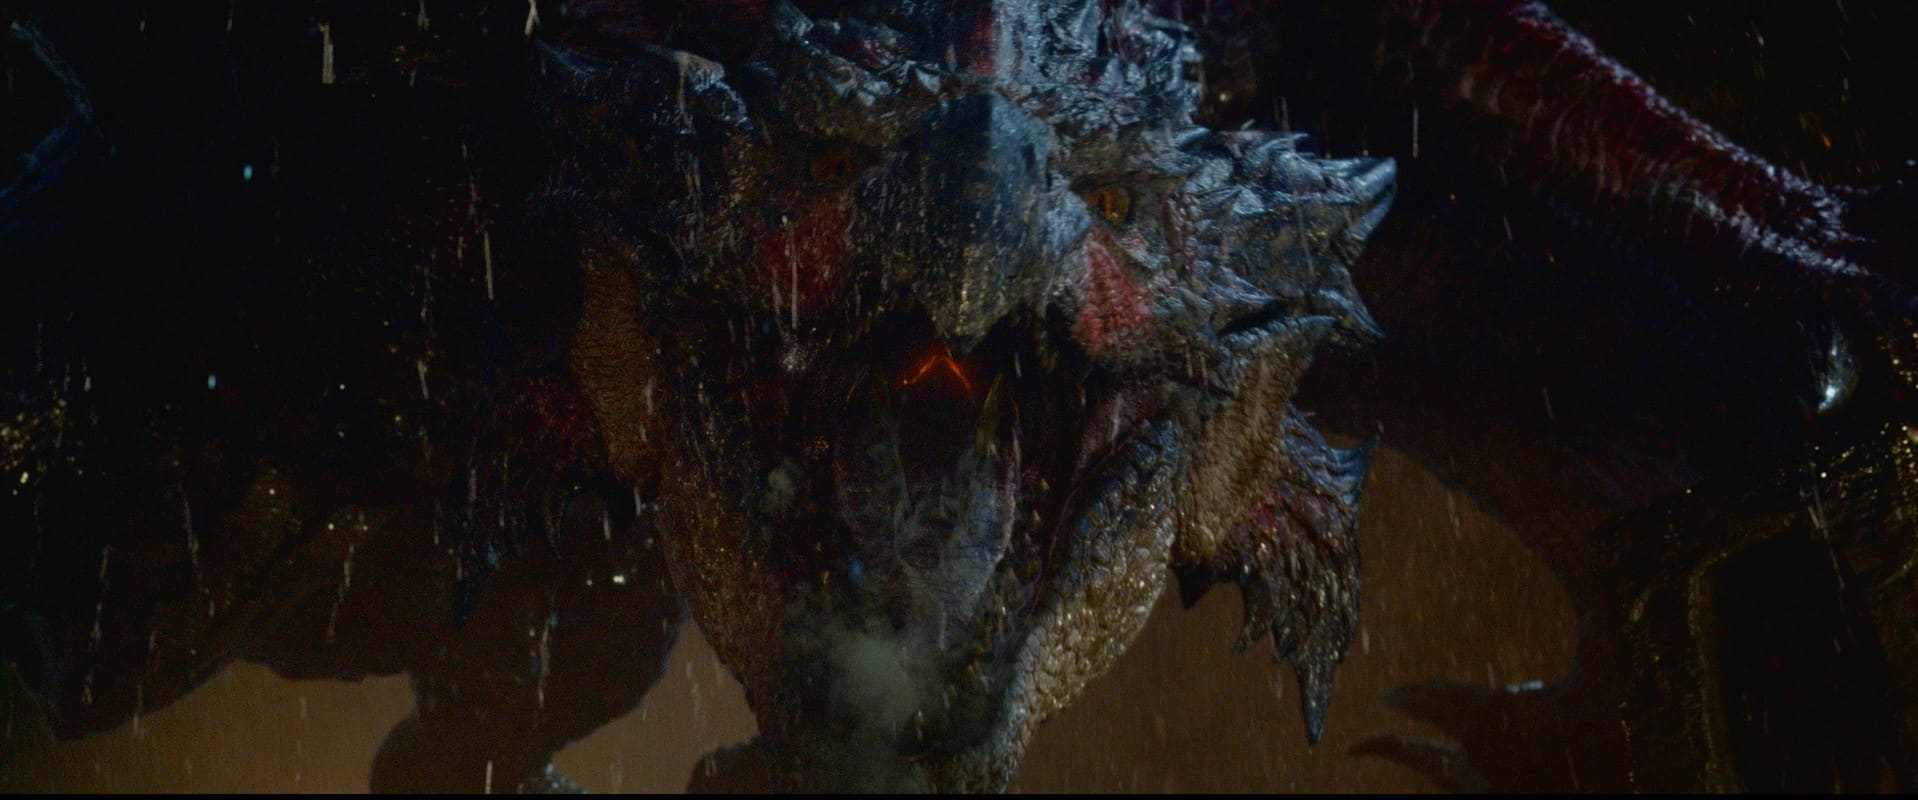
AB: We completed 1305 visual effects shots at MR. X and there were 1400 visual effects shots in total. There were 7 creatures: Rathalos, Diablos, Gore Magala, Nerscylla, Apceros, Cephalos, and Palico. The Diablos had 9 variants to capture the various damage states it took throughout the film, from losing a horn to getting shot in the face with a rocket launcher to getting a poison arrow in the eye we made sure there was continuity throughout the film and that the creatures always showed the damage they had accumulated up to that point. Visual cues to indicate a monster is weakening is a core theme in the Monster Hunter video games and we made every effort to replicate this for the film. Similarly, Rathalos had 12 variants to reflect the damage that he took throughout the Sky Tower and Final Battle sequences. The Nercylla had 9 variants which, combined with the ability to scale each asset as needed, gave us enough different looks that we could use them in large numbers without the audience noticing duplicates.
fxguide: What were the creatures rendered in?
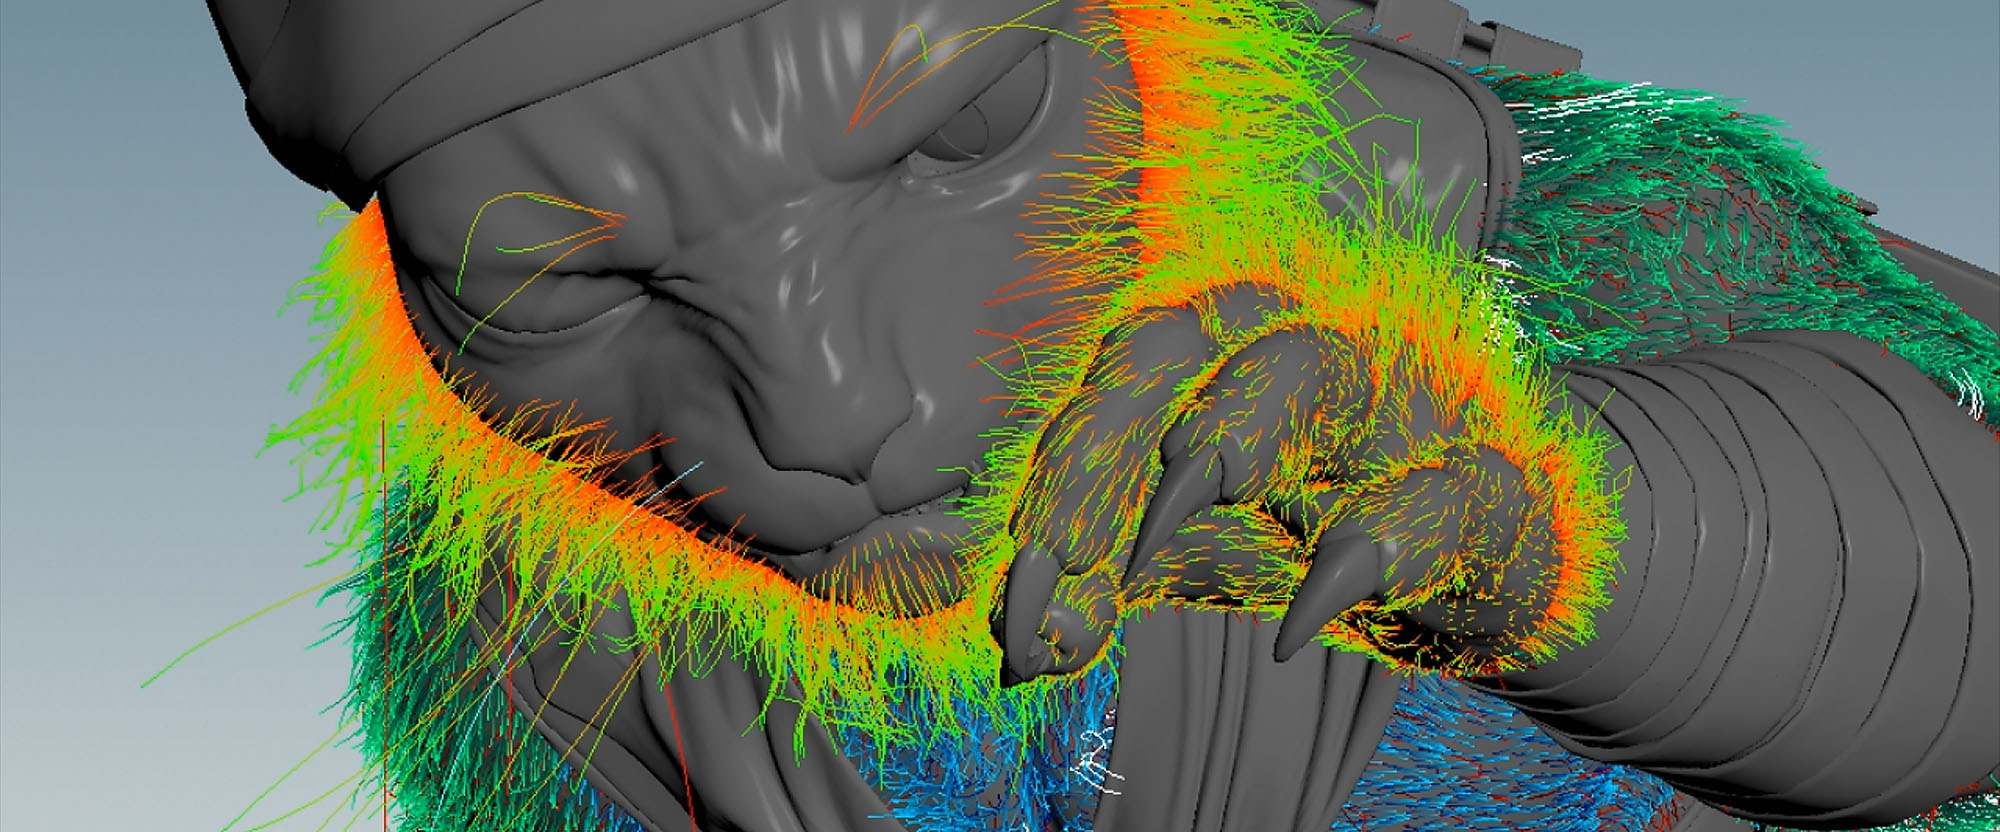
AB: Creatures were rendered in RenderMan through Houdini. Our lookdev was built around PxrSurface, we had custom MR. X nodes for texture reads and attribute binding but most of the shading networks used nodes that ship with RenderMan. We used a custom hair shader developed by MPC for the Palico’s fur. MPC and MR. X are both under the Technicolor umbrella, so we had the advantage of technology sharing. Fur shading is surprisingly different from hair shading and the MPC fur shader gave us impressive results compared to the default hair shader that ships with RenderMan. All geometry was rendered using alembic archives through the alembic procedural that ships with RenderMan. Palico’s fur groom was pre-cached to alembic before lighting and all of the fur curves were rendered directly. Volumes were rendered using OpenVDB.
fxguide: Were the renders split into lots of layers and passes? I assume so – if you did what do you find the most useful to manipulate to ‘final’ a shot.
AB: We rendered our elements into many passes and layers. We break our render layers out per-light, and break each light into components, so each light can contribute to diffuse, reflect, refract, sheen, sss, and coat. We also breakout emission (direct and indirect) and additional utility passes such as depth, rest position, normals, etc. We didn’t use Cryptomatte for the show so we also rendered matte IDs for comp. We have a gizmo in Nuke that assembles these passes to reconstruct the beauty and exposes a lighting control panel for lighters and compositors to adjust the influence of individual lights or components without breaking the rules of physically based rendering. These passes were typically not rendered deep. We also rendered deep images for many shots. By default, we would only render deep RGBA channels and use DeepRecolor in Nuke to transfer our flat renders to the deep data. With the amount of FX work in the show, we found this was incredibly useful in allowing us to push and pull layers back and forward in the comp. For example, the sand and dust in the Diablos and Phoenix sand ship sequences was rendered in Mantra and the Diablos and Phoenix were rendered in RenderMan, rendering deep allowed us to recombine these elements seamlessly but also gave us the creative flexibility to say push the ship deeper into the sand so it looked more shadowed or pull the Diablos forward so it was more visible. At the start of the show, we hadn’t planned on rendering deep that much but by the end of the show we were doing it on most shots that had creatures and FX elements.
fxguide: Finally, I would welcome your views on selling live-action and creature work at this high level?
AB: Selling creature work in a live-action film requires so many things to come together. If I had to summarize; the three main areas that contributed most to selling our shots were performance, lighting and atmospherics, and comp integration.
Performance of course because the way we animated these creatures formed the foundations of each shot. Moving a creature too slowly made it feel sluggish, moving it too quickly took away from the sense of scale and made it feel small. Finding the sweet spot where you convey an action in the time you have for the shot while getting the right sense of mass and scale was a tricky balance. We came up with a funny rule of thumb: any animation that we liked when played back at 24 frames per second always gave a better sense of weight and scale when played back around 16-18 frames per second. The takeaway from that for me was that it can sometimes come down to tuning just a few frames to get a performance to feel right.
Lighting and atmospherics, I think have to go hand in hand. Lighting is where the look of the CG comes together and you find out if all the work you’ve done up to that point is going to be successful. Good lighting design brings creatures to life. The first stage is of course matching the onset lighting but often a Cinematographer isn’t able to light for a CG creature because it isn’t there when they’re lighting the shot. This is where we have an opportunity to build on the set lighting by adding more CG lights or indirect bounce or negative fill and understanding how Gaffers, Grips, and Cinematographers work allows us to do this successfully. Another tool to craft more interesting lighting is atmospheric effects. Any time you can add dust or smoke or embers moving through the frame you’re making that shot feel more layered and interesting. We employed this technique throughout the film. In the real world, this kind of stuff is always happening naturally, sometimes it’s enhanced deliberately with smoke machines being used on set or other practical effects. These subtle additions may not even be consciously noticed by the audience, but I think they help in making better shots.
Finally, comp integration is where it all comes together. There are so many subtle things that have to be dialed in. To name a few: vignetting or softening on the edges of the frame as you would get with a real-world lens, depth of field, exposure and white balance, atmospheric diffusion, grain, chromatic aberration, bloom, or flaring, etc. Each of these areas contributes to the success of a shot and much of our time in comp was spent tuning these attributes to find the right balance for each shot.
One of the things I love about working in Visual Effects is that every project brings a new set of lessons and challenges and Monster Hunter was no different. One of my main takeaways from this project was the importance of developing my eye and gaining a better sensitivity to all of these subtle things that individually may not make a big impact but combined can make all the difference in the world.
Monster Hunter is now on Amazon Prime.