“The way that visual effects are these days is that we definitely are the can-do department,” – Chris Townsend.
Chris Townsend, the overall VFX Supervisor on Marvel’s Iron Man 3, reflecting on the crucial role his department played in bringing the film to the big screen. Along with visual effects producer Mark Soper, Townsend co-ordinated 17 studios across the globe and more than 2,000 shots for the Shane Black-directed picture.
fxguide breaks down the major sequences and shots from Iron Man 3, which this time around featured multiple suits realized by multiple vendors and a powerful sub-surface skin effect known as Extremis. You can also listen to our fxpodcast on Iron Man 3 with Digital Domain VFX supervisor Erik Nash.
Suits and skin
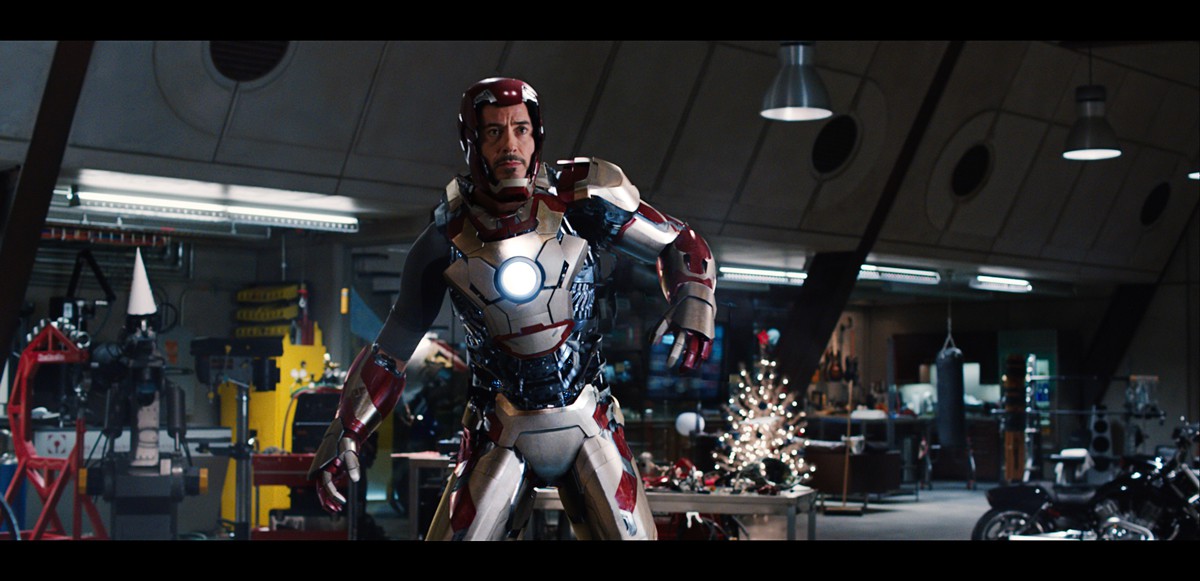
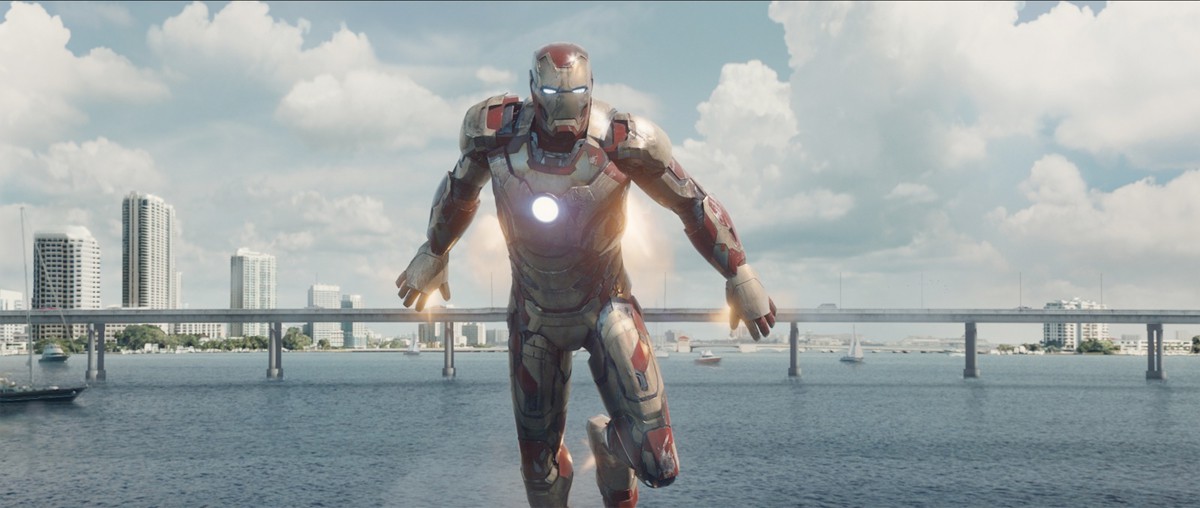
Although each preceding Iron Man film and The Avengers had of course featured CG Iron Man suits, this new outing would break new ground in number, design and sheer complexity. “We still had to be aware of the history of the suits in terms of where it had come from,” says Townsend, “but every film advances the technology more and there’s more of a whiz bang feel about the next suit in each film – we’re up to Mk 42. It can fly as individual pieces, and wrap around characters and fly as autonomous beings.”
A relatively short post-production schedule and a wide variety of sequences meant that multiple facilities worked on the Mk 42 at one time. Digital Domain lead the original design and modeling effort, while at the same time Scanline and Trixter created suits for their shots. Consistency between VFX houses was enabled via constant sharing of OBJ files as well as shader looks and animation performances.
https://player.vimeo.com/video/65540115
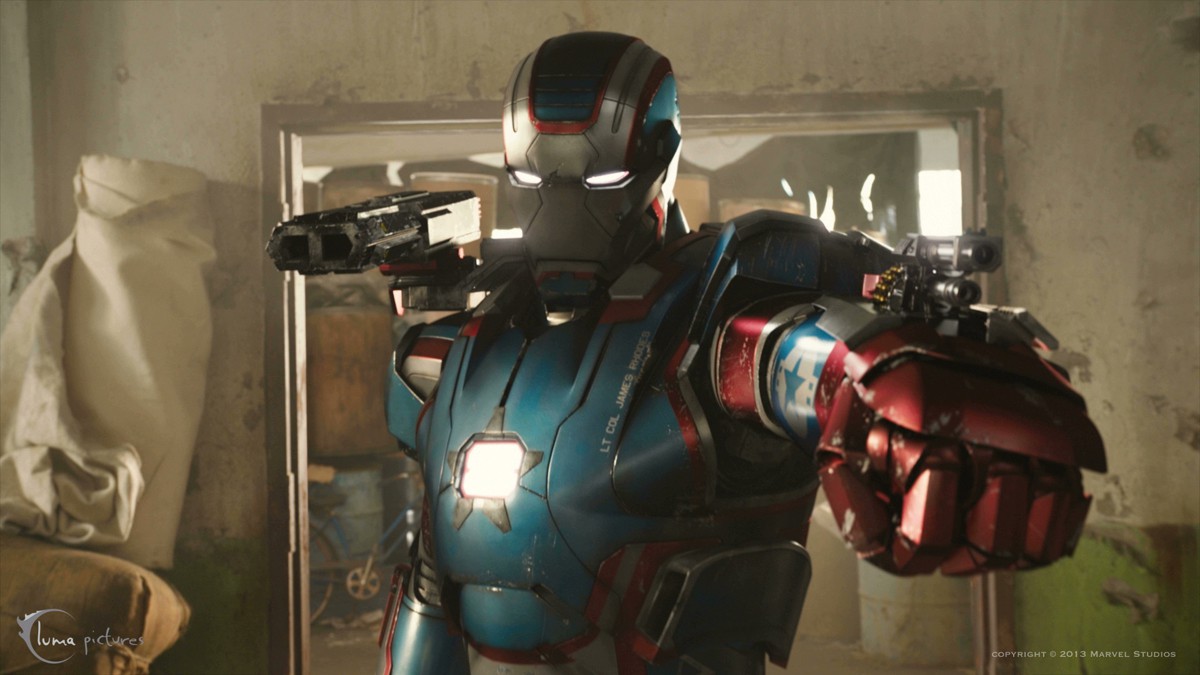
Above: watch a breakdown of Digital Domain’s VFX for an Iron Patriot scene in Iron Man 3.
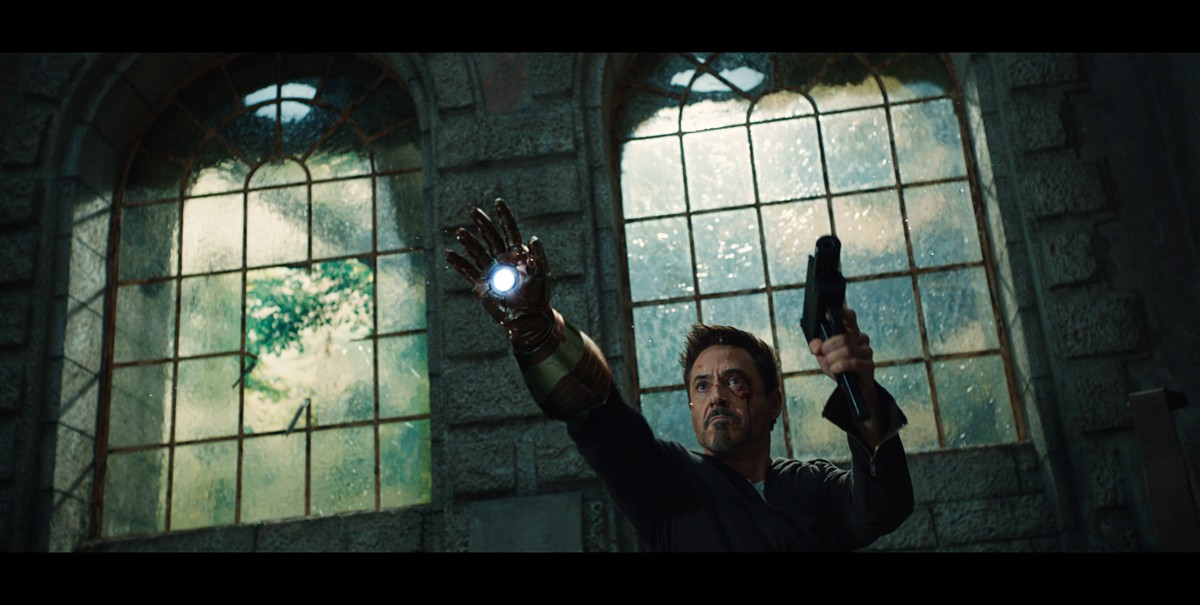
On set, production filmed with portions of practical suits crafted by Legacy Effects, including a half ‘football’ jersey style painted with a metallic finish and ‘clamshell’ pieces of suit, soft-suits and half-helmets, both for the Mk42 and for Iron Patriot (a red, white and blue version of War Machine). “Even though the suits often become replaced,” notes Townsend, “the actual reference you get as you shoot those live action suits, either as a maquette or a partial suit being worn, the actual lighting reference is invaluable. It also restricts the body movements a little bit, which is the right sort of performance.”
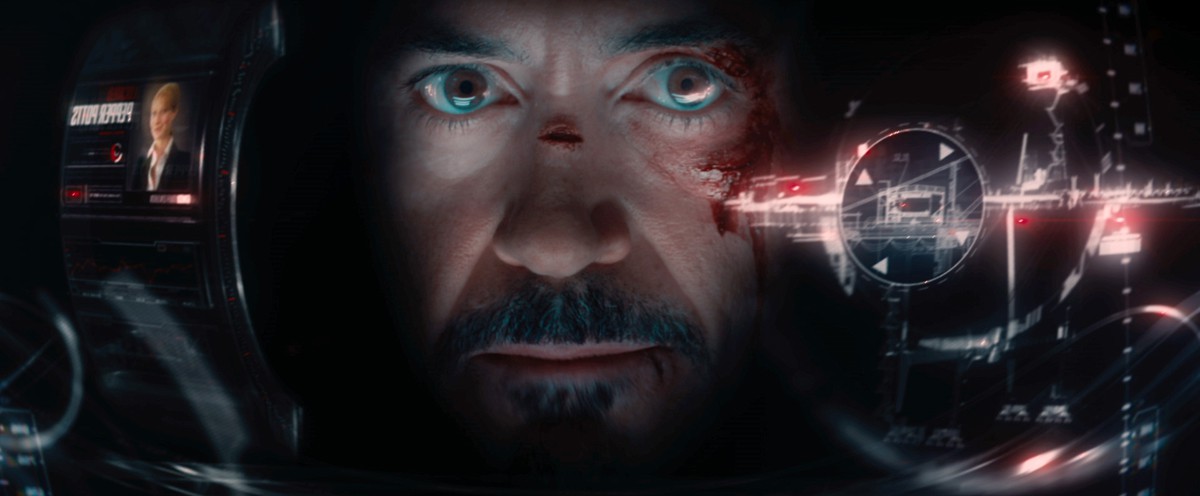
VFX plates for the suits always made use of HDRIs, LIDAR scans, photo texture shoots and gray and chrome sphere reference. “Invariably we’d shoot a soft-suit with Robert then we’d also put tracking markers on his trousers,” adds Townsend. “He would also wear lifts in his shoes or be up in a box so he’d be the correct height – Iron Man is 6″5′. During shooting we used multiple witness cams, Canon C300s, and we had two or three running whenever there was an Iron Man or Extremis character.”

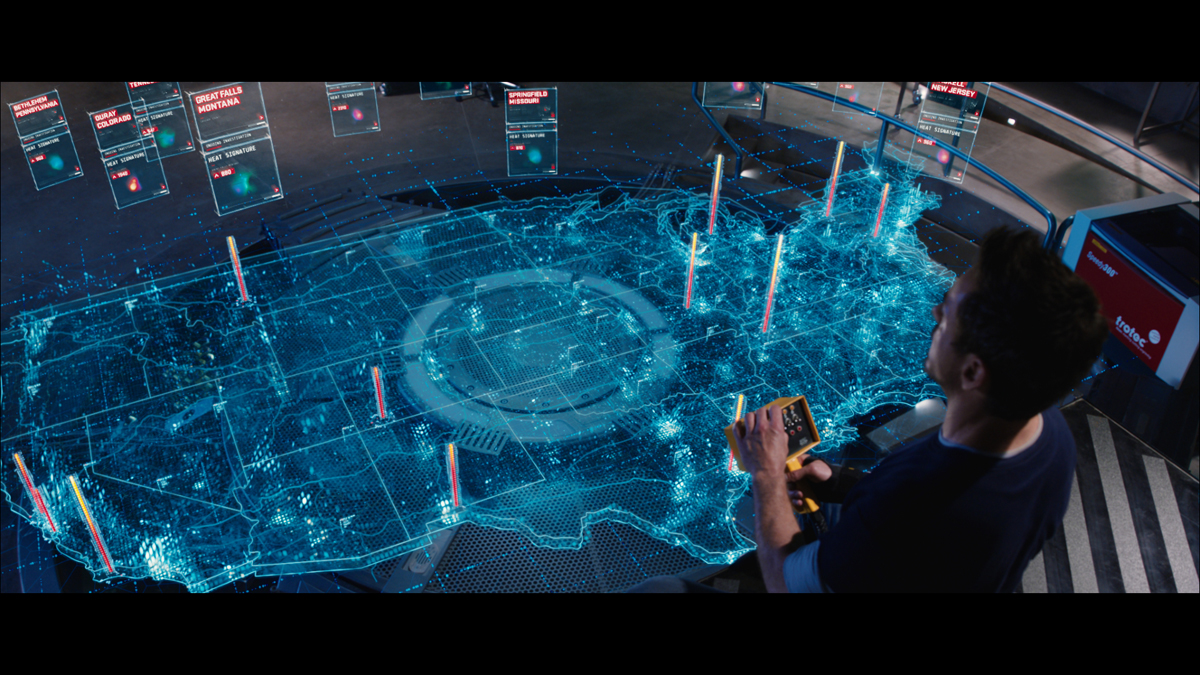
The Extremis effect was, with the newly designed suits, the film’s other big visual effects challenge. “It was an internal glowing sub-surface volumetric effect,” explains Townsend. “It makes them stronger and helps them re-generate areas of their bodies. There’s a glitch in the system and the story is about finding out what that is.”
Townsend and Shane Black wanted to ensure that the Extremis look was, however possible, still grounded in reality. “How do make a guy who glows orange and explodes look real?,” Townsend jokes. The answer lay in referencing actual phenomena such as the aurora borealis, x-rays and how things looked photographically when you seen inside the body. “We wanted to steer clear of the medical look and keep a bit of mystery,” says Townsend. “We looked at time lapse photography of decaying fruit and vegetables and played it back to see if this organic process of re-growth and rebuilding. We looked at time lapse of cars driving through the dessert and there would be streaks of light flashing through the desert – they were very reminiscent and inspired these energy ribbons that were very organic with pulses of energy.”
Previs, planning, shooting
Iron Man 3 was filmed mostly in North Carolina, with some scenes captured in Florida, Los Angeles and China (there is, in fact, a unique Chinese version of the film with additional characters). DOP John Toll, ASC shot predominantly on the ARRI Alexa. StereoD completed a stereo post-conversion. The VFX houses involved included Weta Digital, Digital Domain, Scanline, Trixter, Framestore, Luma Pictures, Fuel VFX, Cantina Creative, Cinesite, The Embassy, Lola, Capital T, Prologue and Rise FX.
With so many action sequences and visual effects, the filmmakers turned to The Third Floor for previs and postvis work. This included the attack on Tony Stark’s mansion, the Air Force One rescue, the Rosehill town fight and the seaport finale. “We also provided techvis for several of these, including the Malibu attack and Tony’s ‘suit connect’ sequences,” says previs supervisor Todd Constantine. “We built/used the upper living room level and lower garage level of Tony’s mansion so we could make sure all of our cameras would fit in such a closed, specific space.”
“Marvel’s Iron Man 2, which we also worked on, only had two suits,” adds previs/postvis supervisor Gerardo Ramirez. “In Marvel’s Iron Man 3, we learn that Tony has been busy creating more toys for himself. One challenge we faced was helping define the characteristics of each suit, its features and how they moved and worked. The fun part was helping determine how the different traits that each suit has would help push the story forward and in the end help Tony survive.”
Perhaps the most complicated sequence to previs was the final seaport battle. “The scope of the end battle was a challenge,” says Rameriz. “There were various stories that needed to be told and we needed to make sure each action helped move the story to the next scene. As the edit evolved, the VFX editors would send me the updated plates and our team would adjust the shots to the new concept, delivering back revised postvis frames. This workflow allowed the director and editor to explore various options to tell the story.”
Check out the scene breakdowns below, identifying the challenges faced by the VFX vendors on the show, and how they solved the issues facing them.
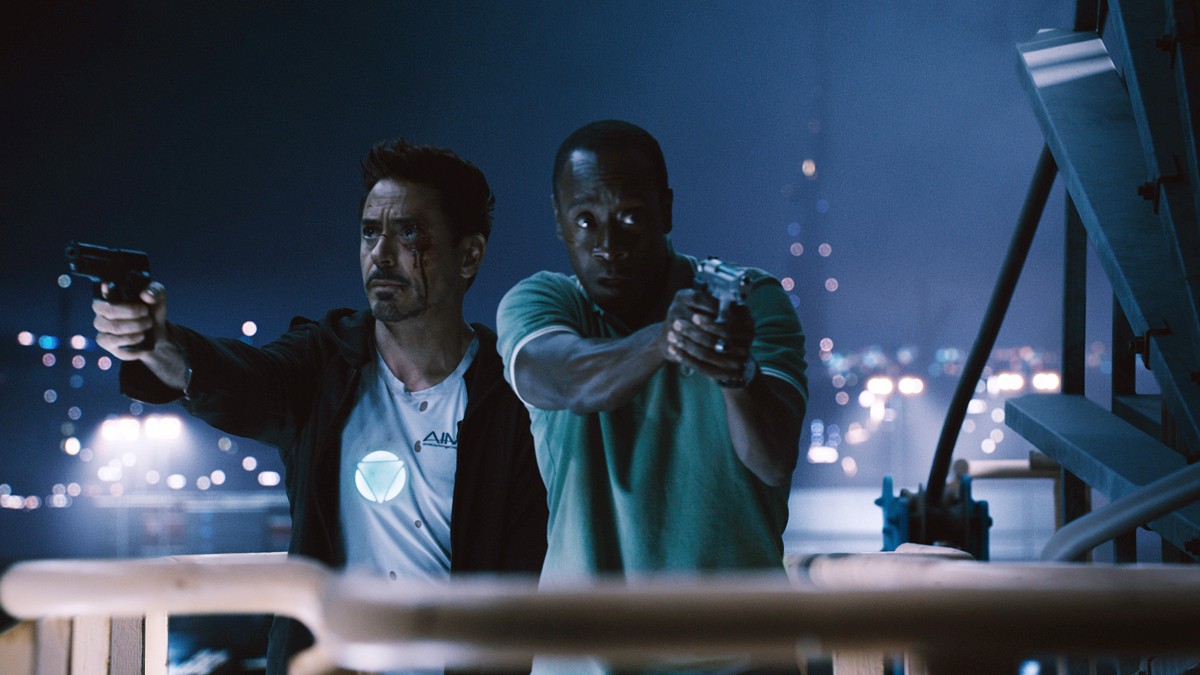
Suit connect
The challenge: Make individual Iron Man suit pieces autonomously fly onto Tony Stark to connect as the Mk42, initially for a Comic-Con trailer playing some 10 months before the final film opens.
The solution: Trixter took on the the suit connect sequence, designing suit pieces and the final shots – they got the call in May 2012 and completed a version of the sequence at the end of June.
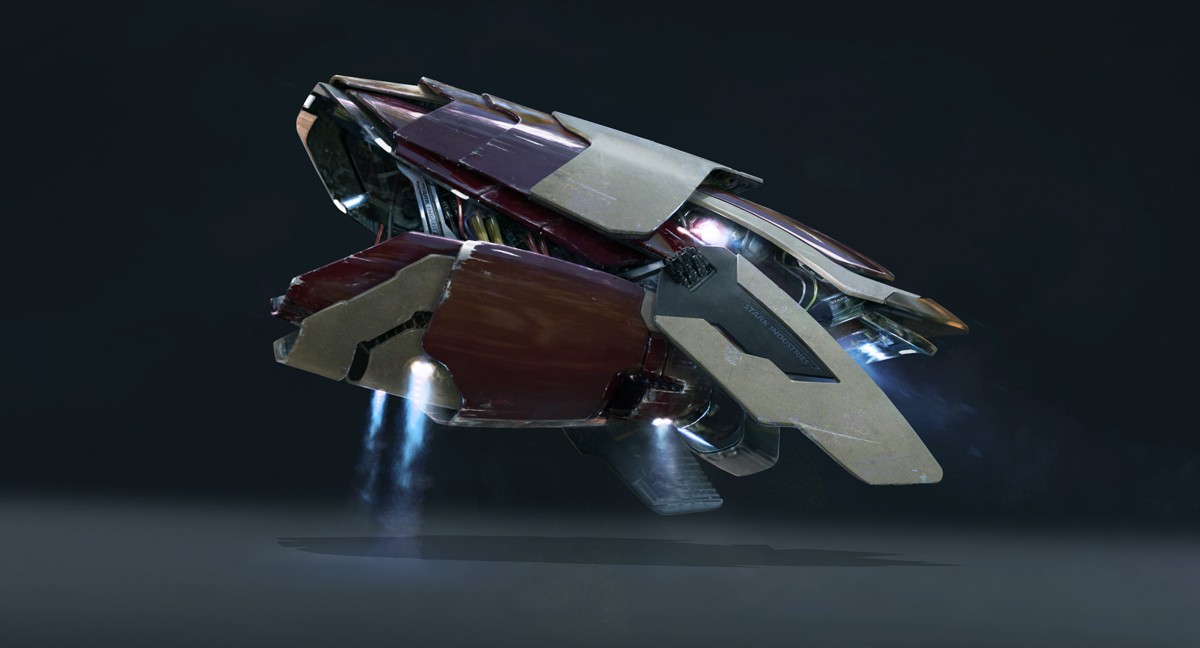
Beginning with The Third Floor’s previs, Trixter developed droplet shaped pieces in lookdev and shot design prior to principal photography. The shots called for pieces of the suit to be lying around Stark’s lab, which when summoned would activate and propel themselves onto his body, finally transforming into the individual suit sections and undersections as they connect. “We had to use actual elements of say the final glove but shuffle them around to make it look different,” explains Trixter visual effects supervisor Alessandro Cioffi. “Sometimes it was funny because we got comments that the pieces looked like a kitchen tool or a coffee machine, so we had to refine the design. It had to look cool but be functional to our purpose. The suit was eventually split into 24 parts.”
On set, Downey Jr wore tracking markers mainly just for reference, with witness cams also relied on for matchmoving. He was also often in a fully wired rig which had to be removed from the final shots.
Animation-wise, the suit pieces went between three stages: totally unconnected, transforming and final. Various animation vignettes were designed and could be called upon later for other suit forming shots. The particular challenge for Trixter was that Robert Downey Jr moved quite frenetically during suit connections, especially when he was hit and being thrown around. That necessitated a (successful) standalone greenscreen test to ensure that an actor could be roto-mated.
The final suit pieces and final suit itself was made up out of brushed gold, a red slightly matte finish, dark metals for underneath the suit and for cables and other parts and a ‘champagne’ matte non-reflective metal with a fine grain. An iconic landing shot of the full Mk42 referenced Marvel imagery and used a re-projection of Downey Jr’s face. Trixter relied on a Maya and RenderMan pipeline, moving into Katana for lighting half-way through production. Effects additions were done in 3ds Max, FumeFX and rendered in V-Ray.
For subsequent shots featuring the fully formed suit ‘mirroring’ for Stark as Pepper arrives home at their Malibu mansion required a unique approach to animation for this new ‘domestic’ setting. “We had to make it seem like RDJ was in the suit even though he wasn’t,” notes Cioffi. “How would he act, how we would walk? Then he approaches Pepper and puts his hands on her shoulders and does a gentle massage. Then she figures it out and the suit is standing next to her (so the audience knows it’s empty) and we had to switch to a different character that wasn’t RDJ. There was a lot of subtle animation there.”
Trixter also contributed to a fight scene later in the film when Stark takes on some adversaries with just a glove and boot attached to his body. A somersault shot in that sequence proved particularly challenging. “Chris Townsend was on set and he called me and said hey we’re running into a little problem where there’s a very dangerous stunt RDJ needs to do and this cannot be shot on location,” recalls Cioffi. “So we needed to shoot it in a green box and bring the action inside the room.”
“Chris shot HDRs for the room from each corner plus two extras and a LIDAR scan of the location,” continues Cioffi. “We matchmoved the green box scene for the complicated camera move. We reprojected the room onto the model and enhanced the action, we could move the shot around and re-create the smoke, feathers and FX coming from the boosters from boot and glove.
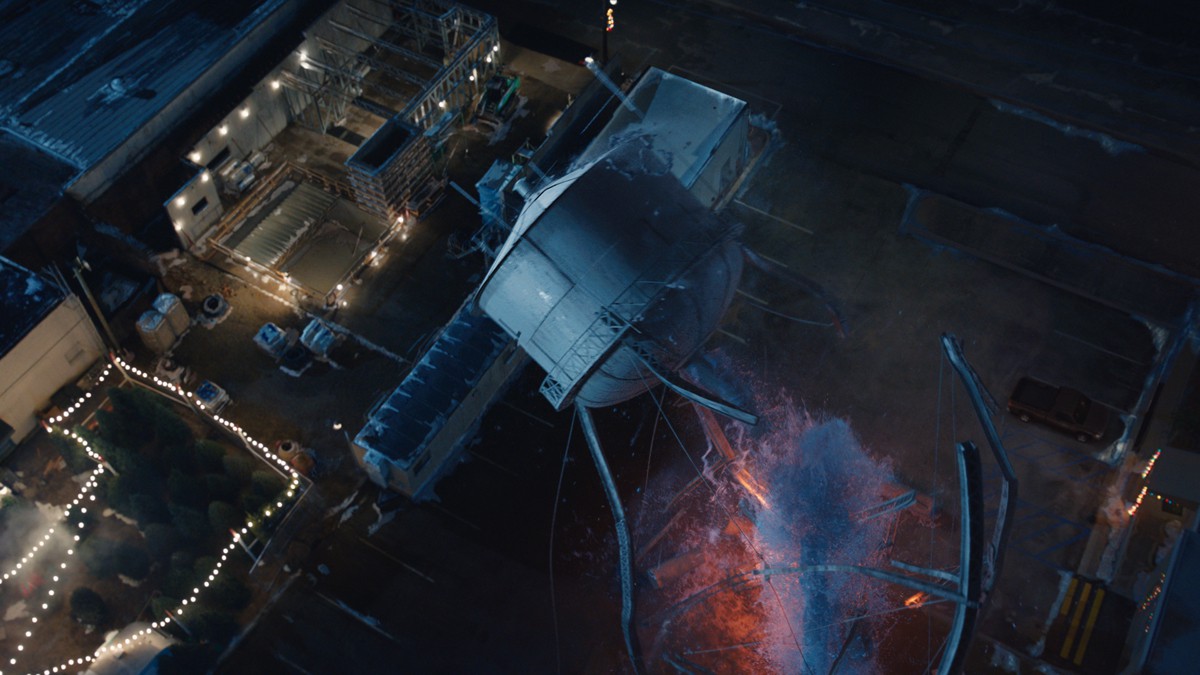
The house attack
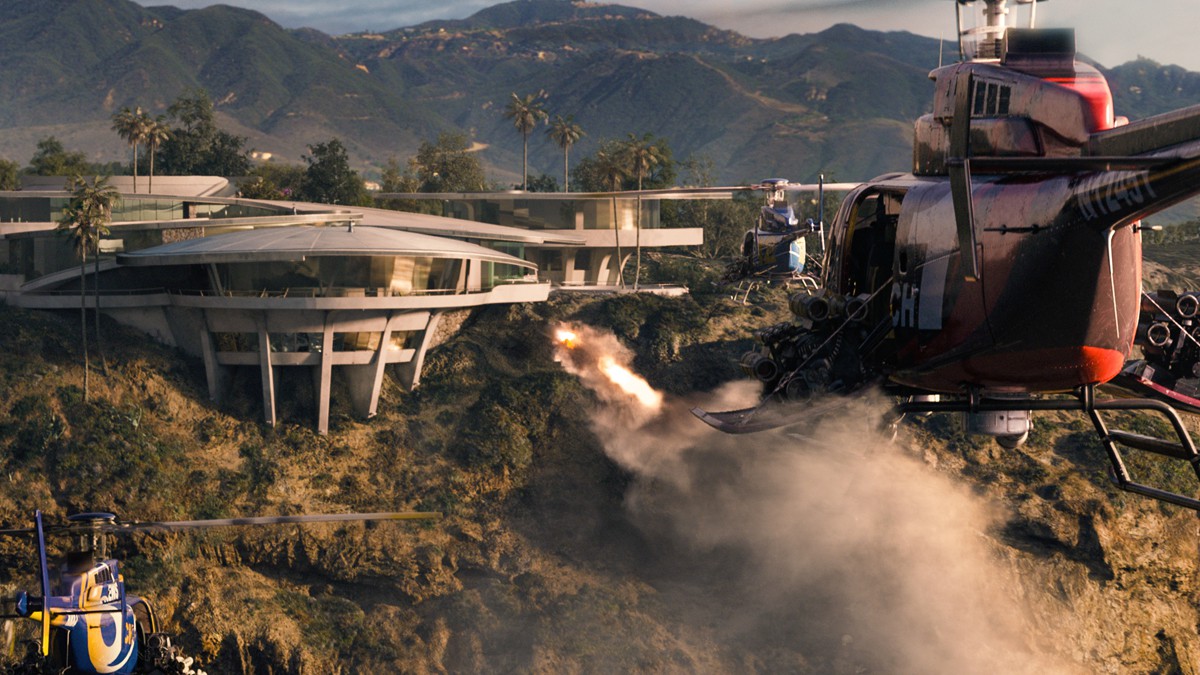
The challenge: Destroy Tony Stark’s Malibu mansion – which doesn’t really exist – inside and out and make it crumble into the sea below.
The solution: Scanline devised the visual effects for the sequence almost entirely digitally.
Stark’s house had been established in the previous Iron Man films – it’s location in Malibu was real and had previously relied on background aerial plates with a CG house. “However, very recently they passed an ordinance that you couldn’t fly helicopters as close as before for the shots we required,” says Townsend. “We also realized we needed to see so much more during the day and we had to re-sculpt the cliff so that we could show the cliff and house falling directly down to the water. So we had Scanline create the attack as a photoreal CG sequence.”
Watch part of the house attack sequence.
Based on The Third Floor’s previs, Scanline created an early test – started again even before principal photography had begun. Plates from Iron Man and Iron Man 2 served as reference, and additional photography for textures and locations were also captured. The shots progressed over the course of year with continued refinement, including as the time of day of the attack became near sunset. “Chris Townsend had just got a new iPhone 5,” recalls Scanline visual effects supervisor Bryan Grill, “and they were shooting some scenes in Miami with a helicopter and he had shot the helicopter flying below near his boat just with his phone and we used that as a reference because it showed the different way the sun was hitting it.”
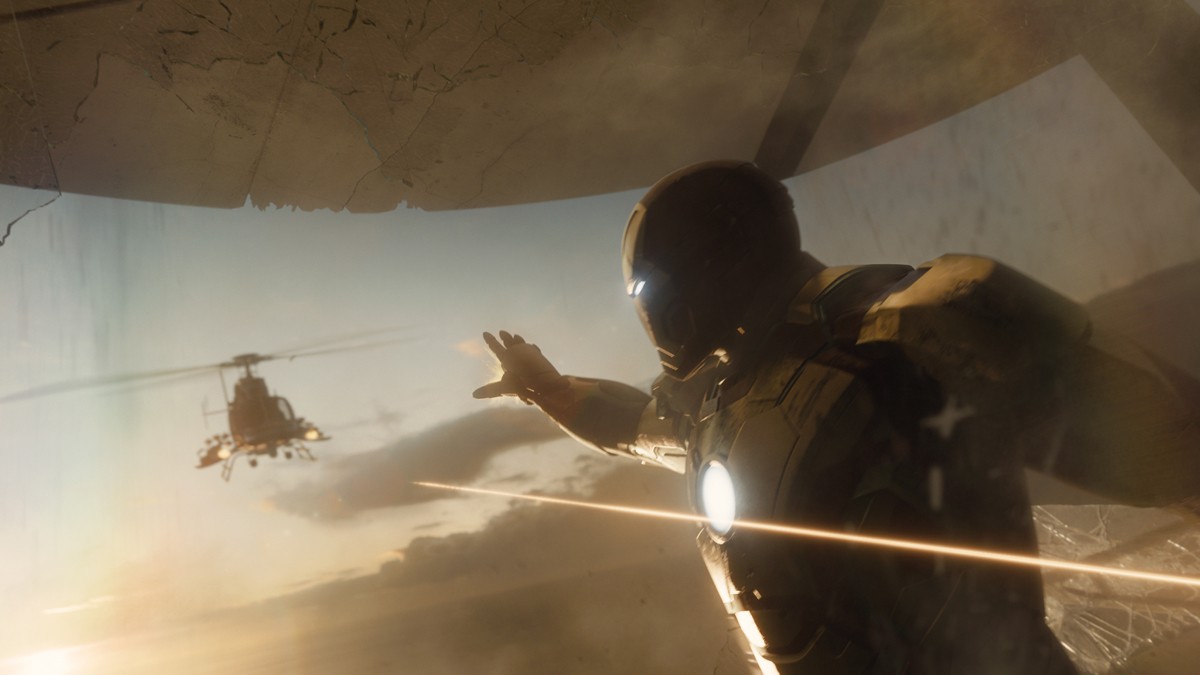
The choppers launch missiles on the house, sending Tony, Pepper and their visitor Maya Hansen flying in slow motion amongst a wealth of debris, before Stark summons the Mk42 suit pieces to save his girlfriend. Scanline had been developing its own Iron Man suit asset, working in Maya and V-Ray, with animation supervisor Bernd Angerer overseeing the suit pieces and final suit animation. “Graphically it was quite aesthetically pleasing to see a shape that is more like a flying object than just a chest plate flying across the room,” says Angerer. “It just has more aesthetic appeal. And it made more sense from a functionality point of view that it was built out of these plates that were sliding into each other – they don’t compress in a way but they are more mechanical in terms of folding and unfolding.”
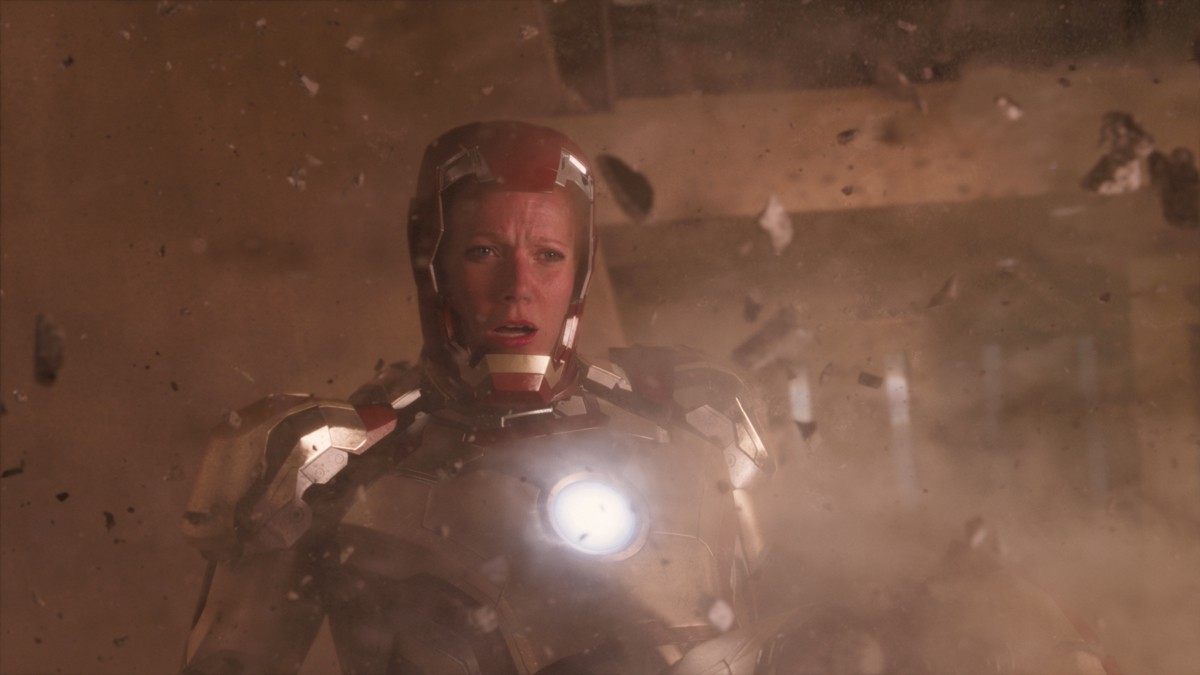
“We had a matchmoved rig that matched Robert Downey Jr very precisely,” adds Angerer. “In parallel we worked on another rig that consisted of those individual pieces and there was a system that hooked them up. In the end it would re-assemble the actual suit but made out of the little pieces. We had a few scripts that matched the two rigs. We really developed our own new Iron Man 3 animation style in a way which was based on what had been done before but has its own spin to it.”
For shots inside the mansion, production built the set on hydraulics, split into two pieces and choreographed action with debris, smoke and bullet hits. Scanline augmented this with digital destruction and the CG suit, comping in Nuke. Although Iron Man takes out one of the choppers, the mansion and cliffside give way and slide into the ocean below. “We used Flowline for the simulations of the smoke and the water, and we also used Thinking Particles for the RBD damage,” says Grill. “Then there are the little bits and pieces that follow – the cliff has its own dust and rocks falling, the water is bubbling and splashing.”
Now underwater, Stark in a damaged Iron Man suit is weighed down with all the debris, seen through a murky environment. “We used atmospherics and bubbles and what I call the ‘soup’ because there was so much debris falling into the water,” says Grill. “We really started thickening up the water and adding multiple layers of articulates. It sometimes did still feel like we were in an aquarium – we were seeing water, we were seeing underwater. but it didn’t feel like we were immersed in water and so we added particulates hitting the camera lens and things right at the lens to make you feel more engulfed in this distress.”
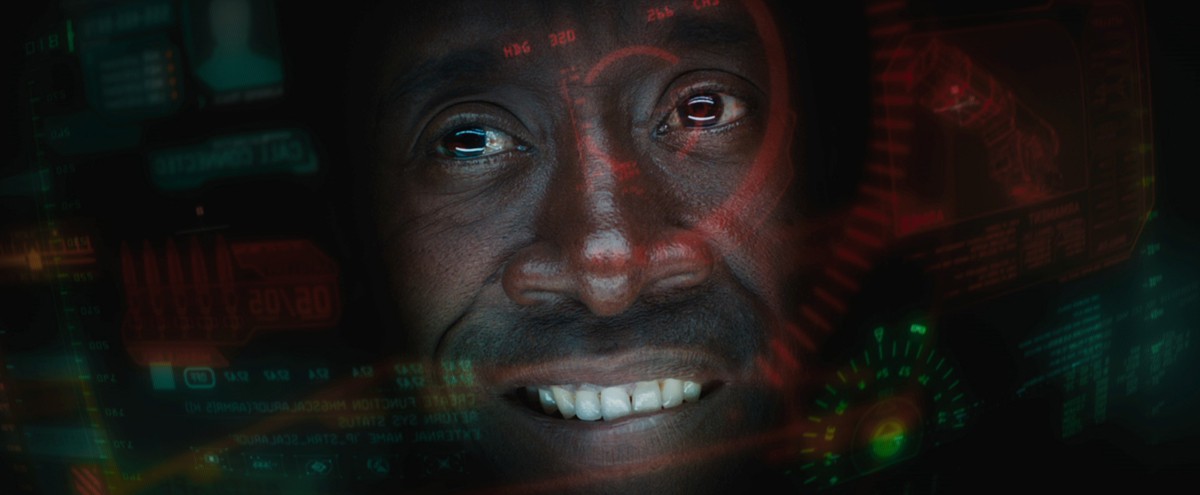
Heads up
The challenge: Almost as recognizable as the suits themselves are the Iron Man HUDs – how do you draw on previous work and up the ante?
The solution: Cantina Creative delivered upgraded HUDs to match the new suits seen in the film.
Cantina visual effects supervisor Venti Hristova says there were several new effects in the Iron Man HUD. “For example, the lights on either side of the external HUD gadget, those two laser lights we built into the actual HUD design as a motif of where the actual holograms emanate from. We also integrated a shelf component in the base of the HUD which really utilized the three-dimensional space – the Z-depth – a lot more than we ever had in the past. We took that to the next level and gave the graphics a tactile component. We built them out to have light interactive features. They glow a certain way – they don’t feel like 2D graphics anymore. They feel like glass holograms that could exist in a photoreal sense.”
The HUD for Iron Man was formed through 2D concept artwork and then brought into the 3D ‘HUD world. “We try and bounce off the suit design and incorporate design motifs from the suit into the HUD, notes creative director Stephen Lawes. “The HUDs in the other films really started off as just graphics in space and now have a much more holographic feel to them which gives them more of a sense of realism – like they live in the space a little bit better.”

POV shots were also given a slightly different feel. “Chris Townsend wanted parallax in thee POVs which at first seemed like such a strange thing,” admits Hristova, “because how do you see parallax when there’s no motion – it’s locked to the frame. So we had to drift the left and right cameras in such a way that it would create on the X axis a parallax between the elements to make it seem as though when a human eye is looking at something and moving slightly you’re going to reveal more.”
The graphics were created in After Effects with a team of artists and production staff including Sean Cushing, Lily Shapiro, Alan Torres, Leon Nowlin, Matt Eaton, Aaron Eaton, Lukas Weyandt, Jon Ficcadenti, Johnny Likens and Jayse Hansen. Says Hristova: “We’ve used as much of the 2D cheat mechanisms as we can to create a really awesome three-dimensional texture. We’ve also used a lot of plugins – the optical flares, chromic aberration which gives a really nice texture on the periphery of the HUD which displaces the light and makes it feel even more light interactive and translucent, and Cinema4D and Maya.”
“The house attack sequence uses primarily C4D to generate the sexy three-dimensional elements in the radar,” adds Hristova. “We created the 3D graphics in C4D and then the barrel of monkeys freefalling sequence used Maya. In that scene, the entire scene transforms from a 2D After Effects space to absolute 3D Maya elements on both sides.”
For some of the new Iron Man suits appearing in the final battle, Cantina adapted their suit designs for the graphical display. “Shotgun, for example, looked very angular and the colors are very white and gray, so we used that motif and designed a HUD that was almost TRON-like,” says Hristova. Then another had more of an Asian inspiration and so we created these light spectrums in the foreground. Nightclub has a round repulsor transmitter so its HUD design was semi-circular. Hammerhead’s POV was almost aquatic so we followed that design sensibility.”
Hologram stories
The challenge: Kilian shows Pepper a brain hologram, and Tony Stark researches the aftermath of the Chinese Theatre bombing.
The solution: Using deep image, FUEL VFX crafted the holographic sequences to help immerse the viewer into the story.
“The brief for the brain hologram was not to have an instantly recognisable representation,” says FUEL producer Jason Bath. “It needed to be a more ethereal and beautiful interpretation so we looked to stay away from any ‘traditional’ depiction of synapses. Instead we researched modern DTI (diffusion tensor imaging) scans of the human brain, and with the help of data supplied to us from university researchers, created a base CG model of the brain’s fibre pathways. We used these curves to animate light moving within the brain. The outer surface of the brain was a separate model with different shaders, and it’s visibility and lighting intensity were constantly shifting.”
Deep image was used to render the layers of the brain that Killian and Pepper. “This provided greater control in the balancing of the multiple, semi-transparent passes, and provide flexibility in adjusting depth of field in comp,” explains Bath, who also says the stereo nature of the production impacted this approach. “As we were re-comping most of our shots in stereo on converted plates we knew we could not employ any of the usual 2D tricks to get the mono shots completed, if that would stitch us up for the stereo delivery. So the comp leads always had to be thinking ahead in that regard.”
After the bombing at the Chinese Theater, Tony Stark investigates the site using a holographic re-construction of the scene. “We had to track the camera and rotomate the actors in some cases – especially when Stark was moving his hands to control Jarvis,” says Bath. “We built all of Stark’s garage in 3D because we needed to be able to have our holograms intersect and collide with those objects (there is a LOT of CG lighting interaction with the live action set). The garage model had to be exact because we knew it would all have to track – and stick – across all of the various angles. The fact we were re-comping the shots in stereo meant there was no room for error. The tracking of the camera and set was all done in 3DE which was helped by having a lidar of the garage. The rotomation was started with a one point track from 3DE and finished by hand, frame by frame.”
“For the Chinese Theatre scene,” adds Bath, “it was critical that the real world geometry of the plate was preserved in the stereo conversion process because there is a LOT of CG lighting interaction with the live action set and we needed to our CG hologram elements to intersect and collide with it. We worked closely with stereo vendor Gener8 to ensure the real-world dimensions of the set remained legitimate in their converted plates so that our 3D renders would sit correctly within stereo screen-space.”
Searching for the Mandarin
The challenge: Show Iron Patriot on the hunt for the Mandarin, the film’s apparent villain.
The solution: Luma Pictures created shots of Iron Patriot flying over Pakistan, and also worked on a sequence where he is captured and subjected to the Extremis effect (Luma also completed a number of Iron Man battered suit shots for the film).
The flying Iron Patriot shots made use of FumeFX for clouds with some Houdini volumes, and two and a half D matte paintings for the ground planes. Luma incorporated suit assets into their Arnold rendering pipeline.

For the Extremis shots, the studio created the molten lava look on the metal suit as an asset level effect rather than per-shot. “This meant that once we lookdev’d the asset and got things working we were able to propagate that into the shots,” says Luma visual effects supervisor Vince Cirelli, “rather than the other way around, which involves getting the asset in there and slapping over layers.”
“The molten lava was texturally procedural and it was also inside the shader in the way it animated the different values of the metals,” adds Cirelli. “So when the metal heats up, it’s not just a matter of it getting red, the surface properties actually change on it. There are certain areas that flake and do not look like they are reflective – they almost look dark and are silhouetted against the hotter portions of the suit.”
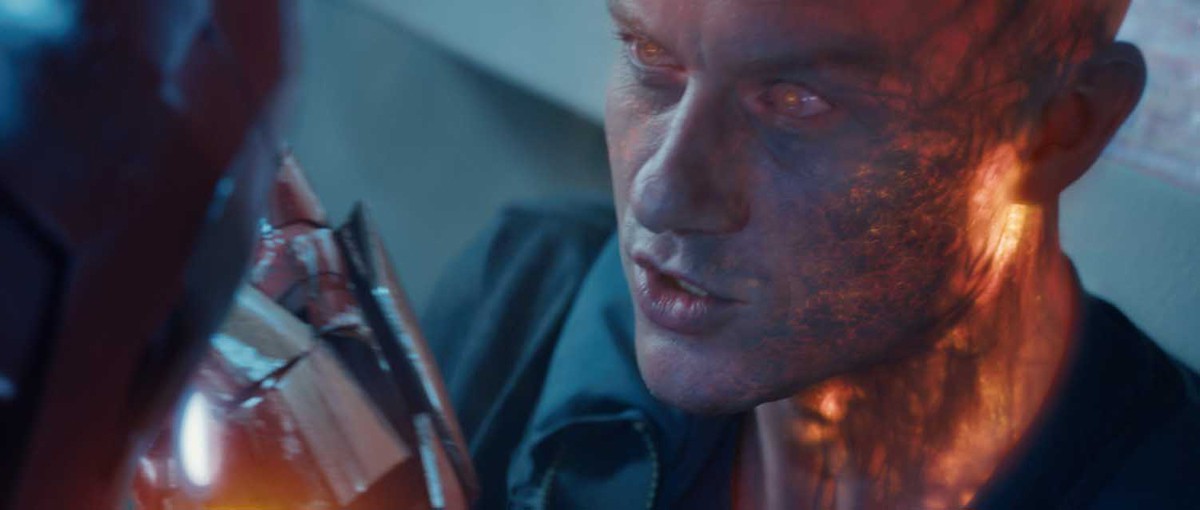
Extremis explained

The challenge: Define the look of Extremis as it reaches the skull.
The solution: Framestore had a number of Extremis shots for characters including Savin, Brandt and Pepper, that featured the effect around the skull, a look that was then used as the basis for other vendors on the show.
To create the skull look, Framestore, under visual effects supervisor Mark Bakowski, conceptualized a volume-driven approach, something that came from deep within the body and not just on the surface. For this they modelled the skeleton and muscles including blood vessels and capillaries. Close matchmoving was also essential. “The main challenge was to find together the look of the Extremis,” says CG Supervisor Alexis Wajsbrot, “mixing the anatomically correct component, with the more magical lava one. How much do we see the bones / veins / muscles / teeth?”
The flow of Extremis was split in two – a deep flow that was more blurry and a surface flow that was brighter and sharper and flowing onto the veins very close to the surface. “We had a few iterations going back to modelling adding arteries, capillaries,” adds Wajsbrot, “finding the right distance between the arteries and the skin and between the skin and the bones for everything to be lit correctly. We also went back a few times to the rigging department in order to have the right deformation of the anatomy for the 3 characters we were in charge of. The model was very heavy we had to save every files as Maya Ascii as our model was over the Maya binary 2g limitation file size.”
Lighting delivered four key passes to comp, using Houdini for the flow of particles going through the arteries, veins and capillaries. “We were exporting these as texture / point clouds (one point cloud per anatomy member, so we were able to render them separately) and a baked mesh of the arteries with per vertex attributes baked in,” says Wajsbrot.
“The Extremis is as well as being a flow of hot energy going through the arteries beneath the skin revealing the anatomy of the character and so is also generating some steam,” adds Wajsbrot. “We were doing some Maya fluid simulation out of the texture map created by our Houdini FX TD to generate the steam. The big challenge was also to create a setup to be able to deliver 150 shots in a very tight schedule. Everything we were showing to the client, we needed to make sure that we could automatise it and do mass production.”
For some regeneration shots, where the character Brandt is walking through the fire, Maya FX TDs were also using the Houdini flow texture to create some RGB 2D fluid simulation on the skin. This was then used to reveal different status of the skin, such as wounded or burnt or blistering and charred skin (the charred sin was done as an nCloth setup).
“The dependency was the key here,” notes Wajsbrot. “We started with an animation bake – Houdini FX TDs were creating a flow of particles for this bake – Maya FX TDs were generating steam out of the flow, and also generating 2D fluid sims out of this same texture (that was treated in Nuke to make it wider with a bit of noise to make the emission more interesting). Other FX TDs were using this 2D fluid map to launch a nCloth simulation to make the skin fall – and obviously lighters and comp were using this 2D fluid map to reveal the different stages of the regeneration.”
The power of Extremis
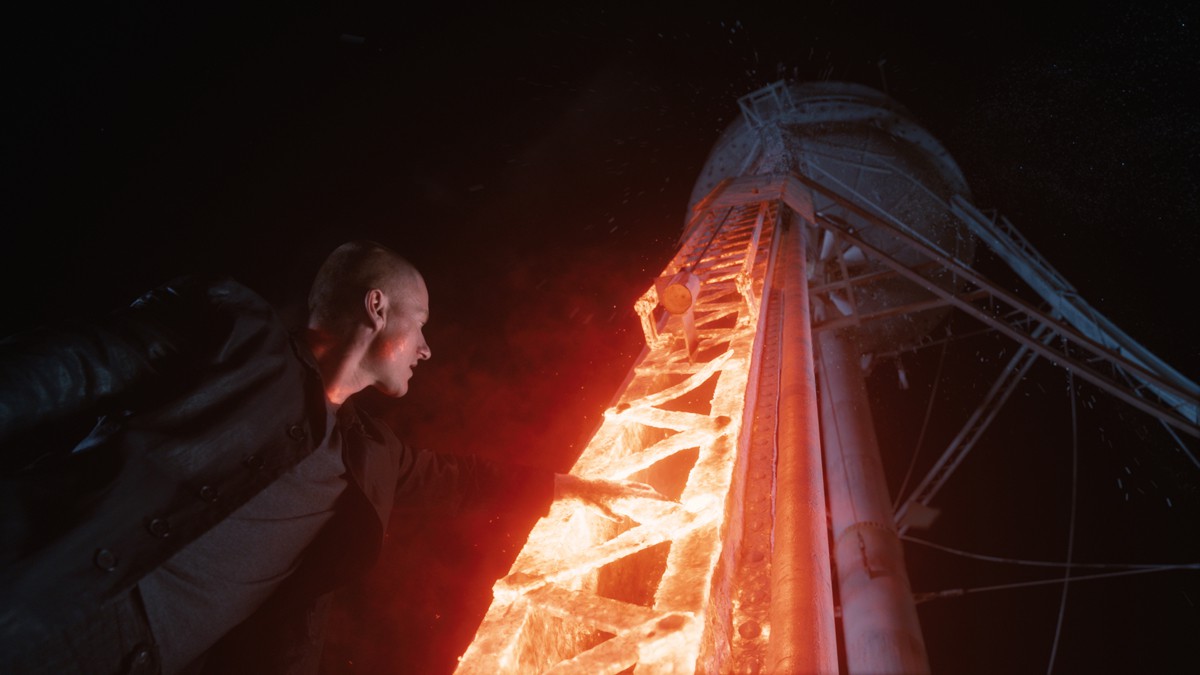
The challenge: Highlight the power of Extremis by bringing down a water tower, and also have Kilian breathe fire.
The solution: Method Studios delivered a range of shots that showcased the effect of Extremis on individuals’ bodies, and then delivered fluid sims for a water tower destruction.
When Stark finds himself in rural Tennessee investigating the cause of several mysterious bombings (actually glitches caused by Extremis), he encounters one of Killian’s agents, Savin. Savin taunts Stark, using his power to heat up the leg of a water tower that turns to molten metal and crashes down.
Method realized the Extremis effect seen inside Savin’s body based on vascular and bone system models provided by Framestore. “We modeled Savin ourselves and bound that to the rig,” explains Method visual effects supervisor Matt Dessero. “We would build blend-shapes for certain performances. We then built the skin maps in UV space and controlled them in comp and articulated them nicely around patches on the face. We’d pull a luminance map on the skin so that we could knock it out even more to make it look more organic looking. It was all about a deep glow, rather than a surface effect, so it needed to be held out by the muscles, bones and veins.”
Watch a breakdown of Method’s work.
“We had to be able to track very closely,” he adds. “Our matchmoves and roto-mation had to be spot on. That’s where our blend shapes came in. The matchmovers would get that back and toggle between blend shape A, B, C and D – usually we had three or four shapes per performance. That gave us nice tight locks to the body. In the inside internal veins, the matchmovers are working with our simple bone system and the extra vascular tied into that.”
For the water tower collapse, Houdini sims were used for the molten metal look. A dump tank of water was filmed on set for the crashing tower’s contents, with Method adding secondary splashes and spray. The shot cuts to a large water wave coming right towards camera – a fully CG shot. “We modeled the tower in Maya, textured in MARI and ran some of the animation in Maya and sims in Houdini,” says Dessero. “Then we went into water sims with geo exported from Maya through Alembic into Houdini.”
Method was also responsible for shots of Kilian demonstrating his own Extremis powers to have the captured Rhodes exit the Iron Patriot suit. “We received the base Iron Patriot suit from Digital Domain,” notes Dessero. “We had to score the suit to have it open. We added extra textural detail. There were 100s of pieces for the animator to control. We started with the exo-skeleton of the suit and hit timing marks – so we we would say I want the head to open by say this frame and then the shoulders open a certain frame. The goal was to make the suit feel very heavy.”
When Rhodes jumps out, Kilian literally breathes an Extremis kind of fire from his mouth. Explains Dessero: “You see the energy coming up from the center of his chest, up to his neck and there’s the incandescent glow out of his mouth. They didn’t want it to feel too fiery – it had to be volume rays more and mixed with fire. Fire hits the wall – done in Houdini – and we put some collision geometry in there with a lot of embers and heat distortion.”
Attack on Air Force One
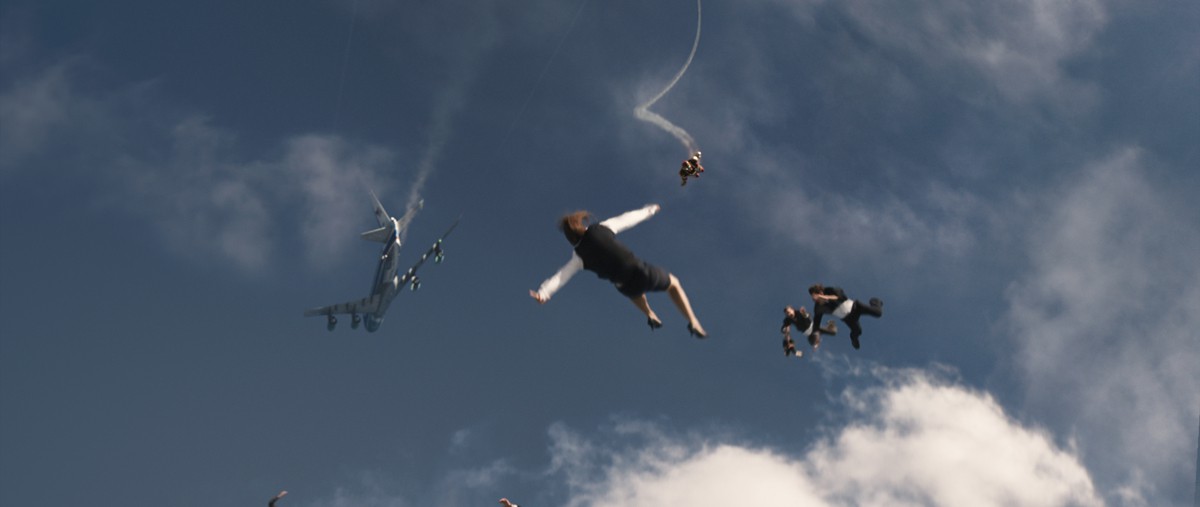
The challenge: Have Iron Man save 13 free-falling passengers from Air Force One over Miami, using plates of real skydivers filmed elsewhere.
The solution: Digital Domain rendered a digital plane, CG Iron Man and digital backgrounds for the dynamic sequence, while also incorporating the skydivers.
In the sequence, Killian’s men have stolen the Iron Patriot suit and use it to board Air Force One, abduct the President and subsequently destroy the aircraft. When several passengers fall from the plane, Iron Man rounds them up mid-fall and delivers them safely into the water below.
Digital Domain visual effects supervisor Erik Nash, himself a veteran of over 1300 skydive jumps, oversaw the freefall sequence. “It made for an awful lot of work for us to establish continuity from shot to shot, changing the environment, changing the skies,” says Nash, “but it imbued the sequence with a visceral reality in terms of the camera work and the relative motion between the camera and the people.”
https://player.vimeo.com/video/65540116
Watch a breakdown of DD’s VFX for the Air Force One sequence.
For Air Force One, DD looked to scores of reference imagery and video and soon learned it is “probably one of the cleanest aircraft around,” says Nash. “I think when it’s not flying they’re washing and polishing it, which made our job of making it look realistic all the harder because all of the typical grunge and grime that you add to make a CG plane look real – you really can’t do on Air Force One because the real one is so clean. So we made it look a little dirtier than the real thing.”
The Red Bull freefall team carried out the jumps wearing civilian and military clothes with chutes underneath. A skydiver also wore an Iron Man soft suit to replicate the heroes look and colors, although this would of course be replaced with a CG version of the suit, along with a large environment build and sky and sun positing matching. A cameraman captured the footage with helmet mounted RED EPIC, using the same Leica lenses that main unit had mostly filmed with on the Alexa.
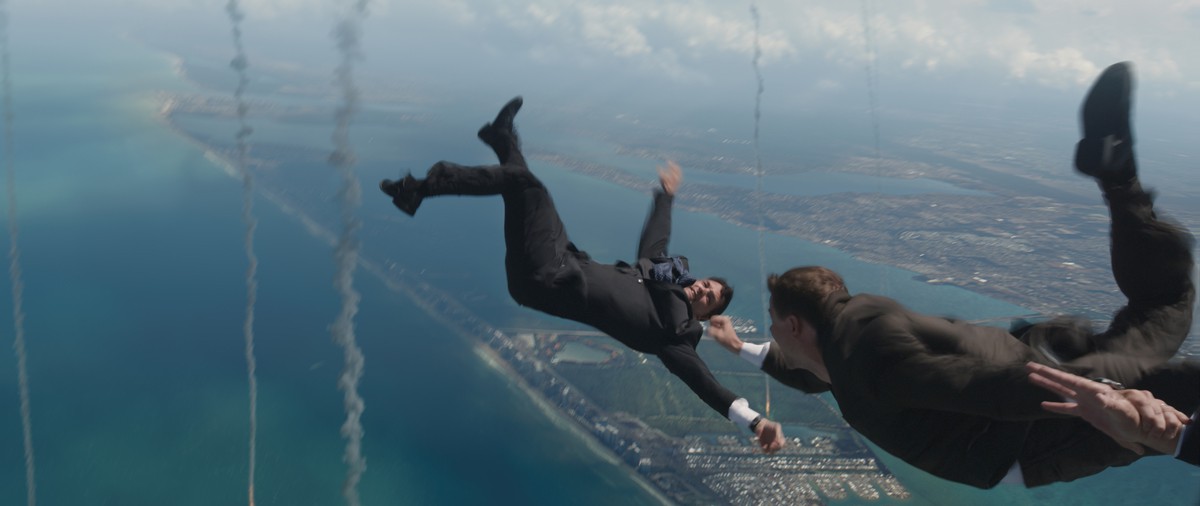
“It was easily the biggest rotoscoping job I’ve been involved with,” comments Nash. “Compounding that was not just the amount of edge work but also the complexity of the edge work we had to deal with. We had to work with flapping fabric and loose hair. There were three or four women in the group of 13 all with relatively long hair, and at 120 miles an hour the hair is moving around rather frenetically.”
Every performer involved in the freefall sequence was full body scanned, head scanned and wardrobe scanned and photographed with the help of 4DMax for the purpose of creating digi-doubles. The scanning company also completed LIDAR, cyber scanning and digital modeling for the entire film.
The Iron Man suit relied on Digital Domain’s pipeline set up for Real Steel – Maya and V-Ray. DD had also developed early design and modeling work on the suit and others featured in the finale, with the studio’s renders shared with the other vendors to match. “As much as I wanted to get back out there and jump again, we don’t really have a HDR apparatus for freefall,” says Nash. “We were also changing the environment almost on every shot in the sequence so what we wound up doing was creating an HDR that served the whole sequence that had our sky and clouds and Miami landscape built into it.”
The water landing made use of a dual wire hanging rig for each of the performers. “The wires are crossing other performers and the water and the background,” notes Nash. “That was shot in the ship channel and had to look like Miami. The water in the ship channel is not blue by any stretch of the imagination – it was more a sickening shade of brown so we had to Miami-fi it – make it look like that tropical blue water that is so typical in south Florida.”
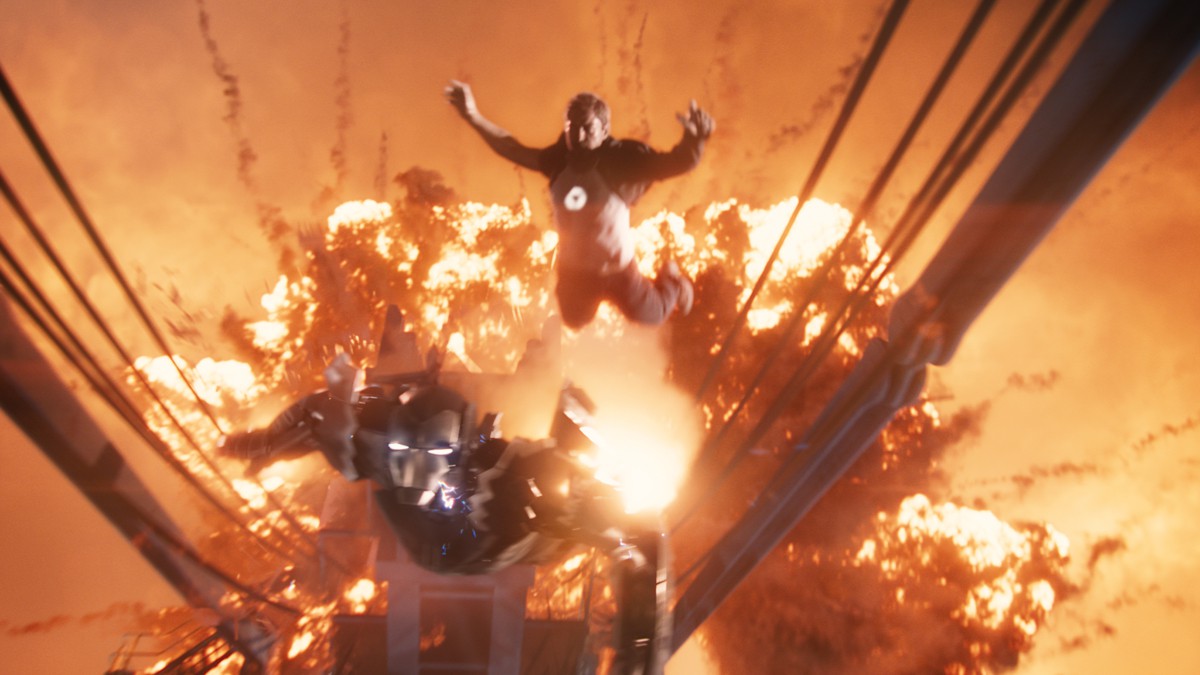
Arrival at the seaport

The challenge: Stark and Rhodes’ initial arrival at the sea port for their confrontation with Killian and his mercenaries relied on a mix of greenscreen and practical sets.
The solution: Cinesite carried out composting for the sequence, as well as dozens of other shots for the film.
“We did the front end for Tony and Rhode’s arrival and the shoot-out,” says Cinesite visual effects supervisor Simon Stanley-Clamp. “It was mostly greenscreen comps and nesting greenscreens back into digital environments and then placing digi-environments back into greenscreens. The environments were models and textures from Weta that flashed through our pipeline which worked really well. Layouts were sent for quick approval, and we worked in additional smoke, dust, light passes.”
Cinesite also completed several traveling car composites and an aerial view of Stark’s factory – a re-purposed helicopter plate of a university campus that relied on digital matte painting and SpeedTree foliage work. And the studio delivered a key shot in which a character was killed off earlier than planned, and so had to be replaced with another character by painting her out, patching backgrounds back in and inserting the new actor from greenscreen.
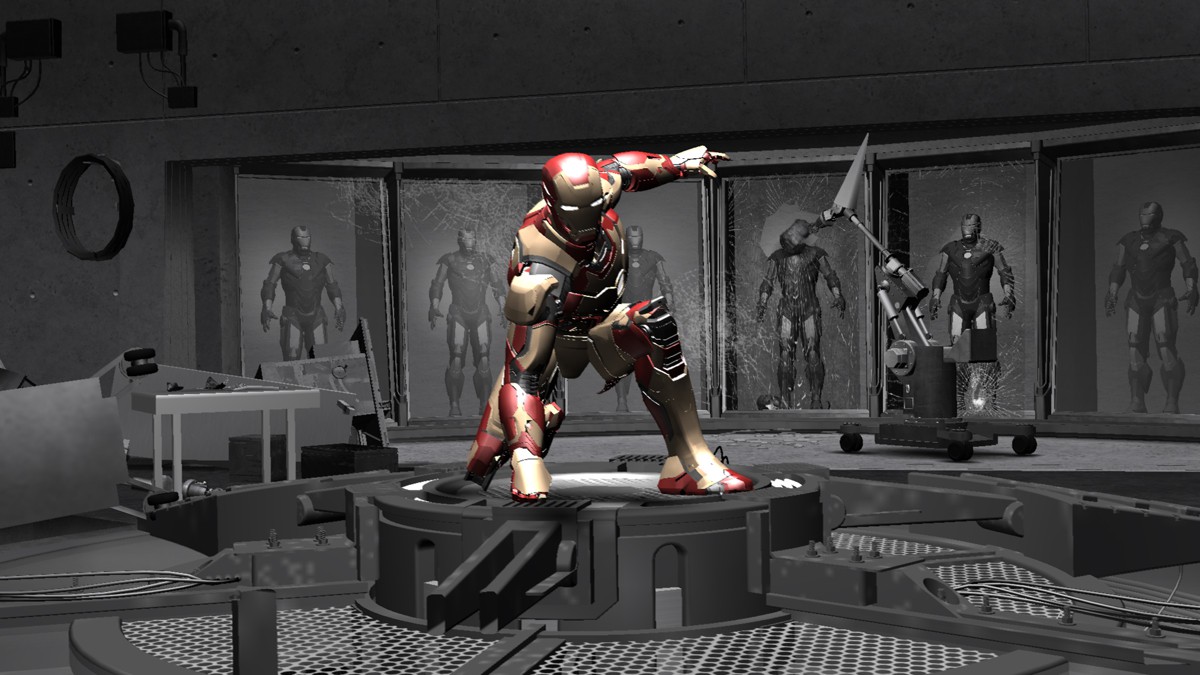
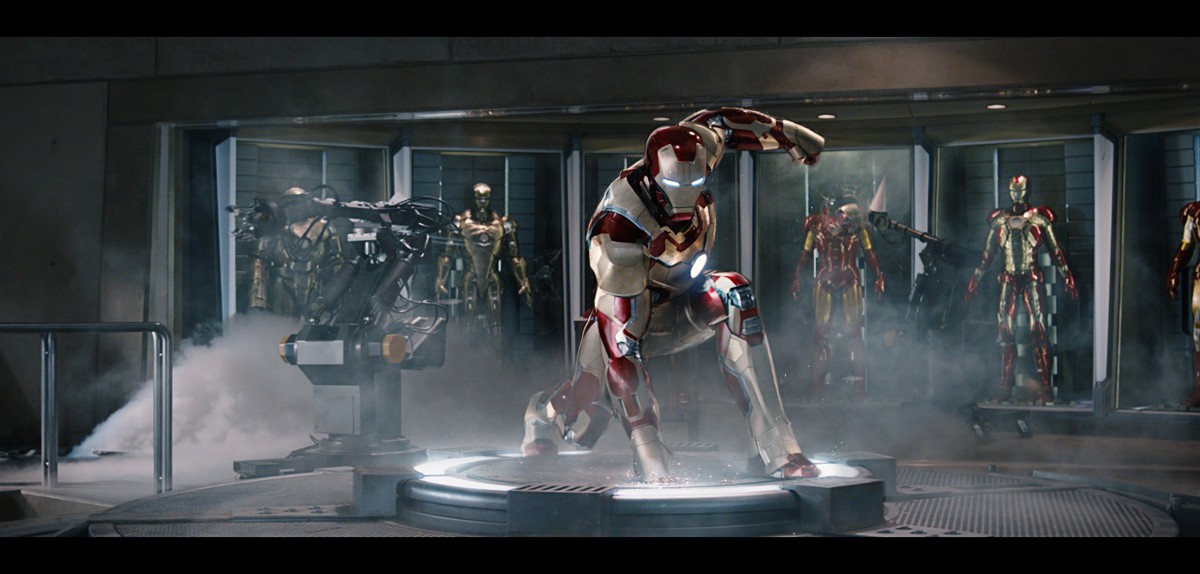
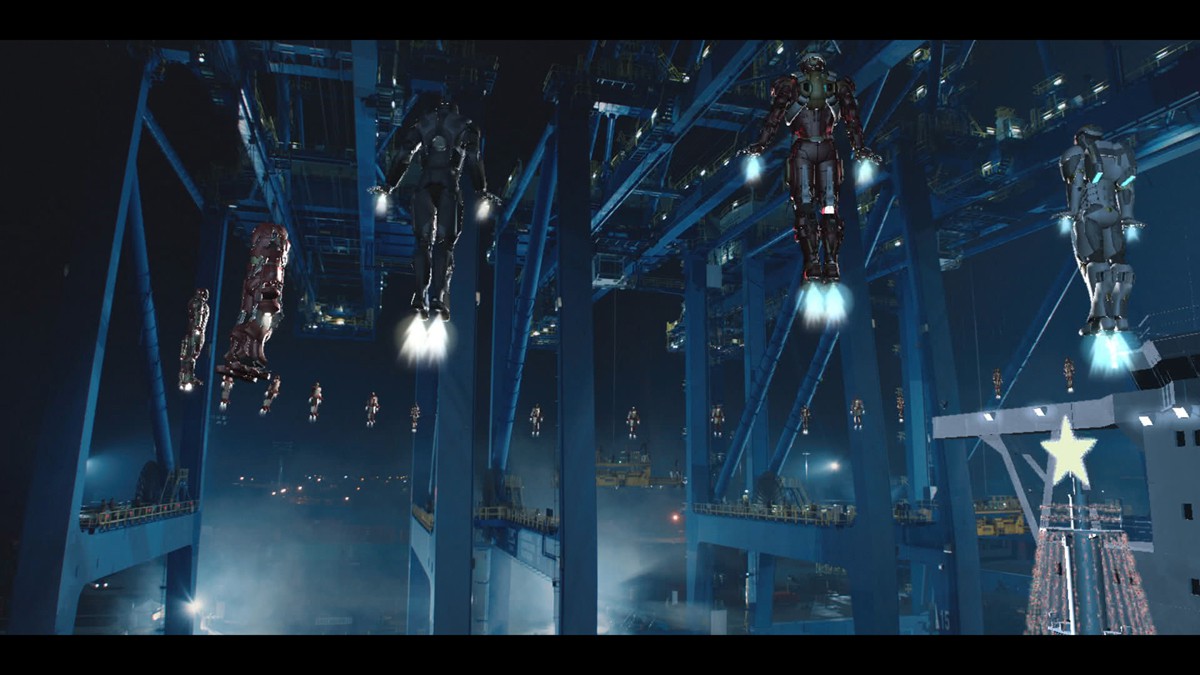
So many suits

The challenge: Although 36 suits feature in the final battle, Weta were initially asked to do 10 hero suits and 12 background suits, but that grew to 12 hero and 24 background suits. When the extra ‘non-distinct’ (ND) suits also proved appealing, they too had to withstand full-screen scrutiny.
The solution: Weta Digital crafted 10 the hero suits to high detail, based on early Digital Domain builds, and then built the ND suits out of parts of the heroes. That meant no compromise in terms of CG quality whether a suit would be seen in foreground or background action.
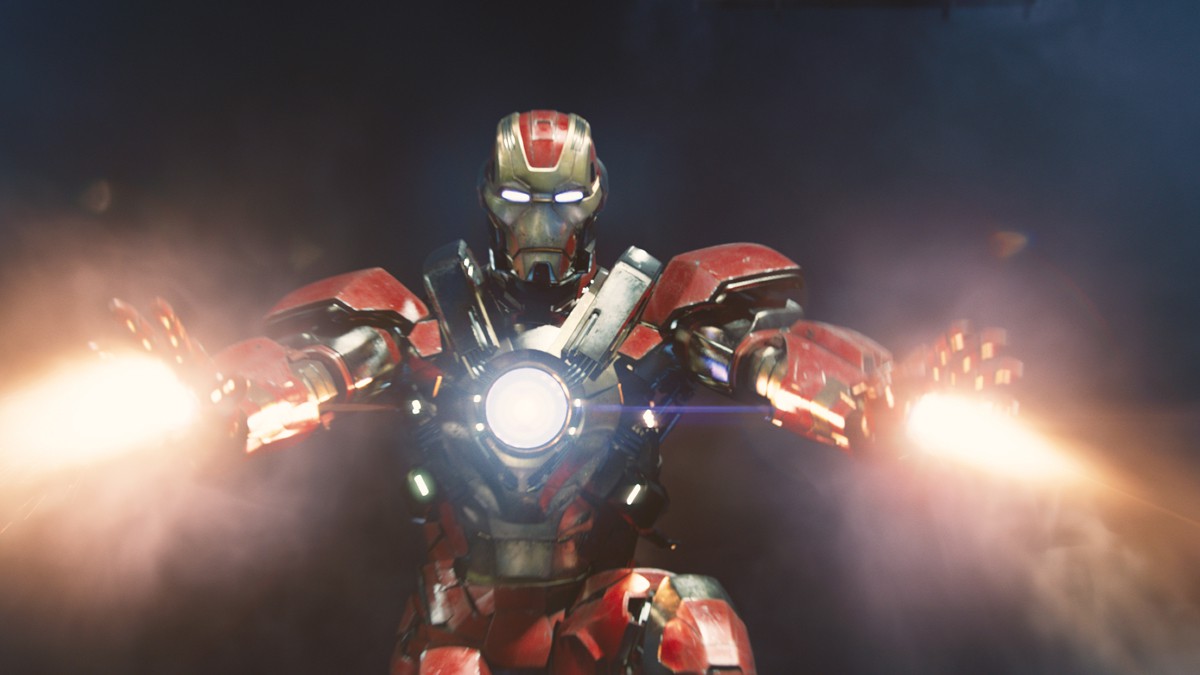
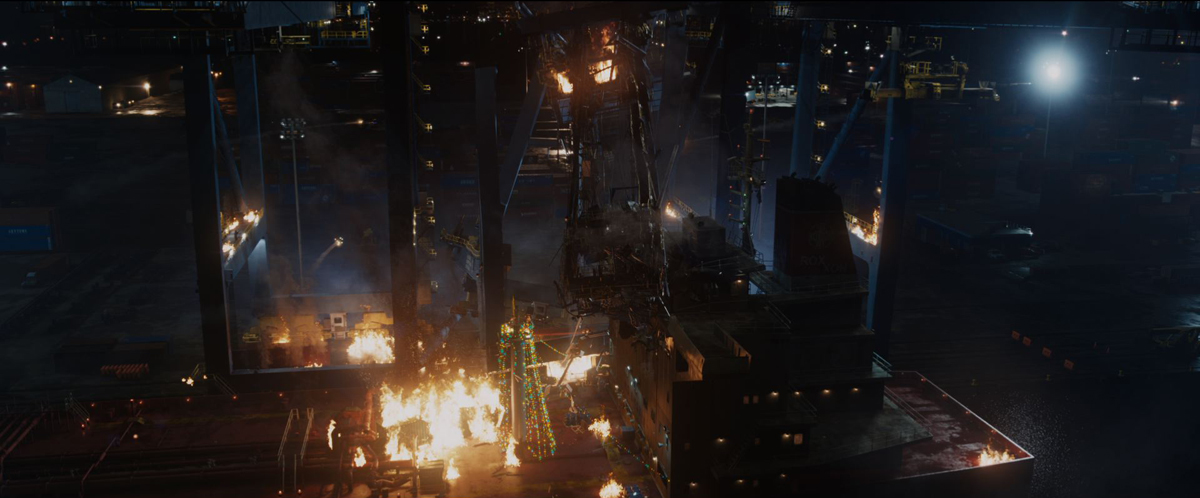
Over 500 shots, Weta Digital handled most of the epic final sea port battle in which Stark and Rhodes engage Killian and his mercenaries with a little help from 32 newly designed Iron Man suits. The result is a fiery aerial encounter around massive gantry cranes, as well as a stand-off between Stark and Kilian, now demonstrating his full exposure to Extremis.
“We used parentage markers on pieces so they knew which textures to pull,” explains Weta Digital visual effects supervisor Guy Williams. “The hero textures got used on the individual suits and the only texture work we had to do for the ND suits were distinct markings. So Hot Rod had flames on his legs, for example. But for the most part it was changing a couple of shader parameters or group assignments – what was gold on one suit was car paint on another.”
The studio had, of course, worked on an Iron Man suit for The Avengers, writing a new car paint shader. For Iron Man 3 this was completely written to further enhance the material absorption properties. And since the sea port battle was a nighttime sequence, Weta Digital steered away from IBLs and instead relied mostly on direct area lights. “Close to camera we would ray trace the suits – not a full-blown ray trace – but we would do a trick where we would ray trace into the indirect cache which allowed us to get something that looked just as good as a ray trace but was a lot faster,” says Williams.
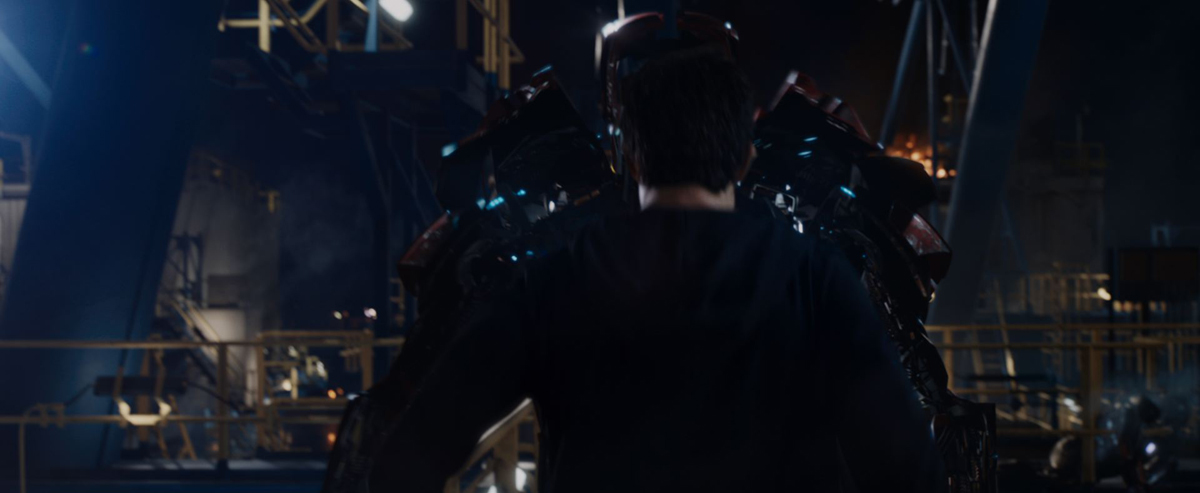
Suit transformations
The challenge: While battling the mercenaries, Stark is able to move around the cranes or escape perilous falls by summoning the flying Iron Man suits and literally jumping into the back (and front) of them as they connect around him.
The solution: By developing a new Guide Rig Puppet, Weta Digital allowed animators to bypass the usual puppet referencing process and also create a flexible approach to ‘cutting up’ the suits for the connects and even for shots of the suits being torn apart.
Usually, an animator working with a reference-based pipeline is working with a puppet that cannot be modified – the puppet is locked. “This means you can never do custom hacks to your puppet because it would essentially break the puppet and the pipeline,” explains Weta Digital animation supervisor Aaron Gilman. “It’s a way of protecting the flow of information that goes through the pipe.”
But for the suit connects – essentially transforming metal pieces – the suit panels and the internal under armor that drove the outside panels needed to be shifted around, opened and closed, and even ripped off. With a normal referencing system, an animator would not be able to take a metal panel and do the required custom cutting of the geo, move the geo and push that down the pipeline.
“Normally what would have happened,” adds Gilman, “is that we would have had the animator not even start with the puppet for the transformation. We would have them start with the hero model which is just a static piece of geometry that sits at the global origin of the scene. On that hero model they would have used their knowledge of modeling and taken whatever modeling tools they’re comfortable with and would have started manually cutting up different pieces of the geometry. The animator would have taken the time to cut up all of those panels and would have been doing this on a static model – there would have been no animation at this point – no body blocking or performance within the context of their actual shot. Then they would have taken a bunch of locators and patched them to each one of those cut pieces, then animated them and created a lookdev for what the transformation might look like. Then that would have shown to me and the VFX supe, but we would never have shown it to the client – not in this form – to Marvel, because they are interested in what the performance is going to be in the context of a shot, not what a model is doing in the global origin at a static t-pose.”
That’s the usual process. It can take a long time. And a lot of work can be done between rigging, modeling and animation before anything is even shown to the client. Then, if the client has any critiques, the whole process must essentially be repeated. Weta Digital’s new approach, envisaged for the suit connect scenes, was to give the animator creative control over the puppet. And that’s what Weta Digital developed, something they called the Guide Rig Puppet. “It’s essentially a puppet that exists outside of that reference system and it gives the animator complete control over all of the hi-res geometry of the actual Iron Man model,” says Gilman. “Then we built a bunch of proprietary tools that give the animator huge amounts of freedom, efficiency and the ability to stay creative while designing a transformation on a puppet that is actually moving within their shot. We can cut up these panels on an Iron Man suit while the Iron Man is performing the story of that shot.”

Other tools allowed the animators to generate custom controls on panels and keep track of parent/children hierarchies. “That gave us the freedom to design the transformations within the context of a shot, get the blocking performance and even final anim in front of Marvel for a buy-off,” says Gilman. “Once they approved that we’d go through the process of officializing everything we had done, which we would have done in this ultimate universe at the very beginning before we showed anything to Marvel. Now that we have an animation approval we can then give our guide rig to models who will see all the cuts, officialize these, hand to creatures who would then finalize the official hi-res puppet.”
And the same Guide Rig Puppet was used also for shots of the suits having their arms, heads or legs ripped off by mercenaries, as well as shots for the suit that could disassemble its limbs and use them as flying weapons before they re-attach. A third use for the rig lay in the addition of damage over a series of shots to a suit.
“In the same way that we can cut up metal panels, we can cut up metal panels to damage them and fling them off the body of the character,” says Gilman. “The cool part was that the tools we built allowed the animator to flag down the pipeline which panels they wanted to go downstream and which panels they wanted to stay upstream. So if you were working on a shot and you know that your character has been damaged four times – when you’re doing a shot that’s had four shots worth of damage, you need to very quickly load that damage from those shots to your shot, so that when you do further cuts you want to make sure you’re cutting on top of the damage that’s already been done.”
Digi-vironment – building the sea port
The challenge: With aerial fly-throughs, crane destruction and complex camera moves, it was determined early on that a fully digital model of the sea port would be needed.
The solution: Weta Digital modeled the entire area with cranes, containers, yard dressings but spent significant time ensuring the environment would render efficiently. Deep compositing helped, too.
Parts of the sequence were filmed with partial sets and with actors against greenscreen. Weta Digital looked at satellite reference to help with the layout of their digital asset before launching into the large-scale build. “Once we got the whole yard built,” recounts Williams, “we then went through a long process of trying to make sure it would render efficiently because we had 500 shots. We cached all the lighting and shadows into brick maps so that the yard render delivered more efficiently. We broke the yard up into a lot of passes and the renderer had scripts that did all that for you.”
“The detail didn’t suffer however,” he adds. “We didn’t make it efficient just by throwing away polygons. We made it efficient by being smart about how we proceeded with it.” Ultimately, one of the main gantry cranes in the sequence was made of 46,000 objects, about 3.2 million polys, while even a more background crane constituted 692 objects and 46,000 polys. These were lit with around 215 area lights.
Weta Digital’s leading approach to lighting and deep compositing were also crucial in realizing the sea port environments and the surrounding action. “I can’t even fathom doing a project like this without deep compositing because what it allows you to do is bank renders early,” says Williams. “Everything took an incredibly long time to render but the second the yard was ready we rendered the yard before the animation was even done. So as long as we knew the camera wasn’t going to change we could start doing the renders. And since we didn’t have to worry about hold-outs, even the fluid sims didn’t have to be re-done if we wanted to change the frame.”
Williams notes that atmospherics also helped sell the scenes, with Weta Digital often replicating what had been achieved on set. “If you look at the live action plates, the DP would go around and put lights in the sea port shining back towards the camera, and then smoke up the set so you couldn’t see the stand or the cherry picker – you would only see a bright lens flare shining at you through the smoke. We worked really hard to replicate that in compositing.”
“And our lighters would put lights down in positions so that the cranes felt very positionally lit, which really helped with the scale of the cranes,” adds Williams. “Then they’d pass off chan files – basically positional locators for Nuke – and then we could attach lens flares to those files and then do volume renders for shadows and light to get atmospherics built into the shots.”
Background animation
The challenge: Detailing significant background action to depict suit versus mercenary battles as the sea port sequence plays out.
The solution: Weta Digital ensured that this additional action did not overshadow the foreground characters – something that proved more difficult than first thought.
“Initially I thought it would be easy to create a library of behaviors, flying and shooting and banking with our mocap performances and plug all that into the background of all the shots,” notes Gilman. “But very quickly we realized that wasn’t going to work – for one fundamental reason. Animators are educated and trained to generally have their animation performances be as vivid and dynamic as possible, but plugged into the background, their natural thinking process is to make the animation read as physically and dynamically as possible. The problem is this is a background performance – we don’t want it to read like that. It detracts from what you’re meant to see in the shot.”
See some of the final seaport shots in the film’s trailer.
An example was the negative space around foreground characters in a scene. At first, animators filled this space almost equally with flying suits and tended to follow the ‘rule of thirds’ notion of having the most interesting action at the intersecting points. Ultimately, that approach was adapted to reflect more of a war footage feel, much more random and organic. “There was also a tendency to put suits in the background of every shot,” says Gilman, “but then you would have that repeating from shot to shot and it would create this monotone rhythm. So because it’s CG we could artistically create these shots, we could choose to have some suits in the shots and not others, then there would be a proper rhythm forming.”
In one go – the crane comes down
The challenge: During the climax, an explosion triggers one of the main gantry cranes to collapse – as seen over multiple shots in the sequence.
The solution: Rather than simulate the collapse over the multiple shots with individual sims, Weta Digital elected to do a single 500 frame animation with a two pass simulation that could then be broken up into the desired camera coverage.
Animator Julia Chung designed the collapse. “While we were blocking out these shots we simulated and animated one single shot of the crane falling all the way to the ground and then we would position the timing of that in the individual shots,” explains Williams. “It was akin to shooting live action – we dropped the crane only one time but the 5-10 shots that you see the various parts of the crane destruction in – all those shots were pulled from the master destruction file. That allowed us to share the same rigid body simulation, the same fluid dust simulation, the same cable sims – it meant we could put the sum of all the effort into one shot and break it up into the individual shots.”
The first pass took the largest parts of the crane segmented into blocks that ran as a constrained rigid sim. The resulting motion was then used to drive a detailed rigid constraint sim to account for all of the geo on the crane. “We set up with about 5,000 to 10,000 pieces of rigid geometry held together with constraints and springs,” says Williams. “So as the crane’s coming down all the railings are swaying and the catwalks are bouncing. Anything that came into contact flattened and broke its constraints and then those pieces were post-nominated back into a cloth solve and were all deforming as slightly pliable metal. That system was insanely huge and took about a day to run the entire sim. Then we had to iterate.”
Extreme mercenaries
The challenge: Weta Digital was charged with completing Extremis effects for the mercenaries, including shots of limb re-growth, and for Pepper who has been subjected to Extremis injections.
The solution: The studio relied on several techniques to highlight the glowing Extremis look. “Instead of trying to do it all in comp by tracking on patches and trying to make it look kind of right,” says Williams, “we got a ray trace through the skin using refraction through the skin surface and then the ray trace did a ray march and ray marched all the way through the skin, stopping at every point and ray marched to a local light so you could see it moving around and blocking the light from the muscles to the tendons and bones.”
“The cool thing was,” he adds, “that being a proper ray trace, the deeper something got the more it absorbed the light and it became blurry so you got this great sense of depth and absorption. We did do some helper passes for the bones and the veins – the reality is that if it was not within a centimeter of the surface then it would be so blurred and occluded it would just be a value change as opposed to a detail. So we added more detail by putting more veins closer to the surface, and we made the bones a little more blurry than the veins.”
Extremis to the extreme
The challenge: A slight change to the film’s ending involving Stark and Killian and Guy Pearce’s freshly grown beard meant a whole new set of challenges for realizing the finale.
The solution: Weta Digital went…all digital. The studio had already replaced Killian from the waist up to his neck with a digital double (since the character had taken his shirt off to reveal tattoos underneath) that featured a tissue solve for the muscles, fascia and skin. When the re-shoot occurred, Pearce’s beard meant that it was essentially easier to also complete a digital head, requring a full FACS session for relevant facial poses.
In his final confrontation with Stark, Killian has what Williams describes as a ‘lava God’ appearance. He has just been in a large explosion and his body is seen re-growing. “Large portions of his body were covered in this black husk and it was almost like a large scab that would crack and peel apart like lava separating, and at times large sections of the husk would fall away revealing bright sections underneath.” Weta Digital crafted a system to birth husks onto the skin, and combined that with a fluid sim for the smoke and heat and extra particles for embers being emitted.
The Iron Man legacy
On Iron Man 3, Chris Townsend and the visual effects teams were able to continue to innovate both technically and artistically by drawing on the already rich effects work that is now part of the Marvel universe. But they also manged to introduce a new approach to Iron Man performance and animation. “In this film we have various Iron Man characters walking around just doing normal things,” says Townsend, “they’re not always fighting helicopters or Extremis characters. Sometimes they’re just sitting on a couch or walking across a room. We worked hard with the companies to get those subtle performances, say when he’s just giving Pepper a massage. It’s not always the whizz bang moments.”
All images copyright (c) 2013 Marvel Studios. All rights reserved.
Excelente información.
Es tan increíble la realización de los efectos visuales de iron man 3 como espectacular fue el resultado, realmente admirable.
Fantastic article! Love it. Great work Ian & the FX Guide team putting all this together.
Pingback: Iron Man 3: VFX Breakdown e Concept Art | Dicas e Tutoriais de After Effects
Pingback: Iron Man 3 - Behind The Scenes & VFX Breakdown
Pingback: Oscar Effects: Creating the Iron Legion of Iron Man 3 | Digital Trends
Pingback: Support | ATG | Stronger Relationships. Greater Success.
Pingback: IRON MAN 3 : HUD + GFX PROCESS REEL – NEWS – LIBEL STUDIOS