Have you ever wondered about taking advanced new high-end Machine Learning approaches and applying them to regular VFX projects? For that matter, have you ever wanted to just be young again?
 Thiago Porto is a VFX Supervisor and Senior Comp at MPC New York. He’s interested in how developments in Machine Learning (ML) could be applied in visual effects and has been promoting ML and asking why there’s not been a lot more discussion on adding much more complex ML tools to visual effects compositing pipelines. Porto set out to see if he could use the most recent cutting-edge ML in his beloved Autodesk Flame. It turns out he absolutely could
ML has become a key area of 3D R&D at most of the major VFX facilities. But Porto set out to see if he could incorporate a series of published academic ML algorithms into a predominantly 2D compositing pipeline. Porto will be presenting some of this online at next week’s online RTC conference June 9th.
Central to Porto’s attitude is that experienced visual effects artists know an awful lot about making an image look right, and surely this wealth of experience, that ML researchers don’t have, is valuable. He believes the path forward is combining the science of ML research with the art experience of VFX professionals, and that such a marriage will dramatically alter effects work.
Starting on Paint fixes
A great example of Porto’s approach is how he started looking at the problem of painting out small faults such as rig removal or removing facial tracking markers. Rather than using published data sets from the ML community, he gathered the best paint out shots he himself had done over his career. He then got the software to train on his own before and after digital cleanups. Once he had trained the ML engine, he started using Flame to generate ML ‘Thiago’ level marker removal. The solution was in how ML Generative Adversarial Networks (GANs) work. Internally, a GAN runs on the principle of two AI engines battling it out. One produces a result much like a counterfeiter, and the other tries to detect the fake, much like a cop. This internal battle of self-improvement is key to GANs success, the ‘counterfeiter’ keeps improving until it can fool the ‘cop’. Porto’s process involved doing a difference matte between his best manual solution and the computer’s own attempt.
When using GANs one needs a loss function or discriminator (the cop) to know what is good and what is not. By doing a difference matte in Flame, Porto produces a black and white matte, which can be thought of as a value between 0 and 1 for every pixel. If the image has not been touched, then Flame’s difference matte is naturally black or 0. The GAN was trained to try and get its paint repairs to be so good that there was no difference between a crafted hand-painted fix by Porto himself and the digitally generated fix done automatically by the computer. This worked remarkably well. Since the AI trained on Porto’s finest professional work, it produced results he was artistically happy with. Armed with this early success Porto decided to embark on some much more complex tests.
At fxguide we were more than happy to support Thiago’s exploration, with a test to demonstrate what is possible in de-aging. Together we staged a de-aging shoot of fxguide’s Mike Seymour, taking Mike back about a decade in age and appearance using Autodesk Flame and cutting-edge published ML algorithms.
De-aging
Porto was inspired by ILM’s work on the Irishman, and he set about seeing if there was a 2D solution using ML that perhaps he could use in shorter length projects such as in advertising or episodic TV shows. He challenged himself to not only de-age a person but do it without softening the image and losing facial detail.
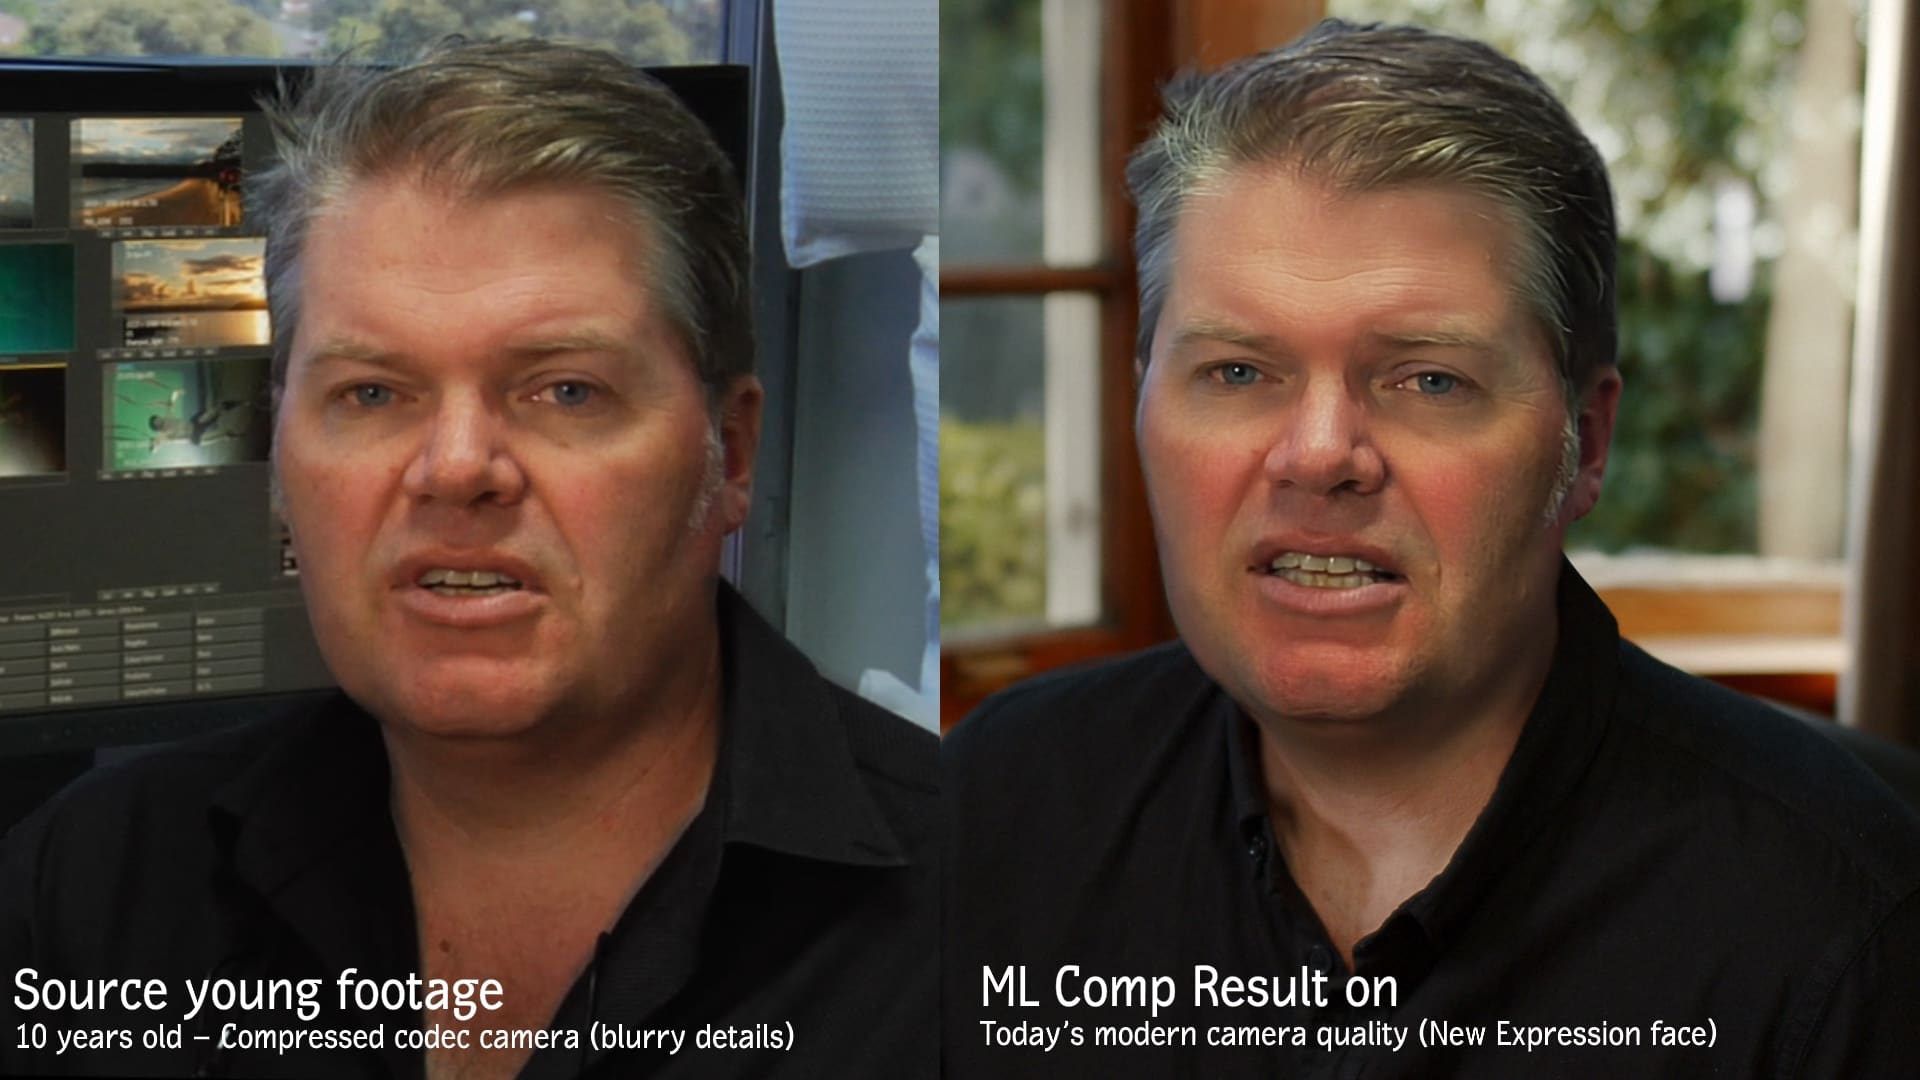
The workflow for the Mike de-aging test is actually a new approach for Porto who has been doing tests now for some time. He started experimenting with connecting Nuke Scripts with Flame and while he succeeded, he found the process so time-consuming that it was only of marginal benefit. He then developed a series of approaches based on an earlier version of Flame using ML, but this newest approach documented below is the result of Porto migrating to the newest Autodesk Flame 2021 version of the software. “Flame 2021 machine learning models changed my workflow, it may not be perfect but it is perfect for me,” he explained.
Stage 1: Up-Res
To do this de-aging demo, the first stage was to find a clip of Mike Seymour from ten years ago. That was not difficult. But a decade ago the shot was not mastering in 4K, so Porto started by up-resing the source clip to 4K, adding in detail and clarity with ML. This Super-Res clip would become the training data for the various ML tools which would then learn the face of the younger Mike Seymour. Porto did a Super-Res which is a ML up-resing process.
The ‘Super’ up-res was approximately 6K when done. The reason for this is the relative size of just the face in the overall image. While the whole frame was 6K, Porto wanted localised resolution encompassing the face to be 1024 x 1024 pixels for training. “Commonly online you see that people crop in on a face, and it’s effectively just a 256 x 256 resolution space. They do the ML and then up-res at the end. This is not enough effective resolution for a good result and the face still looks soft even when up-resed to 4K,” he explains.
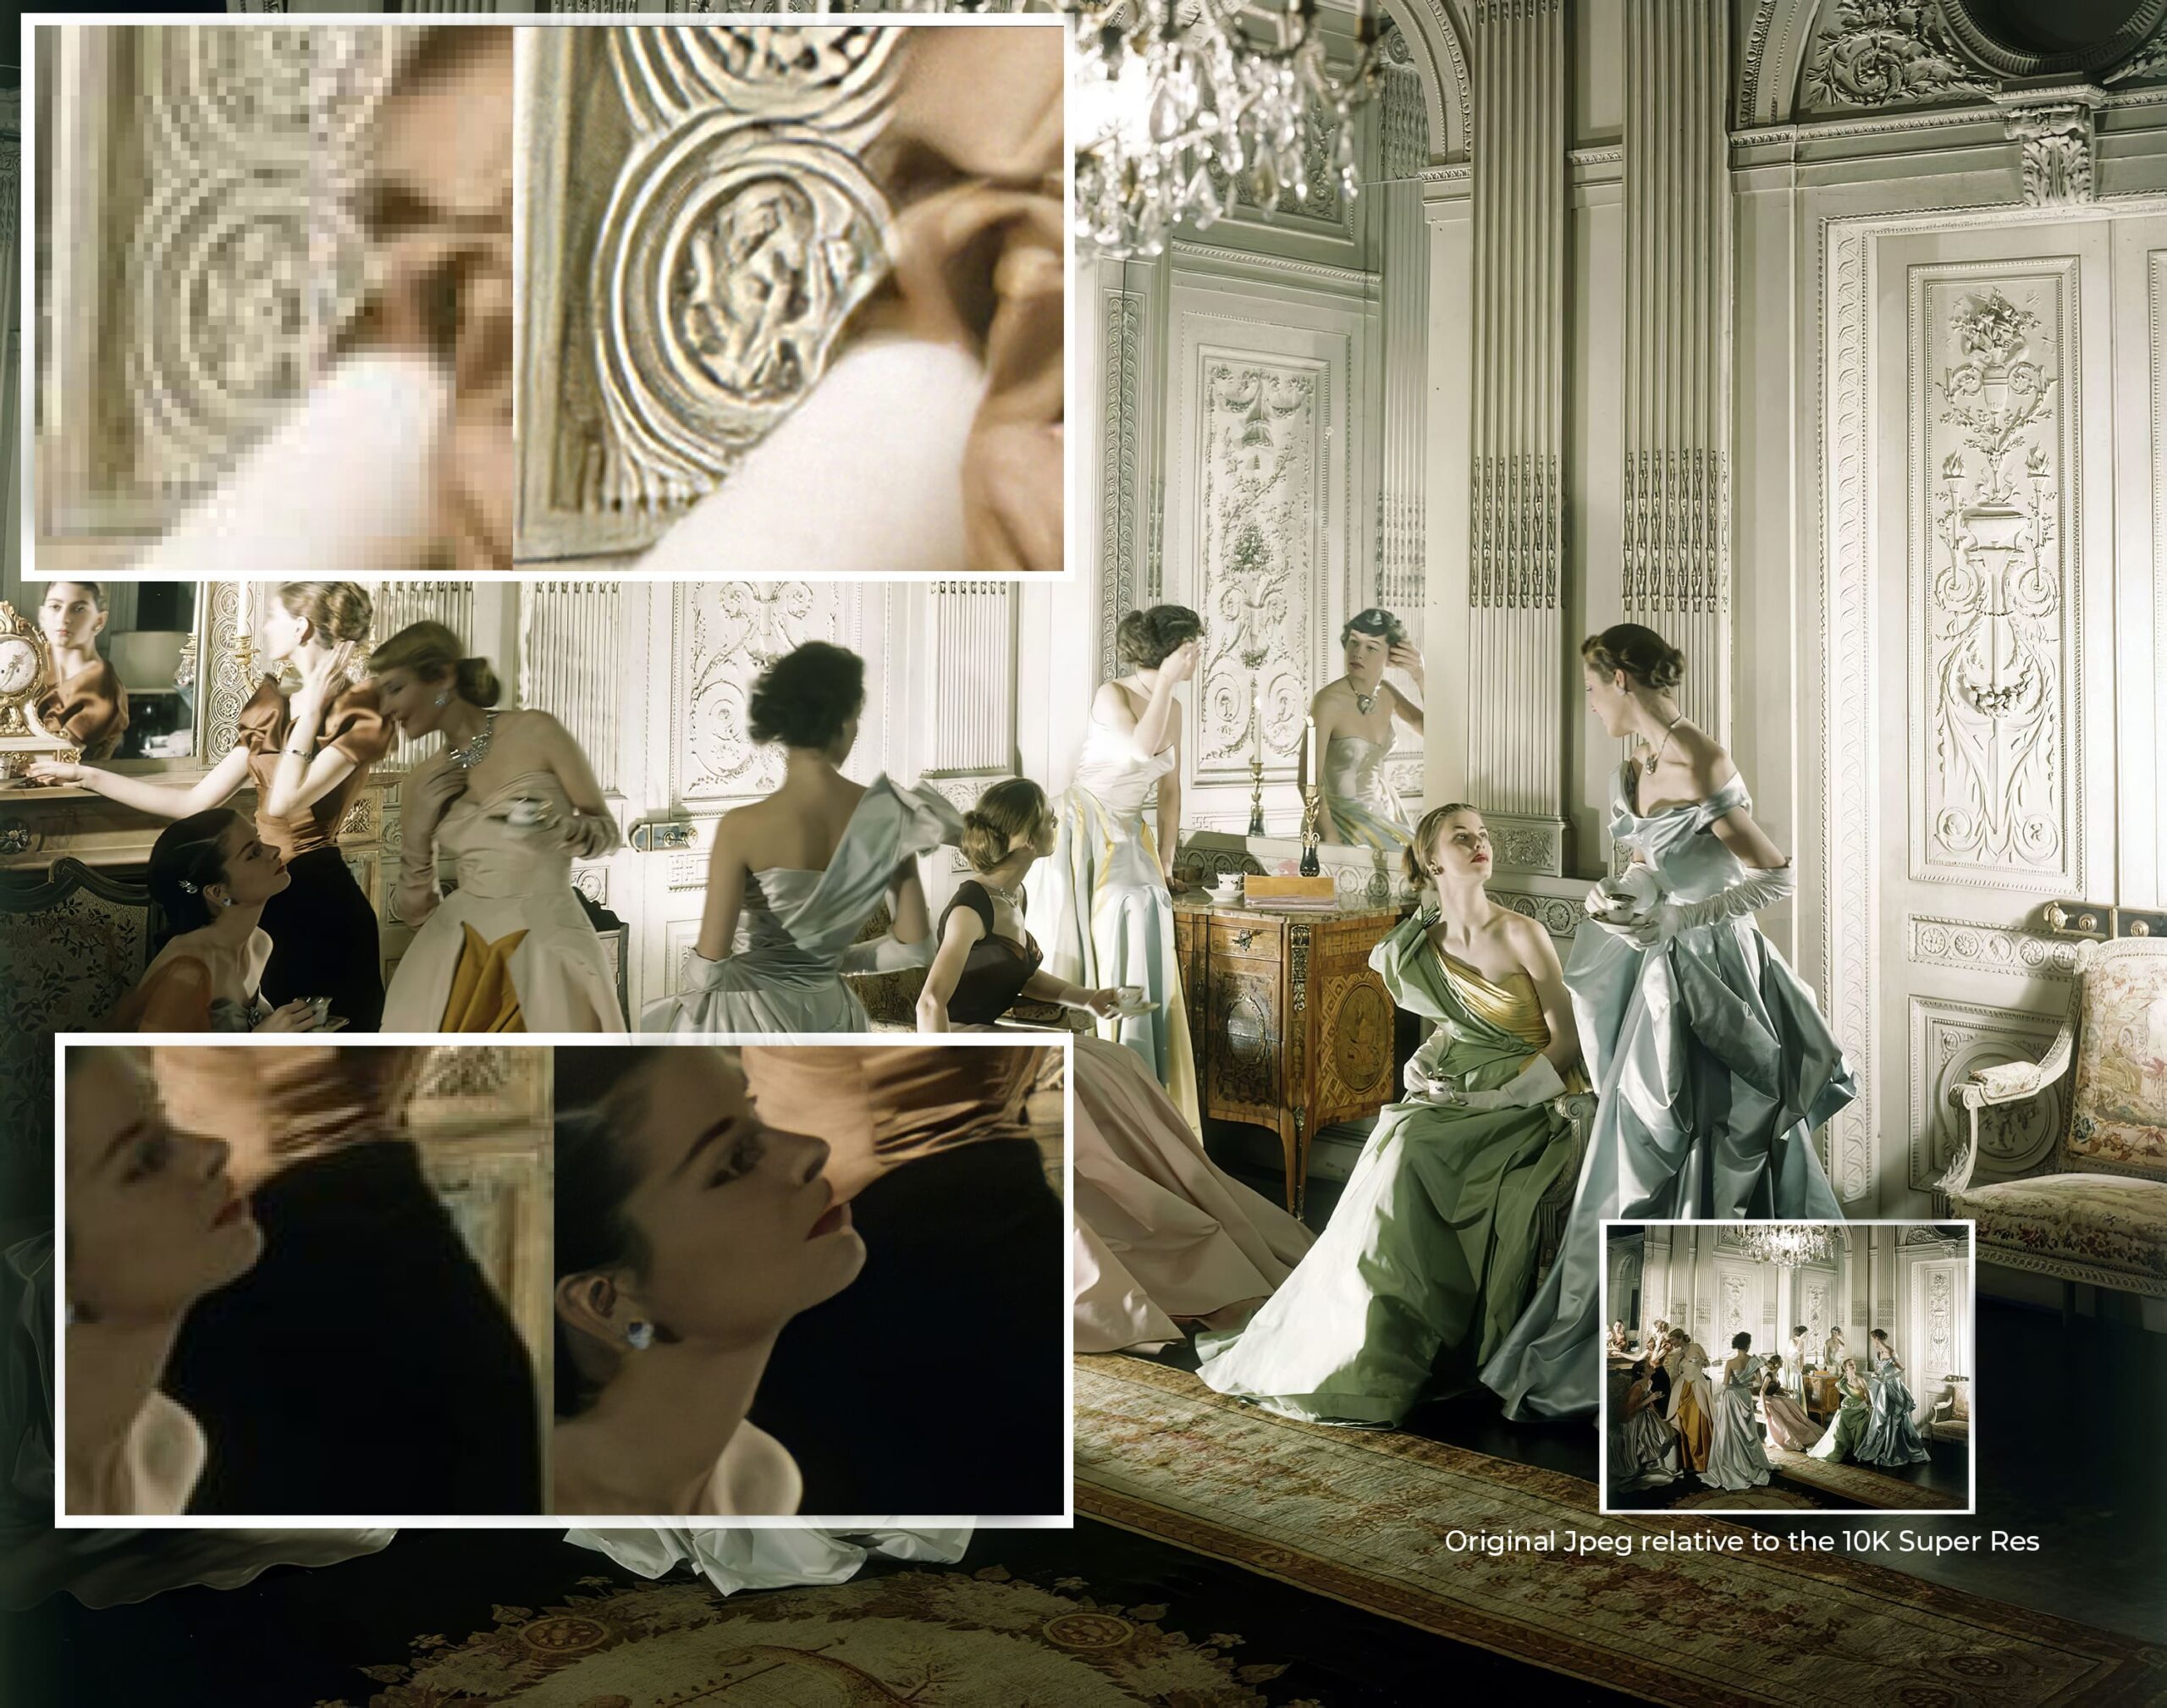
“I could have scaled the clip in Flame as normal but it only has a bicubic based up-res at the moment – but I hope Autodesk moves to Super Resolution with GANs (as a tool in Flame), that would be amazing” Porto suggests. To demonstrate the difference between a bi-cubic scale and trained Super Res, Porto offers this example of an image by fashion photographer Cecil Beaton from New York. The original resolution is 1800 by 1400 pixels and Porto’s Super Resolution version of the image was scaled to 10K. Below is a version of the 10K image, compared to the source in relative size (bottom right) and with examples of the difference in detail (left of the frame).
Stage 2: Training
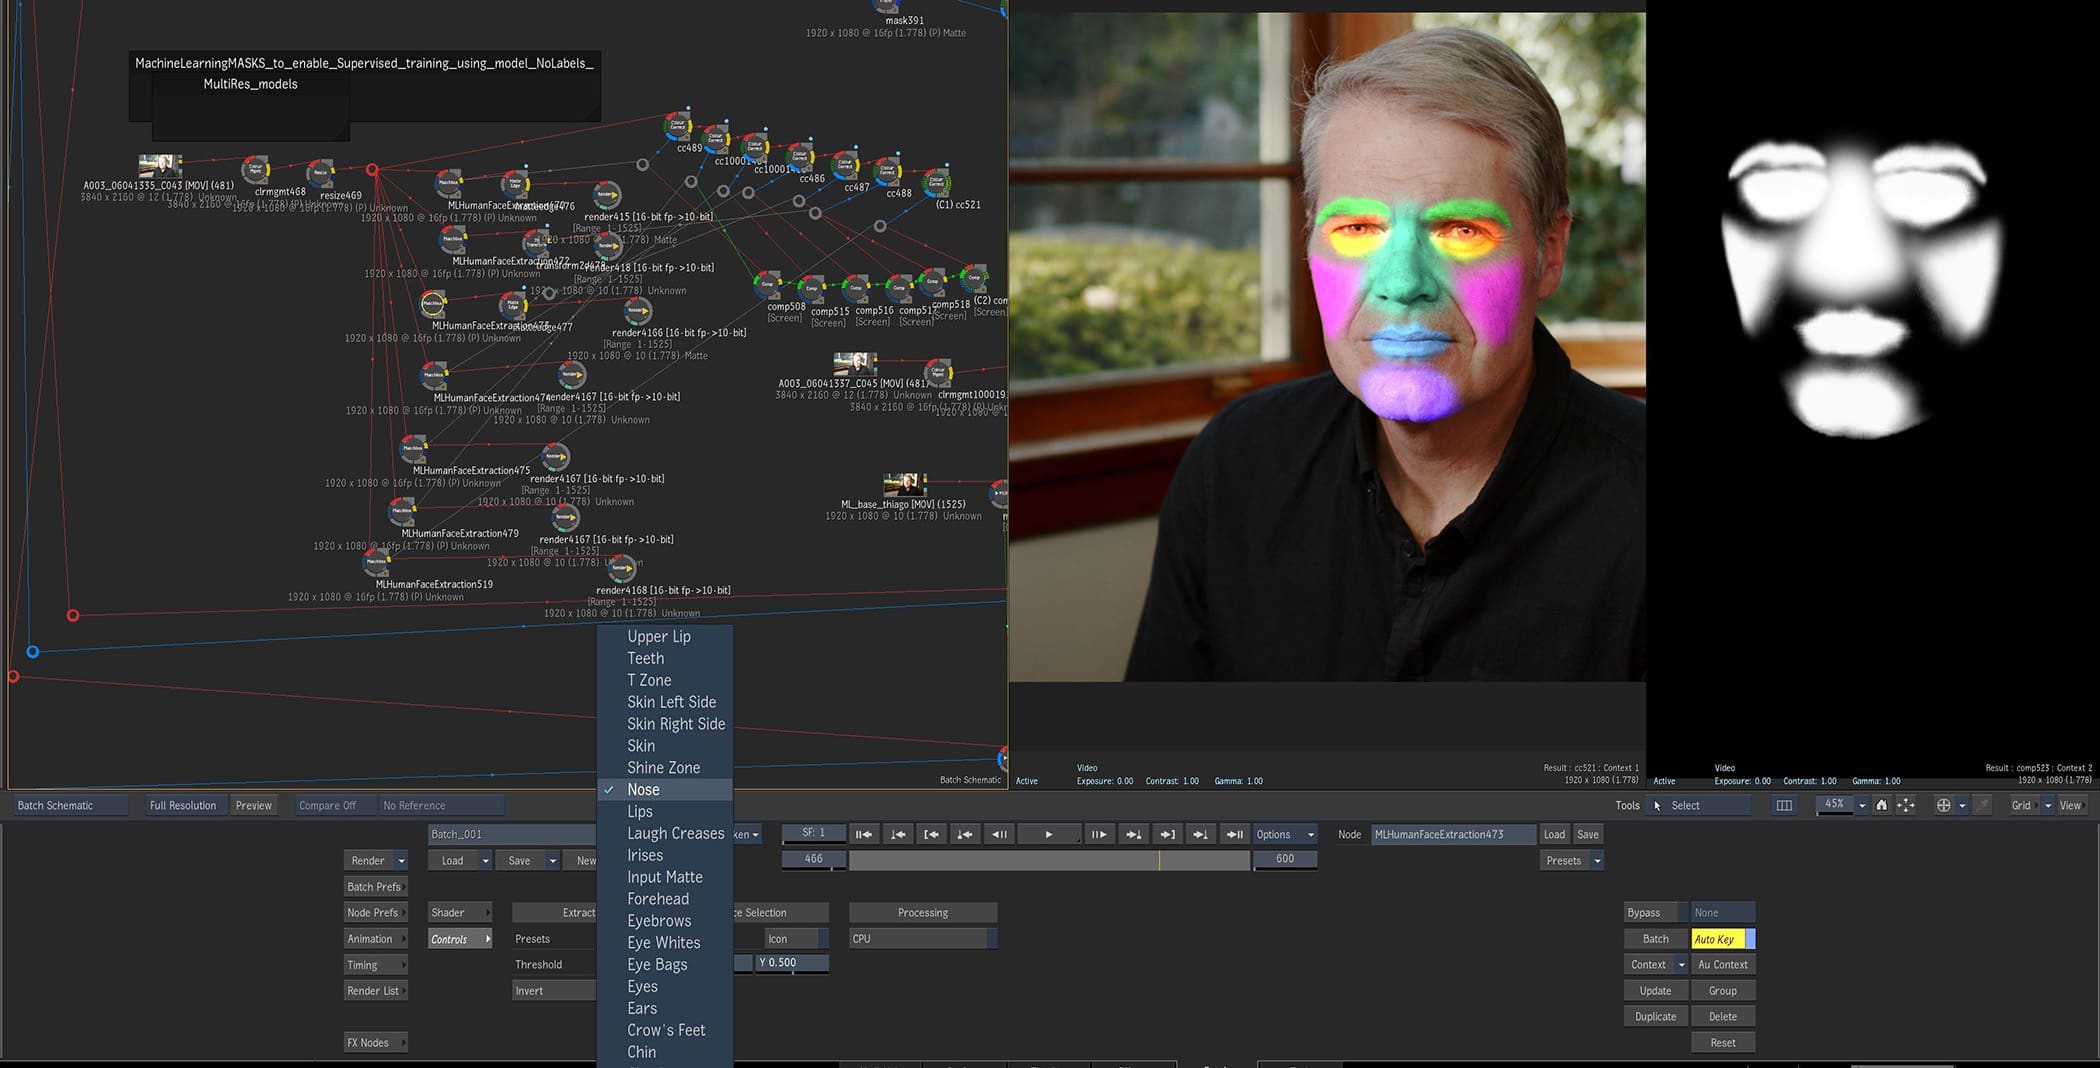
The next task is to train the ML on the young face. This is done not as one large attempt, but a series of smaller sections which are then brought back together. In January Porto posted some early personal de-aging tests he had attempted on clips from The Irishman but these used a different approach. These initial tests trained on the face looking one way, then the face straight on, then the face looking down, etc. For the Mike demo instead of dividing the problem up by face directions, Porto divided the face up by regions. “The previous approach was nice but it was very time-consuming. Instead of building a model based on the pose of the head, I now have a model for just the eyes, and just for the mouth, etc. It no longer matters what the orientation of the mouth is, it just builds a model for the mouth, for example.” Porto explains.

The whole process requires training on both the source and target faces. Key to this stage was isolating parts of the face in both the training data and the target hero clip of 2020 Mike. Here the new advanced ML tools in Flame were used directly so that the various different ML models could be trained. “In Flame now you use masks with brushes and you can feed those regions into a set of ML tools to just learn that one area of the face,” Porto explains. Porto’s approach drives the ML model of each of the two faces with masks, previously this would have required tracked roto shapes. “The ML Models in Flame enabled my new workflow of simulating a Supervised Training Data set, without having to label Data sets, by using this Mask training approach,” he adds.
Autodesk introduced these special ML face tools last year. Since all human faces have commonly recognizable features, ML algorithms can be trained to find these patterns. The tools in Flame were introduced to help simplify accurate color correction, relighting, and digital cosmetic/beauty retouching, but they are perfect for breaking up the face for Porto’s approach of a series of ML face feature models.
“Since first releasing AI-powered features in Flame last year, our goal has been to help artists accelerate common, highly-manual tasks which slow down the creative process,” commented Will Harris, Flame Family product line manager, Autodesk. “What started out as machine learning-based AOV generation quickly grew to sky extraction, isolating human bodies, heads, and finally in the latest release, facial features. Advanced machine learning algorithms remain a big focus for us, and we’re continuing to explore new ways of introducing them to Flame to help artists.”
Stage 3: Inferring the younger face
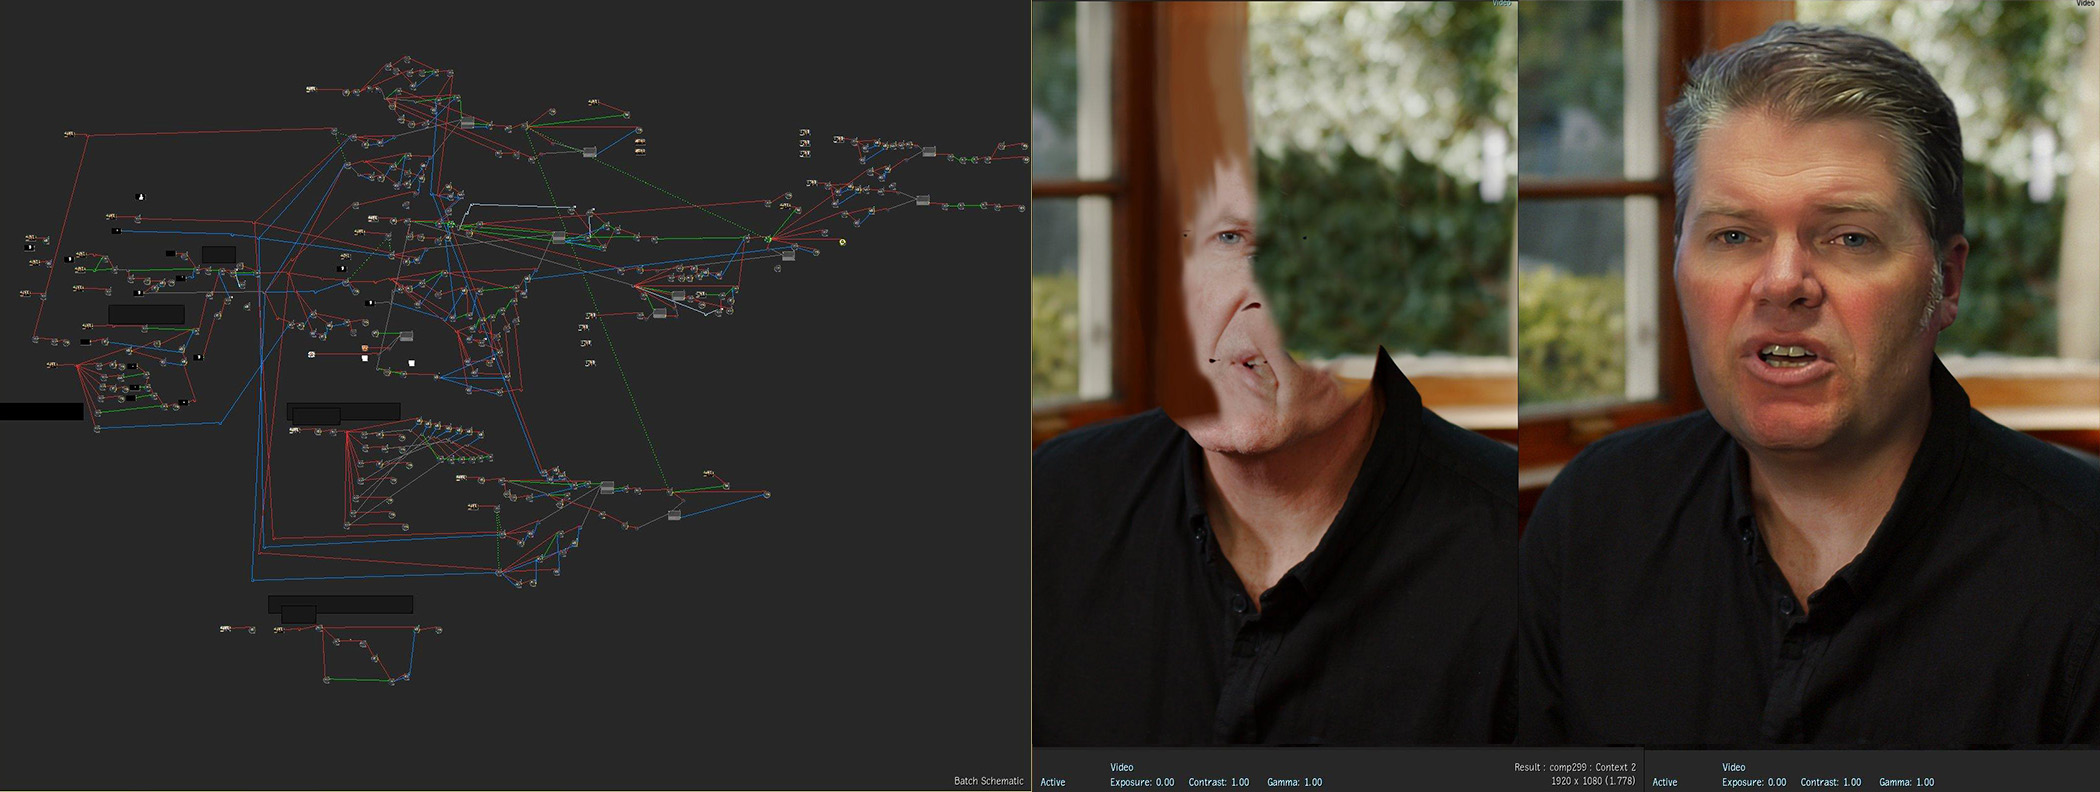
Once the training is done, it is possible to infer the new younger-looking Mike face. These inference outputs need to be combined. “This idea of splitting the face into a series of ML models actually came from greenscreen,” Porto explains. “To get great results, you always actually do a set of keys around the object. You can never key a person with just one key, you can end up with 5,6 or even 8 different keys to get all the parts looking good. With that idea, I thought of doing a different model for the eyes, for the mouth, etc. And this lets me get much better quality, but the most important thing is fitting the right data and that means spending a good amount of time preparing the data.”
Porto uses a partial GAN solution, with some noise generated in the process, but he actually finds this can be helpful to make the final output look more natural.
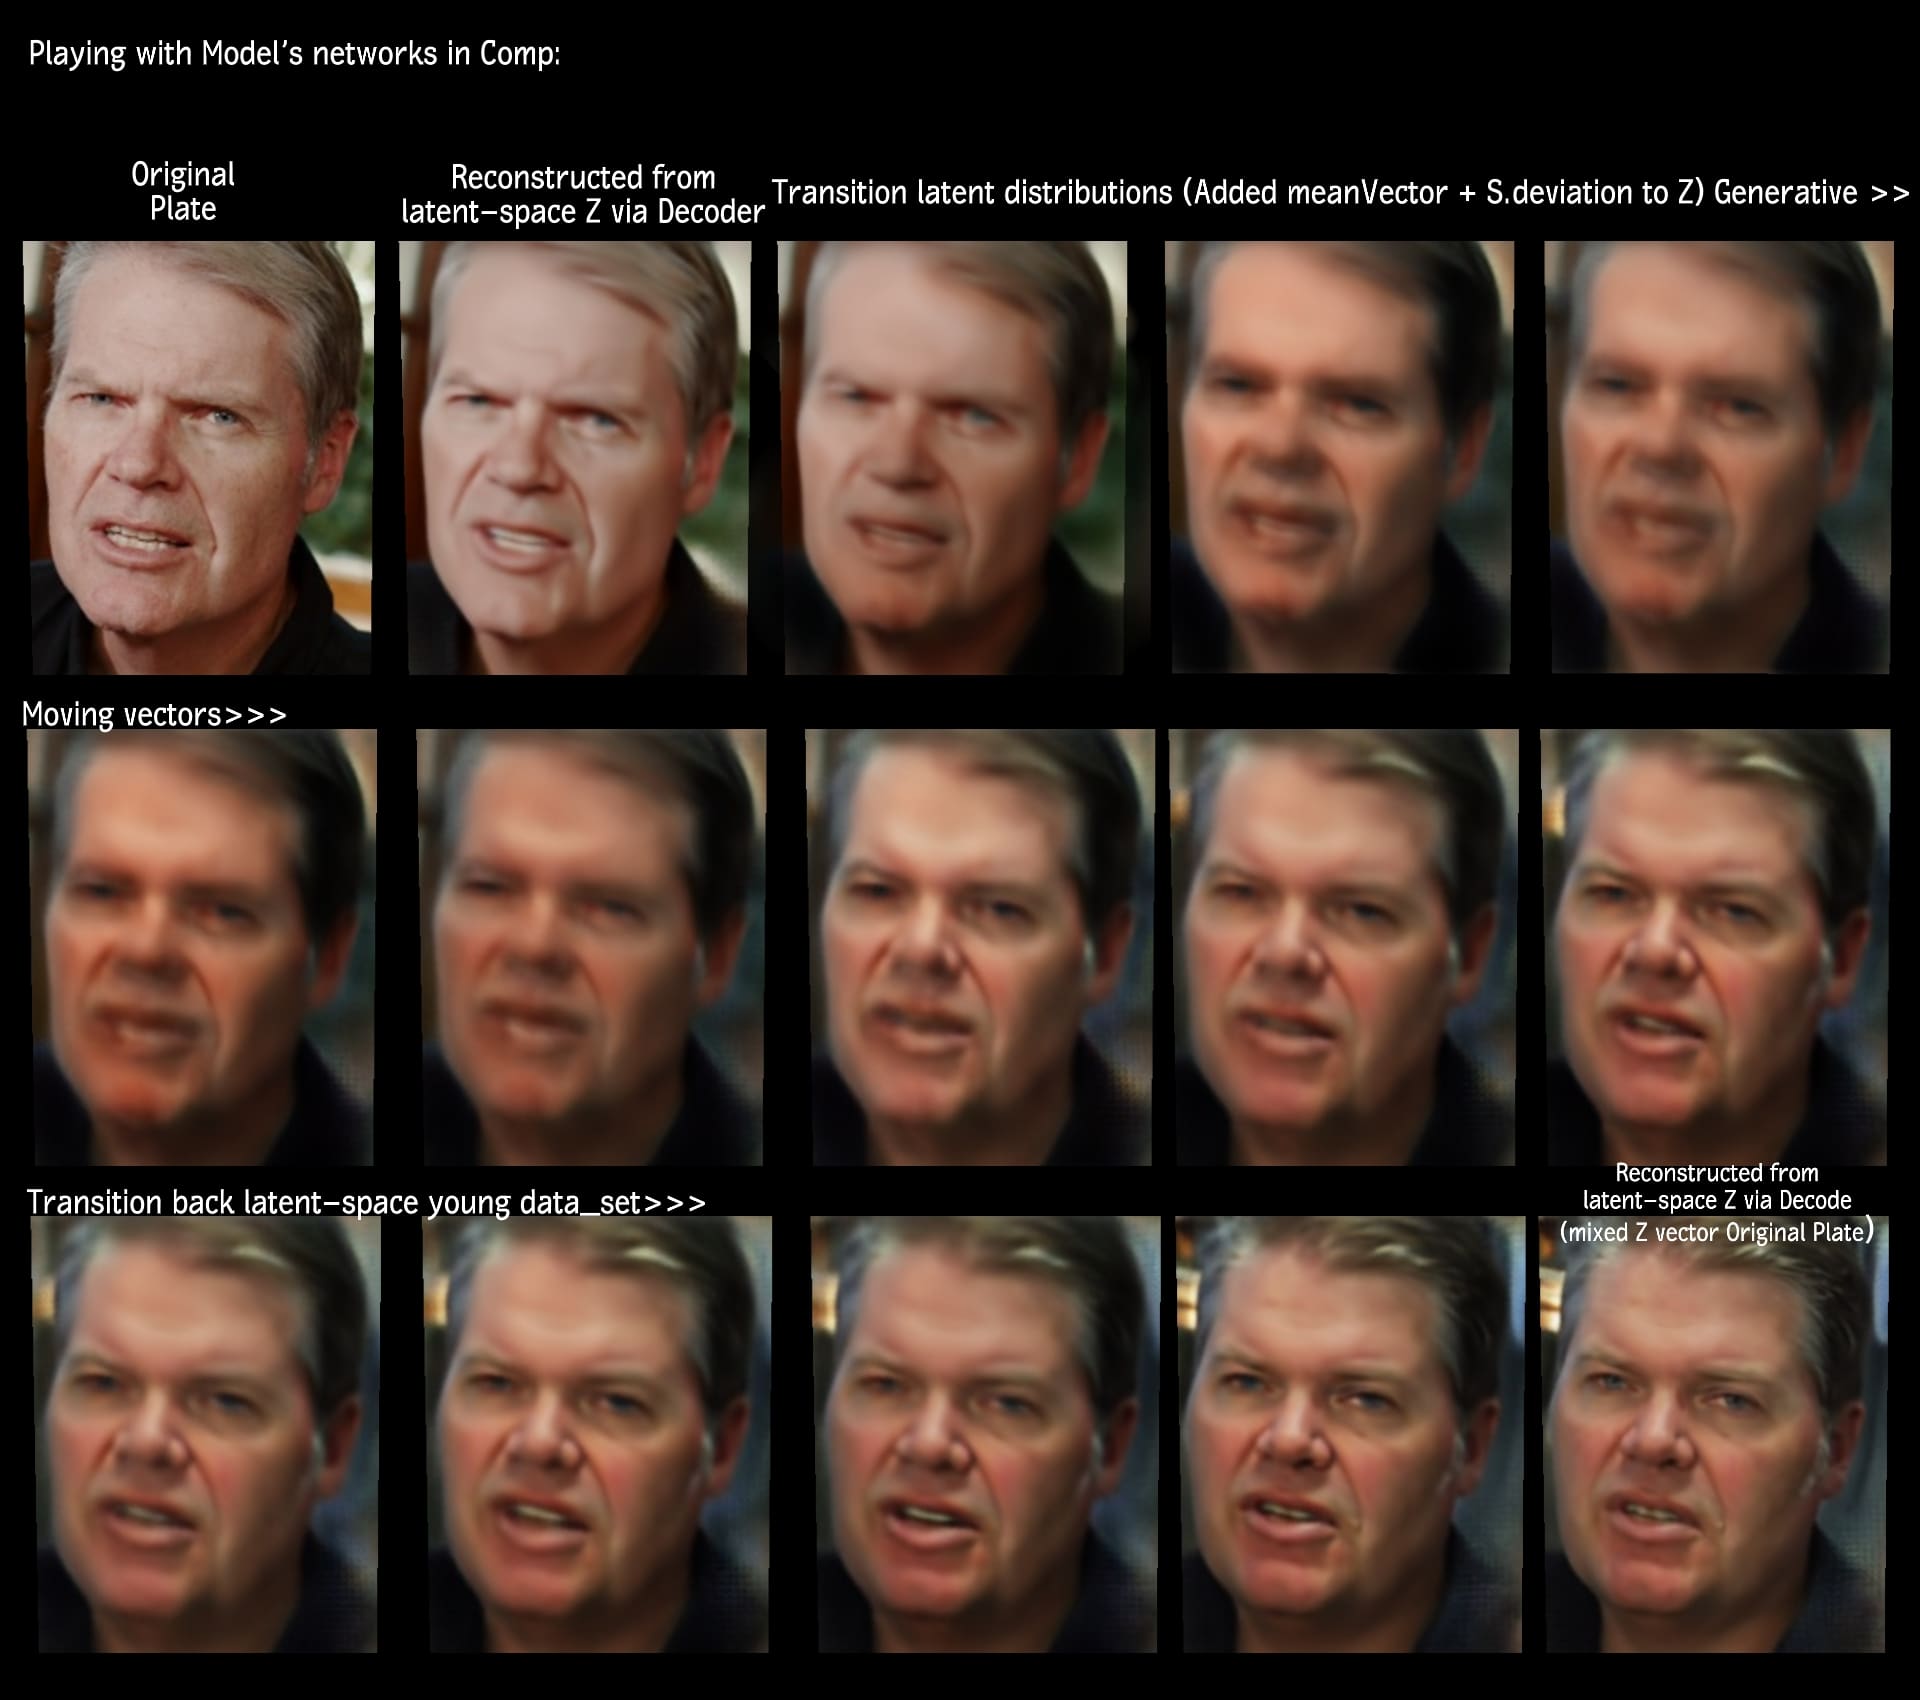
Referring to the image above, Porto commented that he finds that this is a “nice way to visualize latent-space vector Z and the transition between distributions. I was inspired by this paper, Optimizing the Latent Space of Generative Networks. It is not actually the same but my version is very similar. Essentially it is about ‘finding’ the distribution of the features after the image is encoded. Then moving/isolating to adjust. It is a cool little trick to play with adding or removing from the image, such as adding a smile, changing gender, things like that…With Mike, I’m playing with the vectors. I could add a VGG model and play with adding things like glasses, hair, or Mike getting older if I chose to.”
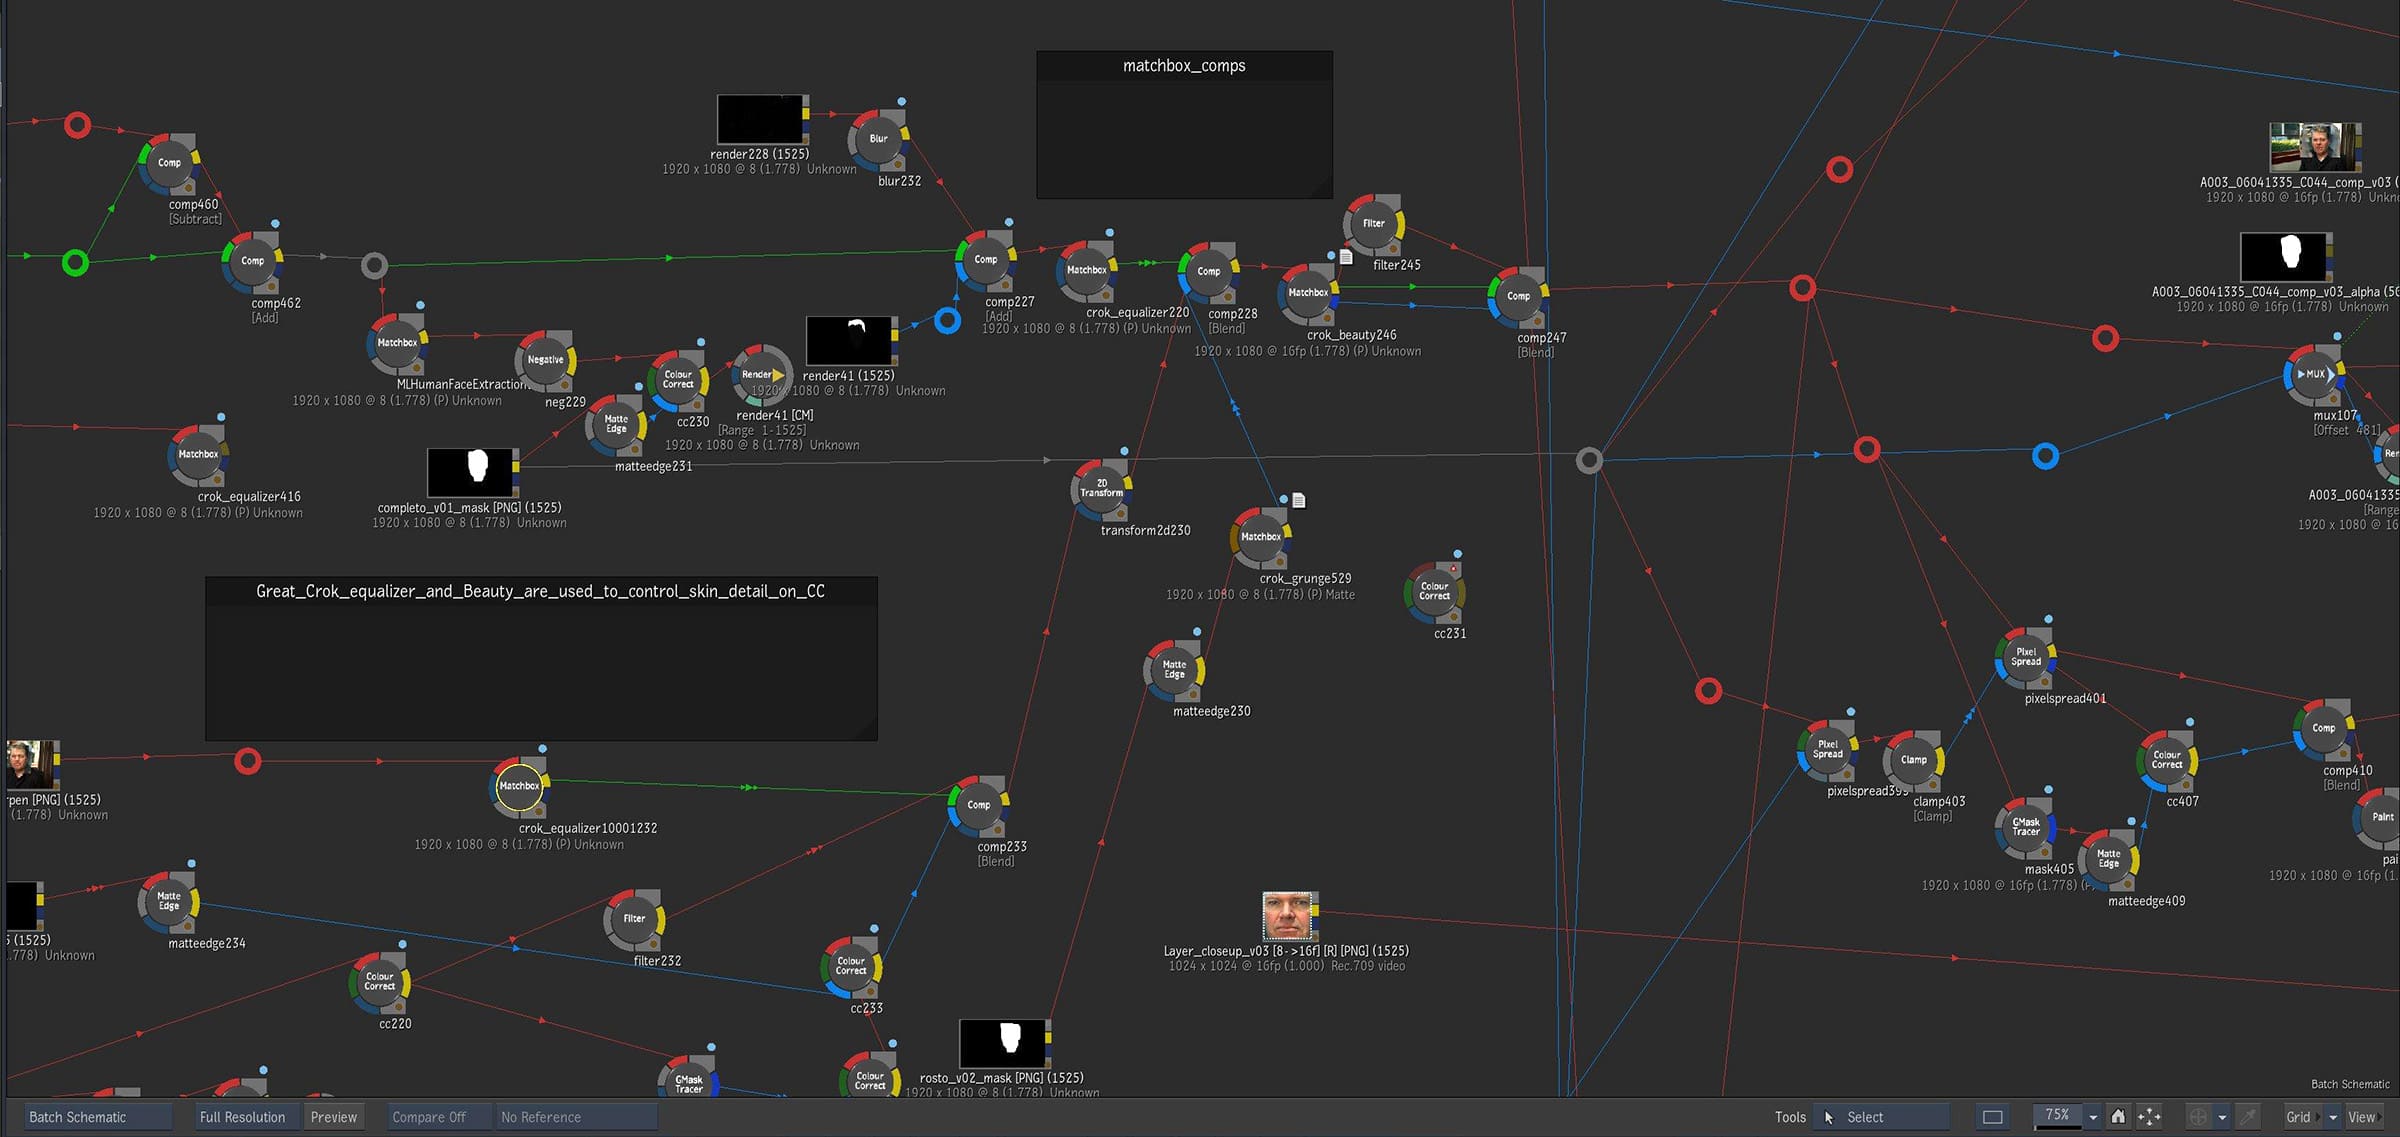
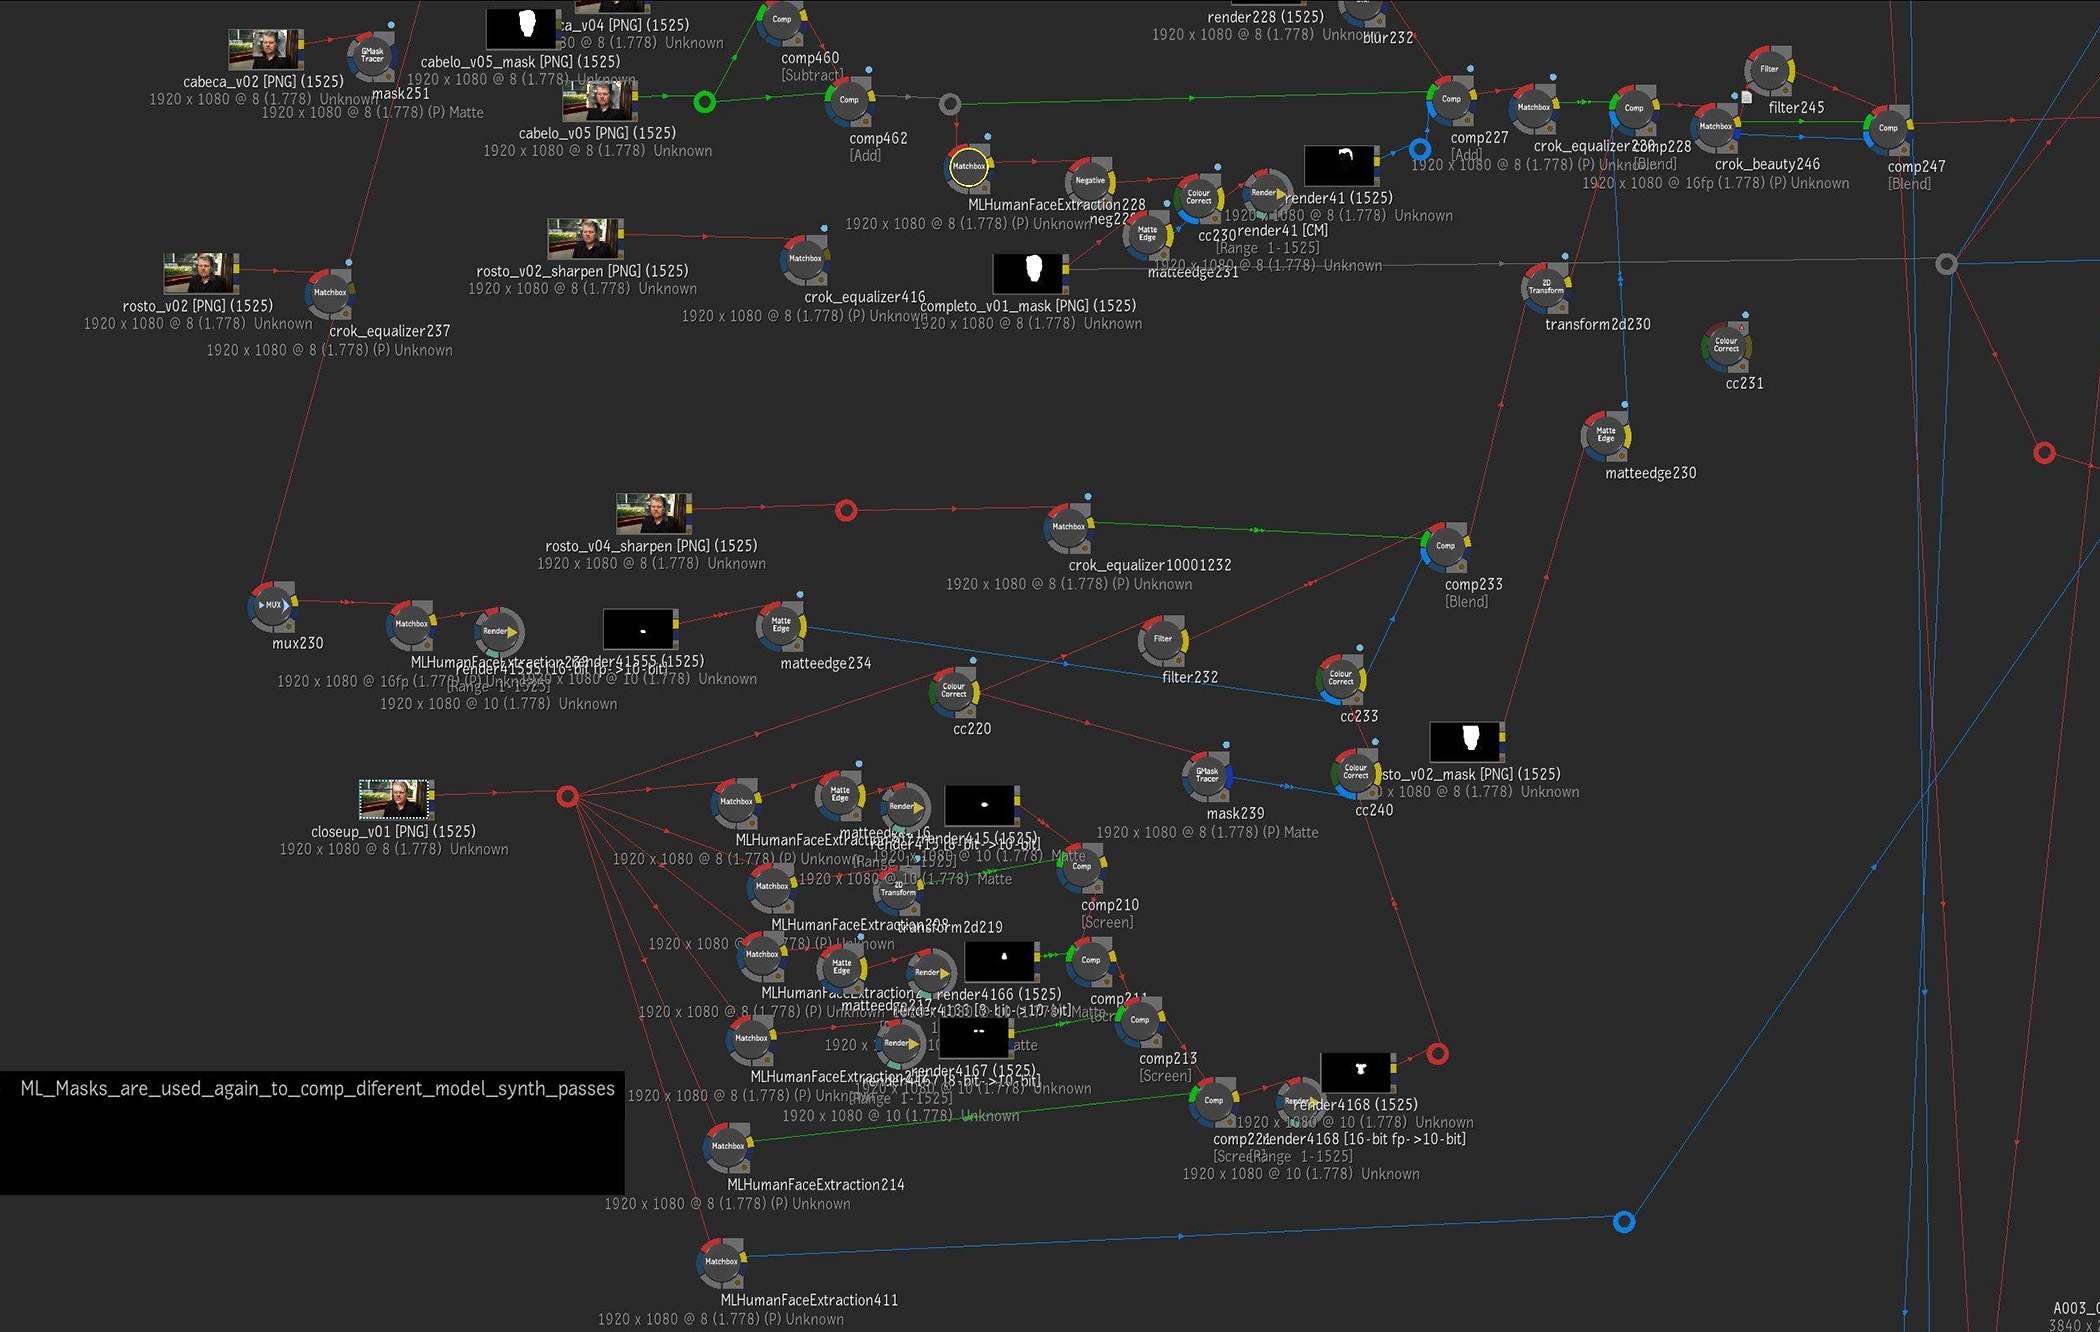
To recombine all the elements Porto has a complex batch setup that uses more advanced tools in Flame, specifically user generated tools via Flame’s Matchbox node. Flame introduced the Matchbox environment in Flame 2019. Matchbox is an interactive development tool that allows people to run OpenGL shader language (GLSL) to add specific functionality or create custom effects. Porto used the Matchbox shaders tools as nodes in Flame’s Batch.
“‘Crok_equalizer’ is a Matchbox tool that I have been a fan of since I got Beta from Ivar Beer,” explains Porto. “What I like about crok_equalizerm is the control of Blur (positive values) and Sharpen (negative values) all in one node. They all work in combination – doing areas, edges, and frequency channels –but they do not feel like a classic pixel sharpen or blur.” The crok_equalizer according to Beer “tries to replicate the Texture Equaliser from Filmlight (grading deck)”, and it is just one of the many precise tools Beer has contributed to the community and that Porto regularly uses.
“I’m using ‘crok_beauty’ to give touch of softness between all the passes, and it offers this very tiny ‘Bleach Bypass’ blur look in the mid-tones. This gives the render of the young Mike source a ‘lack of definition’, but just a bit.” says Porto. “Because I have different ML passes/angles, per feature sets – for cheeks, eyes, forehead, mouth, hair and so on – I use different settings for each pass.”
Matchbox shaders are a key part of the user sharing environment of Flame’s ecosystem. Many of the GLSL tools are collaborative efforts and Porto has nothing but praise for both its introduction to Flame a few years ago and the community’s response in sharing. Ivar Beer has earnt the nickname ‘The Matchbox Magician’, for his work in popularising and sharing tools that Porto and others use for this style of work. Crok_beauty, which was used in this Mike demo, was posted to the Logik site by Beer and is based on the work of Lewis Saunders who posted his skin solution based on frequency separation logic. “The crok_beauty one is based on the great work of Lewis (Saunders’) ls_dollface code,” comments Beer. “I asked him if I could use his median filter algorithm and he agreed. I thought it would be nice to combine the different techniques for beauty work into one shader”. While there is a small core group of users that have contributed to the bulk of the tools, this open-source initiative has produced some exceptional tools. “Ivar Beer and GP Malone did an incredible job putting some of what I made together into that beauty shader and I cannot emphasize enough how good it really is. If it was a $500 plugin I would instantly buy it,” says Saunders. “The whole Logik scene is just amazing. So many people have shared so much knowledge on there.” He then goes on to add, in reference to the Autodesk engineering team, “I’m not sure who decided that it would be great to have a text-based environment for image processing – seemingly totally incomprehensible to 90% of the userbase – but it turned out to be precisely what we needed!”
For the Mike de-aging Porto used these plugins extensively and he relies on them to polish his work and provide exactly the artistic touch needed to compliment the technical solution of the ML models.
Stage 4: Normal Flame Comp
The last stage involves placing the new head into the target clip. As there was no clean background plate, a simple paint-in was used to produce a semi-clean plate. The process also requires some roto on the new digital hair (unsurprisingly Mike in 2020 has less hair than in 2010!).
In the same master batch setup, the ML masks are again used to composite different synthetic model passes back together.
Below is a close-up image showing the impressive final match that Porto achieved with Flame on the younger Mike Seymour, but Francis Bouillon, Senior Product Owner, and ML specialist at Autodesk points out such results are not easy. He explains the lack of traditional predictability in ML models is something some Flame users struggle with. “One thing to keep in mind with these tools is that ML doesn’t work for every single shot, as it is based on a data set that doesn’t include every single image content possibility,” he comments. “To get the best out of the ML tools as an artist you need to take the time to test a lot of shots to understand when it works and when it doesn’t.” As Flame comes with pre-trained ML facial tools, for example, Flame artists need time to understand what shots will work and what won’t, before an artist can easily predict the results from just looking at any new clip. “It’s like a little animal that we trained for you and you have to figure out what tricks he knows” Bouillon jokes.

It is also to be remembered that this is still early days for ML tools inside Flame or any VFX product. No doubt as users find ways to use the technology, user experiences and interfaces will improve and simplify the process. For their part, Autodesk is committed to “continue our journey on machine learning as it opens new possibilities not possible to obtain using a traditional algorithm,” Bouillon confirms.
Want to learn more? You can download the actual Flame Archive Batch Setup with a sample frame (non-commercial use only) and play with the Flame Comp yourself.
Slow-Mo
Digital de-aging and digital make-up are just two of the techniques Porto has been experimenting with on his personal frame system in his own time. He has also been exploring advanced ML optical flow hybrid solutions.
Porto has been exploring advanced ML enhanced optical flow, based on a 2018 NVIDIA technical paper. This personal experiment by Porto took one of the fastest animals on the planet, a cheetah, and using ML-deep learning, produced a clip as if the cheetah had been filmed at 5,000fps at 8K. To do this 16 frames were created to slow the clip from about 350 fps to 5000 fps.
The first stage was to remove the compression artifacts using ML and then up-res as before using the Super Res ML approach. Porto up-resed the original H264 clip he found online from 1920×1080 to 8K resolution. Operating at 8K this experiment needed 100Gb+ of VRAM and the total render was 2.1 TB.
Having trained on the Super Res clip, Porto set out to find adequate training data for the slow-mo inference. The ML engine trained on another source clip from Cheetahs on the Edge. A National Geographic documentary which included a cheetah filmed at 1200 frames per second. After training on this clip, Porto turned his attention to slowing down the 8K version of the original target clip.
Finally, Porto was able to introduce 16 frames for every existing frame and produce exceptional slow-mo results.
Thiago Porto is very focused on educating VFX professionals on how they can expand their toolset using ML and he is a key presenter at RTC, next month. “Next week I hope to show what is possible and how we should be talking more about using these ML tools as a natural part of our VFX and our 2D pipelines”, Porto concludes.
For RTC Registration Click Here
Thiago Porto presents June 9 as part of the DIgital Human ML Session

Fxguide is a proud media partner of the RTC. Fxguide’s Mike Seymour, along with Facebook’s Christophe Hery, they are curating the June 9th session on Digital Humans | Artificial Intelligence | Machine Learning | GANs.