2011 has been a big year for big visual effects films, but almost as equally prominent have been effects of the invisible kind. In fxguide’s last ‘incredible, invisible effects’ piece we looked at Contagion, Killer Elite, Apollo 18, Drive, Deathly Hallows: Part 2 and Water for Elephants. We’ve also had in-depth coverage of recent releases Hugo, J. Edgar, The Muppets, Tower Heist, In Time and Moneyball. Now we turn to a collection of more great invisible effects work seen in Tinker Tailor Soldier Spy, Twilight: Breaking Dawn – Part 1, Machine Gun Preacher, Jack and Jill, Young Adult and Dolphin Tale.
Tinker Tailor Soldier Spy
Invisible effects play a key role in Tomas Alfredson’s Tinker Tailor Soldier Spy, set in the early 1970s. For the film, Framestore completed several subtle enhancements (read about their invisible effects work for the film here), as did The Chimney Pot in Stockholm, whose major shot was the creation of the MI:6 ‘Circus’ archive. Here, spy Peter Guillam (Benedict Cumberbatch) is tasked with surreptitiously gathering a file from a rack of bookshelves deep inside MI:6. The file then travels by elevator through the MI:6 building.
– Above: watch a breakdown of The Chimney Pot’s vfx for ‘Tinker Tailor’, courtesy of 3D Supervisor Ruslan Ogorodnik.
Initially, the archive scene was conceived as a 2D shot that would stitched together using several pieces captured on the film’s London set. However, the nature of the scene and the existence of only minimal props necessitated a 3D solution. “We still shot a lot of live action reference,” says The Chimney Pot visual effects supervisor Fredrik Nord, responsible for overseeing the work with executive producer Fredrik Zander and VFX producers Anneli Oscarsson Emma Stenborg.
“They knew they needed the actor in the middle stealing the files and some workers on the other levels,” adds Nord. “We shot lots of material of people walking around. We also shot a lot of texture plates of the bookcases and other objects for the 3D and took measurements.”
Back in Stockholm, Nord began building the entire archive set in Softimage, complete with textured bookshelves, stairs, beams and pipes. “The challenge was to work out how many floors there were, how many elevators, where was all this in relation to the archive?,” says Nord.
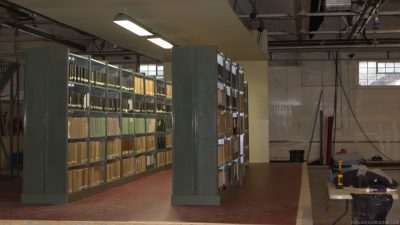
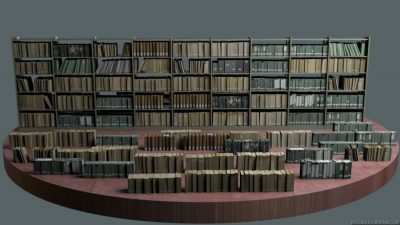
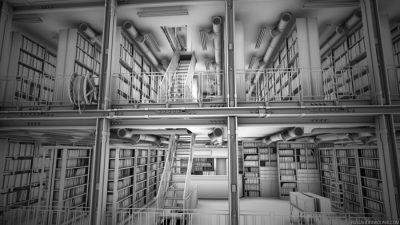
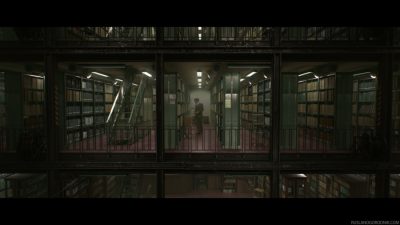
3D supervisor Ruslan Ogorodnik then took over the scene, lighting and rendering it in high detail using 3ds Max and V-Ray. The CG renders were then composited by Olle Peterson Oskar Larsson, Axel Klostermann and Andreas Karlsson in Nuke with plates of the main actor and extras filmed on greenscreen.
The archive had to match a look established with a live action plate for the shot of the file traveling in an elevator. “When we were in London shooting the elevator,” explains Nord, “we covered it with a greenscreen shot of a lady walking in placing files on a desk. Then we had this still of the front of the elevator which we animated and comp’d into the shot. It’s a 3D background with a small move to match the greensceen shot and then composited. The hardest part was matching lenses to the wide shot. It was tricky to get the live actor in the center to look real even though the lenses were way off from pulling the camera back.”
Ultimately, The Chimney Pot ended up contributing around 100 shots to Tinker Tailor Soldier Spy, including scenes of tracks changing on a railroad, background trains and landmarks, plus a gruesome post-murder shot of a man with flies hovering about his neck wound. The facility also provided the film’s DI services.
The Twilight Saga – Breaking Dawn, Part 1
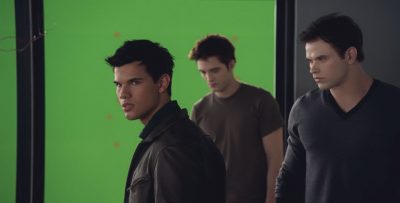
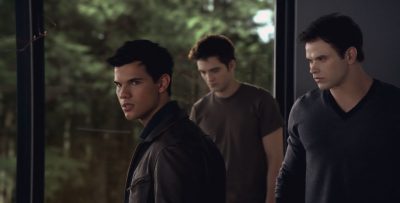
Although the latest pic in the Twilight Saga, Breaking Dawn – Part 1, features some amazing digital wolves and super-fast vampires, the film also showcases hundreds of seamless effects to present important locations. Many of these invisible effects were created by SPIN in Toronto – 600 in total.
“SPIN’s primary contribution on this film was to add the backgrounds to all the sound stage greenscreen windows on the main set of the Cullen House,” says SPIN visual effects supervisor Jeff Campbell, who oversaw the work with visual effects producer George Macri. “With no actual glass in the windows of the set,” adds Campbell, “many shots required the addition of room reflections and/or character reflections. Both character and room reflection elements were created entirely in CG and animated to match their live action counterpart.”
On set, SPIN compositing sequence supervisor Kirk Brillon assisted the production’s overall visual effects supervisor John Bruno and his team by laying out the backgrounds during filming, before the shots were finished back at Toronto. “Each window setup had multiple types of weather and time of day for different shots from the same location,” explains Brillon. “The [Vista Vision] plates were usually nine to twelve cards per view depending on the location and how much could be seen out of the windows. These were then stitched together in Nuke using 3D cards to create seamless projections. A virtual camera was used in Nuke to match the live action shot with information provided by production. We started off going for literal location angles but then drifted towards more aesthetically pleasing setups for the final layouts.”
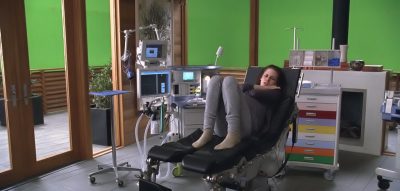
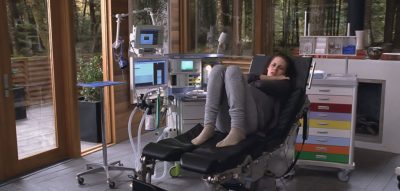
For one particular shot of Bella surrounded by medical equipment, SPIN had to assemble a wide background environment since the room featured large windows on two sides. “We modeled all of the interior furniture and created digital doubles for Kristen Stewart and Robert Pattinson for use as reflection objects,” says compositing supervisor Eric Doiron. “These were carefully animated to match the actions of their real life counterparts. Finally, the interior room environment was reflected from HDRI images of the set.”
SPIN also completed a number of shots of Bella and Edward’s honeymoon island visit. For these, John Bruno shot live action plates that were assembled in comp and augmented with matte painting. “I used Photoshop to paint several sky elements, color corrections, adjust tone and paint an oversized sky bigger than the film plate so a post-drift could be added,” says matte painting supervisor Jim Maxwell.
The studio relied on PFTrack for layout and tracking with Maya and Nuke for CG and compositing, completing the 600 shots in only a few months and encountering a couple of surprising invisible effects on the way. “I had a few fun shots,” says Jeff Campbell, “where we had to add teeth to the newborn baby. So I used my son’s teeth from a photo I had when he was one year old and finished it on the Inferno.”
Machine Gun Preacher
Visual effects artists are often asked to alter skies and the weather. For Marc Forster’s Machine Gun Preacher, With A Twist Studio went one step further, devising a chaotic storm sequence featuring the main character Sam Childers (played by Gerard Butler), a reformed drug-dealer, as he steps out of his Pennsylvania trailer park home.
“Marc wanted something violent that would be a frightening life changing moment,” says With A Twist visual effects supervisor David Burton, who worked with overall visual effects designer Kevin Tod Haug on the shots. “Storms have always been a storytelling tool of judgement and salvation,” notes Burton. “My goal was to create this storm sequence that would serve as the judgement that Sam would have to face to reach salvation on the other side. I wanted that storm to be staring deep into his soul. We really love to design shots that impact the story.”
– Above: a breakdown from the storm sequence shots in ‘Machine Gun Preacher’ by With A Twist.
The shots take place in the evening, just as a large midwestern storm approaches. Production shot on 35mm (flat Vision3) for the plates, and filmed grids of the 16mm lens to later match the anamorphic look of the rest of the picture. The art department had Ritter fans and bags of leaves and debris for practical elements. “Some shots and some effects plates were filmed using those elements,” notes plate supervisor Brandon Bartlett. “But the results weren’t nearly extreme enough and since they were practical they were hard to control on an outdoor set. We were losing light fast as it was the last shot of the day, so we made sure we had clean plates without any practical debris or on-set lightning gags.”
Ultimately, all of the debris and lightning hits were created by With A Twist digitally, with the practical plates forming useful reference. “David and I also hung out outside a little longer than some of the others were comfortable with and took shots of various cloud formations for reference and speed,” adds Bartlett. The final shots made use of three different storm systems filmed after principal photography.
To craft the storm shots, artists tracked the plates using SynthEyes, relying on a bare minimum amount of parallax to get a full 3D camera solve for each shot. “Performing full 3D tracks enabled our compositors to place elements on cards in Nuke’s 3D environment and have those elements move convincingly in the scene,” says compositing supervisor John Bowers. “Matchmoving also expedited the process of extracting mattes for various objects in the frame and for creating interactive lighting. There’s nothing like having solid tracking!”
– Above: see a further breakdown from the storm sequence shots in ‘Machine Gun Preacher’ by With A Twist.
A virtual trailer park based on on-set measurements was constructed, with Houdini used to create a ‘tornado alley’. Much of the original plate was augmented, including the adding in of practical swaying trees along with CG elements. “We used Houdini’s dynamic op’s to build a variety of flying leaves, furniture, and small debris all within the same system,” says Burton. “From that point we ran a variety of wedges to get the right amount of speed and violence. Some branch elements were created using L-systems in Houdini as well. All of the CG elements were rendered in mantra as .exrs and sent to Nuke for compositing.”
Achieving the right look for the storm was one of the key challenges. “There was much discussion over how dark and foreboding each shot should be,” says Bowers. “Should it look like 6:30pm, 7:30pm, or 8:30pm? How close is the storm at this point? Having compositors who had grown up in Michigan, Wisconsin and Oklahoma became a huge asset in this discussion, as people who haven’t experienced a severe thunderstorm or tornado at that time of day in that part of the country might not know: that the sky goes really green!”
Small details helped sell the storm, too, such as the addition of interactive lighting and camera shake. The approach was so successful that 48 additional shots inside the trailer were added during the storm to feature debris, camera shake and a tree branch that crashes through the wall. “I found a perfect branch hiking at Griffith Park that we shot back at the studio,” recalls Burton. “And one of the smaller details is that in the last shot we removed any set dressing on the ground like bicycles, outdoor furniture, et cetera to really sell that the high winds had blown everything away.”
Jack and Jill
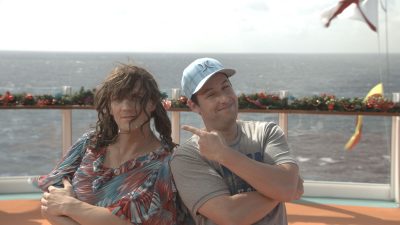
Selling the fact that two characters are played by the same character also often calls for invisible effects work. For Dennis Dugan’s Jack and Jill, Method Studios Vancouver were among a couple of effects houses responsible for seamless work to bring Adam Sandler, playing Jack, and Adam Sandler, playing Jack’s twin sister Jill, together in the same scenes. The studio also completed other effects work involving a pony, a cockatoo and a chocolate fountain. Method’s visual effects supervisor was Thomas J. Smith, with production visual effects supervisor Dan Deleuuw overseeing the entire show.
“With a film like this,” notes Deleuuw, “since you’re basically making Adam Sandler’s twin, you want to be in a position where you believe Jill as a character. We’ve all seen Adam in a movie and we believe him as Jack. You initially see that there’s Adam dressed up as Jill but you want to believe her as a character in and of herself.”
“I find these to be the most challenging films to work on,” adds Dennis Hoffman, Method Vancouver’s senior vice president and general manager. “It is truly about helping to drive the story in the most invisible way. If the audience says, ‘Oh that’s a really cool effect’ in those kinds of stories, then you’ve failed. This is a comedy, it’s about the jokes. It’s challenging to do the destruction of the world, but to do things where people are surprised to see the visual effects credits at the end of a film I think is the greatest accomplishment to the artistry and the craft.”
To set up Jack and Jill appearing in the same scenes, Deleuuw established a clear set of rules. “If they were in a stationary position it became a splitscreen,” he says. “If it was something where they needed to move the camera then the motion control would come in. Then if for some reason the twins had to touch each other – hugging or passing a note, for instance – then it might be a trick shot or a head replacement.”
One sequence has the siblings on the back of a cruise liner doing a double dutch jump rope routine. The first issue there was working with a constantly moving horizon and sun position. “We were actually out on a test cruise while we were filming,” recalls Deleuuw. “Dean Cundey, the DoP, had a walkie talkie to radio the captain and ask him to navigate the ship to keep the sun in the same spot.”
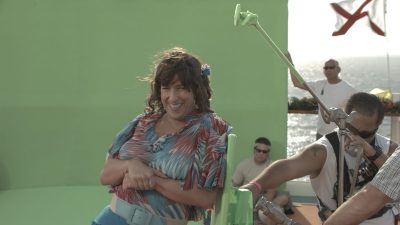
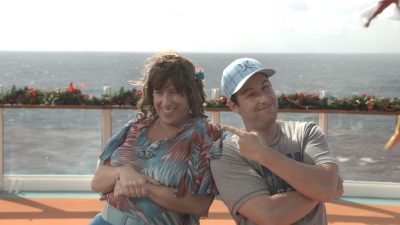
For a shot of Jack and Jill shoulder to shoulder, two plates were shot – one of Sandler as Jack leaning against a stand-in for Jill, then another of Sandler as Jill against greenscreen. The Jill stand-in had green dots on his face to help with matchmoving (for other scenes Sandler’s head was built in CG from Gentle Giant scans full digi face replacement), while Sandler as Jill pushed up against a green stand to give the feel of weight. Method created a clean background plate, then composited the shots in Nuke, relying on animated warps and articulated rotoscope separations to deal with clothing overlaps.
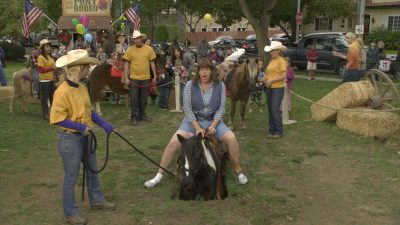
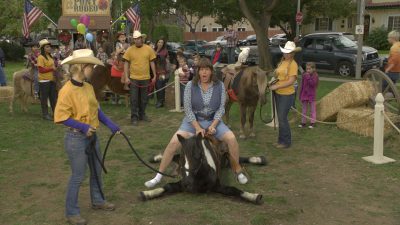
At one point, Jill rides a pony which cannot support her weight and buckles underneath, resulting in its legs splayed outwards on the ground. For this shot, a real pony was filmed on a hydraulic lift and the legs added by Method in CG. “The special effects team built the test lift in a 3x4x4 hole and slowly rehearsed it with the pony and then would speed it up until the pony got used to it,” explains Deleuuw. “The pony was also scanned on stage by Gentle Giant. Then we handed all that off to Method to build the CG legs and composite the shot. They tracked the pony, did some animation tests and got the feel for what the legs splaying out should look like. For inspiration we went off the look of Bambi on the ice with his legs out. We had to re-time the background to make it drop a little faster.”
The pony was modeled and animated in Maya under the CG supervision of Peter Hunt, then rendered in mental ray. Lead compositor Jason Knight used Shake to lock the CG pony into the plate. Method also added a CG rope, matte painted skid marks on the ground and 2D dust elements.
Method also contributed a CG cockatoo to the film for shots of ‘Poopsie’ being subjected to the antics of a child who likes taping things to himself. “Originally,” says Deleuuw, “it was photographed as a fly swatter taped to him. The shot was staged but the swatter just didn’t read and didn’t get that big a laugh. So the guys called me in and said, ‘Hey, what can we put on him that’s funnier?’. We tried a plunger and tested that but it was still a little hard to read, so we got the idea to put Poopsie on him upside down.”
The plate photography was cleaned up by first removing the fly swatter, and then modeling and animating the bird in Maya. Animator Daniel Mizuguchi referenced real cockatoos for wing flapping cycles. The scotch tape holding the bird onto the child’s back was created as a texture card in Nuke by compositor Luke Vallee, which was deformed and wrapped around the bird model and augmented with point lights for the final shot.
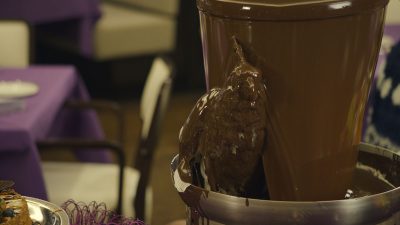
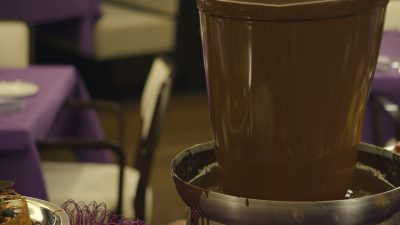
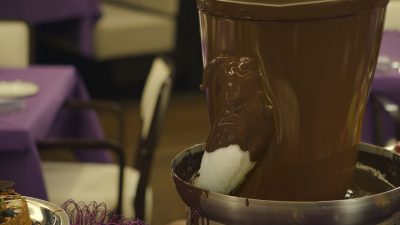
Poopsie also gets into mischief by playing in a chocolate fountain, an effect requiring Method’s digital bird and a CG fluid sim for the flowing chocolate. “We had the stuffie versions of the birds so we took one of those and dipped it in the chocolate to get an idea of what the feathers would look like,” says Deleuuw. If you matched it properly it was one of those things that looked like a poor bird stuck in an oil spill, so we only used that for reference. Then we did a rough animation for preview – even from the beginning when it was a gray shaded bird and painted on feather textures, it got a giant laugh.”
Daniel Mizuguchi animated the bird while CG artist Lisa Nolan created a custom animated branching system over the bird geometry in Houdini to direct the flow of chocolate. The shot was composited by David Chen and Aaron Brown using a combination of the CG renders and custom distortions in Nuke, plus 2D elements for dripping chocolate.
“I think with Jack and Jill a lot of the effects were there for things that just couldn’t happen for real,” says Method’s Dennis Hoffman, “but the challenge was really to get the laugh that was needed that didn’t break the rule of believability.”
Young Adult
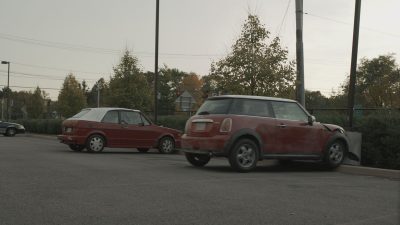
Comedy/drama Young Adult, directed by Jason Reitman, features 80 invisible visual effects shots from Phosphene, under visual effects supervisor John Bair and visual effects producer Vivian Connolly. The shots range from the creation of a character’s (Patton Oswalt) physically deformed leg from a bashing injury, to digital car fender rig removal and clean-up, sign replacements and monitor inserts – all crucial to telling the story of fiction writer (Charlize Theron) returning to her home in small-town Minnesota.

For the leg sequence, which is an intimate scene between Oswalt and Theron, tracking markers were placed on Oswalt’s leg. “We began design tests early on to determine the look of the leg,” says Phosphene’s lead digital artist Aaron Raff. “Extensive medical research allowed us to make sure the deformity was as medically accurate as possible. In post, we stabilized and isolated Patton’s leg movement and began applying medically appropriate scarring and texture to the skin. Using warping tools, we redefined the outline of the leg to properly portray the loss of muscle and bone density, maintaining the disfigured shape from every angle as both the actor and the hand held camera moved freely throughout the scene.”
“Because the shot was close-up and intimate,” continues Raff, “the leg had to move realistically as Patton rolled around on the bed. Since we shrunk the limb quite a bit, we also had to recreate everything that was under his leg as he moved on the bed’s surface including ruffled blankets and other items.”
Other sequences with seamless effects included a comical ‘fender bender’ when Theron’s character drives into a parking spot. A sports bar scene required replacement of greenscreens placed outside windows, and television monitor inserts. “We decided the best approach was to use the Flame for this scene,” says Bair, “because it was over 50 shots that had to be turned around quite quickly and continuity was of the utmost importance. Under the circumstances, being able to pull quick keys and have quick reviews for continuity checks made the process much easier.”
Dolphin Tale
Inspired by the true story of Winter the dolphin, who relies on a prosthetic tail after hers was lost in a crab trap, Charles Martin Smith’s Dolphin Tale features CG dolphin and other invisible effects by Arc Productions. Arc visual effects supervisor Terry Bradley worked with the film’s overall VFX supe Robert Munroe on scenes of dolphins in the ocean, and shots of Winter with her new tail – all completed in stereo.
– Above: watch the trailer for ‘Dolphin Tale’.
Arc’s shots ranged from full CG dolphins and water environments, to mixtures of CG dolphins in real water, prosthetic enhancement, plus trainer removal and rig and puppeteer removal for an animatronic dolphin used on set. To create the CG dolphins, Bradley referenced the real Winter extensively. “I was able to take lots of pictures and take lots of measurements of the animal itself. We spent hours with Winter. The trainers really gave us phenomenal access and we were obviously sensitive to the animal’s needs but we were able to get a lot of reference.”
“We also brought in an anthropologist to talk to us,” says Bradley, “specifically to talk about the dolphin anatomy and physiology. We learned a lot about the way dolphins move which we could work into the rig and the skin. There were about a dozen things I would have gotten completely wrong if we hadn’t talked to him!”
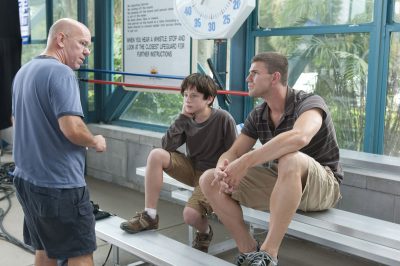
Those things included the fact that dolphins are very back-heavy, since forward of the pectoral and dorsal fins are all organs and cavities, while the back part of their body is entirely muscle. “The other thing is that the skin is attached to the muscles directly,” says Bradley. “So they wouldn’t have any of that sliding muscle underneath the skin that other animals would have. You can feel the organs moving, but not the skin. So we took great care to match that in the rig.”
Artists used Mudbox and Maya for modeling to create one base dolphin before making a number of variations. “Our animation lead Dave Baas led an effort to take footage of the real Winter,” says Bradley, “and rotoscoped her identically with our rig to make sure it could do exactly what she could do. After she loses her tail, she develops a number of abnormalities with respect to her physiology and the way that she swims, so we had to make sure our dolphin could perform like that.”
Animation was either keyframed or via pre-determined paths, which Bradley says had to reflect the realistic swim distances and exertions of dolphins. “We wanted to make sure that the rate at which the tails and the bodies were moving were appropriate to the amount of water they’d have to displace to travel at that speed,” he says. “Consider yourself standing up against a wall, and you push against the wall – the speed at which you travel away from the wall is equal to the speed at which you’re pushing away from the wall. The same is true of the tail – it’s got to be exactly the same phenomenon.”
– Above: watch a scene from ‘Dolphin Tale’.
For shots of the dolphins appearing in completely virtual underwater environments, Arc relied on Maya, RealFlow and Houdini for water sims. For real water and surface scenes, a deformation technique was used. “We would take a flat surface, do a water sim on it and actually use that to deform the live action plate,” explains Bradley. “Splashes were a challenge – we used a lot of real world reference for that. Typically we’d sim it in two levels – we’d sim the deformation of the water surface itself, and then the splashes in RealFlow and tie it together.”
Some of the particular challenges were tracking underwater shots and dealing with the associated lens distortion, and also working with stereo footage. “It was shot on the RED camera,” notes Bradley, “and they shot through a polarizer, and that means that the specular highlights in each eye are different and you get what’s called ‘rivalry’. All of our plates went through a fix process. First we would make sure the vertical alignment was correct, and then the rivalry and color and specular highlights. As the CG stuff we would be rendering wouldn’t have that issue, we had to fix the issue in the plates themselves before comp’ing the shots.”
Photo credits
Tinker Tailor Soldier Spy images and clips copyright © 2011 Focus Features. Courtesy of The Chimney Pot.
Twilight: Breaking Dawn – Part 1 images copyright © 2011 Summit Entertainment. Courtesy of SPIN.
Machine Gun Preacher clips copyright © 2011 Relativity Media. Courtesy of With A Twist Studio.
Jack and Jill images copyright © 2011 Columbia TriStar Marketing Group Inc. Courtesy of Method Studios.
Young Adult images copyright © 2011 Paramount Pictures and Mercury Productions, LLC. Courtesy of Phosphene.
Dolphin Tale images and clips copyright © 2011 Warner Bros. Pictures.
