RenderMan 19 is a significant step forward for RenderMan in many ways, as we covered when it was first announced. But now that it is available and free for personal use, we wanted to touch base with some actual users for their experiences and perspectives.
![]()
From Pixar’s point of view, the new verion of RenderMan has been a great success and already broadened the user community. “The response to non-commercial RenderMan has been great. People have been impressed with both the speed of the new RIS technology and how easy to use with features like interactive rendering. It’s been exciting to see so many new users join the RenderMan community,” comments Pixar’s Dylan Sisson.
RIS is the key new feature of RenderMan 19 which allows interactive, real-time rendering – iteratively refining the image over time. For 3D artist and fxphd Houdini Prof. Liam Whitehouse the most impressive thing about RIS is that it “allows you to move the camera interactively, adjust the materials, change their properties and navigate around the 3D scene,” all while the renderer keeps updating, he explains. “This is a great time saving because you can check the effect of changes to your scene easily in the RIS iterative render in the (IT) render view. This is very impressive because the original REYES system you exported a RIB file from your 3D scene but it would slowly render in RenderMan one bucket at a time.”
By contrast, now the RIB file in RIS does progressive rendering for a very quick first iteration, and then, depending on the quality settings, converges with time. For larger scenes like castles and forests, Whitehouse points out that “now you can look at everything and see feedback much more immediately.”

The progressive rendering and image check pointing feature means artists can run partial renders and then pick up from where they paused the render, “which allows for a rough version of animations and frames to render incrementally is really excellent for previewing advanced RenderMan features like fur or displacement to make changes” adds Whitehouse. Whitehouse now rather than rendering out his scenes with full settings, progressive renders his scenes – gets a preview of his work “which I can then refine according to the time I have allowed.”
With RIS in the new RenderMan one gets quick first results, but generally it takes longer then REYES. “Productions are reporting longer render times with RIS (to fully converge compared to REYES) but RIS looks better'”, notes fxphd Professor and Lollipopshaders.com co-founder Christos Obretenov. “In particular with textures, RIS path tracer’s camera rays directly sample each shading point, as opposed to the grids sampling with ShadingRate in REYES, so you get much sharper textures in RIS: in REYES you would have to take the ShadingRate down to 0.25 to get that ‘equivalent’ quality (In RIS ShadingRate only applies to Displacements now).”

For Pixar, this new version has been seen as a good counterpoint to “the industry shift towards photoreal ray-tracing renderers like Arnold,” says Whitehouse. “Ray-tracers create a more photorealistic image but they have traditionally had severe shortcomings, including very long render times, especially with scenes with a lot of motion blur and displacement.”
The new RenderMan is a completely new rendering system which is offered as a concurrent alternative to REYES. The REYES can create geometry and motion blur “with virtually no performance hit at render time but it was too slow with ray-tracing,” remarks Whitehouse. RenderMan 19 is to be a totally new approach from Pixar. From the interactive rendering engine to the new drastically reduced price, to the original features being supported including render time subdivision, displacement and motion blur rendering speed, “it all adds up to make it the #1 renderer for feature films,” in Whitehouse’s opinion, but he sees competition as a good thing, driving the industry forward and he jokingly suggests, “Arnold is very good as well and if it wasn’t for Gravity looking so good, we may still have the old REYES RenderMan for $2000 USD per CPU, who knows?!”
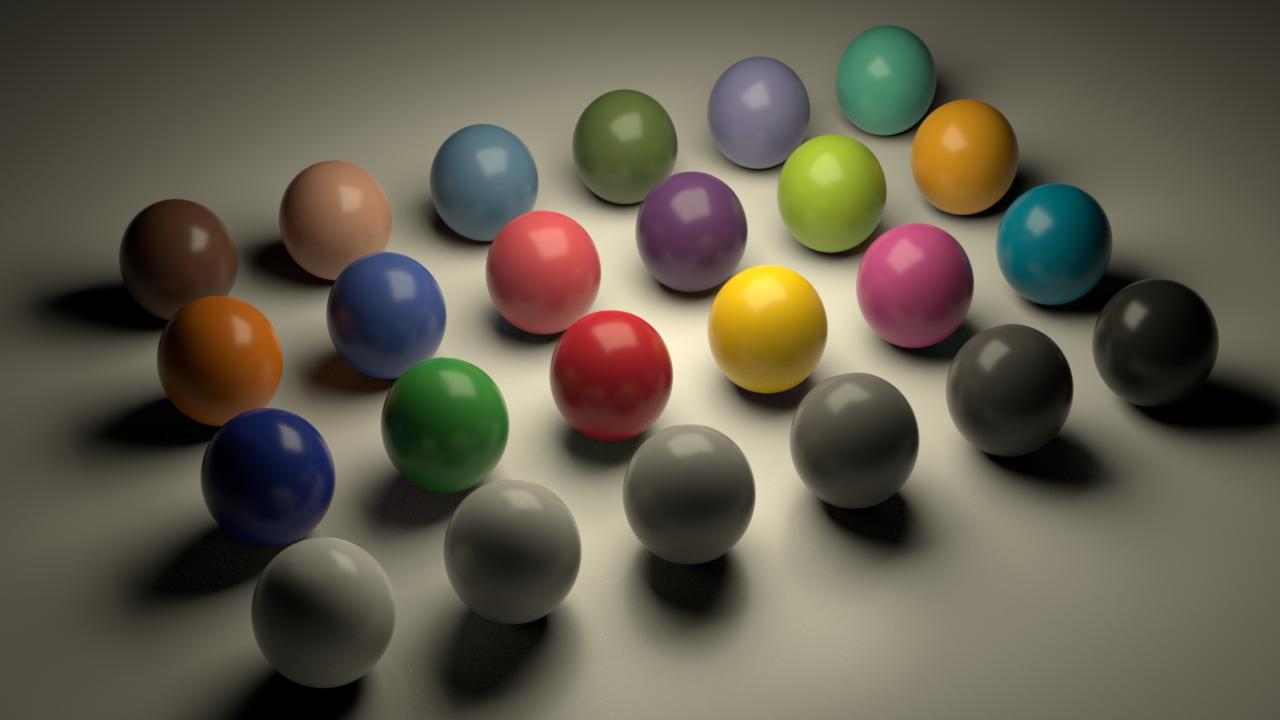
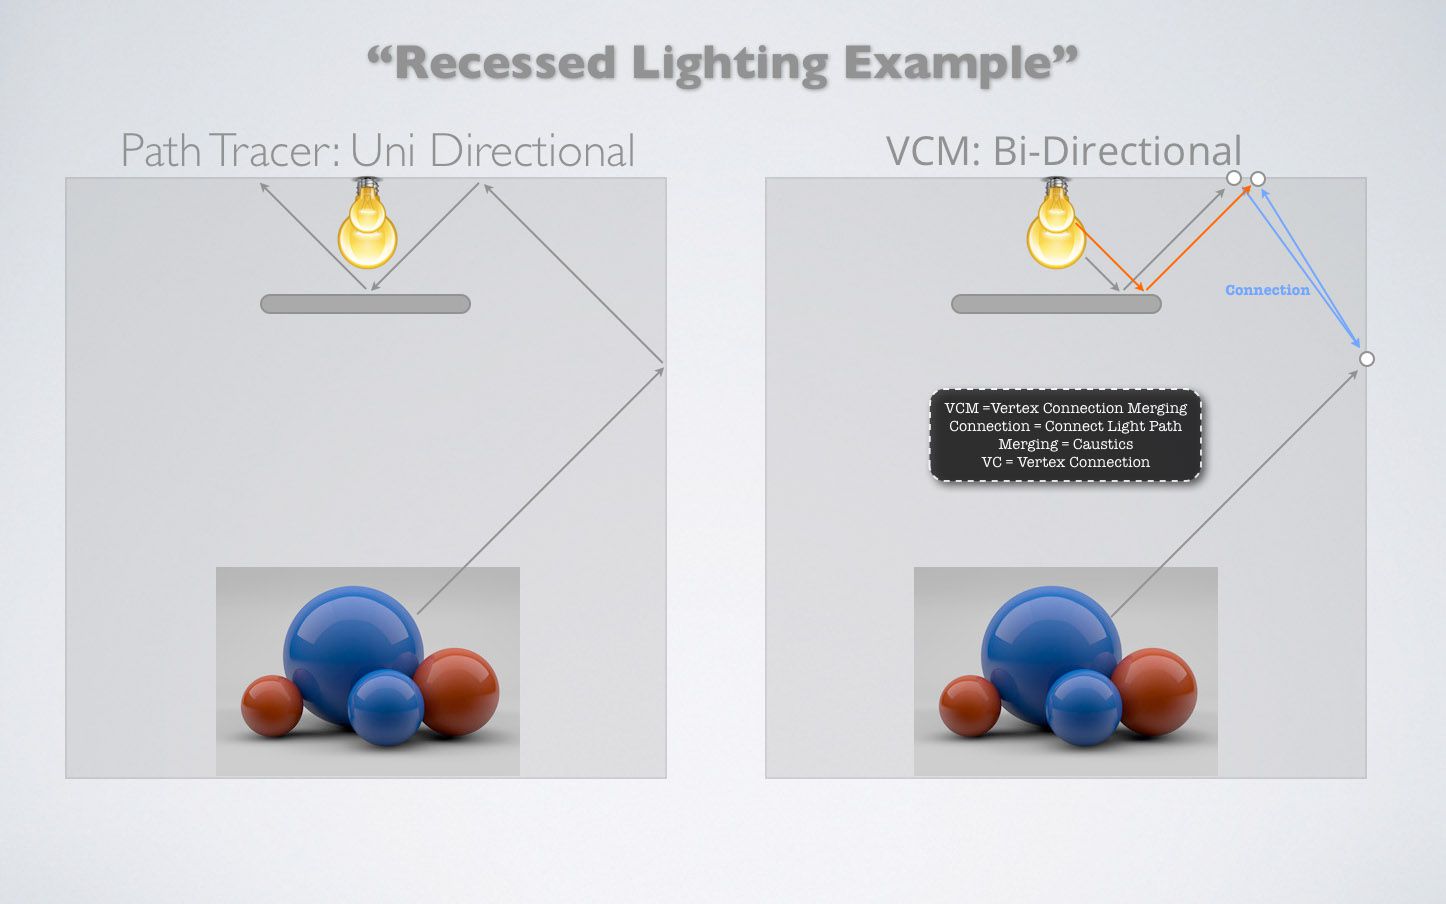
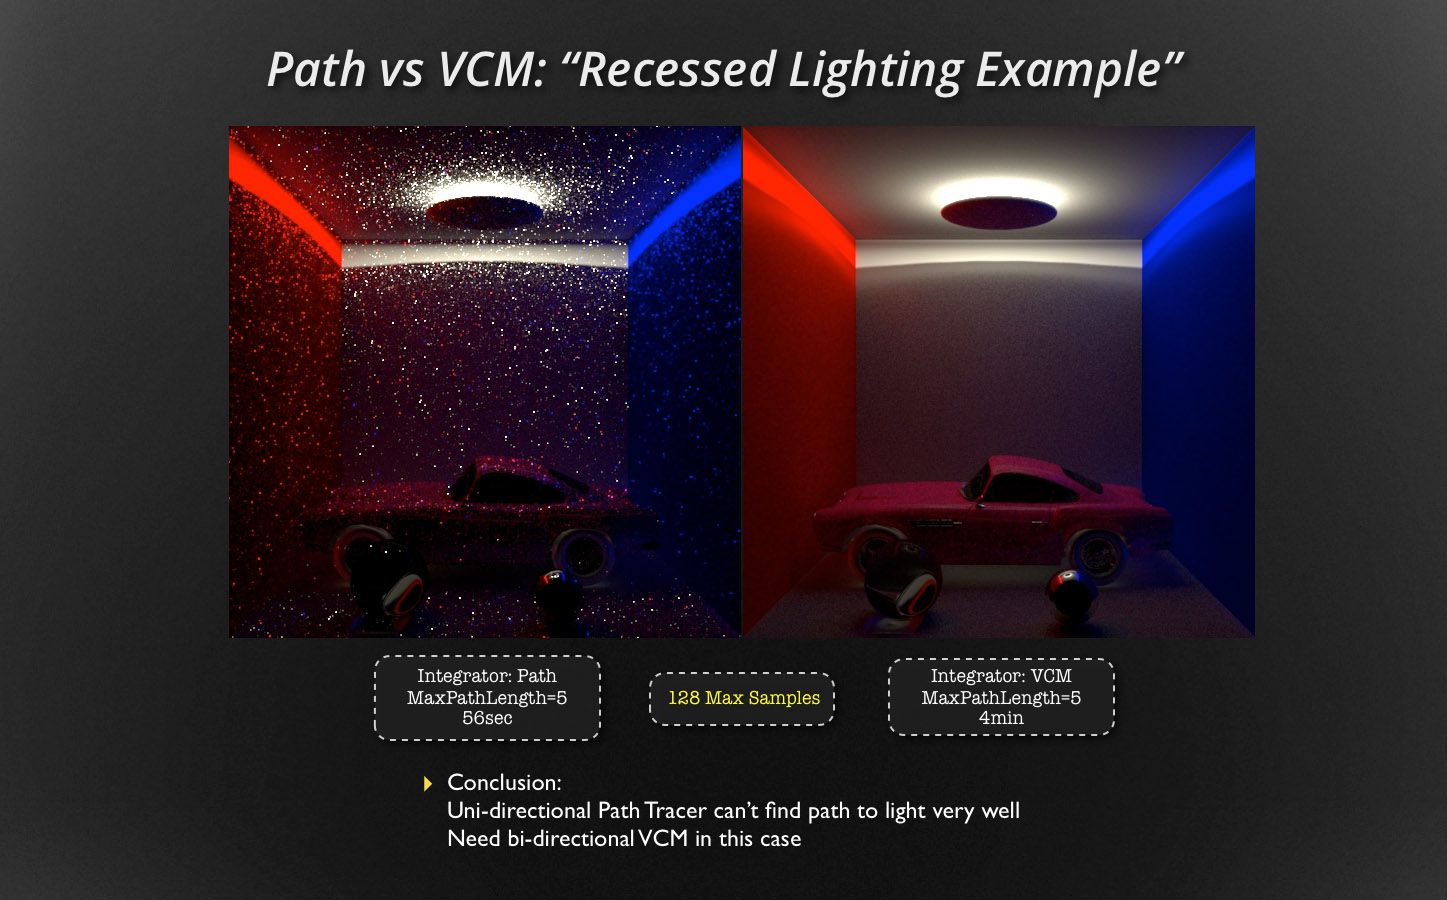
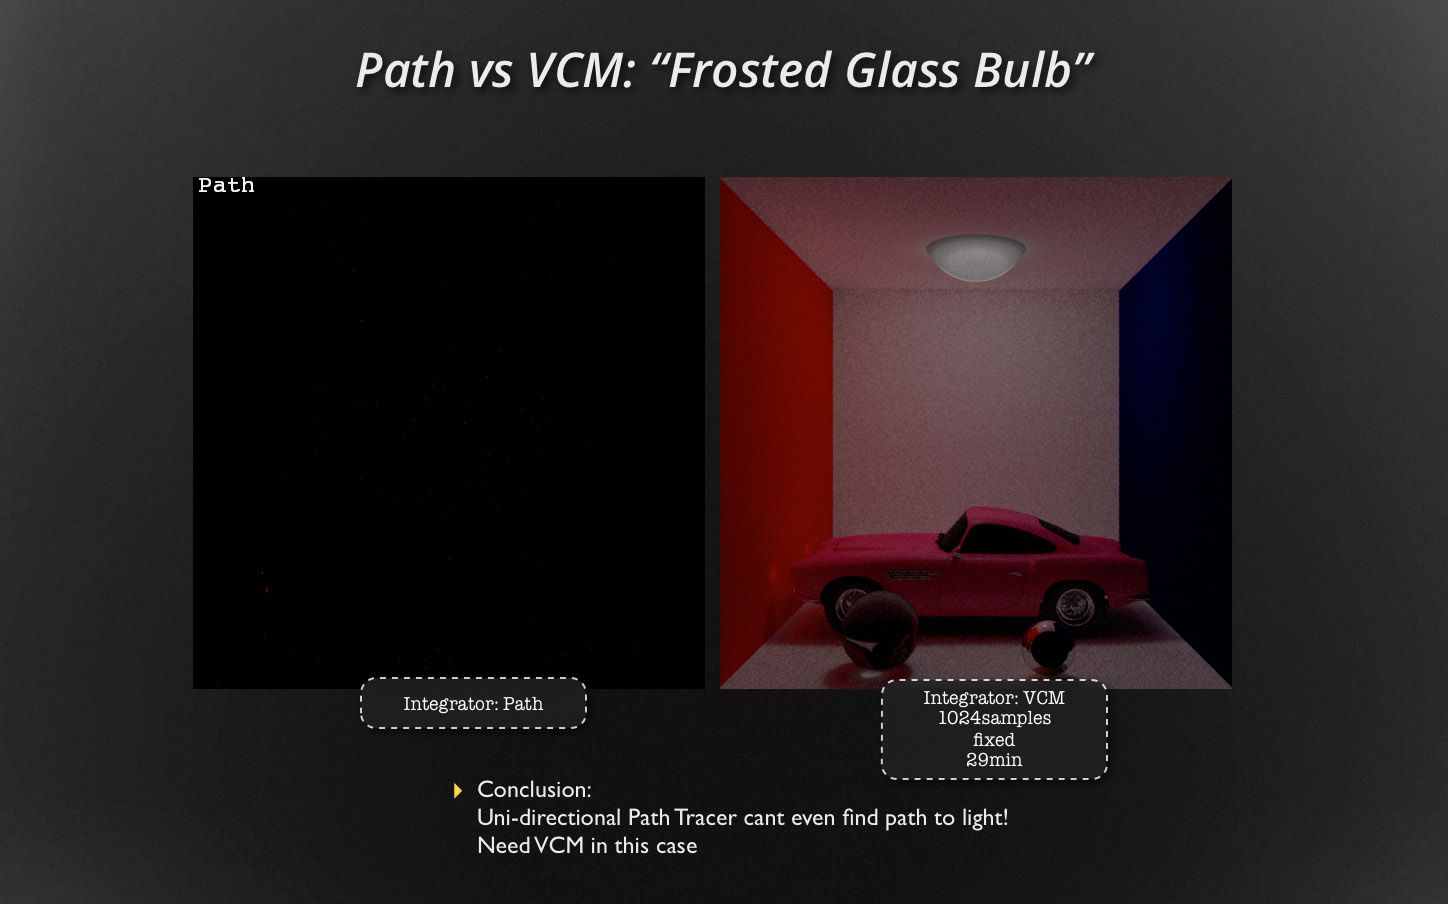
The bi-directional path tracer
As part of RenderMan is the option to render with a bi-directional path tracer. This approach of mapping not only forward from the camera but back from the lights means that recessed lighting and other very complex lighting effects now render much much more quickly or in some cases produce a result where normal uni-directional tracing is just completely infeasible. As you can see below if you are lucky enough to get an image without bi-directional path tracing – it was very noisy.
Denoising
New in RenderMan is the incredibly powerful new denoiser. Developed recently and separately from the actual renderer itself, this new tool harnesses the latest in image processing algorithms to produce some of the best denoising solutions yet seen.
The first release of the new module runs the denoiser as a separate pass, but the denoiser is intended to be more closely integrated in some future release.
The denoiser was developed thanks to the benefits of the now-huge internal Disney research family which spans from Emeryville to Zurich. Walt Disney Animation Studios used the denoiser as part of its Hyperion workflow on Big Hero 6 (as outlined by WDAS’ Brent Burley at FMX). And, according to Pixar’s Christophe Hery (also while at FMX), Pixar will be utilizing the denoiser in the production of the upcoming Pixar animated feature: Finding Dory.
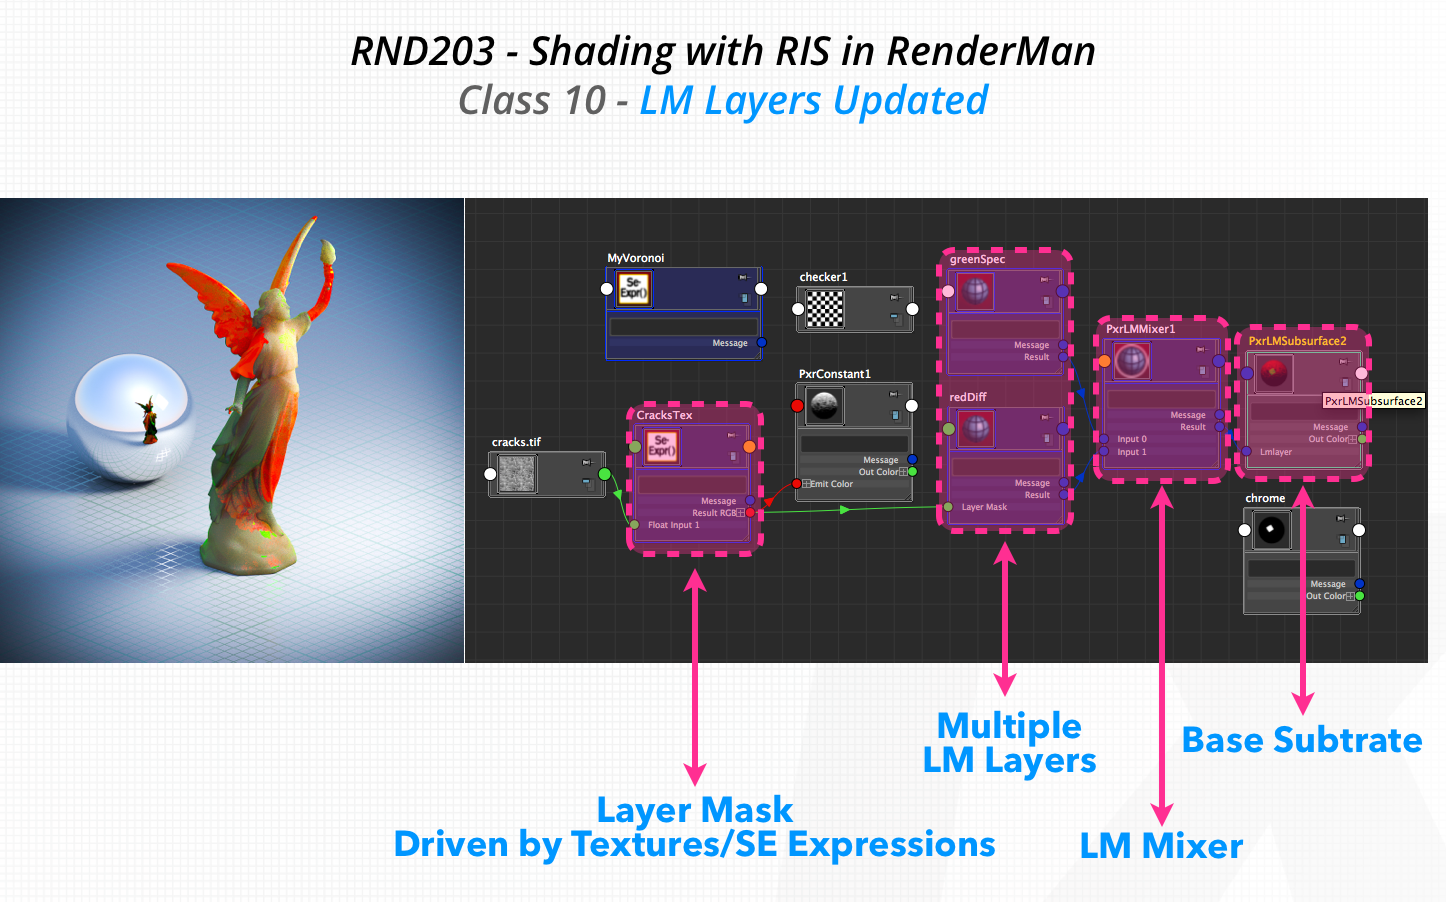
The LM Layer Shading
The LM Shaders support the creation of complex layered materials using:
1. Substrate – the base layer can be diffuse, metal, SSS or glass
2. Varnish – this is a coating over the base substrate. It can be separately colored or clear
3. Varnish Thickness – this allows the varnish to be of varying thickness (see below)
4. Roughness – different roughness can be applies for each layer
5. Bump – each layer can also have its own bump and anisotropic properties
The LM shaders are lay-able with other LM materials. Here is an example of such a setup.
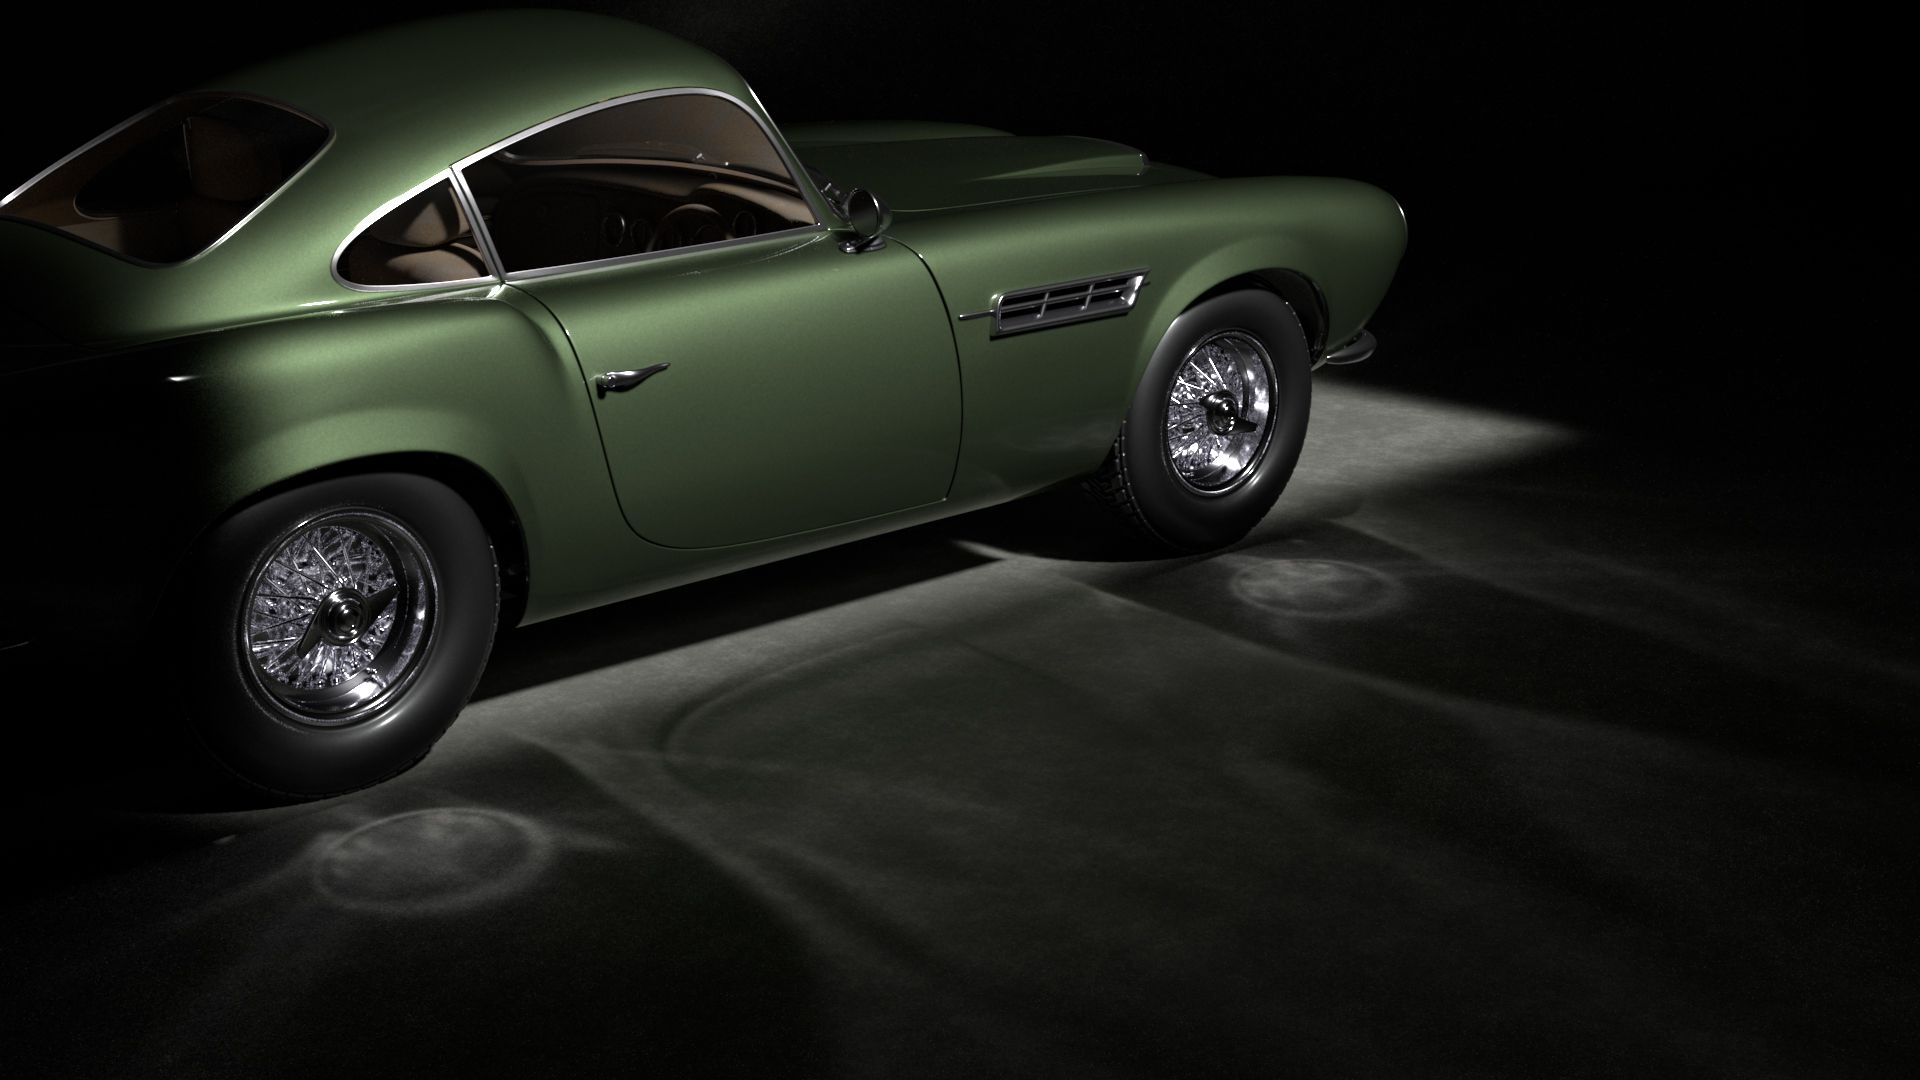
The clear use of such a system would be for car paint, where the ‘varnish’ is the real world ‘clearcoat’ on a new car. In fact one could interchange the term varnish and clearcoat (and 3D expert and fxphd Prof. Christos Obretenov often does).
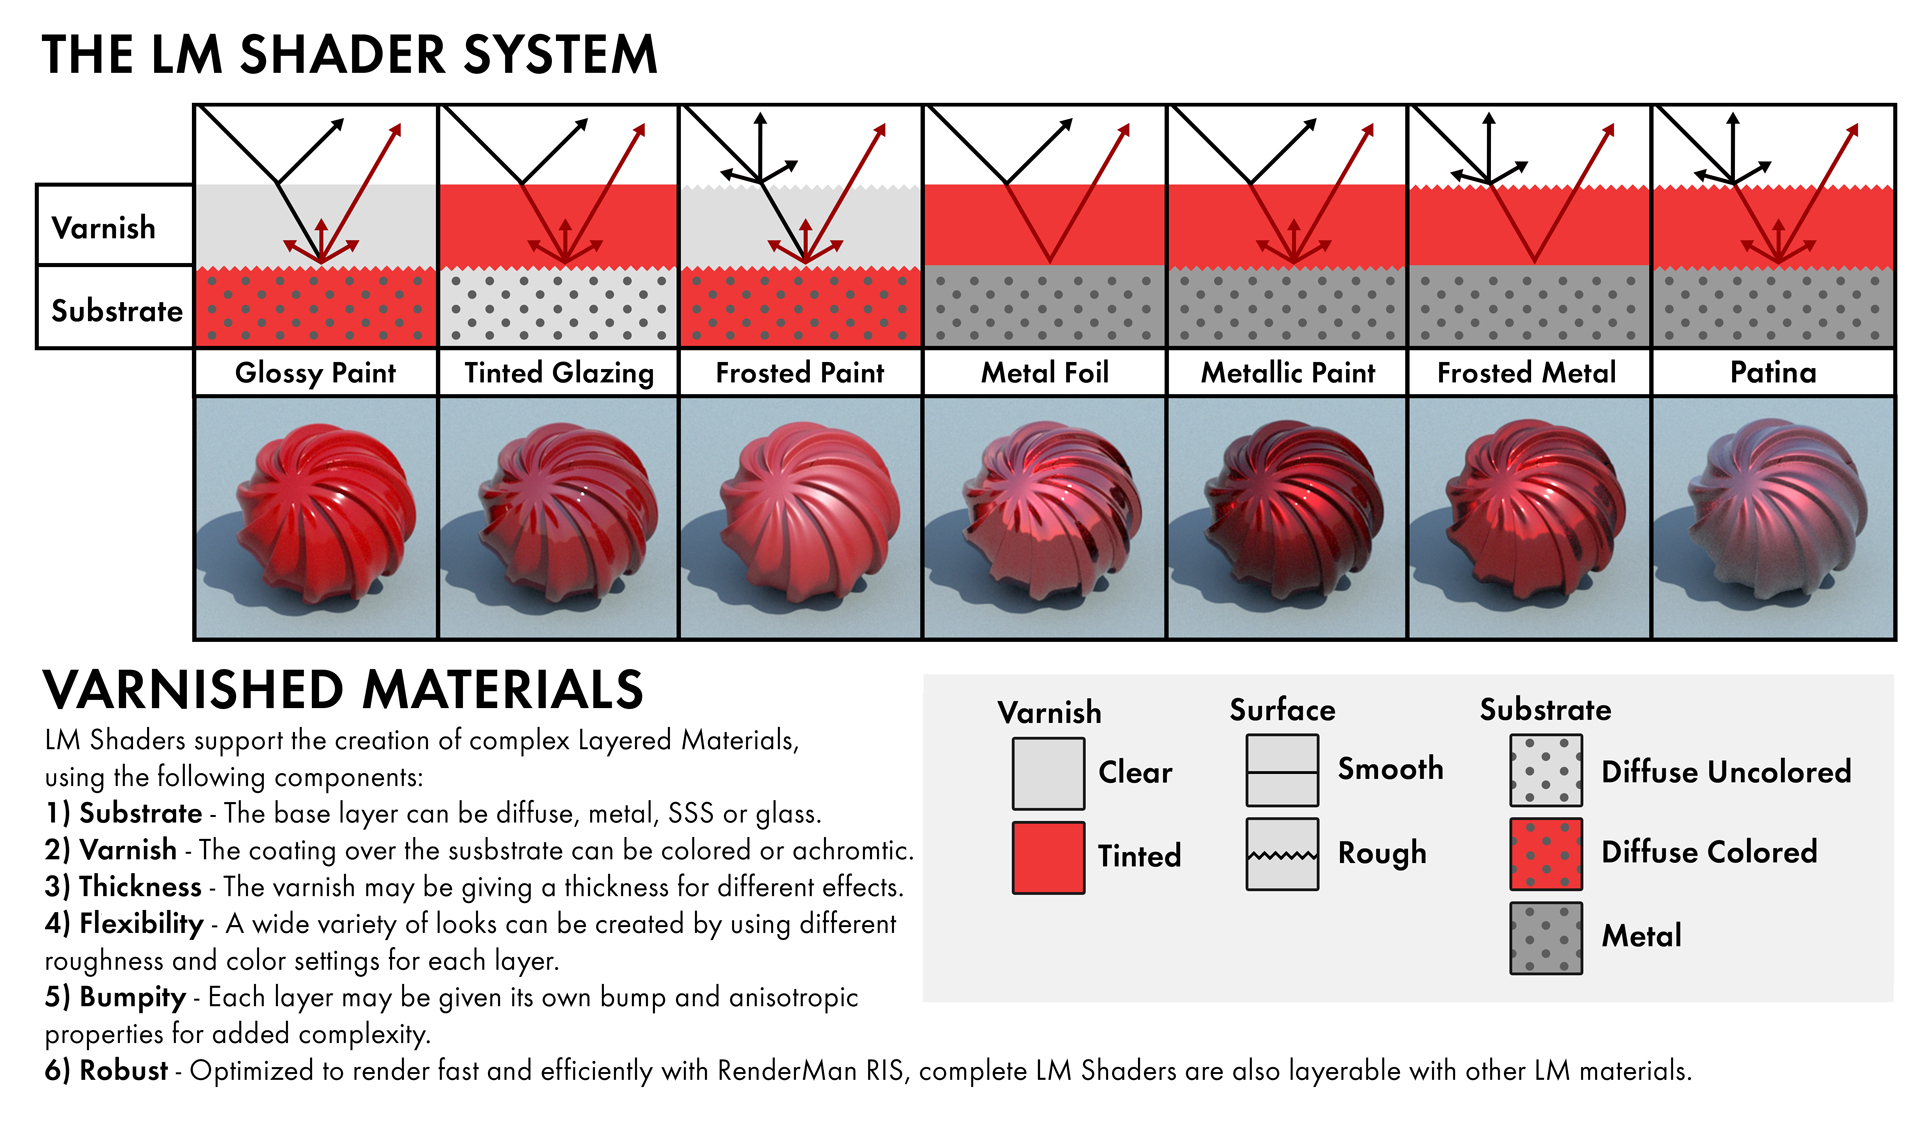
What is not immediately obvious is how an artist works exactly to get the ‘color’ of any object since it comes from multiple contributions. For an object lit with a standard white area light, the spec highlight will be white, since it is a first bounce off the varnish. While the varnish might be clear, it may be tinted. The key however is the thickness of the varnish. If the varnish is very thin, it contributes little to the overall perceived color of the object, even if the varnish has a tint. Light would be primarily colored by the color of the substrate. At the other end of the thickness spectrum – if the varnish is very thick, it will scatter the light so much that it will dominate and allow very little of the substrate’s color to contribute. The clearcoat is meant to be di-electric (like a metal) so it is not meant to color the highlights.
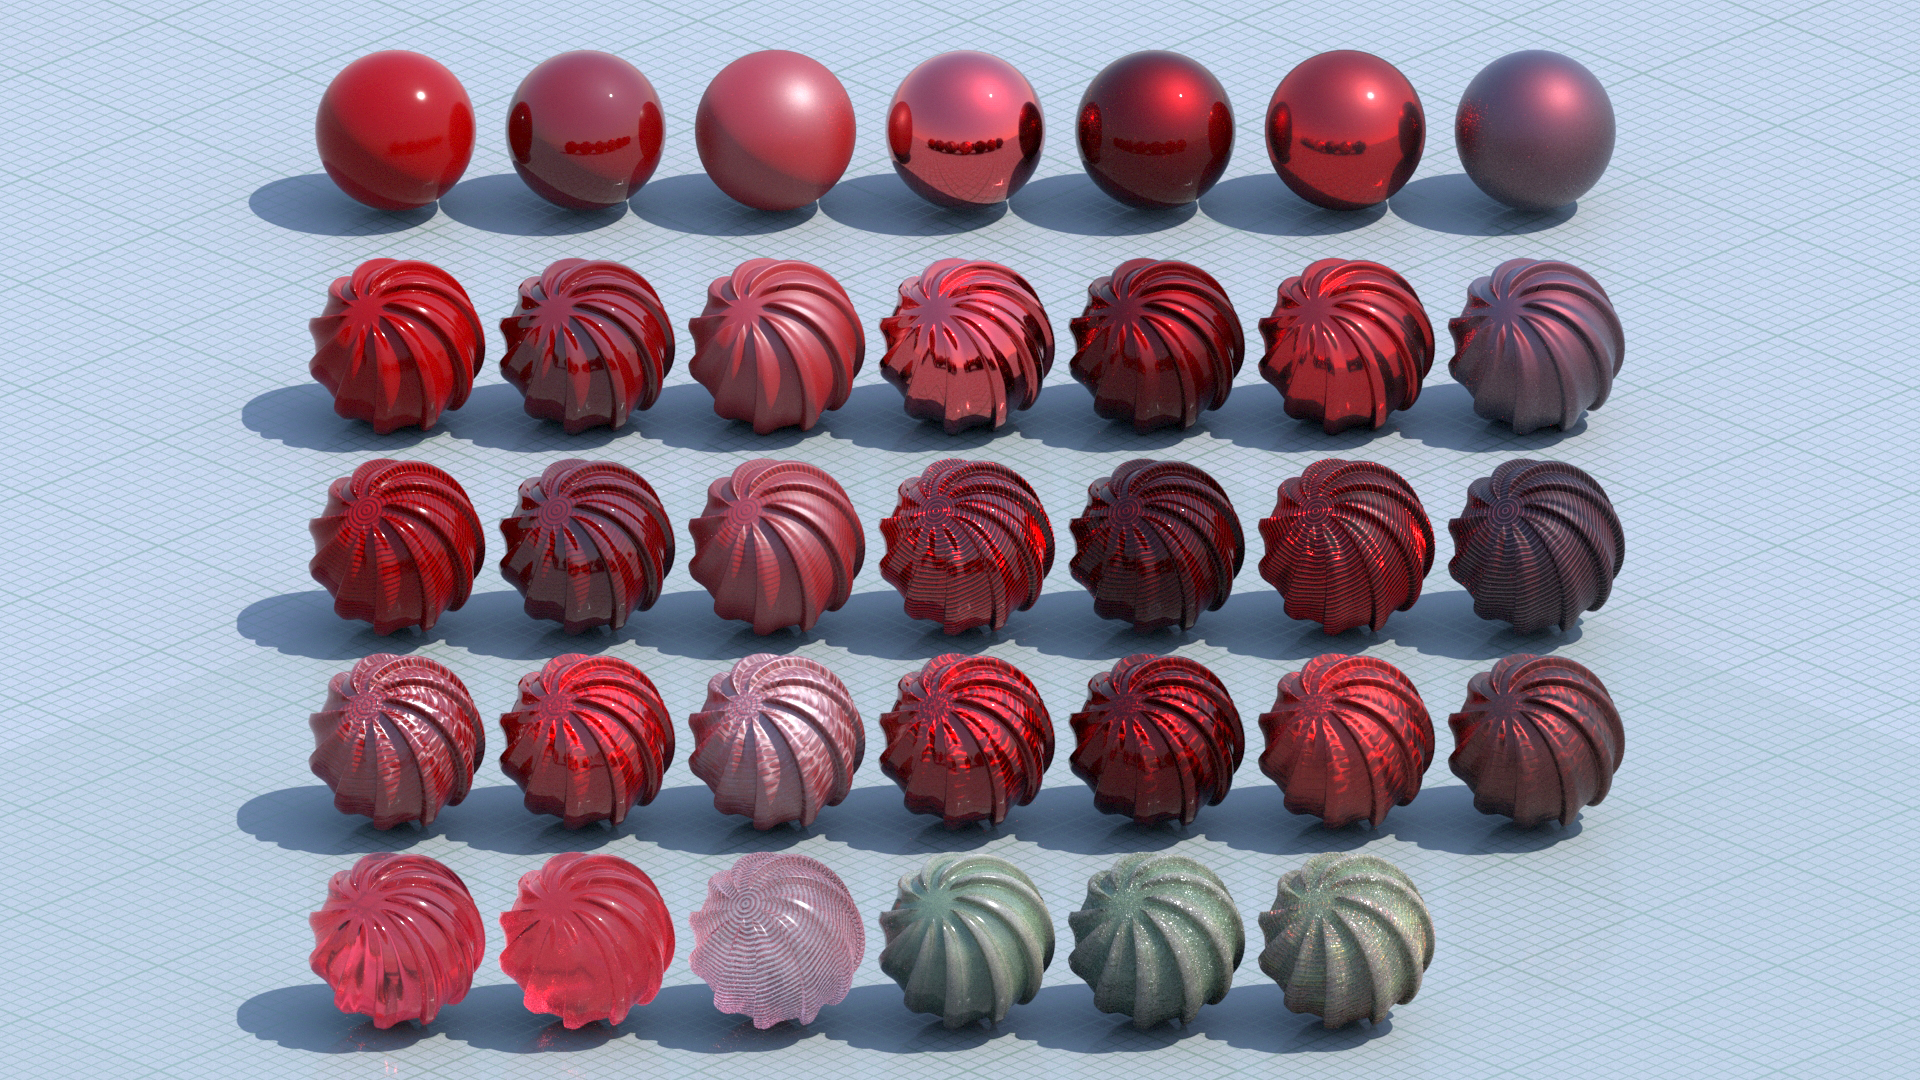
Thus in the image below, as the thickness of some red varnish over a grey ball increases its thickness it moves from having spec highlights – as one would expect from a thin varnish, white and crisp, but the varnish is contributing little to the grey substrate color, as the thickness increases, the highlights or spec always remains the same but the varnish’s internal scattering and tinting makes the ball look like it is red and then finally with extremely thick varnish, the light is scattered so much in the varnish – the object looks dark to the point of being black.
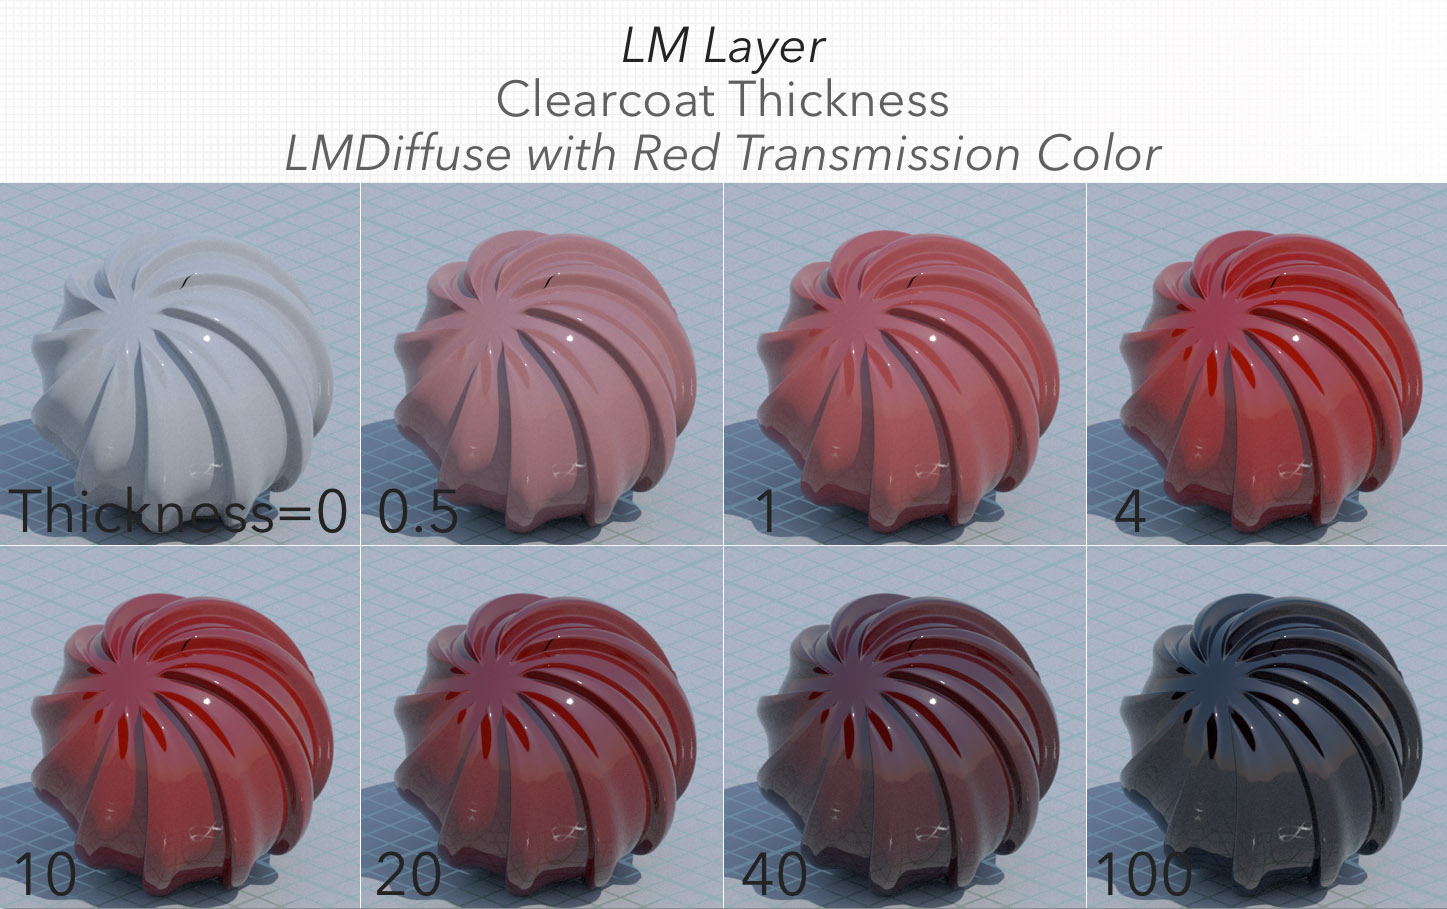
But the final ‘black’ looking object is really that way due to the nature of the white light used to light it.
If the same thing is done with the same red varnish/clearcoat but lit with a green light, notice how the spec highlights are green and then at thickness 80 we see the scattered green light in the red varnish make the object seem green.
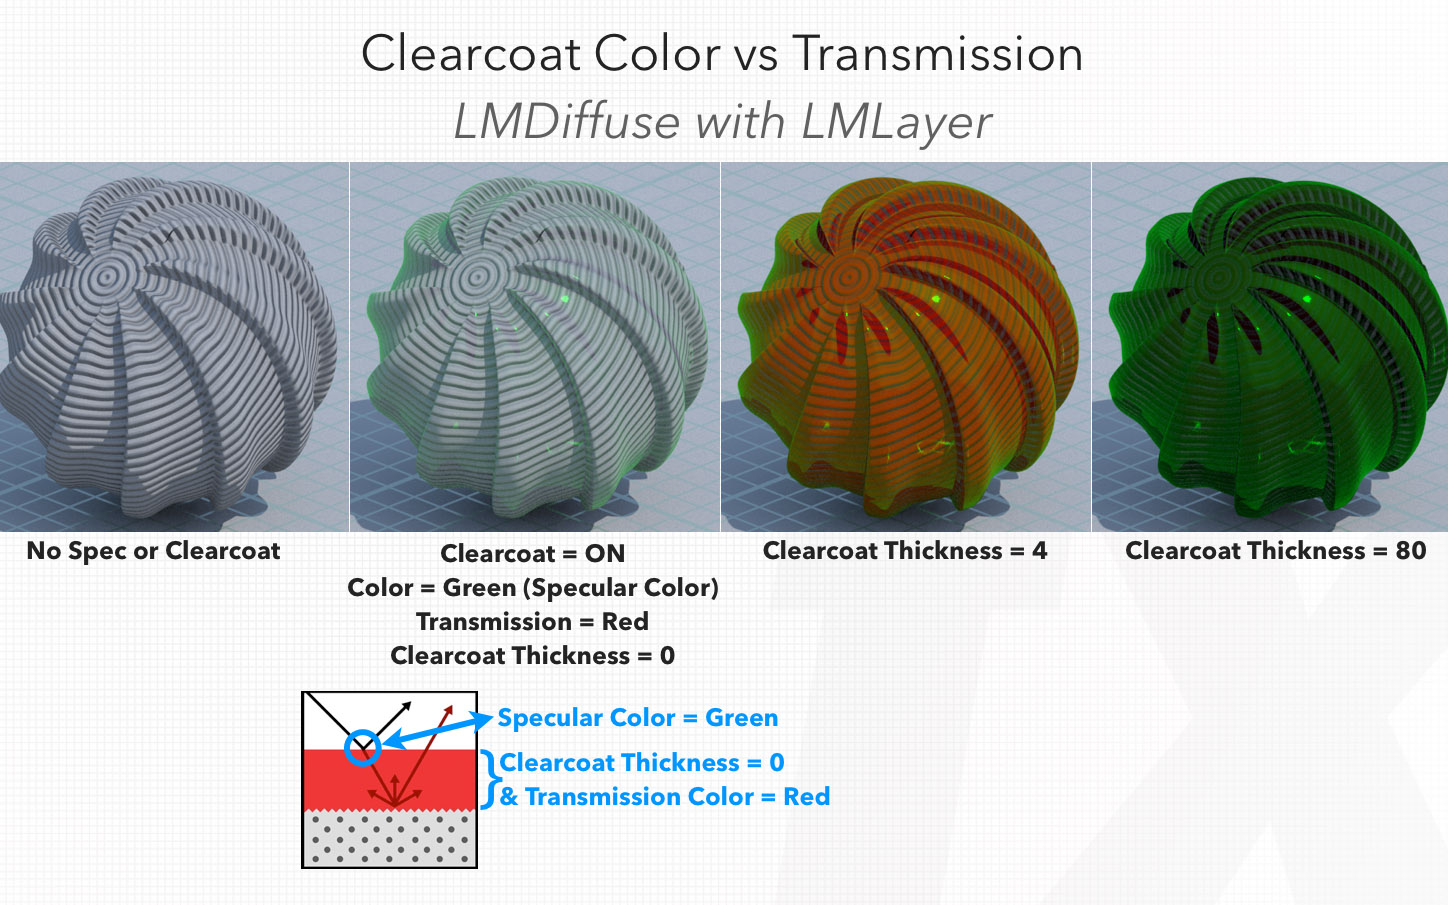
Varnish
The LM Layer shading system supports a Diffuse, Specular, and Clearcoat lobe on top of the base substrate (diffuse, scatter, or metal). In our fxphd course Obretenov goes further with this diagram of the LM Layers to demonstrate the interplay between the Specular Color, Clearcoat Thickness, and Transmission Color – all within the Clearcoat lobe in LM Layer. One only sees the Transmission Color when the Clearcoat has a certain thickness. Furthermore at a certain thickness point the scattering of the rays inside the “varnish” medium will ultimately obscure the base substrate.
Christos Obretenov’s web site has more: this is the main website for more info: www.lollipopshaders.com and
“RIS Starter Kit” with free download: http://lollipopshaders.myshopify.com/products/risstarter
Geometry
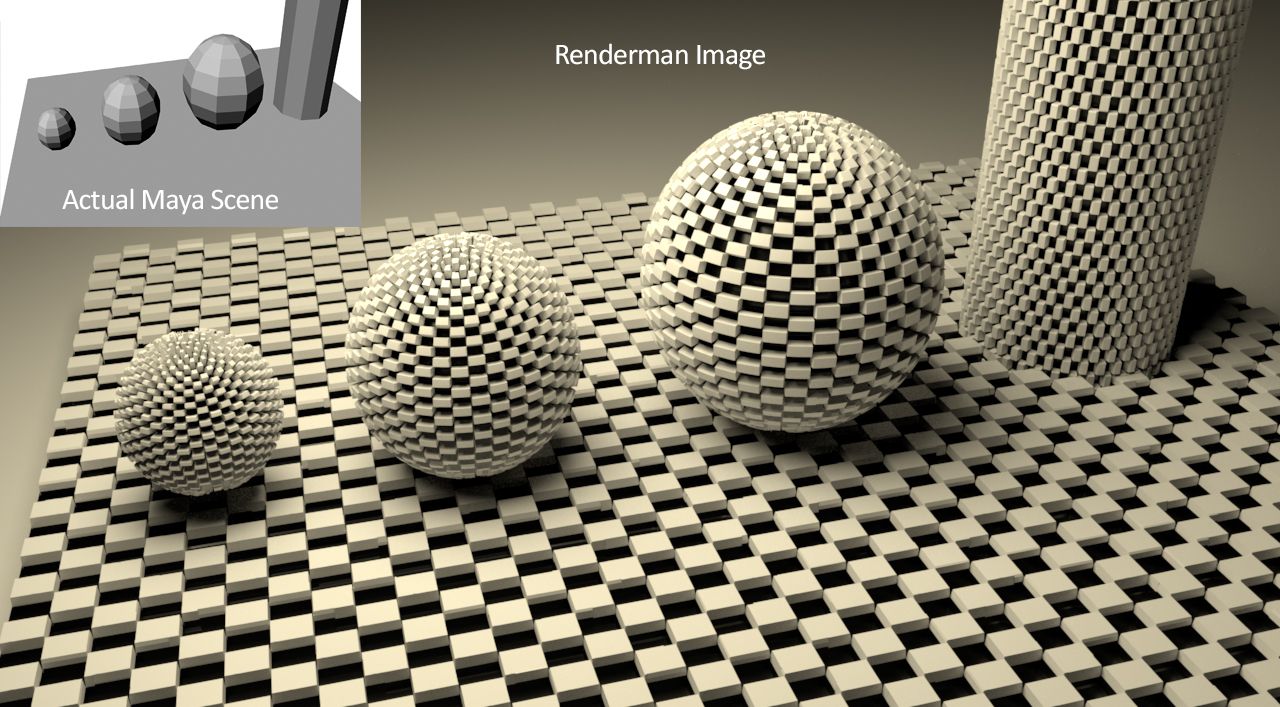
For Whitehouse the single best thing about RenderMan is “that you are able to create geometry at render time. If you can carefully setup geo in Maya, a plane can become a million polygons of photo real solar panels with microscopic details at render time. Similarly spiders webs can have microscopic hairs on the webs generated with geo shaders, and snow can have crystal structures smaller than 1 pixel that create a photo-real snow look. That’s the real power of the software.”
Below is an image showing how very low polygon Maya geometry, can become very high polygon and accurate displaced geometry with correct indirect lighting as if it were modeled in Zbrush.
The added feature of Ray-traced indirect lighting is pretty much a requirement at this time (2015) says Whitehouse. “All other rendering engines like V-Ray and Arnold have been able to generate photoreal materials and lighting by simulating the bounces of light rays scientifically around scenes and interior rooms for nearly 10 years, so it’s time for RenderMan to do it faster and better with new code as well. The upgrades in hardware and memory have made physically based lighting and ray-tracing whole scenes feasible now where it once was too slow and expensive.”
We also asked Whitehouse how he uses and how he applies a RenderMan production pipeline to his own projects…
With a RenderMan Pipeline, you have to know you are using it way in advance, because you have to model all your geometry in Maya with RenderMan Subdivision attributes and special edge loops to make sure sharp edges don’t become blunt. The 5 steps I would complete for a RenderMan VFX Shot would be:
1. Model a polygon object which can be subdivided with correct 4 sided topology.
2. UV map the object and create displacement maps with images or in MARI or ZBrush.
3. Convert the Displacement maps and high res textures to .tex files (required by RenderMan) and test render them in the interactive renderer on the geometry to make sure they are not too big. Setup all photo-real materials and test render using the IPR, interactive Rendering.
4. Import HDR images to use as Image based Area lights or Spherical HDR environment lights, no spot lights, point lights or direct lights in the scene anymore. Rotate the HDR lights and HDR area lights to get the right reflections on vehicles and creatures from the background plate environments.
5. Color Grade all the final AOV renders in NUKE X on a color accurate monitor like a HP Dream Color monitor. Use the color picker to match CG rendered elements into the background by matching the shadows, mid-tones and highlights of the real scene. Finally add in some optical effects from Sapphire in Nuke.
Done. CG and Renderman CG integrated together.
Daylight shader
In RenderMan v19 there is a resource, a shading network so that when working in Maya there is an easy way to have any time of day for a day light shading IBL setup. This makes it easy for newer users to place their work in an exterior scene with the Maya setup work done for you.
Below an image shows a simple mirror ball in various times of day. The system is energy conserving and PBL.
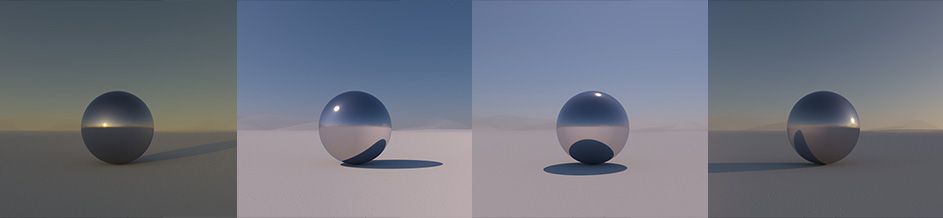
However there are still tricks to be learnt in v19. For glass for example, if you type in Glass in Renderman studio, there is a REYES Glass and RIS Glass and you need to use the right one for the renderer path that you are going to use. And even then the results may not be totally intuitive, see below, the shadow in this sphere for example is not actually correct, the area light works well but an environment light is not actually producing a correct result.
Pixar offers solutions to make accurate outdoor lighting easier. Outdoor scenes differ from indoor scenes in two important aspects other than geometry, according to the Pixar. Firstly most of the illumination comes directly from the sun and sky; and secondly, the distances involved make the effects of air visible. The effects of air are manifested as the desaturation and color shift of distant objects and is usually known as aerial perspective.
Pixar offers an inexpensive Maya analytic model that approximates the effects of atmosphere. Aerial perspective is a fundamental depth cue that we all use to estimate distances, and the only absolute depth cue available for say an unfamiliar distant object. The effect is complex, colors are less saturated and the palette reduced, the overall effect that results in a visually rich appearance of the sky is due to sunlight scattered by a variety of mechanisms. For more on the research behind the complexity of outdoor lighting see the excellent paper A Practical Analytic Model for Daylight, by A. J. Preetham Peter Shirley Brian Smits University of Utah.
http://www.cs.utah.edu/~shirley/papers/sunsky/sunsky.pdf
The Pixar Maya hypershade node network solution for daylight is very effective. For those using other pipelines such as Houdini, Katana etc, Christos Obretenov’s web site – www.lollipopshaders.com – offers a complete sampled set of real world HDRs, the HDR lightmap set Sun up to Sun down – is a fully unclipped energy conserved recorded option. It is the full set of HDRs – (but it cost the team severe sunburn sitting out all day filming!)
In summary
Obretenov has noted with the latest version of RenderMan that “in general I am finding that the ‘right out of the box’ usability when I teach my workshops is good. A lot of students who previously may not have thought to use RenderMan, thinking they needed a team of TDs, now are…out of the box they have the shaders – they can put in one light source, they get caustics, realistic lit surfaces… which is great. Overall, from what I have heard also from professional clients is that with RIS the render times do increase if you add a ton of area lights – so you have to be careful but the results are excellent, they are loving the look especially with bounce lighting… it looks really really cool. Plus the plug-in architecture really opens it up.”
The new plugin system that he refers to is C++ and allows enormous flexibility to extend RenderMan even further: with the integrator architecture one could write their own renderer inside RenderMan: this is great not only for custom features for a production, but also, for say, testing academic graphics papers on different technologies.
Obretenov also likes the Mesh lights in RIS. The Mesh lighting system allows one to select any geometry, select the mesh lighting and it will make a custom light shader for that piece of geometry and puts a custom emissive surface shader on it which allows RenderMan to see it as a light and importance sample it correctly, avoiding noise as it would without MIS.
Obretenov’s company LollipopShaders has an “RIS starter kit” product which includes 100 physically-based material presets for the PxrDisney BxDF that are based off the scientifically measured MERL100 material database (www.merl.com/brdf), unclipped HDR map, and custom Integrator for super-fast ambient occlusion. There is a free download of it here: http://lollipopshaders.myshopify.com/products/risstarter and it works with the free non-commercial RenderMan. It’s a great extension to RenderMan’s RIS package.
Christos Cobretenov’s RenderMan training can be found at fxphd.com where he has 2 courses on the new RIS RenderMan workflow.
-
Introduction to Path Tracing and RIS in RenderMan
-
Shading with RIS in RenderMan

Hi Mike !
This is a great article, thank you very much for the detailed review ! I have a quick question about this new denoiser you mentioned in the article. Is it a tool that is/will be available with the free version of renderman or is this something that we can expect to see with the next official release of renderman ?
Thanks again !
Hi Mickael, The Disney Denoiser will be included with RenderMan 20, which is currently in beta.
It will be included with the updates for both commercial customers and Free Non-Commercial RenderMan users as well.
Regards,
Peter Moxom
Pixar’s RenderMan Team
Oh this is great news ! Can’t wait to try it 🙂
Thank you Peter
Best,
Yes the results are really impressive (almost too good to be true !) and it will be a great addition to the tool kit
Mike