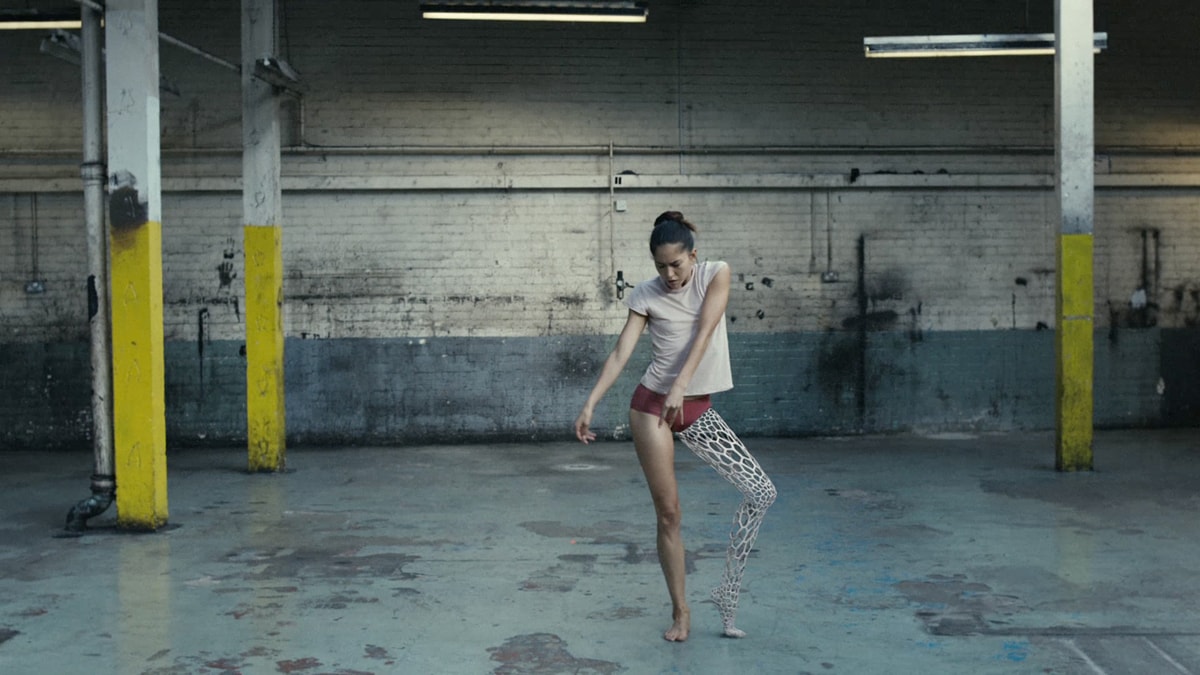
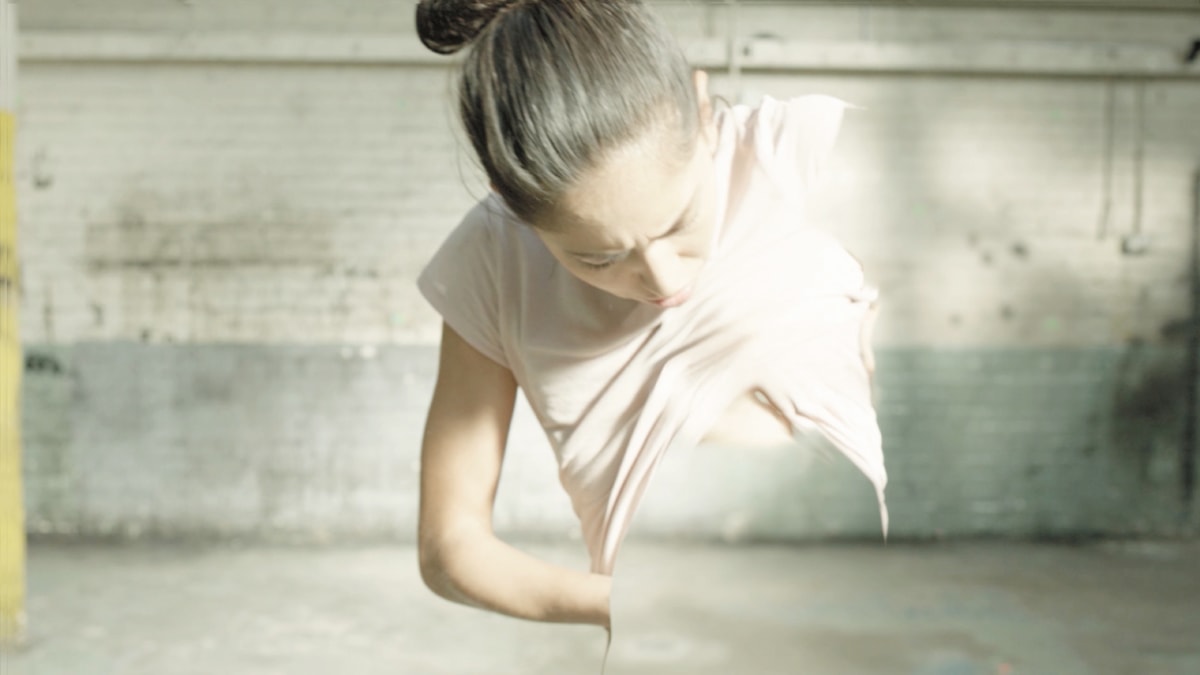
As far as VFX challenges go, the latest Chemical Brothers promo Wide Open (feat. Beck) is a doozy – a woman dances around a warehouse space as parts of her body are revealed as 3D-printed lattice constructions – in one four and a half minute shot. That’s right, one shot. If matching the dance performance with see-through body parts wasn’t hard enough, the effect had to last almost 6,800 frames. But The Mill London was up to the challenge, collaborating with directing duo Dom & Nic and implementing meticulous tracking, mocap data and even a bespoke tool for producing clean plates to make the promo possible. fxguide spoke to key members of The Mill’s team to break down, step-by-step, how this incredible piece was brought to life.
‘Completely see through’ – the creative
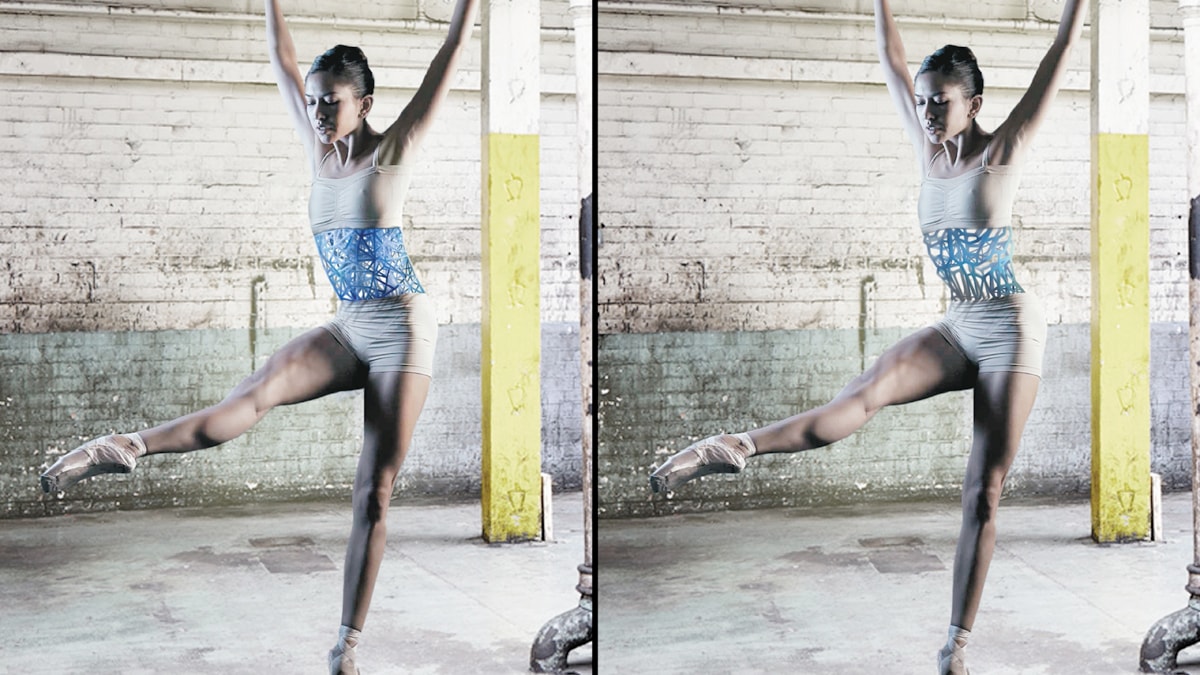
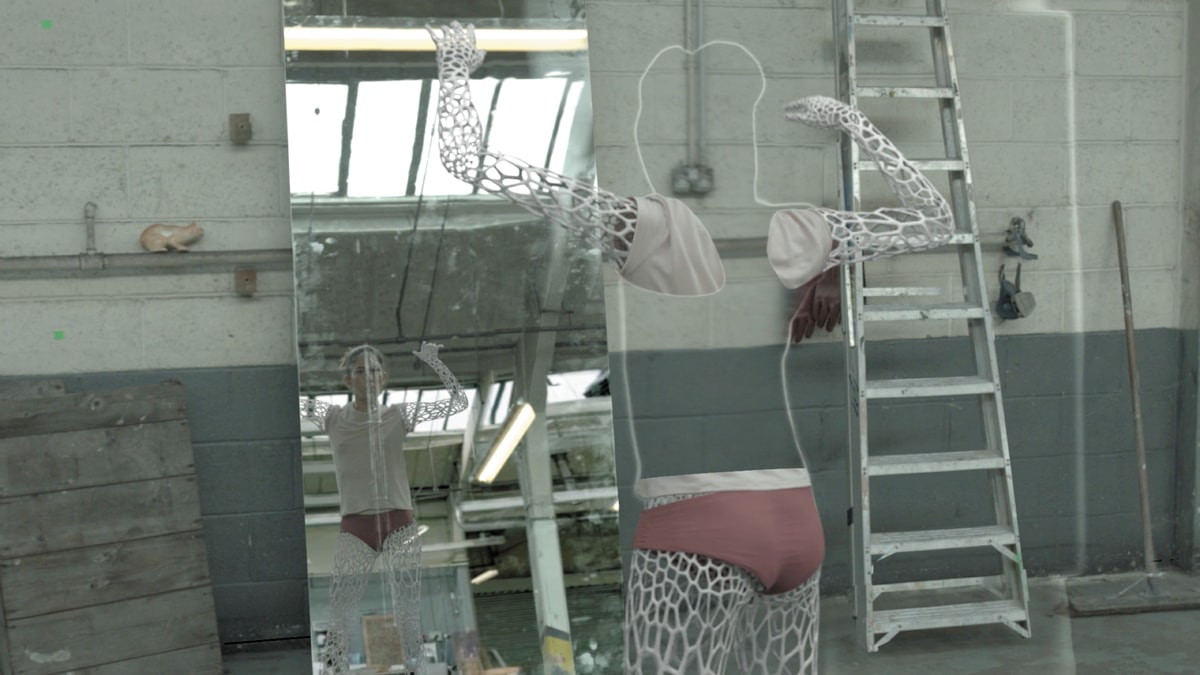
In early concept meetings, the list of visual effects requirements for Wide Open quickly added up. Body parts turning into a 3D-printed mesh material was an obvious challenge, but the fact that it was see-through added a whole new complexity to the mix. “Not only would we need to paint out whole parts of her body to reveal a clean background,” says The Mill Head of 3D and co-3D Lead Artist David Fleet, “but we also had to create clean parts of her own body for when her limbs occlude parts of herself. Throw in that they wanted to shoot this as a single take, we knew that it was likely to become the longest and hardest camera and body track that we’ve ever taken on.”
Originally, too, the promo’s location was not an interior warehouse. It was going to be a beach or forest. But, as Fleet notes, “shooting indoors meant that we had more overall control. It also meant that we could scan the set to help us create clean plates and it provided lots of natural details for accurate camera-tracking et cetera.”
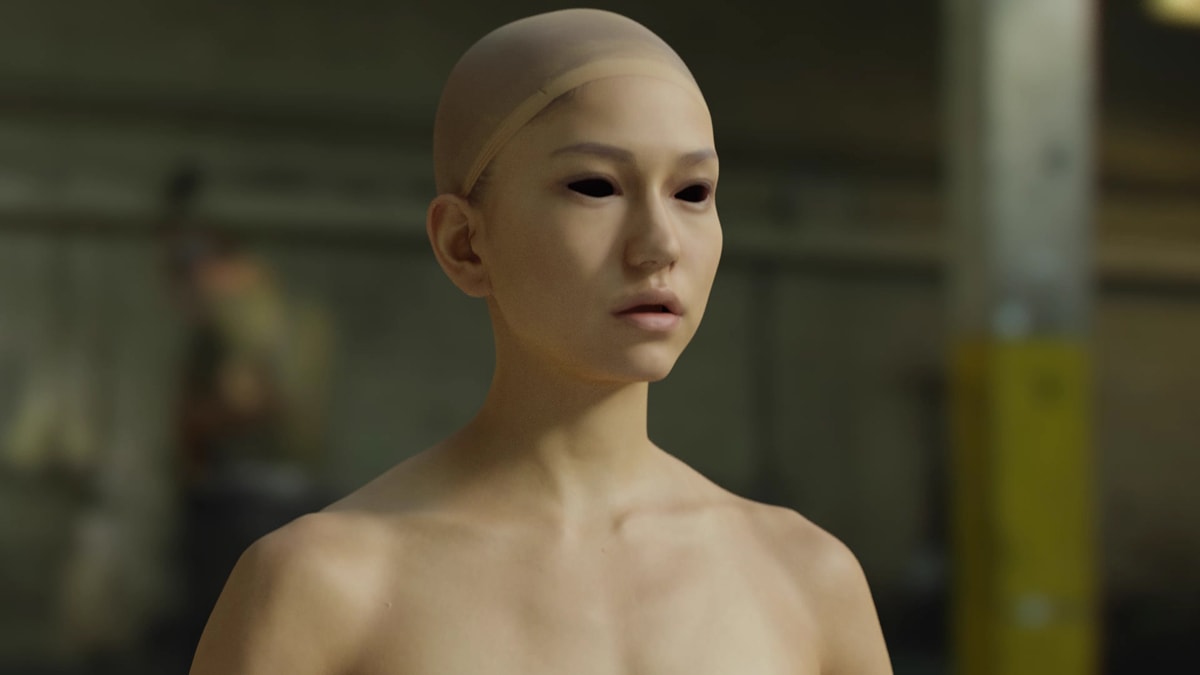
The creative team also wanted to find a unique approach to augmenting the dancer (played by Sonoya Mizuno) by not going with a typical android or robot hybrid approach. Says Fleet: “The [directors] shared lots of reference of 3D printed structures. Furniture, jewellery and even prosthetics. Mainly objects that without 3D printing would be impossible to make. They wanted to avoid any structures that followed any sort of decorative design, favoring more unusual procedural cellular structures.”

Four and a half minutes – shooting a single take
 Part of the success of the promo rests in the subtle transitions on the dancer as her body parts become the lattice material. But how were these going to be accomplished in what would be a four and a half minute long single take? Early discussions did turn to ‘bolting’ multiple takes together, but it soon became clear that constant natural lighting changes would make this difficult. Two solutions quickly became apparent for the transitions. The first, of course, was good planning as to where those transitions would occur so that the camera was in the right position at the right time framed on Mizuno.
The second was to take advantage of the ARRI Alexa and ARRI lenses used for the shoot. “We shot Open Gate on the Alexa to give us more pixels top and bottom,” explains Fleet. “This allowed us to re-rack the frame within the crop afterwards. The rest came down to well choreographed dance moves coupled with great Steadicam work. And then we recommended ARRI’s LDS lenses. The Lens Data System captures highly accurate metadata. Useful information about iris, focus and even zoom is embedded in the recorded files, so it requires no extra effort on our part. We managed to pipe the focus data into our 3D camera. This enabled us to render-in depth of field using real values from the actual lens. This not only gave a more natural look, it required very little input down the line.”
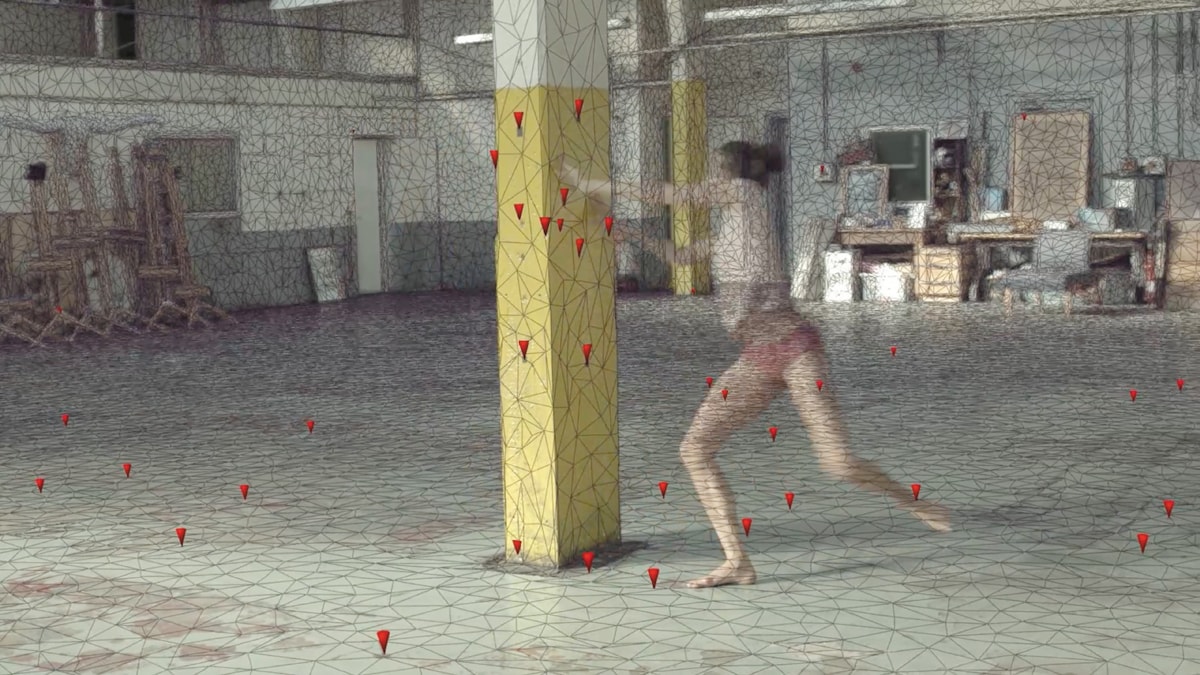
The location was also captured with a LIDAR scan by Duncan Lees’ Efficacy4D, which was used later to ensure an accurate track of the area had been created. “Matching the dancer would’ve been a whole lot harder if we couldn’t trust the camera track,” comments Fleet. “We used the scan to project HDRI images for accurate lighting, it was also incredibly useful for making clean plates.”
Dancer data
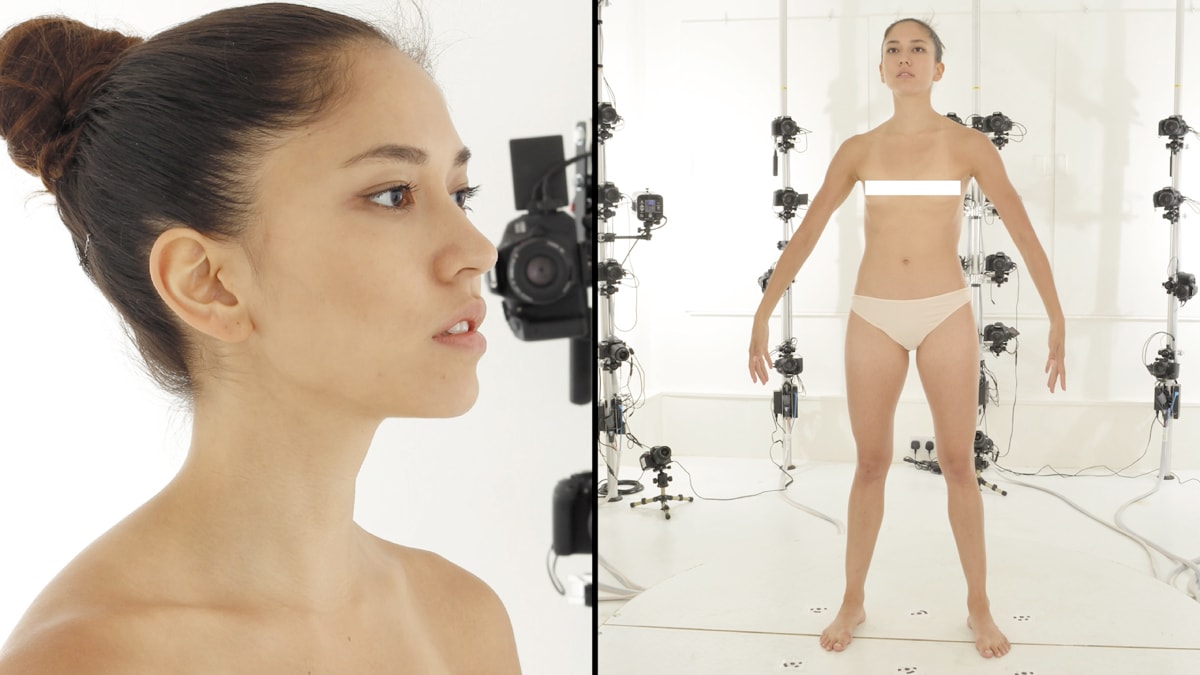
Like the scan of the set, a scan of Mizuno would also be crucial later on for accurate tracking, textures and CG portions of the dancer that The Mill would ultimately produce to fill parts of her body seen through gaps in the lattice. “We teamed up with Jack Rothwell from FBFX Digital who are based at Shepperton Studios,” outlines Fleet. “They have an awesome photogrammetry body rig with over 100 cameras. They also provided us with ultra-high resolution textures. Working with FBFX made the whole process very straightforward.”
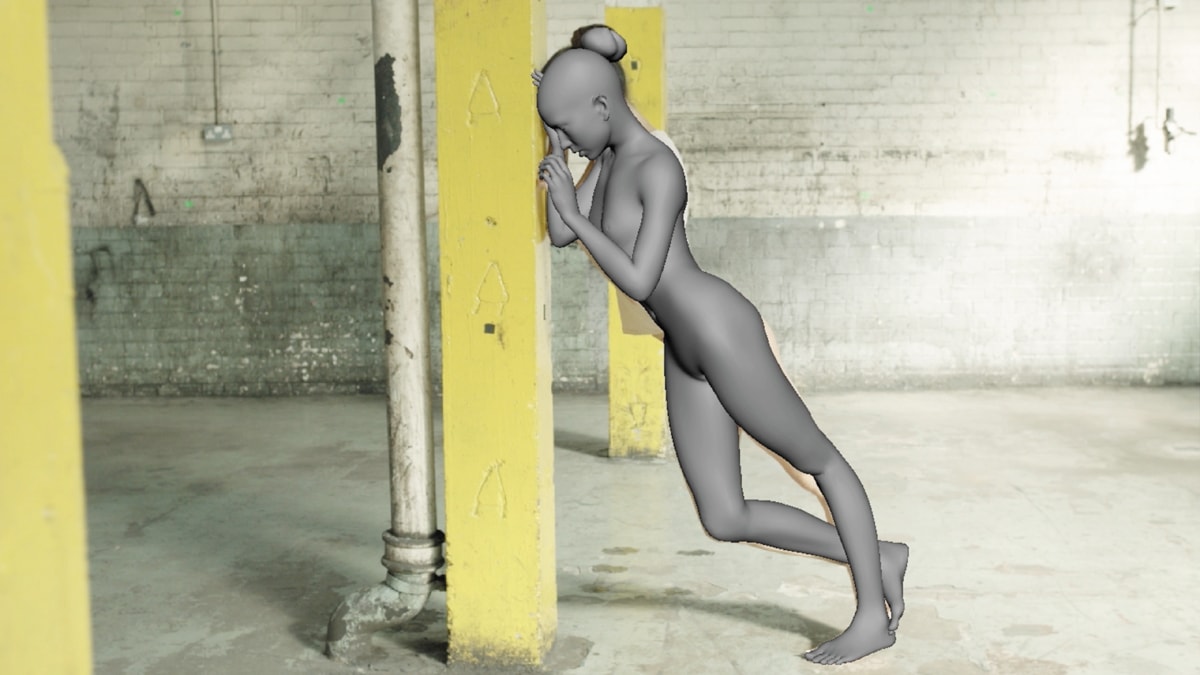
“We knew that Sonoya was likely to get into some pretty extreme poses and matching her almost endless shifts in volume was going to be a challenge,” adds Fleet. “To help with this we scanned Sonoya in a whole range of action poses to use as reference. These did not need to be anywhere near as detailed as our main scan as they were just for volume reference. Andreas Graichen, our Head of Rigging, incorporated literally hundreds of blendshapes to achieve the correct deformations. These were triggered using Hans Godard’s RBF solver.”
Tracking and matchmoving was always going to be a critical component of ‘selling’ the lattice mesh body parts becoming part of the dancer. And so The Mill embarked on an ambitious tracking effort by partnering with tracking specialists Peregrine McCafferty and Amélie Guyot from Peanut FX, who worked alongside The Mill’s animation team lead by Head of Animation Jorge Montiel and Lead Animator Ian Potsos. On set, Peanut helped The Mill mount 11 GoPro witness cameras to record the performance from every angle. “We even included one attached to the main Steadicam to give us a consistent, wide angle, high speed – 48 fps – view for tracking,” states Fleet. “The idea was to provide as much reference as possible for the animation team.”
Frames, frames frames
“In total, the final piece is 6,798 frames long,” states The Mill co-3D Lead Artist Suraj Harrington-Odedra. “Each of those frames required 2D cleanup of some description, be it limb removal, clothing restoration or tracking marker removal from the set or the dancer. The total number of frames that featured 3D work was 5827. It’s also worth mentioning that we didn’t employ any camera or editing tricks, such as cutting when the camera went behind a pillar, or combining takes. It really was 6798 frames straight through!”
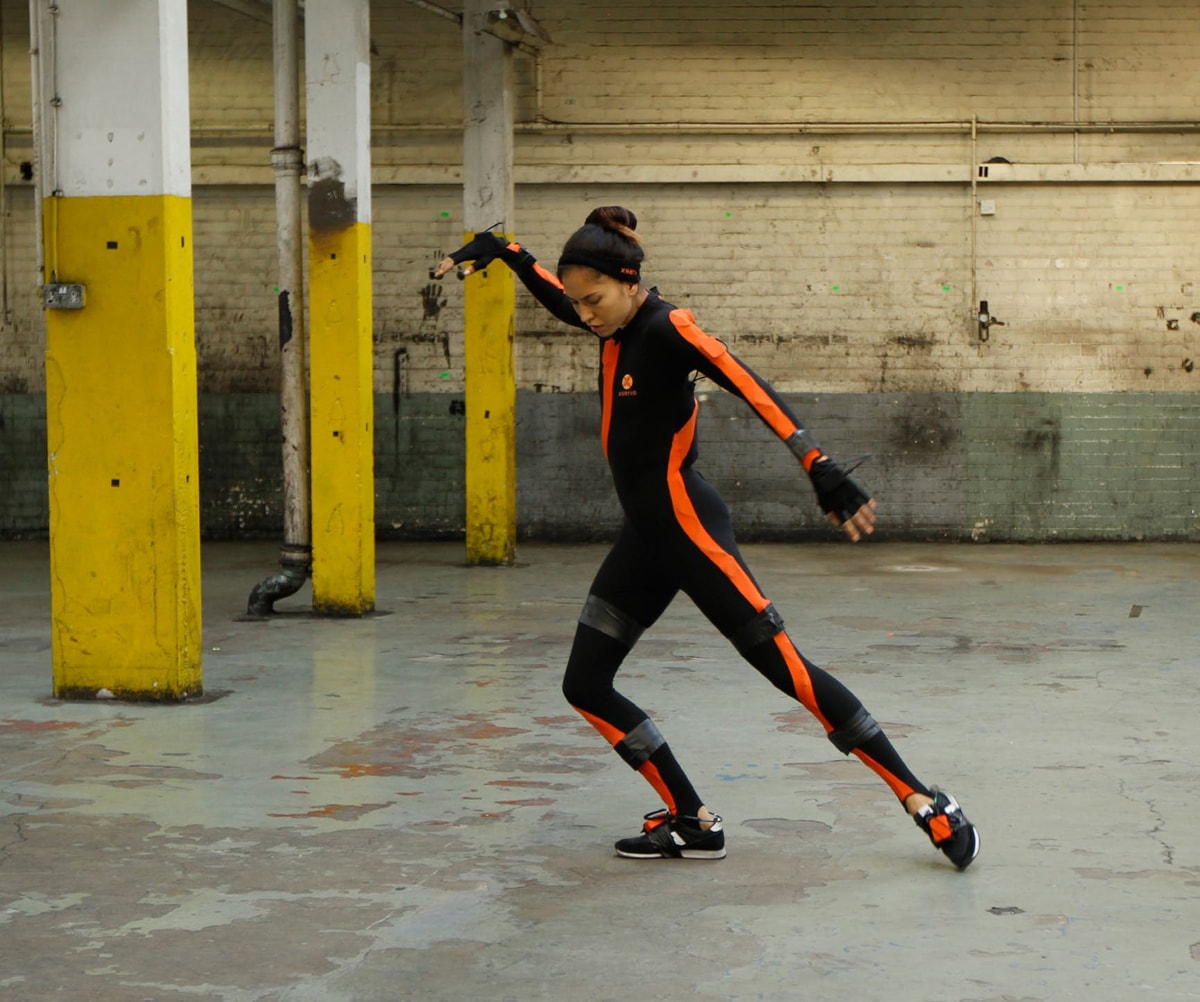
Mizuno’s CG body parts were achieved via a combination of motion capture and hand animation. “Even though Sonoya is a great dancer,” notes Fleet, “we obviously couldn’t expect every take to be identical, which made a motion capture solution somewhat limited. However, we figured that if we were to use a portable motion-capture suit and get Sonoya to run through the choreography a few times on the day, then at least we’d have some animation to start with.”
The production turned to Ivo Slivkov from Timeaware, a company that specializes in remote motion capture. “He flew in especially for the shoot to capture the dance,” says Fleet. “We used the Xsens mo-cap suit, which not only looked awesome, it allowed Sonoya to easily perform unhindered whilst many sensors captured her in real time.”
“The biggest hurdle for the tracking team,” suggests Fleet, “was matching the ever shifting surface. Skin moves independently to the skeleton as it slides across muscle, bone and fat. Getting the skeleton in the right pose was only half of the battle. This was most evident when we tried to lock the tight-fitting live action underwear to the surface of the CG body. Andreas added many extra controls constrained to the surface, but we realized that no amount of rigging was ever going to make this work, which is why she has CG pants for most of the film. The shoulders were also problematic due to the range of rotation and constant volume shifting. Unfortunately there were no special tricks or cheats, just lots and lots of patience! Even with the witness cameras and motion-capture, the team still had to meticulously position each limb so that it exactly matched Sonoya’s pose on approximately 5,800 frames.”
Crafting a clean plate
Since the lattice mesh portions of the dancer would be see-through, it was determined early on that clean plates of the warehouse environment would be optimal. That way, what would be seen through the lattice could be composited in where necessary. One approach considered was to acquire a clean plate of the environment after each successful main take of the choreography, with the same Steadicam rig and camera. “The plan,” says The Mill Co-3D Lead Artist Suraj ‘Sid’ Harrington-Odedra, “was to 3D camera track the clean take and then project this onto the LIDAR set geometry. In 2D, we would then be able to blend this projected pass with the main plate to generate a hero clean plate.”
However, on shooting day the team realized how strenuous this would be for the Steadicam operator and ultimately only three clean takes could be captured. “Also,” notes Harrington-Odedra, “because we were using natural light and relying on the unreliable British weather, the lighting conditions were changing every moment of the film. This meant that our clean plate, which was taken minutes after the main plate, had completely different lighting.”
So a different approach, using Houdini, to acquire clean plates was adopted. “We ended up developing a tool in Houdini that was able to automatically erase a given section of a live action plate, as long as there was a 3D camera track and LIDAR geometry,” explains Harrington-Odedra. “The tool would scan the footage forwards and then backwards, then 3D project the last healthy section of the plate before that area went behind the dancer. This clean plate pass ended up being another tool used by the compositors to aid in the cleanup.”
That bespoke tool proved extremely useful but 2D artists still spent significant time refining the plates to provide clean areas. “The sheer volume of cleanup to do with removing her limbs from the background meant that any help with that was invaluable,” says The Mill 2D Lead Artist Fergal Hendrick. “As with everything on this job, there was no single technique that worked throughout the sequence so it was about using the right tool available for each section.”
What does a 3D-printed lattice body part look like anyway?
 As the visual effects challenges continued to pile up for The Mill, work also took place on lookdev’ing the lattice limbs. It was a tough ask since not much reference was immediately apparent. “Concept artist Nathan McKenna provided some rough designs which enabled us to at least start figuring out what works and what doesn’t,” recalls Fleet. “We played with all sorts of ideas for the structure; thick, thin, hollow, hard, smooth, we covered all angles. As talented as Nathan is, the design itself wasn’t really something you could nail in a concept painting. It’s the kind of thing you have to rotate around to experience the desired effect. We initially started hand modelling in Maya, but we quickly realized that we simply couldn’t turn around iterations quick enough. We tried to speed up by using some of the great tools in SOuP, but the model quickly became slow and cumbersome to work with.”
Seeking an alternative, The Mill then considered modeling in Houdini, something Fleet says “was the ideal choice. The procedural nature of Houdini made it very flexible and powerful, not to mention quick. So quick in fact that Dom & Nic could make changes with us in real time. We then exported the mesh back to Maya for some cleanup and eventually ZBrush for extra detailing. We modeled around 30 different versions of the mesh before we settled on the final version.”
Classic Chems
The Chemical Brothers are well-known for their innovative music videos which often take advantage of VFX and video art tools to tell great stories. Star Guitar, directed by Michele Gondry, was a single take train journey that used DV footage shot multiple times from a train ride in France. Let Forever Be, also by Gondry, employed clever video effects transitions. Midnight Madness ,directed by Dom & Nic, included digi-double fx from Framestore, while Believe (also Dom & Nic) featured a fully CGI car factory robot. The same directors went to Framestore also with The Salmon Dance for its fish tank of friends.
The actual look of the mesh material had to represent the way that a 3D lattice would be printed in resin. “The more modern materials appeared to have a slightly more sandy look,” suggests Harrington-Odedra, “whereas the older resins tended to have more of a striated look, which was a by-product of how an object was printed. The final look was comprised more of this striated texture, mainly due to the fact that it was more visually interesting than a simpler, sand-like texture.”
The mesh was rigged in Maya with the aforementioned RBF solver. Texturing took place in Photoshop and MARI, with rendering in Arnold. Marvellous Designer and Maya NCloth were used for cloth effects work.
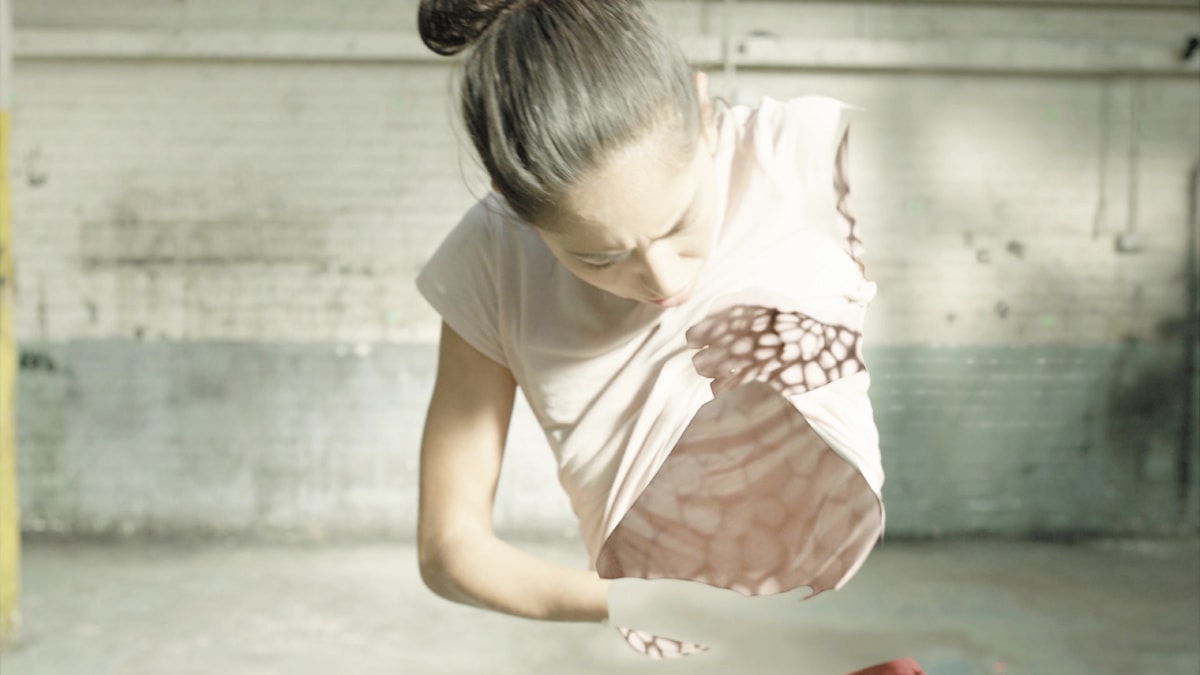
At one point, Mizuno lifts her shirt to reveal a mesh torso and heart, with the heart designed to be pulsing to the rhythm of the music. “This meant that the heart needed to be slightly translucent with light emanating from its center,” says Harrington-Odedra. “After some experimentation, we found that although it took a long time to render, placing lights inside the heart gave the most realistic result. Since Arnold was our render engine of choice, the heart passes were the heaviest of all due the high number of refractive bounces required.”
The lattice was built with the intention to deform via a simulation that moved each of the links in the mesh around. “However,” says Harrington-Odedra, “due to the length of the shot, we soon realized that this was not an option. Ultimately, we relied on Head of Rigging Andreas Graichento to provide us with a beautifully deforming skin, which we then used to wrap deform the final mesh using our own in-house Maya plugins.”
Meshing it altogether
In compositing the final frames, dealing with lattice shadows cast onto Mizuno’s real body and floor proved to be one of the biggest challenges for the 2D team. “Her real cast shadow was obviously solid,” notes Hendrick, “so we had to effectively swap that out for a shadow with holes in it. To achieve this we had to matchmove the whole body throughout the entire sequence, rather than just the white CG limbs that you see. Then lighting provided us with a matte pass containing just the shadow holes, we called it a ‘stained glass’ pass. We used this to grade up the original shadow in the plate. The fact this worked is a testament to the accuracy of the 3D lighting set up.”
Another big challenge, aside from the huge volume of cleanup, was getting the CG to interact with Mizuno’s clothing. “From the moment she had two fully CG legs, we decided to switch to fully CG underwear,” recounts Hendrick. “Up to that point, we used NUKE to project the live action plate onto the animated geo. This method provided much more control whenever mesh meets fabric and gave us the ability to add additional shadows and bumps. It also meant we could remove the natural contours of her body so that the fabric would lock to the CG body parts.”
Matching the on-set lighting would normally required HDRIs for each take, but since the shooting lasted all day, the sun was different each time. “We therefore had no idea which take was to be selected,” reveals Harrington-Odedra. “Our only option was to take a full set of HDRIs before and after each take. Even this proved to be tricky as the lighting conditions would change during a bracketed exposure! Once we had these HDRIs, and a take was selected, it became clear that there were two distinct lighting conditions; direct sunlight and overcast. The resulting lighting rig projected four HDRIs onto the LIDAR scan of the set. We built in a slider so that we could choose the exact amount of direct versus overcast contribution.”
Credit list
Record Company
Record Company: Virgin Records
Video commissioner: Ailsa Robertson
Production Company
Production Company: Outsider
Director: Dominic Hawley & Nic Goffey
Executive Producer: John Madsen
Director of Photography: Steve Chivers
Steadicam Operator: Rick Woollard
Sound Design: Tony Rapaccioli
Costume Designer: Tara Stift
Hair and Make Up: Fiona Fellows
Production Manager: Steve Elgar
First Assistant Director: Ben Gill
For Random Dance: Rebecca Marshal & Ellie Douglas-Allan
Focus Puller: Ross Naylor
Clapper Loader: Stephanie Kennedy
DIT: Paul Swann
Video Playback: Tony Booth
Grip Trainee: Warren Wiseman
Runner: Daniel Osei
Runner: Ana Freire De Andrade
Runner: Billy Goffey
Editorial
Editing Company: Final Cut
Editor: Ed Cheeseman
VFX & Design
VFX & Design: The Mill
Executive Producer: Misha Stanford-Harris
Production Coordinator: Tess Miles
Shoot Supervisor: Neil Davies & Suraj ‘Sid’ Harrington-Odedra
Executive Creative Director: Neil Davies
Animation Lead: Jorge Montiel & Ian Potsos
Rigging: Andreas Graichen
2D Lead Artist: Fergal Hendrick
3D Lead Artist: David Fleet & Suraj ‘Sid’ Harrington-Odedra
2D Artists: Joe Courtis, Brad Wood, Sole Martin, Lucas Carracedo, Jeanette Eiternes, George Cressey, Warren Gebhardt, Stefan Susemihl, Rebecca Clay
3D Artists: Andreas Graichen, Ian Potsos, Marta Carbonell, Ashley Reemul, Alberto Lara, Matthew Kavanagh, Sauce Vilas, Jasmine Ghoreishi, Sherin Mahboob, Philippe Moine
Tracking & Matchmove: Peregrine McCafferty (Peanut FX), Amelie Guyot (Peanut FX), Philip Maddock
Modeling & Texture: Marta Carbonell
Lighting & Rendering Assist: Yoann Gouraud
Shoot Assist: Margaux Huneau
Motion Tracking & Supervision: Peanut VFX – Peregrine McCafferty and Amélie Guyot
Body Scanning: FBFX Digital – Jack Rothwell
Rotoscoping & Clean up: Trace VFX & GelaroGrace
Scanning: Duncan Lees (Efficacy 4D)
Motion Capture: Ivo Slivkov (Timeaware)
Colour
Colour: The Mill
Colourist: David Ludlam
Colour Assist: Oisin O’Driscoll, Brendan Buckingham
I had fun working on this and the end result was amazing to see. For those interested in the concept design process: https://www.patreon.com/posts/4221793
!!!!!!!
incredible hard work
Stunning work, amazing in every possible way. I never tire of seeing it again on a Vimeo hunt.