When director Neill Blomkamp seemingly burst onto the scene in 2009 with District 9, he had already demonstrated his deftness at making raw sci-fi with several short films. Tetra Vaal (2004), for instance, introduced a law enforcement robot amongst the slums of Johannesburg. With Chappie, Blomkamp returns to the style and feel of Tetra Vaal, while feeding into the mix the complications presented by artificial intelligence.
Chappie also sees Blomkamp continue his close association with visual effects house Image Engine and concept/practical effects studio Weta Workshop – which both collaborated on designs for robots seen in the film. And the director worked again with actor Sharlto Copley, who performed the role of Chappie on set for filming in Johannesburg and Vancouver.
fxguide goes in-depth on the film with overall visual effects supervisor Chris Harvey, looking at Image Engine and Weta Workshop’s effects plus contributions made by The Embassy VFX and Ollin VFX.
– Watch our exclusive breakdown of Image Engine’s Chappie VFX, thanks to our media partners at WIRED.
Concepting Chappie

Chappie’s origins began after the release of District 9, with Weta Workshop contributing a wave of designs of the character in 2009/2010. After Blomkamp’s Elysium, Weta returned to Chappie concepts – basing them in part on robots the director had incorporated into his earlier short films such as Tetra Vaal and Tempbot. A distinguishing feature of the robots in those films was the bipedal design and its ears – which were retained in Chappie.
“Our first designs had ears and for a while Neill went away from them,” says Weta Workshop concept artist Christian Pearce. “They were a definite nod to the Appleseed robot Briareos, too. Originally the idea was that the ears were antennae but also radiators to dissipate heat. During the design process we even did some drawings to show how they could be animated to convey emotion.”
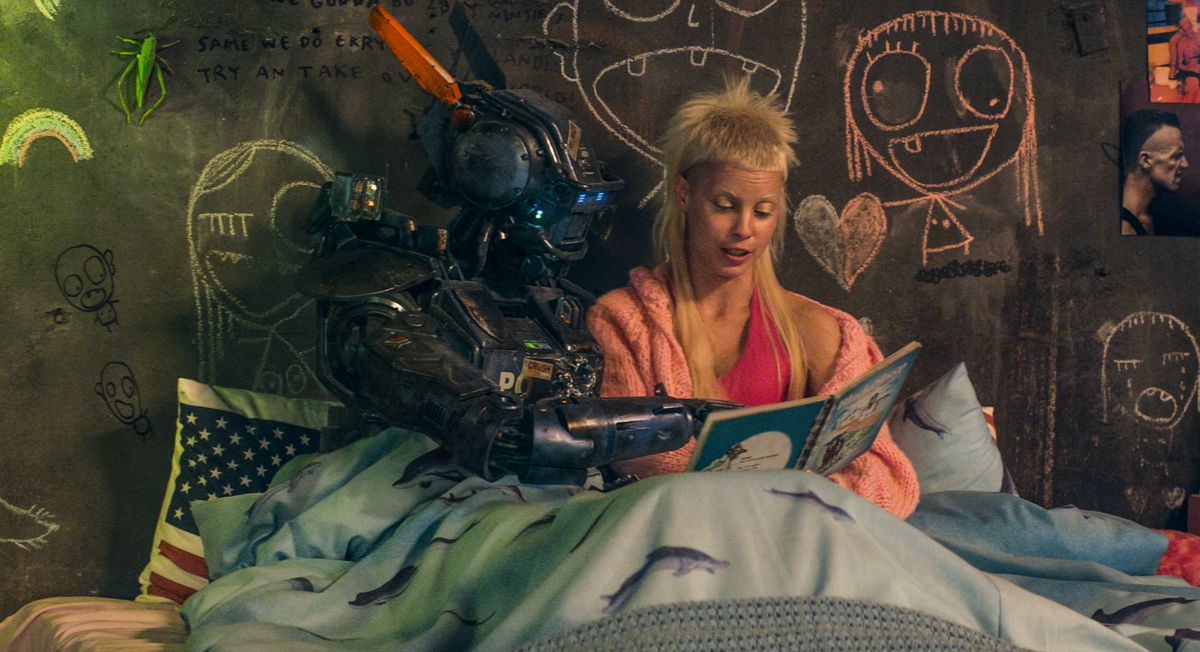
Although the ears remained, an early design feature on Chappie’s face was changed last minute – his face. “Originally his face was just essentially an LCD screen,” states fellow Weta Workshop concept artist Leri Greer. “We thought we might just put up emoticons like a happy face or sad face, but at some point when they thought about the interaction with the actors, so they decided to put a visor on him that would mimic the idea of eyes.”
“We were literally packing Chappie up as a finished mannequin into the boxes to ship,” adds Pearce, “when we got this new note from Neill that we needed something human on Chappie since the actors would be looking directly into Sharlto’s eyes. So really quickly, within a few hours, I did a design for the visor.” The Workshop team then crafted the visor on the project floor in only a day and half before the robot was boxed and shipped.
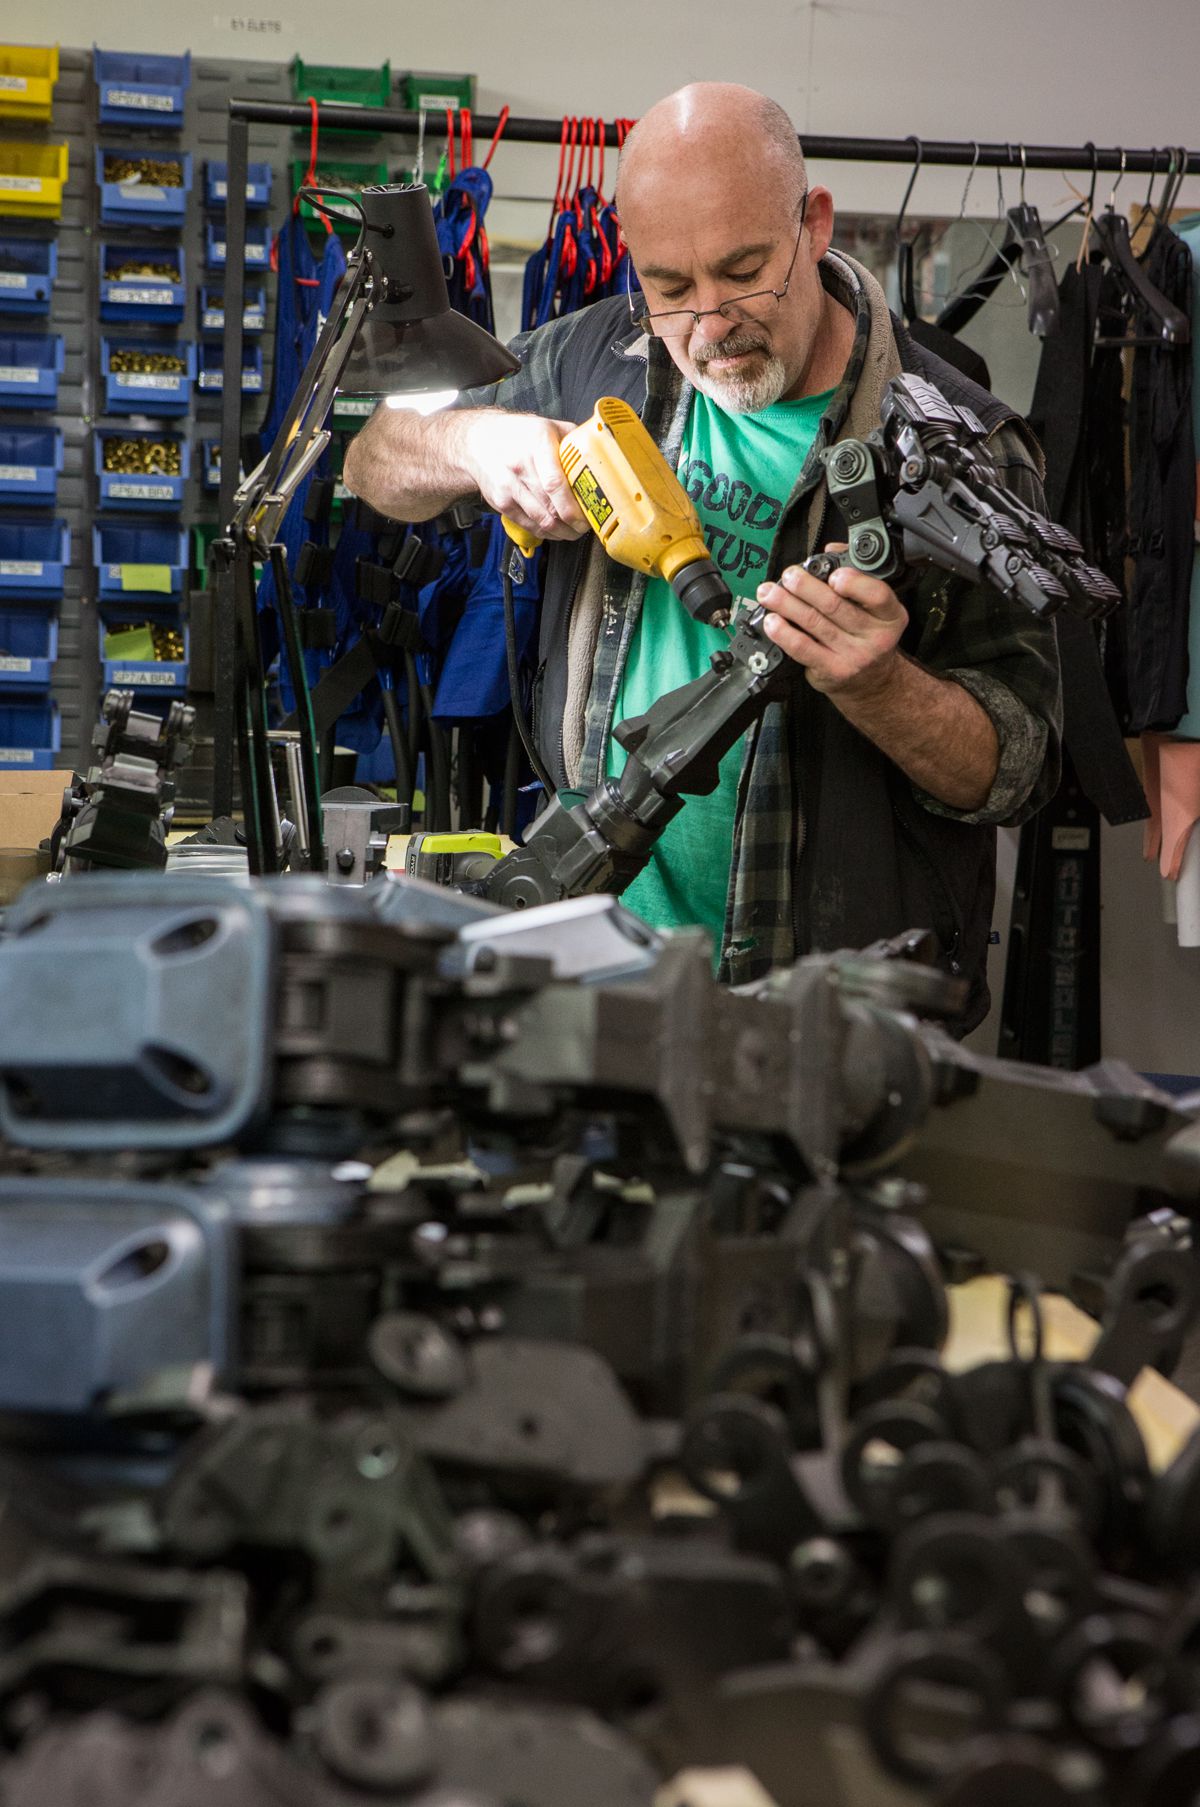
Oftentimes Weta Workshop will work solely on a character design, all the way through to a physical, practical model that may be used on-set, and then replicated in CG by a visual effects house. But on Chappie, Weta and Image Engine collaborated directly on the robot designs – these being the police Scouts, Chappie and the Moose. Ultimately, Image Engine produced final 3D designs that fed directly into Weta’s pipeline for 3D printing and constructing the live action props.
“You can either make the physical thing and then match digital after that,” says Weta Workshop modelmaker supervisor Edward Denton. “But on Chappie it’s probably one of the first times we’ve actually got the special effects studio to make the final 3D model. And we had to match that exactly.”
“Weta sent us their designs,” adds Image Engine asset supervisor Barry Poon. “We then blocked out the model as seen in the concept design and then we started working out the finer details and the mechanics of just everything else. We’d find things that limited the range of motion, and then we worked with Neill on that until we got to something that really worked. Once we blocked things out, modeling worked with rigging to make sure that it could still get that range of motion, we then up-res’d everything. We were on a tight deadline since Weta really needed to build Chappie and Moose as practical models, we built them in sections – leg first then torso and arms and head.”
During that process, Blomkamp and overall supervisor Chris Harvey looked to ensure the rigging of the characters would result in movement that was as realistic as possible. “We didn’t want to do any of the typical cheats you might do in CG robots, where if you don’t see it it’s OK if things are crashing through,” says Harvey. “We really wanted Chappie to be 100 per cent physically accurate in how it works – and no cheating with ball joints. It had to be more mechanical.”
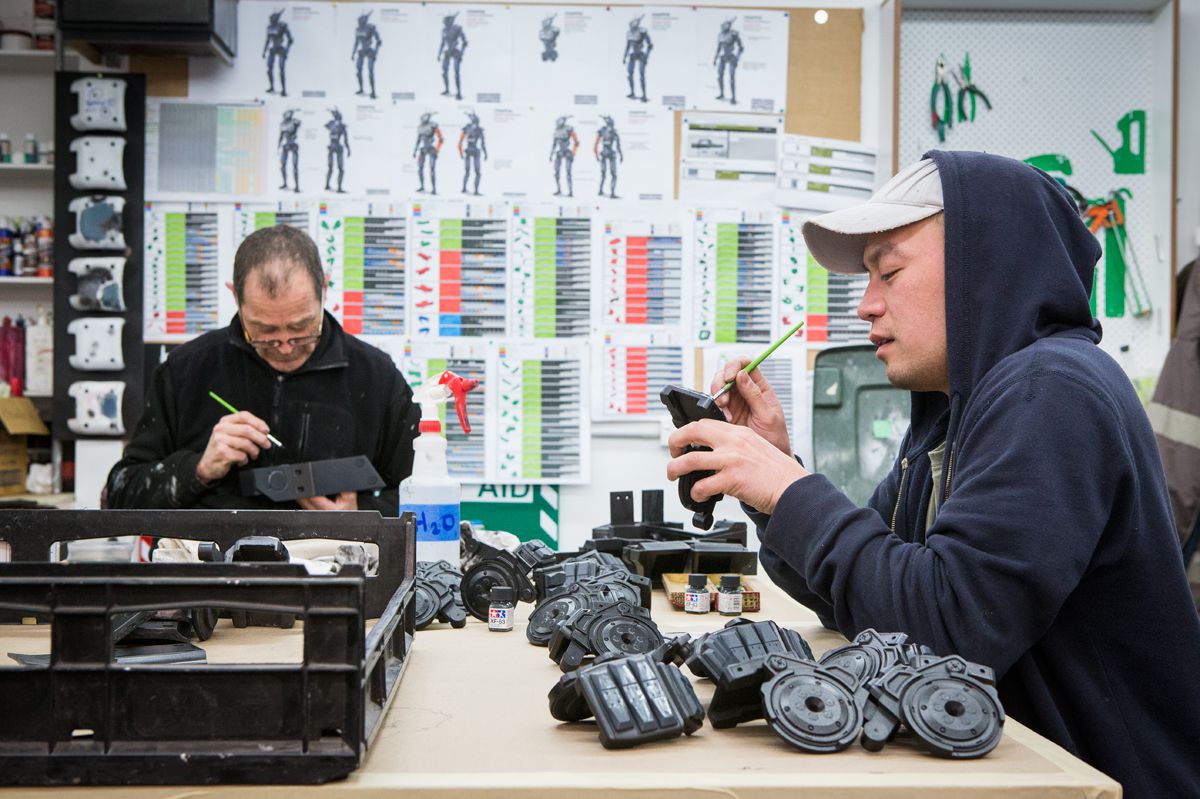
Weta Workshop then worked with Image Engine to orchestrate the files so that they would be suitable for 3D printing. “He was almost entirely 3D printed,” recounts Denton. “Every part was printed and snapped together almost. We build some of our own 3D printers and also use an Eden and a ProJet printer off-the-shelf to get super high resolution for small parts.” In the end, the Workshop made around 19 Chappie/Scouts, in various stages of destruction and damage, and with different paint jobs.
On-set
Watch a gray suited performer in action on the set of Chappie.
Despite some early reports about the film, no motion or performance capture of Sharlto Copley took place on set. Instead, the actor (and other stunt performers) donned a gray suit with tracking markers and performed the role of Chappie in the plate which Image Engine animators would match to. “Weta Workshop created a few chest block pieces so he had the same block shape as Chappie does and to slightly restrict his movement,” says Harvey. “It gave the other actors the right volume if they were to hug or put their hand on him. He also wore a GoPro on his head the whole time so we could capture his POVs. He had these little wires on his head to provide the camera framing for how big his ears might stick up.”
“There’s no way Chappie would have been successful without Sharlto,” adds Harvey. “What he brought to the project was absolutely amazing – you couldn’t put a value on how important that was. His performance was referenced 1:1 – we always referencing back to his timing.”
Plate prep

After filming, Image Engine launched into a massive postvis effort. “There was a requirement from Neill that in no audience screening would anyone ever see Sharlto,” relates Harvey. “We wrapped end of January and the first audience screening was mid-March, so we had to replace Sharlto with Chappie in every single shot in a two month period – the entire film – in a postvis version.”
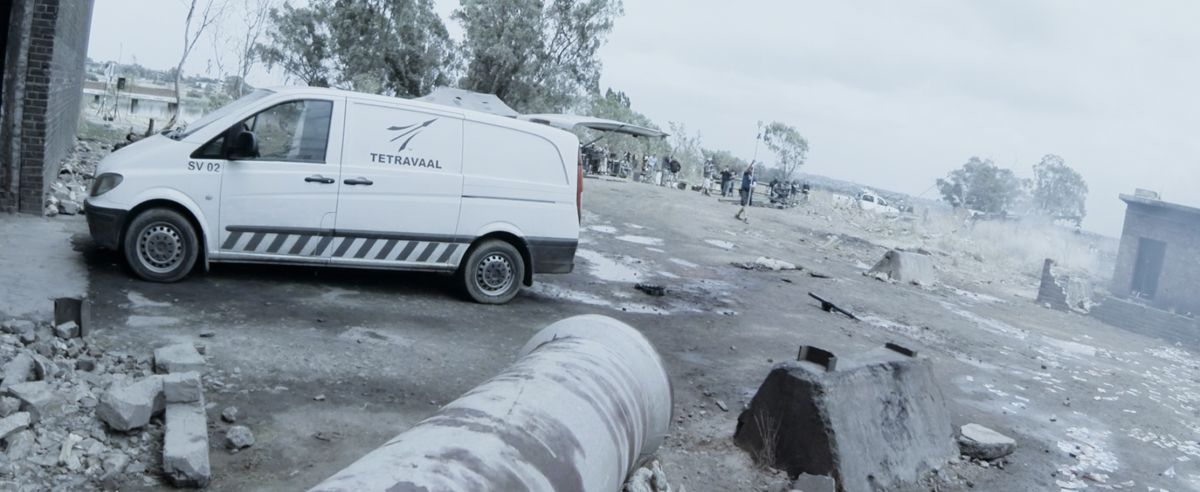
It was here that Image Engine experimented with some animation timing, but the results were never intended to be final shots. At the same time, a significant matchmoving, tracking and plate preparation process was carried out – working with RED EPIC plates and anamorphic lenses used by DOP Trent Opaloch. For some of the plates, the film crew had to work quickly and did not acquire the usual LIDAR or set scans to aid in matchmoving, owing to security concerns.
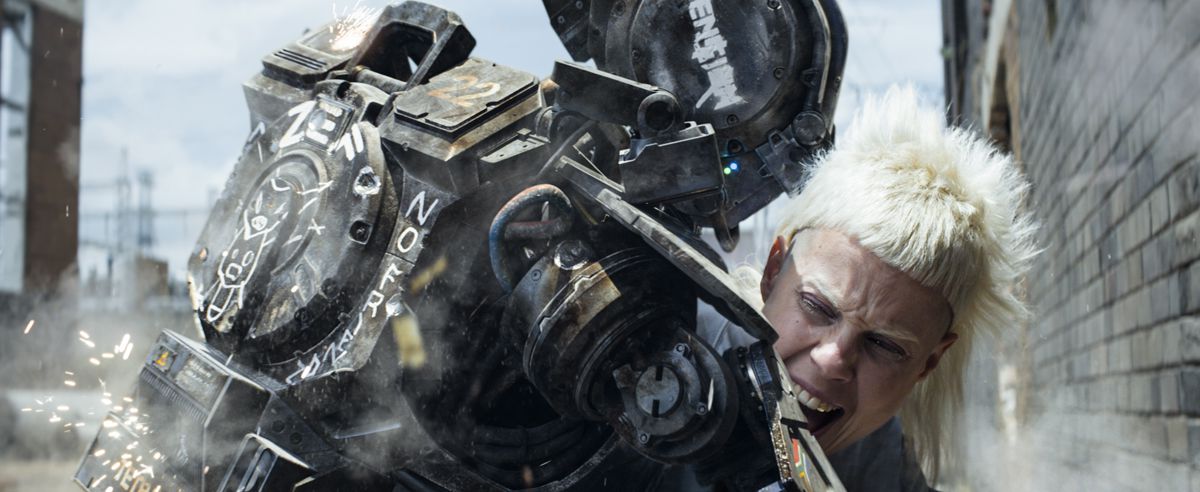
The police robots partake in a raid.
“Some of the locations were, security-wise, not necessarily the safest places,” outlines Harvey. “It was a real concern that we could actually create a riot by staging one [for one scene]. You never know how things would go. But the people were all awesome. I don’t remember any problems by any of the local people while we were there.”
HDRIs were still a staple, however, for Chappie scenes. “For all the environments Chappie was in,” says Harvey, “we created a version of it digitally – a lower-res version, but we photo surveyed and modeled environments and then grabbed HDRIs. If he walked through the room all along the path of his movement we did a spatial reconstruction of the lighting as opposed to a single sphere. We’d take those, stitch those together and re-project those back into this low res digital environment. So that gave us a photographic recreation of the set to reflect off Chappie and added a lot to his lighting. Image Engine had also calibrated and reproduced the gray suit digitally so that it could used in their lighting setup. “We could measure the gray values from the suit against our gray values of Chappie.”
Asset management
The central Chappie character takes quite a beating throughout the film. Originating as a police Scout, he is hit with an RPG, before being repaired, but then also sustains other damage, being spray painted and even loses an arm. All of those iterations – from different body parts (including his chain bling) to various paint jobs – were meticulously tracked by Image Engine from a master asset to 17 digital assets in total. “They had one master asset and the pieces would all feed in,” explains Harvey. “You would toggle switches and it would swap in the appropriate parts. All of that was automatic – his rig would come in and then load all the different parts it needed for the damage and shot required.”
“Chappie was one asset in Maya that had all of these different damage states,” adds Barry Poon. “We had multiple arms or chest pieces or heads – any of the pieces that would get damaged throughout the movie – he existed as one large asset with multiple setups. When it got to animation, depending on what state it would be it would show what was necessary. It was the same with lighting. They wouldn’t need to worry about hiding or showing the right pieces – it was a proprietary setup in Shotgun and Maya talking to each other.”
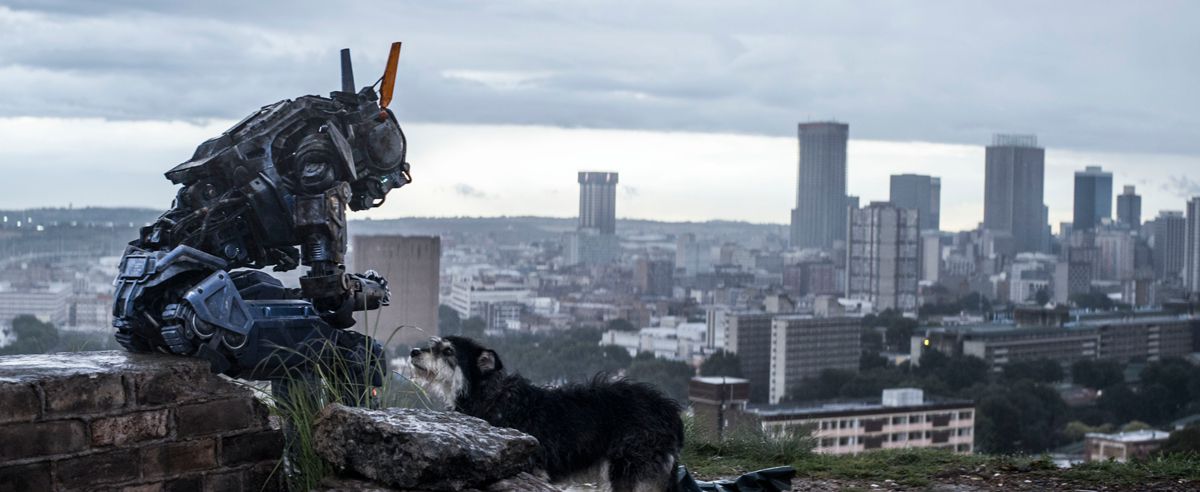
Image Engine’s Shotgun team developed the workflow in-house, even using the software to ensure that Chappie’s battery level display was correct from shot to shot and that damage was also consistent. “Depending on which damaged state Chappie it was, when the artist loaded up their scene, it would read Shotgun and know which version of Chappie had to be loaded. Some of the damaged states for Chappie are just texture variations, say adding blood or certain graffiti – and those were handled in Shotgun automatically.”
Animation
Having Copley’s on-set performance was, as Harvey notes, a crucial aspect. The intention was that Chappie, with full A.I., would actually move in fluid-like humanistic ways, as opposed to the more military style Scouts, while still preserving somewhat of a robot look. “The mechanical-ness of that fluid movement would just naturally happen because of the way we had designed all the jointing earlier on,” says Harvey. “It allowed him to move fluidly but still have a sense of mechanics running through it because the joint articulation was different than a human.”
Still, a great deal of the emotion from the character needed to come from the face. But, says Harvey, “we didn’t have a face to emote with – we had an eyebrow, an upper eyebrow bar, a lower one and then two ears. It was surprising the range of emotion we could use, just using those four things. Then we would steal other things from Sharlto’s performance. If he was doing little eye darts, sometimes we’d steal those – not onto the eyes but the whole head so his head would dart around like an eye. You’d look for nuances to put into other areas of Chappie to help it read the same way.”
Chappie goes gangster.
Additional animated elements included Chappie’s gold ‘gangster’ chains that he acquires. “Originally he wore only a couple when we photographed it,” explains Harvey, “but Neill wondered if we could add more. So we had four – things like that were in 450 shots of chain sims. It’s all true rigid body sims between every single link.”
The final 3D pipeline for Chappie relied on animation in Maya, effects in Houdini, rendering in 3Delight (via a newly built physically based shading setup at Image Engine) and compositing in NUKE.
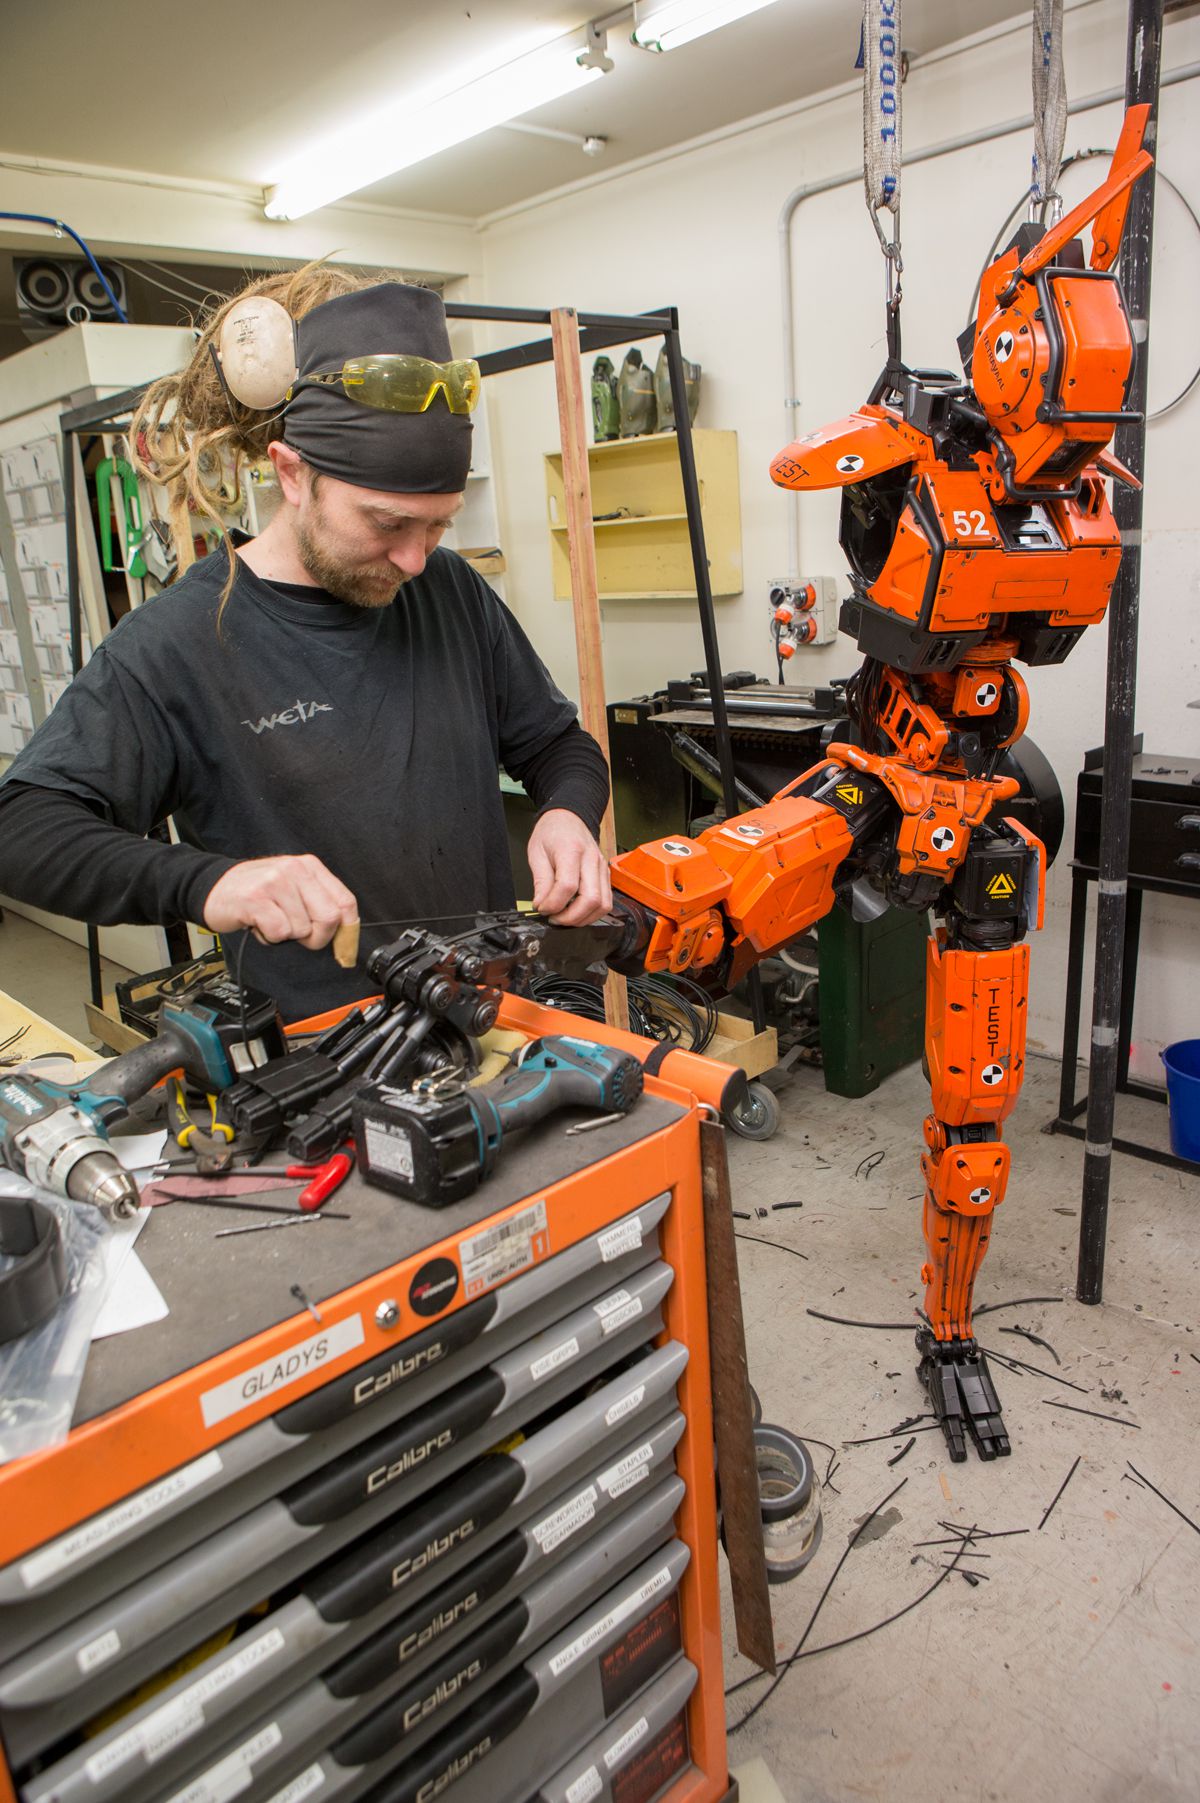
Making Moose
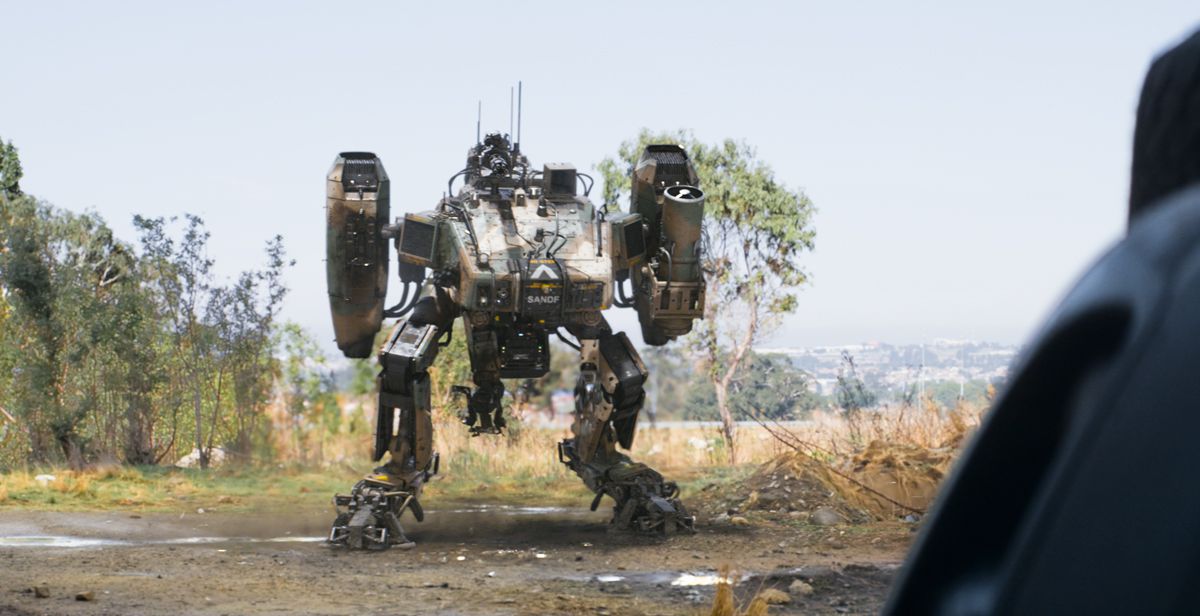
The effectiveness of the police robots – and Chappie – in the world of the film is a cause of jealously in Australian engineer Vincent Moore (Hugh Jackman), whose own Moose robot design is considered less useful. Weta Workshop also contributed designs for the Moose, and had more than just the usual guidance from the director – Blomkamp actually gave them a rendered CG model! “He’s quite an accomplished 3D modeler himself – that was his start in VFX,” outlines Weta’s Leri Greer. “So for the Moose he actually made that himself and rendered it. Almost every project, if he gets three or four days free, he’ll do a 3D model and send that to us and say, ‘Can you make that a little bit better? You know, I only had a couple of days.’”
Of course, Weta Workshop continued to refine the designs for the Moose with further to and fro with Blomkamp and Image Engine. Since the robot was intended to be a slick, weapons-heavy machine, that made its way into concepts, sometimes unintentionally. “On the very first version I sent through I was kind of making a joke about it and I totally covered the Moose with all these weapons and lasers and rocket pods and gatling gun,” recalls Christian Pearce. “I was expecting Neill to say, ‘We’ll use that and maybe that,’ but he said, ‘Yeah that’s fine, move on to the next thing.’ So every single one of those weapons is on there!”
Other design alterations made included heavier angles to give the Moose an Abrams tank feel, while retaining the look and feel of a robot that might really be built by a company such as Boston Dynamics in the near future.
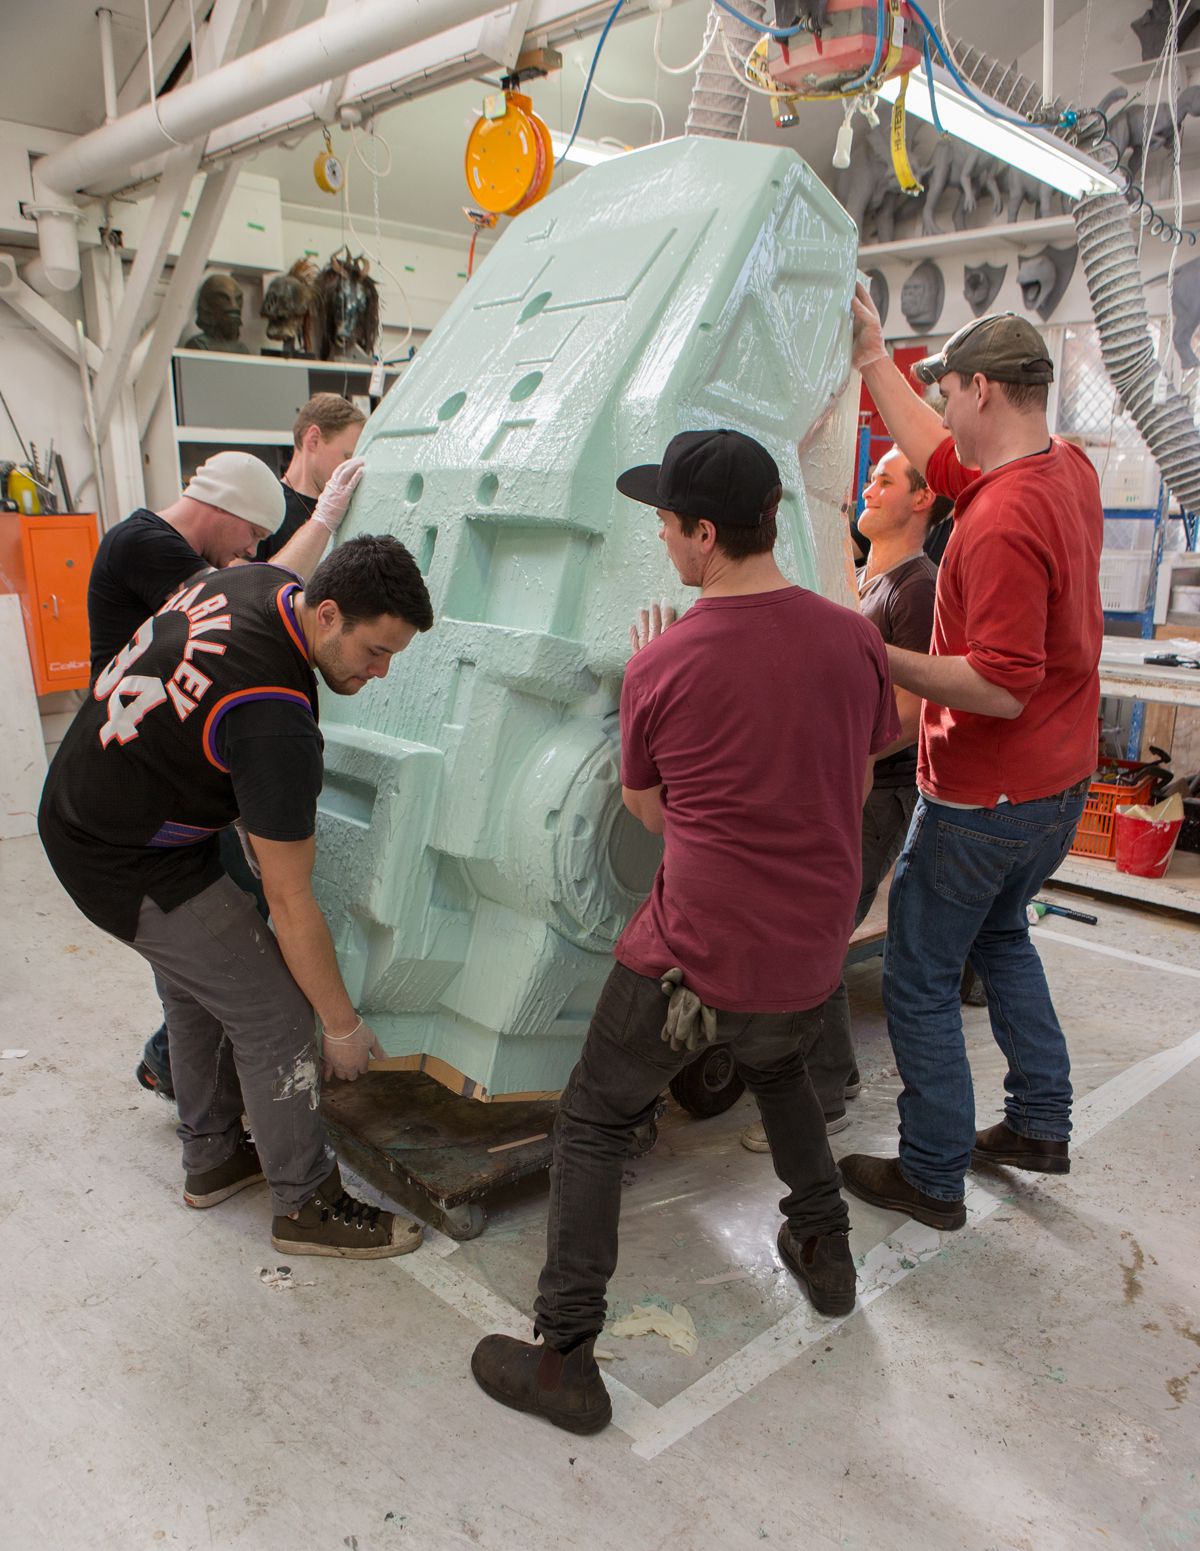
Once the design was signed off, Weta Workshop commenced one of its biggest builds in recent times. The Moose was constructed of up to 10,000 individual parts, according to the team, with the main material being urethane. “A lot of the parts were molded and cast out just to give it the strength and longevity on set if it got knocked around,” says Greer. “We knew there was a scene where it potentially was going to be blown up. Everything was made in the strongest possible way also with steel and aluminum and lots of urethane parts.”
Not all of the Moose’s parts were super-strong, however. For a cooling fan component of the robot’s engine block, Weta Workshop drew on a surprising material. “In building models,” explains Leri Greer, “there’s always been this thing for putting macaroni in there somewhere. We didn’t have any in the building so they actually got ramen noodles, spray painted a brick of the noodles and put that inside the engine.”
“For that cooling fan,” adds Denton, “it was just an impossible thing to make out of a bent bit of wire. It was in the middle of all of these metal components which you would never see the inside of, but we thought how are we going to make this? So we got five blocks of ramen noodles, spray-painted them black and then painted them silver and stuck them in the middle.”
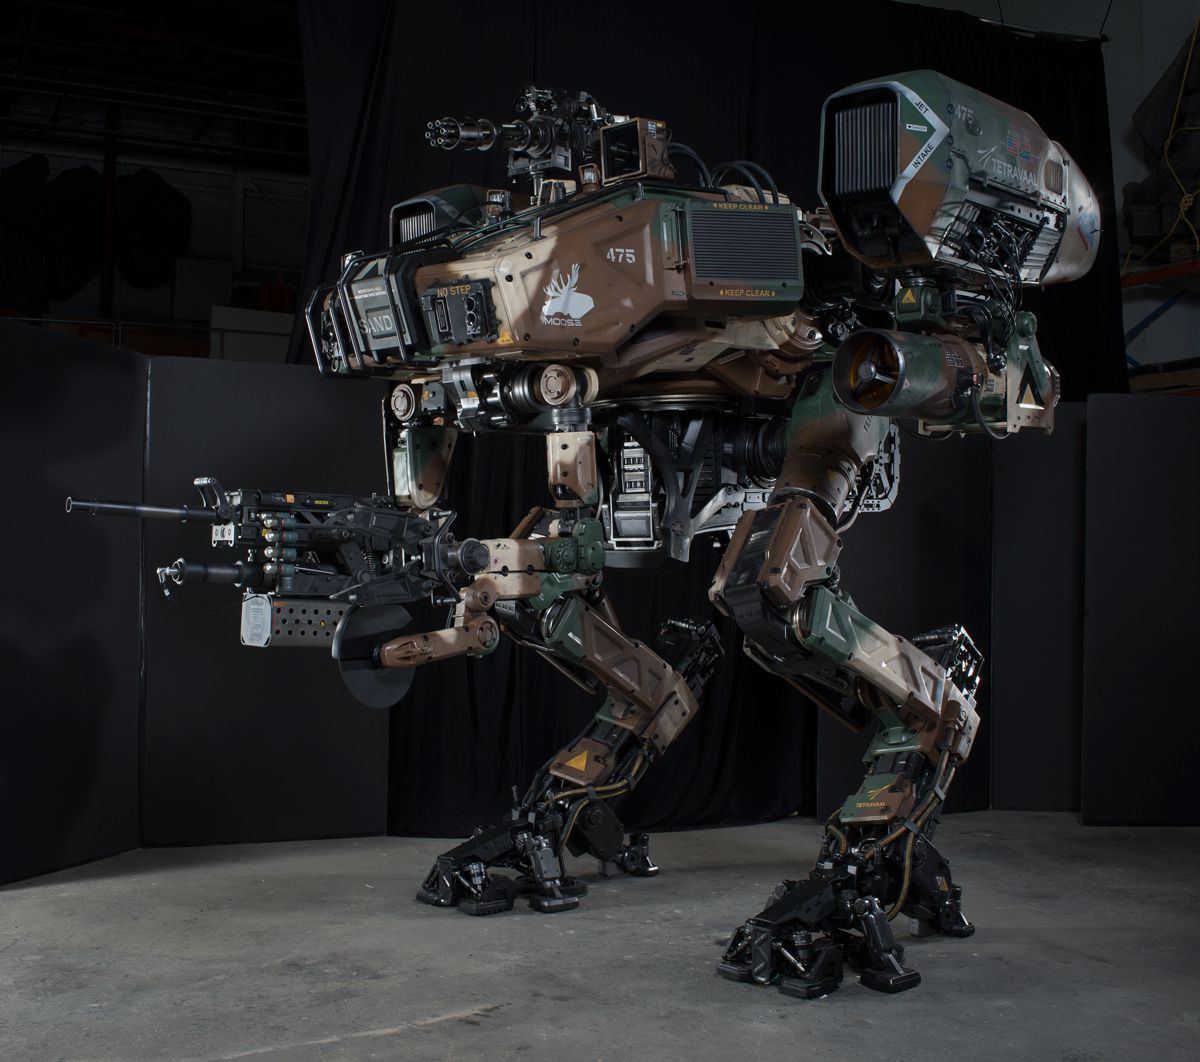
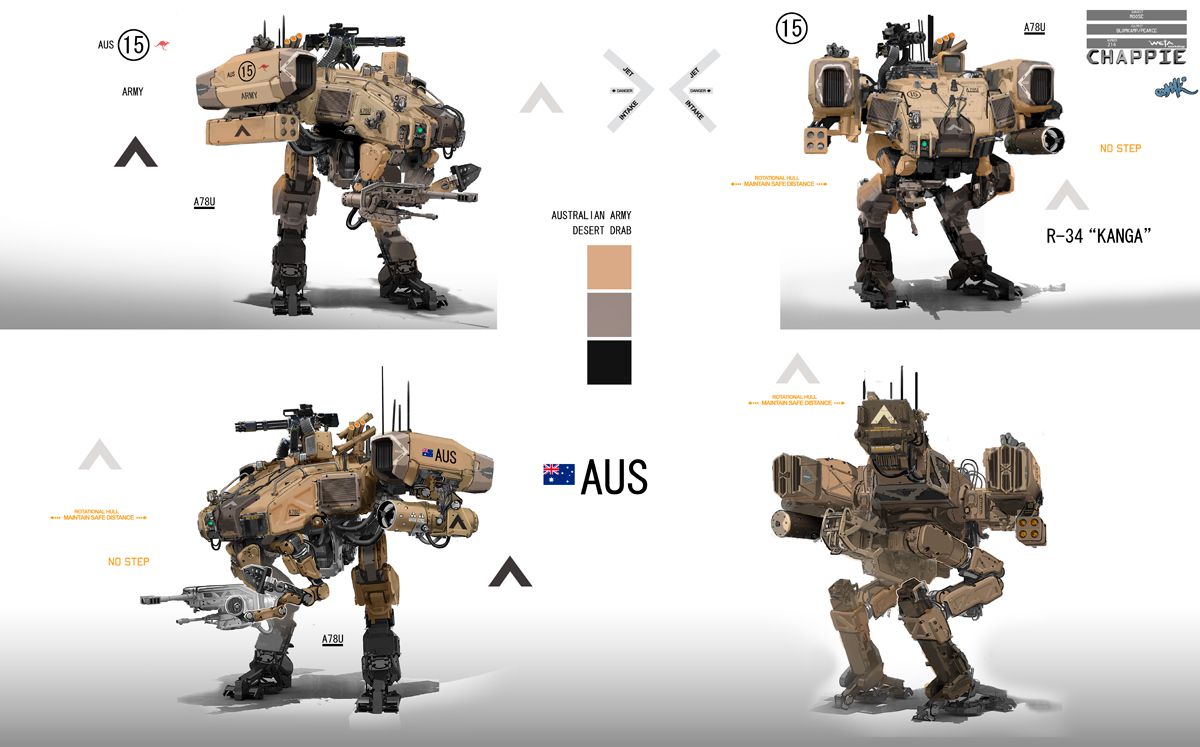
The noodles are just one of the Easter egg elements of the Moose, the team notes, without revealing too many others. Viewers looking closely will see a range of decal stickers representing both the Moose origins (the robot is originally developed for use in Australia, and known as ‘Kanga’, before being adapted for South Africa – with the Moose an ode to Blomkamp’s close ties to Canada).
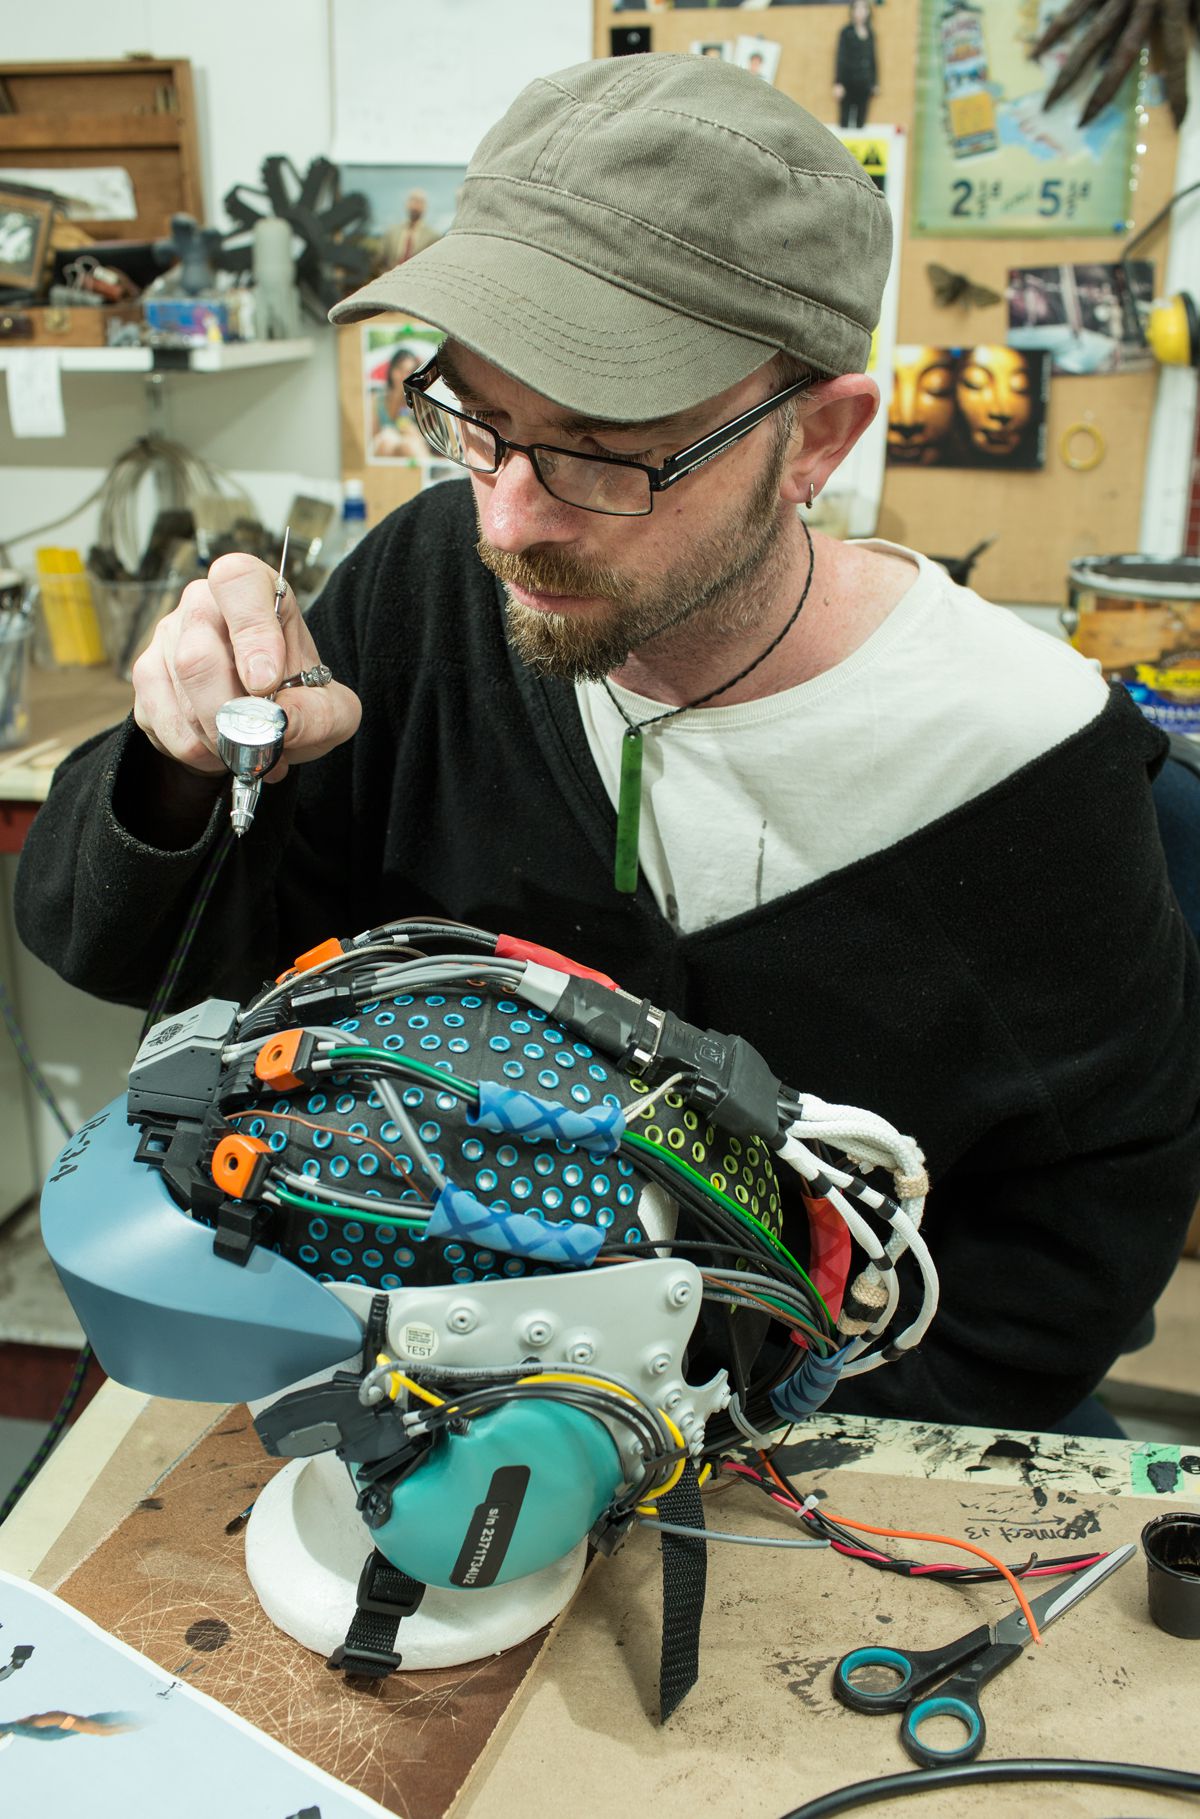
In addition to the Scouts, Chappie and the Moose, Weta Workshop also delivered several other on-set robots and props, from an orange robot prototype, to Vincent’s VR helmet, Chappie’s grenade belt and various weapons, including the EMP rifle Vincent uses on Chappie.
Image Engine’s CG Moose was, of course, another collaboration with Weta Workshop – following a similar process as the Chappie digital model creation. However, the robot was not ‘performed’ on set as Copley had done for Chappie. Instead, says Chris Harvey, “we went really old school and quite often with one of our matchmovers would be holding a pole and a tennis ball for eyelines. We would do that for rehearsals with the intention of pulling him out so we didn’t have to paint him away later, but the actors got so used to him being there that they demanded we put him back in the shots.”
“When the Moose flies around,” adds Harvey, “we had a drone team that would fly a drone around for the eyeline. There was always something for the actors to look at and react to.”
Vincent pilots Moose with the aid of a VR helmet.
Moose ends up causing considerable damage to Chappie and buildings and environments that are shot up. During filming, special effects supervisor Max Poolman orchestrated large scale explosions and general chaos. “There was one scene with Moose,” recalls Harvey, “that we re-shot because we thought we could go bigger. On the day it went off and we said, ‘Holy crap Max, what did you do?’, and he said, ‘Well you guys said make it a little bit bigger,’ and these things were triple the size! He always was happy to make things explode or go bigger.”
A new, but old, point of view

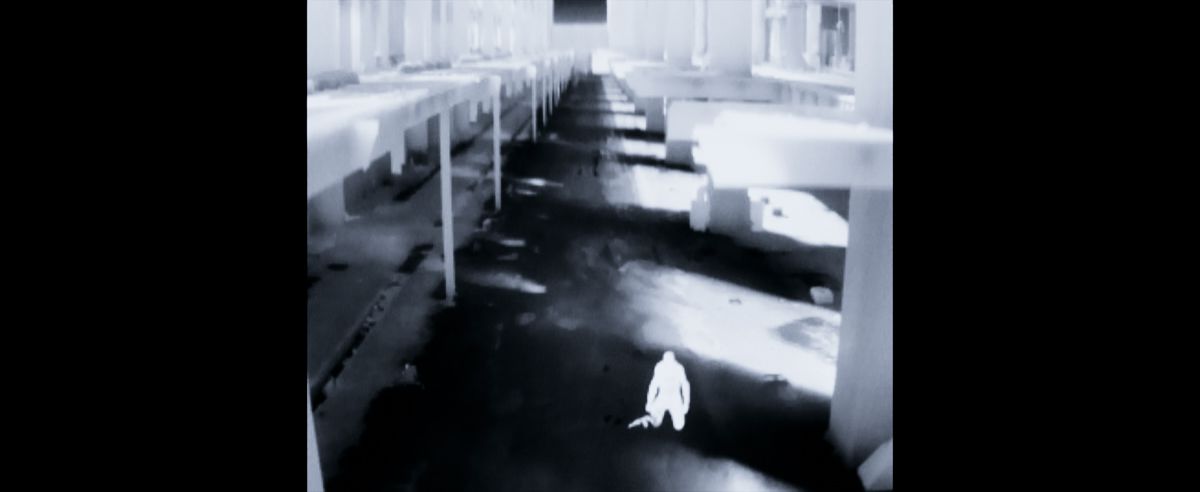
The near future world of Chappie and its new-world robots saw also a new take on robot POVs. For these, Blomkamp would turn to frequent collaborator The Embassy VFX, which took initial designs for POVs from the Scouts, Chappie and Moose and turned them into final graphical displays and HUDs. Interestingly, the actual views came mostly direct from GoPro cameras worn by Copley and other robot performers.
Design-wise, The Embassy sought to introduce a ‘low-tech’ look for the robot POVs, the idea being the imagery was more like surveillance footage instead of an ‘Iron Man HUD’. The POVs consisted of several elements – random text, code in the background and often visual elements that mapped out a room or a threat. “For major story points,” describes Embassy visual effects supervisor Michael Stewart, “we had to think of different ways to tie that POV in with the story. So you’ll see that Chappie might be looking at a weapon or a person and we had to draw the audience’s eye towards that which we did with a tracking box that would lock onto certain items.”

Chappie’s continual learning was also conveyed via the POVs. “Chris Harvey actually proposed the idea that Chappie is listening in and anaylzing and storing key words,” notes Stewart. “Those go into the top left – they’re important words he looks at later and those words flash on. It was a little thing that helped tie in with what was happening on screen.”
In terms of workflow, The Embassy took the original GoPro footage (and some RED EPIC shots), then generated basic HUD elements. For specific story points, specific animation would be done and a process of to and fro with editorial occurred. “Everything was done in 2D in NUKE,” states Stewart. “One cool thing we did, though, was that if we had any little glitches or tracking errors, we left them all in and Neill loved it because it felt like the robots were analyzing in realtime and it felt a little more real even with very small glitches.”
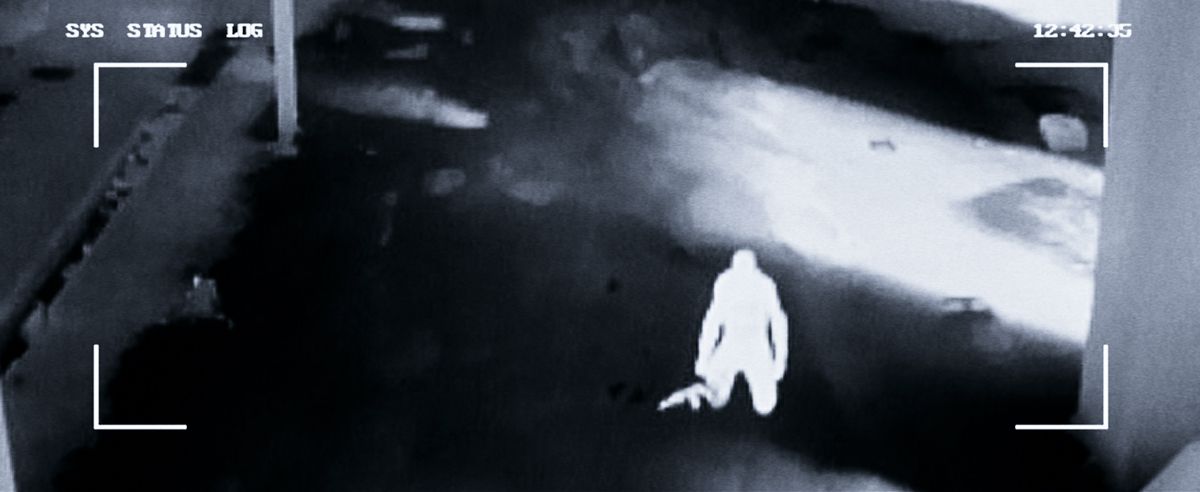
Moose, on the other hand, was considered a more expensive version of the Scouts, so “he had a little bit slicker interface and more items available for him,” says Stewart. “He has different telemetry items at the bottom of the screen. And he’s a little bit sharper than Chappie and overall a different color treatment – he’s more the Cadillac of robots. In one particular moment, Moose’s camera breaks and the robot switches to infrared footage. Production actually filmed those views with a FLIR thermal imager.”
Additional monitor and television comps and some POVs were contributed by Ollin VFX, which based their work on shots being carried out by Image Engine and The Embassy, as well contributing their own imagery. “There’s a sequence where Vincent is VR-piloting the Moose and that was a mix of different contributors,” says Ollin visual effects supervisor Charlie Iturriaga. “We have the Moose done by Image Engine, then the content done by The Embassy, but we re-did some of that content based on changes that were needed. And then all of the close-ups on that sequence were done by us.”
All images and clips copyright and courtesy © 2015 Sony Pictures.
Great write up Ian!