In September, fxguide‘s Mike Seymour hosted the Virtual Production episode of The Pulse, Epic Games’ new video series about interactive technology trends. During that panel, a series of more technical questions arose from viewers that we could not answer during that discussion and so we decided to do this followup audio fxpodcast where Mike is joined again by Epic Games Matt Madden (Director of Virtual Production).
Matt has such a strong background in Virtual Production. In addition to his leadership role inside Epic, working on projects such as The Mandalorian, he worked previously at Profile Studios and Giant Studios. In short, Matt has a wealth of knowledge and in this episode of our fxpodcast, you can hear Mike and Matt joyfully deep dive into the implementation of Virtual Production and especially LED stages.
 In addition to Mike and Matt, the original Pulse episode featured Sam Nicholson (CEO and Founder, Stargate Studios), and Felix Jorge (Co-Founder, CEO, and Creative Director, Happy Mushroom Studios). The panel explored how production and post are merging at the start of the pipeline, with the industry deploying new ways of creating and managing content, as well as the narrative opportunities virtual production is affording.
Bonus Pulse Lighting Video
As a bonus for fxguide readers, here is a special video of a previously unreleased part of the original Pulse discussion that we did not have time to broadcast. (Special thanks to the team at Epic for editing and providing this).
Pulse Questions
In the Pulse event, Mike opened the discussion up to allow viewers to ask questions, and there was a flood of questions ranging from the most elementary to the most complex LED staging questions. The most technical of these could not be addressed in the time the panel had so this podcast aims to fill that gap. Our thanks to everyone who posted questions, as there were several hundred of you! We appreciate it and it is clear this is currently a really key area for many artists.
In the podcast Mike and Matt discuss everything from :
- The key pipeline issues around LED screen design from its shape to the best LED screens to use and why
- The issue of latency and targets for professional use
- Colourspace and colour science issues
- The complex issues of focus and virtual defocus in an LED stage
- Stage calibration and alignment
- Other sources for more information.
Below is the Original Pulse Panel Video recording:
Here is the transcript of the fxpodcast with Mike and Matt.
Mike: (01:04) Matt, thanks so much for joining us. It was a lot of fun doing that Pulse video that we did the live event. That was kind of fun, wasn’t it?
Matt: (01:12) Yeah, that was great. It’s great to get everyone’s insight and exchange some stories and ideas and just different perspectives. Really, a lot of fun,
Mike: (01:22) Of course, the problem that I was having, and I’m sure you might’ve had it a bit as well, is that we can talk about this at so many different levels. And for me, there were some interesting questions popping up in the chat that I was like, well, this is probably not the right forum for that. Cause that’d be like a deep dive, but deep dive is my favorite place to dive.
Matt: (01:40) That’s the trade-off, isn’t it? Because a lot of these areas you really do want to go deeper, but that could take up a whole hour.
Mike: (01:51) Exactly. Yeah. And also, you know, when you’ve got a panel of four people, you know, sometimes it’s a bit more difficult to, uh, to cover all those bases, but so let’s, let’s get into it. Now, I’m going to start with the obvious stuff, which is LED screens, because that isn’t the only form of virtual production, but it’s certainly one that we’ve got an enormous amount of questions about.
Mike: (02:13) I’ll get to this in a second, ’cause there are some questions about costs, but I just thought, I’d ask you if you’d agree with me, there’s sort of this sort of base question like, Hey, you know, what’s the standard? And of course, it’s too early to say what a standard actually is. Because there’s no, you know, sense of a standard, but from my reckoning, most of the stages that people are looking at at the moment are around, kind of, 10m by what 4 or 5meters high. Is that kind of the sort of scale that you see most of these current stages at? Or are they getting much, much bigger than that?
Matt: (02:48) I’d say a little bit higher than that because these are these large-format cameras. It’s easy for something that’s 4m hired high to quickly show what’s above that. You know, you’re a bit more limited in your camera move. If you stay at four meters, usually around 6m, I would say on the height, but I think you’re pretty spot on, on the width. And the other thing about this, Mike, is the volumes or these walls, you know, we’ve been up all these different names for what, what an LED structure is. Right, it really depends on the application, you know? And so what a standard is, is it a standard for a full three 360 world that you’re trying to emulate? Or is it a standard for one part of a world and the rest of the set live action? So it really kinda depends on the type of production and how you intend to use the virtual content.
Mike: (03:39) Yeah. The initial sort of one that most people got to their mind, I think is a cube, but from my talking to people, a cube, isn’t probably the best place is it?
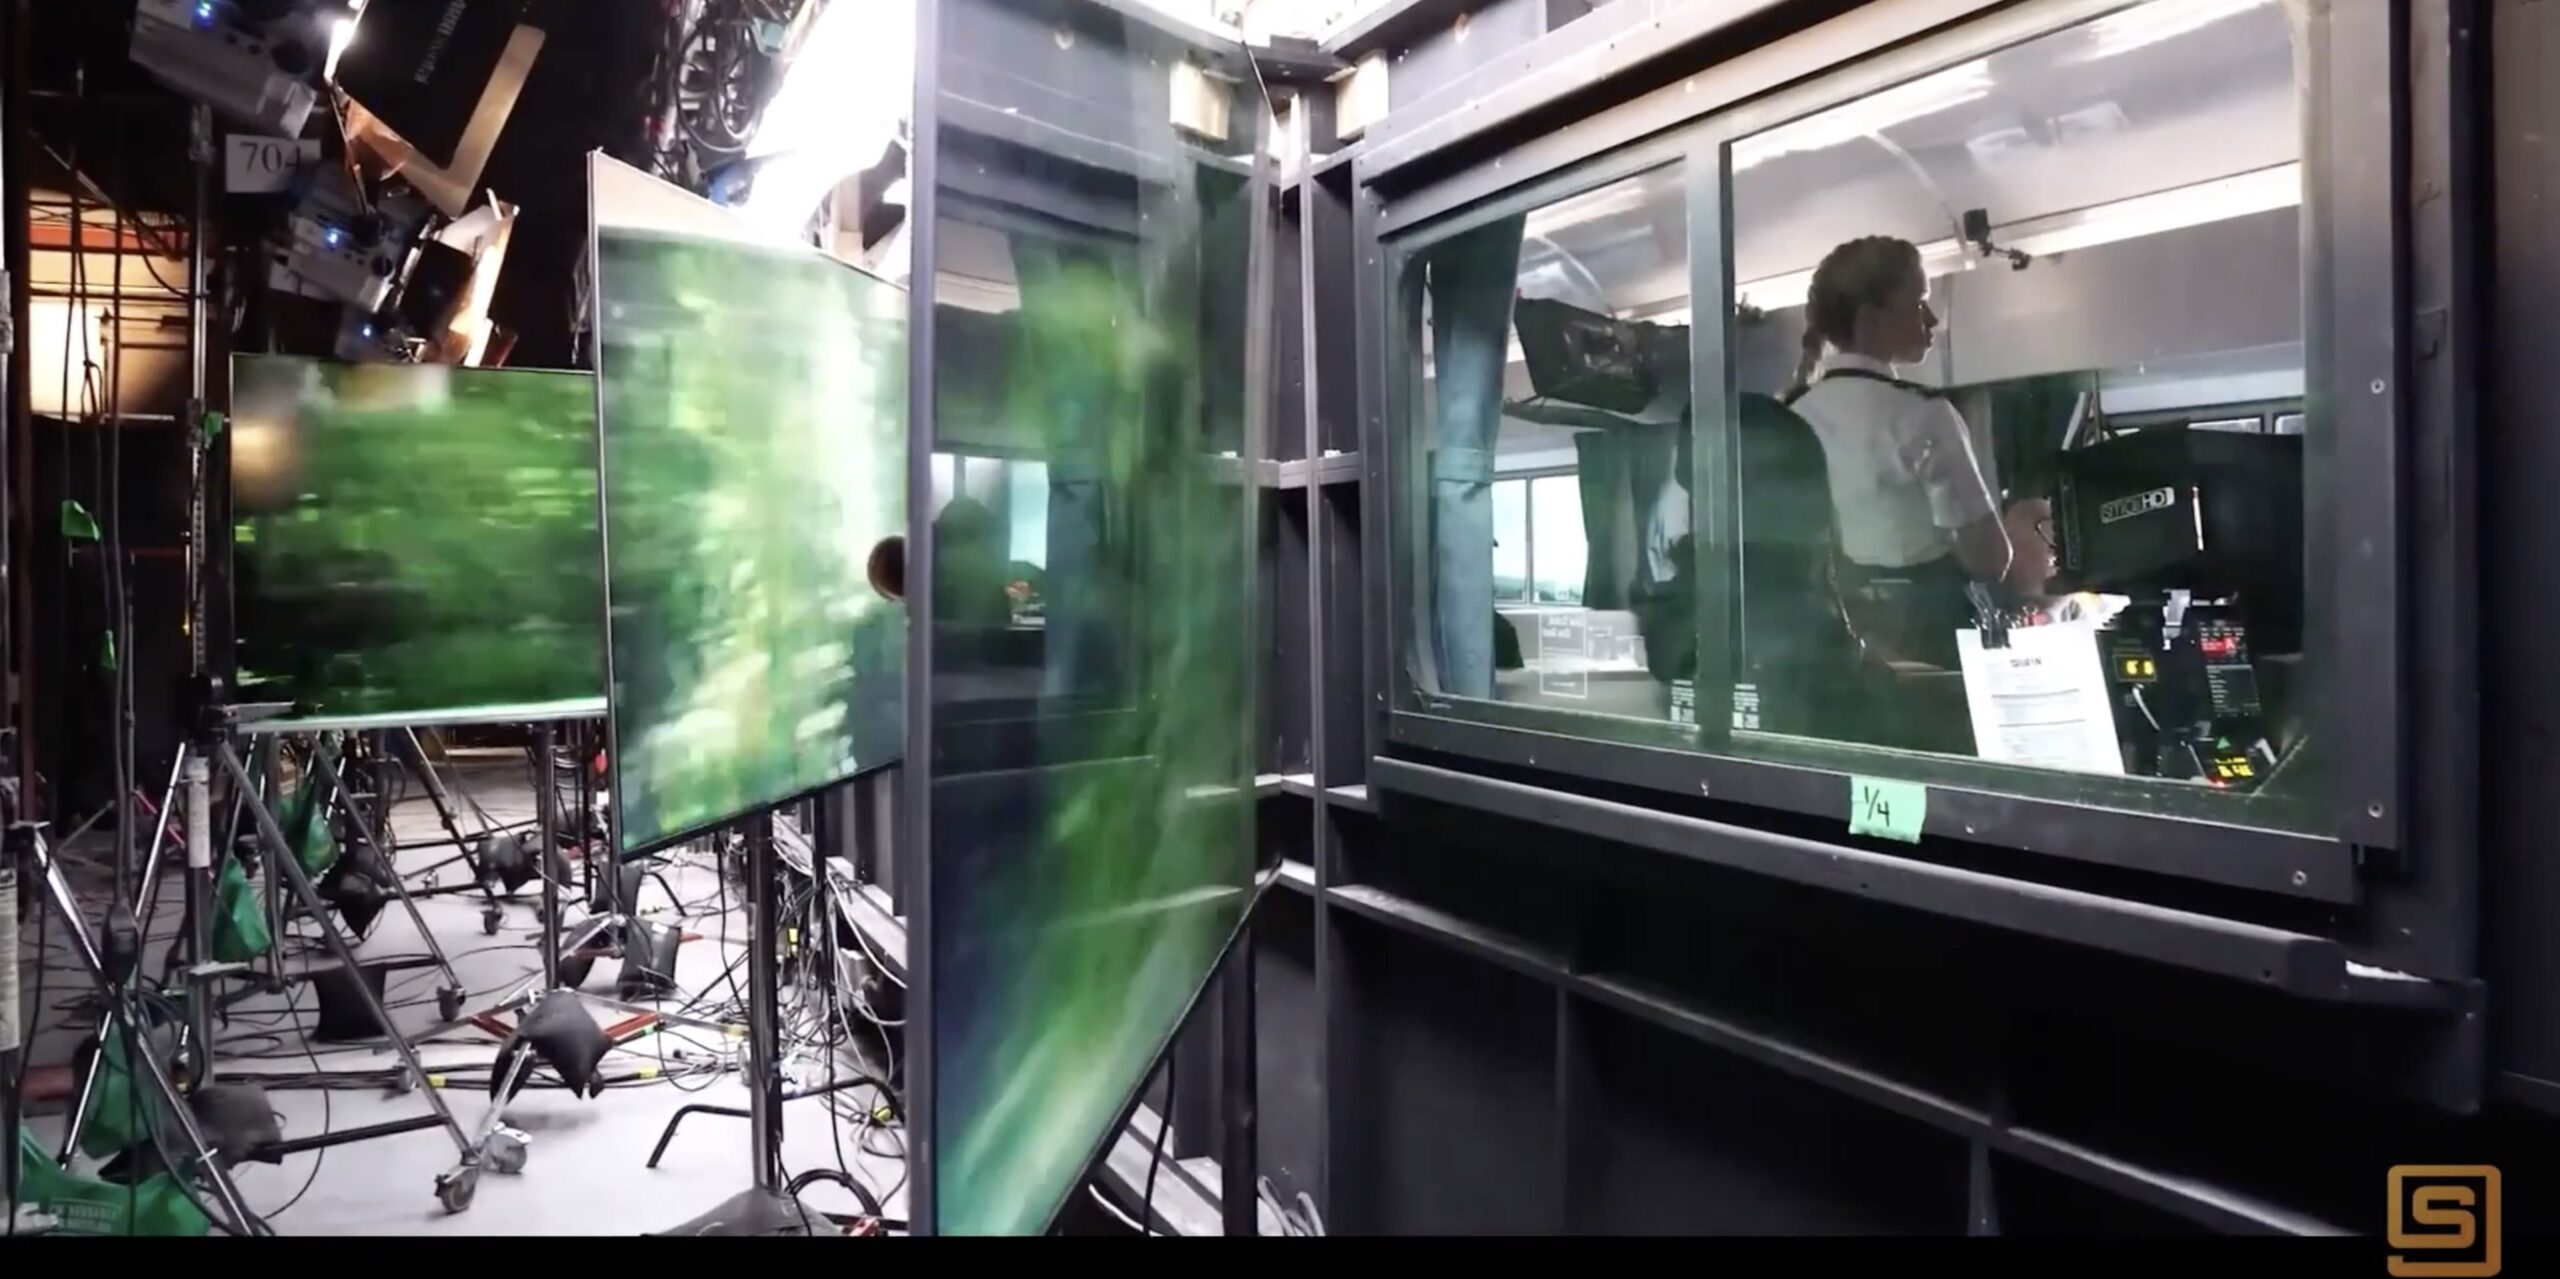
Matt: (03:52) I would agree and I’ve seen a lot of these cube setups that you’re talking about in demos and even clients have sent us specs and for feedback and the problem with that right angle and the cube as you get into your camera angles starts to actually get off track or offline with the actual light coming from the wall. And so you have issues like color shift that you have to deal with because you’re much less perpendicular to the actual wall itself. So generally a rounded wall is better and it doesn’t have to be a consistent angle, but typically we suggest having more of a rounded wall than, than a right angle, for sure.
Mike: (04:38) Let’s just deep dive on that straight out of the gate. So there are two things there, firstly, you don’t want to get too rounded or you’re going to get crosstalk from the LEDs, right.
Matt: (04:48) That’s right. That’s right. So you have to be mindful of the angle between the LEDs. So then you’re not getting light, that’s actually carrying over, like you said, the crosstalk on adjacent LEDs. So that is an issue. So you can’t get too aggressive with that angle. A sound is also an issue. If you have one continuous angle all the way through then, uh, especially if you’re building more of a, a 270-degree volume, – sound is something certainly be mindful of.
Mike: (05:19) Yes they’re hard surfaces…it bounces, it’s not how you would design a soundstage!
Matt: (05:22) No, it’s actually the opposite of how you design a soundstage. And so we’ve actually been talking to some ‘acousticians’, which is a new word for me, but they are acoustic engineers and this is what they do for a living. And we asked them, “Hey, what would you do if you had to build something like this?” And they first laughed cause they looked at what we were dealing with which is a hard surface cylinder, with all the sound bouncing towards the center and this massive echo – they just couldn’t believe we were shooting in this, but you know, we, of course, …., I worked on the Mandalorian season one and anyone in this kind of environment is dealing with these issues, so you use all the normal production tricks of flags and other set objects. Anything you can to break up the sound. But their idea was interesting. They came up with a suggestion to alter the angle of the arc throughout the space. So the sound wasn’t all being directed back towards the center was actually throwing it in different places,
Mike: (06:27) Right?! A lens you want exactly the same curvature to focus it at a point; – you’re saying let’s make a wonky lens. So it never focuses
Matt: (06:34) Exactly. You want that sound to be dispersed across the whole environment, not in one single place or that echo, that bounce and so that’s what we’re looking at and suggesting to our clients for future builds.
Mike: (06:50) The other thing that you said there earlier was, uh, you know, having a sharp corner because you’ve got a box just to, um, explain that a bit further. People don’t know, depending on the LEDs, you’re getting the actual LEDs, aren’t all at the same flat kind of space. So if you were to cut a led and going like, so you’re about two inches off it, they wouldn’t all be exactly the same height, which means if I’m on, a very obtuse angle – like I’m glancing down the wall, it can actually look kind of pink. I’m thinking about the demo one at SSIGGRAPH. When I was there, of course, it looked completely normal. I went up the back and took some photos. I was at about the same height as the, uh, the ceiling panels and in my photos, it was coming out red. And I’m like, is that some kind of weird frequency thing? And of course, what I realized is that the red LEDs were poking out just a little bit more. And so when I got in a glancing angle, it was kind of pink. Now, if I was underneath it or literally the people that were standing underneath it in my photo were completely illuminated normally because they are getting the straight light coming down from above, and it’s even. It’s just that to the camera, seeing it at a glancing angle, it started to go funky right?
Matt: (07:58) Right And that actually it is dictated also by how you orientation the LEDs. So it’s going to have a larger color shift, either left to right or top to bottom, typically it’s oriented so that the color shift is more top to bottom. So your Red, Green and Blue actually are stacked vertically. So when you look at it left to right, you get a more consistent color, even at those sharper angles, but you’re right at some point, there’s the initial angle so that the LEDs is going to die in terms of how much you can actually throw at the camera at a certain angle, but it will also start shifting. And so that’s why this right angle can be, .. In camera, – if it’s just for lighting and reflections off to the side, that’s one thing, but if you’re trying to do a sweeping pan or a large tracking shot from one, one surface to a perpendicular surface, all in one continuous go, then that’s a pretty big ask!
Mike: (08:57) The other thing that people were asking was, you know, like what is the cost of stuff? Well, it’s very hard to get to the cost, but I think the first thing you would say is it really depends on the quality of the LEDs. And to that, – I think you’d probably agree – 2.8 is kind of a standard pitch that most people are working to on these days?
Matt: (09:17) It is probably the most common right now, I would say, for mid to high-end productions. Yeah. 2.8.
Mike: (09:24) What is the best you’ve seen and how sort of far away is that from being standard?
Matt: (09:29) Well, that’s an interesting question. What best is because we’re seeing more LED panels that have a smaller pixel pitch, you know, down in 1.5, 1.7 range, and that nature. But the other factor you have to consider is brightness, color shift, reliability, and consistency across all LEDs. So what we’re seeing is some manufacturers, not all of them, but some of them are pushing to get more LEDs on a panel, which means a smaller pitch, but at the expense of these other things like brightness, especially, and like color consistent.
Mike: (10:08) I would’ve thought color consistency was a bigger problem than light levels? Because I would’ve thought light levels – its not like you’re pumping those screens normally, at a 100% hundred max?
Matt: (10:20) Well, That is another interesting question. Some of these panels have a max brightness of say five, six, 700 nits, while others go up two to three times that. So there is quite a variety of the actual brightness of these panels. And that’s another factor that you really have to consider.
Mike: (10:41) The reason I said color consistency is because I have used LED obviously with LED lighting panels and I learned pretty early on that LEDs are not all the same. And in fact, they’re very much not all the same. So two things for those who are listening (to this). There are literally companies who make LEDs and they have bins – quality bins. Like ‘these are the really good ones’ and ‘these are the not so good’. And ‘these are the ones that are kind of a bit off-spec’. And the theory is if you buy a cheaper screen, it looks pretty good to your eye because what they’ve done is they’ve used a bunch of ones that aren’t in the best, but they figured that it will average out, like there will be some good ones, some bad ones, some up, some down and you’ll get an ‘even’ color out of it, the really good manufacturers, -and I’m thinking now, like the high end brands you’d know, are spending more money to buy the more accurate LEDs. So that’s a really big point. And then the second point is, and maybe you can talk to this Matt,.. if you do a frequency response of LEDs, there are kind of spikes and troughs in a spectrum of light that’s coming off and, and how those spectral spikes affect human skin tones is an incredibly key difference to say tungsten, right? It’s a very different spectral analysis. And so we really are talking about to your eye, it may look okay, but you’re actually going to get changes in skin tone that you may not be wanting – if you’re buying kind of cheaper cheerier LED panel
Matt: (12:08) Absolutely. And you hit on a lot of good points there, Mike, and the other thing is the consistency across we’ll be touched on that and how they’re mixed in certain batch, at least with some, some manufacturers. And that’s where calibration becomes a real challenge too. Because if you, if you think about it, you have all this variation across individual LEDs on a single panel that you have to account for, and the LED processor companies realize, okay, if we’re trying to output a certain amount of light from this panel, we have to look at the whole thing. We can’t just assume they’re all gonna be admitting the same amount of the same color. So we have to calibrate things down to the individual LED. So it’s actually a really painstaking process to ensure that they can provide consistent color and brightness across those different types of panels. So you’re kind of working with the least common denominator in the batch if you want that consistency. So, if the blacks don’t hold up or the brightness, isn’t the same on others, you have to work within what they can all do across a panel in terms of calibration. If you want to have consistency for the whole, otherwise you start to start to get into noise. I’m sorry?..
Mike: (13:27) How do you calibrate? So like when you walk onto a Mandalorian type stage, like a high-end, decent quality stage, – what is the calibration?
Matt: (13:36) Well, that usually comes with the processors. So there’s a couple of new techniques that the special cameras that the companies have, the processor companies in particular and it’s, it can take 10 minutes for a single panel sometimes to actually calibrate. I haven’t done it myself. We usually work with folks like Brompton and others to actually do the calibration, but it’s a very detailed spectral illuminance analysis of each individual LED, under every possible setting to determine what they can actually produce. And then the calibration process again dictates what the consistent light and luminance and spectral values are for a given signal and that’s the end result. And that’s really the challenge, and then what you’re talking about, thousands of panels on top of that, that you have to calibrate, um, it’s a pretty significant undertaking. They’re supposed to come out calibrated from the factory, but these processes are companies are saying, no, actually we need to do it again. Cause that’s really just kind of an estimate.
Mike: (14:52) When your building the stage, we need to know where a panel is relative to the camera. Right? And we often talk about tracking, like ‘where’s the camera in the volume?’. And that’s, I think, well-understood tech by most people, – that you can do camera tracking, – but I actually need to know where the screens are. And I know in broadcast in particular companies like Disguise use their Omnical to do a spatial mapping and actually do structured light to try to work out. What’s what, but like, what is the process of actually determining? Because you can’t just say, well, I’ve got a 3D model of where the guys were meant to put up the panels, and let’s hope that they put them up there?
Matt: (15:30) Right, right. We use that as an estimate and then you need to do some kind of LIDAR is what we often recommend and possibly photogrammetry. We haven’t done the structured light approach. There are teams that will actually do that, that, – that their job is to integrate led walls. And uh, but to your point, you need to have a highly accurate, 3D version of mesh of the physical structure, not the design of what it will be. That’s a good starting point. Yeah.
Mike: (16:06) Because I mean, obviously in some cases like maybe for a skylight kind of Skydome, you’re not thinking that that’s particularly accurate, but it’s incredibly accurate. But when the camera is moving, if it’s relationship to the virtualized stuff is wrong. If the LEDs are physically not where the camera system thinks they are, that would all not quite line up. Can I ask another question ? While we’re on that tracking thing, is there a particular type of tracking for the camera – getting back to that, that you think in stages is the kind of defacto go-to recommendation for like what you’d set up as the capture volume, … to know where the camera is?
Matt: (16:47) I think it really depends on the condition. For example, the broadcast groups that are doing LED walls and camera tracking and compositing work, as you know, compositing is, has very strict criteria for live compositing. So in that case though, the cameras are very predictable. You know, they’re on these rigs that move around, which slowly they push in, they move out, they track a bit of panning, but they’re not like what you see and some of the hardcore film and TV productions and in those cases,- it is a bit of a mixed bag. I’ve used a lot of the optical tracking systems like the MoCap version, if you will, with integrated IMU (inertial measurement unit). And the reason the IMU is so important is that the optical itself is again, gets you a really good starting point, but it’s prone to a bit of noise and you don’t want to over filter that because that can lead to a little bit of looseness in the camera’s rack and there’s softness and latency. So you don’t want either of those. And so a high grade I’m you, which has a gyro and accelerometer is essential really for any of those systems. It’s not just whether it’s an inside out, where you have a camera mounted on say your Alexa or your Sony with, with reflective dots on the ceiling, – that’s one approach that is reliable, but the problem is you get a physical set in there, grip start coming in with other flags or something else that you didn’t anticipate. And all of a sudden the camera sees about a third of those, right? You have to have a few tools in your belt to accommodate those changing conditions on a production. So for the large volumes, we have often used the, the optical capture, but those have their limitations too. They’re not as pixel accurate just for the nature of the process of something that’s more of an inside out, uh, like a stereo camera rig, or like I mentioned, the ones that are mounted on the camera, looking up at some array of reflective markers and the inside out tracking tends to be more accurate, but also has challenges with consistency and robustness because there’s so many things that can change in the field of view of that camera during production. So really it’s about understanding what you’re shooting. What kind of show is it, or a lot of things changing, how much can you predict where the camera’s going to be and what you have access to in terms of visibility for tracking, once you define those, then the options start to become a bit clearer.
Mike: (19:36) The next related point to that is what it’s the camera ‘seeing’. And the camera is seeing, of course, the people in the set, but they’re also seeing the led screens, which brings us to some questions we had from our Pulse thing. So, Jesse Sperling, Scott Lynch, like a bunch of people send us questions during that. And they were asking, ‘Hey, what about color space?’ or ‘is ACES something that we should be incorporating?’ – and other people are just asking simple questions, like ‘how good is the color reproduction on the screens?’ And ‘do they have enough dynamic range to get final visual effects, shots in camera?’
Matt: (20:12) So to the second question, yes, they do. They certainly are capable of wide gamut and high dynamic range. And so then it’s a matter of getting that content to the screen. And so then if you back up to the actual asset creation process because that’s where it all starts, right. We have the majority of the assets being created now are still typically in an SRGB space or something very comparable. They don’t have to be, but that’s what we’re seeing more often than not now. So the first thing you have to make sure you’re doing is tracking what color space these assets are created, because if you want to convert something else or if you want to work with it in any other form, you have to know any conversion, you have to know what you’re starting with. Right, – so currently in the standard, workload with Unreal, it assumes assets are coming in, in SRGB. It will then convert that to a scene linear. So it actually takes off that display referred curve. So you work in linear. So any edits you’re doing to color,
Mike: (20:15) So any math you’re applying to color change will be linear in Unreal so that the math works properly.
Matt: (20:16) Correct. And because it’s a nightmare, if you try to work with different gamuts at the same time, with all kinds of effects and calculations. And then you have the options, as part of the post-process, to convert and transform that color to some other space and some other encoding, if you want to work in a wider gamut from the start. Currently, that’s the best way to do that. And we have clients that are working in ACEs in, uh, in with our assets. So they’re actually converting that imagery to ACES-CG.

The rest of that workload is the same until you send it to, to whatever display device you’re sending it to. And in this case, we’re talking about LED walls. You then need to transform it again to the color space and coding that the LED processors are looking for. And they have different options as well. You can send REC709 REC 2020 in DCI, …
Mike: (23:07) Yes REC2020, not necessarily the best, but it just seems to be most popular.
Matt: (23:11) It definitely is gaining popularity now because of its wide gamut. No question. And that’s what we’re seeing more often than not with the newer workloads that are being produced. And the folks that are more interested in exploiting wide gamut on the walls, – yeah for sure.
Mike: (23:34) For those that are listening (to this) – just to sort of grasp how complicated this is, even though it sounds incredibly simple: You have the color that it is made in, the color that Unreal is dealing with, – then the color space or the sort of the nature of the range of colors to send to the monitors. Of course, then there’s how that’s displayed by the LEDs. And then how that is perceived by the CMOS chip in the camera? Bearing in mind of course, that all of this – from the camera then gets recorded and handed on down to Post.
Matt: (24:11) Yes. And kind of just to add to that, because that’s a really good point too, is that developing a 3dLUT that emulates what the camera, and what’s coming from the render through the LED processors, through the panels, to the sensor, to a calibrated monitor… If you want to evaluate the content, let’s say you’re in the art department, looking at virtual worlds with the DP and the director production designer. And you want to evaluate these worlds on a monitor in your lab or your art department. Ideally, you have a way to emulate how it’s going to look through the camera, right. Not just here’s what the world looks like. And then when we put a camera on it, it’s going to, we know what it should look like. Well, ideally you want both, right? Here’s the world in its natural state. Here’s what it looks like when you look through the camera so they can evaluate it both ways.
And because that’s where the DPs that gets involved. Of course, now you’re talking about looking through the virtual camera. So when they get on stage, that’s what they expect to see – is the world that looks that way. Right? And so you have to account for that. And then on the day, you want to remove that transform because then the camera and the LED processor, and the wall, or that whole process are going to apply it naturally. So you have to come up with that separate step. If you want to be able to evaluate the content in a way that will ultimately look through the lens.
Mike: (25:48) I mean, the whole principle of ACES is, ‘Hey, my Canon camera is going to have a different kind of perception of color than my ARRI camera’. So I need to sort of normalize everything into one space. – now that’s the math end of it, which I love, but if you’re listening to this and you’re thinking, ‘Whoa, Matt’s lost me a little. Cause he’s like above my pay grade’ (!). Let me just simply say this, Matt, didn’t this transpire on the case that the art department painted some props that were gray, on the Mandalorian set, and that same gray had to be extended into the LED screens because obviously, it was a set extension. And of course, you want the two grades to match. Now that sounds like the most trivial problem in the world, but if you get it wrong you have an art department working at midnight repainting!
Matt: (26:33) It’s not, just grey, it’s dirt, it is everything because you also are. You’re also factoring in the effect of the environment on that physical dirt, on the physical side. And so anytime you’re merging one to the other – it’s a challenge and you never, you never nail it theoretically ahead of time where you load it all in and go, yeah, it’s one to one perfect transition. Can’t tell where one ends and the other one begins. What you do in that case is you hope to be at a point where you’re just fine tuning. It certainly shouldn’t look drastically different by the time all the set lighting comes in and you can’t predict exactly how he’s going to light it anyway, but you can get closest
Mike: (27:19) Yeh a daylight or I’m sorry, I am a tungsten light. Yeah,
Matt: (27:24) That’s right. You bring up a good point. And another tool that we have, that’s critical for this process and that is the color correction regions that you can build very quickly and interactively
Mike: (27:38) Please explain that. Cause I think that is an amazing tool
Matt: (27:41) It’s really the only way that I know of that you could do a seamless blend because of all the variables we’re talking about. All of all the math you have to do upfront to get as close as possible. It’s certainly necessary. But even after that, there’s the subjective tweaking that you do at the very end once the camera is placed and you don’t do it before because things could change. And so you can’t get too, too slick or too ahead of yourself, and start tweaking the content because – first of all, the DP’s going to say ‘what you do in changing my dirt over there?’
But once you frame the shot and everyone sees that transformation, we’ll use the direct example of that physical dirt, sand, and rocks into virtual. Then you can add these color correction regions, and they’re basically cubes that you can transform into rectangles, whatever shape you want. And you place those in the field of view of the camera. And then you can blend that. You can apply that color, through a three cube, the intensity and color values, uh, integrated in with the textures that are in that world. So it’s a 3D change, not a 2D change, which is really important. And then you can also taper that. So it fades off into the rest of your actual virtual sets to get that transition.
Mike: (29:08) I think most people would be familiar with the idea of a Power window from the days of daVinci on a color grade, there’s a power window. Now you’ve got like, ‘power bubbles’? (laughs)
Matt: (29:16) That’s right. Good analogy. Yeah. Right. And sometimes you’re going to need multiple ‘bubbles’ because as the terrain changes in the virtual world relative to the physical, it’s not a consistent relationship necessarily. So you may need to blend those bubbles across each other, throughout that transition area from the physical to the virtual.
Mike: (29:42) Also I want to quickly touch on latency, because I think that’s important. And one of the things that effects latency, …obviously there’s the processing to work out where the camera is. That’s got nothing to do with Unreal or even the scene. It’s just, that’s a frame or two, but once it gets in and obviously Unreal has to do its rendering and we have to get stuff out, – there is network issues. Now I’d just like to get your opinion on this because people are setting up networks and most, I think are NDI, but is that the standard or is that just a stepping stone? I mean, it’s not that NDI, is that particularly old? It’s only been around for a few years, but like trying to get the stuff moved around your internal network off the side of the stage is another one of those places you don’t want to lose a frame or two, do you?
Matt: (30:26) No, certainly not. But honestly, the networking, – personally, I haven’t seen the big hit on networking. It’s been in the rendering and the actual projection, the actual calculations of the interface system and the rendering of the background. And then, then the processing within the led processors and then the wall,
Mike: (30:50) But that I should be aiming at? Like, this is the loop, right? The time it takes for that whole system to update in terms of frames, we’ve got, as I said, a couple of frames here, a couple of frames there, a target number that you’d be wanting to see on a professional stage?
Matt: (31:05) Ideally around six frames at 24fps. Yes, it is fine.
Mike: (31:13) 6 – wow I’m feeling very old fashioned – six? That’s incredible.
Matt: (31:17) Like I said, ideally, but generally what we see is about eight and I think we can shave some, I’m saying the collective, – we, it’s all of us as an industry. And so from what I said, 8 is kind of the standard. What I’m seeing is 7, we got it down to 7 last year on a lot of tests and some shoots that we did. But we still had the camera tracking at two frames. Not because it took that long, but because we were only sampling every 24th of a second. So it was really just a hair over a frame, but because it wasn’t available at that instance, it had to wait for the next one. And so you, you gain almost a whole additional frame on necessarily. So the camera, the tracking could be at 120 FPS and, take six or seven frames at that rate. So it’s just a little bit over a full-frame at 24.
And so since then, in the last year that’s been, uh, that’s been knocked down. I think most tracking systems can do it in a frame. The other area is that the rendering to the wall. So all of these different pieces of the wall that need to be rendered. That’s something we’re working quite a bit on in terms of efficiency, and then resolution, because in the original setup that we had just a bit about this rendering process: we actually had to render the frustum and what the camera sees on every single PC, meaning – let’s say you’ve got this big volume and you’re mapping the background and breaking that background up into a dozen different pieces. And so you have a dozen PCs with high-end Quadro cards on them. Every single one of those PCs had to also render what the camera sees. So you’re rendering a 12 different times for the same image, – so not very efficient, but it worked. But they’re certainly better ways to do it, especially now with some of the new tech that NVIDIA has out. And so we’re doing a lot of R&D with GPU texture sharing now and, and things like mosaic, where you can render one big image very efficiently. And so the whole idea there is to not render that same picture, 12 times on 12 different machines, but maybe have one machine with three or four GPS on it. And so you could render one big image for the camera. And then the other background images on other GPU is, and that copy that inner frustum, that inner picture to the other backgrounds, and then send that to the walls and a much faster, much more efficiently than we did in the previous generation.
Mike: (34:21) I mean, you say the previous generation like…
Matt: (34:25)Two years ago, but yeah, (laughs)
Mike: (34:27) Exactly!!!, Now we did get a lot of questions from people and I’m not ignoring them, – about cost, but I think we’ve already established that it’s very variable depending on, you know, what you’re using it for, how big it is. For example, there’s a lot of costs even in the cost of hanging the LEDs overhead. LEDs are a significant factor because you’ve got a big space. That’s a big ask – to not have any pylons or anything holding up the LEDs from below. So we probably can’t give anyone actual numbers. But what I would like to ask you about in terms of budgets, more like ‘opportunities’ for addressing this (the budget). And one of the ones that I thought was interesting, somebody, Dave Smith, asked us how much of this could I use the Cloud for? Is there any use of this? Can we use the cloud circling back of that latency discussion? I think it is a responsible thing to ask…
Matt: (35:21) Yeah, for sure. Certainly, the cloud is great for pre-production designing assets, collaborating with different teams, especially in the situation we’re in now, where we typically can’t be together. It’s wonderful for scouting, even where there that there’s an interactive component to the live camera and set scouting and that type of thing in Tech checks and such, – and for posts, – same thing, evaluating the content and posts evaluating the edit. We all know the cloud is really good for that kind of stuff. Once you get into production, at least what we’re talking about, where it’s live in-camera content, it’s not ideal. We’re not there yet. We want every millisecond we can get to make sure that that content gets to screen as soon as possible. So I know there’s a lot of interest in that and we’ve been approached by a few big companies that want to explore that, but, yeah, I mean, we just talked about latency and we’re lucky…
Just back to latency for one second, the way this approach that we use, and it just the nature of the process really with the LED wall and the way it’s done, as opposed to a composite, – we kind of get away with a little bit with the nature of this process in that we render a larger area than what the camera can actually see: intentionally. So if there is a bit of latency between what the physical camera is doing and what the virtual camera thinks is happening, we have that buffer zone. So that the perspective is correct from the virtual camera, even though it hasn’t, it might be slightly behind that physical camera with certain moves. And that’s something that with compositing, it just adds more frame delay, right? If you, if you’re doing a comp and you have a greenscreen, and you’re projecting a virtual image on the somewhere in that are covering the green, and you have all this latency in this process, well, there’s going to be a longer and longer time before the camera operator can see the result of that comp because you have to wait until that’s done before you can send it back to the operator. And that’s no good, you know, especially if they have a handheld move or Steadicam where they’re really dependent on seeing that feedback interactively.
Mike (37:47) Yeah. If you’re listening and you’re sort of a little confused as to why this latency is so important, that’s a great example, Matt, like I put, I put a square up just behind your head – because I want to get greenscreen of your hair. And if that square wasn’t, as you say a bit outside, what I need and the camera operator quickly pans to the right, it might be that he goes off the green before the green has a chance to move with his camera. And another way of thinking that is it feels like a bit spongy, right? Like, you know, I would stop. And then a second later, of course, not a second or two, but anyway, the second or later it would all catch me up and it would stop. And so the less, that is a perceivable amount, the better off we are, but yes, having a little bit of, um, a little bit of up your sleeve, so a bit of extra, but quite frankly, like how many times do we not do that with everything else? Right. We always have a bit extra in case we want to reframe or something. So that’s, that’s pretty reasonable.
Hey, the other thing that people ask about in terms of costs, we might be able to give some guide on is like, what are the main costs? Um, just sort of percentage more than numbers. And I’m thinking obviously crew is, is vital and probably the actors, the above the line cost. The biggest thing of all. – But leaving that aside, If I’m using one of these sets we have been talking about, – a typical set we’ve been talking about – it’s got a 2.8 (pitch) It’s not in any way a peculiar thing… and it is, say, 5m x 10 m and done sensibly,..where am I sort of going to see most of the costs being dropped?
Matt: (39:19) Definitely the panels for sure, and the processors to some degree, + the graphics cards, although, like I mentioned, we’re doing a lot of work to minimize the hit in the wallet on the graphics side. But it’s head and shoulders: the panels for sure. Yeah.
Mike: (39:38) So before I leave this, if there was somewhere that people wanted to go, let’s say they’d love to learn more about this? This is fascinating, where, on Epic site, is there a place that somebody can go or is there something that we can help people with in terms of following up on in some way?
Matt: (39:55) Yes, we created a pipeline document for this process in-camera VFX reference pipeline on our docs page. So docs.unrealengine.com has this information. There’s also a link to, …you mentioned hardware. There’s also a link in our reference pipeline document. Now, if you just go to the new releases for 4.25, you’ll see this information inside the reference pipeline document, there’s a link to a recommended hardware for computers, for switchers, network gear, basically, all the bits and pieces required to put this together and different levels of equipment. Different levels in terms of complexity and, resolution for graphics cards and such so that you don’t have to just use the high-end. If you’re testing, if you’re just at home, you want to figure this out. There are different options there. So we try to assemble all of that into a document for users, whether you’re at home, just working on this or you’re trying to do the next big movie.
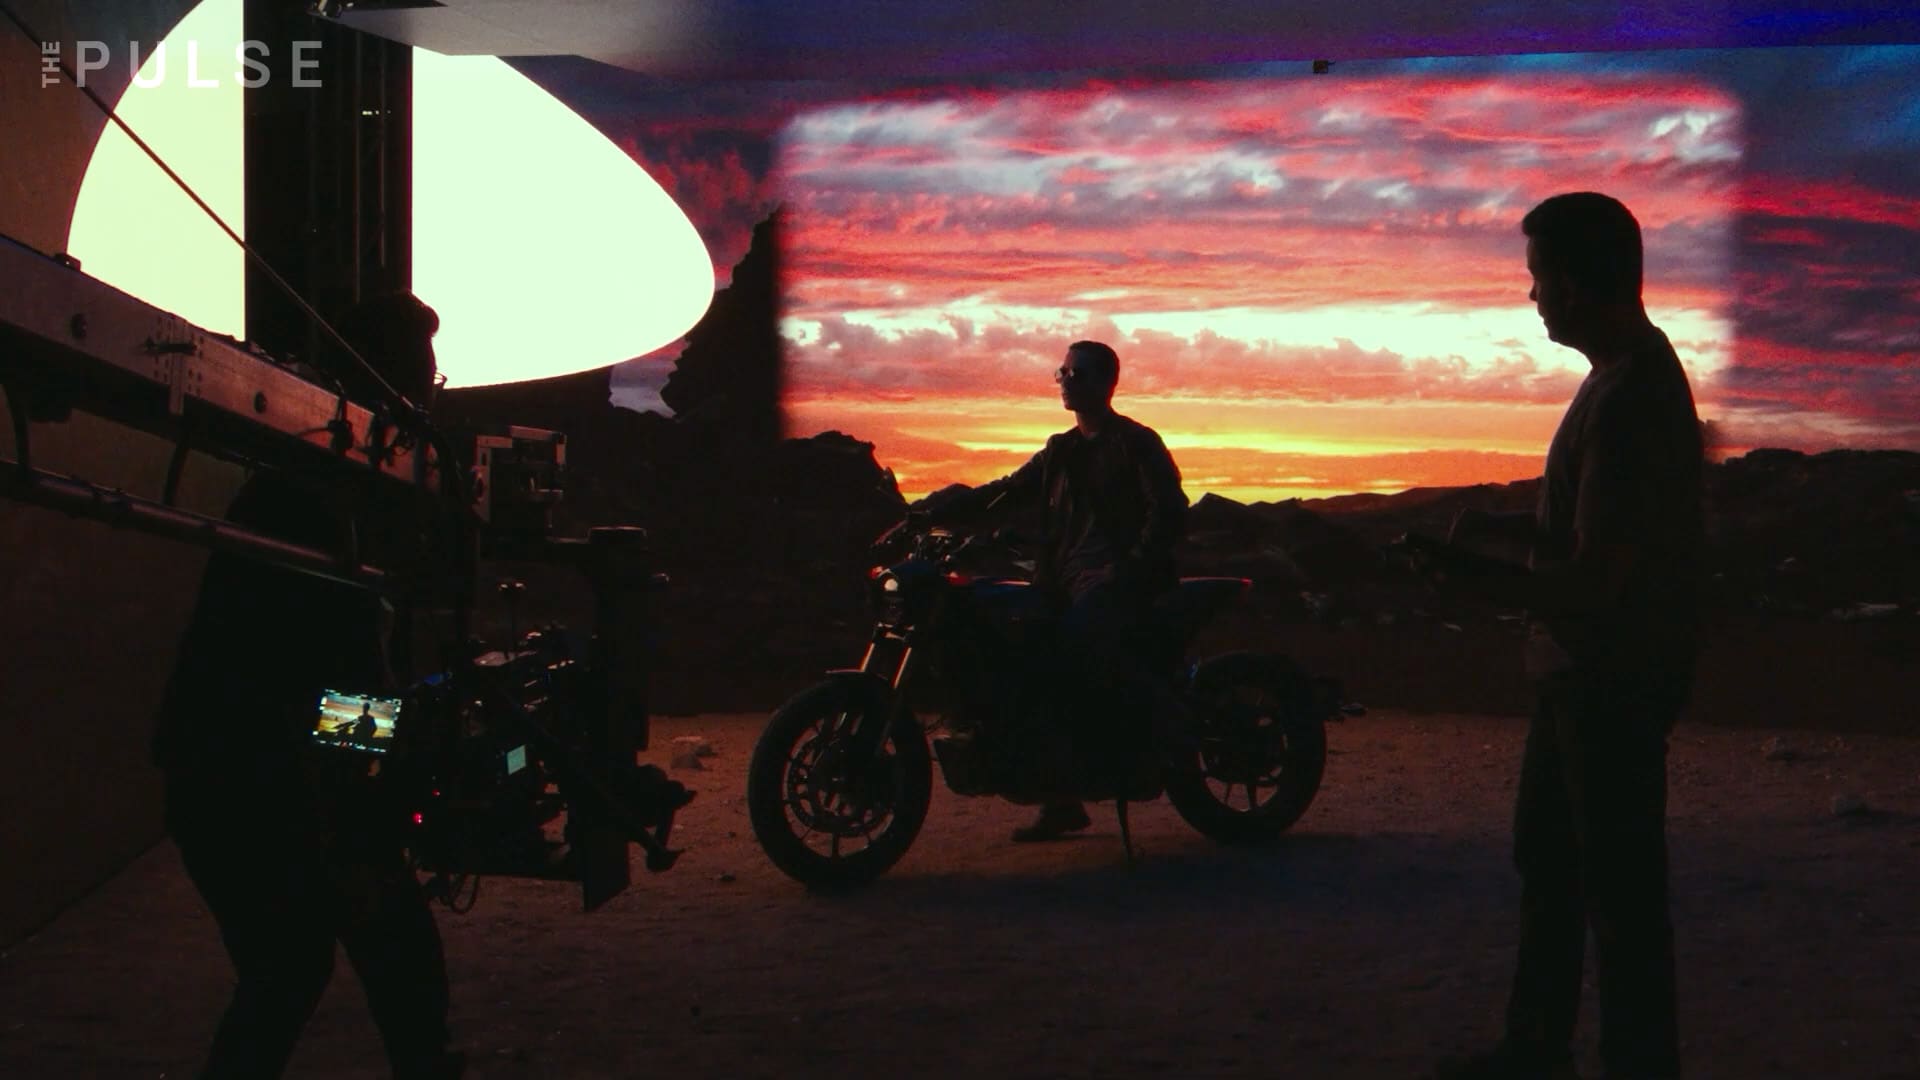
Mike: (41:09) The other question that a couple of people had was about VR. We’ve been discussing LED walls. Maybe you could just discuss that cause it’s kind of like a, if you had a Venn diagram, they overlap like at the SIGGRAPH, launch where we had the setup, the cube, and it was the motorbike with Matt Workman. It was great, – but to the side was also a whole VR overlay on that so that people could scout, I don’t want to spend too long on it. Just give us a bit of a handle. Because we don’t want to imply that the only virtual production is LED sets.
Matt: (41:40) That’s right. Yeah. So when you build interactive content, there are lots of ways you can use it, right? You could have full CG content. It doesn’t have to be with live-action. Obviously, the VR aspect is a really useful tool when you’re trying to design your world. You can immerse yourself in that world. You can work interactively with others and build that world, get feedback on the fly. And we spent a lot of time integrating, our multi-user tools and communication process so that when you change something in VR, it’s updating other machines or other users in that same world. Uh, we also have the Vive tracker now with full, LiveLink support. So again, if you want to set up a small system at home, whether it’s tracking for VR or just, you want to put it on a camera and, and look on the monitor and create camera moves, you have a way to track at home without, you know, the big Hollywood budget prices. Matt: (42:42)So we’re trying to, and in fact, our, our staff is doing that quite a bit with the code situation. We have a lot of us have our own home studios, if you will, because we have to keep testing. We have to keep breaking things and trying to fix them and sharing results. So when we get on our zoom calls, you often see people with all kinds of gear in the background with these home studios. And so that’s a big part of our process too, – to think about what we can do? Because we don’t want to build 30 studios that, with some ungodly amount of money on each (!) And so we’re all looking for ways to do this more cost-effectively, whether we’re testing or, or designing, uh, or just collaborating on something. So, yeah, we’re working on integrating hardware at all levels for every type of user.
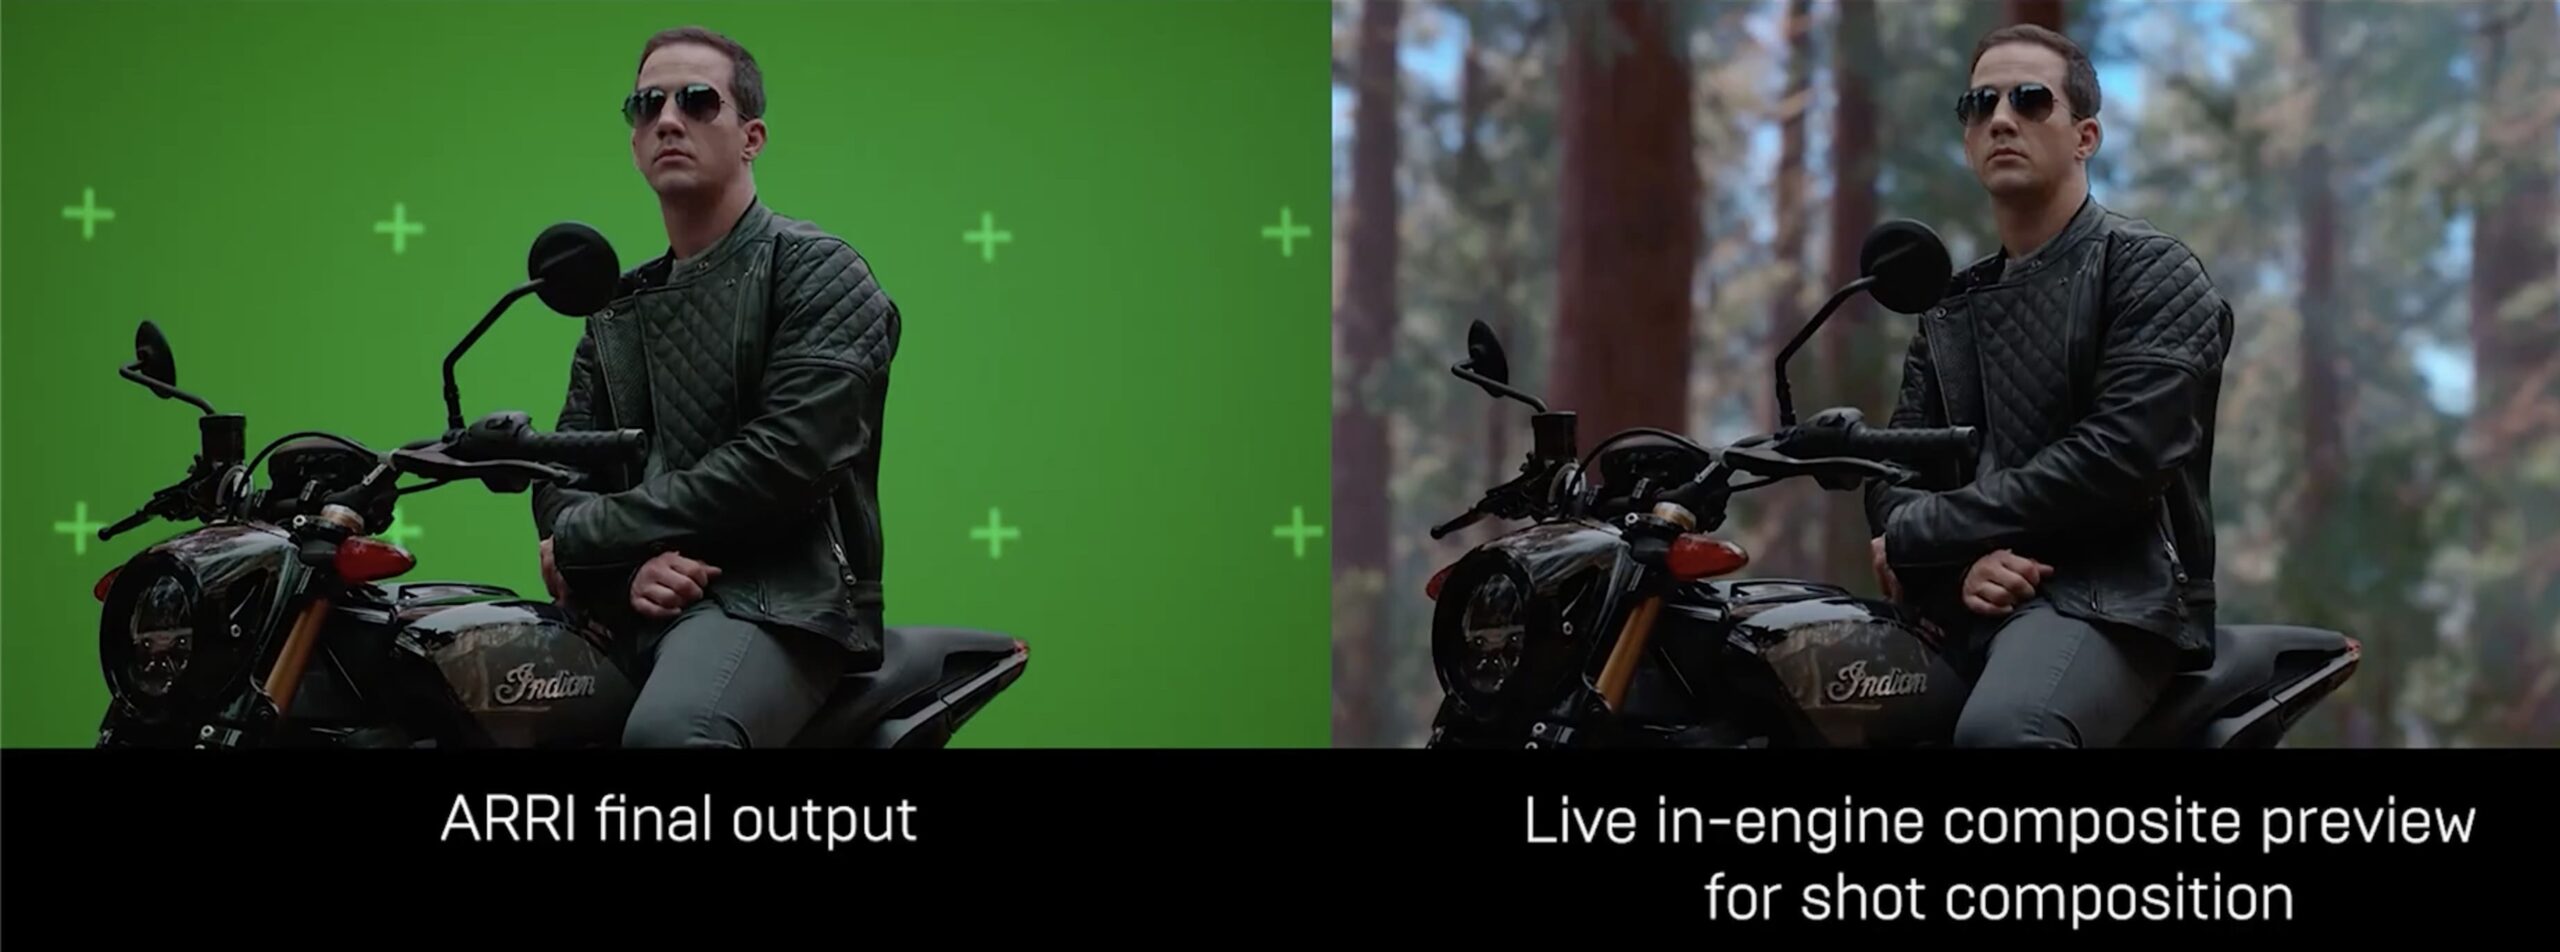
Mike: (43:37) Build out from that. So there are some questions by Cameron Smith and just a bunch of other people about greenscreen into UE4, because clearly one of the things I could do is just have a green screen, a virtual environment, and I could just be placing my person in that. Is there any sort of tips you could give in terms of virtual production, like for how to do that, are we better trying to have some external keyer that’s providing a key signal that we’d better keying it at inside Unreal. Just give me some idea about how I would go about doing that, where I’m no longer that concerned about the LED side of things. I’m just thinking, ‘Hey, I can do a green screen and I can do a virtual world?’
Matt: (44:15) Right Well you can use composure to pull a key. So if you have a video card like a KONA5, card, for example, Blackmagic has lots of cards too, that are different cards we could use. And actually, all that is referenced on our hardware side, the cards that we typically recommend. But absolutely you can use either one, whether you do the keying outside in artwork composite, or there’s certainly nothing wrong with that, but if you want to have it all at one system, you can use composure, which is part of Unreal engine to do the actual composite.
Mike: (44:54) In terms of that workflow, that’s been really like the sort of precursor to the LEDs. Like before we were talking about LED screens, there were lots of companies doing really good work with virtual sets, and virtual environments. And I would say in terms of the questions that we’ve been asked, ‘how do I get into this?’ I think that’s one of the easiest ways to get into this. You can learn a lot from doing virtual production of a green screen environment, -, way before you need to be worrying about LED screens, if you’re a relatively new user.
Matt: (45:26) Absolutely and all the traditional filmmaking, processes and tools are still valid in a sense. I mean, you have to understand if you want to be involved in virtual production, you mentioned getting started. If you know about cameras, if you understand lenses, if you understand video signals and those are all still super important to this process, if you understand a timecode, if you’re more of an engineer, if you understand computer graphics and real-time rendering. So virtual production is really a combination of all those different things. It’s not its own thing. That’s separate. It’s really all of those things combined. It’s interactive graphics, it’s filmmaking, it’s engineering, it’s artistry. And that’s, what’s really exciting about it, but there’s no virtual production class where you go to quote-unquote, learn all this stuff. It’s really understanding the foundation of these different pieces. And once you have that experience and knowledge base, then you can apply it to this type of production.
Mike: (46:32) So to that end, I guess people have seen the Unreal engine UE5 demo. I’m not going to go into the details of UE 5, but is there a rule of thumb of like, how much do you feel this is going to be thrown out the window and I’m going to have to start over again? Or is a lot of this is going to be relevant? (laughs) Well, you laugh, but I mean…
Matt: (46:52) No, – I know that’s the thing about technology, right? You do this cool stuff and that’s a factor is you have user base and you don’t want to have to tell them you’re starting from scratch, right? And that’s not the case with UE5, – the big thing that’s different there, is really, the storage in terms of speed and capacity because the process which content is getting to the GPU is a little bit different. But it’s not, …I’ll say that the bulk of the hardware you have now is still going to be quite useful. Certainly, the graphics cards, memory, motherboards, that type of thing, but storage, high-speed storage, is really the main area that is being leveraging far and away more than anything else. And so if you have a system that maybe needs a bit more of that, or you have a motherboard that doesn’t support the NBMe SSDs, something like that, …then you might need to invest in a new machine, but you could take the graphics card out and put it in the new machine. So you wouldn’t necessarily be starting from scratch.
Mike: (48:07) A couple of specific questions to that end. If I’m doing something like a green screen, placing someone in an environment, the question is, ‘how much do you personally, – just Matt’s opinion – think that we are matching real camera’s motion, blur, and depth of field, with what’s happening in UE4 for at the moment?’ So I’m not talking about your UE5 right now. I’m just talking about at the moment, if I’m doing virtual production, do you feel like those blurs and motion blurs as well as obviously the practically focus ones, -are matching for your eye?
Matt: (48:35) If we were doing a green screen, is that what you mean? Yeah. To an extent it takes some noodling, you know, there’s kind of going back to what we were talking about before you have the mathematical emulation of what we think is happening with the physical camera. And we apply those variables in the computer to try and match it. But, I wouldn’t say it’s one-to-one? No. I think, it does take a bit of fudging and the way the motion blur, for example, there’s the object blur the way that engines work is there’s a blur generated from a moving object and the blur generated from movie camera. And you would think, ‘Oh, well, that’s kind of the same thing’. ‘Whether the camera’s moving or an object’s moving, it’s just, it takes a picture and whatever’s moving during the exposure?!’, – that’s your blur. And in a sense, that’s correct – in the real world, but in the graphics world, they’re handled a little bit differently. And it’s, it’s something that we are working to have more control over,.. to match the physical world. Because there are so many variables in the camera, the type of shutter, the exposure time, the lenses, all those things affect the blur. And we’re not emulating it to that level of detail.
Mike: (49:59) Yeah and also from a VFX point of view, you know, if I’m doing rack defocus, if I get a really shallow depth of field, like it’s 120 mm lens, and I’ve got lights behind that turn into those sort of ovals, you know, the number of blades on the actual physical aperture of a lens will affect what the bokeh looks like. So these things are not like a blur, is a blur is a blur.
But I am doing the exact thing I was going to not do, which is I’m hitting this from a VFX point of view. And the next question I want to ask you actually came from somebody that said, ‘Hey, you guys are kind of asking all these questions about VFX artists and lighting, artists learning this stuff. What about a games person? How easy do you think it is from a game developer to enter virtual production? And is that something that, you know, you’d recommend or is it too steeper a learning curve?’
Matt: (50:49) Oh, not at all. Game developers are more than welcome. In fact, there are ideal for this workflow because they understand interactive graphics. And that’s one of the steeper curves in this process coming from a more traditional VFX background, how real-time renders work, that is different from traditional rendering and the demands of a real-time render that are quite different. And so if you understand how to build great real-time assets, there’s a, there’s a job for you in virtual production. I assure you. So understanding filmmaking, sure, you need to learn that, – you need to understand how this process differs from game development. And it’s funny, we have that within Epic. We have people from, of course, we’d have hundreds of people from a gaming background, obviously, – but now, we have more and more people like myself coming from the film world and to see these two worlds come together, it’s really interesting because we will be in conversations on both sides where once I think they’re talking about something that’s very obvious and very intuitive and we’re deep into it. And someone raised their hand says, ‘hold on a second. You know, what does that phrase mean? What are you talking about there?’ or ‘I don’t quite get that and vice versa’. So it’s really interesting to see this coming together and it’s happening all over the world as we go down this road together. But absolutely there is a demand, I would say, a need for professionals from the game world to come into virtual production. And I think the best teams will have combinations of both people from both backgrounds.
Mike: (52:37) Yeah. I was talking to a friend, Ben Grossman, I’m sure that might be mentioning this from Magopus and he was just totally embracing that concept. Like you need both, right? You don’t win with a bunch of film people sitting around trying to learn stuff that is intuitive to a game developer. And similarly as a language for a film director that again, developer might need to learn. Yeah, it’s an approach, you know, because of background, obviously I think the example we always go is, you know, if I’m doing a shot in film, I ‘dress’ to the lens. I don’t care about the mathematical continuity. I just care that it looks good. But a game developer tends to build a world. So you can go anywhere in the world and you don’t think to move the table up off the floor and hover it three inches above just because I’m at this particular camera, whereas a film guy will be like, yeah, we’ll just, you know, totally lift that table and stick some wooden blocks under it.
Matt: (53:32) That’s so true. And that, that’s one of the biggest transformations of this process is this idea of world-building, because it can be done so efficiently and that’s not to say you have to create the entire world to final, but you can get very far along ,…pretty quickly as opposed to just saying ‘I’m going to do just a section of it’. It’s amazing when you approach it that way, what you get in return. Because I’ve, now that I’ve been immersed in it for a while- to work with people that think that way of building worlds and that, like you said, now I’m going to go lens it, it is really interesting. So what we’re seeing now is this, this collaboration between screenwriter, director, worldbuilder, so that it’s not about the shot, it’s about where we are in these worlds first, to really develop those worlds to the level that they’re needed before they worry about specific camera shots, unless it’s a special case, but generally define the world. The interesting parts of the world, where we could be, is becoming a real process in art direction, production, design, and actual asset building.
Mike: (54:51) So I’ve got two more technical questions, but I do want to sneak in one before we leave this. Because it was a great question that I hadn’t even thought of – about this idea of roles and backgrounds and somebody said we don’t discuss the role of the producer very much? How do you feel the role of a producer is different with a virtual production? Because where we’ve discussed directors, we discussed lighting, you know, fair enough too, but producers, – it’s quite different than the sort of almost waterfall kind of one after another: pre-production, production, post. How do you find producers adapting?
Matt: (55:29) I think the biggest challenge is, is taking what was traditionally budgets from art department construction and visual effects because now we really, what you’re doing is a bit of both. You’re taking some, some of that labor that was from physical set builds and construction and grips, and all the folks involved in creating physical sets and some of the visual effects that were all created in post,.. and putting all that in production. So I think the challenge has been how much of, where are we actually using from physical production versus visual effects? And that’s the part they get. They, of course they get the budgets, they get the schedules and all of that. But it’s understanding at the end of the day, where Would this have gone? How, how, when I’m, approaching a film, because each department needs their budget. Right? And so giving that up and understanding, working with the director and breaking down the scripts and the visual effects supervisor and producer, that it’s such an important process now, more than ever, when you’re doing a script breakdown to understand, okay, ‘where can we best leverage this technology? And this approach?’, ‘let’s circle these pages in these, in this story that we can get the most bang for our buck’.
And there’s also the concept, now Mike, for the studios or the content holders of repurposing assets. So you start that that’s when their eyes start to light up, is this idea of, and we’ve all been talking about it as an industry forever and a day, but now that the assets can be created as final content in camera and not just a visualization tool, I think the industry is waking up and saying, Hey, these are really worth something. I can take these worlds and I can change the texture. I can change the lighting. I can rotate them around. I can move them out a little bit. And all of a sudden I have a different world. And so now I can build a library of these worlds for my storytellers to choose from. It doesn’t mean they’re all going to be used in the story, but at least to hash out ideas and start brainstorming and kitbashing different scenes together and coming up with concepts very quickly. And I can very well have assets that I can repurpose for the actual show too. That’s really an interesting evolution that we’re seeing now with all of this.
Mike: (58:08) Yeah. I think that also raises two important points. One is just the marvelous world of kitbashing, but the other one is it also from we’re talking about producers at a studio production level, it also really matters about asset management. And we shouldn’t skip over the fact that reuse is as much an asset management database problem as it is an asset retrieval problem, – as it is technically being able to do it. I mean, I’m sure you’re the same, we’ve all been on occasions where someone’s gone: ‘don’t we have a bunch of, …well, they’re on a tape somewhere… or they’re backed up some I can’t… I take me so long to find them. I make them again.”
Matt: (58:46) No question about it. And we’ve all been there many times. And so this is definitely a hot topic inside of Epic and within these studios too, because you’re absolutely right. It really, the value of the assets are really in so much as you can access them intelligently, efficiently and give access to content creators to review them remotely. And, uh, not just in 2D, but actually in 3D. So a lot of work in terms of infrastructure that needs to be done to really facilitate
Mike: (59:22) Key questions to finish on because I want this to be a deep dive. So I’m going to go back -in… so one of them is risk related to this, right? Which is,…so on a modern, like an ARRI camera or something that’s running with i/data on the lenses and stuff. There is metadata streaming now reliably. And we used to be that everything would get transcoded and you’d lose all the metadata. And even though you had this marvelous lending information on set, it was all gone by the time you got to post, I don’t think we’re there now, but how much is Epic and Unreal kind of focused on that kind of ARRI, hardcore metadata or the stuff that are coming out, because obviously if you are embedding metadata with the imagery on set, you’ve got a very reliable source of data. Whereas if I’ve got a secondary file of someone saying, ‘Oh, we were shooting on a 35mm for that shot’. You like, well, if you say so,… but I’m not going to trust you !
Matt: (01:00:15) Yeah. So we’re actually talking to pretty much all of the lens manufacturers that have smart lenses, where we can tap into that metadata on the fly and stream that to a PC, especially if we’re doing any kind of interactive lens distortion for compositing, or if we can use information like data, for example, that’s incredibly useful. Another important part for us is the camera center, or some people call it the nodal shift. So understanding where that real camera center is interactively because we have to match the virtual camera to that and so there is a calibration process to that. But when you pull focus, that center can actually change. It’s not even if you have a prime lens and you’ve calibrated it and match that true camera, that optical center to the physical camera, um, those lenses breathe And so your actual focal length can shift, which means that nodal point will actually shift slightly. And so we have to be able to track that and recreate that on the fly. Now, you mentioned coming out of the cameras, the reason we haven’t used the camera metadata on the day or in real-time today is because it does take a few frames from the image processing and debayer and all that with, especially with these large-format sensors, to come out the SDI tap in the back of the camera, and then we have to send it to a card on our machine to interpret that image and extract that metadata. And that’s just a few extra frames now. There’s other stuff we are doing, the rendering, the tracking and all that business in parallel to the image processing and all of that. But we don’t want to have to wait for that metadata to get to it before we can apply it to the virtual camera lens in real-time. It doesn’t mean we wouldn’t use it in post. Absolutely. But in terms of real-time, we haven’t, use the actual metadata that’s embedded in the imagery today.
Mike: (01:02:33) On that, so this is for my benefit. I swear to God, I have to just… I’ve got you and it’s such a treat, Hey, so my problem is this: I’ve got my lens and I’m focused on you and behind you is an LED wall, right? So the LED wall is out of focus because it’s three meters behind you just to use some math, right. But, what’s on the wall. Isn’t three meters. It’s, you know, another three meters because it’s, you know, virtually further away than the wall. And my problem is this. If I’m focusing on you, the wall goes out of focus by the fact that it’s not at your point, – but by the same token, it should go even more out of focus because it’s another three meters away. But if you just dialed in the six meters, it would be too out of focus. That makes sense because it’s, you know, not allowing for the fact that camera is actually itself providing some defocus. And I don’t know if this is solved or is it that I just don’t know how to do it? But it just seems to me an interesting problem, right? Like the wall gives the illusion that the mountain is miles away, but it’s actually only, you know, 10 meters behind the actor or five metres behind the actor?
Matt: (01:03:38) Right. So there’s this idea of relative depth of field from the projection surface. So the actual LED wall surface of where the contents being projected, like you said, there’s a certain distance that the physical surface, that content is projected from the camera, then you have to know, okay, well, how far is that content in that world? Away from the LED wall in that same world space. So if that mountain is another hundred meters from the wall, then that depth of field should reflect that relative to what the physical camera is doing. Beause you, right, the physical camera is only going to change. What’s projected on the wall. And so that’s, that’s in one space. And so if you’re not doing anything to the content that is supposed to be behind the ball, then that’s technically wrong. Doesn’t mean you can’t get away with a lot of times. So technically that’s incorrect.
We’ve talked about this a lot as you can imagine. And we’re fortunate that so far, in so far as that flaw hasn’t show up, but you’re a 100% correct, : it’s not accurate. And there are cases where it is wrong and you may have to fix it in post, but the way to handle it is to have our relative depth of field adjustment to that plane, to that plane in the world space of your environment and of your physical set. So that in this case, that’s, that’s the LED wall. That’s because that’s what the camera sees. And then you have to understand the distance of what the camera is doing to the imagery in, in that plane and how objects that are projected in that plane should change even more than what the camera’s doing.
Mike: (01:05:34) The reason I use the original example of the three meters plus another three is best illustrated, I guess, by a window, if I’ve got a window like a digital window, and I’m seeing through the window, then clearly the window is three meters behind you. Plus the notional three of virtual space across the mountain scene through that window is notionally, as you said, like a hundred meters back. And yeah, it just seems to me that if things are way off in the distance, you can probably get away with it, because like who can pick it right when you’re getting these things that are just on the edge of depth of field. Because you know, obviously there is no, sharp point of in or out of focus…
Matt: (01:06:12) I think what you’re getting at is that you can, …if the window, let’s just say that window is actually at six feet, if it were physically built, it was the same distance for a second, then that defocus should be the same. If it’s a one to one from where, where it would have been built physically and where it’s actually projected on the LED wall, then that distance is the same. If it’s different, if it’s closer, which you can do, you can actually put content, that’s supposed to be closer. You just have to be careful. I can’t do group too aggressive with that, but you can do it then that technically should be more unfocused. And that’s actually a bigger challenge.
Mike: (01:06:59)Y Laughs Yeah, I dont know how you would do that???
Matt: (01:07:01) That’s getting into deep learning stuff where you’re using, you know, – that’s another kettle of fish, but, what we have found, we’ve been at least in our study and, and based on our collective experience, working on set in this situation is having a tool because no matter what you do mathematically, at some point, the DP doesn’t care and they want to make it look the way they want to make it look good. It looks right. And so if you have a tool that calculates what it should be, that relative depth of field change from the projection on whatever distance that wall is from your foot, from your camera. And that’s another reason, we need the focus system streamlined to figure all this stuff out. Then you have a dial to tune that if they want to hold that focus a bit more blurred, a bit further from what the camera is doing. But starting with the correct mathematical solution so that we can show them, yes, this is what it actually would be doing. And they say, well, that’s great, but I want to do this other thing here. I want to soften this up a bit or whatever.
Mike: (01:08:11) Well, very kind of you to indulge my ‘rat hole’ on focus, but I love that stuff. So my big last question, that was the one I was heading towards technically is… so we may be wonderful and be able to get final pixels in-camera, but we should also acknowledge that there’s going to be a bunch of occasions where it makes sense to take this into post. What’s the attitude at Epic about packaging up information in such a way that post has kind of way to unpackaged, because in a sense, I need continuity of what was in shot, but I need like if I did lift the table up in this shot, I need to know that if that take is used in the next take, we decided we didn’t want the virtual table lifted up. So he put it back down again. And it’s not enough just to give me the scene because that was a shot specific kind of thing. So it’s almost like you need continuity or timecode marks on anything that’s in everything so that I can mix and match. And the guy in post or the woman in post isn’t pulling her hair out or his hair out to reconstruct it?
Matt: (01:09:13) Yeah. It sounds like you’ve been in some of our R&D meetings This is exactly the kind of stuff we’re talking about. We have a new tool coming out in 4.26 called Level Snapshot that is designed to deal with this exact type of thing where you have essentially a delta that’s happening of some sort, you did something just exactly how you described it, – in the moment on the day that may not be a global change that you’re making a scene. In fact, it probably isn’t, it’s something that happened in the moment, that you need to track. And that’s that whole idea is this meta layer on top of your base level that lives with those files so that you can easily apply those to get back to the state of of that. (at this point, it’s still effectively) a take – of course, because we’re in virtual production world and we’re not in shot land yet, but the delivery to the VFX vendor would include that level snapshot with that, that meta information of any transforms, any modifications made to the base level.
Mike: (01:10:21) It seems to me, that that is not only just incredibly helpful to the post people, but you don’t want to slow down on set because you’re going, ‘wait, wait, wait,, if you’re going to do that, I need to take a note of it. Stop for a second.’ I’m going to loose track here’.
Matt: (01:10:32) Yeah, absolutely. And then you’re shooting again and we’re, where was everything last Tuesday? What, what did we do that, you know, that we’re going back to that scene again and, Oh, I got, you know, it’s take four/ scene 26. And so you have that, all of those offsets, that’s your safety net. And again, absolutely critical for posts, but even for production. And, you wanna do a pickup shot. Absolutely. And the way to the degree that we tweak the lighting on set with light cards and flags, and you’ve seen some examples of this, but to those of you that haven’t, in addition to the normal lighting of the virtual world, there’s additional surface lights. If you will, on the LED volume that you can layer. And the point of those is to actually optimize the physical set and actors lighting. It’s really not for the virtual world itself. So you don’t see them in-camera, but they’re, they’re light cards and flags. So you can think of them like just primitive shapes that you can scale. You can change the transparency, you can change the color and the intensity. And they’re used all the time,
Mike: (01:11:46) Yes if I am on top of a real mountain. I might have my camera assistant person, whatever, holding up a piece of Polly and bounce, some extra light into your fill side, just so you don’t look too contrasty. No reason why I have to have somebody on stage doing that. I can just put up a virtual piece of square Polly on the on the wall and Walla : area light.
Matt: (01:12:07) Righ and so you have to track all that too, of course, because that’s what made the actor look the way they did exactly how the DP wanted. So just another reason why it’s so important to have that snapshot.
Mike: (01:12:20)I mean, I we’re running out of time, but I could just talk to you about this stuff forever, but I’m so excited that not only that this has been done, but you know, quite often with these things, you’re like, Oh, I just can’t wait till we finally get our hands on this. Because I could see a few years off, but this changes so quickly you know, that these ideas come up and then as you said, like way back in the day, like
Matt: (01:12:42) Yeah,
Mike: (01:12:43) It’s fast moving you know, some people might find it a curse. I find it a gift that we know that there are things that would be great to happen and we’re not going to have to wait until after I’ve retired before they appear!
Matt: (01:12:56) It is exciting. And it, and it’s a challenge. It’s a lot of fun. It’s a fast-moving train and we’re all on it. And we are also spending a lot of time though, thinking about making sure our, our users, uh, when we put out a new version, new release that they’re not having to do a lot of re-engineering if they make tools in engine and, and, and dedicating more support so that they can make that jump with us from, from one version to the next and are bound to the previous version, just because of the legwork that they’re going to have to do to make that transition. And that’s, that’s the other side of the coin is when things are moving as fast and you really want to take advantage of all the latest and greatest stuff that we want to make sure our users can do that and, and are interested in and helping them in that regard because they do have access to the tools at a low level. It’s not just an application. They get a license to touch a bunch of buttons. They are customizing their arm doing great things with it. So it’s just part of the process and it’s very exciting.

Mike: (01:14:06) I guess I should have said this at the beginning, Matt, but if people are new to virtual production, I totally recommend The Pulse because it was a little less geeky than this and had terrific, input from the whole panel. But having said that, man – I’ve had so much fun talking to you today !
Matt: (01:14:22) So a lot of fun for me too