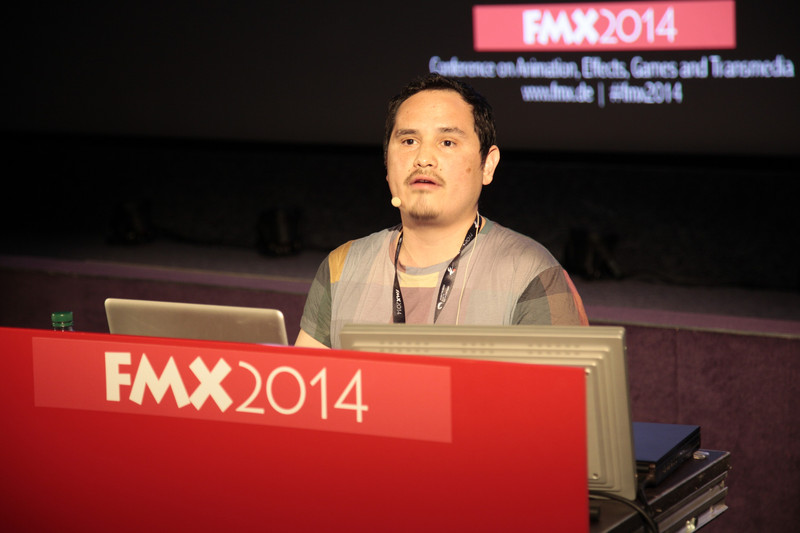
FMX has become one of our favorite conferences over the years, based upon the variety of content available. There is a broad range of sessions, a small trade show floor, as well as a well-represented recruiting area. This is no small conference, with over 3,000 attendees making the journey to Stuttgart. If you have a chance to attend in the future, we highly recommend you do so.
In case you missed it, be sure to check out our other coverage from FMX 2014:
FMX 2014: day one report
FMX 2014: day two report
The variety of sessions we mentioned before is evident in our third recap from FMX. This article includes an overview of a panel discussion on applying animation pipelines to vfx, as well as sessions covering the Arnold Renderer, Shotgun, Rush, and work by Paul Debevec’s research team at ICT.
When VFX Met Animation
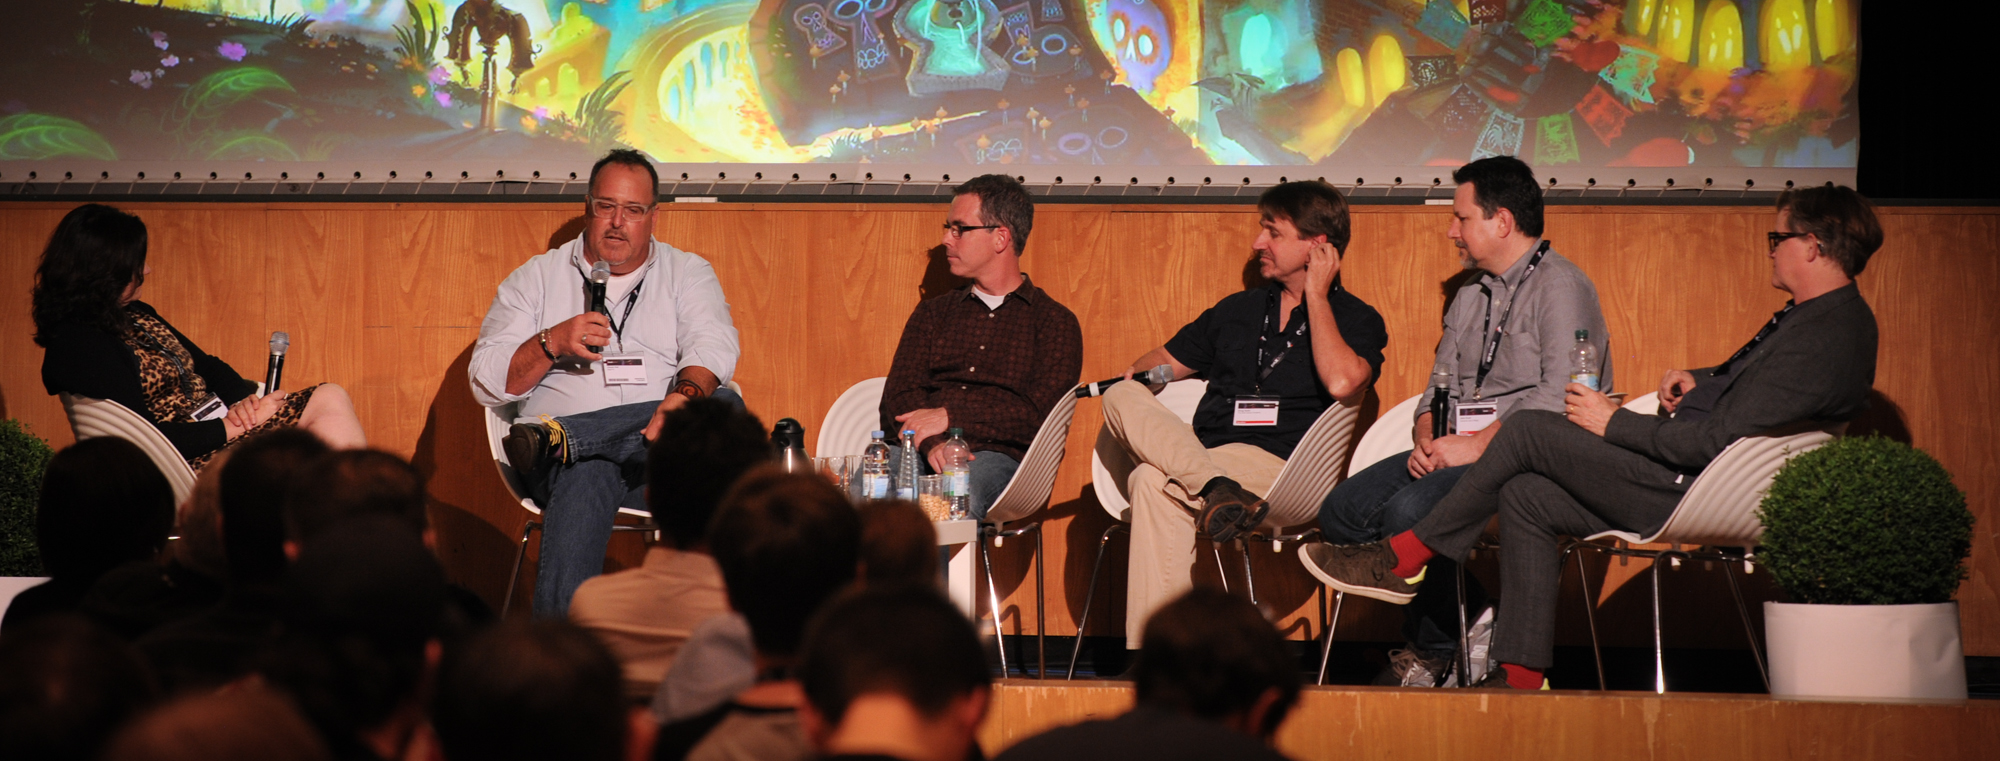
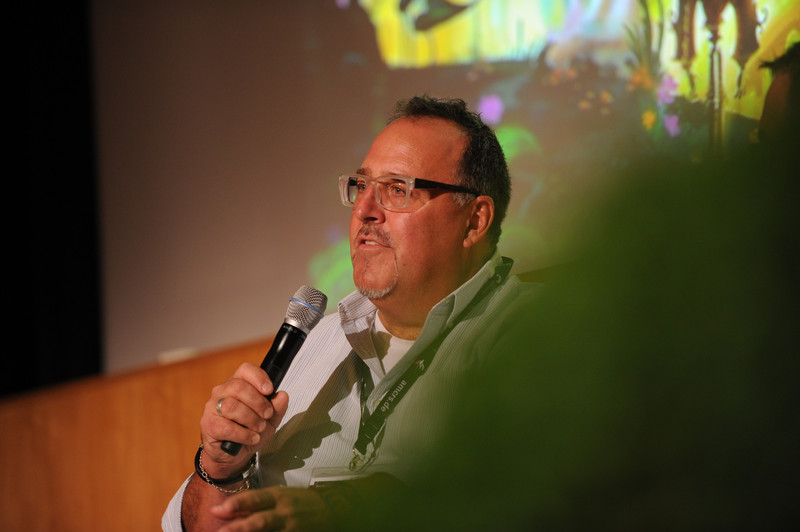
What lessons can be learned through animation pipeline and virtual production for VFX? Are there lessons that can be used to streamline the process and make production easier and waste less money? That was one presentation as part of a day long “5D Institute: Pipe Dreams” track. Taking part in the roundtable were Rob Bredow (Sony Pictures Imageworks), Doug Ikeler (The Walt Disney Company), John Knoll (ILM), and Chuck Peil (Reel FX). The session was hosted by Alex McDowell, Creative Director of the 5D Institute, and Sarah Smith, CEO of London’s new CG Feature Animation studio Locksmith.
Rob Bredow began the roundtable by saying he felt that there wasn’t really one pipeline that works for all projects. Instead, the pipeline should be tailored around the need for the production and around the filmmaker and his/her sensibilities. For instance, when working with Robert Zemeckis, the mocap stage would used to run through rehearsals with the actors but without any camera framing. After he was happy with the performance, they would move upstairs and start working on framing the virtual camera for the performances.
However, for Surf’s Up the movie was intended to feel like an animated documentary. So they created the virtual set first and then used the handheld virtual camera within the set to find the shots. This worked for the project because the film was supposed to use a documentary style approach, so they had to live within the restrictions of the world. Just as a documentary filmmaker would.
And then there is technology. The reality is with something like cloth sims that even with the advancements in tech, they are unable to use what a realtime capture would be. The reality is that they need to use more complex sims with long renders and then take those renders through multiple iterations. For realism and storytelling issues, they are a long way from accepting the first result of a sim.
Doug Ikeler was asked if he was starting from scratch, knowing what he knows now what would he do differently? For Ikeler, the toolset has effectively always been the same. By that he explained that while it is faster and one can visualize faster, you’re still making a film. What is missing is interoperability. “I would work to glue the tools together better,” Ikeler said, “I think there is still today a very big disconnect between the creative and the technical.” That’s not to say there hasn’t been any improvement. Interop is better, but the players and the software really need to work closer together and get rid of the walls in the process.
John Knoll said that to improve efficiency, ILM is targeting a production coming up in a couple of years in which they plan to give the director a better view on the virtual set. In other words, provide something that is much closer to the final result. But that plan is not without a major caveat: you have to shift a lot of post into pre-production. The facility has to build, texture, and even light assets before production, unlike normal schedules where this process can be started later. This might prove problematic says Knoll, as it’s “kind of a disease” in the industry that people often wait until the last minute to make changes. There is a danger of getting the worst of both possible worlds…that you build everything before….shoot….and then have to build everything after…because parties involved won’t make a decision until the very last moment.
Contrast this to live action, where there is a very strong focus on making a decision and stay with the decision. “I see very large amounts of budget wasted on large tentpole pictures” due to a lack of understanding of the implications of making changes and the common practice of doing so.
According to Rob Bredow, the idea of bringing a virtual production environment to the beginning of an animation feature is quite interesting. Normally in animation-based projects you have changes made to finished scenes because scenes that are completed later end up having an impact (due to story, wardrobe, lighting, etc). This ends up being one of the significant costs in animations. The potential of bringing everyone to the table early on in the process could actually reduce the number of those later decisions because you’re discussing them up front.
Rango was an unusual project for ILM and a very healthy thing to happen to the company, says John Knoll. Some of Knoll’s more interesting projects are ones that fundamentally break ILM’s processes. This is because it’s a natural tendency to adapt a process from one show onto the next, even though the solution isn’t really perfect. But the solution is complete.
Then comes a project like Rango that actually breaks that and there is no way that their already-built process is going to work. According to Knoll, they didn’t really have a good sequence lighting tool, since in live action vfx they are lighting for a given plate. So they developed some tools for sequence lighting so that they could bring the whole sequence up at once. They could look at unique lighting directions in the sequence and then address all of those and have them applied to the sequence. They could then spend the rest of the time improving things in the sequence. Knoll feels ILM could apply that to a lot of what they normally do in vfx films.
Meanwhile, during productions, the crew at Reel FX found that directors weren’t making decisions and the producers weren’t managing that. They developed a tool called Insight so that the clients could see everything: not only works in progress, but budgets…what is over budget and what is under budget.
According to Peil, this ended up putting the heat on everyone, including the producer. Since the studio could see the impact of decisions and changes, the studio could force the issue with the director. Urging them to finish the shots up, as either they were out of money or out of time and the shots wouldn’t be finished.
In the discussions about the financial problems facing the vfx industry, the fact that studios don’t control the vfx budget has often been mentioned as something that might need to be change. The studios are incredibly good at managing the principal photography production and keeping the production on time and on budget. The same can’t be said for the end of the process, so this might provide some hope for future improvements in the situation.
However, in contrast to the experience at Reel FX, Bredow related an experience where it proved problematic. They had a very big show they were doing that was breaking new ground. For this show, they left an open book (budget/expenditures) with the studio and agreed to do the job on a cost plus basis. Two months into the show they were giving the full reports to the studio and the team at the studio found some large line items the completely surprised them. One large line item was for development of tools to remove markers from on-set. They also saw that SPI had a contingency plan in the books that was there in case the tech didn’t work. This additional contingency was unlikely to be used, but it was something that internally SPI always prepared for.
The studio kind of freaked out about it…saying that those line items had the ability to put the film budget and goals in jeopardy. Bredow told the client that this wasn’t unusual…and that it would be OK, as it’s something they do all the time on films to make sure they are sensibly prepared. Bredow laughed when telling the story, commenting that there actually a lot of other items similar to that which were coming up in the budget, but weren’t visible. Thinking about how they’d react if they knew that.
A couple weeks later Bredow gets a call from the studio, asking if they can go back to the flat bid. The studio didn’t want to have to worry about the budget and instead simply concentrate on getting the story right rather than get bogged down with the budget. So they did and everything was OK in the end with the flat bid, turning out as expected and being fine financially. The lesson being, once again, there is no one single right answer to a problem.
For Rango, ILM looked for effective ways to streamline the process in order to save money, since they were trying to get a lot done for the money. One area was separating the front-end from the back-end of the project. Do the experimentation where it makes sense…early in the pipeline before compositing and rendering. This way, there would be fewer changes in the more expensive back-end and it would help keep the budget in line.
For Pacific Rim, ILM made the same pitch to Guillermo del Toro, as the biggest waste on a blockbuster tends to be working on a moving target. In other words, the goal was to avoid the tendency to make changes to things that are close to final. Early on, the plan was to give an accurate representation for del Toro, so he could visualize the end result sooner so they can lock in and not make the changes later on in the process. After all they have the same goals and not waste money or time. According to Knoll, it was a handshake deal, but “God bless him, he stuck to it” and the process proved effective.
Arnold Renderer Workshop
In addition to presentations covering projects and panel discussions, FMX also provides an opportunity for manufacturers to host sessions. MAXON, Adobe, Side Effects, Autodesk, and others had sessions running during the week. In this highlight, we recap a presentation from Solid Angle.
The session was extremely well attended, with over 100 filling the main room and countless others having to use the overflow rooms with a video link to follow the talks. In the evening Solid Angle had hired out a bar to continue the Arnold discussions along with free drinks and sushi. Again, this was very well attended and went on into the night.

The presentation started as Solid Angle CEO Marcos Fajardo ran the new 2014 teaser demo reel. What followed looked like a who’s who of Summer blockbusters including Iron Man 3, Elysium, Pacific Rim, Star Trek into Darkness, RoboCop, and of course Gravity. Once the auditorium settled down, Fajardo gave a brief overview of Arnold, its history, the projects it’s been used on and how it approaches rendering. He also made it clear that Solid Angle would continue to support Softimage (XSI) for the next two years, and that the SItoA plugin source code would be available to customers.
Next, Fajardo talked about Arnold 4.2, the latest release, showing slides of how render times and memory usage have decreased version after version, for dramatic reductions since the Arnold that was used on Pacific Rim, Elysium and Gravity.
Major updates to the software in 4.2 include:
- Faster performance
- Improved memory usage
- New bump mapping
- Improved sampling
- Stereo renders out of Kick
- Sculpted Motion Blur and Rolling Shutter effects
- XGen support
From there Fajardo passed over to Martin Preston from Framestore who talked about their work on Gravity and specifically the rendering side of things using Arnold.
Preston started by talking about how Framestore was faced with two key challenges in the early planning of Gravity: firstly how the Director (Alfonso Cuarón) wanted everything to be very photorealistic and secondly how he was looking at using some very long shots. In the beginning Cuarón was thinking about having the whole movie is under 12 shots total, however in the end the film worked out to be around 156 shots. This is still remarkable however given that the average shot count for a Hollywood movie is around 2,000 shots for a 90 minute film. Framestore tested every main renderer available and eventually settled on Arnold as the best for this project.
Gravity wasn’t the first Framestore show to use Arnold, however. Earlier, a number of shots from Wrath of the Titans had used it. One of the first things Framestore had to do was modify their lighting tool ‘fRibGen’ which allows lighters to generate render passes that manage the application of shaders and data to geometry. To do this they wrote a bridging plugin called ‘fArnoldGen’ which was pretty straightforward. They also had to port all their Shaders from RenderMan to Arnold which was done by two R&D developers, four Shader writers and three Look Development TD’s. They also had one Solid Angle developer on-site and lots of support.
Preston and his team created their own in-house ‘Monolithic Shader’ to reduce complexity and used this throughout much of the show for creating various metals. They also wrote their own Portal Light, Stereo Camera Rig, PTM for cloth, and a dedicated ray-marcher for clouds systems (stored as fVox files). A single shader accounted for all the atmosphere, clouds and terrain mapped onto a single sphere. For the complexity of the ISS and other ships Framestore used a propriety instancing system called ‘fBounce’.
Towards the end of Preston’s talk he gave some stats from the show. A typical render in Arnold had the render settings for AA samples set to 10 (sometimes 12) and the Diffuse and Glossy samples set to one. One beauty render was done which included the standard Arnold AOV’s. The memory usage rarely went above 20Gb, and they used about 600Tb of disk space. Render-times were broken down into ‘core hours’ with light scenes taking ~30 core hours, average scenes taking ~50 core hours, and very heavy scenes (interiors) taking ~150+ core hours. Preston finished his talk discussing some of the other projects Framestore has used Arnold on since Gravity. This included RoboCop, 47 Ronin, and Iron Man 3. Going forward Framestore will be using Arnold on Edge of Tomorrow, Jupiter Ascending, Paddington, Dracula Untold and Guardians of the Galaxy.
The third section of the Arnold presentation was looking at the newly developed, and still beta testing, Houdini for Arnold (HtoA) plugin. This was covered by Frederic Servant, one of the key Software Engineers in the London office of Solid Angle. The plugin had started as a personal project for Servant, but he quickly teamed up with Fabian Gohde, a Norwegian TD. Servant, who was currently working at The Mill, was given 20% of his time to develop the plugin, and Ivan De Wolf at Solid Angle also got involved.
Since then the plugin has gone into Alpha and has seen 14 releases. 254 alpha testers have worked on it and 316 tickets have been submitted. The plugin works with Houdini’s 12.5 – 13.0 and runs on Linux, Windows, and Mac. Functionality-wise, HtoA works very much the way MtoA and SitoA works, giving the artist all the controls and quality they would expect. Solid Angle will be shipping HtoA with 82 shaders, full support of OpenVDB, and full documentation and quick tips.
300 Ways To Visualize an Empire from Previs to Final
Chris DeFaria (Warner Bros.), Patrick Smith (The Third Floor), Duncan Burbidge (The Third Floor), Thomas Zauner (Scanline VFX), and Don Parker (Shotgun) took part in a session on 300: Rise of an Empire. For this recap, we’re focusing on the role that Shotgun played in the pipeline, as well as looking at some of the new features announced at FMX 2014.
Chris DeFaria set up the talk as a starting a new initiative on 300: Rise of an Empire for Warner Bros. to make their shows more efficient. They decided that building a pipeline for their fx shows should help everyone, so they partnered with The Third Floor, Scanline VFX, and Shotgun to make that happen. For this recap, we’re focusing on the pipeline aspect of things.
Third Floor and Scanline talked about how they worked together and with Shotgun. They agreed on naming conventions and other details and centralized all data in Shotgun. They even worked out a way for the Scanline water tools to be given to Third Floor so they could do realistic water in previs that could be sent back to Scanline and reused. Third Floor supervisor Patrick Smith said this was one of the coolest things they’ve ever done in previs. They also spent a lot of time prepping previs assets with lots of details to save time later during post. It was an interesting story about how the two teams were collaborating in advance and used Shotgun to help unify their workflows.
Don Parker from Shotgun then talked about the process of working on the pipeline since The Third Floor and Scanline are both Shotgun clients. The team at Shotgun thought it was worthwhile to invest R&D into the show to help make the process as efficient as possible, as in the end it’s beneficial for Shotgun to have the pipeline work effectively. A central cloud-based server was set up for the show that all vendors on project had access to. The development team at Shotgun then mapped out the process and built lots of tools. In the presentation, Parker covered 3 of them:
- A tool to help art department store, organize and share art with everyone on the show, which stayed online through the entire project.
- On-set tools to aggregate on set meta data from cameras and fx team. Later the take/slate data was linked to cut info via a cut parsing tool. Then line up and count sheets were generated automatically for fx companies. Again, all data was kept online for entire project so no history was lost, leading to efficiencies downstream.
- Tools to manage cut changes and finales versions to keep all fx companies and the 3D conversion company on the same page. Cut info was always up to date and available and the final versions from fx companies were tracked along with source files to help the 3d conversion team work efficiently. Changes were sent out as notifications to the right parties to make sure everyone was in sync as key data changed.
Parker mentioned that after studying the process, the team at Shotgun can see many places where this process an be optimized, saving time/money for Warner Bros. and all the fx companies, as well as making the process more agile. They plan to continue to iterate on projects with Warner Bros. and their partners until a set of productized apps can be used by new productions to quickly ramp up an efficient pipeline.
This is the same paradigm as the new loader app which was announced during FMX. In the past, each vfx studio would build their own applications and functionality that hooks into the Shotgun pipeline, effectively re-inventing the wheel at each company. While there are some customization opportunities, this is a tremendous amount of waste.
With recent releases, Shotgun has been working to add common tools to the software that any customer can use as a starting point. The hope is that vfx and other studios won’t have to spend time writing their own in-house tools. Instead, they can quickly bootstrap a pipeline – a concept that is valuable for these large multi-company fx shows where each project basically has to ramp up a new pipeline quickly after the show is green lit. These productions are set up like separate legal entities and at a basic level feel like one-off companies or pipelines. Because of the schedule, the lack of time often keeps these pipelines from being worked out in time. But by having a set of pre-built pipeline tool, these shows can get an effective pipeline up and running quickly.
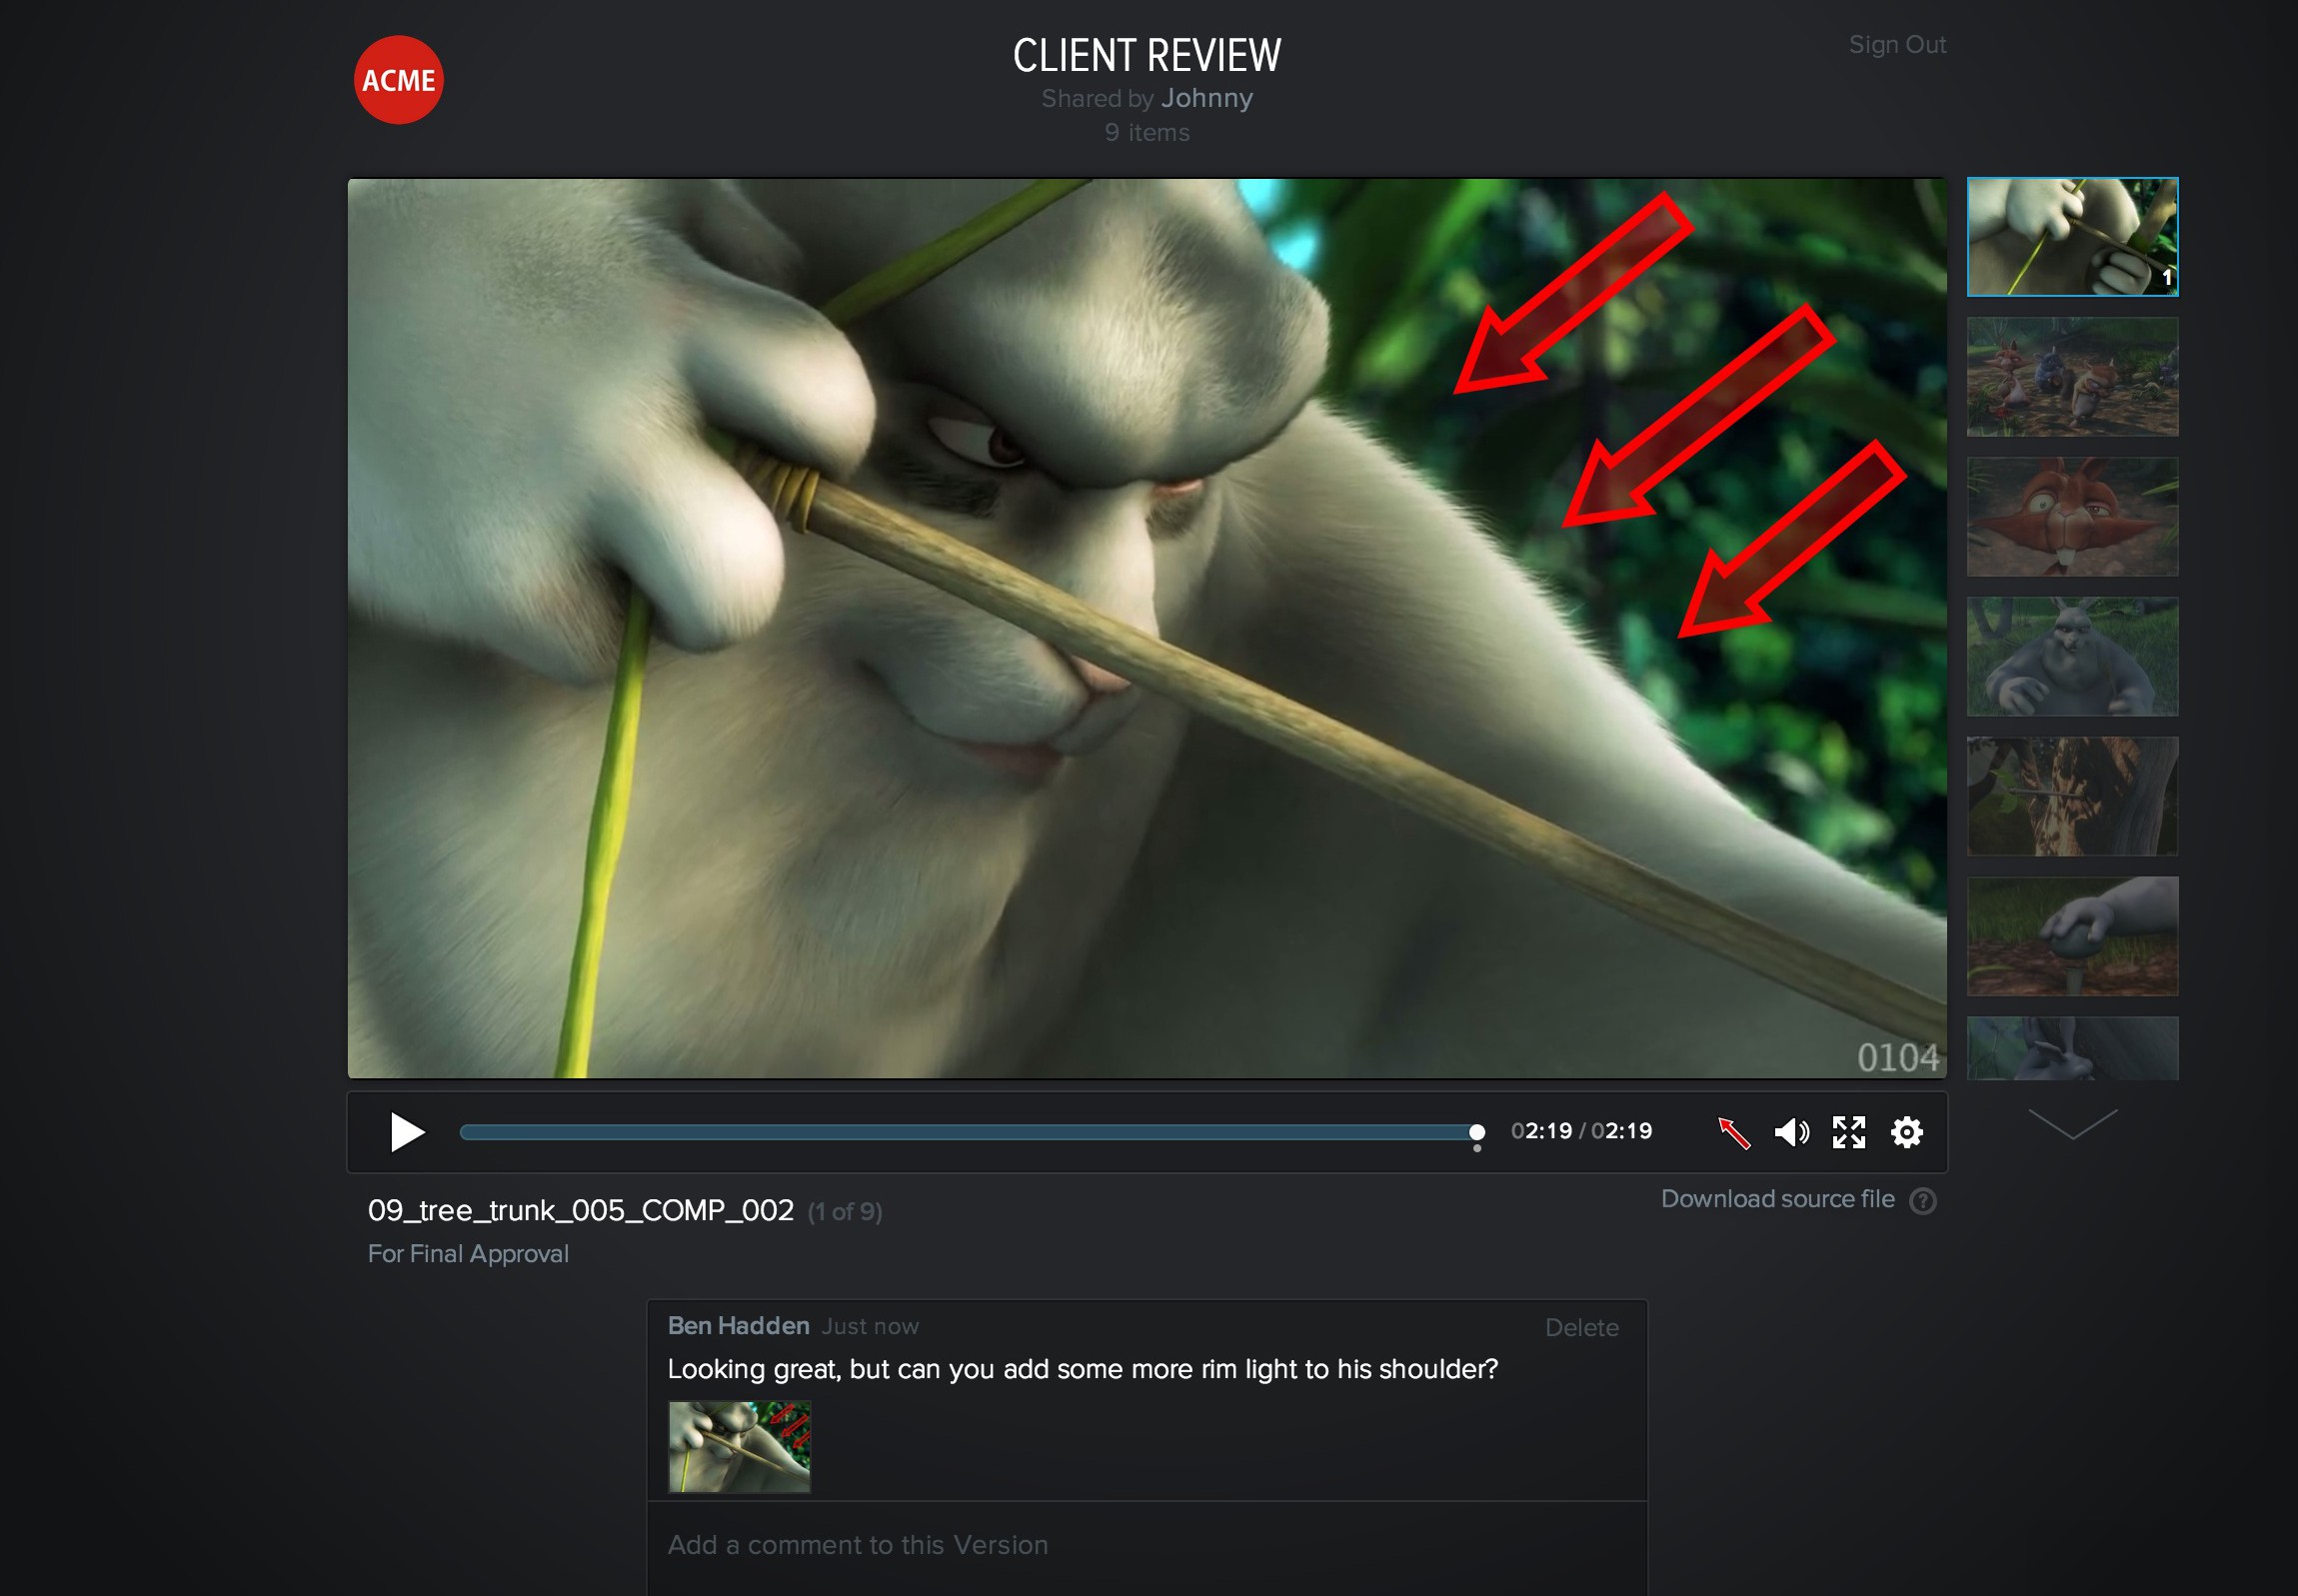
As an aside, Shotgun recently released version 5.3 of their software, which includes a new client review site. The functionality is straight forward, as all the user needs to do is drag and drop the media to a playlist and share it. A special secure client site is automatically created, from which the user can then enter email addresses to share the access link with users. Since this all built into Shotgun, notes and annotations as well as comments can made by the client and will be immediately reflected in the project.
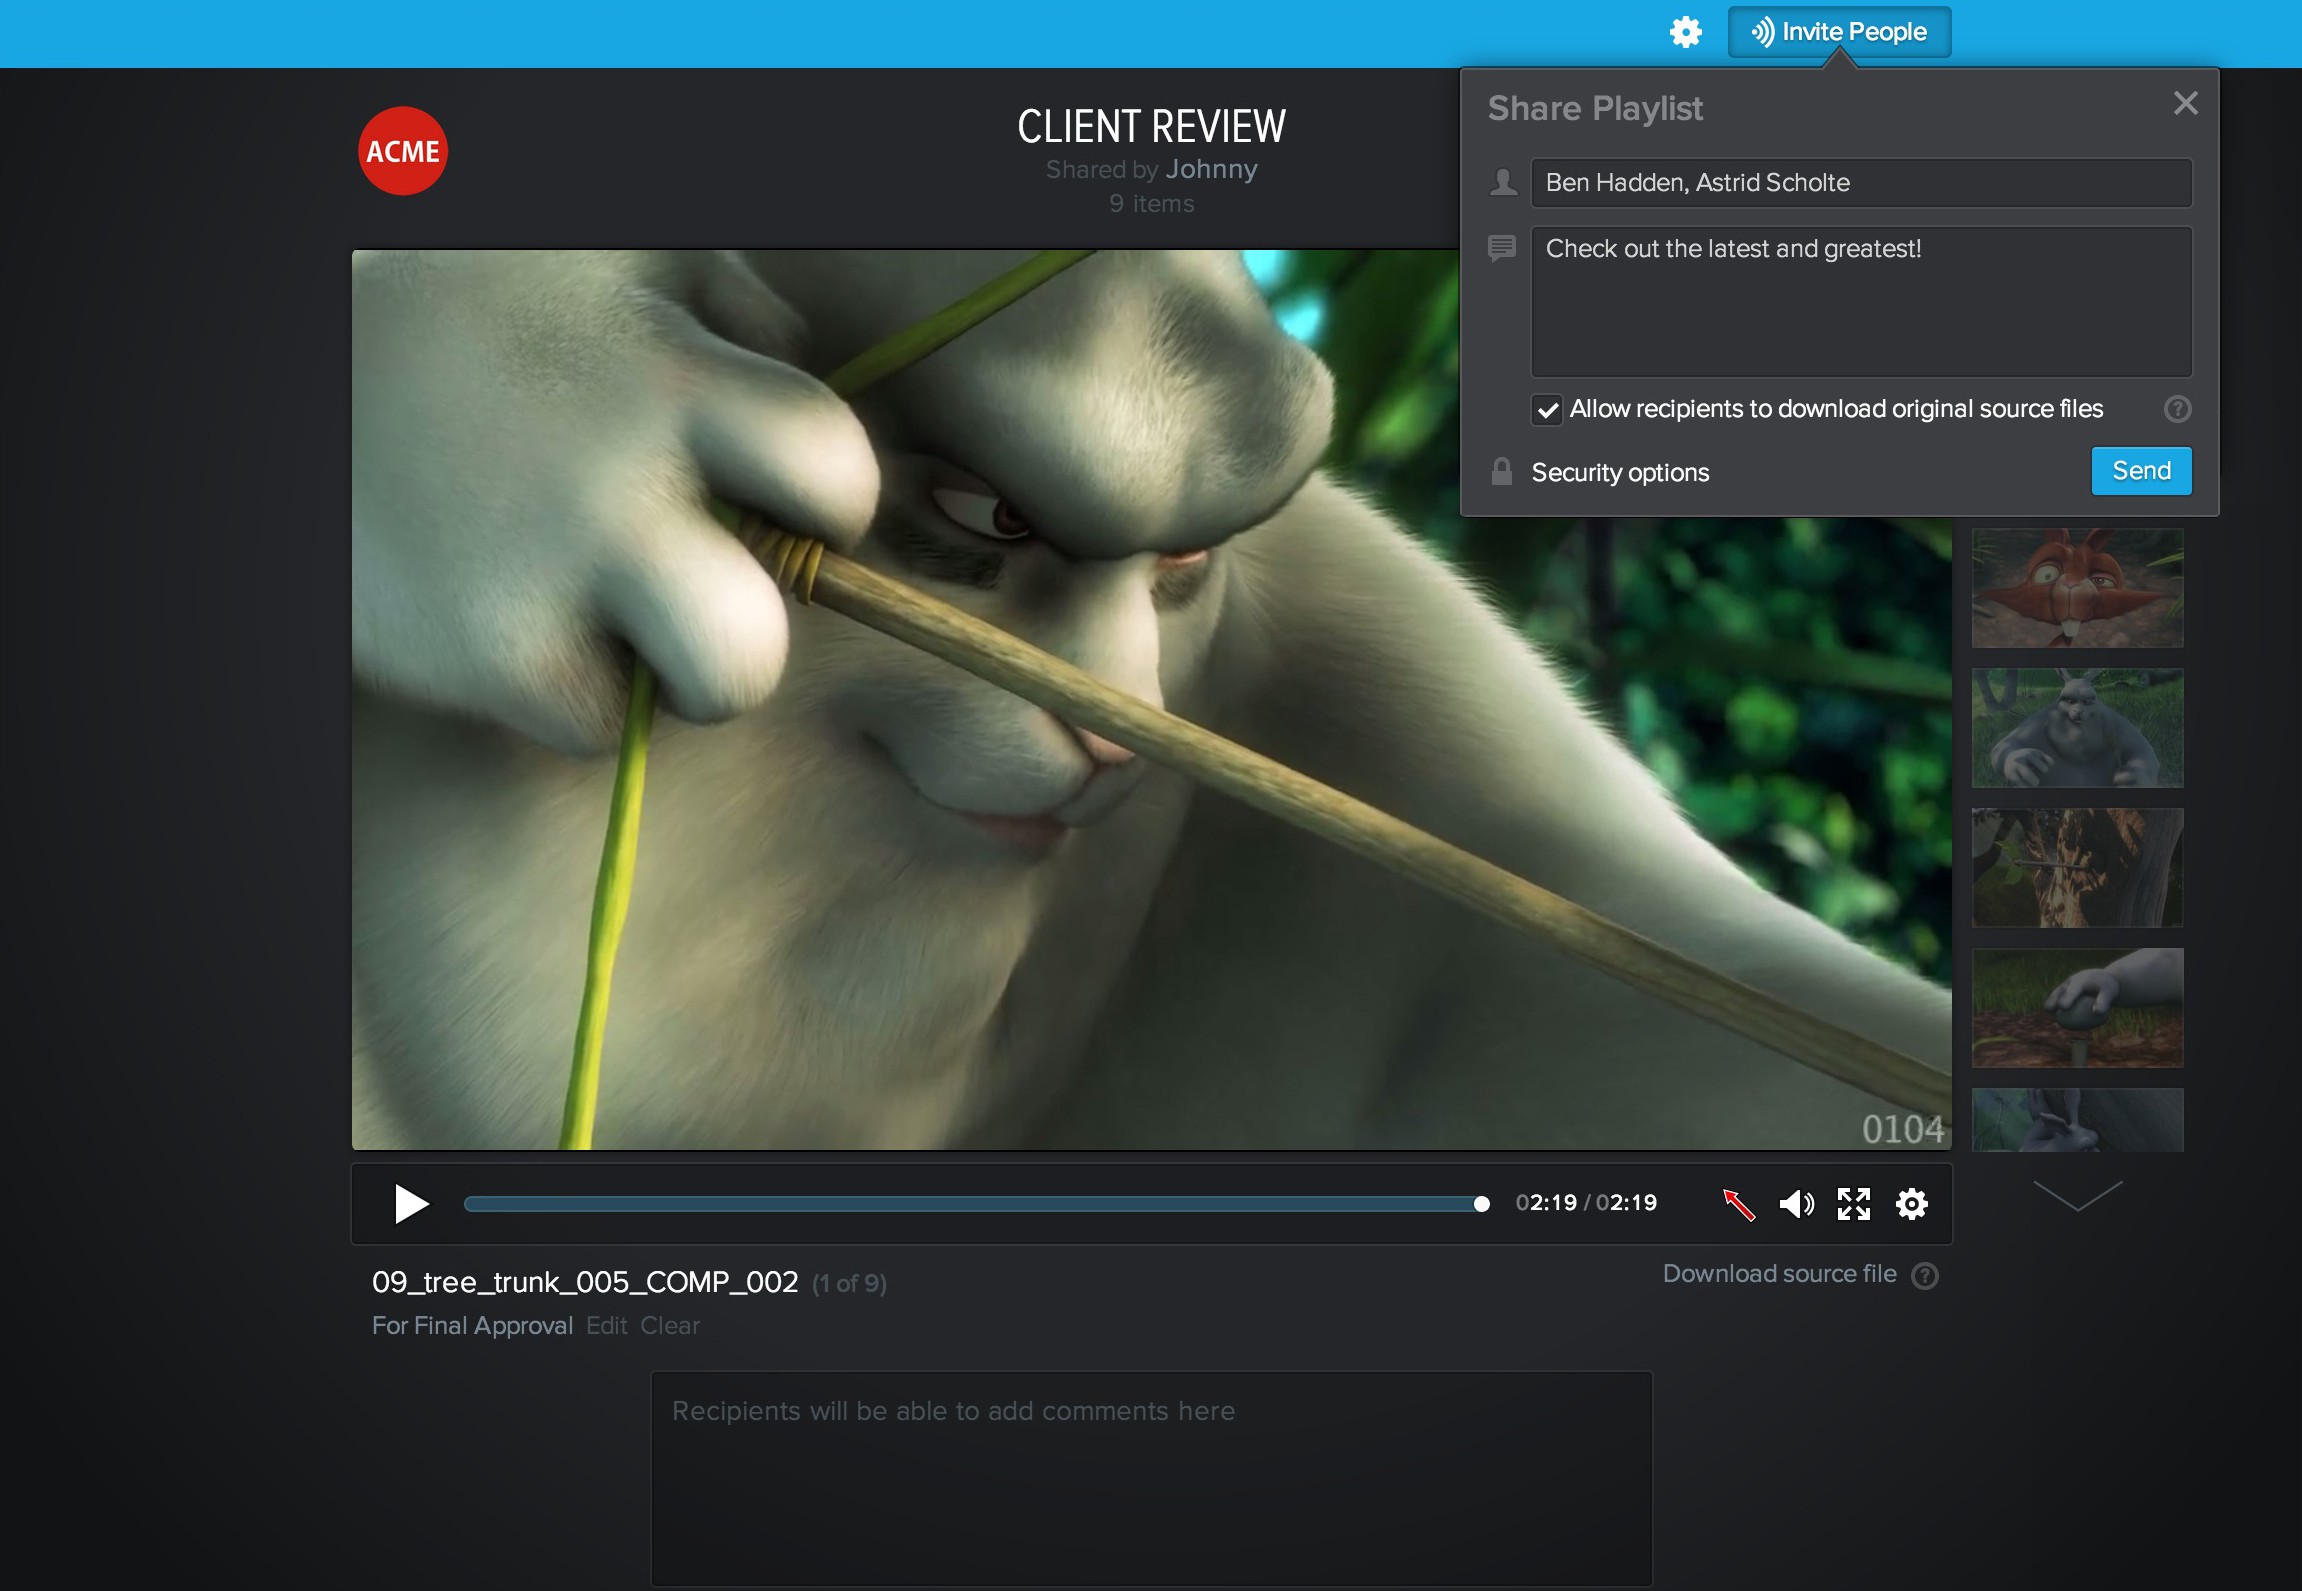

At FMX, Shotgun announced some new features in their product, the biggest one being a new native loader app. The loader is currently available for Maya, NUKE, Photoshop, and 3DS Max with Motion Builder support coming in the future, as is Houdini, HIERO, and Softimage. The loader is an item in the Shotgun menu, and it launches a browser window with multiple panes for previews, searching, filtering by type, and more. Importing into the scene is as simple as double-clicking, but a contextual menu also provides the ability to create a reference as well.
Under the hood, the dev team has put a lot of work into improving performance and workflow for the new loader. This functionality is another example of Shotgun building apps which can be used by facilities without having to build their own tools.
In other recent Shotgun-related news, they have also recently integrated with Perforce, which is most likely the games industry’s leading source control tool. In addition, being an online-based tool, Shotgun has also contracted with security firm Bishop Fox to undertake a security audit of the Shotgun application software. This kind of thing is actually incredibly expensive, but a needed step for software that needs to meet the security requirement of the studios. The recent “Heartbleed” vulnerability is a good example as to the types of online security threats companies need to deal with.
Finally, with all the time spent on new features in Shotgun, the time has come for the dev team to squash the annoying bugs their customers have been living with, as well as implement minor tweaks and improvements. Shotgun plans to have weekly releases throughout the summer, taking care of the ‘little things’ that make a difference day-to-day for users. They’re even setting up some voting so that customers can request their top improvements or fixes.
If you want to keep up to date on Shotgun, they have blog which is updated frequently. Note: Big Buck Bunny – footage courtesy of (CC) Blender Foundation, www.blender.org
Behind the invisible Visual Effects of Rush
Nathan Ortiz, FX Supervisor (Double Negative)
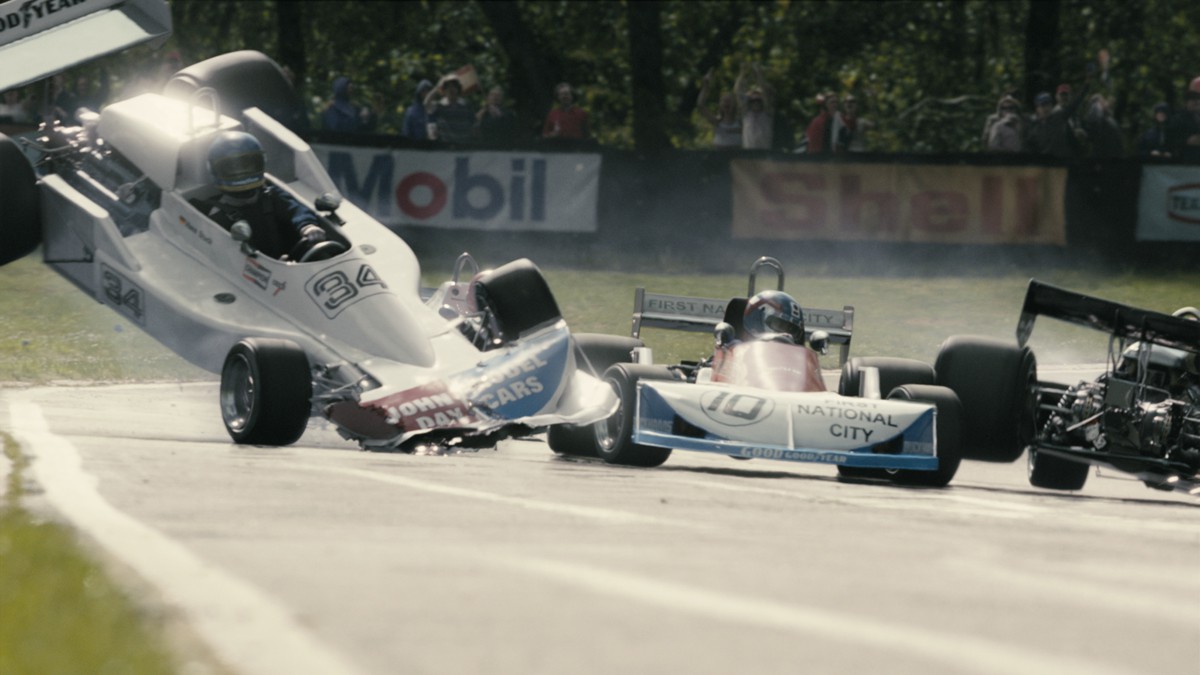
Rush tells the story of race car rivals James Hunt and Niki Lauda during the 1976 Formula One motor-racing season. One of the key aspects of the visible effects brief was that the effects themselves where to be invisible, not drawing attention to themselves. As FX Supervisor, Nathan Ortiz’s main task was to replacing live actions cars where it was deemed too dangerous for a real car, to recreate the race tracks, some of which no longer existed, and to fill the stands with race fans.
Director Ron Howard was very keen that the style of the movie had a very documentary feel and a lot of effort went in to researching the exact look and feel of each of the tracks during the 70’s. Another interesting aspect of the film was Howard wanted to cut back and forth between existing archive footage and sometimes even add computer generated cars into the archive material. Also although the film was shot with the Arri Alexa it needed to look like film so a lot of work went into recreated the look of the grain and film properties.
As a independently financed movie Howard wanted to keep the cost as low as possible and visual effect played any important part in help him achieve this. As much as possible was filmed on location including a number of real racing cars. Background plates where filmed along with high dynamic range images (HDRI’s) and survey data of each race track. These included Blackbushe Airport, the Snetterton, Cadwell Park, and Brands Hatch, along with the Nürburgring in Germany.
To capture reflection maps of the locations the crew used a Google car to drive round the tracks capturing images of the location from all directions. These images where then stitched together to form a high resolution texture map which was used to proved the reflection environments for the computer generated cars. This was achieved by applied the images to a large tube which followed the shape of the race track, in RenderMan the render team turned off the tubes ‘primary visibility’ so the tube itself didn’t render but the reflections appeared in the cars.
Many of the races where filmed at a single race track in England and so this had to be digitally dressed to resemble different race locations for the film. Ortiz’s team also were responsible for a number of television screen replacements as Howard used these to help tell the story through the use of racing commentators. All the 3D cars where keyframe animated using Maya for the most part but in some situations dynamics where employed, to give a realistic look to the cars under or over steer which is very difficult to keyframe. For the crash scenes Double Negative employed Side Effects Houdini which simulated the bucking and tearing apart of the cars. The rendering was done using Pixar’s RenderMan, utilised Double Negative’s Physically Plausible lighting and rendering pipeline.
 To sell the idea of speed and danger Ortiz added vibration to the cars and various 3D signage, reflections in the drivers helmets and other element placed around the track to sell the incredible speed the cars would have been travelling. For the final race in Japan the weather was extremely wet, so Double a Negative added additions CG rain, roaster tails (spray off the car) and added water to the visors to again give the appearance of danger. The skies where also digitally replaced or altered throughout the races to make the situation feel more menacing.
To fill the stands with spectators, Double Negative used systems built in both The Foundry’s Nuke and Houdini, placing pre-filmed people onto cards which could not only be randomly placed but also changed to represent different team supporters. Also to help the viewers understand where Hunt and Lauda where in the race Ortiz’s team added 3D score boards throughout the race sequences.
The film comes to a head when Lauda crashes his Ferrari at the Nürburgring. Fortunately for the film makers a young boy had filmed the original event on 8mm film and this was available to the visual effects team for reference. Although the actual impact of the crash was not visible on the film due to dirt obscuring the view Ortiz was able to workout the crash happened at 117Mph, where the car left the track and what happened once the car came back onto the track after it skidded off the grass verge. This enabled the Double Negative to very accurately recreate the crash include fine detail such as how the car broke apart, skid marks, and how the dirt and dust was thrown up.
One of the biggest challenges in the sequence was the fluid dynamics of the fire. Some of the flames were filmed on set but due to obvious dangers the majority of the fire was added using a mixture of Houdini fluid sims and Double Negatives own flip solver Squirt. A huge amount of detail when into the crash including things like the cloth mask of Lauda slowly getting blacker as the flames increased and paint rubbing off from one car to the next. As with many of the presentations it was a fantastic showcase of the UK’s visual effects companies.
For in-depth fxguide coverage of Rush, check out:
feature story: Thrills and spills: behind the VFX of Rush
the rc podcast: the rc #136: Arri AMIRA + Oscar Winner Anthony Dod Mantle on RUSH
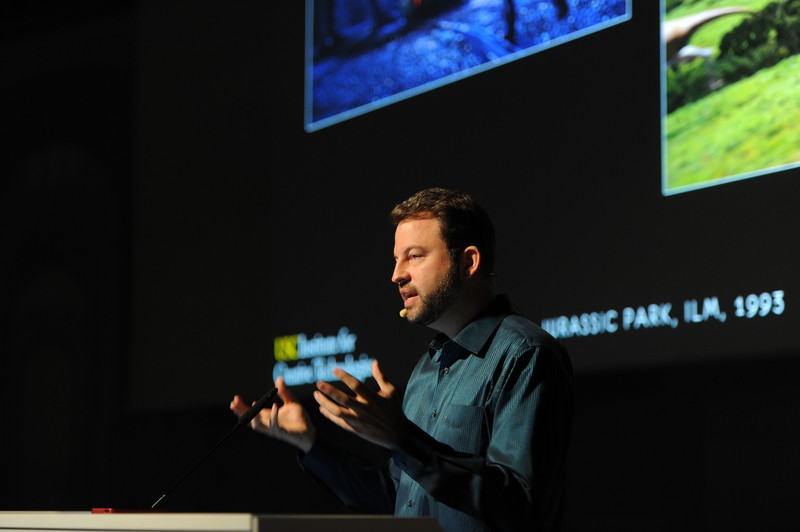
Gravity Lighting R&D and Digital Ira
Paul Debevec (USC ICT)
This session covered a bit of history of Paul Debevec’s research into digital lighting. We’ve had a lot of seriously in-depth coverage of this over the years at fxguide, so if it piques your interest be sure to check out the links at the end of this section.

Debevec first became interested in digital lighting back in 1993 when he first saw Jurassic Park. He was particularly interested in how the dinosaurs where lit and integrated into the live action plates. What surprised Debevec the most was that the integration was done by hand and not automated. This lead Debevec to research into what we now know as Image Based Lighting through the use of High Dynamic Range Images or HDRIs. This research was published under the banner of Rendering with Natural Light at Siggraph 1998s Electronic Theater.
First used in the feature film Pearl Harbor, Image Based Lighting went on to revolutionise the visual effects industry. One of the more recent movies which utilised a huge amount of Image Based Lighting was Rhythm and Hues’ Life of Pi where almost every scene was lit with various HDRIs. In fact the only element not lit that way was the actor Suraj Sharma who was integrated again into the background plates by hand.
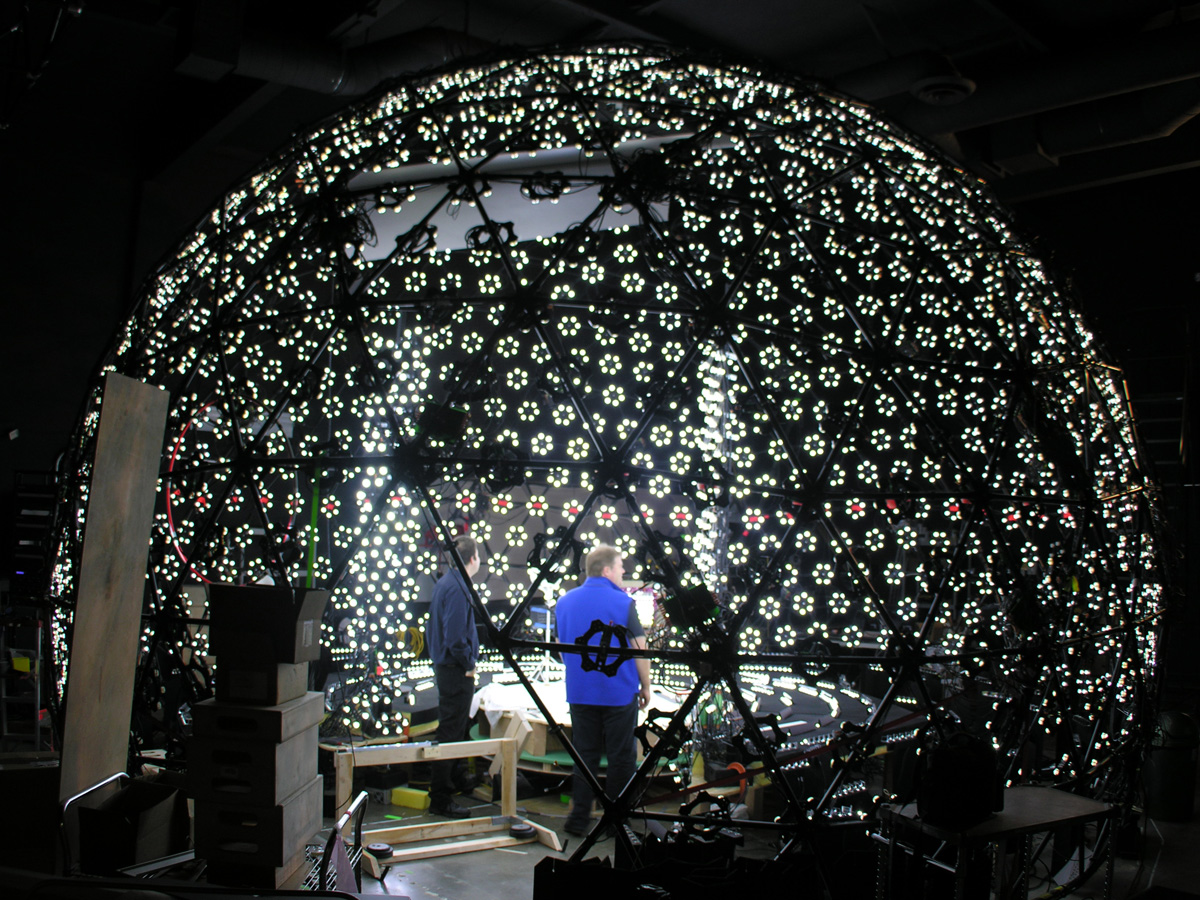
One of Debevec’s next research projects was to see if it would be possible to illuminate a person based off an pre-shot HDRI. The research culminated in the creation of the Light Stage in 2000.
Over the next few years the Light Stage was updated and contributed to a number of visual effects movies including Sony Pictures Imageworks Superman Returns and Spider-Man 2. Using Color Kinetics iColor MR Lights Debevec continued to refine the Light Stage. Now he was able to produce values of colour between 0 – 288 (8 bit) using 156 lights to create a full sphere of light around the subject. This was Light Stage 3.
In order to create a matte for the subject within the Light Stage Debevec used black cloth in the background and an inferred camera which runs simultaneously to the main camera. By dividing the pixel values by that of a clean plate taken without the subject you get produce a white background and black foreground matte.
One of the early problems Debevec had to overcome before the Light Stage became more mainstream was the reflection of the multiple lights in the eyes of the actors with in the sphere. In low resolutions this wasn’t overly noticeable however at HD and over it became a problem. It was around this time that David Fincher became interested in using the Light Stage for his next feature The Curious Case of Benjamin Button. Fincher was hoping to create a computer generated version of an older Pitt but wanted to use the real actors eyes to bring authenticity.
In the end Digital Domain, the main visual effects company (VFX Supervisor Eric Barba and Character Supervisor Steve Preeg), ended up making the eyes entirely in 3D. However this led Debevec to push the Light Stage into its next iteration. This new evolution used LED Panels built around the Barco D-Lite 7 system which worked well, but there were some issues relating into the direction of the illumination as the LEDs occluded each other when viewed from the side. Nevertheless, this new system fixed the reflection issues found on earlier models of the Light Stage.
The next film project that came Debevec’s way was another David Fincher movie The Social Network. This film posed a unique situation where Fincher needed two identical twins to appear together. The work was carried out by Lola Visual Effects under the VFX supervision of Edson Williams. Debevec used the new Light Stage 5 to illuminate the actor’s face based off HDRs shot on various locations. In some situations, such as the rowing scene the actor’s head was bobbing up and down and so Debevec simulated this movement of light but revolving the lamination within the Light Stage instead of having the actor move their head. This made Lola’s job of compositing the face onto the stand-in actor much easier.
Another interesting development which was taking place at the time was the ability to relight a person filmed in the Light Stage. This was achieved by shooting the subject at 2,000 fps while capturing different lighting positions cast by the Light Stage. From this an HDRI could be used to re-light the face using those lighting setups. This system however required a large number of lights and Debevec’s next step was to find a way of reducing this complexity down. What he found was if you divided the light by the X, Y and Z positions you could generate a Normal Map, and through the use of polarization this could be improved even more. Furthermore a 3D representation of the actor’s face could also be created from this data. This lead onto The Digital Emily Project: Achieving a Photoreal Digital Actor. For this project Debevec scanned 30 key facial expressions which would be interrelated between to create a final animation.
Jumping ahead Debevec was approached in early 2010 by Chris Watts who was brought in by Warner Brothers for Alfonso Cuarón’s Gravity. He had recommended Debevec’s work from The Social Network and how this could help with the digital faces required for the characters played by Sandra Bullock and George Clooney. To capture the images Debevec used five high speed cameras shooting 200 fps to film the actors on the very newest Light Stage. This generated 11 illuminated positions which created the surface normals of the faces. If the actor moved around too much they could realign the images using optical flow analysis. However capturing a total of 1,000 fps was very costly in storage and problematic for a production workflow. In the end the production created its own Light Box approach surrounding the actors with LED lighting in a cubical box — lighting which projected the appropriate light for the scene in which they actor would be composited.
Debevec concluded his talk by looking forward to hopeful future developments. This include better digital humans, a way of colour balancing LEDs and the possibility of using projectors instead of LEDs for future Light Spheres.
For in-depth information about Paul Debevec and ICT research, check out these fxguide articles:
feature story: Paul Debevec and ICT: an fxphd BKD | fxguide
feature story: The Art of Digital Faces at ICT – Digital Emily to Digital Ira
fxpodcast: Art of HDR – A Conversation with Paul Debevec
feature story: Twice the Social Network
Pingback: FMX 2014: day three/four report | Occupy VFX!
Pingback: What I read today – 8 May | rob pieké
Pingback: FMX 2014 Virtual Production Round Up