Faces are the most recognized conduit of emotion. To quote John Cleese’s BBC documentary Faces, ‘We don’t put photos of our loved one’s feet on our walls and desks, we put pictures of their faces.” For a long time it has therefore been the target of computer graphics research to solve being able to produce CG photoreal faces. In this article we will explore the area of digital faces, focusing primarily on the work done by the team at USC ICT and the various companies and films they have been involved with and influenced. We discuss rendering and modeling but also a key part of believable faces has been solving their incredibly complex animation, especially with the growth of the Light Stage. ICT has a long history now of innovation. From their early work on relighting with natural light to today’s character work, the team headed by Paul Debevec has made a huge impact on computer graphics.
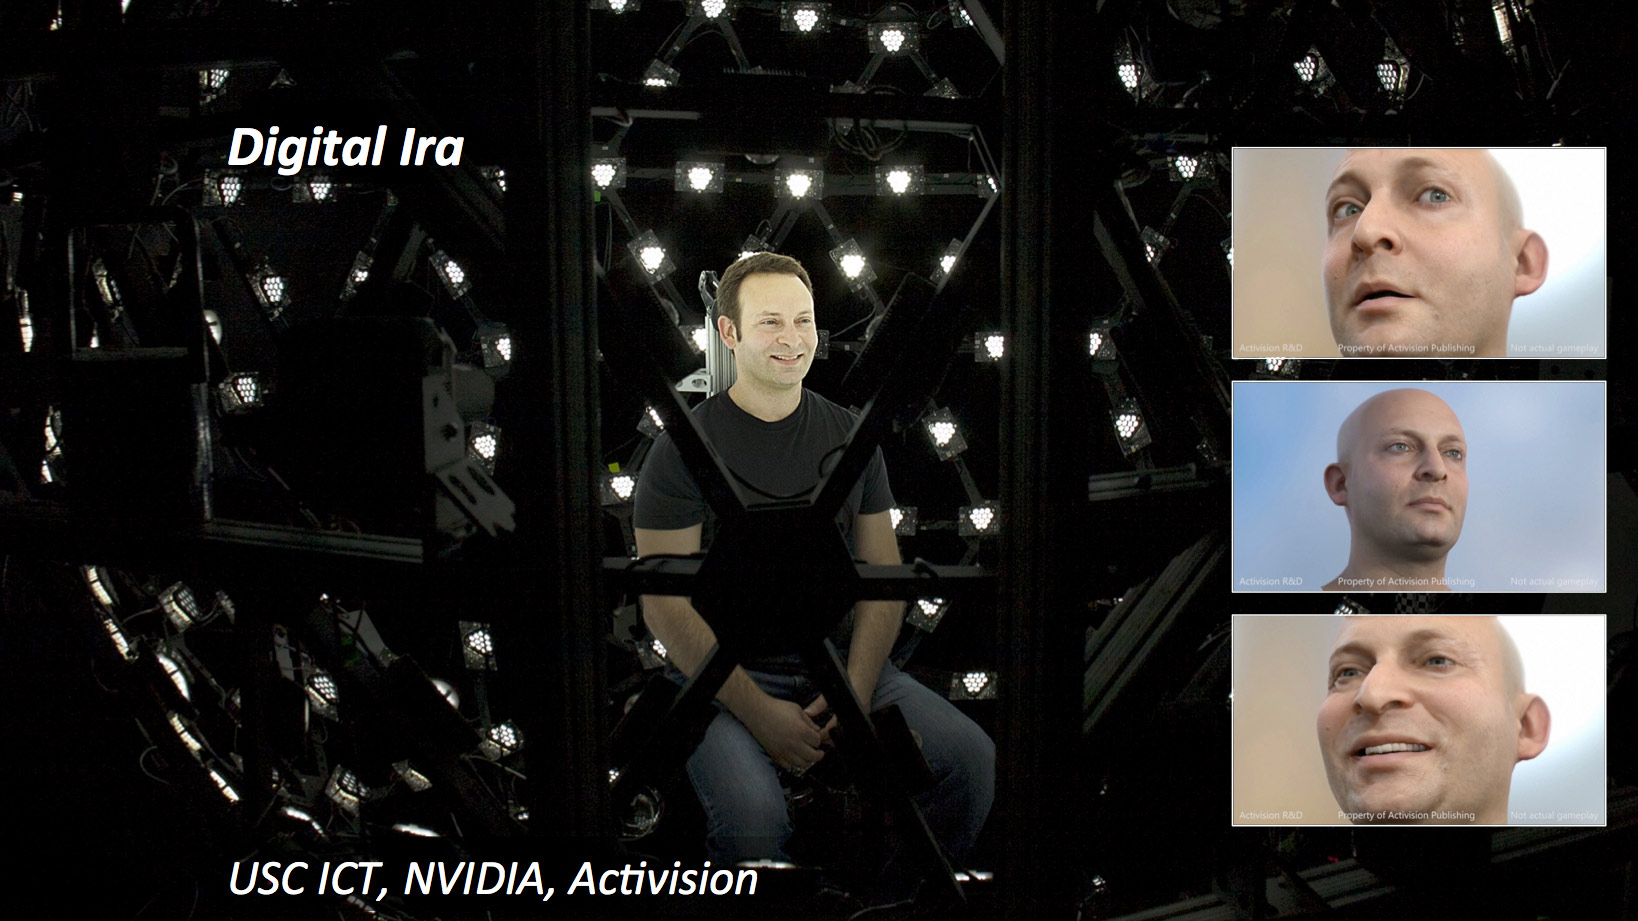
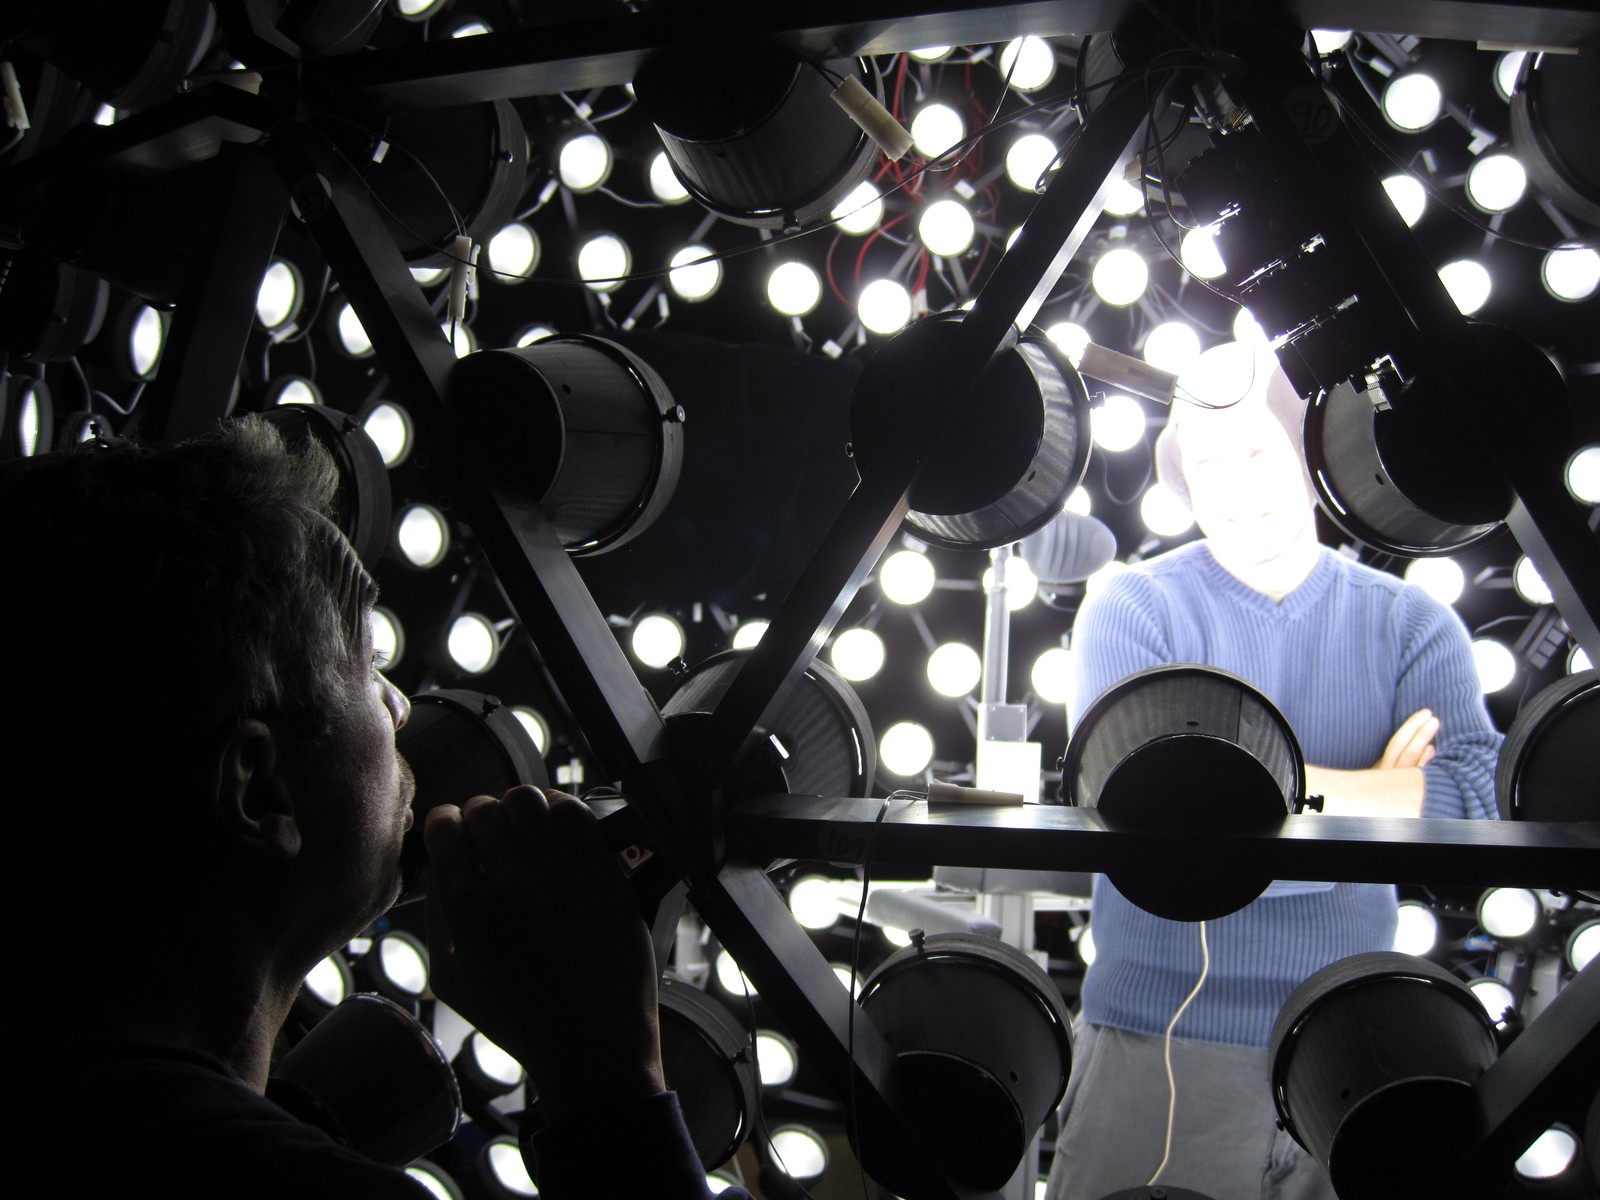
 Light Stage is a name for a series of lighting or relighting domes invented by Dr Paul Debevec and the team at USC ICT in California. Initially the work was centered on relighting in post, but it grew into advanced geometry, textures and performance capture, and the domes grew from Light Stages you could sit in, to Light Stages you could run in. The most recent version and the one referred to most below is Light Stage X, which has the latest LED lighting and control systems. fxguide has covered this work for many years, and the ICT group consistently publish their work, especially at SIGGRAPH, where this year they presented a real time live digital head known as Digital Ira – shown in 4K – in co-operation with both Activision and NVIDIA.
“Dr Debevec really shook up the real time world with his paper Rendering with Natural Light (1998) – when that high dynamic range work first started coming out of his work, and then in real time (2002) we were blown away,” comments Curtis Beeson, a senior researcher at NVIDIA. “I am sure other people had been working with high dynamic range but he made it accessible to a lot of us, myself included. From this to his work with character capture, I have been a fan of his for a long time, and they have a really talented team there (at ICT).”
 In 2008, the ‘Digital Emily’ project (fxguide link) showed how a set of high-resolution facial expressions scanned in a Light Stage could be rigged into a photorealistic digital animated character thanks to the research of USC ICT and the work of Image Metrics. Digital Emily was rendered as just a face and done traditionally as an offline non-real time render and at a resolution which never showed her in a tight closeup.
Dr Paul Debevec
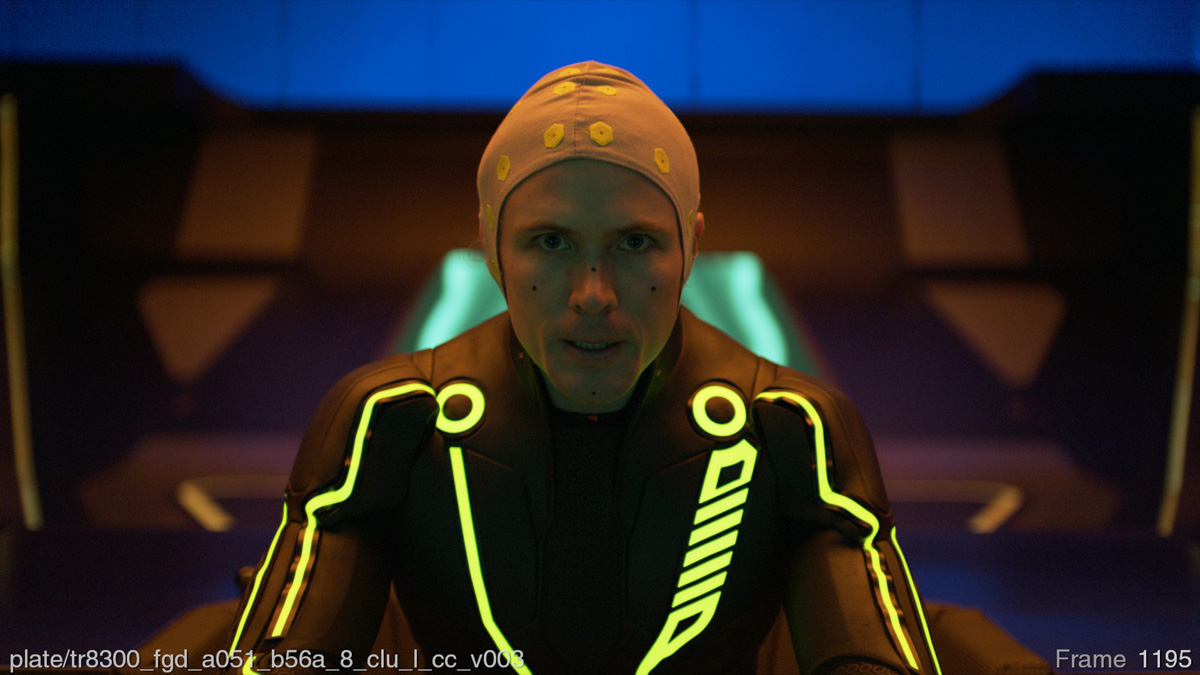
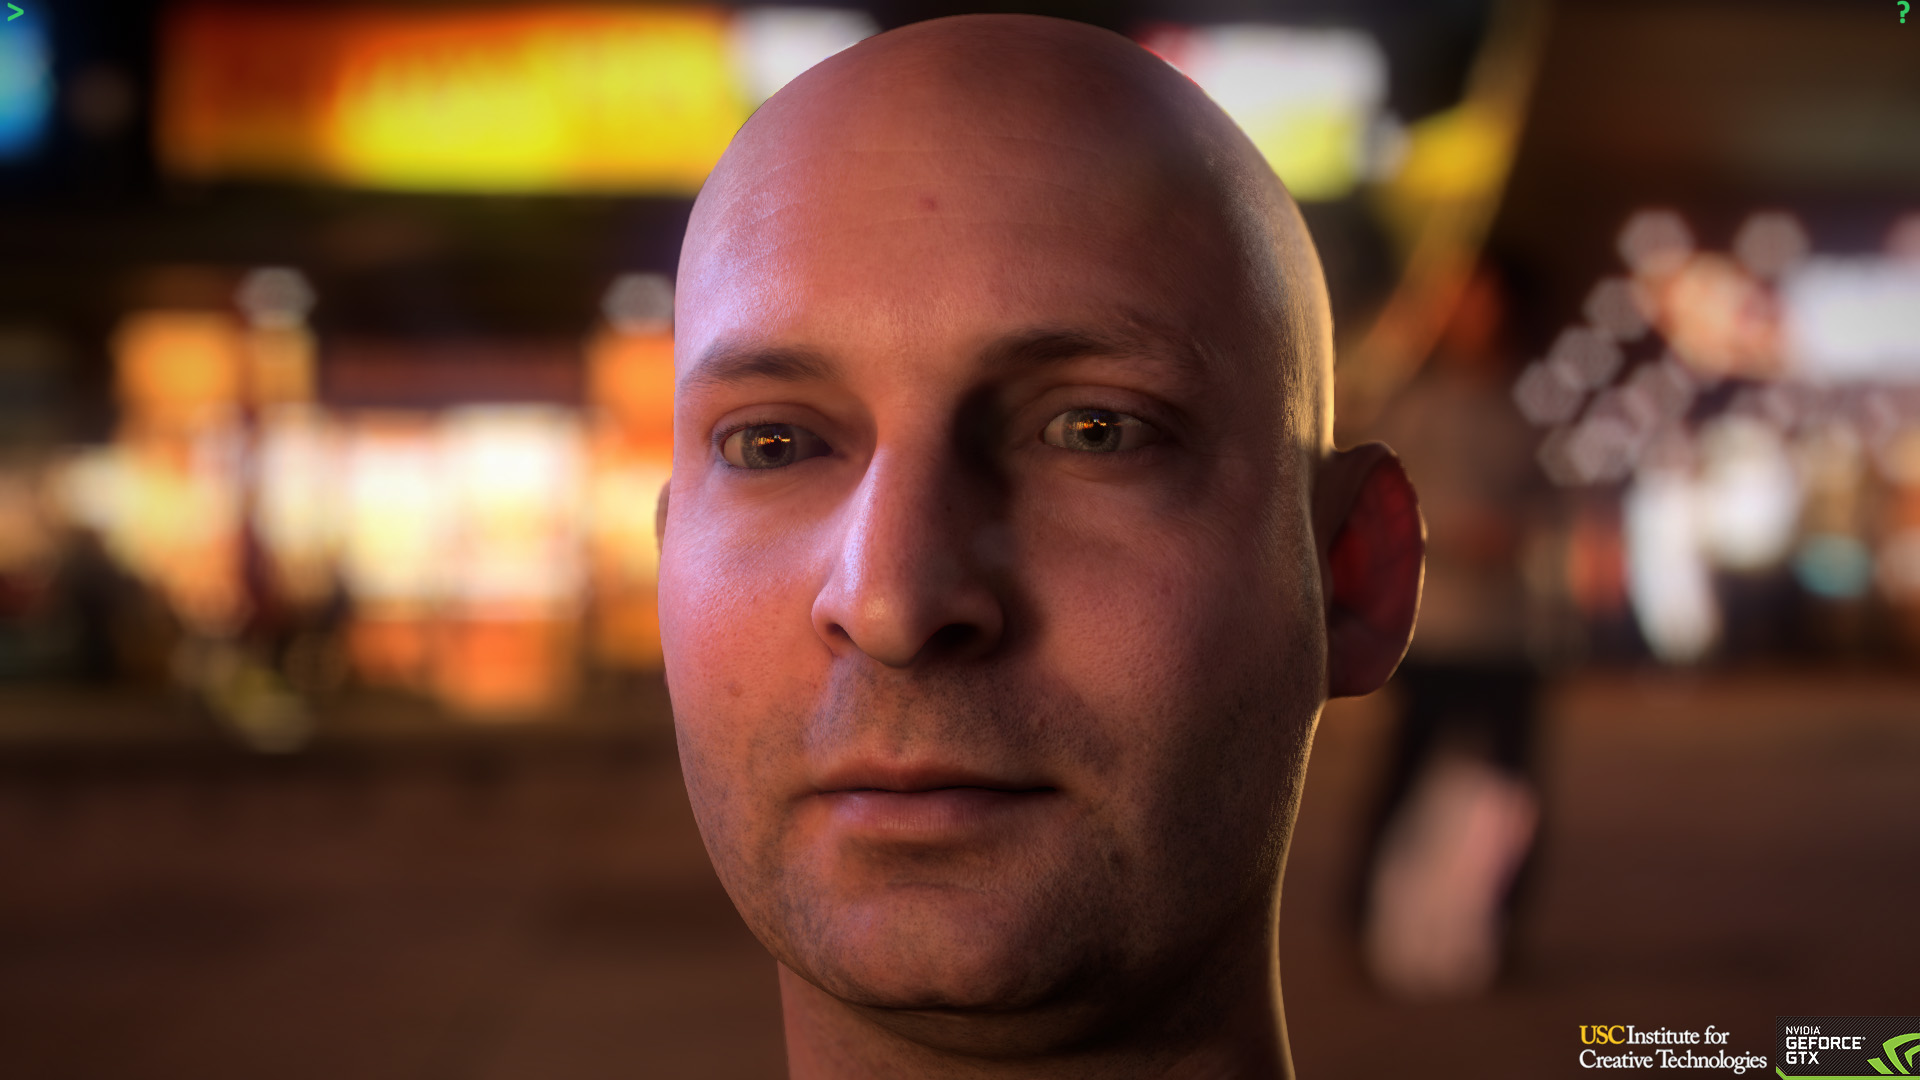
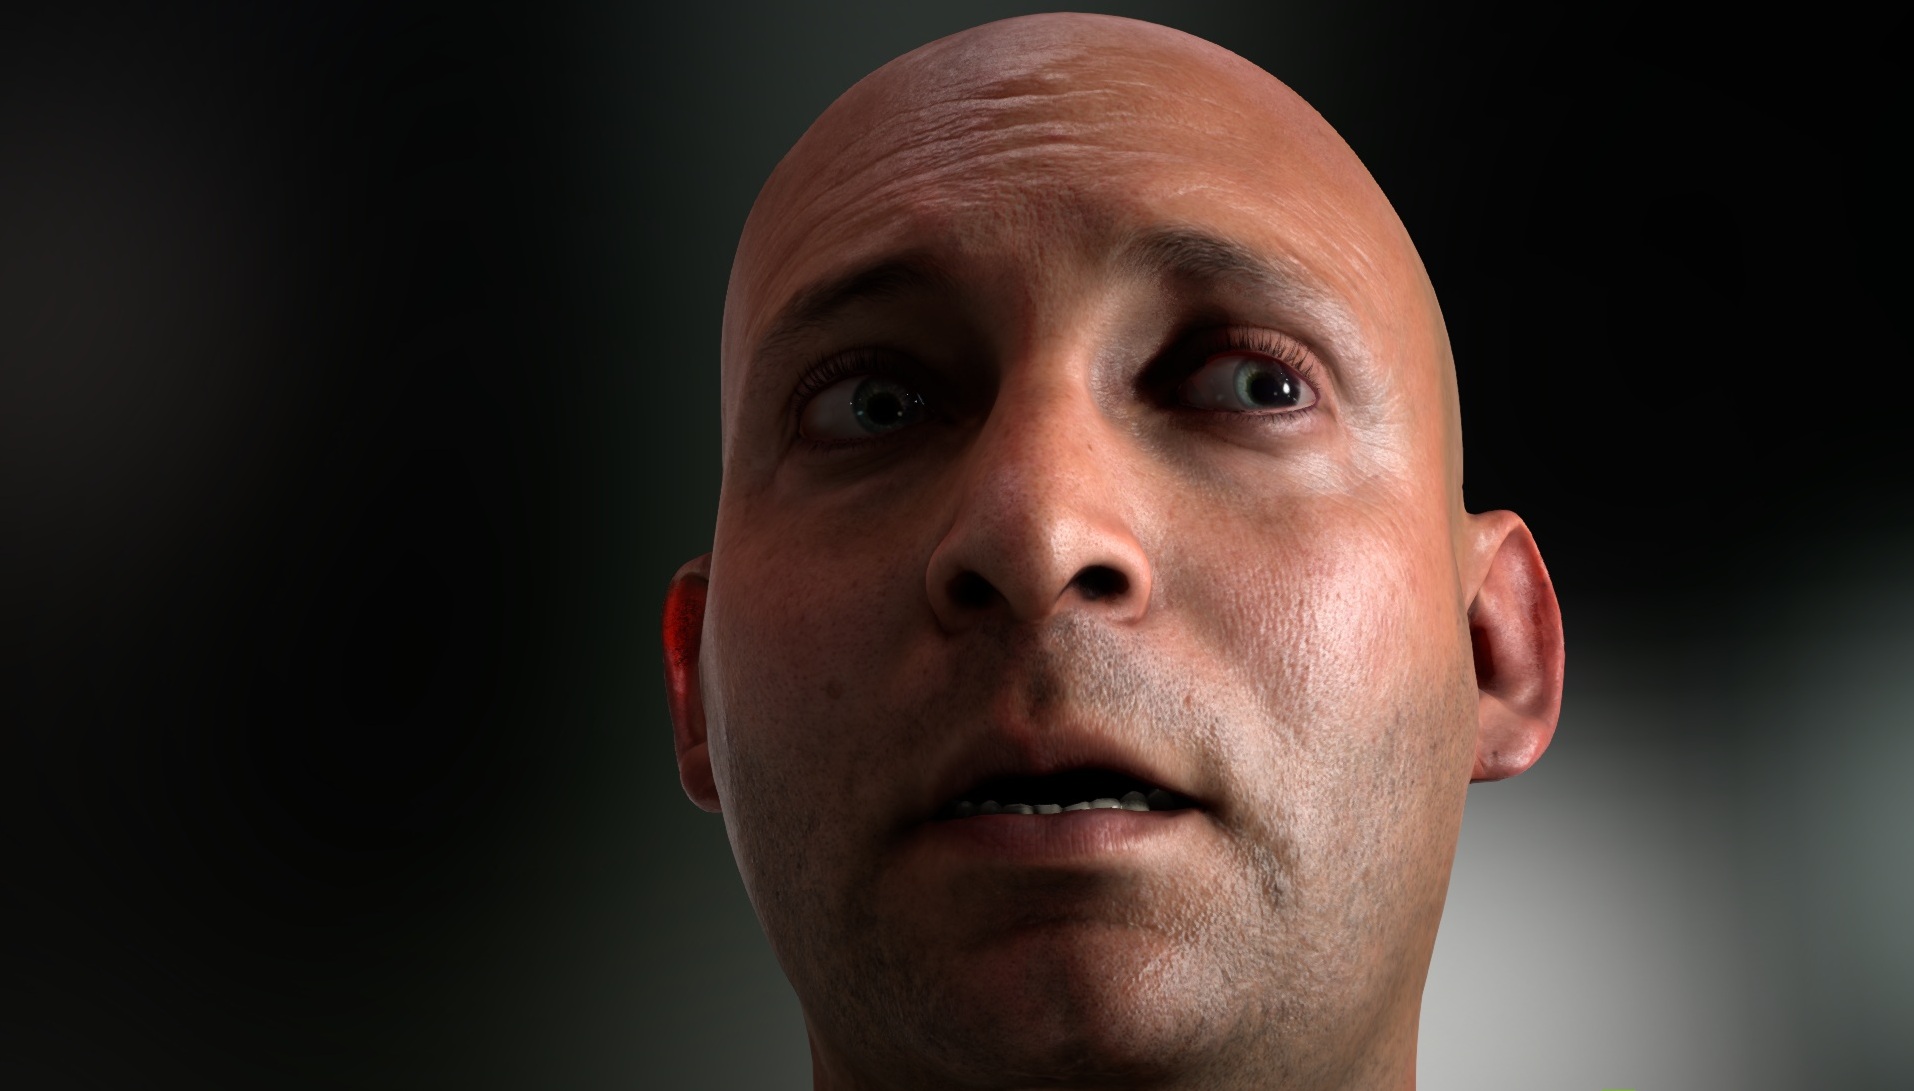
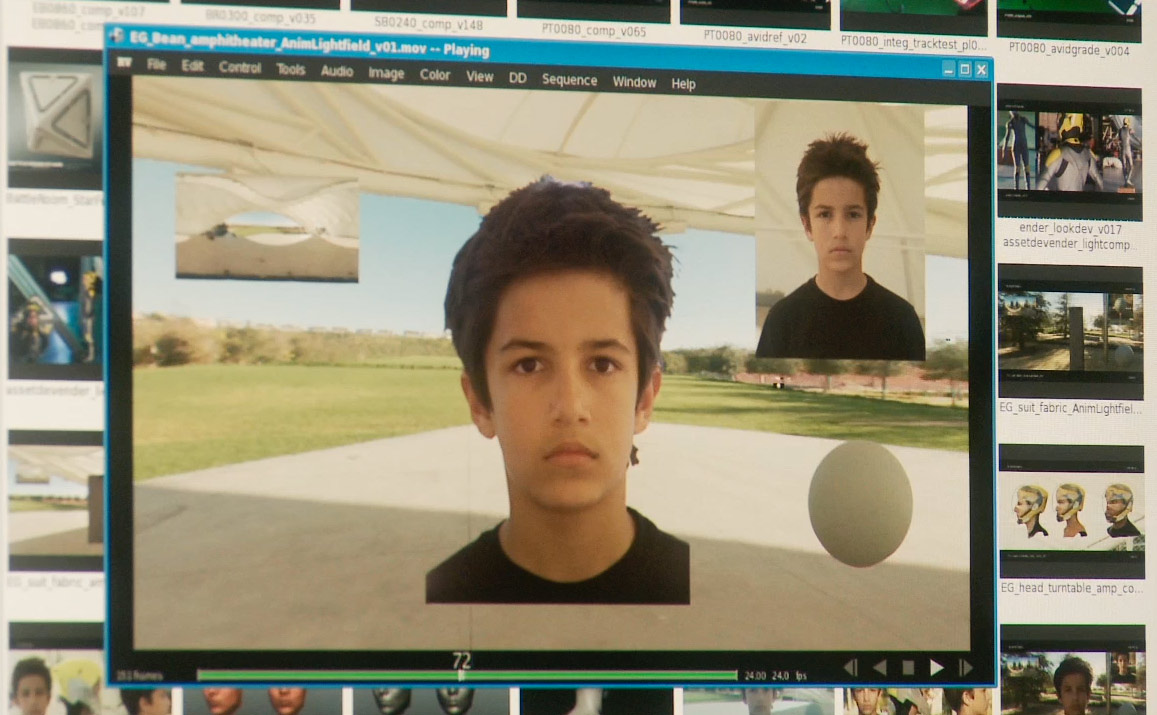
Jump to today and at SIGGRAPH 2013 in a collaboration between Activision and USC ICT at the Real-Time Live Event, the audience saw Activision’s ‘Digital Ira’ – a real time, high resolution real human head which could be seen from any viewpoint, in any lighting, and could perform realistically from previously recorded performance capture – even in an extreme tight close-up.
Not only was the head real time, interactive and high res, but it ran in a real time game-ready production pipeline, ultimately achieving 180 frames per second for a full-screen character in a GTX 680 (@ 720P). In short, Emily was rendered and traditionally composited over days if not weeks, but Digital Ira was talking to you – rendered in real time and shown the same week also on a new graphics card in real time at 4K on the NVIDIA booth.
In five short years the technology had moved in seemingly unbelievable leaps and bounds – from days for a render of just a face to a whole head in extreme close-up in a fraction of a second.
Here is a demo of two interactive demos, made years apart in 2000 and 2013 – both using the USC ICT Light Stage
1. Early key milestones
Some key landmark moments over the years:
- The Jester (1999)
- Final Fantasy The Spirits Within (2001) / Animatrix: Final Flight of the Osiris 2 (2003)
- Matrix Sequels – Universal Capture (tests 2000 films : 2002/2003)
- Spiderman 2’s Dr Ock (2004)
- Tests for Dir. David Fincher
- The Curious Case of Benjamin Button (2008)
- Avatar (2009)
- The Avengers’ Hulk (2012)
- Oblivion – Gravity – Ender’s Game (2013)
• The Jester (1999) / Young at Heart and the importance of SIGGRAPH 1999
Dr Mark Sagar was working at Pac Title when he produced The Jester. This landmark film, in its day, was the benchmark of photoreal digital people. The film came before the relative simplicity of adding realistic hair, subsurface scattering or many other advances of the last decade and a half, but it still managed to be a strong sign post of what would come, and in the year it first appeared at SIGGRAPH it was the highlight of the show. The film shows a digital version of actress Jessica Vallot in a Jester’s hat talking to camera. The uncanny valley might not have been crossed but the lip sync and facial animation, in particular, were exceptional.
Watch The Jester.
It is also significant as its presence at SIGGRAPH would be in the same year that Dr Paul Debevec would show Fiat Lux. To paraphase Mark Sagar from our fxguide interview 2 years ago, Debevec had the best lighting and Sagar the best digital actor, it was natural that the two would meet and discuss a possible collaboration.
Debevec’s work until this point had been dominated by architecture and photogrametry, not faces, so this meeting would prove to be hugely significant.
The project that was intended to be this collaboration was Sagar’s next short film Young at Heart. The film showed anti-aging of a digital character who was an actress. But the collaboration did not proceed at Pac Title and the plan for Young at Heart was stopped due to either schedules or higher up corporate politics. It would be only when Sagar moved to Sony Pictures Imageworks (SPI) that he and Debevec would collaborate. Roughly at the same time that Sagar moved to SPI in LA, Debevec moved from Berkeley to University of Southern California (USC) and the relatively new Institute of Creative Technologies (ICT est. 1999). “It is always a pleasure working with Paul, he’s a fanatically inspiring character and he has such a clarity of thought – there is always something going on,” remarked Sagar.
Sagar would end up producing Young at Heart without direct Debevec involvement. He again used the actress Jessica Vallot, but now digitally renamed Miss Jessica Digitalis.
TEDxAuckland 2013: BabyX Infants differ from adults in the distribution of facial tissues, which makes the appearances of some muscular actions different from adults.
A special baby version of FACS is required to be used when doing infant FACS animation pipelines.
For more see : Harriet Oster who detailed these differences in a work called Baby FACS.
Dr Sagar’s work in facial animation would move from SPI to Weta Digital and include key contributions to King Kong and Avatar (see below). He continues to be a world expert in facial animation linked to real world anatomy and physiology.
Dr Sagar today is the director of The Laboratory for Animate Technologies based at the Auckland Bioengineering Institute (Auckland Uni, NZ). The laboratory is creating interactive autonomously animated systems using facial animation.
“Dr Sagar’s research involved a landmark study in how to develop an anatomically correct virtual eye and realistic models of biomechanically simulated anatomy. It was one of the first examples of how lifelike human features could be created on a screen by combining computer graphics with mathematics and human physiology.” – University of Auckland.
He recently presented a digital infant at TEDx in Auckland.
• Doc Ock
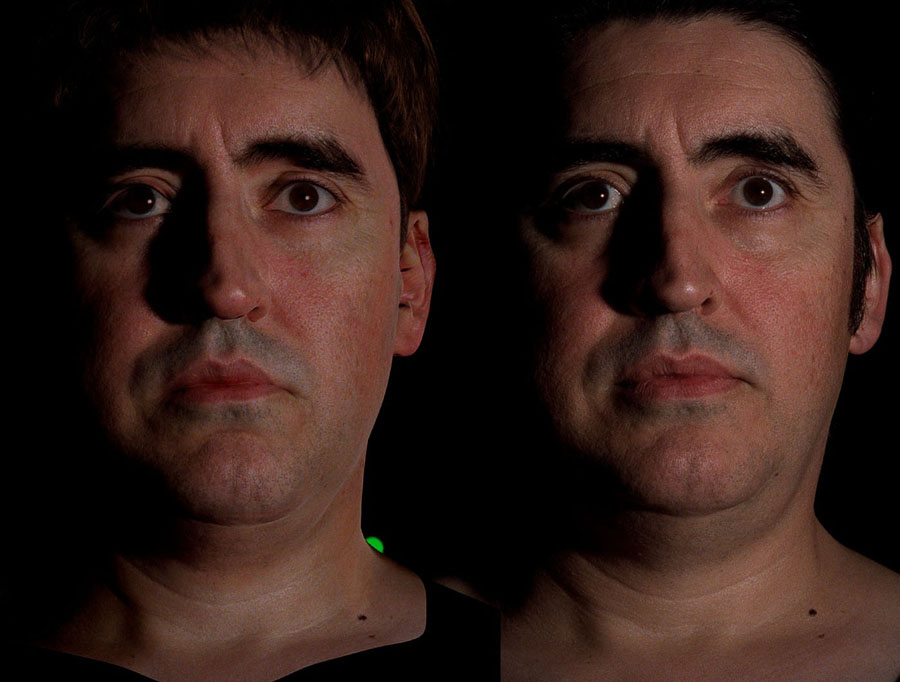
 Paul Debevec and his team at UC Berkeley built the first Light Stage at ICT out of wood and rope, literally, but their research into light sampling on human faces in 2002 still attracted the attention of visual effects supervisor Scott Stokdyk of Sony Pictures Imageworks (SPI) who chose it for creating photoreal computer-generated stunt doubles of actors Alfred Molina (Doc Ock) and Tobey Maguire (Spider-Man) for the movie Spider-Man 2. “I did a survey of everything that had been done out there in terms of digital humans and it seemed like everyone was taking a reductionist approach to doing a CG human,” says Stokdyk. “And that sort of makes sense – that’s what we do normally in computer graphics, we break everything down into its smallest pieces, but I just thought the complexity of a CG human dictated that we don’t go down that path. “When I looked around the only person who really was in the space of acquiring – on a deep level – humans and human performance, and really pushing that boundary was Paul Debevec. Even great achievements like Final Fantasy which I studied and studied. I felt if we went down that path – and just do incrementally better than that – we might not succeed.”
“When I looked around, the only person who really was really pushing the boundary was Paul Debevec”
By this time the motorized, strobe-based Light Stage 2 system had been constructed at USC ICT. The holistic approach of Paul Debevec (and the Light Stage team) really appealed to Stokdyk. “He was trying to catch the inner works of what was happening all at once – no one else was really trying to capture things the way he was and I thought it was the best path to the finish line. As I did my research I kept coming back to Paul’s work, especially his stills as being crossing the uncanny valley. I kept coming back to Paul’s images as being a true capture of reality rather than a re-creation of reality.”
Mark Sagar, who was now well established as a world leader in facial animation, led the effort inside SPI to adapt the process for film animation. While Light Stage was targeted at faces, the team knew they would need to integrate this with digital bodies, clothes and environments, so SPI’s John Monos joined to focus on everything but the faces. This soon changed and Monos would also be a part of the Sci-Tech awarded team. Today John Monos is still at SPI. He is now a senior shader specialist. “We had a few people really interested and pushing this technology,” says SPI CTO Rob Bredow. “From a hands-on perspective, Monos took point as the CG Supervisor in charge of the Light Stage work and was instrumental in its success.”
“We did not know how complex it was going to be going into it,” adds Stokdyk, “and the complexity of data – which I think is a testament to the complexity of humans – on the first Spider-Man movie we had perhaps 3 terabytes of data for the whole movie, and then Doc Ock (in Spider-Man 2) started rivaling that for just one character.”
Even after Spider-Man 2 and its success the problem was not ‘solved’. Stokdyk for example knew that were still many obstacles on the path to fully CG humans – but in his own words, “I was just really glad to see there now was a path forward.”
After Spider-Man 2, SPI had a string of films all with major advances and refinements in human faces, from Superman Returns to Spider-Man 3 and Hancock – and this was built on complex digital doubles from key films such as Hollow Man done just before Spider-Man and the performance driven facial animation system for Monster House. SPI’s role was enormous in advancing digital humans on screen.
The fourth member recognized in that Sci-Tech award in 2010 for Light Stage after Spider-Man 2 was Tim Hawkings. He had been central to the work at ICT and was as experienced as anyone could be with this new world of facial sampling and scanning.
Today, Tim Hawkins is the CTO of Lightstage LLC in California (which is Chaired by Jules Urbach – who also runs OTOY / Octane with a minority ownership from USC ICT). Hawkings continues to refine and do production Light Stage commercial scanning – such as all the actors for Marvel’s Avengers, and is currently working on a portable Light Stage that will allow on set actor scanning, avoiding actors having to travel to LA.
The Sci-Tech award in 2010 recognized over ten years of research, development and application of technologies designed to help achieve the goal of photoreal digital actors.
The technology was used in nearly 40 shots for the 2004 Spider-Man 2 film which itself earned an Academy Award for Best Achievement in Visual Effects in 2005 (Stokdyk shared this VFX Oscar with John Dykstra, Anthony LaMolinara and John Frazier).
• Fincher tests
As key as SPI was in the development of digital faces, there were clearly other big contributors, in particular ILM with Dobby in Harry Potter and the Chamber of Secrets. While not a ‘normal’ face it was still significant and other companies, in particular Digital Domain, also began making in-roads into digital faces, including with director David Fincher.
The Curious Case of Benjamin Button would not come out until late 2008 but tests were being done even before Fincher directed Zodiac in 2007. In fact DD did a key test in 2004 and a series of digital characters in TVCs for Fincher with US Popcorn brand Orville Redenbacher in 2007. (see fxguide article). Principal photography for Button was underway by this point – having started the year before in 2006.
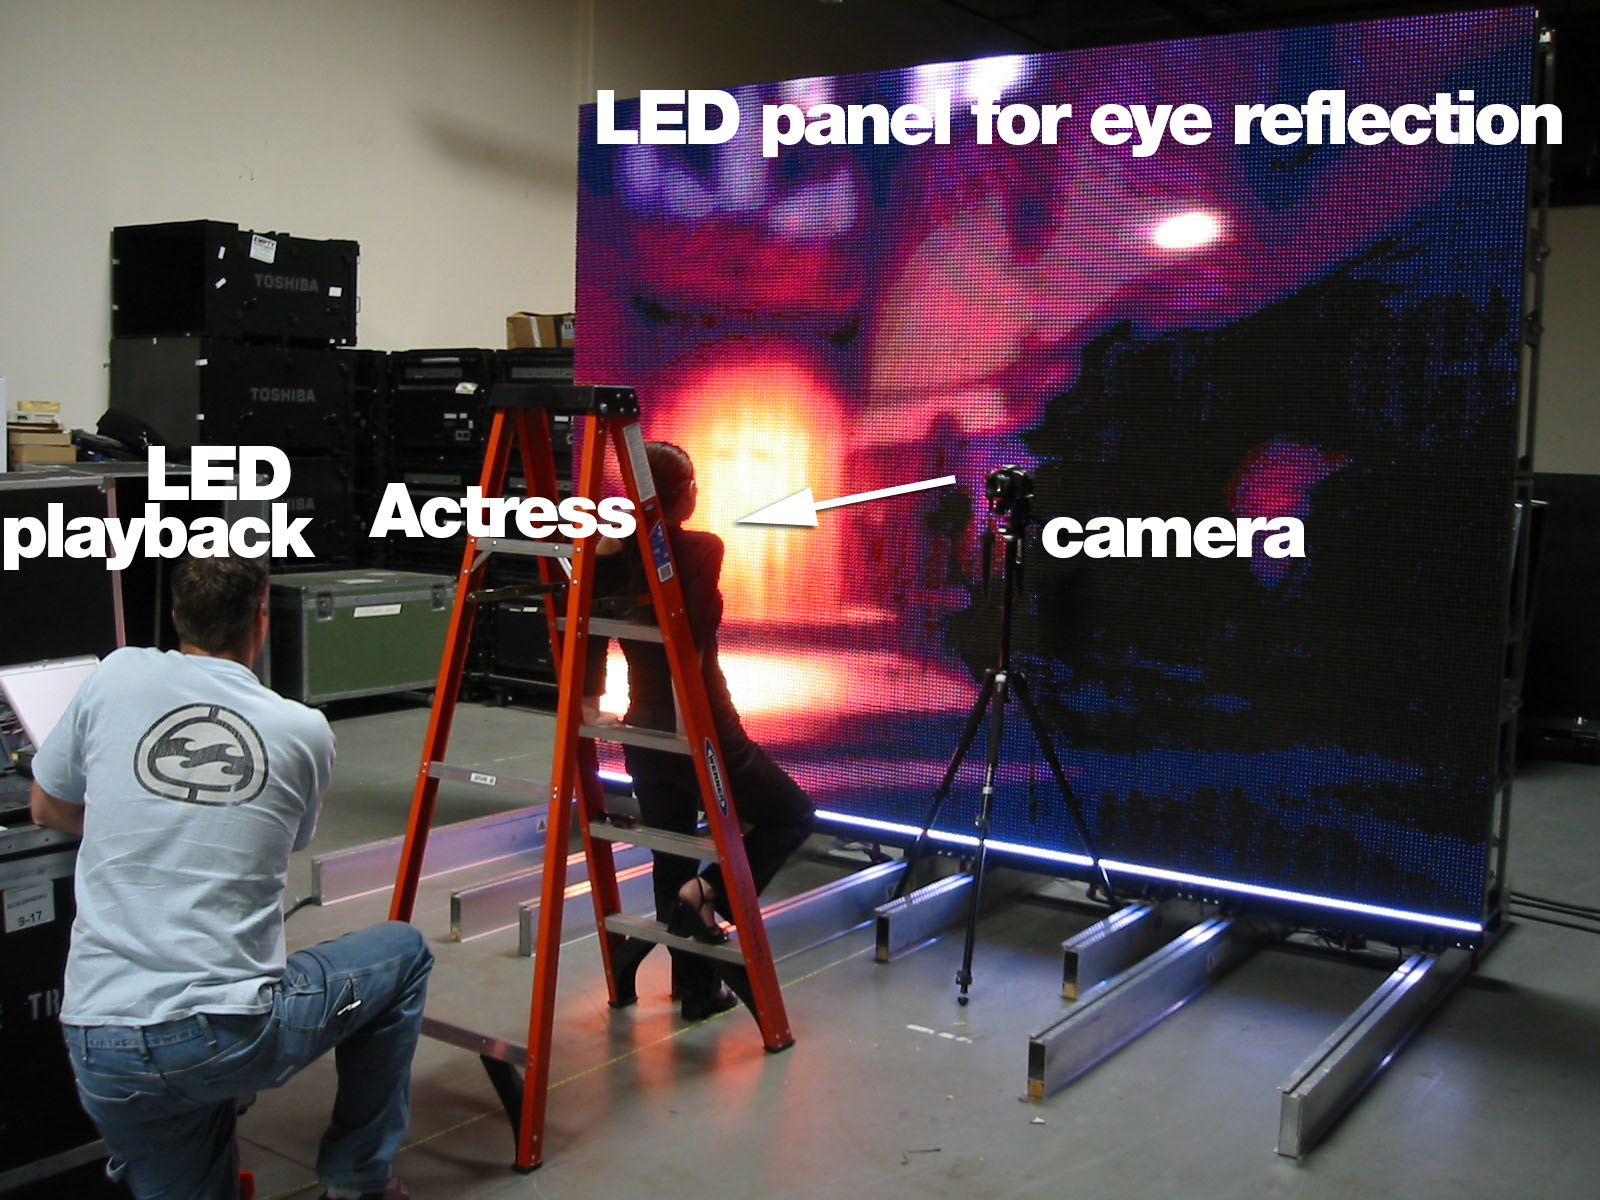
One of these tests was done with ICT for David Fincher in 2004, one for an early test for Benjamin Button, seeing if Brad Pitt could possibly be captured giving a performance and have his face but not eyes replaced. Since the eyes are so key to a performance Fincher wondered if real eyes in a digital head might not be an intelligent way forward?
After a visit from David Fincher and Digital Domain to the light stages at USC ICT, Debevec proposed building a ‘wall of light’ to effectively create a giant wrap around TV which would produce the correct lighting in Brad Pitt’s eyes. Here are the original design files.
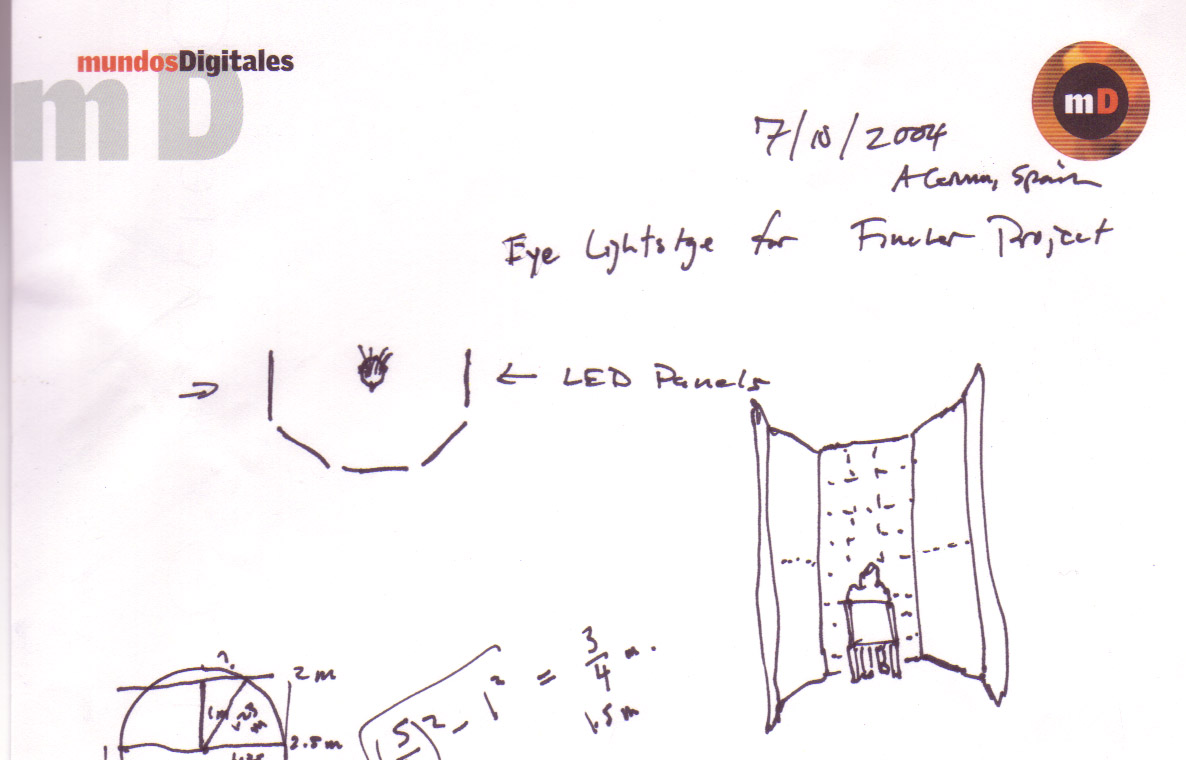
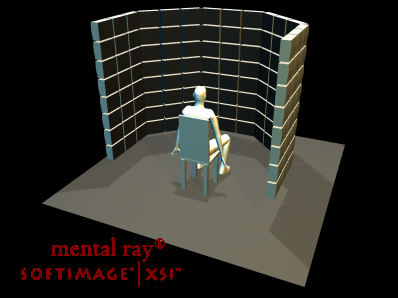
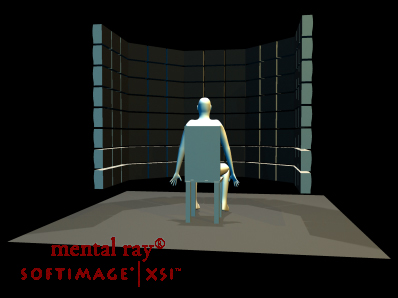
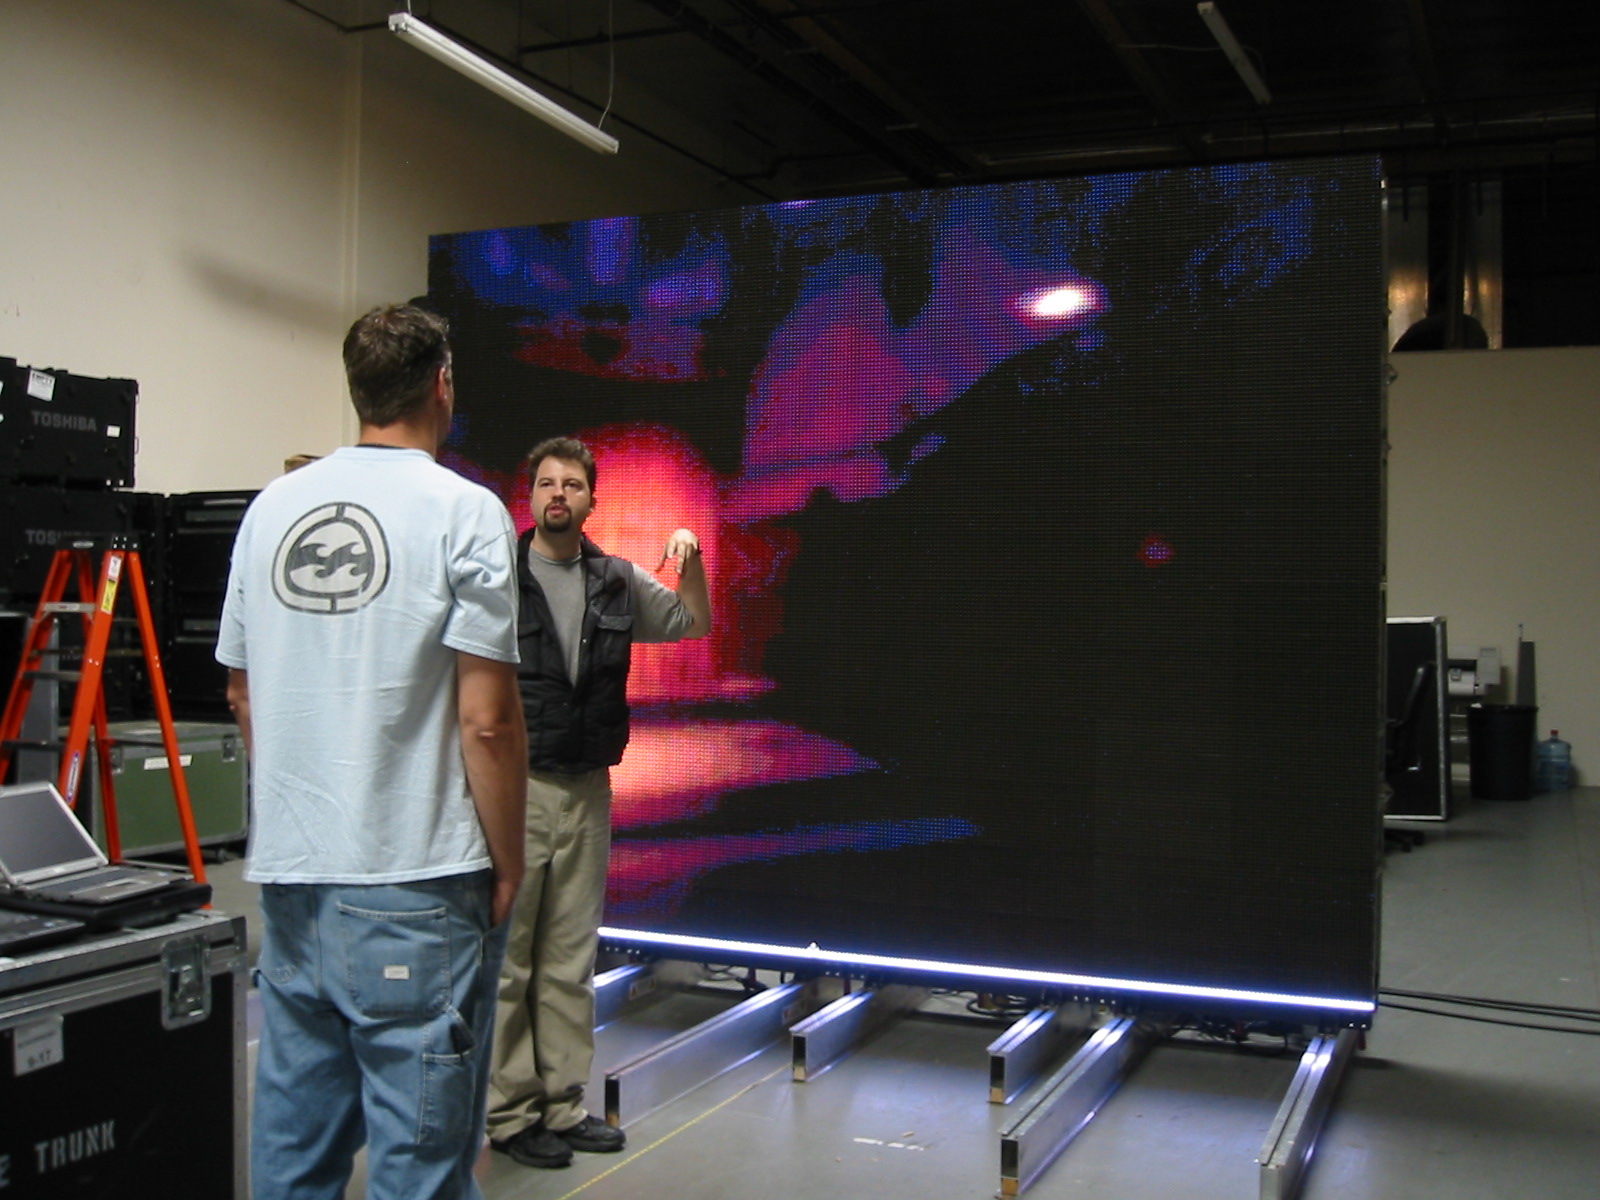
While the bidding team could not build exactly this they did build a single panel with help from BARCO and do tests to see if the principle might work.”
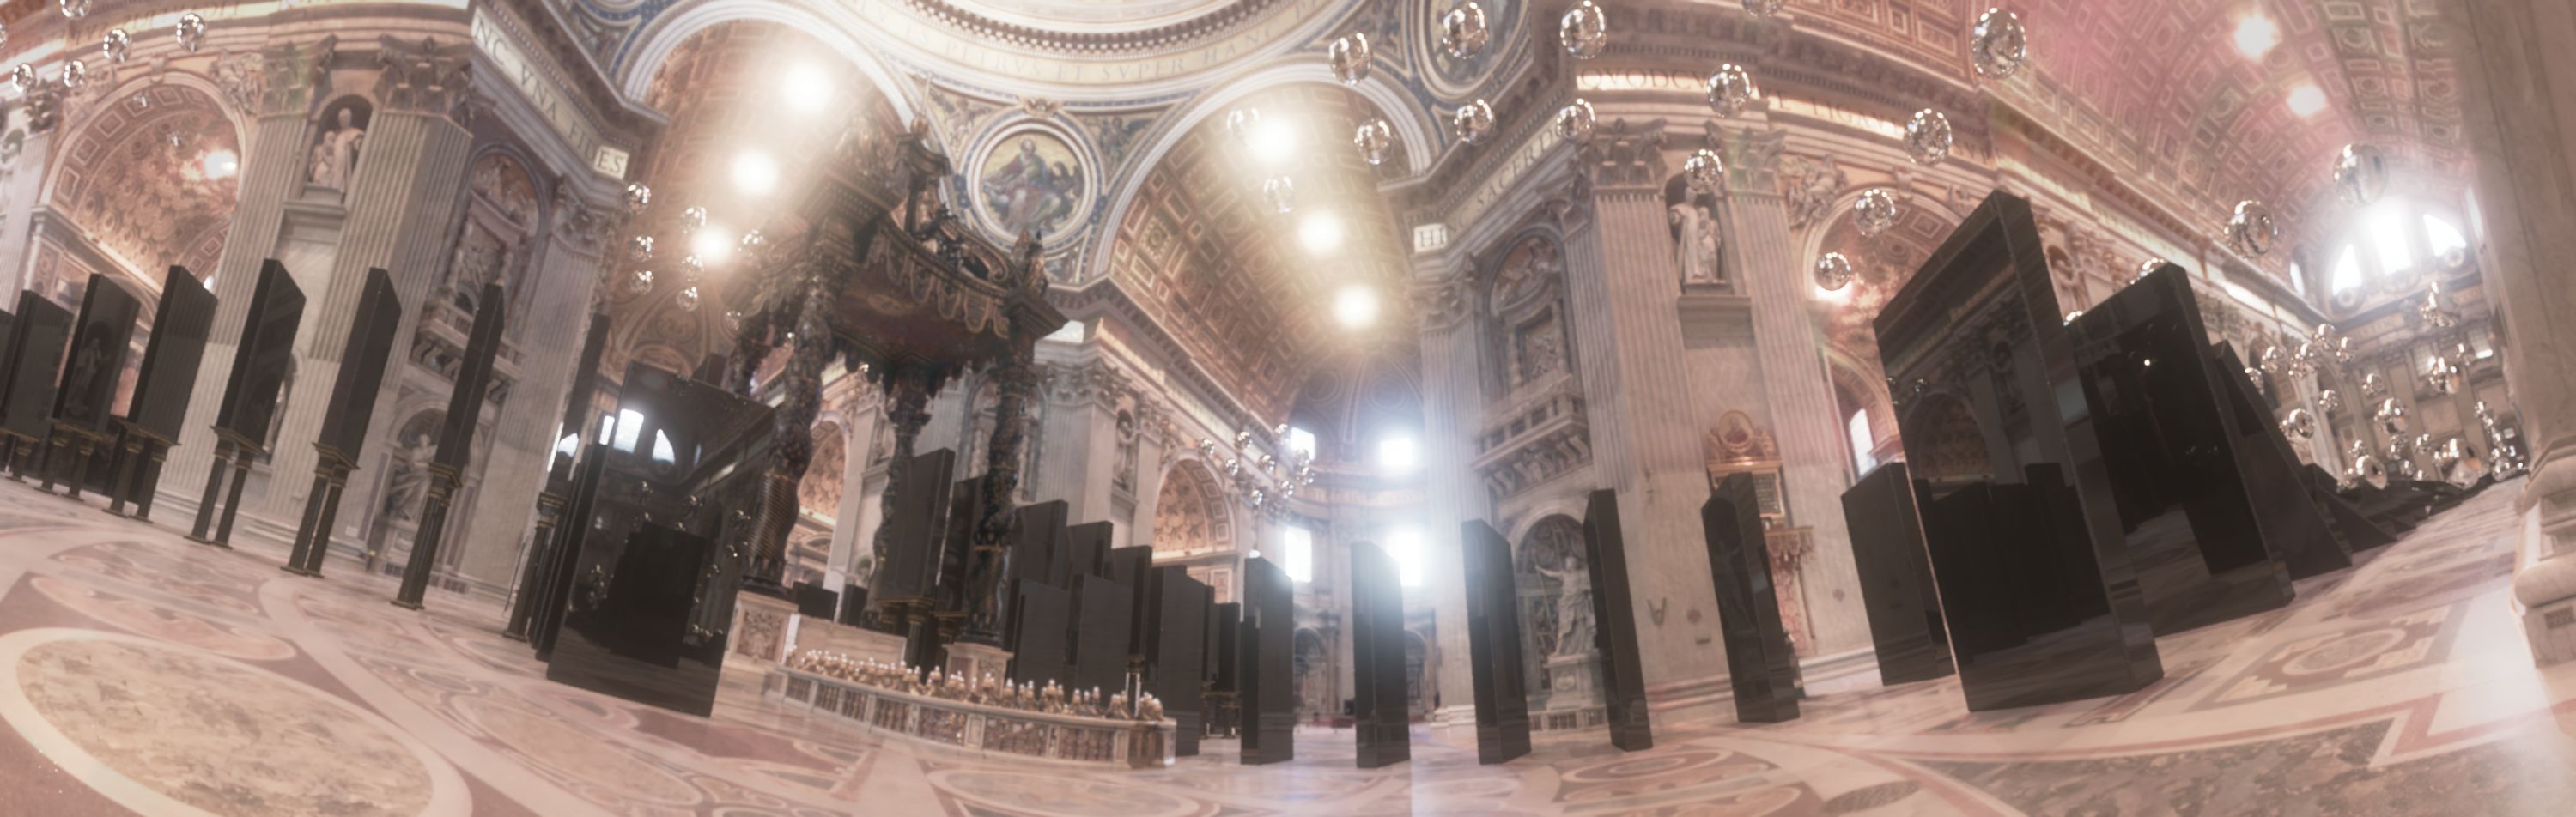
“I asked BARCO up in the Valley to put together one wall of a system for us, and went up with Maya and my graduate student Andreas Wenger from our Light Stage 3 system to test out the idea using a section of the Grace Cathedral light probe image…but DD ultimately went with a full-CG solution for Benjamin’s face,” recalls Paul Debevec.

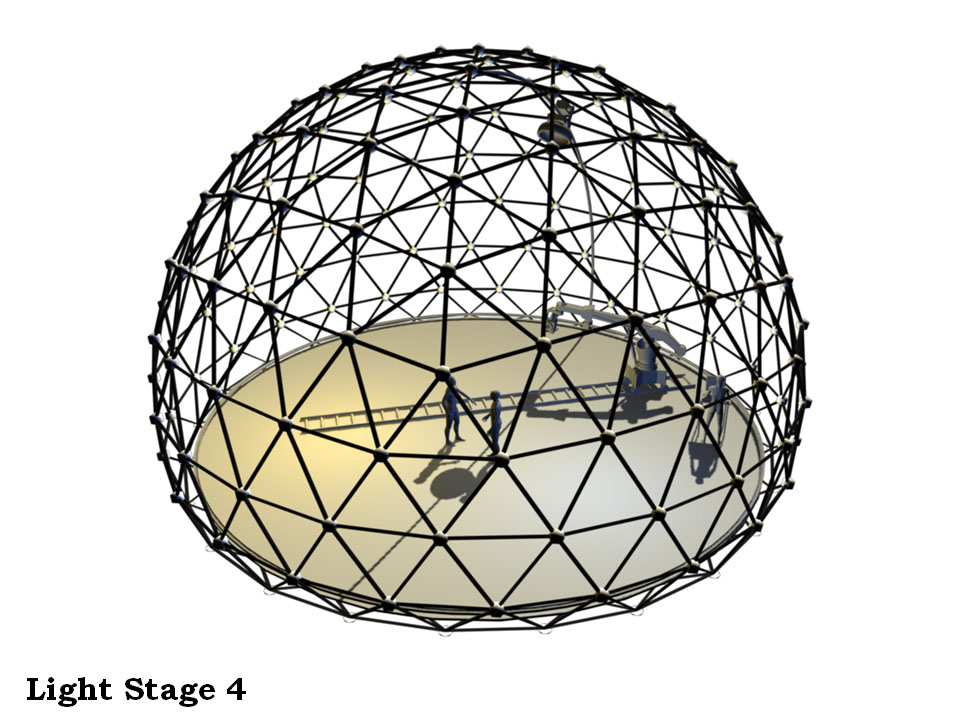
Earlier in 2001, Debevec had led an effort to build Light Stage 3, a spherical geodesic structure which surrounds an actor with RGB color LED lights to reproduce omnidirectional lighting measured from a real location or rendered out from a virtual set. “In my paper presentation at SIGGRAPH 2002, I proposed a design for Light Stage 4 as a larger lighting reproduction system with the camera on a robotically-controlled arm and the sun as a super-bright traditional light mounted on its own gantry system, since LED lights can only go so bright for concentrated sources.”
These ideas would interestingly be seen again when the team from the film Gravity ended up solving the weightless issues and a Light Box solution with a robotic arm mounted camera (see below for more on Gravity).

Interestingly, in December 2009 the ICT and Digital Domain once again did a test for Fincher using Light Stage 3’s colored LEDs for a lighting reproduction shot for The Social Network with Armie Hammer. The job ultimately was awarded to the team at Lola in Santa Monica.
The idea was to film the actor on a set of Red cameras at 4K, and vary the light over the faces during the take in the Light Stage, in such a way that when it was composited his lighting would appear natural and in sync with the plate, thus allowing him to be seen in both spots on the rowing shell. (Amusingly, at the end of this video ICT postdoctoral researcher Alex Ma, now at Weta Digital, is seen doing the line up test – in other words a test for this test!)
• The first 52 minutes of Benjamin Button
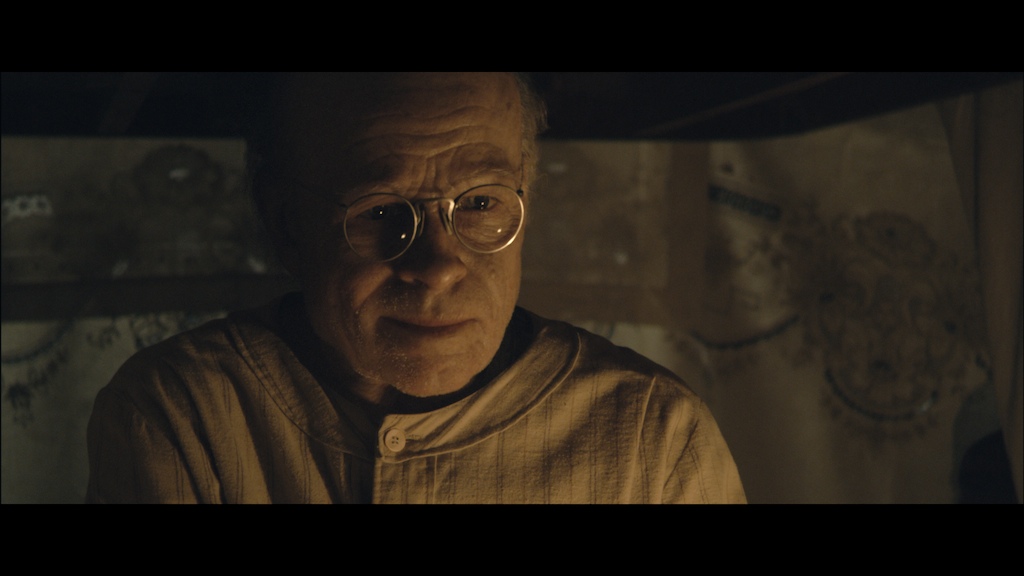
The remarkable fact about the Oscar winning The Curious Case of Benjamin Button is that Brad Pitt’s real face would not be seen by the audience for almost the first hour of the film. “For the first 52 minutes of the film it’s a full 3D head, there were 325 individual shots. There’s no projection, there’s no 2D techniques. Once our work stops about 52 minutes in, Brad takes over in makeup. Ultimately as he gets younger he wears less and less makeup until it’s just Brad,” explained visual effects supervisor Eric Barba in 2009 to fxguide.
The pipeline for Benjamin Button was based on experiences learnt with the 2004 test and the Orville Redenbacher project in 2007. “We learnt what ideas wouldn’t work and what would need further refinement,” explain Barba. “We started working with the Mova Contour guys (developers of the Contour Reality Capture System). Our use of Mova Contour on the Orville Redenbacher commercials didn’t get the warmest reception. Part of the reason was we were doing a guy who was already dead so there was no way to capture a performance from him. We cast a voice that was similar and then different actors to do the face and the body, which ended up as three very disparate performances. Another problem was that as you art direct a commercial you start to get away from the original performance and you tend to move into that “Uncanny Valley” territory. Doing that commercial was a great learning experience and it also humbled my team that had previously worked with David Fincher to put out some pretty amazing work. Up until that point we thought we had a handle on it and then we did Orville and realised we still had a lot to do to make it all work.”
“The part that carried over from 2004,” added Barba, “was taking a life cast of the actor and from there a maquette is sculpted. With Orville the maquette was not very good so we knew we would need some fantastic maquettes showing Brad at age 80, 70 and 60 that the studio could sign off on. In the end we used the Mova rig to capture Brad’s facial shapes and we then built systems to use Brad’s performance to drive Benjamin.”
USC ICT’s Light Stage 5 system – with a 156 bright white LEDs with high-speed control hardware was added to the geodesic structure of Light Stage 3. This used to record the shape and light reflectance of the “Ben 70” maquette. Arriving at ICT in a black box, the elderly rendition of Brad Pitt was gingerly placed in Light Stage 5 and sampled to determine a ‘ground truth’ for the final shots. Following the image-based relighting technique from Debevec’s SIGGRAPH 2000 paper, a set of images called a “reflectance field” showing the maquette lit from every direction light can come from could be used to render the head under any complex lighting environment. It was thus possible to dial up the maquette head under the particular HDR of the scene and then compare it to the digital version rendered in the same HDR lighting setup.
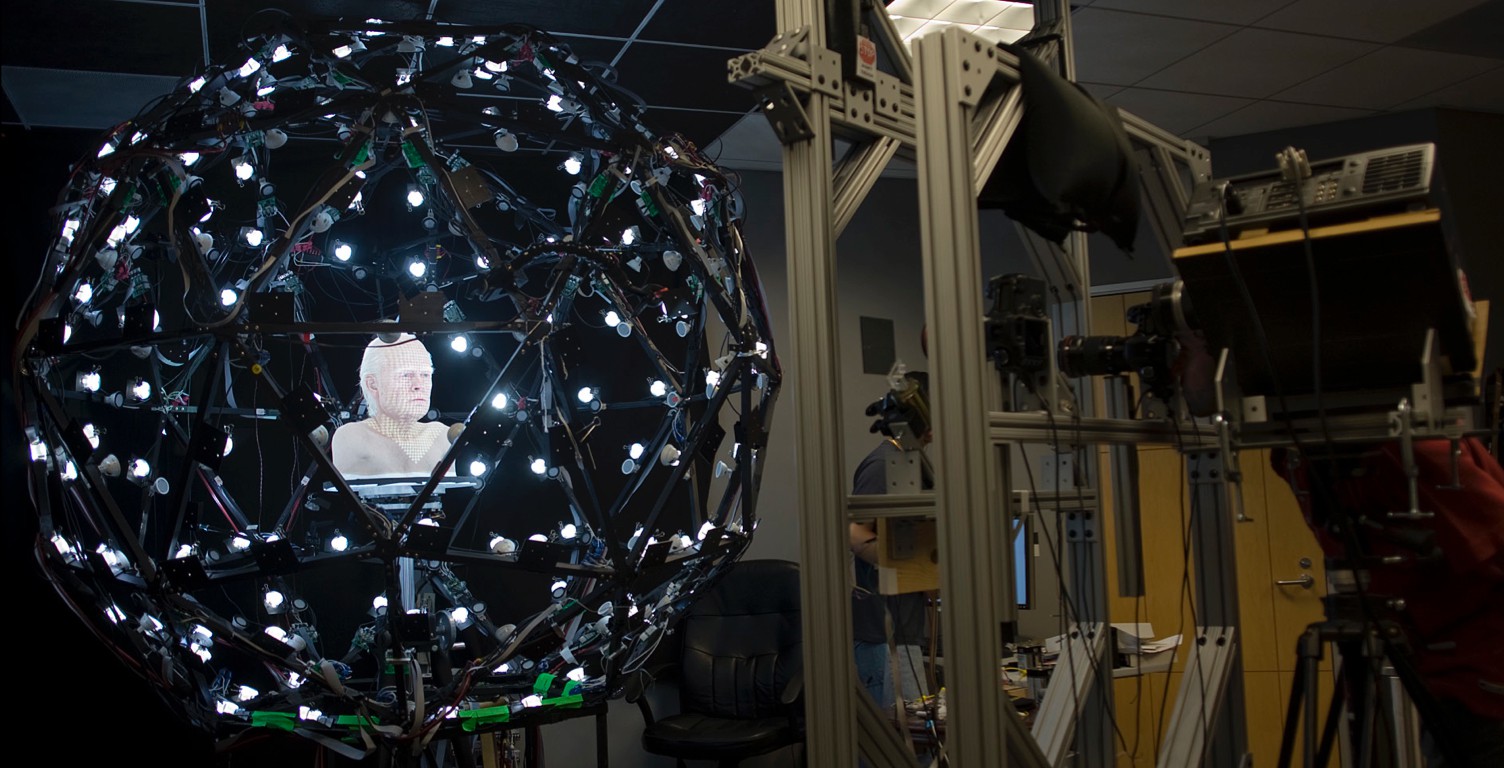
This was the high water mark of using the Light Stage as a reference tool, one could see what a ‘real’ old Brad should look like in each of the on-set lighting environments, without Brad Pitt being made up or even being on set at that point. It gave the animators and lighting TDs one of the strongest tools for consistent lighting and photo reference when there should have been none. It was truly an inventive solution.
The overall process was then:
- Working from life-casts of Brad Pitt and body actors to create three photo-real maquettes representing Benjamin in his 80s, 70s and 60s, then shooting them in different lighting conditions using the Light Stage. (Kazu Tsuji created the maquettes, under the supervision of Rick Baker).
- Create 3D computer scans of each of the three maquettes.
- Shoot scenes on set with body actors in blue hoods.
- Create computer-based lighting to match the on-set lighting for every frame where Benjamin appears.
- Have Pitt perform facial expressions while being volumetrically captured (with Mova/Contour), and creating a library of ‘micro-expressions.’
- Shoot Pitt in high definition performing the role, from four camera angles, and using image analysis technology data to get animation curves and timings.
- Match the library of expressions to Pitt’s live performance of Benjamin.
- Re-targeting the performance and expression data to the digital models of Benjamin (created from scanning the maquettes) at the specific age required in the shot
- Finesse the performance to match current-Pitt expressions to old-Benjamin physiology using hand animation.
- Create software systems for hair, eyes, skin, teeth, and all elements that make up Benjamin.
- Track the exact movements of the body actor and the camera.
- Compositing all of Benjamin’s elements to integrate animation, lighting, and create the final shot.
• Avatar
“Light Stage was used very successfully as part of our work on Avatar…Weta continues to be very interested in exploring the uses of Light Stage and the research work done at ICT”.
One of the most groundbreaking films for digital characters was James Cameron’s Avatar. While Light Stage was used to feed the animation process for the digital blue avatar characters, one might argue that these are characters not humans and thus outside the scope of this article. But in Avatar not only was Light Stage producing great creatures native to Pandora, but it was also used for the principal cast for some of the more challenging body doubles and digital replacements.
Four-time Oscar winner and head of Weta Digital, Joe Letteri, explained to fxguide that “Light Stage was used very successfully as part of our work on Avatar. As a reference for skin detail as well as how faces react under different lighting, it gave us a good basis for understanding how we might create the blue skin of the Na’vi.”
![]()
He goes on to add that, “Weta continues to be very interested in exploring the uses of Light Stage and the research work down at USC ICT.”
Sebastian Sylwan, Weta Digital’s CTO, points out that Weta worked with Light Stage for King Kong before Avatar, but once Weta was working on Avatar, the studio had not only face scans but also dynamic performance captures of several key scenes with actors and actresses such as Sigourney Weaver and in particular Stephen Lang for when he is fighting as Colonel Miles Quaritch at the end of the film.
![]()
Since Avatar, Weta has continued to be interested in Light Stage and recently Paul Debevec worked at Weta for a month as part of a program the company has to bring key researchers to New Zealand and work with the team and be em bedded for weeks or months at a time. Sebastian Sylwan himself used to work at ICT in LA before joining Weta Digital.
Paul Debevec remembers this as an exciting time at USC ICT
“It was an exciting time having Sebastian as part of our graphics lab, and we designed and built the big Light Stage 6 system together. Sebastian got the call to become the Director of Technology of Digital Domain only six months in to his time with us, but by that time we had almost finished Light Stage 6 together and were already doing a research project with it. For a grueling month, Sebastian worked at DD by day and with ICT by night to finish the project.”
From DD Sylwan would move to New Zeland and Weta Digital.
• ILM’s Hulk (The Avengers version of the Hulk)

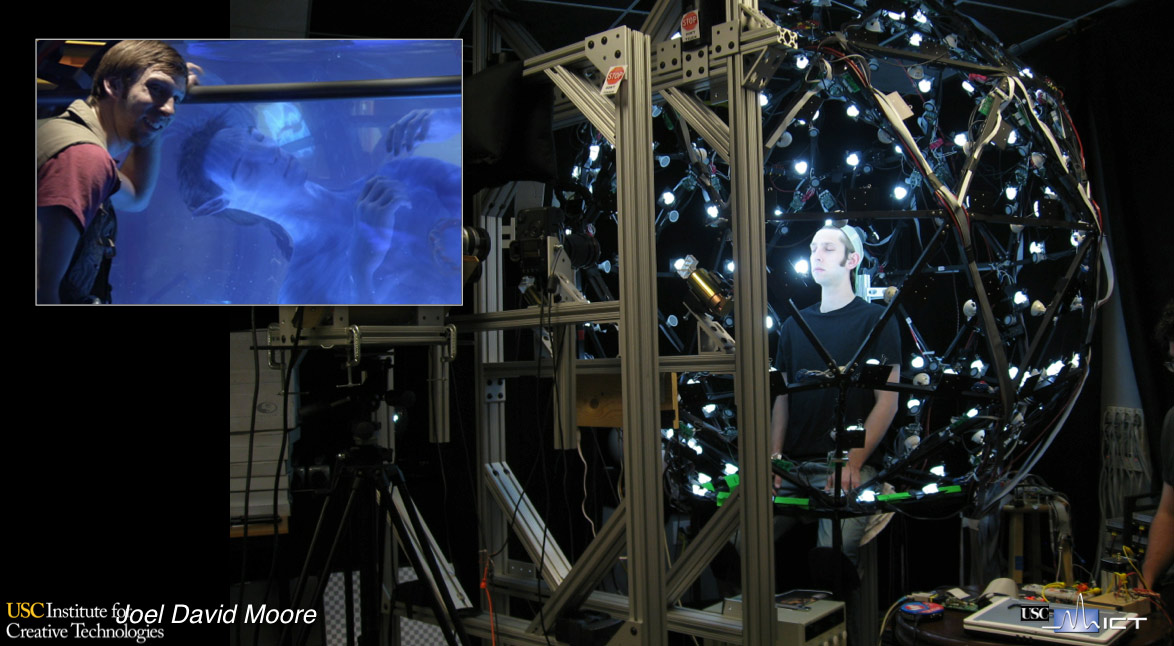
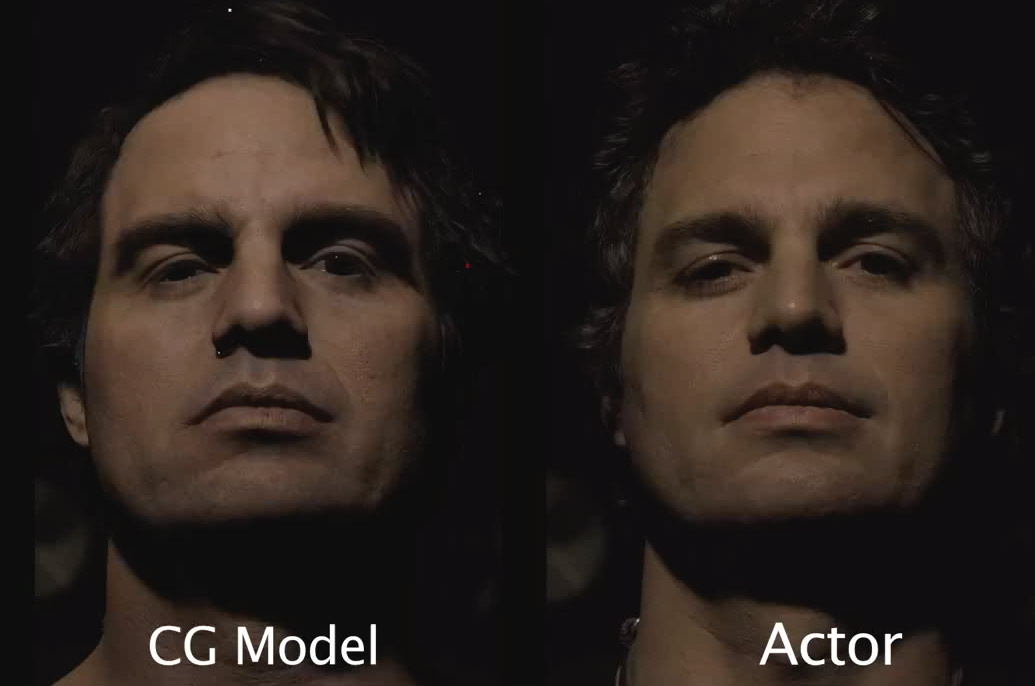
ILM has been at the forefront of digital character and digital doubles, but perhaps one of the most challenging characters has been the Hulk. In ILM’s version of the Hulk for The Avengers, not only did the studio delight fans and achieve amazing realism but it managed to produce a digital Bruce Banner who could within the same shot, transform into the Hulk. ILM scanned all the principal cast of The Avengers at Lightstage LLC and produced digital doubles in many shots, but the work of the Hulk remains exceptional for its results. And it was the Hulk where ILM worked the hardest on Avengers in terms of accurately simulating and representing skin, points out Jeff White, ILM’s senior VFX supervisor on that film.
Janek Sirrs, the overall visual effects supervisor on The Avengers, told fxguide that it was also the Hulk’s ‘greeness and monster-ness’ also allowed some leeway in crafting a believable digital character. “He has many, many human characteristics but you’ve still got that little bit of flex room in there to get away with,” says Sirrs. “It’s more important to preserve likeness or subtle likeness to Mark Ruffalo than have absolute skin qualities. We got away with a bit more than we would have done if we had to do a completely digital version of Mark for the whole movie.”
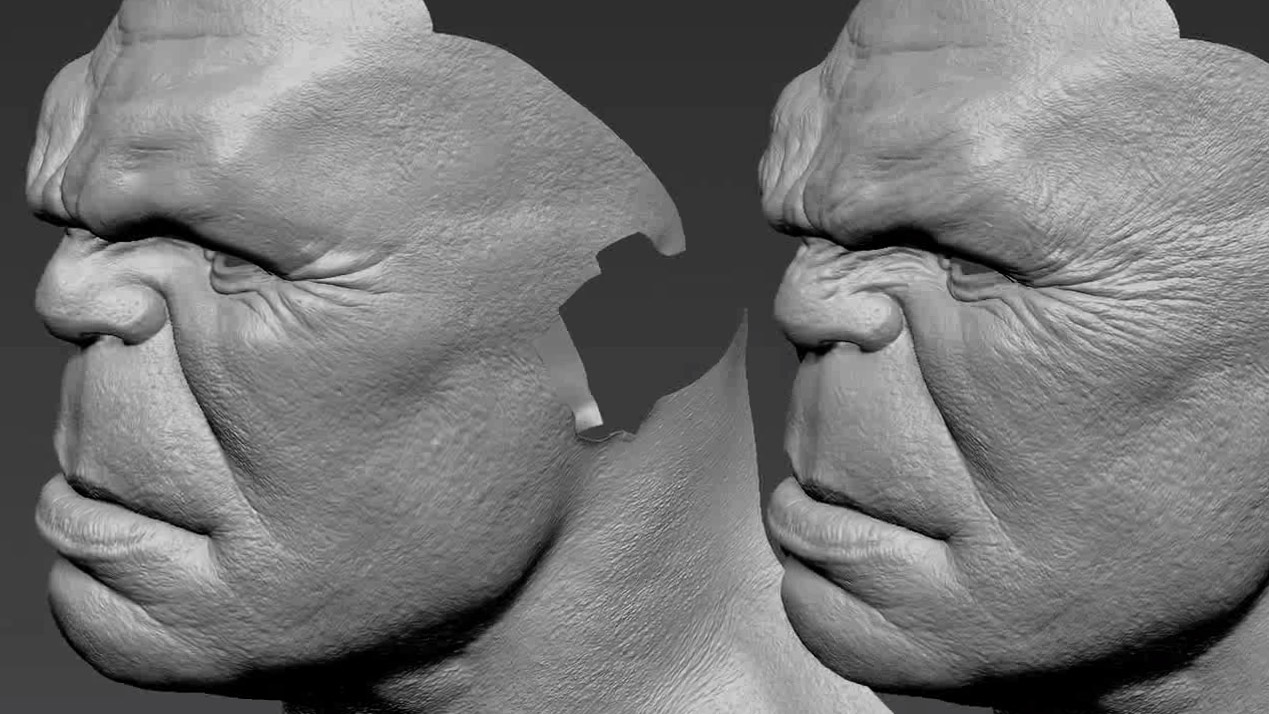
White explains that to solve the Hulk, ILM decided to solve Mark Ruffalo first. “We did all our digital doubles at Light Stage which was hugely valuable, specifically with Mark Ruffalo. Our verification process for getting the Hulk was we have to build digital Mark and put him in the shot – now does he look right? Now we can move on to the Hulk without it being such a huge art project. Light Stage was great – on the base level it gives good geometry, skin detail, texture, and that is a lot of material to work from. We could utilize the texture data and extract out displacement maps of all the pore detail.” ILM supplemented the Light Stage with a life cast of Mark Ruffalo – “They complemented each other pretty nicely,” says White.
ILM built extremely complex digital models of both Ruffalo and the Hulk. “Being able to get geometry and textures at the same source at the same time is really a key part of what makes working with Light Stage so great,” notes White.
 ILM did not do their FACS static poses using Light Stage, they used the Mova system which uses mutliple cameras and ultra violet make-up to get the information needed to feed the ILM TDs doing the facial rigging and blendshapes. This was done before Light Stage and built the basis of Mark/Hulk’s facial library.
“The other thing that was hugely valuable about using Light Stage was the reference pass we would shoot,” explains White. “They (Lightstage LLC) would fire off each light in succession and we’d film it on a high speed camera (a Phantom camera) and that set up would then be replicated in CG with separate renders to match exactly the passes filmed on the Light Stage. That was absolutely the most important piece of reference we had in terms of comparing back and forth at every light angle. Is skin responding the same? Do the eyes look the same? Does the hair look the same? It was hugely valuable to the iterative process of getting Mark to look good.”
In other words, ILM used the scanning data but also it used Light Stage as ground truth on the actor in any lighting setup – as clearly ILM’s access to Mark Ruffalo was inherently limited. “In the process of creating any digital human you have to have something to compare to, pointing back at, to try and answer all the questions about ‘what doesn’t look right?'” says White. “And that pass alone we would go light by light looking at all the different parts of the face.”
In an extremely key vfx environment such as this at ILM, the team is having to adjust and dial in so many different variables at once, from SSS to lights, texture, movement. “Being able to build everything off that Light Stage reference was a big part of our process on Mark,” adds White. Once the ILM team had finally perfected the digital Mark – only then did they turn to the Hulk himself. “The nice thing about spending all this time with (digital) Mark was that when we turned to the Hulk it was not as easy as turning the Hue to Green – but it wasn’t that bad either.”
• Oblivion, Ender’s Game and Gravity
See below for further discussion of digital faces seen in these films.
2. Summary of Scanning a Face
The first question is why do you want to scan a face?
There are half a dozen solid technical uses for a Light Stage but for the purposes of this discussion, there are two particularly great and relevent answers:
- You want a reference of a face under some lighting situation, or
- You want a model and some textures to put on it for animating.
Light Stage is used for both of these but not exclusively.
A reference session would film an actor in several hundred different lighting patterns in about eight seconds – allowing any real lighting setup to be replicated for ground truth reference.
1. Reference
If you place a real person or even an accurate bust of an actor in a Light Stage sphere, you can film it from every direction that light can come from and then simulate any lighting conditions you desire through software using image-based lighting. If you feed in a sunrise HDR, the face (real or lifelike bust) can be filmed with dawn sunrise light and later when you are producing a CG head that is meant to be in that same spot, you will be able to use the Light Stage session as ‘ground truth’. This process produces a physically correct answer and was used on such films as The Curious Case of Benjamin Button. Using the related Lighting Reproduction process, you can light the actor literally with these illumination conditions in real time with color LEDs placed all around the actor.
2. Scanning, modeling and texturing (the key steps – in principle)
This is the more data intensive and perhaps impressive, and certainly more comprehensive, use of a Light Stage. Here you want to produce a large amount of data and feed it into the CG pipeline directly. So you want to scan a head and then rig it for lifelike animation and then render it…here are the steps you need to solve:
1. Scanning. The head of your actor or subject digitally recorded as a geometric surface model and corresponding texture maps. If you are willing to manually align textures and fix facial distortions, this could be done by laser scanning a plaster cast of the face. In a Light Stage, the scanning is accomplished by photographing the actor from multiple viewpoints under a set of polarized spherical gradient illumination conditions, producing a scan with an accuracy of 0.1mm with aligned diffuse, specular, and displacement maps, enough to record skin pores and fine creases..
You will need a scan of a neutral pose – that is a shot of the face without expression. Normally then you also want a bunch of expressions…but which expressions?
There are no hard and fast rules but a set of FACS (facial action coding system) poses is the most sensible, say between 30 and 60. FACS is a facial expression labeling system developed away from CG but widely adopted now across many animation pipelines. This is also why a plaster cast is a poor approach – it can give a reasonable neutral pose but you can’t get all the expression poses.
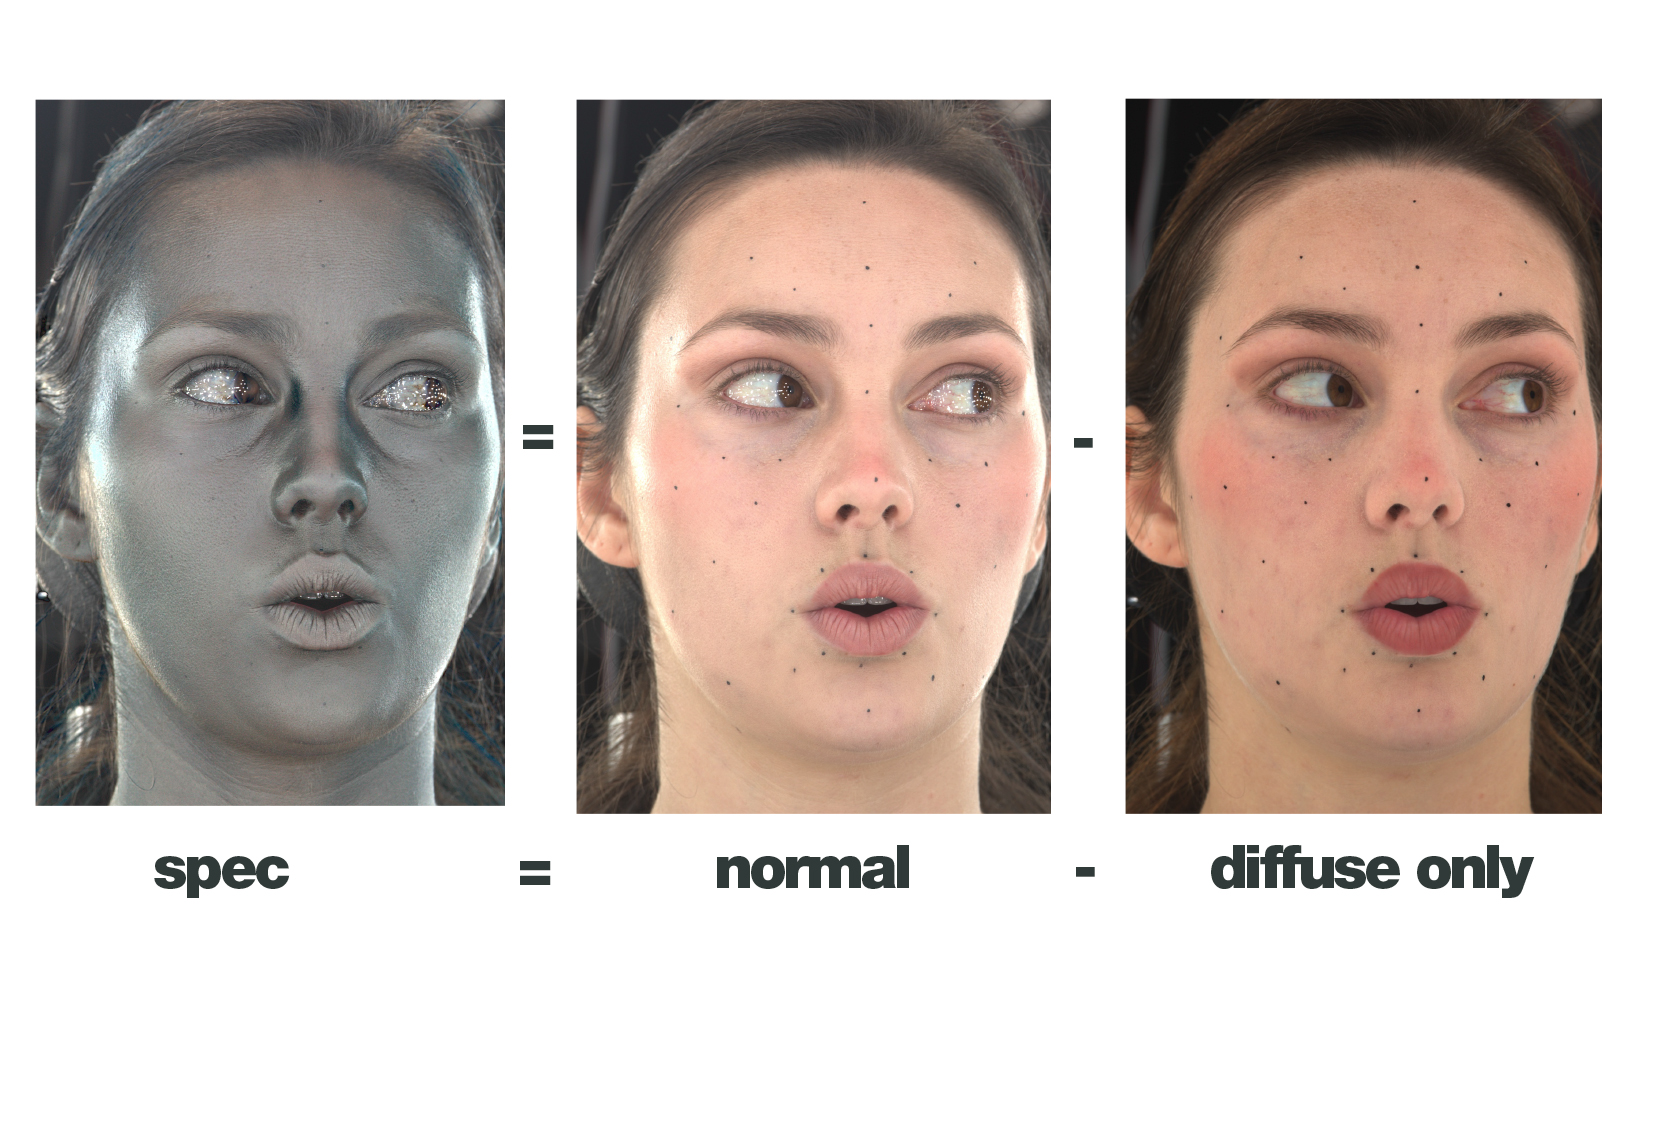
2. In the scan you are going to get a few things – information on shape, texture and with say a Light Stage – both the specular and diffuse separately. This is really helpful as spec is by definition sharp and from the surface of the face, so it will contain loads of high frequency detail.
The separation of spec and diffuse is absolutely key and comes from the ICT team discovering a way to separate the entire sphere of incident illumination using polarizers on the lights and the cameras. Crossing the direction of these polarizers produces a diffuse only pass, since the polarization-preserving specular reflections are blocked, while parallel polarization brings back the specular. With some simple maths in linear color space, the difference yields a spec only pass. This process was built into the Light Stages in a way that allows this to happen in a fraction of a second and thus enables highly detailed sub millimeter accurate scanning of natural facial expressions. Each of the polarization conditions are recorded under spherical gradient illumination conditions, which for those familiar with SH lighting techniques are equivalent to the first four spherical harmonics. A spherical gradient turns on all of the lights in the light stage in a spatial gradient, so that the top gradient has the lights at full brightness as the top, half brightness at the equator, and off at the very bottom. With a little more maths, the left, top, and front gradient lighting conditions yield the X, Y, and Z components of the face’s surface normal map when divided by the appearance of the face under full-on illumination.
The diffuse pass shows the light emerging from under the surface of the skin after subsurface scattering. With Light Stage data, you can also estimate the various surface normals of the red, green, and blue components of the subsurface light and specular reflection of the skin separately. Since it has no scattering, the specular normals reveal the most detail, and the blue, green, and red normals indicate a progressively smoother surface due to increasing subsurface scattering for longer wavelengths. This allows for a technique called “hybrid normal rendering” (published at the Eurographics Symposium on Rendering 2007) to quickly provide an appearance of realistic skin reflectance by using these different surface normal measurements to shade the skin’s red, green, blue, and specular reflectance components, avoiding more computationally intensive subsurface scattering (SSS) shading algorithms which simulate light transport beneath the skin.
Both Digital Emily and Digital Ira used hybrid normal rendering as a visualization tool during their development, but for final rendering, Digital Emily used a traditional (and relatively slow) subsurface scattering approach in Mental Ray, and Digital Ira used a faster and game focused Screen-Space Subsurface Scattering. (For more see Jorge Jimenez, Adrian Jarabo and Diego Gutierrez: Separable Screen-Space Subsurface Scattering – or see GPU Gems piece on SSS from NVIDIA).
3. With the scanned expression data you can start building a digital head or face. Starting with a neutral pose, you build a rigged model.
4. With the FACS expressions you can build blend shapes from the neutral pose to the set of expressions you scanned for. These blend shapes allow one to move a slider and move from the neutral pose to the FACS reference, localized to the various facial regions. Once combined, this will be what drives the model during animation. Depending on your approach, you may also need to solve texturing and changes to the skin texture as the blend shapes move to the key expressions.
5. Now that you have a rigged head that can be made to strike expressions, the actual animation can be done. This can be manually animated or based on performance capture.
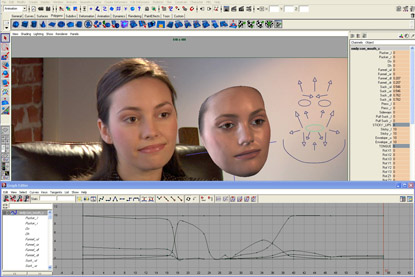
6. Finally the tweaked animation can be rendered. In the case of Digital Emily the rigging took months and there was an additional step before rendering of tracking the animated ‘mask’ back on to the body of the real actress – over the top of her real face. In the case of Digital Ira there was no tracking but the data had to be managed to allow for GPU real time rendering.
3. ICT test projects in detail
With this basic framework, we can now examine how both Emily and Ira were produced and the advances of the last five years that have lead to such a huge technological jump. We have moved from a medium wide shot with little skin pore detail rendered in Mental Ray offline – for Digital Emily, to realtime 4K with extreme close-ups for Digital Ira.
Digital Emily
Digital Emily began in 2007 with an idea from Oleg Alexander and William Lambeth of Image Metrics for a new facial animation technology demo. The idea was to film an actress, model her face, and then recomposite a perfectly matching digital face over her original performance. This 1-to-1 correlation would allow for a close examination between the actress and her digital version. Oleg and William pitched this idea to their higher-ups, who had seen presentations Paul Debevec gave about light stage facial scanning at the 2007 Director’s Guild of America Digital Day event and the FITA ’07 conference in Angoulême, and soon the two teams were in touch. While the original concept for the project involved driving a single neutral facial scan using video performance data, Debevec suggested building the character from multiple high-resolution facial scans, drawing from his team’s experience with their “Animated Facial Reflectance Fields” project published at the 2004 Eurographics Symposium of Rendering. For Digital Emily in 2008, only the front of her face was modeled and replaced, far less than would be done five years later with Digital Ira.
On March 24, 2008, Image Metrics shot background plates and facial performance video of Emily O’Brien, an actress in The Young and the Restless soap opera, at their offices in Santa Monica, CA, and then brought her to USC ICT to be scanned in Light Stage 5. In the course of ninety minutes, Emily was scanned in thrity facial expressions covering the major elements of Paul Ekman’s Facial Action Coding System (FACS). Over the next few weeks, the ICT team processed each of the expressions into 0.1mm-accurate 3D geometry and corresponding diffuse and specular reflectance maps. While the team got different normal maps for the different wavelengths of light, they still used a traditional SSS CG rendering model to render Emily’s digital face.
Instead of using the different normal maps, they ended up using displacement maps derived from the high-res geometry, because “what the normal maps give you is an up-res’ed version of the structured light scan, so what we got was really high level pore detail scans,” explains Oleg Alexander, who was with Image Metrics (and has since joined ICT).
Once the team built their blend shapes they projected onto them to get high resolution displacement maps for her wrinkles and skin details. “We basically set up a traditional displacement map shader network, with about 30 displacement maps,” says Alexander. The team could have set up more as they had more data but they found that the actress really did not make any of the extra shapes in this particular performance, in other words the 30 maps covered enough, even though she had been scanned for more. There were about 75 blend shapes in the rig overall.
Originally the Image Metrics team was going to use a traditional plaster life scan for the actress but the recent advances at ICT in 2008 for capturing skin pore detail made that decision irrelevant. At the time, the ICT’s fine detail scanning approach had been applied to scan actors for Weta Digital for Avatar, but a large set of these facial expressions had never been rigged into a digital character. At this time in the Light Stage evolution, for each facial pose the actress or actor was required to hold still for about five seconds. As with most of Image Metrics’ work, the front on camera provided the basis for their performance analysis.
The face rigging in total would take nearly four months to complete. The 75 poses were all based on the FACS system, the animation of her performance then took one animator about one week to block out, and then after some test renders some more time was required to tweak the animation. Due to the evolution of the technology at this point, there were no eye balls, teeth or hair detail in the scans from ICT. Alexander points out that where the lashes overlap the skin and eye detail there was a lot of noise in the scans.
To fix this, Emily’s top eye lid had to be remodeled from photographs. In the end the eyes had to be hand rigged, modeled and rendered and that proved one of the hardest aspects. In 2008 when fxguide first sat down and interviewed Alexander, we asked just how perfect he felt Digital Emily was? “To date this is the best – but there will be better,” he answered with a smile.
Alexander, as noted above, would move to USC ICT where some five years later he would be involved with not only helping to produce a new Digital avatar – Digital Ira – but also helping design key texturing correspondence software that would allow Ira to be vastly more accurate and detailed than Emily had ever been.
Digital Ira
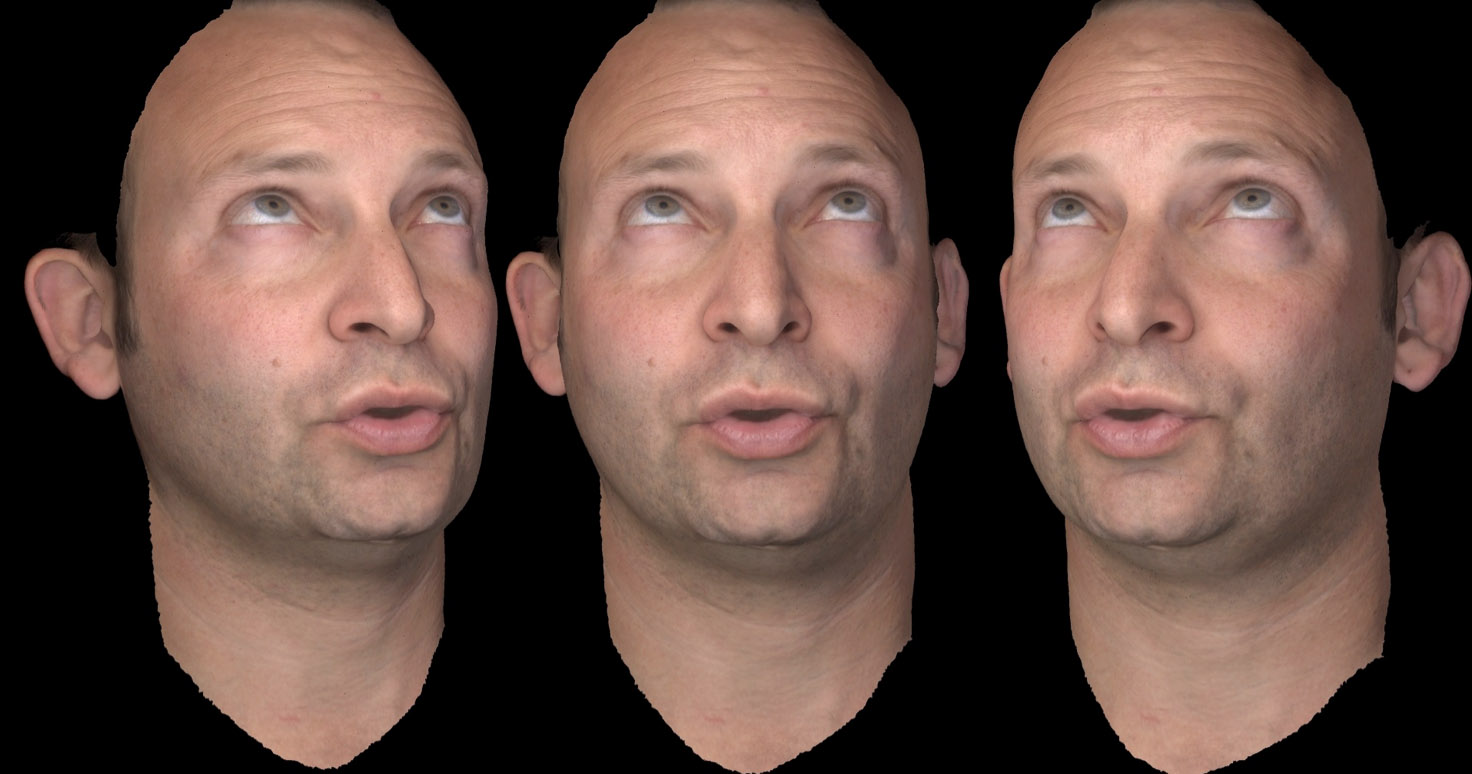
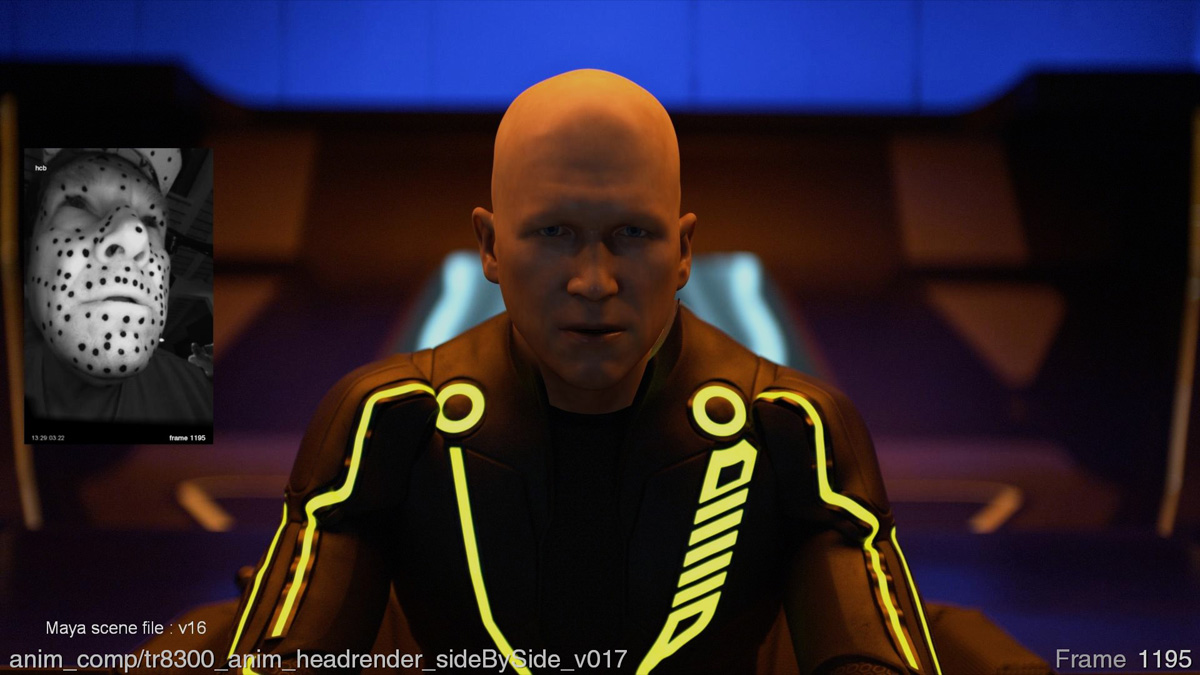
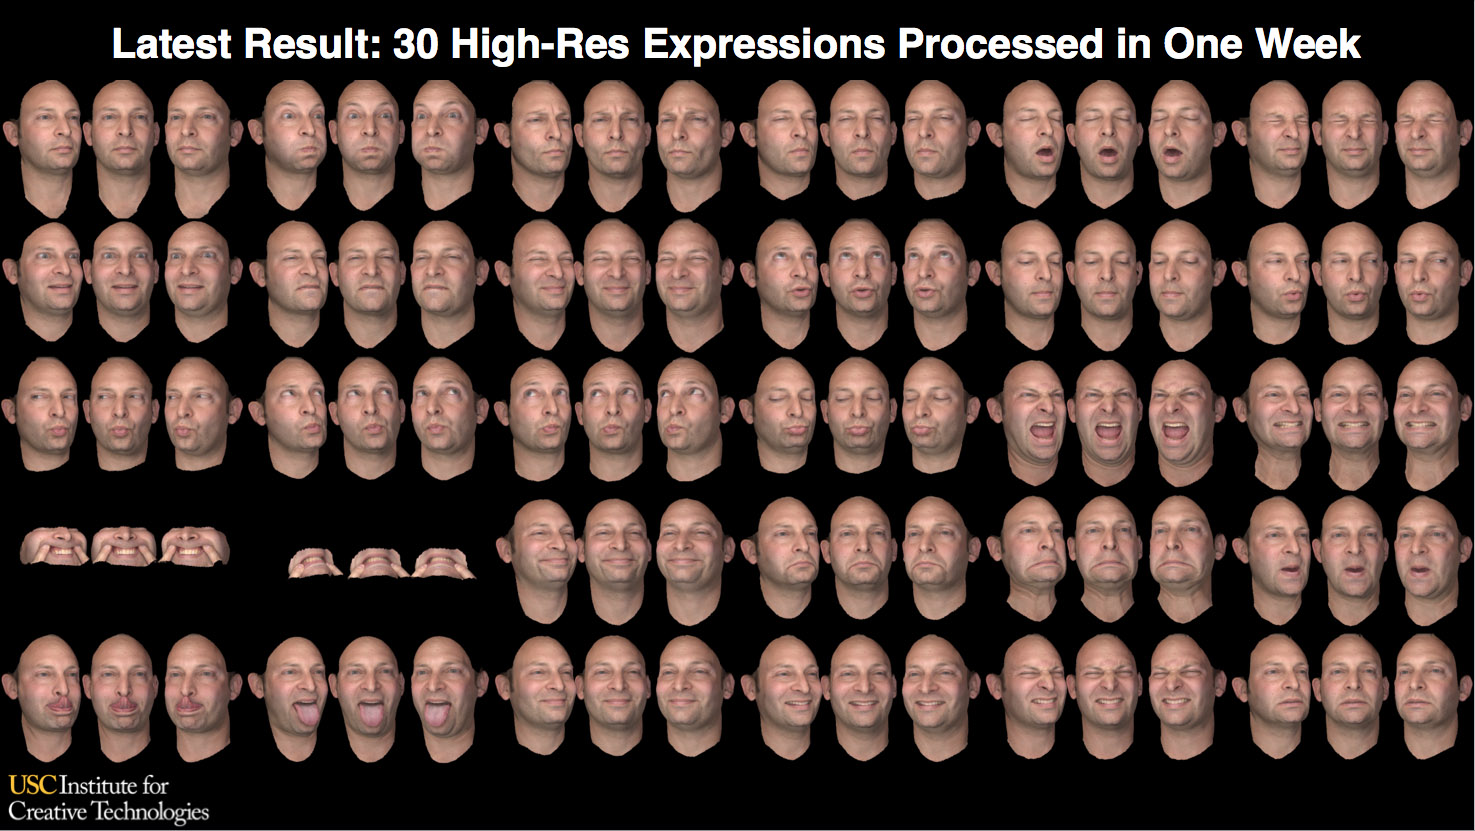
As part of this collaboration between several companies, the ICT team tried to create a real-time, photo-real digital human character who could be seen from any viewpoint, any lighting, and could perform realistically from video performance capture even in an extremely tight close-up – much closer than had been tried with Emily. In addition, the data was passed to both an NVIDIA team and an Activision team. NVIDIA was keen to use it to show the power of their latest graphics card, and Activision was keen to run the demo in a game-ready production pipeline. To achieve this, ICT scanned, their own animation researcher Ari Shapiro in thirty high-resolution FACS expressions using the USC ICT’s new Light Stage X system.
This first step provides a neutral pose and then 30 FACS static poses.
To record Ari’s actual performance, the team shot multi-view 30fps video of the actor performing improvised lines using the same multi-camera rig. . They could do this having recently upgraded to DSLR cameras with video recording capability, but these were not designed for sync gen lock capture, which means some additional post processing was required.
From here there are two almost distinct problems:
- to make a model and rig of Ari now as Ira, with the correct textures and blendshapes
- to drive that rig with an automated facial animation performance capture process
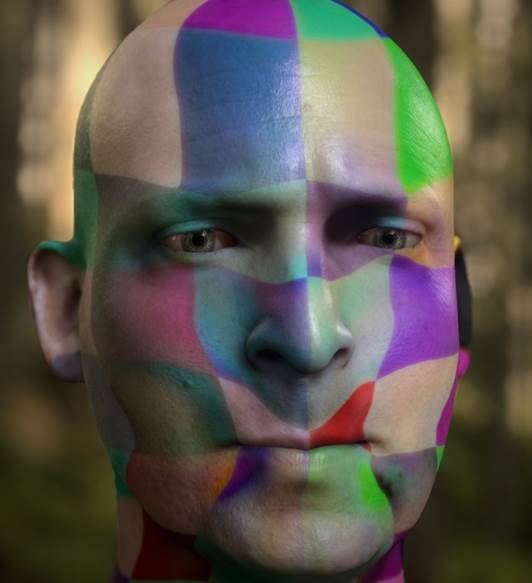
Stage 1. Model and Rig. The team used a new in-house tool called Vuvuzela to interactively and precisely correspond all expression (u,v)’s to the neutral expression, which was retopologized to a neutral pose – artist mesh.
Not to blow their own trumpet but ICT developed Vuvuzela in-house and it is a breakthrough tool for this type of work. The tool was presented at SIGGRAPH 2013 as a poster by Ryosuke Ichikari, Oleg Alexander (see above), and Paul Debevec. The idea is to take the neutral source map, a FACS style expression target map and warp the source to match the target at pore level in texture space.
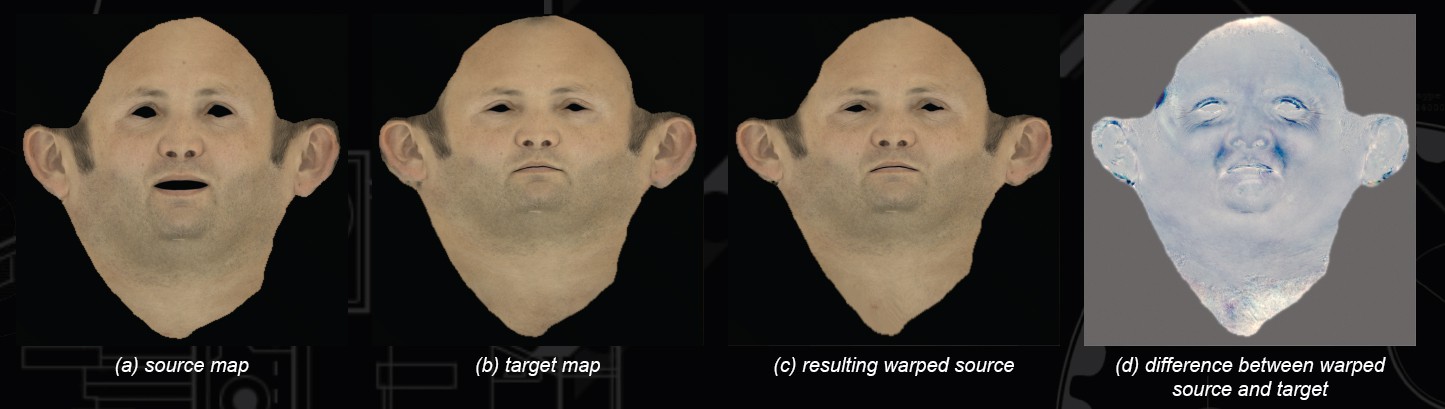
The scans are stored as 4K 32 bit OpenEXR files including diffuse, specular, normals, and the high resolution point cloud. They are ear-to-ear of Ari’s face obtained from Light Stage X. As it is in UV space it is a 2D operation to match and design the warp: the user clicks corresponding points in the source and target, but there is no need for tracking dots as the facial texture data is more than detailed enough. These are not the correspondence points per se but the initialization for Vuvuzela to start.
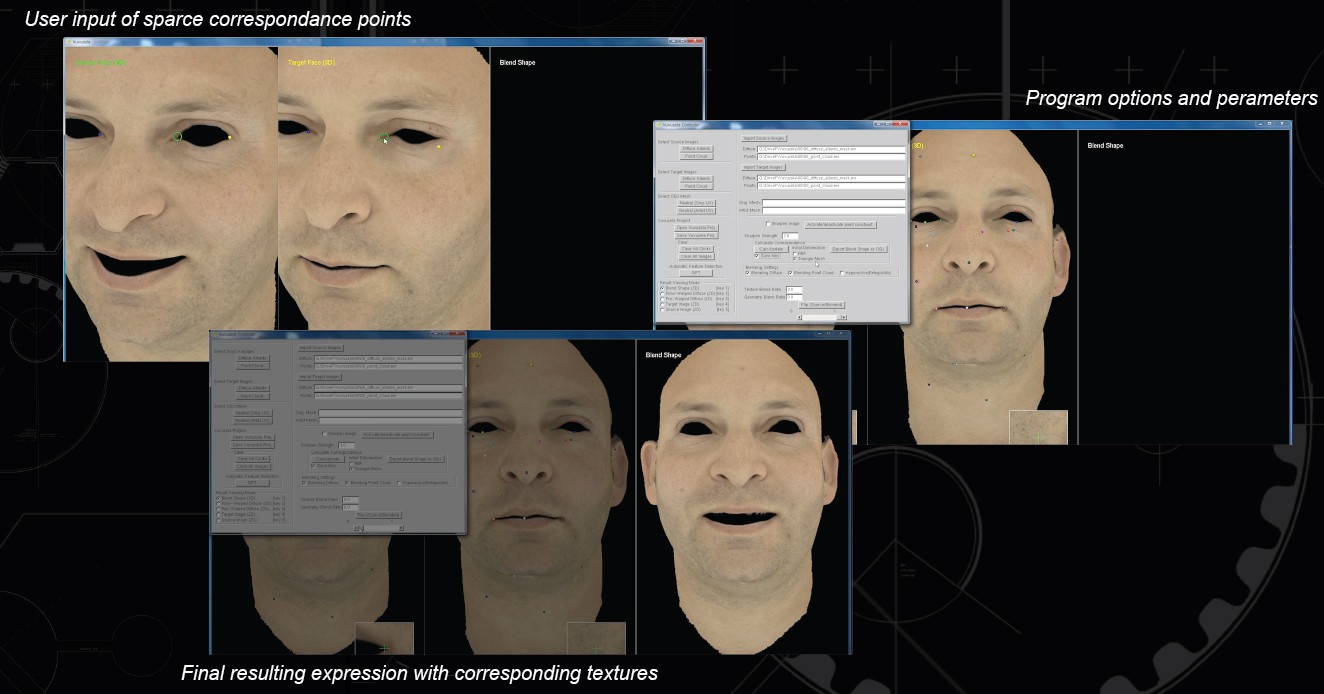
Once you have enough points you can run an update, move into a 3D view and it even previews a blendshape so you can see with a slide if it is moving between source and the new warped Source/Target correctly. It runs an optical flow algorithm to compute the dense warp field, and produces sub-millimeter correspondence. A great by product is that you are able to generate the 3D blendshape directly from the scans. The resulting blendshapes and textures are then ready to hand off to a rigger.
Neither Digital Ira or Digital Emily were rendered with the ICT’s own Hybrid Render Shader which uses the R , G and B separate normals from the scan stage to reproduce sampled Sub-Surface Shader, (even though it can be realtime). Emily was rendered in Mental Ray, Ira was rendered with different GPU pipelines.
This is in stark contrast to Emily where the textures did not match between the neutral pose and an expression, or rather there was no correlation, so mid-blend shape the pores of her skin would effectively cross dissolve from the neutral scan pore data to the pose scan data. This would effectively mean the pores on her skin would go ‘soft’ then ‘sharp’ again at the end of the blendshape. In Emily to solve this the face was made to not really have pores – because of the distance to subject and her makeup – this was fairly forgiving. All that remained was the wrinkles which would correctly appear and subside. In Ira the use of Vuvuzela solved this allowing for the extremely closeup shots of Ira in the demo. To express this another way, Ira had the skin correctly moving from one position and pore stretch or compression to another. Emily had two separate scans but no exact roadmap of how any tiny patch would move from one to the other. Emily had large scale matching details – the eyes, the mouth etc, but Ira could track tiny patches as the moved between blend shapes.
The textures were further helped by various techniques which produced higher resolution skin detail. ICT used an approach based on research they published at Eurographics 2013 (“Measurement-Based Synthesis of Facial Microgeometry”) to sample skin patches and then apply this algorithmically to up-res the skin textures believably. Interestingly, inspecting data from and channeling the spirit of this work, Activision would later effectively used a version of ‘noise’ to do the same thing. It may seem 4K super detailed skin pore detail is over kill but remarkably it is not. In fact, the specular highlight is so key in reading if someone is sweating or flushed that it turns out that this very accurate and detailed texturing is vital to realism. It is also something that can be lost in many ‘casting’ processes due to clogging of the skin (both the material and the talc used to allow separation on hardening) and the weight of the casting materials such as plaster.
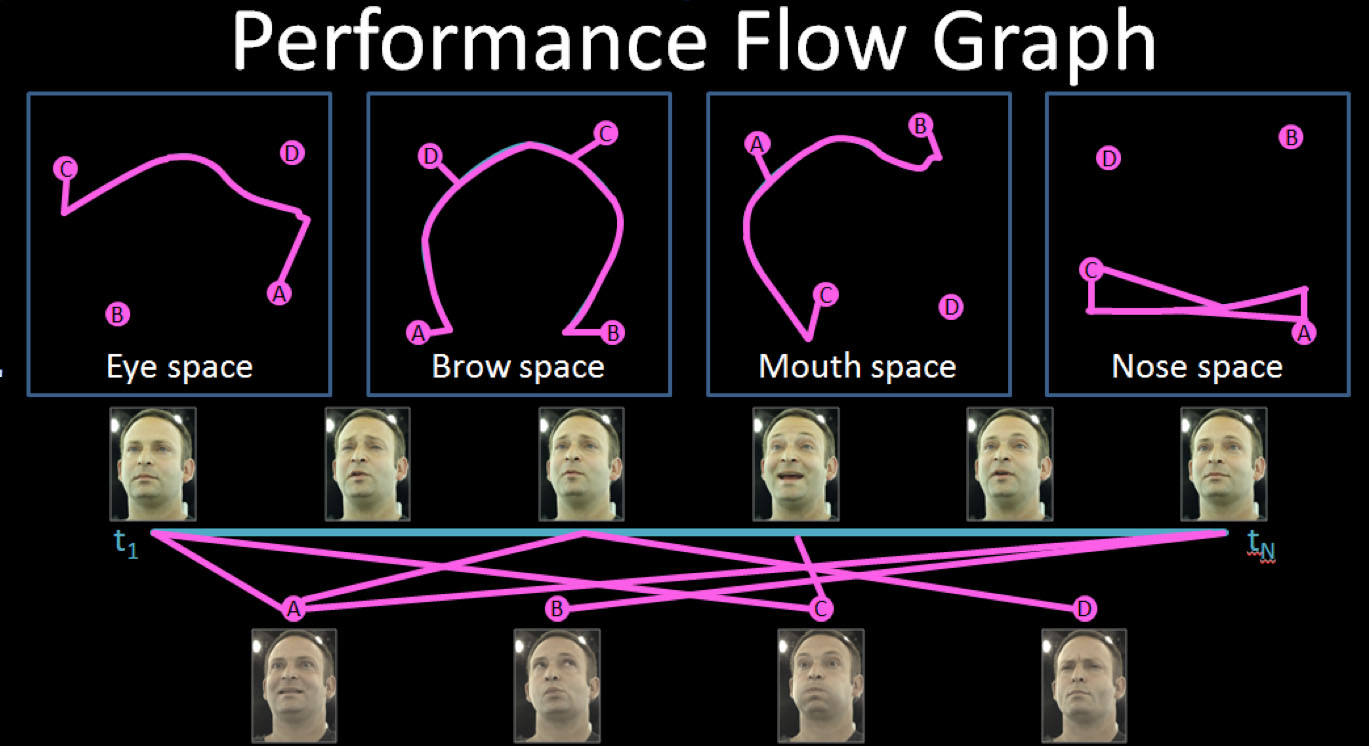
Stage 2. Driving the Rig. Now that one has a rig and a bunch of sliders to move between gross major expressions, one needs to drive that rig to match the subtle performance of the real Ari. Here ICT and lead researcher Graham Fyffe developed a new innovative approach. As it turned out for the lines delivered in the demo by Ari, Digital Ira only needed to reference 8 basic FACS expressions. The new offline animation solver works by creating a performance graph representing dense GPU optical flow between the video frames and relating them to these eight key expressions (key for this particular performance). This graph gets pruned by analyzing the correlation between the video frames and the expression scans over twelve facial regions. This is important – to work, the face of Ira not only uses a mix of 8 static Ari poses, but different parts of Ira access a different set of weights of those eight. So for example, to simplify, the nose may be a blend of static pose A and C in various amounts, while for the same point in the video, the mouth may need a completely different mix of A B and C static poses. The algorithm then computes dense optical flow and 3D triangulation yielding per-frame spatially varying blendshape weights approximating the performance.
In other words there is an optical flow based recipe over time for what static FACS poses should be mixed in, varied in notionally 12 separate regions of the face, all blended and interpolated together, but when it is all said and done it drives a rig that ‘moves’ the skin correctly rather than just mix interpolating between expressions texture samples. When Ira’s skin moves it doesn’t interpolate and cross dissolve.
The tracking developed by Graham Fyffe is a novel method and was presented as a talk at SIGGRAPH 2013. It also aims to solve the problem of drift in optical flow. Several solutions have been published in recent years, but this ICT’s attempt was focused on solving a performance flow graph (performance timeline) in regionalized pose space.
All of this would be simpler if the actor never moved their head, but one of the aspects the pipeline has to solve is zeroing out the head to remove nods and tilts. “Their solver kind of zeroes out the gross motion by figuring out what the vertex weights should be on to that skeleton and what the skeleton motion should be,” explains NVIDIA’s Curtis Beeson. “That takes care of the gross motion like nodding the head up and down or left and right – and then now they have a stabilized base- they can describe the facial animation in terms of a per vertex per frame blend weight into the static poses that they capture.”
What is also key is the level of automation. Once this process has been done, Ari could come back and be filmed saying more lines, as in fact he has been, and then in a matter of just a few hours there could be a new realtime solution ready to be used of him delivering those lines, and that could be played in realtime (via a system like Activision or NVIDIA). This is dramatically faster.
Activision’s Ira
For Activision’s Digital Ira, the source data provided from ICT included a series of 30 high resolution – 4.5M points scans, and a tracked mesh at approximately 20K points. In addition there was each of the 8 FACS Light Stage scans of Ari Shapiro, that were referenced. These had geometry accurate to 0.1mm, (each with diffuse texture, specular intensity, surface normals, and displacement).
“They take the 8 expressions we deliver and compress it even more to fit it into their realtime rendering system,” says Graham Fyffe. For the real-time performance rendering ICT handed over the 8 key ranked static poses and the animation ‘recipe’ (a blendshape animation) to Activision as well as the entire data set as animated vertices. Activision then compressed that into 60 bones for a bone rig as that is how Activision’s team decided to implement their version of Ira. “These things can be converted one to the other – with some loss of fidelity – but it is possible to do that,” adds Fyffe.
To create the game-ready facial rig, the team transferred the mesh animation to standard bone animation on a 4K polygon mesh using a bone weight and transform solver. At SIGGRAPH 2013 the team explained that the solver optimizes the smooth skinning weights and the bone-animated-transforms to maximize the correspondence between the game mesh and the reference animated mesh. The rendering technique uses surface stress values to blend diffuse texture, specular, normal, and displacement maps from the high-resolution scans per-vertex at run time. The final DirectX11 rendering includes screen-space subsurface scattering, translucency, eye refraction and caustics, real-time ambient shadows, a physically-based two-lobe specular reflection with microstructure, depth of field, antialiasing, and even film grain.
This is a continuing project and some ongoing work includes simulating eyelid bulge, displacement shading, ambient transmittance, hair and several other dynamic effects. The same data used by Activision was also used by NVIDIA for their GDC demo. In effect two Ira’s from one data set. While the work compliments each other, the NVIDIA version used higher resolution 4K texture maps but did not use some of the advanced enhancements such as the detailed eye work that Activision incorporated.
The Activision team was led by Javier von der Pahlen, director of graphics research and development, and aided by the “amazing skin and eye shading” researcher, technical director Jorge Jimenez. Speaking at GDC 2013 they explained that, “Eyes are the most difficult part of the body. As eyes are made of different kinds of tissue, some of which is particularly gelatinous and transparent, all skin considerations apply. But eyes are also wet surfaces with multiple densities that reflect light differently.”
Artists need to consider what makes an eye look wet, Jimenez stressed. Activision Blizzard’s team found the main difference between a dry and wet eye is the level of distortion of objects in their reflection.(Polygon). The level of subtlety the team has devoted themselves to has resulted in incredible realism; for example, they also found that blurring the reflections and specular highlights (particularly bright points of reflected light) in the eye changed how wet the eye looks. Jimenez strongly asserts that small details contribute to the overall sense of believability. “The texturing used UV mapping – not Ptex –, and used mainly 2K x 4K maps. But Bernardo Antoniazzi (at Activision) developed an optimized UV layout that manages to keep most of the detail in 1K x 2K.”

Jimenez had previously presented at SIGGRAPH 2012 (Separable Subsurface Scattering and Photorealistic Eyes Rendering) and also in the Real-Time Live event where he demonstrated realtime controls on eyes that were remarkable. Over the last year this has been refined further for characters such as Digital Ira, “The technology is similar. The main difference is that we had more time to actually master its usage. I believe there is a gap between the moment you finish the research, and you maximize its potential — it took a while for us to do so with the eyes tech.” says Jimenez “That said, there were some new features like screen space reflections. It’s a subtle difference, but with this technique, lighting from the surrounding areas hit into the eyes, and make it feel more integrated with the face. With screen space reflections, you can see the eyelids and nose reflection under certain angles. We also found out that these reflections are one of the visual cues that make us to understand that the eyes are wet”.
Screen-Space Separable Sub-Surface Scattering
Activision is using screen-space separable sub-surface scattering. One of the distinguishing features of skin is that light falling onto it enters the body at one point, scatters within it and then exits the skin at some other point, a process known as sub-surface scattering (SSS). Visually, the lighting is blurred. Some years ago, Henrik Wann Jensen, et al published a solution to the challenging diffusion theory equations, which allowed practical sub-surface scattering offline renderings. This work has been extended and built upon numerous times, and widely used in films. For example, Jensen’s SSS technology was used for rendering the Gollum skin in The Lord of the Rings, for which he received a technical Oscar.
“This model evolved to accurately render complex multilayered materials with the work of Craig Donner and Henrik Wann Jensen, and was even translated to a GPU by Eugene d’Eon and David Luebke, who managed to obtain photorealistic skin images in real-time for the first time. Unfortunately, it took all the processing power of a GeForce 8800 GTX to render a unique head,” explained Jimenez.
It was then when Screen-Space Sub-surface Scattering was born, aiming to make skin rendering practical in game environments.
“From its multiple advantages, I would like to mention its ability to run the shader only on the visible parts of the skin, and the capability to perform calculations in screen resolution (instead of texture resolution). Sub-surface scattering calculations are done at the required resolution, which can be seen as a SSS level of detail. The cost depends on the screen-space coverage: if the head is small, the cost is small; if the head is big, the cost will be bigger. So far, this covers the screen-space part of the technique name, but we’re missing what the separable word means in this context” explains Jimenez.
“The way SSS blurs the skin is as you can expect, very different to a Gaussian blur in Photoshop. It is defined by what is called a diffusion profile, which defines the accurate shape of the blurring. In particular, in the previous work this was approximated by using 6 Gaussian blurs, which were summed together to achieve the final blurred lighting. Mathematics told us that for accurately representing the skin we needed to apply all of these operations to approximate what is called a non-separable profile. Instead of strictly following these rules, we tried to make it numerically separable, and it seems it worked out. This means one blur instead of six.”
At GDC 2013 Activision showed examples of their work, not all from Digital Ira but similarly rigged models such as Lauren, one of the team’s first test characters that showed the subtle advantages of their approach in both accurate skin texturing and eye rendering optics. These combined effects including linear lighting workflow, physically based lighting, and special post processing (see below).
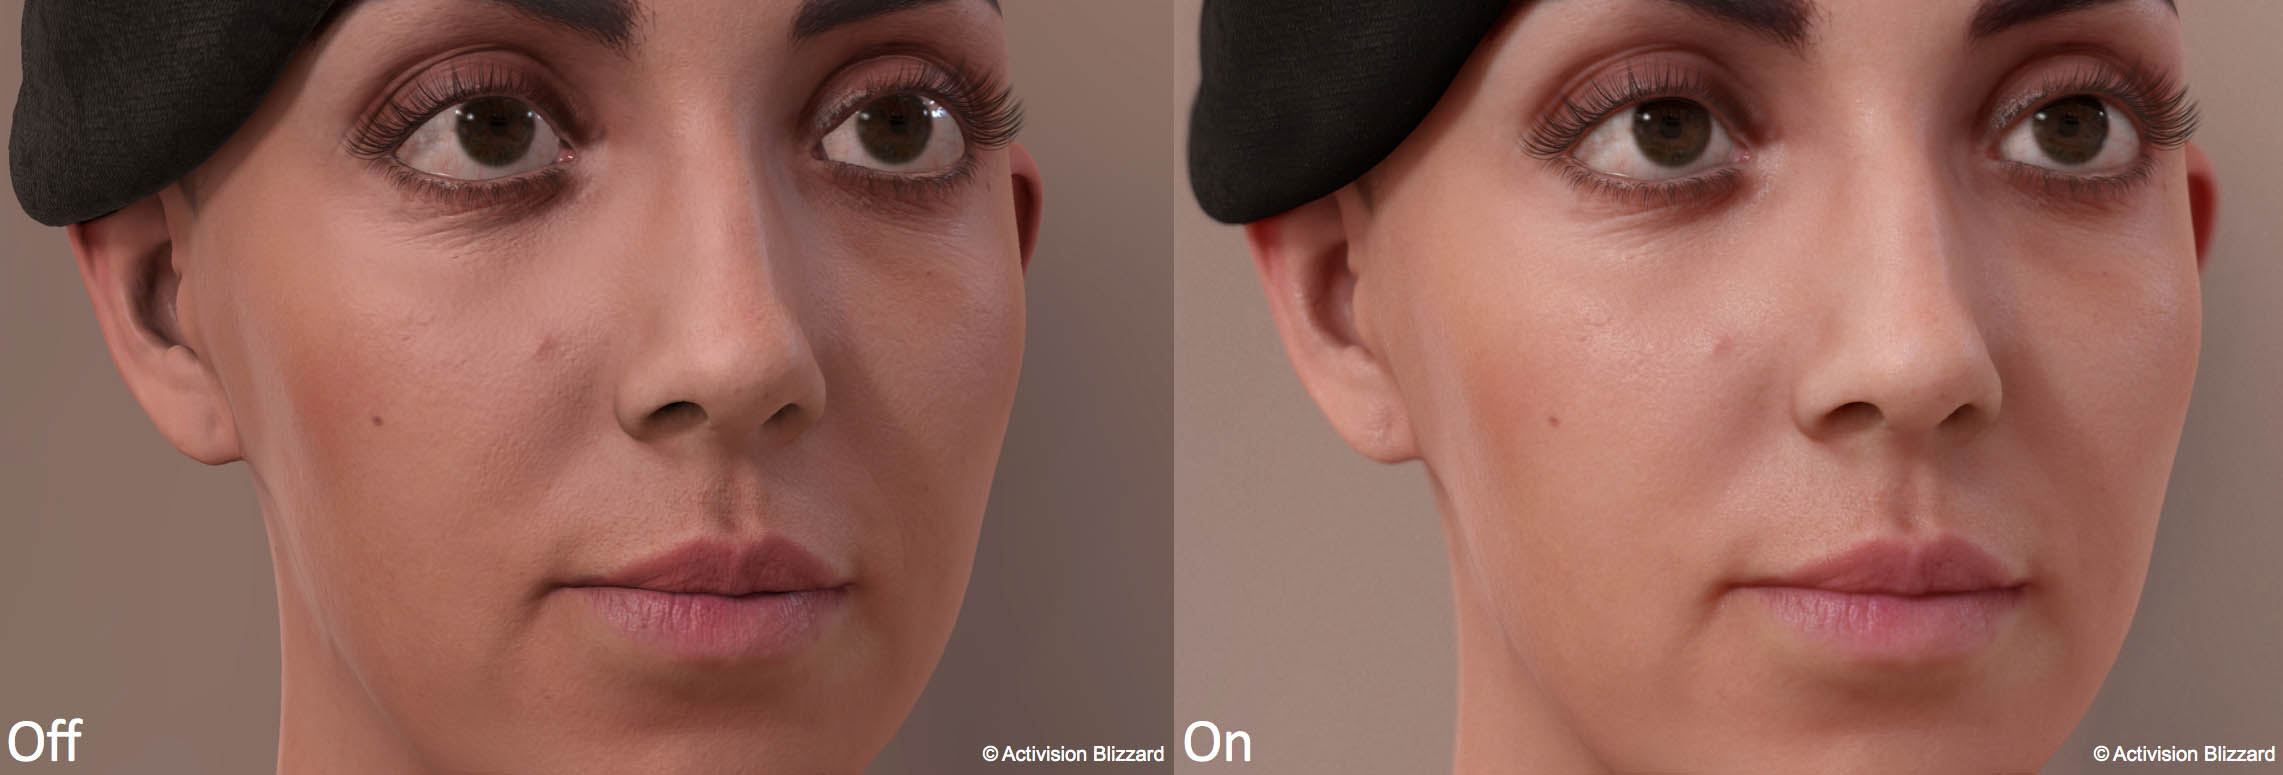
“The texture size is a hot topic each time we present our work! It’s usually thought that the realism comes from it, and to be fair, it’s a requirement – you need good data to start with. You can photograph a face and show it in a mesh in a similar capture render environment, and with little work you will get a photorealistic result. I’ve actually seen this trick many times, and it is very easy to fall into that trap. What we are doing is to enable the face to look photo-real in a consistent manner; let it be a harsh lighting setup with a single light and no ambient, to an outdoors scene in a cloudy day. I think the keys for facial photorealism include subsurface scattering, physically based speculars and eyes shading, as you mentioned. In particular, the micro-geometry is crucial for 1080p renders or for tight close ups. But it goes further than this, I think the key of the work is attention to details, and how many insignificant things can make a big difference when put together. A good example is that we’re even modeling the self-occlusion of pores,” explains Activision’s Jorge Jimenez.
“I like to see some degree of fuzziness in images”
“But also very important and usually underestimated is the effect of the post FX on faces. Depth of field and film grain help to make images more natural. Renders tend to be too perfect, and these are good tools to overcome this problem. I like to see some degree of fuzziness in images, let it be blurring or noise, that tricks me to believe it is real. In fact, as we’ve seen subsurface scattering in the end consists on blurring, and the micro-geometry can be seen as noise, which I think reinforces this theory”.
Lauren was captured by Infinite Realities, not ICT. But she has proven to be a great proving ground for Activision, and research on her informs Activision’s work such as Digital Ira.
“Lauren was key for our research, in particular because of the special facial features of the model. Her beautiful and big eyes made eye shading especially important. Similarly, subsurface scattering is important to soften her skin – as bumped skin looks particularly unnatural on women. This made this face specially challenging, and a very good research scenario,” comments Jimenez.

Note in this image below the Activision special specular shading greatly enhances realism. The team noted that “The key for character rendering is on the details. Perfection is the enemy of photorealism, overcoming it is the most important goal for crafting believable images.”

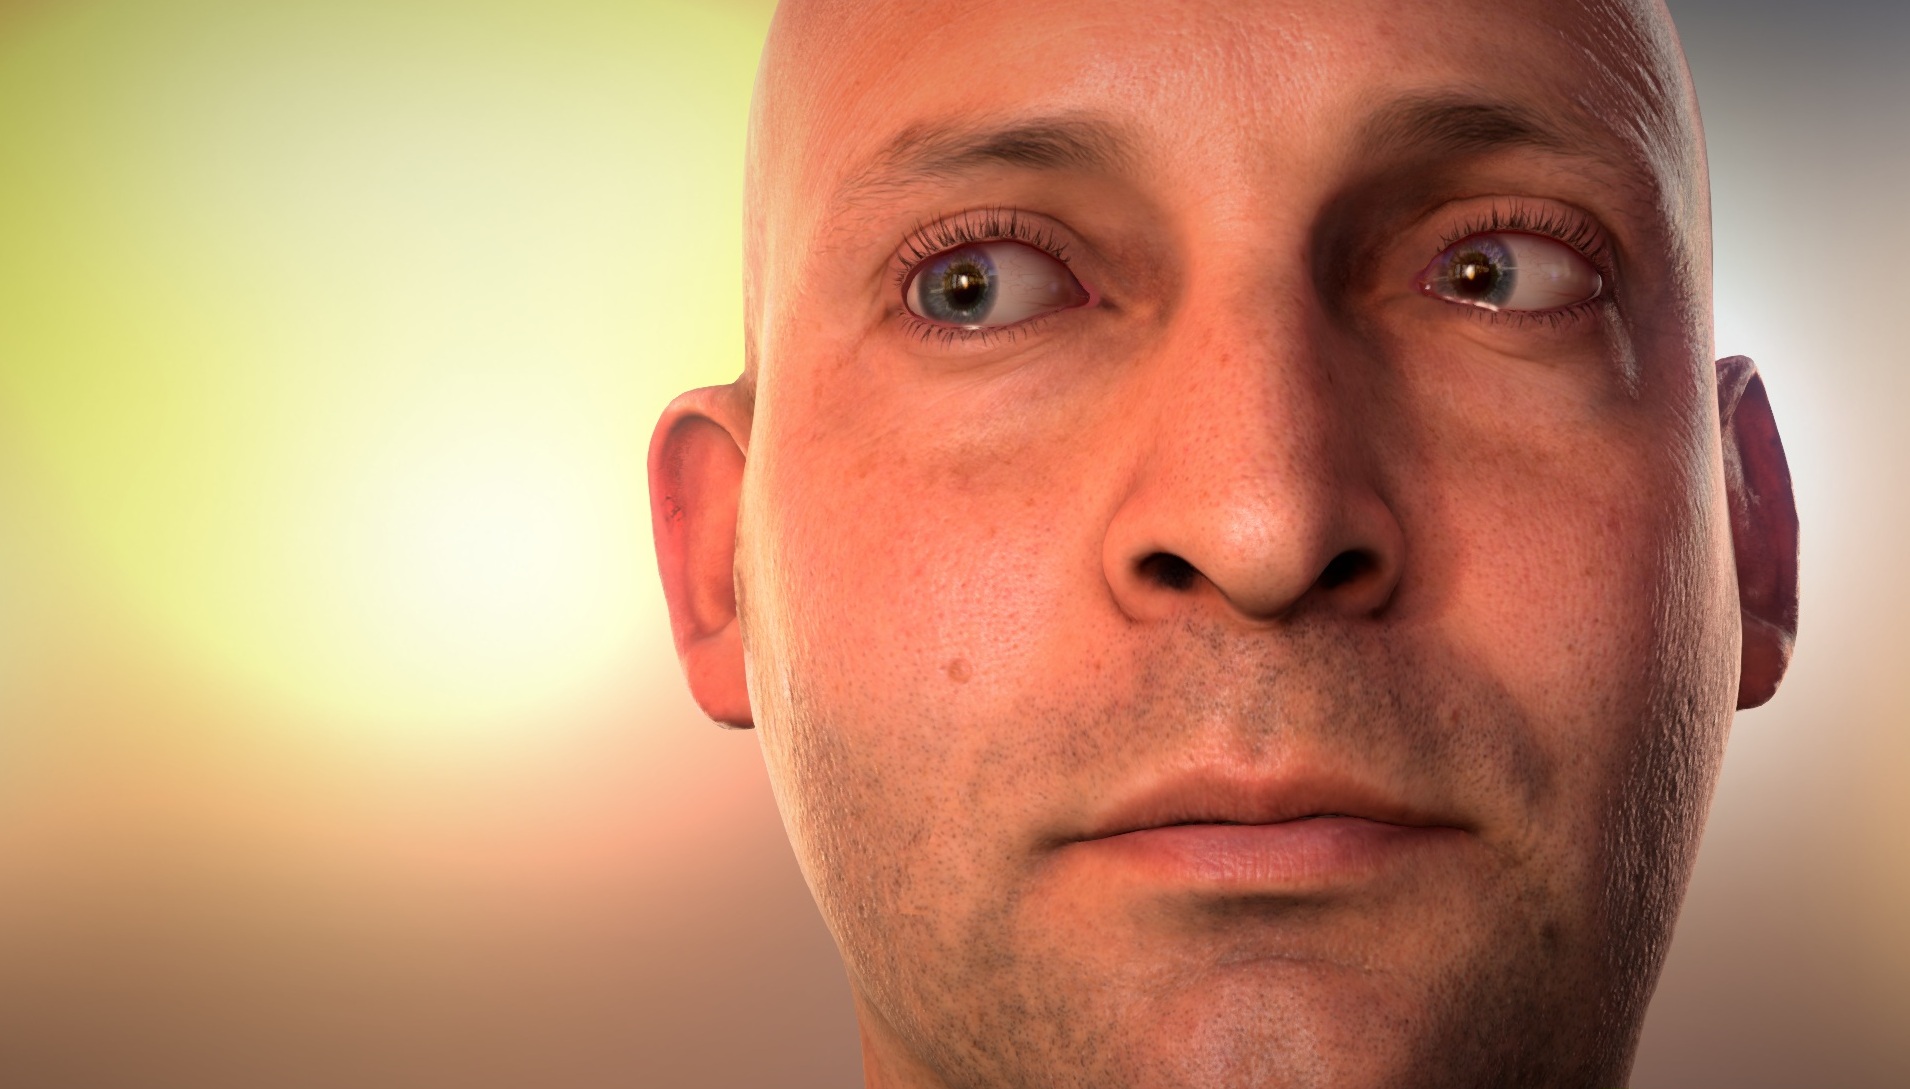
This work was based on and inspired by the ICT research on Measurement-Based Synthesis of Facial Microgeometry. In summary, this research captured micro-scale details for tiny patches of the skin – in this case below, the nose – and smartly cloned it over the face, which allows us to accurately capture the skin reflection structure and properties.
“I think the key contribution of the ICT research on micro geometry was showing the world how important is this feature for skin rendering”
“I think the key contribution of the ICT research on micro geometry was showing the world how important is this feature for skin rendering. They discovered the missing ingredient in the facial speculars recipe. Their approach consisted on measuring the data and doing a very accurate fit to render skin, which resulted in very large 16k x 16k maps. We figured out how to take this awesome work and make it practical in a game environment,” says Jimenez.
“We try to always start from research papers results (which are usually very accurate in terms of mathematics and physics), and then we try to reach the same visual results but with the constraint that we only have 16 milliseconds for rendering a frame. Each frame includes not only the face, but the entire surrounding environment. This involves finding out where we can relax the mathematics without breaking the visual results.”

“The ultimate goal is to capture, process, and render in runtime or near runtime; while not possible today, it will be in a near future”
The ultimate goal is to capture, process, and render in runtime or near runtime; while not possible today, it will be in a near future. Activision is keen to continue their involvement and their combined research. “ICT has great capture technology, we have the tech to compress it and to display it in runtime on current gaming laptops and next gen hardware. Our 2013 projects shows our mix of talents and goals complemented very well so it was only natural that we collaborated. We are working to continue our collaborations in the future”, says von der Pahlen.
NVIDIA’s Ira
There are two versions of NVIDIA’s Digital Ira. The first was shown at GTC in March 2013 and again at GDC a week later. This version was launched with the GeForce GTX Titan and there is a downloadable version here. The Demo will run on a range of cards but is real time (30+frame a sec) on a single Titan and above. Actually the first showing of Ira had him running on two Titan cards in a high end PC, but one is enough. The second version was a refinement that was shown at SIGGRAPH which not only had superior eyes and other improvements but ran on a Dev Kit version of a new graphics chip that is designed for tablets and cel phones. On the NVIDIA booth, at SIGGRAPH, Ira was running in realtime on a 4K monitor in real time and on a prototype mobile table, (NVIDIA’s Project Logan). It was incredibly impressive not only to attendees but to one of its own principal researchers. Curtis Beeson, senior researcher explained that:
“One of the best parts about it is that ICT captured it (Ira) at such high detail, that for the first time when I saw my demo on an enormous screen at a trade show it looked better than it had on just my monitor. For me that was very exciting: the more you see – the better it looks. It was nice not having to apologize for it looking bad when magnified so greatly. I love the work that the guys at ICT are doing because by capturing real world characters they are giving us a quality of data we have just not seen before.”
The work NVIDIA did with Digital Ira is part of a long term process of researching real time characters. Initially the idea had been to update their Dawn Fairy character from several years ago, but as Dawn 2 progressed Beeson and the team felt they were unable to make the sort of serious advance they felt they needed to achieve. “After much blood, sweat and tears, we achieved a look that was not bad for real time but it was not photorealistic,” says Beeson, “and the animation in particular had to remain subdued because if we tried to make her really expressive and emotive just using shapes and skinning, she would fall apart and look like an animatronic machine.So from our end we tried traditional methods, but when trying to achieve realistic human playback it just fell short.”
“ICT have been showing some pretty impressive stuff for years now”
The team then turned to ICT, “where they had been showing some pretty impressive stuff for years now,” says Beeson.
NVIDIA got various scans from ICT of Ari’s head as geometry, with a set of textures diffuse albedo, specular albedo, bump and displacement. The data provided to NVIDIA was similar to the Activision data but it was used differently. NVIDIA was provided with a Maya file, with the head and the blend shapes, and an enormous package of texture data.

“So we did ultimately use their ‘per vertex per frame weights’ for blending in the different textures like the color and the bump,” says Beeson.“I am not sure if this was an artifact of the solver or if perhaps the original capture faces did not fully represent the range of motion – but they provided a set of blend shapes for us based on principal component analysis of the animations themselves. In the end we controlled the vertices with skinning and with principal component analysis rather than strictly with the original weights into the static captures.”
But how did NVIDIA solve getting their Ira to run in realtime with full 4K texture maps?
The texture data needed to be transferred into something that could run in real time, but the NVIDIA team was determined to try and use the full 4K scans – and still run in real time. The final data that NVIDIA received used textures from 10 of the static scans. “That’s 10 targets each having four, 4K x 4K textures: the diffuse albedo, the tangent space normal, the displacement and the specular albedo,” outlines Beeson.
“The first thing we did was try compression on those textures, but the more interesting technique and the one that gave us the biggest improvement, was to notice that since the ICT guys did an amazing job on the stabilization (and lining up) of these textures so that if you looked at, the diffuse albedo of the neutral face compared to one where he was squinting – every pore was in exactly the same location – and all you would see is crows feet around the eyes where the diffuse albedo was capturing the difference in ambient occlusion.”
This lead the NVIDIA team to realize that a lot of areas, say on the forehead, did not change from Neutral for a particular FACS expression. “There is no change, so we tiled the face into an 8×8 grid of 512×512 tiles and started with the neutral head. As we added each of the key expressions we said ‘are any of these tiles indistinguishable from those already in the stack?’ So instead of having an array of 4K x 4K textures, we have a flattened array of 512 x 512 tiles and indices that map the initial expressions and regions to the new array index.” The team had reduced the data set by reducing redundancy in the data set without compromising the overall fidelity of the scans.
Regarding the second version of Digital Ira, it is not only running on new chips but it has other improvements which happened to be similar to the work done separately by Activision.
To be clear, Beeson states the SIGGRAPH version had to be sped up to run on the mobile chips. “We had to optimize it – there was no way we could have run it as is. That being said I think it looks better in some ways as we got to go back and tweak it.”
The NVIDIA SSS solution was a bit different. “We use a texture space blur,” explains Beeson. “The benefit of that is that if there are creases around an ear or eye, you don’t lose detail. For example, if the sun hits the skin behind the ear it should bloom out whether that portion of skin is on the screen or not If you do a screen space (SSS) it is not going to bloom out. You are not going to capture that detail where a texture-space blur would.” Of course, if you do a strict UV blur then you may blur areas not seen by the camera. To solve this, the team tempered their texture solution with a visibility map and disabled the blur for regions that can’t be seen.
 To compute the light transmitted through the skin, NVIDIA relied on the “environmental shadowing term” (see diagram left).
“Typically you have a small point light or directional light applying light in a frustum or extrusion from a small light source outwards. The environmental shadowing term flips that idea on its head in that the large external environment projects inward towards the smaller object of interest (the head), so it looks like a shadow frustum but with the near and far planes swapped,” explains Beeson.
We asked Beeson if NVIDIA had any interest in the separate R, G and B normals that ICT captures and uses in their hybrid renderer – and which can render in real time? “That is a good question – they provided the separate maps for red green and blue, as you described but we did not use them because they only provide SSS assuming no shadows. We compute SSS based on the full shadowed diffuse lighting term, so once you have that you may as well provide the same methodology for the n.l SSS as well.”
Early gaming engines used different blurs on R, G and B with more on R based on various measurements. Today the system is more advanced but similar and done in a UV space shadow map. “I guess, we blur all diffuse lighting and that’s what gives us our sub surface scattering term,” says Beeson summing up.
4. State of the Art today
In 2013 many films used Light Stage technology and digital faces and actors. Two huge films this year have been Gravity and Ender’s Game.
Gravity
Light Stage was used to scan Sandra Bullock and George Clooney in Gravity for Framestore, but the principal lighting solution implemented Debevec’s lighting reproduction approach to live action compositing from SIGGRAPH 2002 in the form of Framestore’s brilliantly deployed Light Box. Framestore/Third Floor’s previs allowed for correctly rendered image-based lighting environments to be shown inside the box, while the camera moved in and out to emulate the actors moving. In this way these shots keep the actors’ properly-illuminated faces and removed or replaced everything else with CG, making the faces sometimes the only non-digital part of the shot. This is covered in our fxguide story on Gravity.
But prior to Light Box solution, ICT was involved in tests with the production, and even filmed performances in a traditional Light Stage to test performance capture.
In the testing phase the notion was explored for fully rendering the actors’ faces and tests were done to explore this with the ICT Light Stages.
Early in the production Chris Watts was hired to investigate the possible ways Gravity might be solved technically. He joined the director Alfonso Cuarón as his LA visual effects co-ordinator. He organized a series of tests for the director to see what approaches might be used to re-light and animate lighting over an actor. The team tested a number of approaches in pre-production, including this one below using the Light Stage technology from USC ICT.
This is the Comprehensive Facial Performance Capture Video from Eurographics 2011. It is authored by
Paul Debevec, Graham Fyffe, Wan-Chun Ma from USC ICT plus Tim Hawkins of Light Stage LLC and Chris Watts, who was a VFX consultant at the time on Gravity. The actress seen here is Margarita Levieva.
The test done here was to see if a relighting option could be used via the Light Stage system developed at USC ICT which involved multiple high-speed cameras, time-multiplexed lighting, and stereo 3D reconstruction. This was not primarily used in the end, due to a number of factors.
Some shots in Gravity did use the Light Stage data as stated above, but this was from a later session, once both George Clooney and Sandra Bullock became the final cast. Each actor sat for static facial scans that were used as both reference and for those shots where fully CG faces were needed.
Actually, as an aside, the idea of filming an actor with a moving platform and a moving matching set of surround lights was also put forward by Paul Debevec and the team with their Light Stage 3 – see below. While the quality of the final comps are poor by today’s standards, especially in the last example of the moving pillars, tracking camera shot, the actress lit in Light Stage 3 seems to move in and out of shadows caused by the sunlight in the full CG environment that was feeding the Light Stage.
Ender’s Game and Oblivion
When the script called for Tom Cruise to fight himself in Oblivion, a digital face replacement was required. Tom Cruise had a full Light Stage scan done of his face and then Digital Domain replaced Cruise’s body double’s face and head with the digital version. Read our coverage here.
Another Digital Domain film to use the Light Stage recently was Ender’s Game. Set in space with complex weightless shot it shared many of the same issues as Gravity although their effects team worked in isolation. In the film Ender’s Game all the principal cast were scanned and again like Gravity most of the time the faces were live action and the rest of character’s body was replaced, but there were a range of body doubles where the entire actor is digitally made – especially for the weightless ‘battle room’ and the stunt work. Read our coverage here.
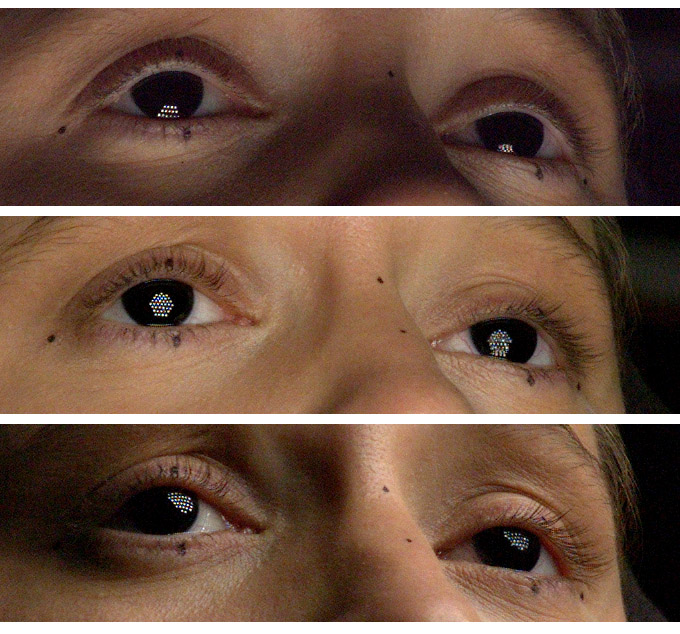
Eyes
One of the first things one looks at is a characters eyes. It is therefore understandable that between Digital Ira shown by Nivdia at GTC and SIGGRAPH – would be the quality of Ira’s eyes.
“We noticed that the transition from the eyelids to the sclera was too sharp for our liking in the original version of the demo, so we created a geometry that spans from the upper eyelid to the lower eyelid that we called the “eye overlay” geometry. We then used a sculpt deformer in Maya to get it to follow the other blendshapes of the face, and wrote a MEL script to generate a blend node that corresponds 1:1 with the other blend nodes of the face. The eye overlay geometry can then be driven with the same blend weights as the rest of the face,” explains Nivdia’s Curtis Beeson
 This “eye overlay” geometry permits NVIDIA to:
- Render the tear duct in the inner corner of the eyes,
- Render the interior flesh of the eyelids & socket,
- Apply a moving ambient occlusion texture that follows the lids when they open or squint, and
- Enhance the “subsurface scattering” term on the sclera of the eye by darkening the blue and green channels more than the red as the light falls off to shadow in the ambient occlusion area. This boosts the red scattering around the eyes within the eye socket.
“It is also worth mentioning,” adds Beeson, “that using a blendshape by itself might allow the eye overlay geometry to penetrate the round geometry of the eye ball and get “lost”. This is a common problem when using blendshapes alone for eye blinks. We have experimented with applying something akin to sculpt deformers in our vertex shaders in the past, but we were able to work around this geometric artifact by simply applying a “z-bias” in the fragment shader to “bump” the eye overlay’s geometry towards the camera.”
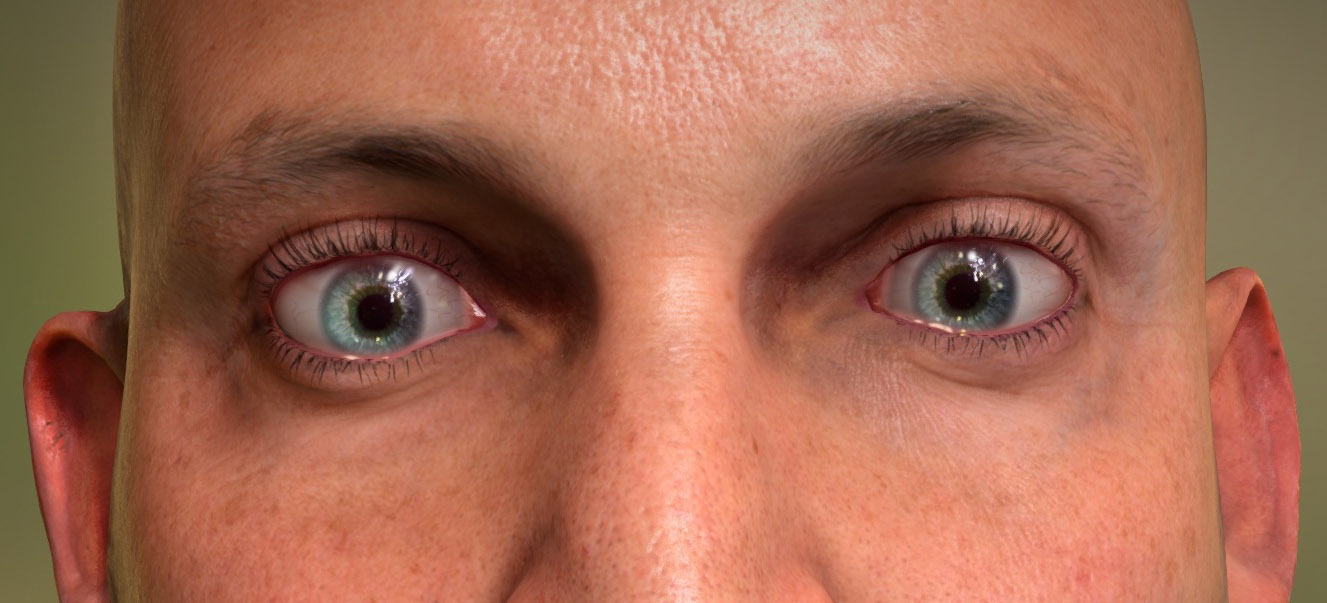
While eyes have not been central to the work at ICT, they are at the core of making believable characters and realistic digital human faces and they deserve special mention. Eyes are a very real key to solving digital characters. “When you look at a character you always look first at their eyes,” says Imageworks’ Scott Stokdyk.
That’s a point raised by multiple Oscar winner Joe Letteri who has put in enormous R&D efforts into digital characters’ eyes at Weta Digital. Starting with work coming out of Gollum in Lord of Rings and again still with films such the Hobbit, not only for Gollum but all the digital doubles of the human and human-ish characters, Weta has aimed to produce incredibly accurate models of human eyes.
“What we discovered in eyes is that they’re all about depth and really the only way to get that depth in an eye especially in close-up is to build all the geometry,” says Letteri. “We had a shot in Planet of the Apes where we were extremely close on the eye, in fact, we pulled through the eye and we looked at all kinds of techniques or layering textures to figure out how to make that work, and the only solution was we had to build all those fibers in the eye and the stoma. And so we decided to build an incredibly dense eye model and that became our reference standard. Of course, you don’t want to feasibly use that every time you see an eyeball because most of the time the detail’s lost and it can be reduced to textures.”
Jeff White at ILM agrees, suggesting that eyes are incredibly complex to get looking right. “That is really where the artistry goes. In particular in animation – but even getting them to look right – getting the right amount of scattering, not getting them to look really bright which can happen in a lot of early renders on Avengers where they would come out nuclear white, and getting the refraction right.” At ILM they have gone so far as to have written plugins for Maya so the animators can see the effects of eye lens refraction while animating “as it can change the eye line that much,” adds White. “I agree the eyes are where you have to pour so much of your time and still a very artistically vital step.”
Weta Digital breaks down eyes into layers. Says Letteri: “While there is no one formula for it, because every eye is different, you have to work out the best way for the particular eye that you’re rendering, how you would break it down and handle all that but it’s generally just going back to physical reality. Built the thing in as much detail as you can and figure out how to optimize it.”
Stokdyk agrees with Letteri on the importance of eyes and the complexity of getting them right, in fact he joked during our interview, “I can imagine you (Mike) doing an article 20 years from now about the latest eye shader that someone has only just published then. It is like a bottomless pit of research – and not that that is a bad thing. Doing work on human creatures will only help other non-worldly creatures and everything else!”
Stokdyk today believes faces and digital humans are still very hard and complex. He deliberately tried to reduce the use of digital humans on his film Oz the Great and Powerful, which he recently VFX supervised. “It is of course completely project driven,” he explains, having just bid a job he says would have been perfect for this style of technology, “and I would love to do that, but I have to wait for the right project to hire me!”
John Monos points out that today with renderers such as Arnold, with its state of the art SSS, skin can be rendered extremely well, removing some of the need to gain separate R,G and B normals. Stokdyk counters that SSS still does not solve his reductionist problem – it is still re-creating, not recording reality. “While I kind of agree with John that shaders have made huge advances, I still think some of the problems of CG humans are not completely solved with shaders and the fact you are separating the shading from the movement and the acting – is problematic.”
Jeff White at ILM points out that it is not even as simple as having a good SSS solution, it is how and by how much you apply it. “Accurate across the surface of the face is important. One of key things is how much it varies across the face. One of the real challenges is dialing in the SSS and how much it varies across the face.” White says that while on Avengers they were working with Tim Hawkins and the team at Lightstage LLC, they also “have a great relationship with Paul Debevec and we are always interested in all the new research he is doing on skin – the micron level sampling and working out what is happening with scattering at those very small densities.”
Stokdyk likes the approach of capturing the model of an actor while capturing how they react to light. “I would like to capture a real actor under lighting conditions that would be changed in post, full animation, and full camera independence. And every year we are getting closer and closer to that.” The camera independent part is the part that is the most challenging, he says. “To do that right now you have to separate the specular and the diffuse – and when you do that – that is when it gets dangerous – because then you have to look at how you are going to re-add it back.” Stokdyk calls full digital actors with controllable light and in particular an independent camera the “tough nut to crack”. He feels this has still not been solved successfully enough for him – yet.
Teeth and Mouth
Curtis Beeson points out that the eye blinks of Ari Shapiro caused scanning problems due to his eye lashes, in the same way the data excludes the teeth and tongue so he feels one area of research that is important is improving lip sync, or rather believable talking.
For example, on Digital Emily, ICT scanned a plaster cast of Emily’s teeth provided by Image Metrics. Below is a photo of the cast on the left and a rendering of Emily’s digital teeth model on the right.
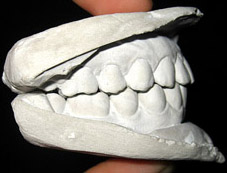
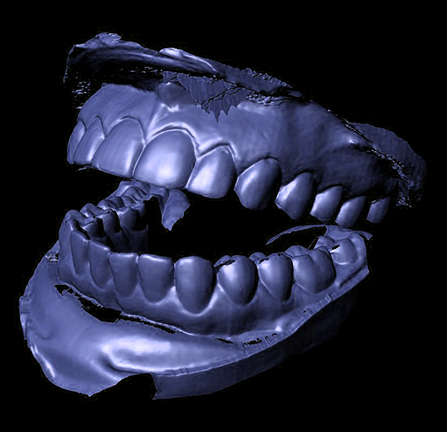
Since the ICT scans can’t scan inside the mouth (as it is occluded) and don’t scan teeth – in the standard configuration – a lot of this is left to artistic interpretation, which makes it much harder to get right. He would also like to add hair to Ira. “It is a fairly daunting task,” says Beeson. “I have written hair simulations before, but to take that synthetically generated hair and put it alongside the photographically captured Ira – I am worried it is going to look like talking a beautiful photo and then adding a building with crayons!”
Doing better and better natural human faces feeds many other aspects and styles of characters.
Beeson believes that the quality of the data being gathered and the rendering of normal faces at such a high level will mean “perhaps given this high quality data we will come to understand to synthesize it for artificial characters but I am just so impressed with the content ICT could create as opposed to what was created with more traditional approaches. They are able to create far more realisitic data and now your content is based on photographic captured reality. You can suddenly move to huge displays and it completely holds up.”
NVIDIA works with a wide variety of researchers and companies. “That being said,” adds Beeson, “the guys at ICT do tremendous work and they have been visionaries for a long time now.” NVIDIA is looking to do more work in this area – “I am definitely looking forward to working with them again,” says Beeson.
Art Imitating Science
In perhaps the ultimate case of art imitating science, the very ICT lab and some of its staff appear in the Robyn Wright film, The Congress. In the film an actress sells her image to the ‘Miramount’ film studio. In the trailer several shots of the Light Stage 6 can be seen.
“It is just used as a prop,” says Paul Debevec. “I had always thought that one of the Light Stages would make a nice location for a low-budget sci-fi movie and Ari Folman apparently agreed. Two members of my team running the Light Stage in the corner of the screen were given “Miramount” work shirts for the show and got paid to be in the film!”

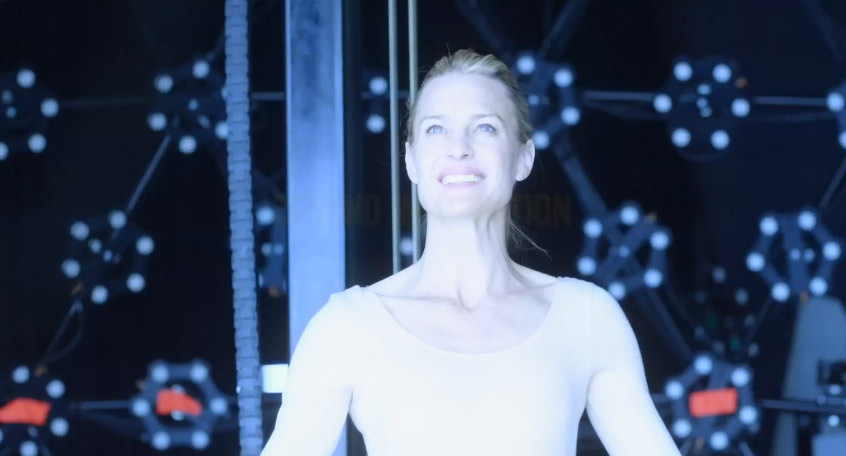
Inside Light Stage 6 now is a custom made Cyberware body scanner owned by Domi Piturro of Icon Imaging Studio. “Domi Piturro used his scanner in LS6 on its own to scan Robin Wright for The Congress, perhaps just to have a 3D model to burn-in to some of the computer screens,” laughs Debevec as he recounts the story. He also points out Light Stage 6 is used for digital humans – normally for full body scans not just faces as in Light Stage X. Here are examples of actors scanned were scanned for Journey 2 the Mysterious Island.


Have we crossed the point of being able to do fully digital character/actors?
Visual effects supervisor Janek Sirrs – who has worked on numerous digital characters from his time with The Matrix films to the The Avengers – believes a completely photorealistic film character hasn’t quite yet been perfected, but is possible. “It’s just a matter of time,” he says. “All these sorts of refinements and techniques will get us there. I’m waiting for that one moment where I’m never questioning for one moment that that was a CG character in a regular everyday scenario where there was no fancy thing to distract me. I think it could be there in the next two or three years.”
What’s next at USC ICT?
This week at ICT there was a special visitor, actress Emily O’Brien returned. The former The Young and the Restless actress has returned to acquired in a whole new set of FACS poses with the latest Light Stage X system. “The next digital version of her should be much better than the one in 2008!” commented Paul Debevec.

History of the Light Stage – http://gl.ict.usc.edu/LightStages
Paul Debevec’s home page – http://www.pauldebevec.com
Fantastic article. Great work and thanks for a great read.
What an amazing article!! As always … congrats FXGuide. Perfect!
thanks for the posts. These Articles do take a lot to research and so it is really nice to get feedback. I am particularly interested in this area, and I have so enjoyed watching it evolve over the last decade.
Mike
PS
Happy Holidays !
Pingback: Lab Notes - December 20th |
Pingback: Lab Notes - April 4th |
Pingback: Lab Notes - April 18th |
Pingback: Lab Notes - December 6th | The Capture LabThe Capture Lab
Pingback: デジタル・フロンティア-Digital Frontier | DF TALK | LightStage 解体新書 Part2
Pingback: Do we need actors anymore? A look at how far Face Replacement in VFX has come - wolfcrow
Pingback: Baby Beeson Mobile Home | disent
Pingback: Research: TEDtalk- Digital construction of human face (Paul Debevec) (ongoing) – BA Digital Arts